
 working with steel
I mentioned writing this up a few months ago, and I finally got around to doing it. This isn't a hard job unless you are missing the right tools. You need:
Combination wrench set
Ball joint tool (zdmak tools-same as for thrust arms)
Pittman arm ball joint tool (zdmak tools-different tool!)
(or pickle fork)
Allen wrench set
Notes:
As I remember, I used at least the 15mm, 18mm, 19mm wrenches. I believe the original nuts were 18mm size, and the new nuts were 19mm size. The center link arms were about a 15mm (I think). I probably forgot a couple, so have a few more in that range handy.
I used a pickle fork instead of the "different tool" because I did not have time to purchase the correct tool by the time I found out that I needed it. I would recommend using it. Do not use the pickle fork, it was NOT FUN.
The tie rod tool that I did not have:
http://zdmak.com/wbstore/main.asp?action=PROD&PROD=266H&CTMP=1&LowCt=0 (See post #5 below, this tie rod tool may not fit! Be warned!)
The ball joint tool I did have (thank the lord!):
http://zdmak.com/wbstore/main.asp?ac...CTMP=1&LowCt=0
The allen wrenches are used when they fit into the end of the ball joint studs to hold them in place while you wrench on them.
When you remove the tie rod ends, hold the center link arms in place and COUNT THE NUMBER OF TURNS it takes to remove them for EACH SIDE. Write it down for future reference. Otherwise, getting to the shop for your alignment may be difficult. This procedure REQUIRES a proffesional alignment afterwards.
The steps:
- Jack up the front of the car and support it with jack stands at the side jack points.
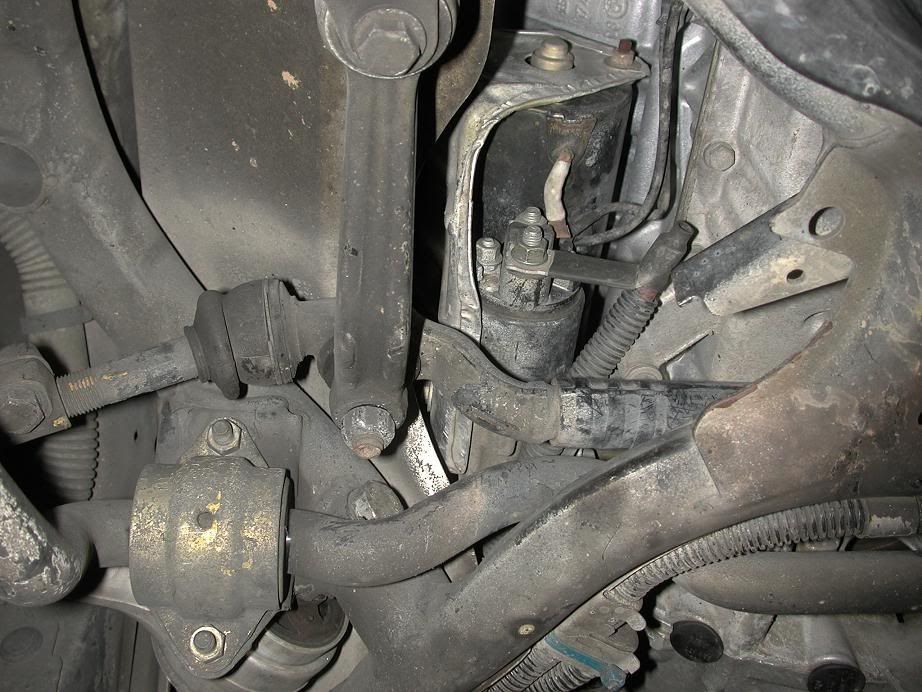
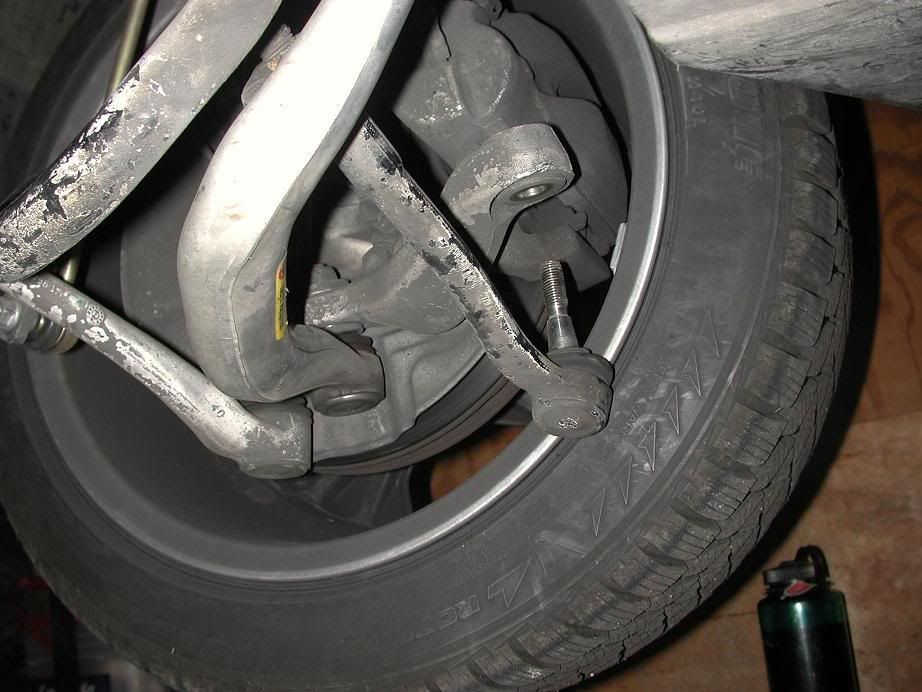
- Loosen and remove the tie rod end nut on the hub carrier. The nuts are removed in the picture and the ball joint threads are visible.
3. Loosen the nuts on the center link ball joints.
(Passenger side-Idler arm)
(Driver side-Pittman arm)
4. Position the wheel to maximize space around the tie rod end.
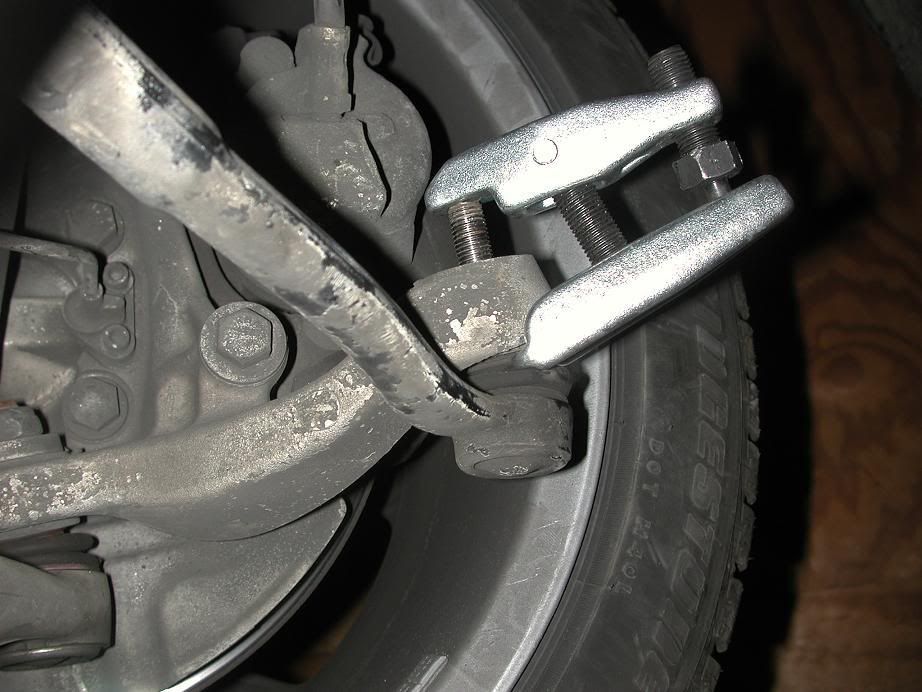
5. Position the ball joint tool over the tie rod end stud and start torquing it down. Go slow. I wore ear plugs during this part, because when the joint pops loose, it’s like a gunshot!
6. The wheel is now loose, and as you will notice, can annoyingly flop around. Use some blocks under it to keep it in place and out of the way. I did not have much, so I used my toolbox and the toe of my shoe to hold the wheel in place when I was working on that side. It was a little strenuous.
7. Now remove the tie rod end from the center link completely. Loosen the pinch-bolt on one of the tie rod ends. With an open end wrench on the center link arm, start twisting the tie rod end so that it unscrews from the center link. Count the number of turns necessary! Loosen and remove the other side as well. Write the number of turns down to remove each tie rod end, and when you put the new ends on adjust them to the same number of turns.
8. Repeat the previous steps on the opposite side of the car. Both of the tie rod ends should now free of their hub carriers and removed from the car.
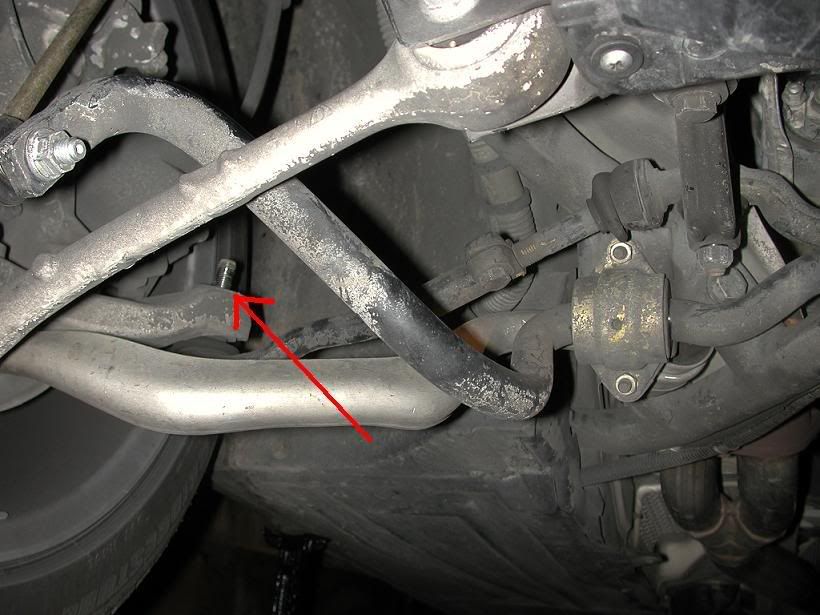
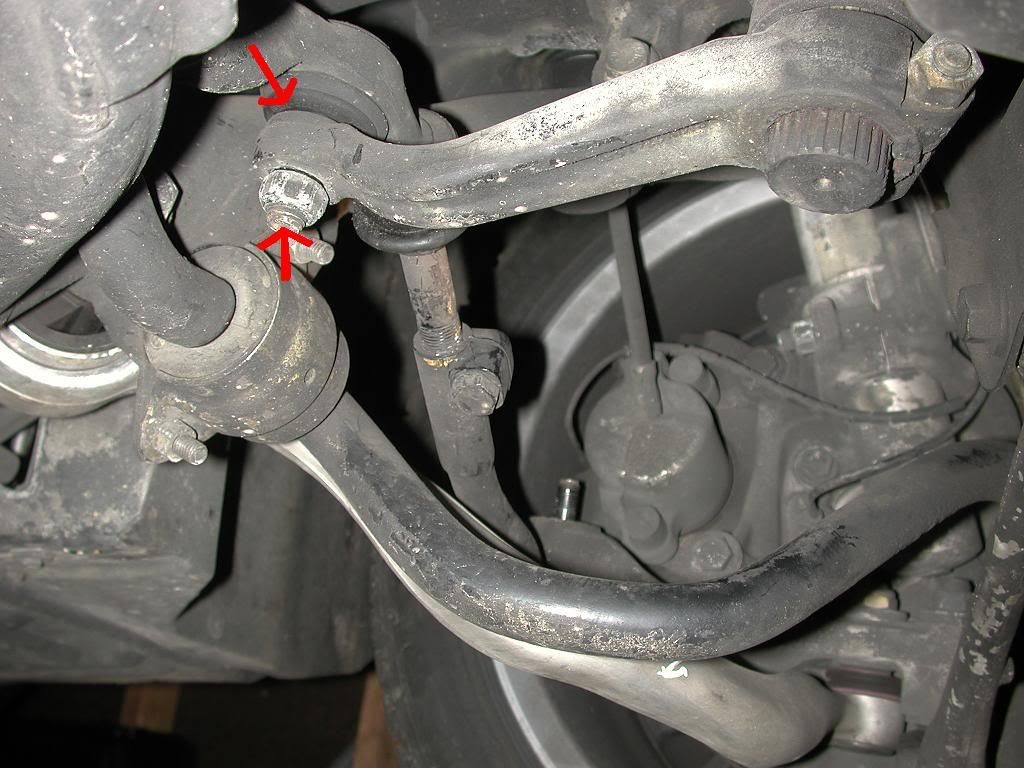
9. When both wheels are loose from the tie rod end studs and the tie rod ends are removed from the center link, its time to remove the center link. This requires the Pittman arm ball joint tool on both of the studs. I did not have this tool, but was successful with a pickle fork. The pickle fork took about 30 minutes per joint due to the fact that I was lying on my back while hammering upwards. If possible, use the BMW (or replica) tool. Due to my inconvenient situation with the pickle fork, I do not have picture of this process. The BMW tool fits at the areas indicated by the red arrows (remove the nut first!).
10. If using a pickle fork, the tongs will fit over the seal at the top arrow (again, remove the nut first!).
11. Remove the nuts and use the appropriate tool to pop out the stud. Again, ear plugs are recommended.
12. Now to remove the center link from the car. Ensure that the wheels are turned out of the way. Adjust the center link towards the passenger side of the car, and separate the center link from the idler arm. It’s a bit tricky, and you will have to adjust the position of the link and idler arm slightly to get it to the correct point where the ball joint stud can come free.
13. Once the idler arm side is loose, move the center link towards the driver side of the car. It will be necessary to adjust the link minutely while applying some force to separate the Pittman arm from the center link ball joint stud. This was not the hardest part of the project (that was using the stupid pickle fork) but it requires some tweaking. It took some time to find the specific alignment of components needed to remove the center link.
14. Slide the center link out of the car, while noting the orientation. The new center link should slide in the exact same way. Don’t put it in backwards!!!
15. Perform the reverse of removal for installation of the center link. This means: Slide the center link into the framework and into position. Face it the same way as the old link was.
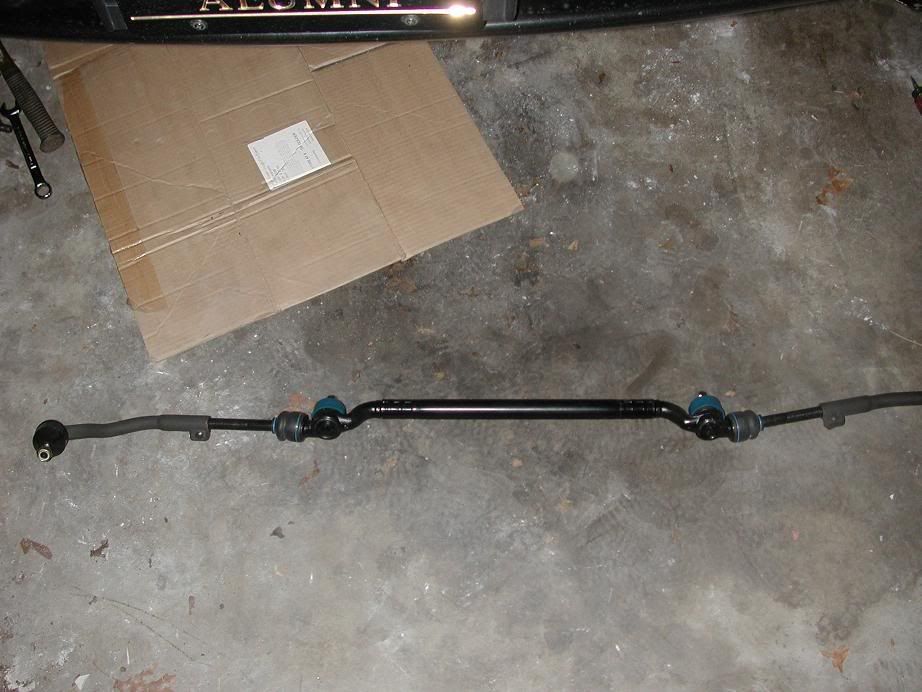
16. My new stuff is pictured below!
17. Move the driver’s side Pittman arm around until you can get the stud into the hole and put the locking nut over it to make sure it stays put.
18. Move the assembly towards the passenger side and get the ball joint stud into the idler arm hole and put a nut over it.
19. Tighten both nuts down. I made them pretty tight (presumably a similar torque to what I used when I removed the original nuts).
20. Remember you wrote down how many turns it took to get each tie rod end off? Install the tie rod ends. Use an open end wrench to hold the end of the center link in place, and twist the tie rod end on to the same number of turns you used when removing it. Unfortunately, this will be incorrect. It is NECESSARY to get a professional alignment done after completing this project. Using the same number of turns should get you to a point where the car is drivable for a short distance so you can get to the dealer.
21. Install the tie rod ends into the hub carriers, and torque down the nuts.
22. Double check the torque at each point.
23. Lower the car and get your alignment done.
Enjoy the tight-as-new steering!
If you have ANY questions, feel free to PM me!
-Chris Barkow
Last edited by cdb3113; 10-22-2007 at 05:21 PM.
Member
thanks very much for the detailed write-up.
working with steel
no problem! I am gone for the weekend, but when I get home I can add torque values. Hope this helps somebody!
Member
This is great - thank you!!! I've got this job coming up...
Member
Hey all
Just wanted to add my 2 cents to this writeup since I just completed the same job.
I bought the same 2 tools from ZDMak but had zero luck with the Pittman arm ball joint tool. Its throat was just too small for the center links ball joints at least on my 97 540. A pickle fork wasnt working well either so I removed both tie rod ends and disconnected the Pittman arms connection to the splined steering input and the idler arm connection to the chassis. While doing this, note that the splined shaft has a tiny line indicating where the Pittman arms pinch connection gap should be.
I then was able to remove the center link with Pittman and idler arms still attached. Once out, I applied the same $40 tool used for the tie rod ends (not enough room for it while installed) and easily separated the ball joints. Then fish the new center link into position and reinstall Pittman (noting correct orientation) and Idler arms.
Hope this helps someone.
-The Fly
working with steel
The tie rod tool was too small?? That isn't good news. I did manage to remove those both with a pickle fork, but it really was no fun.Originally Posted by the fly

I just changed the idler arm bushing last month, and I ended up using a rented gear puller from Pep Boys. It worked great... but I don't know if it would work if the parts had been on there longer than a year. Maybe?
Might be something to try though, for you other people out there!
Rollin' Down Rodeo
Great DIY. Add that one to the sticky Jamie!
Another option (what I use): http://www.lislecorp.com/tool_detail.cfm?detail=732
Air chisel with pickle fork attachments.
working with steel
heh, I had my 20oz hammer with me at the time... so it got some heavy use. Seriously took 30 minutes for the pittman and idler ball joints... never again, lesson learned!
Member
Thanks for the write-up! It was very useful for doing the job.
I wanted to post a couple of notes on this as I just completed the job last weekend.
For the inner ball joints, I was able to remove them with this tool from Harbour Freight:
http://www.harborfreight.com/3-4-qua...tor-99849.html
The arm that I purchased was from BAV auto. the arm appeared to be noticeably longer than the original so I measured from center of the ball joint to the end and marked the new ends with tape to get it as close to the original. With the longer ends, counting turns was going to be way off.
I have pics of the tool on the car and the old arm and new arm comparison but for some reason, I can't get pics to work here.
Member
Another way to separate the parts (tie rods, ball joints, etc.) is to wedge a long pry bar between the two components, have someone apply as much pressure as they can (my g/f stood on the bar) and wrap the outer component sharply with a smallish hammer.
The vibrations of 3 or 4 smacks is usually enough for the tie rod end to pop free.
Member
If that doesn't work use a torch. IDK if necessary for our cars, but for 20+ year olds, it's a must!
Member
When I did mine I had to re-use the tie rod ends so I couldn't use pickle forks and hammers weren't knocking them loose. I went to Advance and rented this kit:
http://shop.advanceautoparts.com/web...92_T%7CGRP2083___
The tool on the far right popped all the joints easily, and kept my boots intact.
The only issue I had with the whole affair was getting the center link back into the pitman and idler arms- that was a real pain and took 30+ minutes all by itself.
.
Last edited by copracr; 03-06-2011 at 06:17 PM. Reason: Automerged Doublepost
Member
Bentley and TIS refer to the use of a measuring drift to ensure the idler arm and pitman arm are at the same ride level setting. This is ensure that as the suspension settles in, the toe on the left and right remain identical, and optimizes straight ahead travel on uneven road surfaces. In all the DIY's on the tie rod replacement/overhaul or front end overhauls, I've never seen a mention of this. Interestingly, some folks who've done this have reported problems with trammeling and alignment difficulties. I can't find an independent (of stealer) source but it looks simple enough to make from some 12mm rod. Anyone have an informed opinion on the need?
Member
Did this over the weekend, took about an hour or so.
Here are my notes for those interseted:
I removed the idler arm from the vehicle rather than trying to pop the ball joint under the car; I couldn't find an angle with enough clearance for the puller I was using.
I popped the pitman arm's ball joint under the car, using the L-shaped puller in the harbor freight 5-peice puller kit. It's a tight fit and required a few good whacks with a small sledge to get it on, but once it was on it worked great, just remember to leave the pitman's nut on the bolt to give some extra bite area for the puller.
I used the same L-puller on the idler arm ball joint after the center tie rod was removed from the car, again with a couple blows from a sledge to get it on all the way.
Also, to remove the outer tie rods from the wheel knuckle, I used the large C-puller in that same kit. Again, leave the nut on to give more area for the puller to push on.
spoolin'
I'm getting ready to do this tonight. I'd also suggest replacing this bushing on the idler arm
2-21-1-136-452-M270 $18.00 1 $18.00
Idler Arm Bushing, 27mm, 633CSi (09/82-1984), 635CSi (1985-89), M6
(1987-89), 528e/535i/M5 (09/86-1988), Each - Brand: Corteco

1985 325 - 5 speed - LSD - M50NV - MS2/extra - AEM UEGO - TiAL MV-R - 750cc injectors - HX35 - Blunttech Manifold - 3" exhaust
1991 318i - 5 speed - M50NV - e36 rack - Smileys
spoolin'
So I finished this job today and have a few comments to add:
A) I would suggest replacing the idler arm & that bushing I listed above. According to M5board, it commonly causes play in the steering. I tried pressing mine out and failed, so I ordered a new arm with bushing preinstalled. M5board seems to think the bushing should be able to be pressed out rather easily so I may have experienced unusual difficulty. My car was built 6/96 and the bushing was corroded/chemically welded in place.
B) I used a pickle fork for the whole job. It was easy and worked well, although I did mark up my steering knuckle a bit. I found that by turning the steering, I was easily able to place the pickle fork in between the upper control arms & the body of the car, and then wack the pickle fork from the front of the car. Everything came off in minutes.
C) I don't suggest the "thread/turn counting" method to maintain your alignment. Instead, pull the entire center link/end link assembly out as a whole and carefully measure it. Assemble and adjust the new assembly outside of the car, then install as a whole. My car tracked straight afterwards and seemed fine during the 8 mile drive to the alignment shop. I noticed the threads on my new tie rod ends started at a different spot than on the old parts, so counting threads or even measuring the threads themselves will result in an erroneous toe setting. All my original parts, excepting the idler arm, were factory TRW and replaced with TRW parts.
1985 325 - 5 speed - LSD - M50NV - MS2/extra - AEM UEGO - TiAL MV-R - 750cc injectors - HX35 - Blunttech Manifold - 3" exhaust
1991 318i - 5 speed - M50NV - e36 rack - Smileys
Member
I removed my idler arm from the car and brought it to the auto part store and they removed the old and installed the new bushing for 10 bucks.
'17 BMW 330i XDrive MSport Touring
'20 BMW R 1250RS Imperial Blue Metallic-Exclusive
'02 BMW Z3 2.5i Titanium
spoolin'
I think something was up with mine. I've pressed stuff in and out before without a problem.
1985 325 - 5 speed - LSD - M50NV - MS2/extra - AEM UEGO - TiAL MV-R - 750cc injectors - HX35 - Blunttech Manifold - 3" exhaust
1991 318i - 5 speed - M50NV - e36 rack - Smileys
working with steel
I'd like to add that I've since replaced my tie rod ends once more (PM), and instead of counting threads, I simply measured the original installed length from ball joint to ball joint, and made the new ones match. I didn't need an alignment afterwards even.
Member
I just did this repair myself, I thought the same thing!! I marked them and put them to where they were before, but I thought to myself, is this an adjustable thing I need to consider?? How far up or down it's supposed to rest. I'm going to check in to this.
+1. At the very least :/
Also, although they had minor play, on a zero play spec, my steering still feels a bit strange. I did my own alignment at the shop I work at but it still feels strange... At 150,000 miles does anyone have any input on adjusting the actual steering "rack"? I heard there is a screw on top of the recirculating ball steering system that you can adjust to close the gap between the inner gears a bit. Any input would be sweet :/ maybe I'll keep looking on the forums
Last edited by mathaiser; 01-03-2012 at 11:57 PM. Reason: Automerged Doublepost
spoolin'
Replacing the tie rods shouldn't affect ride height so adjustment isn't needed. Also, if your car is like mine, you probably won't be able to adjust the pitman arm at all as mine is frozen solid.
I think I'm chasing the same ghosts as everyone else on this forum. There is a nut on the top of the steering box but it's pretty hard to get to. I have small hands and was able to get a wrench on it, but unable to loosen the bolt with the small wrench needed to fit on the box. I'll be replacing the last of my control arms this weekend and if that doesn't fix the steering, I'll probably try to adjust the box one more time. Alternatively, I may snap and buy an M5 box
1985 325 - 5 speed - LSD - M50NV - MS2/extra - AEM UEGO - TiAL MV-R - 750cc injectors - HX35 - Blunttech Manifold - 3" exhaust
1991 318i - 5 speed - M50NV - e36 rack - Smileys
Member
^
As homer Simpson would say,
"Mmmmmmm M5."
Heh
Member
Im about to replace my center link in my 540i, just out of curiosity why are you guys exactly removing the pittman arm ball joint on or off the car at all? From what im reading im planning to remove the driver side tie rod ball joint and remove the pittman arm completely, then simply remove the center link from the idler stud and passenger tie rod end by twisting the centerlink off the rod end..
Im replacing the center link assembly so where and why does the pittman ball joint removal need to take place?
spoolin'
A) That ball joint is on the center link, not the outer tie rods so it needs to be separated from the pitman arm.
B) Most of replace the outer tie rods at the same time
C) The pitman arm is installed at a set height and needs to be reinstalled properly if removed. Leaving it on the car is dead simple.
D) The pitman arm is usually hard to remove.
1985 325 - 5 speed - LSD - M50NV - MS2/extra - AEM UEGO - TiAL MV-R - 750cc injectors - HX35 - Blunttech Manifold - 3" exhaust
1991 318i - 5 speed - M50NV - e36 rack - Smileys
Member
Thanks for the reply..
I know the ball joint is on the center link, as its on the new center link im going to install.. it didnt make sense to me why its being removed when its part of the trashed assembly..
So I guess since im unfamiliar with steering in general I will take your advice and not remove the pitman arm, although the job seems much easier to remove it..
Although im still unclear how im going to remove the ball joint from the pitman arm as its been said the tool doesnt fit, and pickle fork doesnt really fit either.. Also what are the best value/quality outer tie rods that wont need to be replaced so often?? let me know thanks
Last edited by PokerIzWork540; 04-15-2012 at 02:35 AM.
 Posting Permissions


 Reply With Quote


Bookmarks