
 Member
MODS: Feel Free to add it in the DIY forum/section.
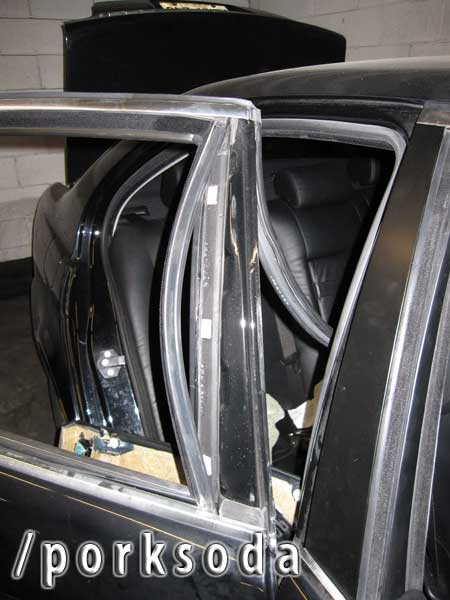
Here is the DIY for replacing the exterior B-Pillar. They come in two flavours one is stock matte black painted or high gloss
M-Sport/M5. A lot of these matte black ones get paint chips and eventually bubble up from rust and look like poop. You can
buy a set for 120 or so from various dealers or some have taken the route of putting b pillar stick ons that cover the b pillar
with carbon fibre or chrome or any other kind usually bought from ebay. I prefer to keep the stock look and ordered them from
tischer and decided to do a diy as there is little to no info on how to replace these. Surprisingly this was fairly easy and
took me couple of hours to do all 4 doors.
Tools Needed:
- T20 Torx Screwdirver
- #2 Phillips Screwdriver
- Flathead Screwdriver
- Interior Panel Removal Tool (OPTIONAL)
- Pick Tool (OPTIONAL)
- Flashlight (If not working outside in the sun)
- Patience
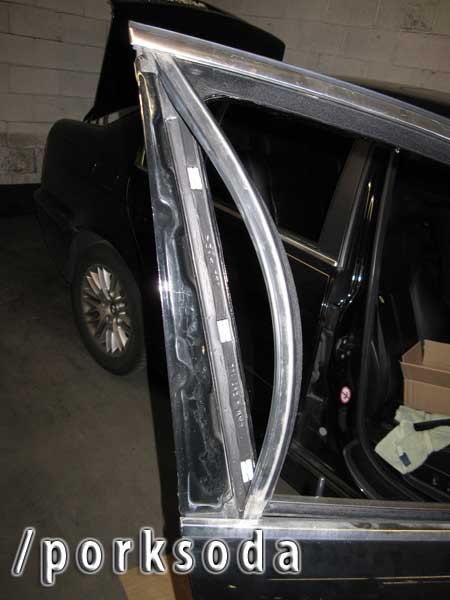
I only ordered the moldings for the doors... in retrospect I should have ordered the ones for the tiny window (rear window) as
well as the old b pillars get greyed out over time from weather so I probably have some mismatch there but it's not as obvious.
- MOLDING, COLUMN B FRONT LEFT - 51328159871
- MOLDING, COLUMN B FRONT RIGHT - 51328159872
- MOLDING, COLUMN B REAR LEFT - 51348159873
- MOLDING, COLUMN B REAR RIGHT - 51348159874
Overview:
This was by far one of the most confusing things to research. I decided to order the parts and tackle it as I was reverse
engineering it. I found you have to remove the inside window trim (thanks to many for the hint), to remove the trim you have
to also remove the plastic cover that goes around the door, to remove that you have to remove the door panel.
Note: You maybe able to skip all parts and start from step 16 for front door and from step 5 for rear door. For me the inner window
trim was very hard to pull and i did not want to risk ripping it so i decided to take everything apart.
Basically I started off by removing the door and going on from there. Hope this helps to all the diy'ers who have not replaced
their b pillar and hopefully this will help them to replace it so they dont have to look at the rusty bits. I will post diy for
two doors, front right and rear right. I will concentrate mostly on the b pillar removal and install if you have any questions
about removing the door feel free to look for BSW's speaker install videos that show you how to remove the door panel.
Front Right Door:
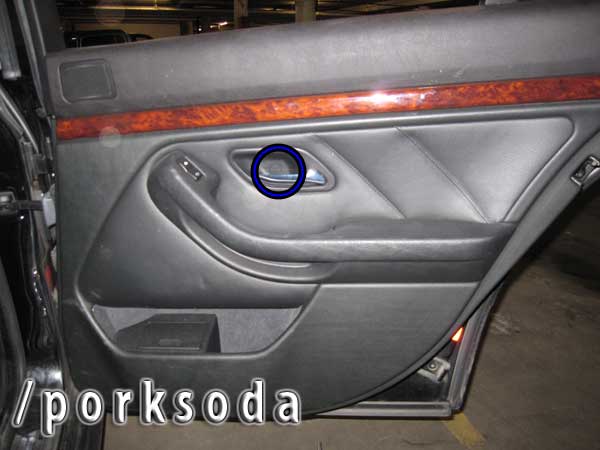
1.
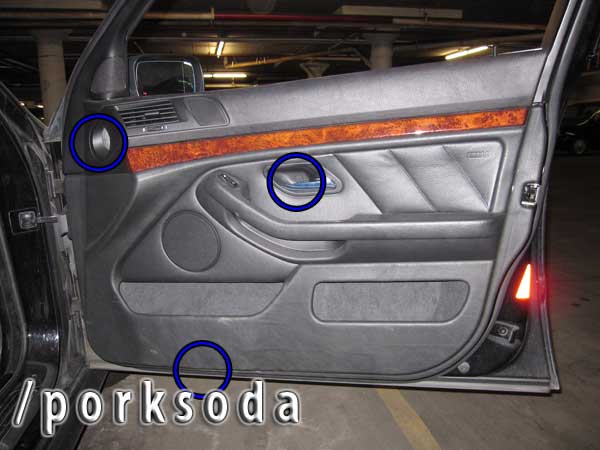
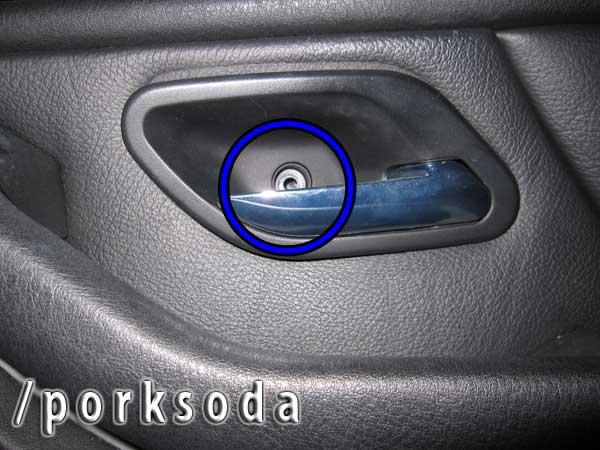
To Remove the Door you have to remove two screws and a courtesy light circled in blue.
2.
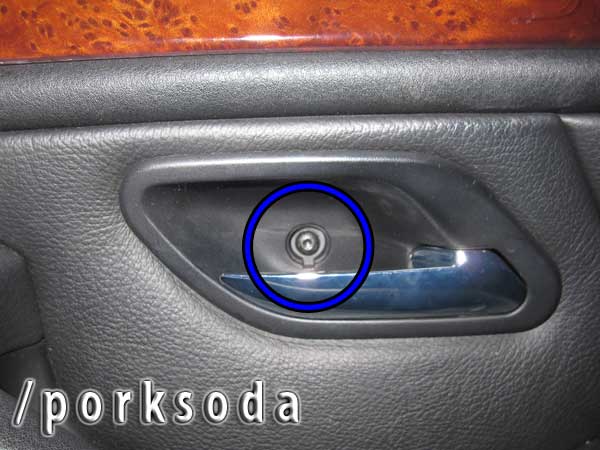
First close the air vent and remove the Phillips Screw (Use #2 Screwdriver).
3.
The Screw when loosened won't come out unless you have a magnetic screwdriver so just reach in and pull it out.
4.
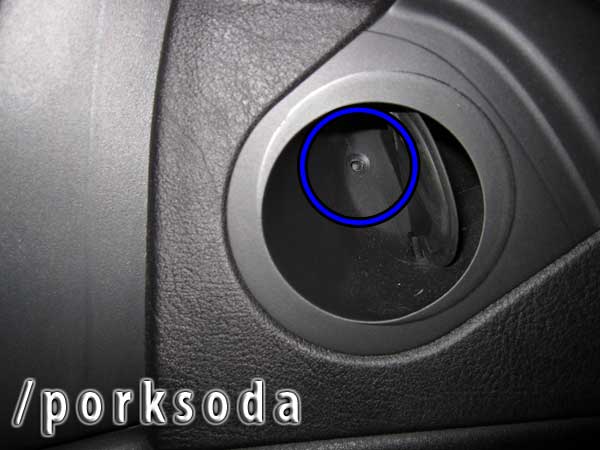
Very carefully use your nail or a pick to remove this cap, be careful not to scratch it.
5.
I am told this maybe a phillips head or a torx for me it was torx and T20 so go ahead and remove this.
6.
When the door handle pocket is loose do not pull it as it stays with the door and when you remove the door you are going to
have to slide it out of the hole.
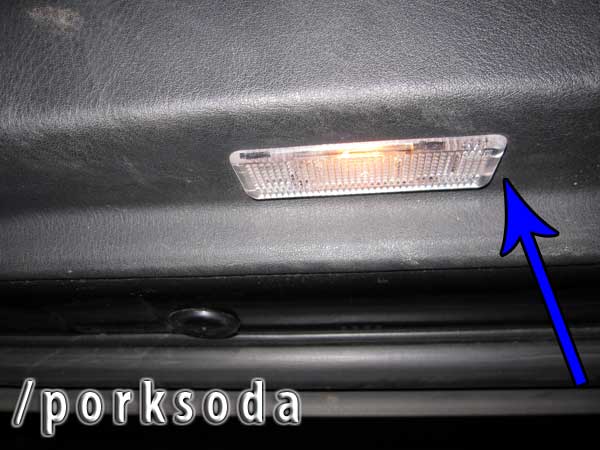
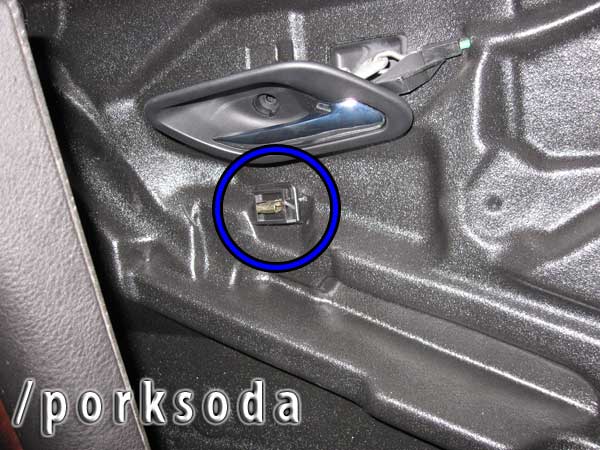
7.
Underneath the door and on the door skin is the courtesy light it is secured by just a tab.
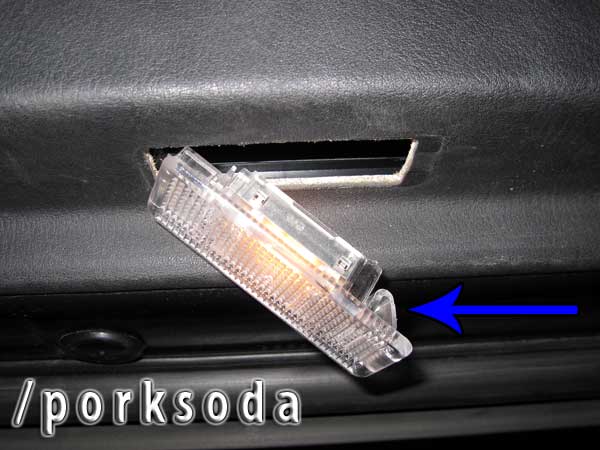
8.
Use the panel removal tool or a flathead screw driver to pry it open, you can see the tab below.
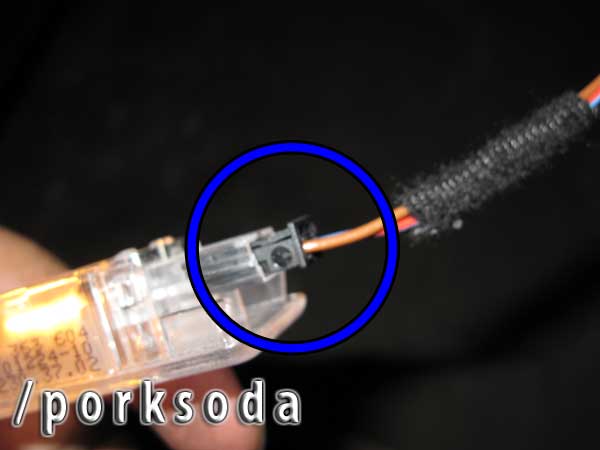
9.
You will have to remove the cable for the courtesy light and be careful not to touch the bulb.
10.
You don't have to remove the door card completely off but it's easier to do so... please look at the BSW video on how to
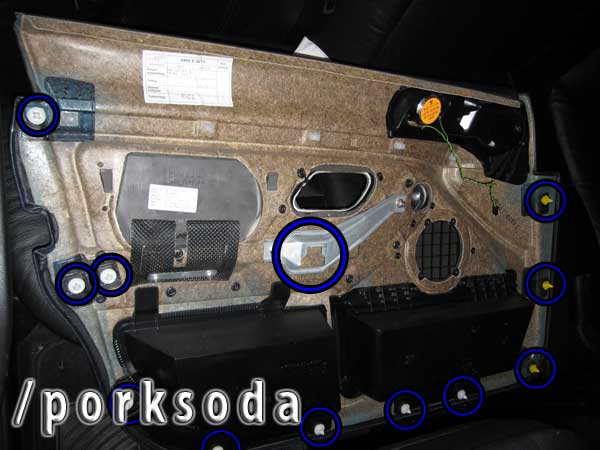
remove the door card to fully remove it. Below are circled all the tabs that go into the door, including the big plastic piece
in the middle of the door.
11.
Below is shown the plastic piece that secures on the door, more than likely the piece is still stuck on the door so use needle
nose pliers to depress the tabs above and below the metal and slide the plastic piece out... we will have to mount it back on the
door before reinstalling the door card.
12.
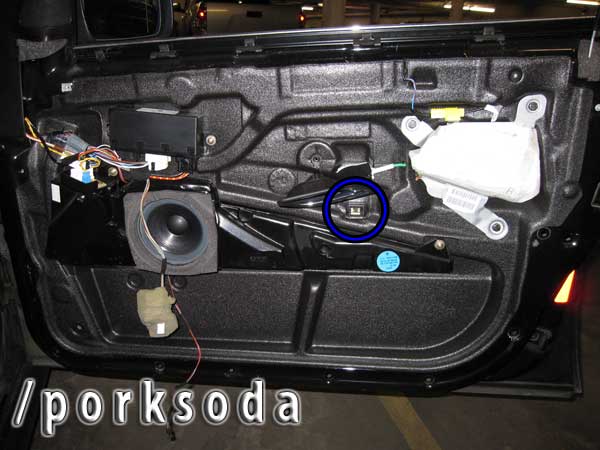
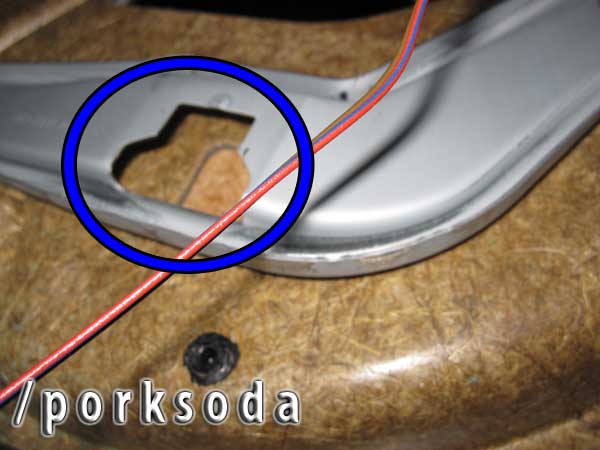
This plastic trim piece needs to be removed, be careful not to break the tweeter grill and/or damage the tweeter itself.
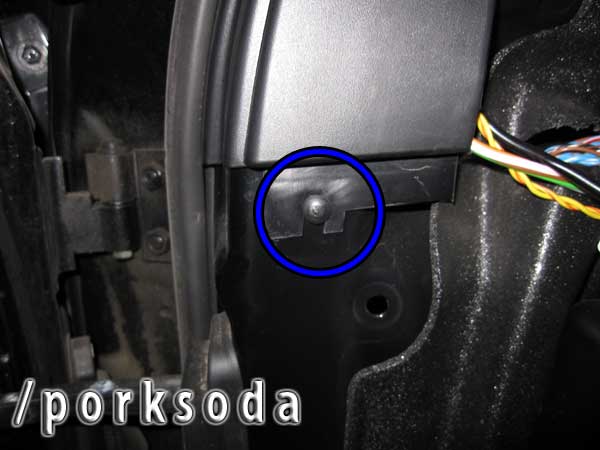
13.
Use the trim removal tool or a flathead to remove this grommet/screw. (This is located just below the tweeter)
14.
Now we can start to pull this plastic piece off, be careful not to crack it as you will have to order a new one.
15.
The whole of the plastic trim removed, this is one piece and has a weird funky wire going to it, I suspect the wire is a audio
sensor that determines the wind noise when the windows are open to adjust the volume accordingly.
16.
The plastic piece removed in step 15 enables us to remove the interior trim piece easily. (You can try removing this piece
without removing the door panel and or plastic trim but I suspect it will be very hard to remove and possibly harder to
reinstall). Pull the trim piece with your fingers outwards and it should come out fairly easily.
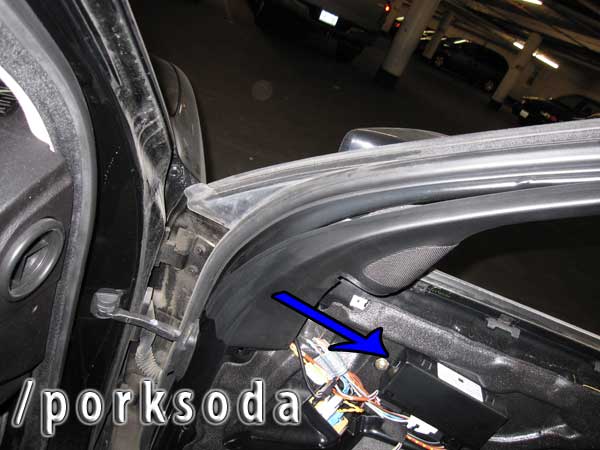
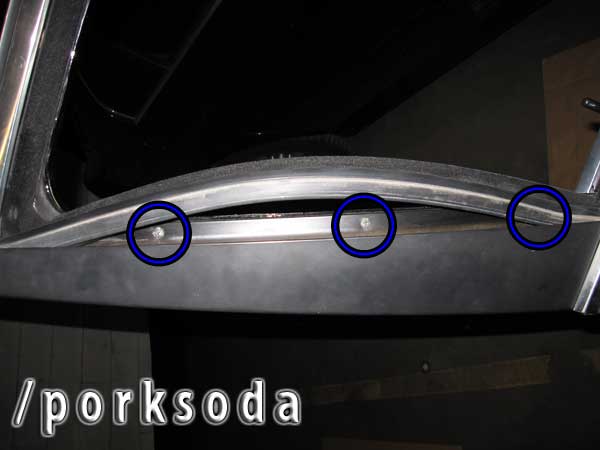
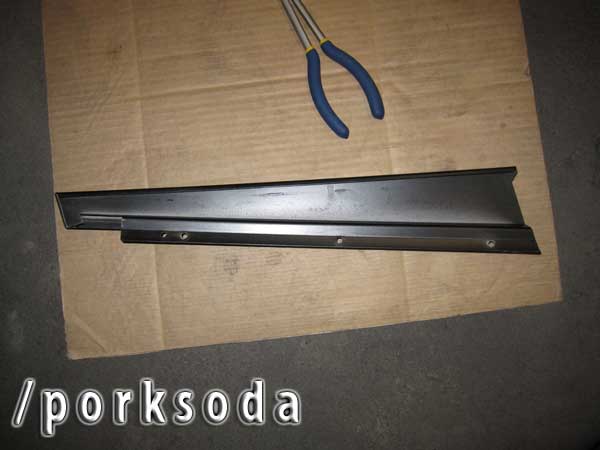
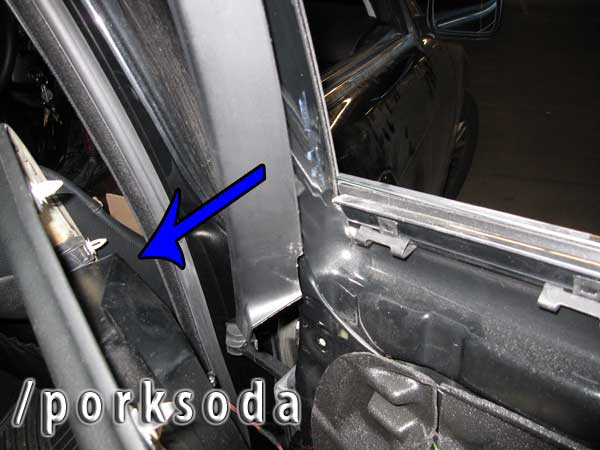
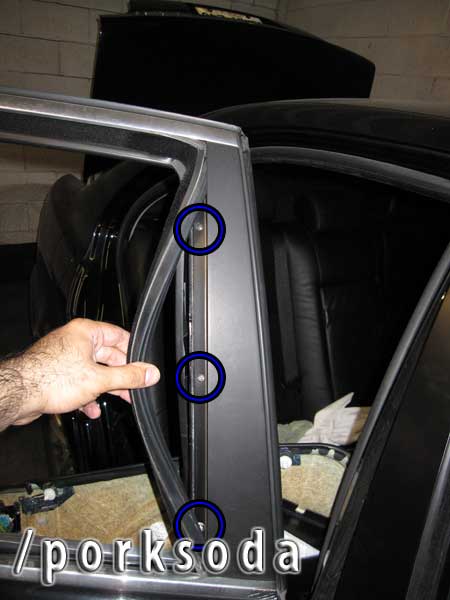
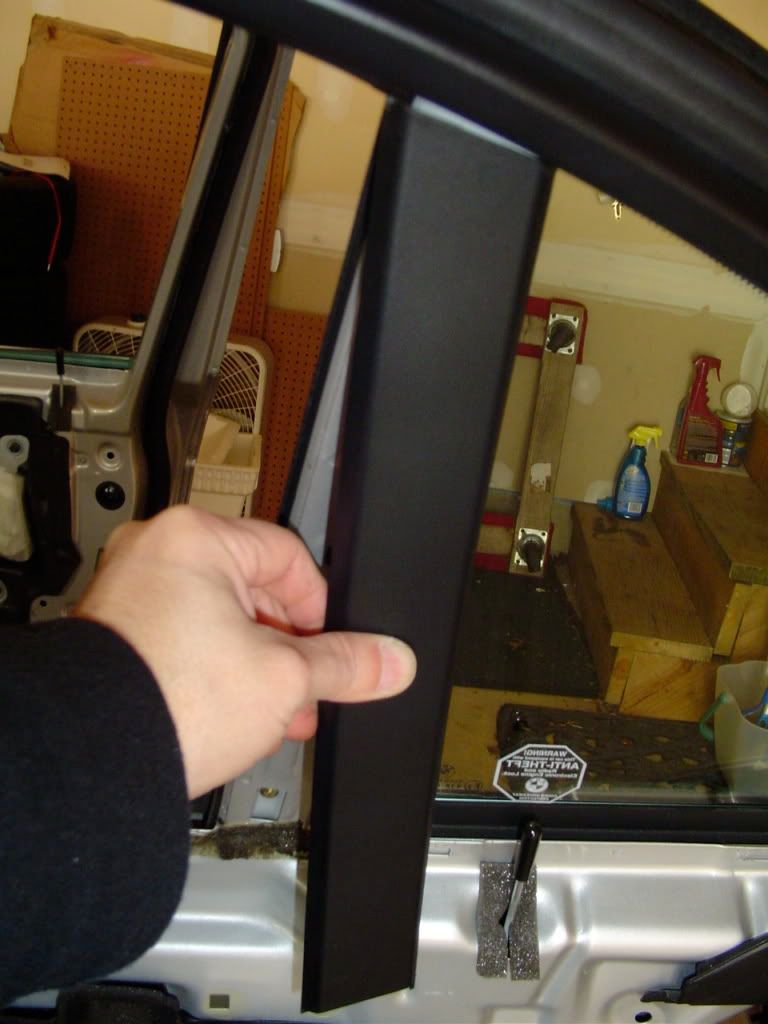
17.
After the trim has been removed you can see the 3 screws that secures the b pillar to the door, use the #2 phillips driver to
remove these screws.
18.
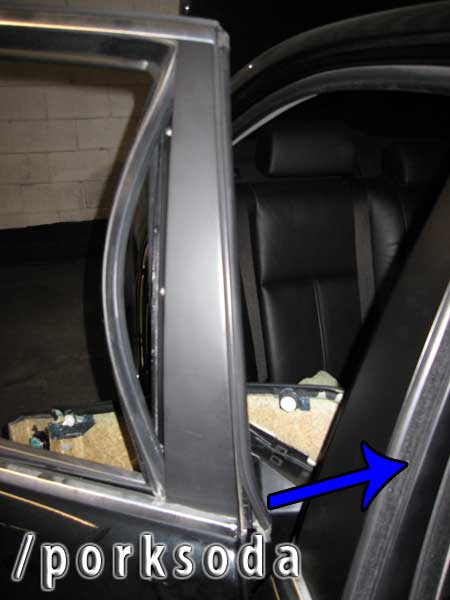
You will have to maneuver the trim piece out. For me I wiggled it a bit and then I pushed it out (left in this case) and then
pulled it up and it came out.
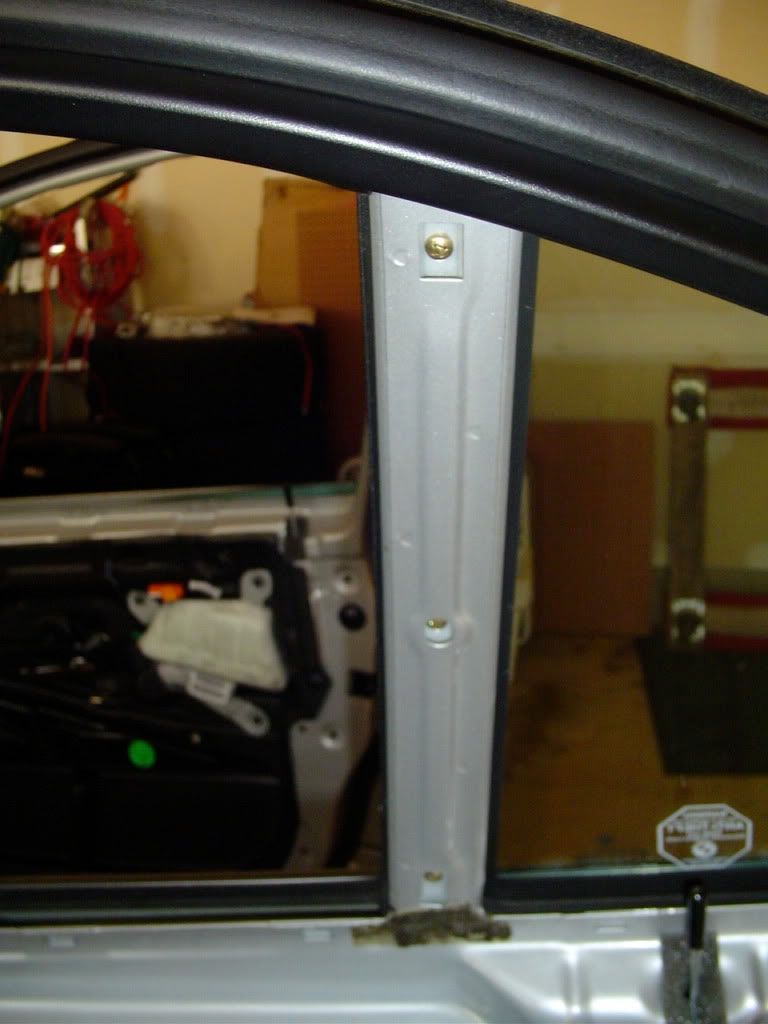
19.
Back of the piece to give you an idea how it is secured.
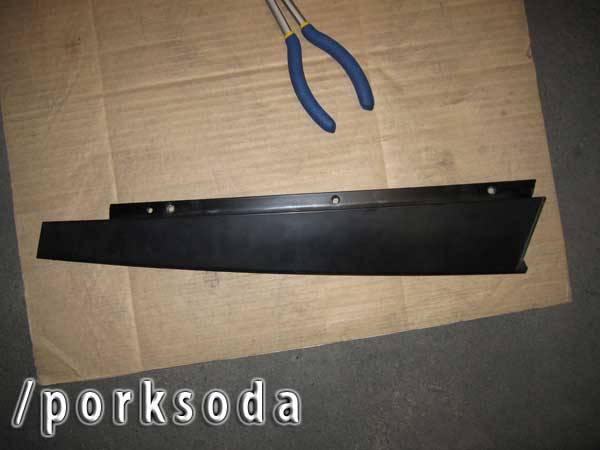
20.
Front of the piece.
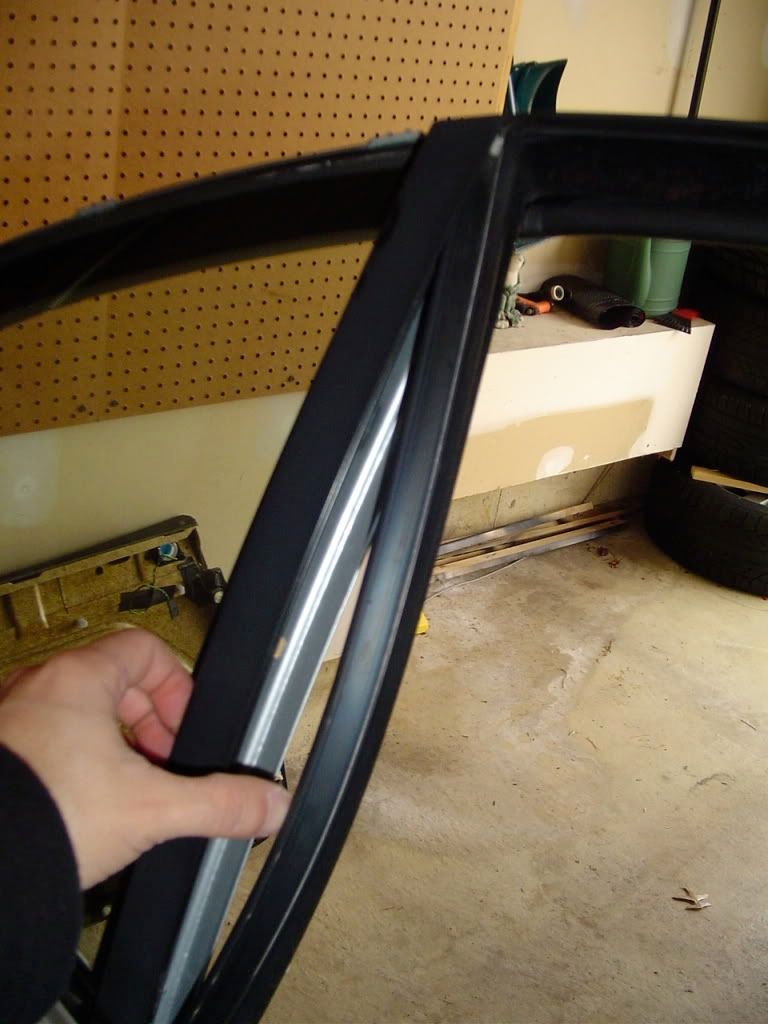
21. - Assembly
Now you can wiggle it back in and make sure to align the screws and put in all three screws and keep them loose until you align
the piece with one hand and tighten it. After that follow the steps backwards to install everything in order.
Rear Right Door:
1.
The Rear door panel is a bit different to remove as it only has one screw which is behind the door handle, once again perhaps
consult with the BSW speaker install video to see how the door panel is removed.
2.
With the rear doors again the door handle stays with the door, also note the plastic piece in the middle of the door, you can
see the plastic piece stuck on it (which has to be removed and installed on the door).
3.
The plastic piece in step 2 has to be inserted here on the door panel/card.
4.
Once the door panel is removed, once again you have to remove the plastic trim piece, in this case you do not have to remove
all of the trim only part of it as the B-Pillar is on the same side where you have to remove the plastic trim, remove it by
wiggling it out (This maybe a bit time consuming as the trim piece is snugly fitted on the door - the end that was cause the
difficulty is inserted in the door so you can pry it out from there - Also if you want to give yourself more room you can also
remove the silver piece near the window).
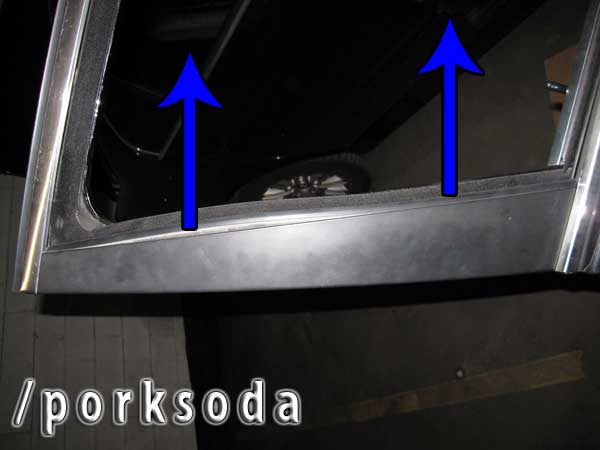
5.
Once the trim is out you can remove the inside window trim easily.
6.
You can see the same 3 screws, they are again #2 phillips.
7.
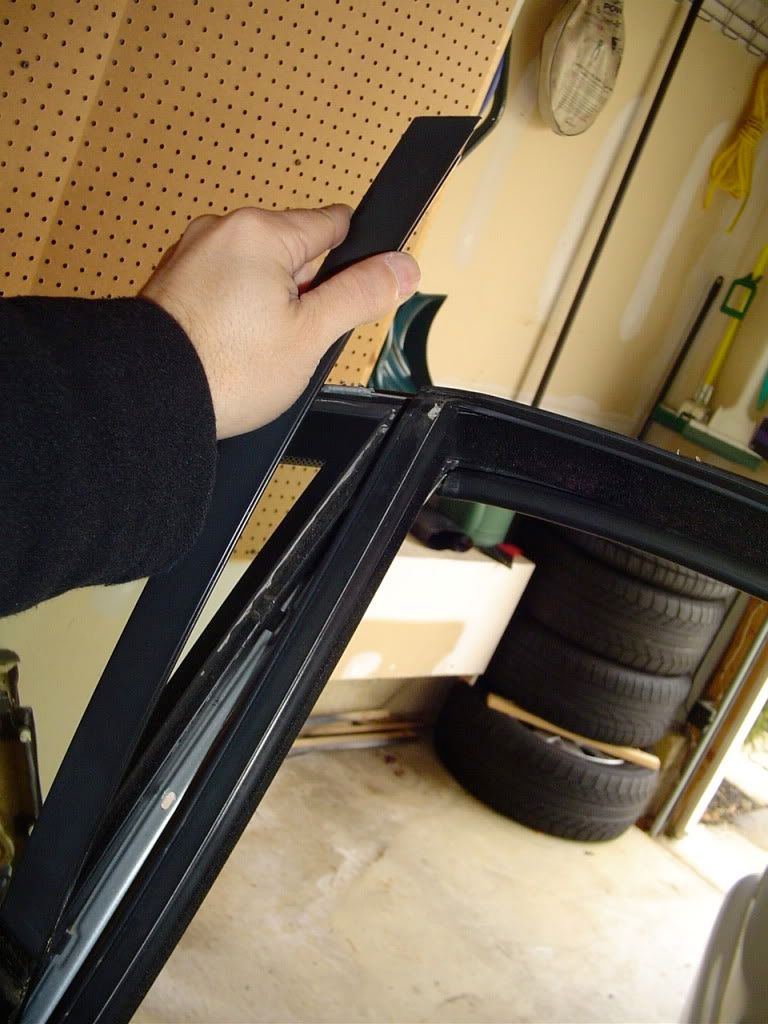
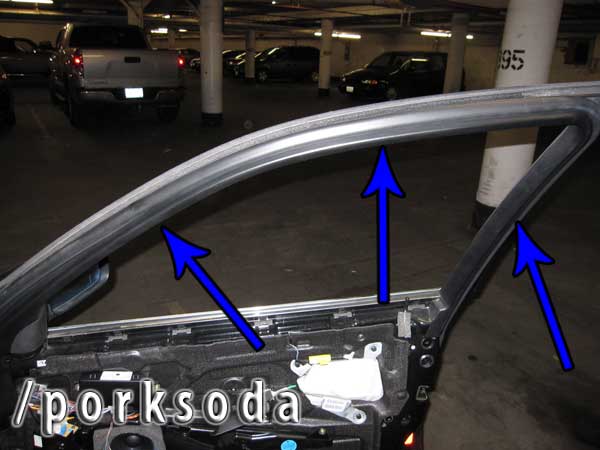
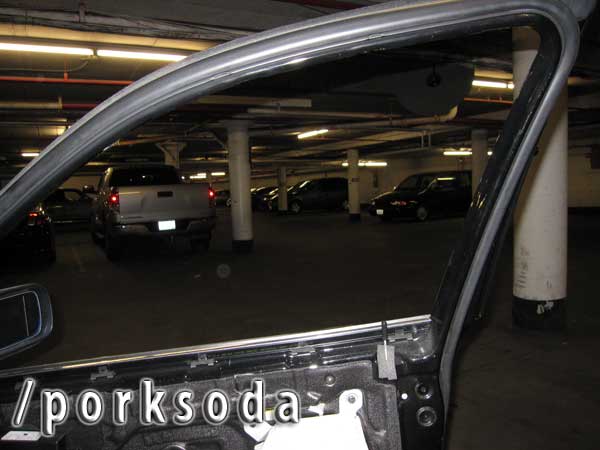
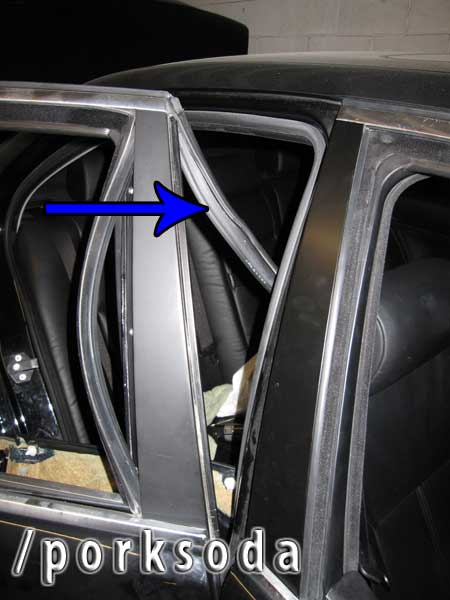
Rear window also has a rubber weather stripping that goes around the B-Pillar, this was a bit tough to remove but use your
fingers to massage it outwards.
8.
Remove it all the way to the top so the B-Pillar can be wiggled out. Use the experience from the front door to remove the
B-Pillar.
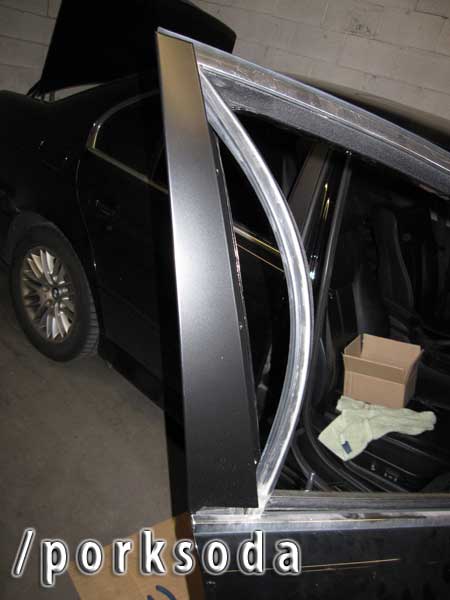
9.
Here you can see the rear door with the B-Pillar removed.
10. - Assembly
Once again wiggle the panel back in and make sure to align the screws and put in all three screws and keep them loose until you
align the piece with one hand and tighten it. After that follow the steps backwards to install everything in order.
- All done have a beer or coke or whatever floats your boat and hope you don't get too many paint chips and the pillars don't
rust again anytime soon.
Last edited by porksoda; 06-30-2009 at 07:43 AM.
my name is andy.
wow, amazing. excellent job.
Member
thanks. That rusty b pillar was very annoying this gives more of a clue on how to go about it for people who have been wanting to do this...Originally Posted by Fiziks

Member
So did you paint your B-pillars?
I plan on painting mine gloss black.
Looking for an E39 belly pan , passenger front inner fender liner
Crazy Cracker
BMW CCA Member
nice diy
Member
Nope got brand new ones they come painted.
thanks
Member
Great DIY but you should've replaced ALL the trim pieces since you went to so much trouble to get to the 'B' Pillars. Now you have fresh looking 'B' Pillars and worn out looking trim...I know cause mine is in need of replacement too. Thanks for sharing...
I'd also like to replace the sideview mirror's triangular backing piece as it looks dull and worn too...at this point, I'm considering the glossy M5 trim. I just met someone with the 2003 540i with the M-sport package and the glossy trim looks amazing in comparison to my matte black.
'00 540iA Sport w/235k+ Original TCG's, Vanos and transmission.*Trans failure at 244k+...FS Now
Member
my trim's not too bad when i get some time its going to be a full diy which usually takes about 12-14 hrs heh. Will treat the trim pieces with 303 and everythign.
I went with stock as i am not sure how long ill have the car for but im very anal about maintenance and i didn't like the bit of rust bubbling at the driver side of all places...
Last edited by porksoda; 07-01-2009 at 12:59 AM.
Member
Replacing those pieces was a great idea, and it came out great! But I did mine (painted everything) a few weeks ago without removing the door panels. I just took it inside and spray painted it, It caame out really nice but I dont trust spray paint as much as factory pieces! Good job
From AM to PM in a BM
great DIY! thanks i was wondering how to do this!
working with steel
excellent writeup! I think mine are JUST starting to oxidize a little.
BMWCCA 484984
Man, you are really cranking them out! Another one needing a tow to DIY.
Great job.
Member
Did you try removing the exterior window surround trim (the trim that wraps around the window)???

Looking for an E39 belly pan , passenger front inner fender liner
Member
Why not just repaint them
Member
The silver one or the inside the plastic piece?!
Heh my summer projects to fix whats around the car... i got some euro wing mirrors i didn't think that needed a diy hehe...
I will take pics of any other thing/repair i do...
28 bucks a piece and my time is very limited i decided to just buy them all.. i only had one basically rusty and another one bubbling but i replaced all four
Member
Great DIY, but what about the small strip between the window and the smaller piece of glass on the rear door?
2001 Z3 3.0i -Oxford Green/Sandbeige
2016 428xi -Estoril Blue II/Black
2018 430iC- Estoril Blue II/Black
2018 330it - Melbourne Red/Venetian Beige/Black
Member
Here is the how to on how to get to the smaller divider strip.
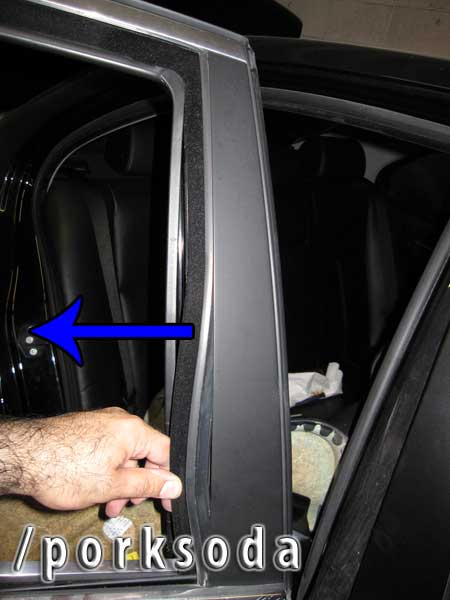
Remove the cover strip on the interior:
Beneath it you will see 3 screws... remove them:
After removing the screws push the trim strip gently away from the car door, it may still be attached to the weatherstripping window guilde in the channel.:
Separate it from the window guide then lift up and out:
2001 Z3 3.0i -Oxford Green/Sandbeige
2016 428xi -Estoril Blue II/Black
2018 430iC- Estoril Blue II/Black
2018 330it - Melbourne Red/Venetian Beige/Black
Member
nice!
excellent amancuso
I think now the rusty pitted b pillar covers on the whole of the car has easy diy and with a hundred or two bucks and some time anyone can do this...
Member
Wish i can do that this weekend.
Live the e39..!!
Member
Why can't you just pull the weather stripping out, remove the three screws, remove trim and replace?
Member
Great job on this write-up...
Member
Thanks for this write up it is rey going to make a big difference in taki g care of tbe rust on them on my car.
2003 525iT Automatic, Topas Blue Exterior, Gray Leather Interior, Sports Suspension, Sports Seats, M 3 spoke Steering Wheel.
2008 328xi E91 (wagon) Automatic, Barberatot Metallic Exterior, Terracotta Leather Interior.
 Posting Permissions


 Reply With Quote


Bookmarks