
 Member
well, it has come to my attention that a common problem with these is a leaky oil filter housing seal, this is due to using something like a crescent wrench to remove the oil filter cap, instead of the 36mm socket. if you develop a bad oil leak after an oil change.. chances are this is your problem. as embarrasing as it is, since i am a master BMW tech.. i recently made this mistake, when i let another tech borrow my socket and it ended up locked in his toolbox during the weekend that i was changing my oil. being a common problem, i decided to make a little DIY write up for the replacement of this seal. this work was done on a 98 528i.
tools needed:
36mm socket
13mm socket
16mm socket
10mm socket
13mm wrench
flathead screwdriver
19mm wrench
extension
ratchet
T50 torx socket
14mm socket
tools that will come in handy:
prybar
vaseline
swivel
parts needed:
oil fitting washer- #32 41 1 093 596(4)
gasket- #11 42 1 719 855
recommended part:
oil pipe- #11 36 1 705 532
banjo bolt- #32 41 1 084 908(2)
ok, now here we go, sorry for the crappy pictures... all i had on me was my phone
first, check the joint between the oil filter housing and the engine block to make sure this is your problem, it should be leaking somewhere around here:
first, remove the oil cap with the 36mm socket (remember... this is why we are in this situation) in order to let the oil flow down into the oil pan, this way you don't lose much oil. remove the airbox and MAF sensor. remove the upper coolant hose for better access to everything.
next, remove the two bolts holding the power steering fuild resevior and move it to the side (no need to disconnect) do so with the 10mm socket:
once this is out of the way you should have a clear view at the leaking area
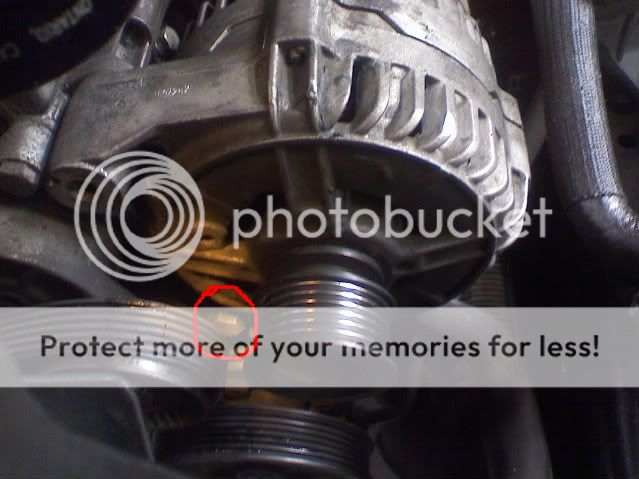
remove the alternator belt. do so by using the T50 torx socket to release the belt tensioner, and pulling the belt off of the idler pulley:
remove the alternator by remove the two 16mm bolts holding it on:
and
use the prybar to get the alternator loose, then remove the two connections in the back.
1: remove metal clip with a screwdriver, and pull connector off
2: remove power cable with 14mm socket
remove the power steering pump by first removing the two top bolts (13mm)
and then the bottom one (get to from under the vehicle) with the 13mm wrench
move the power steering pump aside (no need to disconnect power steering lines)
remove the oil filter housing by removing the six 13mm bolts holding it to the block
it is easiest to remove the VANOS high pressure line from the cylinder head, and just remove it with the oil filter housing, do so with your 19mm wrench. if you have never replaced this line, i recommend doing so while you have it out. that is the oil line and part number listed above, make sure to also replace the banjo bolts and washers. keep track of the bolts removed from the housing, as they are all different sizes.
once the housing is loose, remove the pressure sensor plug connection in the back, similar to that of the alternator
once removed, pull the seal off of the block, or the housing (whichever one it stuck to) it will probably be faitly brittle and hard, and clean the mating surface thoroughly. i took this opportunity to use the parts washer and clean everything off... if you don't have access to one... brake cleaner will do just fine.
once clean, press the new seal into the grooves on the housing itself, no gasket sealer needed
before installing it, check the condition of the two dowel pins in the block, make sure they are not bent or damaged in any way... if they are, replace them
from here... install everything in reverse order, and tighten the housing bolts in a criss cross pattern in steps. this is a great time to replace the belts as well.
i hope this helps some people... let me know if anything is unclear please.
mat
Last edited by jamesdc4; 11-15-2009 at 07:48 PM. Reason: Corrected part # for oil filter gasket.
Member
Thanks for one great write up--thats going to help many here in the future and it may be me---I wonder how our moderator thinks about-- the way that oil filter housing is in no way connected to the block---seems connected to me.
If I may be permitted to edit
This write up with the picks needs to be in the general how too's in our diy lists!!!!!!!
Last edited by Poolman; 08-28-2008 at 11:38 AM.
Member
yea... it felt pretty damn connected when i pulled it off... haha
thanks!
all in all.. it took me about an hour and a half... but that's with a lift.. not to hard a job
Member
Real good writeup, thank you bowmang. I'm curious though, how does using a crescent wrench cause breakage as opposed to the 36mm socket? Don't both tools just torque it the same - right at the center of the cap, or does the crescent wrench do it eccentrically, causing a shearing force?
Member
ya know, i was wondering the same thing... so i put it to the test, since mine was already damaged... i checked it out. i first used the socket, and watched where the damage was done... i could not see anyy flex or anything that would cause such damage... so i installed the cap, and removed it the same way i did before... with a crescent wrench, and there was clearly some flex going on there... i could see it pull away from the block very slightly.. it didn't look like much, but apparently it was enough to cause such a leak. i suppose it is because the socket puts only turning force on the cap, whereas the wrench pulls on the entire assembly before breaking the cap loose.
Freude am Fahren
You better replace that belt!

chiefwej 2003 540i ///m-tech 6-speed Black Sapphire Metallic w/gray
See: My REGISTRY PICTURESMods:plate delete, debadged, 35% tint,euro console, Evans NPG (zero pressure cooling system), CDV delete, Rogue Octane SSK, RP Symcromax
Member
Thanks bowman. That makes sense since the socket would be perfectly on center and the crescent would not be. I guess the same might happen with a strap wrench. I'll check mine next oil change!Originally Posted by bowmang

Member
haha... yea... belt definately got replaced when i saw that!
Member
The gasket part number is for a oil pan gasket. Do you have the part number for the oil filter housing seal?
Last edited by millEr39; 09-29-2008 at 11:26 PM.
Member
oh.. really?> my bad, i posted the wrong number.. give me a second, i'll get it
Member
ok... fixed
the part number is 11 42 1 719 855
Member
This should be moved to the DIY! thanks op, this was very very helpful.
Member
yea... i didnt't know about the DIY section until after i wrote it... if the mods want to move it, please feel free
Member
It's been over there since right after you wrote it up--it's in one of the sections
that you have to click on to get too---DIY needs to have all the stuff listed in
one long list--but it's good to have in any format
Member
oh really? well it's good to know that the mods are one step ahead of me
Member
Excellent write up....
When I had my done last couple weeks ago, I thought I was leaking oil from the oil pan....whew....
But I'm a little confused about removing the oil filter cap...which tool to use to avoid damage to the seal?
Again, big props to you for the informative write-up!
Member
yea.. when i first looked at, i thought it was the oil pan gasket as well.. i even ordered the part.
all you need to avoid the seal being damaged is a 36mm socket... that should do it
BMW Fan
Great writeup, thanks! With your help, I did this repair today on my '99 528i (10/98 build) and I wanted to add a few thoughts.
The job is pretty easy, there is just a lot of disassembly that must be done to gain access to the filter housing. Although it was basically the same as you described, there were a few minor differences in my car.
First of all, DEFINITELY disconnect the battery first. I skipped this step and found out that the positive lead to the alternator is hot even with the ignition off. I accidently touched a wrench to it while removing a bolt and POW! Sure as hell got my attention. I went straight to the trunk and pulled the negative lead from the battery.
My alternator came out pretty easily. I did have to use a prybar, but very little force was needed to free it. Getting it back in was another story. I wrestled with it for at least a half hour before finally coaxing it in. The lower bracket is very tight and the only way I could get it back in was to loosely install the upper bolt and then swing the alternator down and tap it into place with a rubber mallet. I had to use a light and mirror to look into the lower bolt hole to get it aligned so the bolt would go in.
I didn't have to remove the coolant hoses. It made it a little tight to work, but it was worth it in my opinion. I removed the fan, then just sat it down in the bottom of the cooling shroud carefully leaning against the back of the radiator - I never actually removed it from the car.
On my car, there are only 2 bolts holding on the power steering pump. So it wasn't necessary to raise the car and get underneath it. I did anyway, though. Mostly so I wouldn't have to bend over as far to work on it (hurts my back to hunch over the engine for a few hours). I also wanted to look for a coolant leak "while I was in there". It looked like it might've been the water pump and the bearing did feel a little loose. I had an extra one and there was never going to be an easier time to replace it, so I went ahead and swapped it out.
The old gasket was hard as a rock and very brittle. And there was oil all over the side of the engine.
Hopefully this was the source of my oil leak and I won't have to deal with the oil pan gasket!
1998 ///M3/4/5 | 1999 528iT | 2003 Z4 3.0i
Member
Here is another write-up that has been around for a while.
1998 528i:
http://www.bmwtips.com/tipsntricks/oil/housing.htm
Member
thanks for the tips guys!!
everything you said is pretty much right on the money.. nice work!!
Member
BMW spec calls for 25 Nm torque on the Oil Filter Cap, which I think is a bit much. This torque twists the housing upon install and removal of the Oil Filter Cap.
Take another close look and you will see that the sealing is achieved by the O-ring making contact SIDEWAY with the housing.
The O-ring sealing is different when compared with paper gasket (which mates the 2 flat surfaces together and it requires the torque to seat it properly).
What I do these days to make install/removal easier and to prevent damage to the Oil Housing?
Tighten the Cap with 36-mm socket until it fits snugly.
Then using only 2 fingers on the ratchet, give it a slight tug and that is it.
I have been doing this trick for 3 years, not a single drop of oil leaking.
Removal of the Cap is a breeze.
Actually try this next time you change the oil: just tighten the Cap down until it stops, start the engine, you will NOT see any oil leak. Actually even with this snug fit, the Cap won't even come loose (notice the friction when you tighten the cap?).
The reason I do a little tug at the end is just to make sure the Cap is nice and snug. I stay away from 25 Nm torque value.
Last edited by cnn; 01-06-2009 at 10:27 PM.
Member
First, thanks to everyone that's taken the time to post their knowledge on these pages. OK, my oil filter housing is leaking and I will be replacing the seal and the O-rings. I'll try to take as many pics as possible to post them and I will be reading and checking these post to gain confidence on this project. Thanks to everyone. I will need some O-rings.
Member
For cross-reference, I wrote the DIY Oil Housing Seal for my 1998 528i here.
NOTE: Use ONLY BMW seal ($6 at dealer).
http://www.forum.bimmerfest.com/showthread.php?t=414315
Member
Good thread!
Getting ready to do this, just as soon as I clear enough space on my garage floor...
Looking for an E39 belly pan , passenger front inner fender liner
Member
Isn't VICTOR REINZ the OEM gasket?
http://www.eaceuroparts.com/parts/pa...01%20719%20855
Looking for an E39 belly pan , passenger front inner fender liner
 Posting Permissions


 Reply With Quote


Bookmarks