
 Member
As you all well know, I've had a slight whistle noise the past few weeks. Very, very slight. I can hear it at the Starbucks drive-through as I use their walls for a sound chamber.
The little heat shields near the o2 sensors? Check. They rattle sometimes, give them a little whack and problem solved. But no.
The whistle noise also offered some very minor tremor in the car's Force. as the engine was every so slightly running rough. Nobody would agree the car was a little rough at idle...but I sensed it.
A noise seemed to eminate from a tensioner and the tensioner was vibrating so maybe:
http://forums.bimmerforums.com/forum....php?t=1298080
Today I whip out the trusty Mechanic's Stethascope. Could not pinpoint the noise so again, I stare at my tensioner and wonder. As it's a rainy day and nothing better to do, I grab the intake rubber boot I have in my trunk, new from BMW, where it's been sitting and waiting for me to install all summer.
I meant to replace this entire boot when the CCV was done in April. I bought the 2 pieces (which go from the MAF all the way to the Throttle Body) and figured, what they heck....it's a long shot, but maybe, just maybe, if I am lucky...the boot will have an opening in it, a breakage which is causing a vacuum leak which is causing a whistling noise and also a very, very minor engine shake at idle.
I grabbed:
1). A very long flathead screwdriver
2). A medim-sized flathead screwdriver
3). Flashlight
4). Throttle Body Cleaner by CRC
5). Clean rag
A). Removed rubber boot by the MAF.
B). Unscrew the metal clamps at the midpoint-junction point.
C). Pull out the vacuum elbow atop the boot.
D). Use very long screw driver to loosen clamps at the throttle body and the smaller boot above it.
Here is what I found! My car, with 100K miles was not throwing any codes, was barely running rough at all, had a faint whistle noise and gas mileage was good. Wow!!!
"I'd smash that (Jennifer Connelly) like a failed coup in sub-Saharan Africa."
~Macktheknife in my epic Jennifer Connelly OT Thread
Member
The smaller elbow was totally shot, completely open! Looked like a shark attack, it was no propeller or boat accident.
Thanks to mmm635 for listening to me b*tch about my problem.
Thank Chief Brody...I had a hunch it would be wise to replace these rubber intake boots. I've had them in my trunk for many months catching dust. I detail my engine, spray all the rubber with 303 Aerospace Protectant several times a year, my car is a 2003 with 100K miles...if this can happen to me, it can happen to any e39!
Clean your throttle body while you are there. It flips from 12 to 6 o'clock. Do NOT mess around with your throttle body flap. Gently push in at 6 o'clock, use your finger at 12 o'clock to keep it open and spray liberally. Then spray into the smaller opening above. Clean with rag.
The entire job took 30 minutes, in BMW M-time.
Last edited by bimmerfiver; 08-28-2009 at 05:40 PM.
"I'd smash that (Jennifer Connelly) like a failed coup in sub-Saharan Africa."
~Macktheknife in my epic Jennifer Connelly OT Thread
Member
Be careful assembling it. Don't cut the boot with your screwdriver. Be patient. Have good lighting wth a flashlight. Tighten all screws so their heads are facing upwards (so you can access them if needed down the road).
Done! Whistle noise is gone, my gas pedal is snappier and the engine is smooth as Jennifer Connelly's arse.
Last edited by bimmerfiver; 08-28-2009 at 05:42 PM.
"I'd smash that (Jennifer Connelly) like a failed coup in sub-Saharan Africa."
~Macktheknife in my epic Jennifer Connelly OT Thread
five a day
Prodigal Member
I replaced mine last summer.
It was tore up from the floor up.
I vote Bacon Cheeseburger.. of course.
UNDER CONSTRUCTION
- 2000 528i Sport -
Got any questions about my car? Feel free to PM me!
 Member
LOL!
It's like BimmerFiver is reading my mind!
I too have a brand new MAF elbow!
I bought the 328i elbow, thinking that it did NOT have the extra pipe to the air silencer, but it did...!!!
I will have to confirm the part numbers...
I may need BimmerFiver's help and Force on this one...
LOL!
Looking for an E39 belly pan , passenger front inner fender liner
Member
shit, your OCD is catching, i want to know if my intake boots are ok but i'm not going out in the rain now. or maybe gumbi's FIL can answer for me, he's seen it more than i have.
any your hearing must be at some ridiculous level if you can hear that sitting at a drive thru.
voted - me.
Last edited by kerryb; 08-28-2009 at 06:27 PM.
Member
The thrust of my thread is this:
REPLACE YOUR ENTIRE INTAKE BOOT IF YOU OWN/DRIVE AN E39.
My car is:
A). 2003
B). Mint
C). Well cared for (even the rubber with 303 Aerospace)
kerryb, your car is five (5) years older than mine. These boots don't get checked or admired...they get replaced. These parts are maintenance items that get totally overlooked. And there is no sense in examining them...remove and replace. Period. I need to know you're replacing yours. I'm on a need-to-know basis.
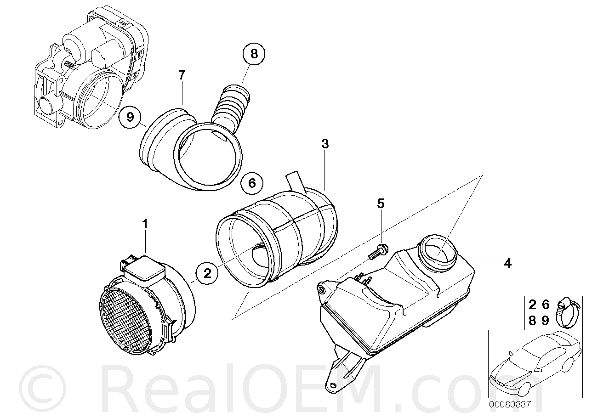
Gumbi can snag you these two, simple, easy, but ever-so-important rubber pieces for prolly $50.00 FTW. Yours looks like this:
http://www.realoem.com/bmw/showparts...43&hg=13&fg=15
http://www.realoem.com/bmw/showparts...09&hg=13&fg=15
http://www.realoem.com/bmw/showparts...10&hg=13&fg=15
Last edited by bimmerfiver; 08-28-2009 at 07:43 PM.
"I'd smash that (Jennifer Connelly) like a failed coup in sub-Saharan Africa."
~Macktheknife in my epic Jennifer Connelly OT Thread
Member
i'm still absorbing my TOTAL suspension overhaul.. gimme at least till a clear day to look..
Member
http://www.realoem.com/bmw/showparts...19&hg=13&fg=15
#7 on the Real OEM diagram is superseded...
Part number 13541437191 was superseded by part number 13541435627.
http://www.trademotion.com/partlocat...&siteid=214672
07Rubber boot113541437191
Last edited by Jason5driver; 08-28-2009 at 07:40 PM.
Looking for an E39 belly pan , passenger front inner fender liner
Status Quo!
Originally Posted by kerryb

Hey Kerry, Last time we saw them was at the overhaul and they dont look original. No cracks either so they might have been replaced. BUT these things can start going bad overnight. The nature of rubber.
You know I got you. I can order it and you can pay when times are right. Cant have you paranoid and calling Keith at 1 in the morning talking about rubber!
BTW guys I actually have my original boot and stock intake which was new at the time. The SC took over in its place so if anyone needs stock intake parts, let me know. CLEAN MY GARAGE!!
Last edited by Gumbi4u; 08-28-2009 at 11:57 PM.
Another FP5241 Creation
Parting out M54 Engine. Intake and all. Cats avail as well. PM ME!
working with steel
Time to do more maintenance. Thanks bimmerfiver, needed that. Not really.
reports will be broadcast as received.
Member
Been there, done that. Bacon Cheeseburger as reward for my efforts.
Member
i will never call b5'er in the night to talk about rubber. That is just wrong on too many levels.
i think i could handle this one ken...but you know where i run to if i want my car in tip top shape.
Member
Request to the Moderators to add this thread to the DIY section....
Please...
Thanks!
Looking for an E39 belly pan , passenger front inner fender liner
Member
Nice watch!!!! Me wants.
BMWCCA 484984
Nice!
Unless it's just me, the poll doesn't work in the DIY section.
Member
Disregard
Last edited by coffee; 07-23-2010 at 03:47 PM. Reason: Automerged Doublepost
pompous a*s
For future searches - my slight whistling was caused by the PS pump. Based on 10 years of direct wrenching experience, I was nearly 100% certain it was a vacuum leak of some sort. I never would have guessed it to be the PS pump; but alas, it was.
Member
Hey Bimmerfive;
Appreciate the detailed description and the pics.
Running into same exact problem w/ my 2001 Z3 3.0 and wondering if you can lend a hand here.
I got stuck at the point of not being able to access the "bottom" where the intake boot goes in (something is in the way, I'm not sure what part it is...); so there's no way I can access with a screw driver to unscrew the hose clamp in order to remove the boot that has the torn up elbow... Any ideas of how to access it correctly? Do I have to remove this part (is this the only way to access it?)All I'm trying to do is remove all 3 sections of the air mass inatake boots. I have already cleaned the MAF sensor with MAF sensor cleaner.
Mean time, put air mass box and old boots back in place...
Thanks in advance
Z3EAGLE
Member
Question: 5er, Can the "inner" boot be replaced without removing anything else? At first blush, it seems buried in there, and I can barely even see the hose clamps, let alone get a screwdriver down in there, so I just want to make sure there's no an extra step in here.
Like Gretzky, B-5'er is already where the puck is. I ordered 2 new intake boots ($30/ea) in hopes to address the "teapot" whistle I get when it's COLD outside. I even see a small crack on the topside of the "accordion" section, so I bet there are more underneath. The one next to the MAF is simple enough, but the other one is a bit buried.
Question: This is very confusing. If you're not touching a flap, what exactly are you pushing and opening? And, are you just spraying chemical onto the surface of the round opening? Does this even do anything, b/c it's already clean? Or are you spraying some sort of movable hinge??Clean your throttle body while you are there. It flips from 12 to 6 o'clock. Do NOT mess around with your throttle body flap. Gently push in at 6 o'clock, use your finger at 12 o'clock to keep it open and spray liberally. Then spray into the smaller opening above. Clean with rag.
Also, flipping something from 12 ro 6 o'clock makes no sense to me, either. I see nothing in the photo at 12', and certainly nothing that rotates on that sort of frontal axis plane, like how a clock's hands would move.

Last edited by OnTheFence; 01-14-2012 at 06:17 PM. Reason: Automerged Doublepost
E39 DIYs done: Wipers, O2 sensors , MAF , Upper/Lower Intake Boots , FSU , ABS module fix , Power Steering Reservoir , Changed Rear Differential Oil , DISA , SAP, Vacuum lines , Radar Detector Hardwire , Fuel Filter , LED Angel Eyes , Headlight Adjusters--> [1],[2], [3] , Headlight Polishing, Punted: Fan Clutch/Tensioner/Pulleys , Oil cap O-rings , Window regulator ,Crumbling Cowl
Member
I tried this DIY today and had to punt. F#$%#. I couldn't get my 20 inch screwdriver into the screw. There is ZERO room for error here, b/c the screwdriver has to go through a very tight crevice. If the screwdriver doesn't land flush into the slot on the hose clamp, you'll never be able to unscrew it. This all depends on the angle the hose clamp was last installed with. Mine is off by a few degrees, and therefore I can't get the screwdriver into the hose clamp. F#$%#. +Regardless, +1 on the LONG screwdriver. If you don't have this in your toolbox, you won't be able to reach the screw either way.
I strongly advise people doing this DIY to get a long ass 1/4 extension bar and try using the socket set to undo the hose clamp (for the cost of that long screwdriver)
Also, after a re-read of the above, I now see 5'er simply meant that you should push open the flap and spray into the upper half.
Last edited by OnTheFence; 01-28-2012 at 05:31 PM. Reason: Automerged Doublepost
Member
I am envisioning your issue.
I am at my car now, eyes closed, my hood is up (hood on my jacket) as I pretend to be a Jedi Boot Master.
I believe...yes...yes...you need a:
1/4" ratchet.
A long 1/4" extension.
A 1/4" universal joint on the end of the extension.
A 1/4" socket that fits the clamp's bolt head.
Then you can succeed.
You need a pinpoint flashlight too.
I've encountered these clamps at various angles.
I always get to them.
I cannot punt due to a hose clamp.
Get your boots off.
Clean your Throttle Body and ICV Valve and DISA Valve and install new DISA o-ring.
Install new boots.
"I'd smash that (Jennifer Connelly) like a failed coup in sub-Saharan Africa."
~Macktheknife in my epic Jennifer Connelly OT Thread
Member
71tIi0-prWL._SX450_.jpg
I replaced both intake boots today.
I used a different long ass screwdriver, and was able to get to the screw!
Thank god the clamp was not tight.
There was a very small tear in the #8 part in the diagram
so let's see if I still get the "teacup" sound next time it's below 20 degrees.
One question:
Once reassembled, the intake pieces "train" (airbox, MAF, intake boot) are hard to connected/press together.
They want to stay apart.... Is this by design? Ie: It doesn't naturally just all slide together like Lego parts.
Instead, the last piece of the connection really had to be forced.
I had to force/push it all together with 2 hands, and have a 2nd person screw the hose clamp down
Is this normal?
Lastly, I have a few more tips for anyone doing this job:
1) You def. need a very long screwdriver, like 5er said.
2) Even in daylight, you'll need a small flashlight to see that 2nd hose clamp screw on the intake.
3) I replaced both boots. #3 was a real pain to get remove/reattach to the plastic resonator box (#4)
(I hate that damn thing box, such a hassle to remove it from the air box, with that 2nd screw underneath)
To get it on and off, you really need to wrestle with it.
I actually used a heat gun to reattach it.
Be patient. I may take a minute or two.
4) The plastic connector piece that connects both the boots can be a pain to reseat.
Instead of pushing the whole thing flush and trying to seat into the lip all at once,
it's easier to jam one side of a boot fully seated, and then wrestle the other side on.
Then repeat for the other boot.
5) I sprayed throttle body cleaner, but I have no idea if it did anything.
When I opened the flap, I could barely see in it, b/c my hand was in the way.
I saw no throttle linkage to pull in order to open the flap without my fingers.
Incidentally, Which is the flap that gets stuck?
Is it the throttle body flap, or the DISA flap, or the ICV flap?w
6) In the diagram above, it was hard to really know if boot #7 was really attached properly.
You can only see the top edge, and there is a lip all around.
I sort of "wrestled" with it, pushing and turning, pushing and turning, in order to increase the odds that it was fully seated.
7) I dropped/lost one of the screws that secure the resonator to the airbox. So, I left the underside one off.
I never liked it anyway, and it seems plenty stable with just the one screw connecting on the side.
8) It's such a pain in the ass to get the airbox back in place, while trying to screw it back onto the resonator box.
This step took me 30 mins, easy. And I never even attached that underneath screw!
Total time: 4 hours. No kidding.
(But this included the power steering reservoir replace and flush)
Update: There was barely a small tear in 1 of the boots. (10 years old, 120k miles)
I think I made it bigger when trying to take the pic.
So, I'm pretty sure these boots did not need replacing.
For sure, the one connected to the MAF was perfectly fine and didn't need replacing.
Unfortunately, the "teapot" whistle is still present.

Last edited by OnTheFence; 02-19-2016 at 08:27 PM. Reason: Automerged Doublepost
License Revoked
I have a few problems with - check out the topic In a moment I tell You what's going on
 Posting Permissions


 Reply With Quote


Bookmarks