
 Sprinkled w/hotrod dust
Moderator
Sprinkled w/hotrod dust
Moderator
Even with powder coating it too will start to bubble up after 4-5 years.
I like that new coolant level sensor design with the reed relay encased. Less likely to break.
 Member
ugh. That sux then. I was hoping that going to the trouble of powder coating my old covers for the 4.4 rebuild would be a longer term solution. I suppose its just a function of the material BMW used in the covers. Some magnesium alloy I read? It must absorb oils and vapor from the underside perhaps.Originally Posted by JimLev

the delay in getting my block and heads back has given me time to address the small pile of parts that has built up for the X5. I also have a 90 deg. T-stat Ive been meaning to pop in. Im only worried about getting an SES light from it, but I can always swap the 105 deg back in if so. Or learn how to code I guess.
Current BMW
2002 E53 X5 4.6i (4.4 to 4.6 swap)
2025 G05 X5 50e
Former BMWs
1996 BMW Z3
1998 BMW E36 M3 Sedan
2004 BMW E46 M3
Sprinkled w/hotrod dust
Moderator
Yup, Mg is a porous metal that the oil migrates thru.
They should have made them out of aluminum like they did with the 3 timing cover.
Your 90º t-stat probably doesn’t have the electrical connection, right?
You could connect a 15-20 ohm 20watt resistor to the wires they were connected to your old t-stat.
Then the DME wouldn’t give you a code.
Member
I does have the electrical connection for the MAP function. I was surprised to see that, so I grabbed it…Turner maybe? It was a while ago and it’s been sitting in the “parts locker” for almost a year. Kept thinking I’d have another reason to drain the coolant, but not yet. Hopefully I can swap the tstat without doing a full drain now.
Current BMW
2002 E53 X5 4.6i (4.4 to 4.6 swap)
2025 G05 X5 50e
Former BMWs
1996 BMW Z3
1998 BMW E36 M3 Sedan
2004 BMW E46 M3
Member
I drove the X5 home from the airport last night and decided that it took a long time to get up to temp, and once again, never got above 99 deg. Who knows, maybe the tstat has developed a mind of its own, but it’s definitely behaving differently from the last 3 years it’s been in the x5.
So today I popped the 90 deg tstat in and took it for a test drive with the dogs. So far so good. 93 deg what’s where it settled out, plus or minus a couple, regardless of outlet temp. Outlet temp varied from about 110 up to 150 or so in stop and go traffic with the AC on “Max”. No SES light either, which I was worried about. It is a 90 deg MAP tstat from ECS, but I was worried the consistent lower temp would eventually set a code and light. So far so good tho.
Anyone know at what temp these fan clutchs kicks in on the M62? I’ll be interested to see how the system performs in the summer. That 15 degrees will obviously just get pushed into the radiator, which hopefully will have the excess capacity to shed the added heat on a hot day, in traffic, with the AC on, etc.
The Zerex g48 coolant had been in the motor for about 20k and looked a bit dark. I drained it via the lower hose connection at the radiator and got out about 1 gal. Perfect for the tstat job, but with 2 gal left in the system, including the bottom of the radiator, not a good way to do a full drain though. The OE tstat, looked like new, for what it’s worth.
No need to take the fan or its housing out for this job, as it turns out. There is plenty of room to work with the intake and boot out. An extension with a universal on it is needed to get 3 of the 4 housing bolts off.

Last edited by Henn28; 02-14-2025 at 09:49 AM.
Current BMW
2002 E53 X5 4.6i (4.4 to 4.6 swap)
2025 G05 X5 50e
Former BMWs
1996 BMW Z3
1998 BMW E36 M3 Sedan
2004 BMW E46 M3
Sprinkled w/hotrod dust
Moderator
Thanks for that tstat info. I just ordered one.
Member
Glad it was helpful. 15 degrees doesn’t sound like a significant drop in temp, but it may help the plastics last a bit longer. And I think it will cause a significant drop in internal pressures. I’m sure there is a formula for that somewhere.
Current BMW
2002 E53 X5 4.6i (4.4 to 4.6 swap)
2025 G05 X5 50e
Former BMWs
1996 BMW Z3
1998 BMW E36 M3 Sedan
2004 BMW E46 M3
Member
My overland rig is in process:

Sprinkled w/hotrod dust
Moderator
Looks good. What’s the cardboard under the tires for? Just curious.
Member
I was test fitting the 16x8 5x120.6 Vision Daytona wheels and 265/70-17 Sumitomo Encounter AT tires put the cardboard there per the seller to prevent rubber from getting dirty / rubbed on pavers in case I needed to return them.
The overall diameter is 31.7 and everything fits but I need to raise the rear axle suspension height and clearance a little bit in the front (rubbing plastic under cover and brake duct even with liner removed at full lock).
These were $1500 delivered to my door.
Member
No pics that I can see. Would love to check it out if you have time to post some.
I’ve been chasing a slow speed front end clunk, which new OE sway bar links didn't fix so yesterday I jacked it up and checked all the torques. Everything looked good except one of the subframe bolts seems just a tiny bit loose. I dropped it several years ago to get the front diff in and maybe I didn’t torque it quite enough? We’ll see how it drives now. Beyond this I’ll just be throwing parts at it. I just put new lower control arms on it a month ago, and the uppers are 2 year old Turner mono ball pieces so I hope they aren’t bad.
I recently put all new “edge protection “/ weather stripping on all 4 doors, and the trunk. I’d been slowly buying these pieces over the past 6 months and now that they are on the doors close much more firmly. The 23 year old original pieces were ripped and worn. I also re-tightened the upper trunk lid hinge bolts, which seems to have fixed a persistent clunk from the back of the car as it flexed at slow speeds on uneven surfaces.
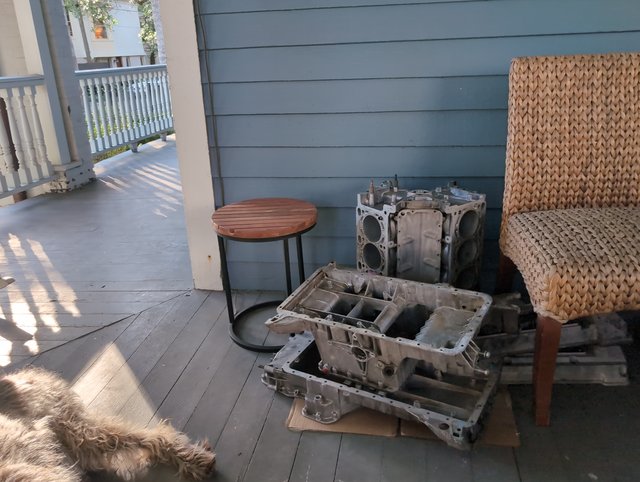
in other news, my block and crank are back and sitting on my porch, waiting to begin reassembly. The block and oil pans were just cleaned up and the crank was polished. Also, the block amd crank were were measured by the shop , to back up my micrometer measurements. Everything was within OE specs, except one of the cylinders was very slightly out of round tolerance. I’m going with new rings and a rebuild anyway on it.
I kept the x5 oil pan as I need to punch a hole in the 540 eBay pan at approximately the correct place for the OSV and PCV oil return to drain into. The X5 OSV setup is on the back of the motor and I’d like to keep it there as it seems much better than the 540 setup. There will be some challenges though modifying the hardline that runs down the back of the motor from the OSV and PCV, especially where it goes around the exhaust manifold. It’s a needlessly complicated BMW design.
my plan now is to lap the cylinders with felt pads and the Sunnen lapping compound used on alusil blocks. AM Tuned (Audi shop) sells a kit to get this done. I figure why not, and from what I read exposing the silicon again is the best way to ensure a good break in when using new rings. I’ve found some good and definitive reading on the process and plan on renting a profilometer to ensure I get the correct hone. That’s the plan anyway.
Last edited by Henn28; 04-19-2025 at 12:11 PM.
Current BMW
2002 E53 X5 4.6i (4.4 to 4.6 swap)
2025 G05 X5 50e
Former BMWs
1996 BMW Z3
1998 BMW E36 M3 Sedan
2004 BMW E46 M3
Member
I finally have my block and crank back (block cleaned and crank polished) so I can get to work on the bottom end. I don't have my pistons back yet, but I can at least get the crank in with new bearing shells. First though, I decided that since this was a project, I might as well put a lap on the cylinders to help the new rings seat. I've read everything I can find on this process, and got some good advice from Peter Partee at Partee racing. Key to the process is having a profilometer on hand to see where the cylinder wall are before lapping, and then again after lapping to make sure you get them into spec. I ended up renting a profilometer for the job because, again, its a project so why not. As it turns out nothing is an exact science, even with an instrument that measures in microns.
My pre-measurements generally put the cylinder walls in the .2 micron range for average height (Ra) and (mostly) in the 2 micron or below range for mean height (Rpk). There are several other measurements that I took with the profilometer, including valley depth numbers, but Rpk in particular seems to to be the most telling. Valley depth was interesting and difficult to obtain reliably because in addition to 20 years of crap in the valleys of the cylinder walls, between the silicon crystals, the lapping paste builds up in there too I think, despite vigorous cleaning with brake cleaner. I took measurements at three places on the walls, and often had to repeat the measurements several times to get numbers that made sense. Bottom line though is that all the cylinders save for a few showed wear below what my reading indicates is a minimum Rpk of 3, and a desired of .4 - .7ish.
On to lapping then. The kit I bought from AM Tuned had the felt lapping tool, a tin of the lapping compound and some directions. Basically you slather it on the walls (there is just enough for 8, plus 2 re-do cylinders), put some on your felts, and lubricate the whole mess with wd-40. Then you set your watch and start honining with a drill on low RPM (600 or below). I started at 60 seconds on cylinder one and then did about 80 seconds on number 2. After measuring 2 was showing Rpk and RA numbers of .422 and .406 while number 1 was barely at .3 microns. This lead me to lap every cylinder for about 70 to 80 seconds which produced in spec Rpk and RA numbers on all but two. I used the remaining paste to redo these two cylinders, along with number 1 and got all of the cylinders up to at least .3+ and often .4 or .5ish.
All 4 bores on one side ready for lapping in the pic above.
After lapping the bores look 80% better. Some of the wear marks are still there, but there is a much more uniform gray to them, which I read is good.
A messy job, but hopefully one which will pay off with the ring change.
Last edited by Henn28; 05-10-2025 at 05:55 PM.
Current BMW
2002 E53 X5 4.6i (4.4 to 4.6 swap)
2025 G05 X5 50e
Former BMWs
1996 BMW Z3
1998 BMW E36 M3 Sedan
2004 BMW E46 M3
Sprinkled w/hotrod dust
Moderator
Interesting post. Did you buy the Mitutoyo profilometer. Looks pretty pricey.
Member
Rented it from a company in SoCal. 5 days for about $500. Plus a big hold on your card in case it doesn’t make it back in one piece.
it’s a pretty fascinating piece if gear, and can do lots more than I used it for apparently. Thankfully it wasn’t too difficult to set up tho.
i read several rebuild posts going back years and found that most guys don’t lap their cylinders, but most also re-use their rings. The consensus seems to be if using new rings, the cylinders should be lapped to expose more silicon, otherwise the new rings won’t have enough silicon to seat properly on. I had lower compression in a couple cylinders, so I figured lapping was the way to go. Also, it’s just an interesting exercise.
I was surprised to find that more often than not, multiple attempts with the tool were needed to get accurate measurements. From what I read this is due to the fact that for Rpk, for example, you are getting a mean, so the tool needs to ride over and measure sufficient silicon crystals to get an accurate mean. The valley measurements were tougher and often I couldn’t get a good measurement. As I said, I think that may be from the valleys being full of 20 years of crap. Hopefully lapping took care of some of that, and I’m going to do a pressure wash of the whole block, and brake clean the bores. The valleys are important though as that’s what holds the oil.
Finding specs for the bores took a while, but I did come across some definitive literature eventually that at least gave specs for the silicon crystal “peaks”: an Rpk of .3 microns min and between .4 and .7 microns is best. I didn’t come across any specs for the valleys though. I will say that most of the limited info on this doesn’t say to measure, but directs to lap for a given time period (60 to 120 seconds), or strokes with the lapping tool (60, generally). 70 to 80 seconds got me to above .3 in most cases, and above .4 or even .5 in a few cylinders.
here is a pic of a lapped cylinder on the right and a non-lapped on the left. Big difference before and after. Like I said, some wear marks were lessened, but still there, like where the skirts exert force against the cylinder walls.
Time will tell if this was the best thing to do though. I did read a post where a guy said he lapped his cylinders but the motor ended up burning a lot of oil anyway.
After I finished I pulled this little plug just to make myself feel like I was actually making rebuild progress. I have a new one to put in. It looks like it’s a check valve to keep oil from going to the sprayers on startup while pressure is building maybe.

Last edited by Henn28; 04-25-2025 at 09:01 AM.
Current BMW
2002 E53 X5 4.6i (4.4 to 4.6 swap)
2025 G05 X5 50e
Former BMWs
1996 BMW Z3
1998 BMW E36 M3 Sedan
2004 BMW E46 M3
Member
My right front "clunk" over slow speed bumps has progressed now to sounding out when I jab the brakes at slow speed. Sway bar end links didn't fix it, so per discussions above, I'm on to new thrust arm bushings. I had hoped the monoball versions I've got now would have lasted longer, but I'm at 2 years and maybe 15k on them. New Orleans roads are terrible, and I do have the X on some rougher terrain in the winter.
I decided to give the Powerflex bushings a try this time. I've got a spare set of thrust arms and can turn my monoball arms in to Turner if the poly bushings fix the clunk.
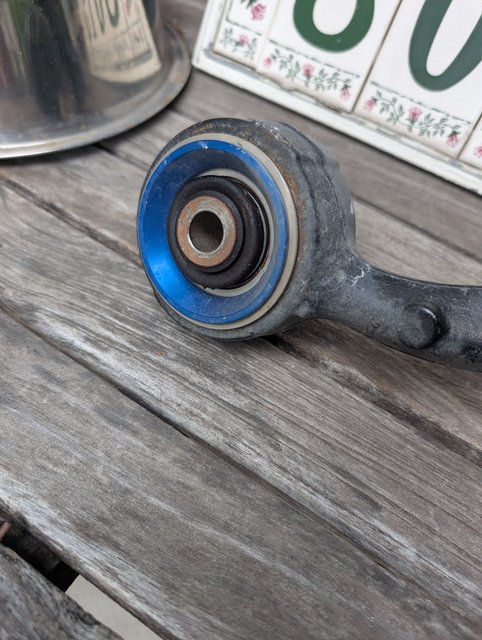
The Powerflex poly bushings came as a kit of four metal insert halves which need to be pressed into the arm, single piece bushings, a metal insert for the bolt to go through, a small packet of grease, and a washer/spacer. Once I pulled my spare arms out of the storage space I quickly figured out that there was no way my bushing kit was going to squeeze the metal collar out of the arm. It made quick work pulling the actual OE bushing out (see pic where the fluid came pouring out as one of them cleared the arm), but even with a little heat on the arm, the metal collar was in way, way to tightly.
So it was off to the local suspension shop today where their 50 ton press made very quick work of the problem Old collars out and new pieces in, and I was on my way home where I set my press up again, this time to squeeze the poly bushing into the bores.
Really the only gotcha is that the instructions stress that the bushings have a front. This is stamped/molded into the bushing flange in small letters, and while the arms have a "R" and "L" stamped on them, I took a look at my X5 to make sure I had the fronts of the bushing bores identified. You can make out some writing on the side of the poly bushing flange in the pic above...that is where it says "front". Somewhat irritating too is that the only place to find the instructions is on line. I'm glad I looked for them though because the bushings look completely symmetrical to me and I'm glad I didn't just pop them in without identifying the front.
Next up is to sked some time on the lift so I can swap them in, along with new ball joints for them to attach to, at the bearing carrier/knuckle. I know one of those bolt heads is stripped, So I've got a reverse thread extractor kit standing by for the job.
It will be interesting to see how the poly bushings compare to the OE and monoball pieces. I liked the monoball a lot, but when the front right wore out the ride and noise level got noticeably worse.
I’ve also got a OE fuel sender unit (left side of x5 gas tank) that was on a crazy sale at FCP, so I grabbed it. Along with an oil level sensor that I’ll eventually need for the M62 rebuild…also OE and also on a big sale. I’m down to an 1/8th of a tank so I’ll pop the sender in when I get home from this trip. I was planning on preemptively doing the O ring fix that guys do to the sender, but the clearance on the BMW part was too good to pass up. It seems that eventually they all fail and the car runs out of gas, while showing 1/4 tank. My sender is original and has 23 years and 170k on it.
Last edited by Henn28; 05-31-2025 at 12:05 PM.
Current BMW
2002 E53 X5 4.6i (4.4 to 4.6 swap)
2025 G05 X5 50e
Former BMWs
1996 BMW Z3
1998 BMW E36 M3 Sedan
2004 BMW E46 M3
Member
I bit the bullet and installed my spare tension struts with the powerflex bushings. Removing the tension struts is a pain, but I also had a set of the ball joints that they attach to at the steering knuckle. I was prepared for a fight, but at the end of the day the ball joints won.
Ive done this job several times now and have found a three jaw puller is the best way to get the struts off the ball joints. My plan after unfastening the struts at the knuckle and the chassis was to unscrew the torx bolts holding the ball joints in, the reattach that end of the strut and hammer on it with a sledge to pop the ball joint out of the knuckle.
My dreams were rapidly crushed when the head on on of the torx bolts stripped. Moving to the other side, I noticed that the bolts there were hex and the first one I tried stripped even more quickly. Good times. Insult to injury, my reverse bit and screw extractor set could not reach the screw heads because the dust shield is in the way. So the ball joints won.
Otherwise the job wasnt too difficult with the three leg puller and my new Gear Wrench torque wrench. And the ride is 90% better. Slow speed clunk is almost completely gone, and things are much more quiet. The right ball joint is very loose and I think causing a slight clunk over very large bumps. These joints have been in for close to 4 years. I changed them when I had the wheel hubs completely off for the motor change.
Mono ball pieces will go back to Turner for a credit I hope. They only lasted 9627 miles and 2.5 years. Time will tell how the poly bushings do.
Eventually Ill need to get those ball joints out. I am going to price out used steering knuckles/hubs so I can do the wheel bearings and ball joints and then just swap them in at some point.
Current BMW
2002 E53 X5 4.6i (4.4 to 4.6 swap)
2025 G05 X5 50e
Former BMWs
1996 BMW Z3
1998 BMW E36 M3 Sedan
2004 BMW E46 M3
Member
I’m way past the sway bar end links while trying to fix my persistent front end clunk. Initially it developed over slow speed bumps, but then progressed to include under braking from slow speeds. I also have a steering wheel shudder at about 50 to 60 mph, like from a wheel balance issue but I just had them balanced a couple weeks while getting an alignment after doing the lower control arms with OE pieces. At this point everything but the ball joints has been replaced, or checked for torque in the case of the sub frame and stiffener plate.
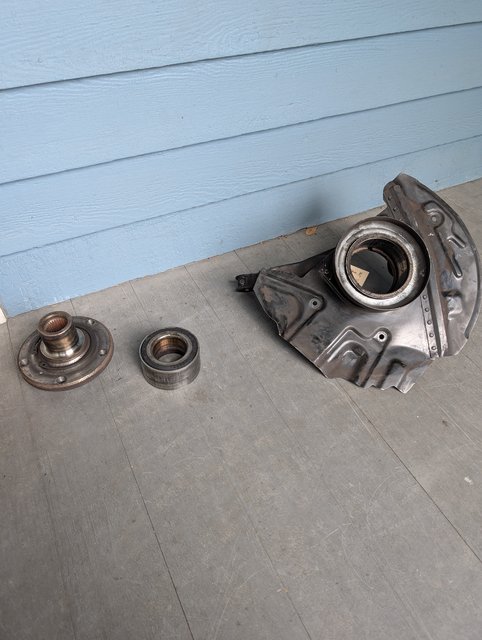
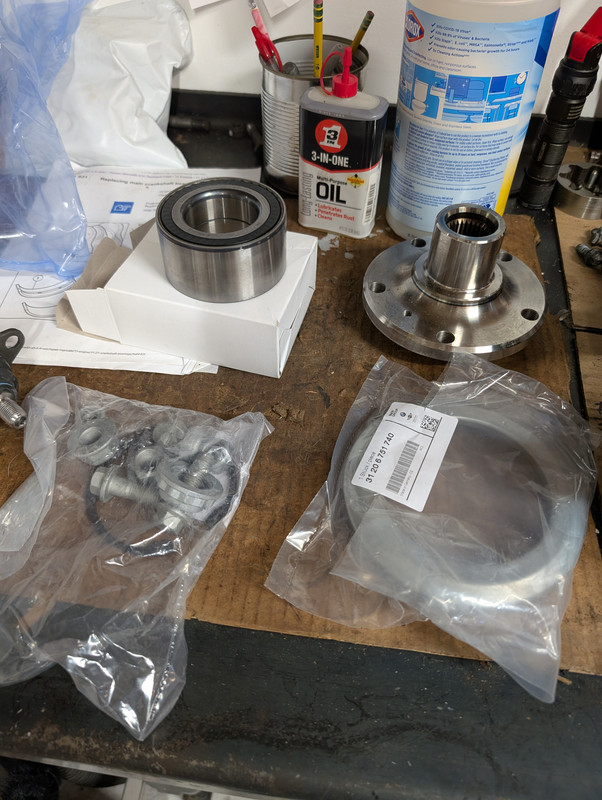
The symptoms initially had me convinced that the Turner monoball thrust arm bushings were bad after 2 years, which is about what I see on OE bushings on the x5. As such, I recently replaced them with poly bushings from Powerflex, and while the clunk under braking has gone away it seems, not the clunk over bumps at lower speeds. While I had the thrust arms off I found the right ball joint that it attaches to at the knuckle to have failed. Super loose in all axes, including up and down…I think I’ve finally found the culprit. Long story short tho, they aren’t coming out easily due to stripped hex/torx heads on the bolts, so I bought an eBay knuckle for the right side ($80 or so) and ordered a bearing kit and hub from FCP. My OE bearings have 173k on them, so it would be silly not to do them as long as I’m going to this trouble.
Thr hub arrived and looked to be in good shape. After a quick clean-up, I took it to my local steering shop and they pressed the hub and bearing out in 1/100 of the time it would have taken me.
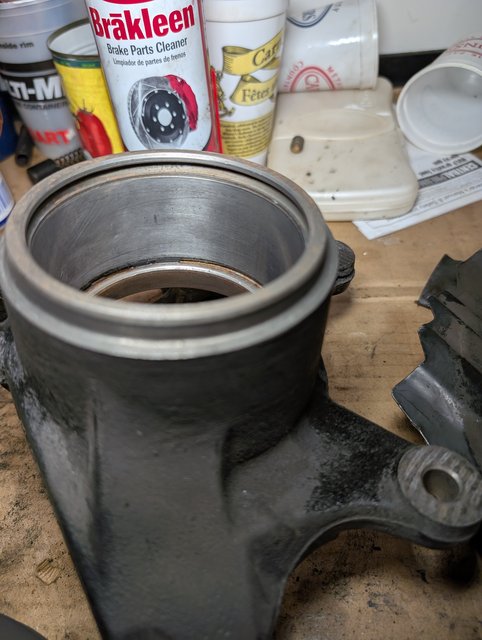
My bearing kit and Loctite 638 order arrive tomorrow, so I tapped off the dust shield and took some 1500 wet dry paper (wd40 lube) to the inner surface of the knuckle where the bearing race sits. Then I put a brush on my drill and cleaned up the bores where the control arms attach. It all cleaned up pretty nicely and is ready to go after a brake kleen wash.
Fortunately the ball joint was held in by torx head bolts that although beaten up, came off easily with a slightly smaller socket hammered on them. The ball joint popped out way easier than I recall any other doing in the past. My lemforder kit has the crappy torx screw heads that strip so easily, so I may see about replacing them with hex bolts. Per TIS the torque on them is only 60 NM, but they have thread locker on them and obviously take a beating under the car from corrosion.
I’ve got a bearing and bushing puller kit that hopefully will have a cup of the right size to get the bearing in, after I freeze it for a while. The hub should be very doable. More to follow once I get the bearing kit and loctite. TIS and Bentley call for loctite 638 on “1/2 of the knuckle surface that the bearing gets pressed into. Neither say which half!?
Last edited by Henn28; 06-18-2025 at 04:31 PM.
Current BMW
2002 E53 X5 4.6i (4.4 to 4.6 swap)
2025 G05 X5 50e
Former BMWs
1996 BMW Z3
1998 BMW E36 M3 Sedan
2004 BMW E46 M3
Member
The torx head screws that are most often used on the tension strut ball joint have always been a hassle for me to remove reliably so I ordered some 20mm, M10, 10.9 grade hex bolts to see if they would work.
I had assumed that there wasnt clearance for a socket, and thats why they use the torx head screws, but not so. I cant think of any reason not to try these, with a little blue loctite of course. Same grade as OE, zinc plated, 20mm.
The bearing value line kit arrived, but Im still waiting on my Amazon prime Loctite 638 which should have been here yesterday, but now shows mid-next week. The inner seat thst the bearing gets pressed into is coated 50% in the stuff. The kit is pretty complet, and has a new dust shield and all the single use suspension nuts needed.
The second problem is that I thought I bought the last word on cheap yet huge Amazon bearing and bushing tool sets, but although it has a ton of cups, none are close to the 90mm I need to pull the wheel bearing in.
Ill either take it back to the machine shop, or try to find a size that will work.
Current BMW
2002 E53 X5 4.6i (4.4 to 4.6 swap)
2025 G05 X5 50e
Former BMWs
1996 BMW Z3
1998 BMW E36 M3 Sedan
2004 BMW E46 M3
 Posting Permissions


 Reply With Quote


Bookmarks