
 Peed-Skillz
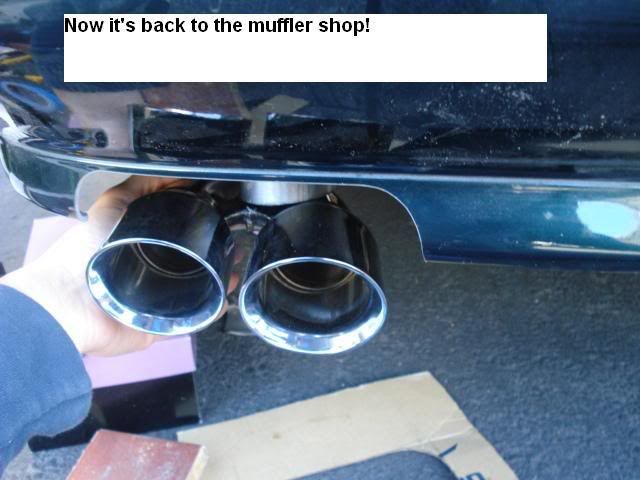
I thought I would put this together for those that hate the way their aftermarket exhaust sits under the bumper.
It's very easy to do, only took me about 30 minutes, but realize that you are working on a finished surface. It's not that hard, but if you are uncertain of your ability to do this, you probably shouldn't. Otherwise, take your time and move slow. A small mistake can f* up your paint, or make your bumper look all hacked up. Besides, cutting slow more than makes up for itself in time saved sanding.
To start, I have practically every cutting tool you can imagine (power and hand). It's NOT WORTH TRYING TO USE A POWER TOOL. Power tools only help productivity and speed, unless your going to spend an hour making a proper jig so you can cut ten bumpers, just cut it by hand.
You will need:
- Coping saw ($5.00 at any harware store)
- Masking tape (blue or green so it doesn't leave residue)
- A sharp pencil.
- Cardboard
- Your exhaust tip (can be attached to the car.. but it may make it difficult. You may want to unhook a hanger to clear up some room)
- Sanding block or small block of wood
- 80, 120-150, and 220 grit sand paper.
- Patience.
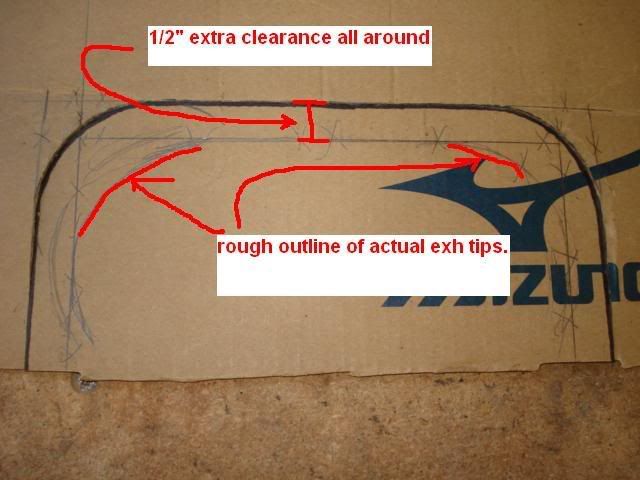
Start by lining your tip up against the cardboard and tracing an outline. Then transfer lines to leave at least 1/2" gap around the tip (1/2" looks bigger on cardboard than it is on the car.. mine is 1/2" for reference inthe pics).
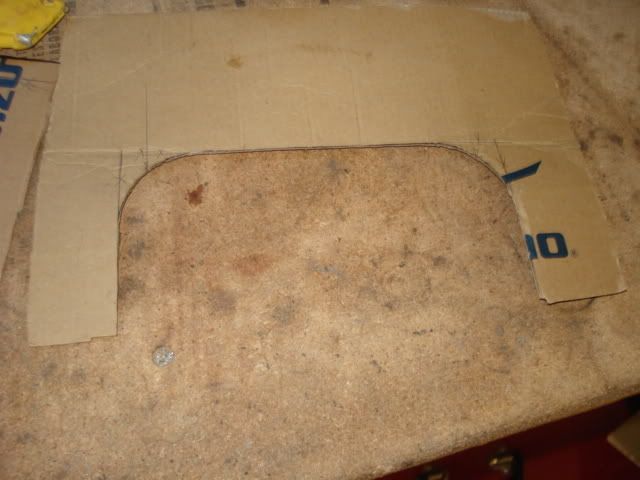
Then cut out said cardboard pattern.
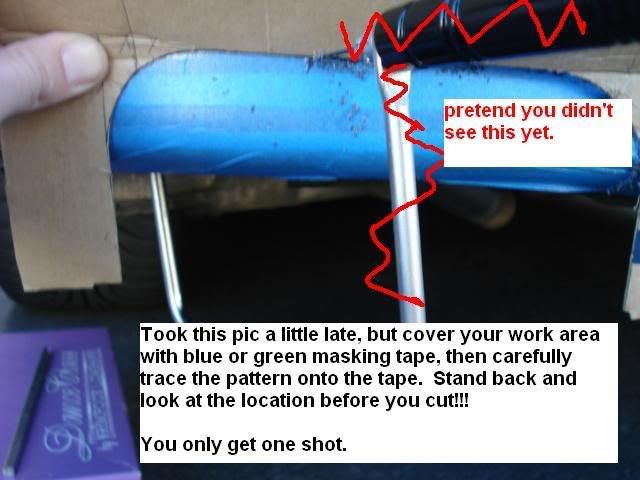
Almost forgot to take this photo, but mask off your work area with blue or green masking tape. Then mark reference orientation marks where you would like the tip to end up visually. Pointer 'V's or Arrows help to locate your marks when they are covered by your pattern.
I scribed a line 1/4" down from the valence seam to align my pattern against. This will keep the tip square with the panel and not look all cock-eye'd and stuff.
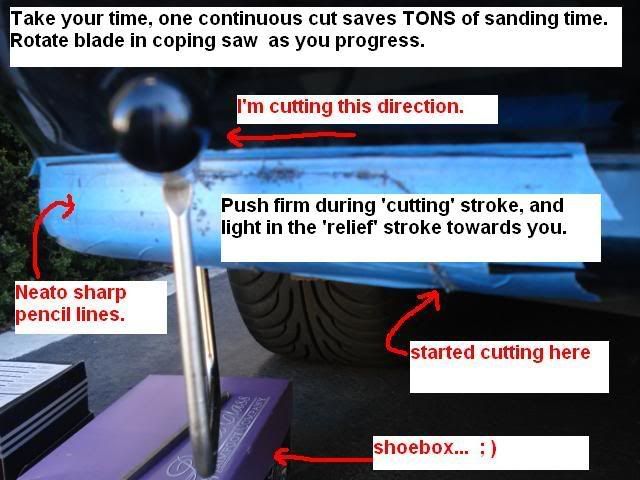
Line up your pattern, trace the line with a sharp pencil, stand back and inspect. Take your time here. I stacked up a couple of shoeboxes to mock-up my tip beneath my bumper.
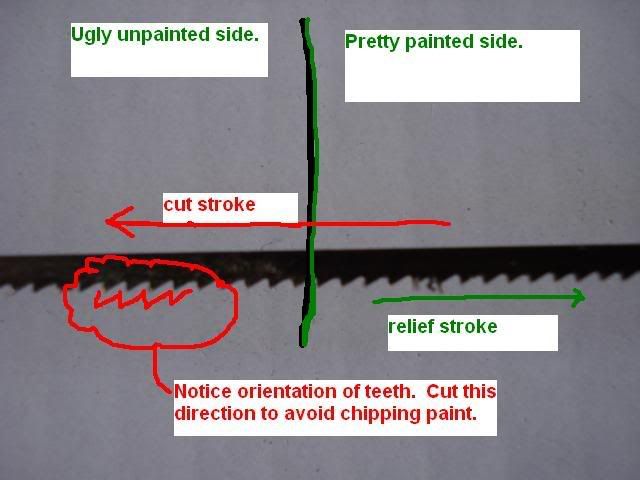
Before you start cutting, orient yourself with your Coping saw.
The teeth have a 'cutting' direction and a 'relief' direction. You want to minimize the risk of "chip-out", which is where the teeth chip/pull paint from the surface. Automotive paint is pretty durable, but it's better safe than sorry. This means you will probably need to flip the blade around in the saw to allow you to cut in the proper direction.
Coping saws are also cool because you can rotate the blade as you cut. Meaning one continuous cut, no seams, less sanding, better finished product.
Start your cut, again, cutting AWAY FROM YOU. When you pull the saw towards you, only apply medium pressure to avoid chip-out.
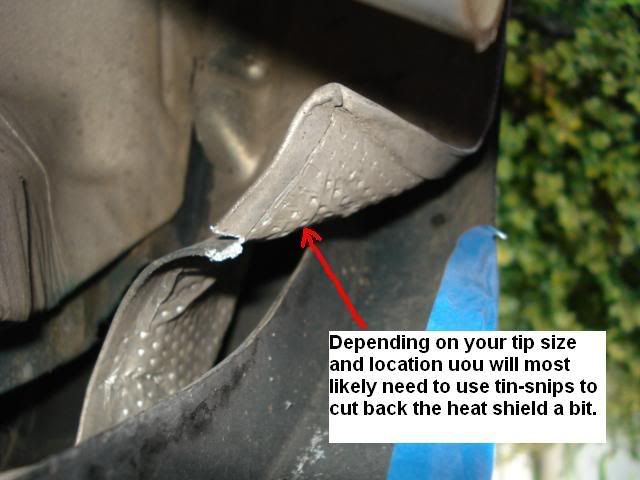
You may or may not need this:
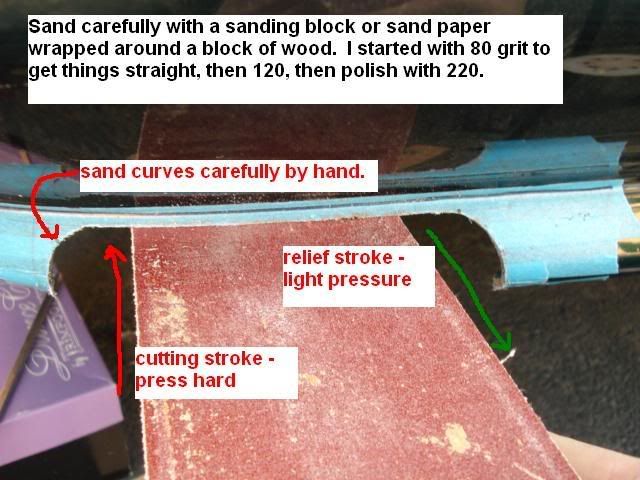
Once cut, use a sanding block with 80 grit to straighten the strait parts. If you took your time, this should be easy. Fold some 120 grit around your fingers and work on the curves.
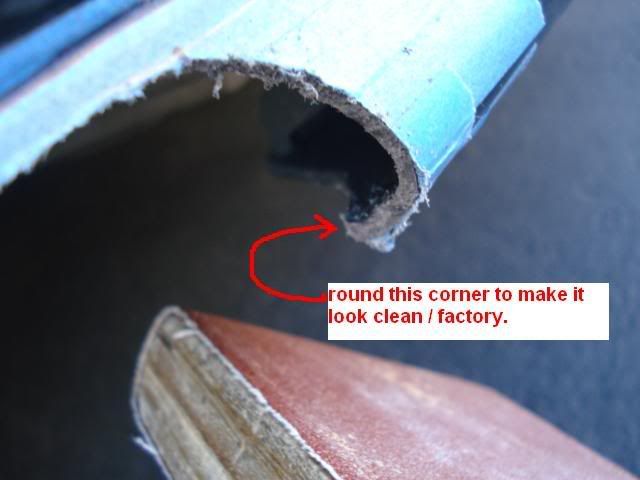
It's all in the details:
Take your time.
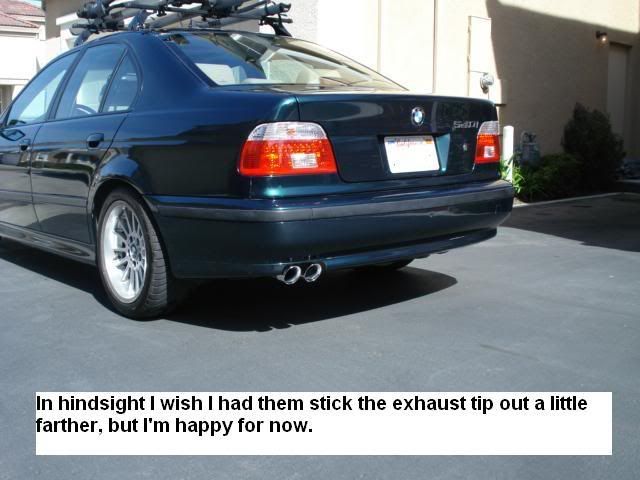
Finished product:
Have fun!
SOME PEOPLE ARE LIKE SLINKIES, NOT REALLY GOOD FOR ANYTHING .....BUT THEY BRING A SMILE TO YOUR FACE WHEN PUSHED DOWN THE STAIRS.
Member
Nice DIY.
Originally Posted by SeanDub

Member
looks good biscuit. great write up!
BMWCCA 484984
Member
looks really nice sine im afraid to hack into my e39 im getting it done at a body shop next week. cutting my bumper is almost like giving myself a flu shot.
Member
Very nice writeup. Great technique and I appreciate how you explained the reasons behind much of what you did.
I have a suggestion: You took a lot of (good) precautions to prevent paint chipping. If you want to take the post-protection a bit further, you can apply touch-up paint to the exposed edges of the cut. That will keep the paint sealed and will hide the grey plastic edge and make it that much more professional-looking. This is one of the final steps taken when one cuts the sheet metal on 96-00 cars to accommodate the 2001+ tail lights.
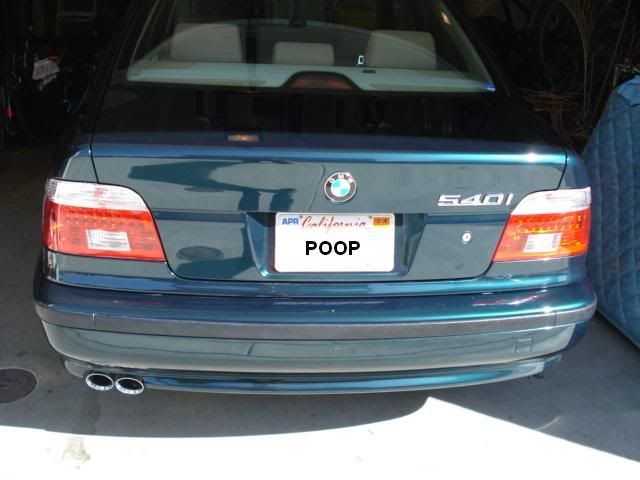
Other than that, great technique and nice license plate!
Peed-Skillz
I honestly thought about it. If it were metal there is no way I wouldn't do it. But you really can't see the black edge in person unless your really looking. And it kinda ties in with my black trim. It's sanded and polished so that if you didn't know otherwise, you would think it was oem.
If I had a white or silver car, it might be more noticable. But for now I just don't think it's worth it.
Glad you like my vanity plates
SOME PEOPLE ARE LIKE SLINKIES, NOT REALLY GOOD FOR ANYTHING .....BUT THEY BRING A SMILE TO YOUR FACE WHEN PUSHED DOWN THE STAIRS.
Member
fantastic diy project,those pipes, realy look cool comeing out the back of your 39, ill be doing this job myself .
Member
Looks great may i ask what muffler your using?
Peed-Skillz
no muffler actually. Just the factory resonator and a straight pipe.
Sounds fantastic, and not as loud as you would think. Can hardly hear it in the car. I could easily add a muffler later, but my shop recommended i try it without it first. Saved me $ too.
SOME PEOPLE ARE LIKE SLINKIES, NOT REALLY GOOD FOR ANYTHING .....BUT THEY BRING A SMILE TO YOUR FACE WHEN PUSHED DOWN THE STAIRS.
Member
I just did this on mr 540i for my Dinan exhaust. The cutout portion was easier than I thought. Ill post some picks when I get it back from the shop.
Member
I guess I cant post pics yet, but I love it. It worked great. My dinan is alot quieter than I thought though. I think Ill be taking out the resonator.
Peed-Skillz
Mufflers break in a little. Give it a few weeks before you change anything.
SOME PEOPLE ARE LIKE SLINKIES, NOT REALLY GOOD FOR ANYTHING .....BUT THEY BRING A SMILE TO YOUR FACE WHEN PUSHED DOWN THE STAIRS.
Member
I'd be a little nervous about using a coping saw just because I think i'd be awkward to handle. Here is a write-up we did last year that has a nice PDF to save to your computer and templates.
http://forums.bimmerforums.com/forum...d.php?t=682844
650hp 10 X5///M5
PERFORMANCE:JB4 w/ meth, stage 2 tune, wrapped downpipes, custom intake
INTERIOR:AVIN 10.25" screen, Blackvue 550 dashcam, 7" tablet for JB4 logging
EXTERIOR:Niche staggered 20's or AC Forged staggered 22's, H&R 2" suspension, LED AE, CF front splitter
325hp 98 BMW 740iL6
PERFORMANCE:///M5 6spd swap, iron sleeves, L/W Teflon coated & silicone impregnated pistons, Sealed Power rings, 3 angle valvejob, P&P head, perf cams, electric fan, CF intake tube w/aluminium heatshield/wrapped MAF tubing, Magnaflow 14816'd, Eaton M112 in-work
INTERIOR:Android Dynavin, hardwired V1 above rearview, 12" RE Audio DVC sub, MTX 81000D monoblock, CF silver trim, 5% tint
EXTERIOR:///MPar staggered 19's, H&R Stage 2/Bilstein HD, custom notched bumper, Shadowline trim, 750iL brakes w/ Axxis pads
190hp 97 328ci
PERFORMANCE:Single mass flywheel, ///M3 clutch
EXTERIOR:Z4///M staggered 18's, rolled fenders, tinted markers
Member
Member
Thanks a million for this post bro I took the leap and did this to my 540 last nite. The results turned out pretty good I must say. Hung a Magnaflow 14816 and looks pretty good. If you're ever in ATL I owe you a cold one.
Member
Looks really great, what was BMW thinking...
Ken
Member
Jcsax400 what is the black trim you used. Looks great!!
2003 540i/6 Sport Alpine White III-Front and rear OEM M5 bumpers with single cut out, M5 # 65 staggered wheels w/10 mm frt spacers, Hankook Ventus V12 EVO, M5 Ft / Rear brakes, SS lines with front Ft / Rear Euro rotors w/aluminum hats, CDV delete, M5 3:15 LSD, Ground Control Coilovers w/remote adjust for rears, M5 rear sway bar w/Beastpower mounts, white gages with stainless rings, M5 pedal covers, Dinan exhaust w/ 18 in Magnaflow resinator, Dinan CAI/High flow intake runners/Throttle Body/Mass Air Meter, Dinan Stage 5 software. Zionsville aluminum radiator w/fan delete, 2 speed electric fan, 545i shifter w/ZHP knob, Alcantara interior, Technical Graphite interior trim, LED lighting ///M
"One day the two great masters will be friends"
Member
This post has totally inspired me to change my exhaust tip. However I need a bit more of an explanation on how to mate the factory exhaust tailpipe tip to an aftermarket tip. there is a wicked curve downward to the existing pipe and I really don't have the tools to weld something on. did the muffler shop solve that problem for you? is there any way you can take pics of where the pipes meet? any additional help is totally appreciated.
Member
Got it from advance auto but u can get at any auto parts store cost about $4..called Door Edge Guard
Member
Thanks a lot.
Was real easy, and is going to look real nice with my upslant tip.
Wish I could post pictures. But when I can I will.
Thanks again.
Member
Sweet this is exactly what Im thinking of doing.
Member
So I did it last night and just got back from the muffler shop.
Looks good. Except that I wish I got a staggered tip.
and because I got a bit of a bigger tip, it looks funky compared to my tiny 17" style 38's
only temporary until my remus exhaust gets here
Next up? .... 18" front 19" rearstyle 32's and a little bit of a drop, and slight tuck in the rear Tee hee... Most expensive part though. So if ANYONE has some style 32's, shocks, and struts, for someone on a budget, lol, let me know.
I want to post pictures but I can't yet.
Looks real nice with that trim. I'm going to get some right now, but it's going to be a bit hard as my tip is already on. xD
~~~~~~~~~~
Last edited by sighkotic; 01-13-2012 at 11:23 PM. Reason: style 32, not 38
 Posting Permissions


 Reply With Quote


Bookmarks