
 I'm the Damn Batman
To all of those who dont want to do the whole M bumper (me included), I give you this alternative.
In a previous post I saw another e36 that used a lip from a golf. After doing a little research i decided to go with a GTI lip off the MK III. One, i like the look and 2 the price difference between the gti lip and one actually made for a non m bumper, saved me about 150+ dollars.
for 40 Bucks i was able to purchase the lip and Create something different. Some will hate it, others might love it. I personally think it looks pretty good. So here is a DIY on how i did this.
First i found a GTI lip on ebay (abs plastic) and bought it 40 bucks
remove the fog lights b4 you do anything
then came the removal of the bumper. This was done by bassicaly pullin all the molding off to expose 4 main bolts. there is also one screw in each fender well that goes through the shroud into the bumper, remove all and slide bumper off half way, then dissconect the ambient air temp sensor
Here are the supports that the 4 main bolts go into
Next i took the bumper and laid it upside down on the ground.
Here came the hard part. Since the lip is not designed for my bumper i had to make it fit. So with the bumper upside down i connected both sides of the lip, centered it by putting hand on both sides and feeling for equality. You can measure if you like but its hard due to the curves.
Once i was satisfied with center i used a wax pencil to mark center.
I then took one side of the lip lined it up and began to mark holes for drilling.
Dont bother to try and hold it in one place, i had to move the lip around to put the holes where i wanted it then id have to bend or pull on the lip to make it work when i was installing.
Once i marked all my holes i drilled them all and used quarter inch nuts, washers and bolts. the bolts are about a half inch to 3/4 inch long. They dont have to be but i wasnt sure what i was in for so i made sure they had some kind of length so i would be ok. Now that i know. they can be a half inch or just under.
I did the same for both sides then loosely bolted it on. aligned it and secured everything.
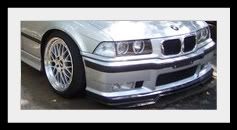
Now the lip extends past the bumper and almost touches the tires. so it will have to be trimmed to the same width as the bumper. I took masking tape and created a line that flowed with the bumper, then marked it with the wax pencil and cut.
Once done just put the bumper back on, stand back and admire.
Sorry there were no pics of the drilling marking and such, but they aren't really needed and it will be different for everyone.
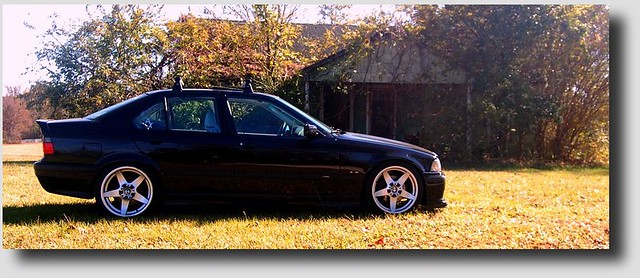
So here is the end result.
here is a close up of the clearance, i used my wallet as a reference,
Clearance from stock height is 4 inches.... pretty damn low. i never planned on lowering the car much, this will deff keep me from doing so
whoring my city lights
for now i left it unpainted. I do plan on painting it black but after an 8 hour day of work and 2 hrs of the install i said fuck it and left it. Plus it matches the faded black molding which now looks dark gray like the lip, so its ok for now. The fitment also isn't perfect. so when i paint it i will adjust and do it perfect, but for now unless your in person and really look you can see little gaps here and there.
So enjoy and thanks for looking. I will be waiting for the rice comments and the ftl comments and whatever. i don't care grow up and just enjoy originality stop being a sheep. And to those who want to follow and do something different, if you have any questions i will be more then happy to help. Save some money and look good doing it.
M poser ftmfllol cheers all

Zip-Tie Engineer
Good DIY!
Member
Nice DIY! Doesn't look bad too bad! I wonder what it would look like painted.
I'm the Damn Batman
in about 2 weeks i will have it painted, maybe sooner, i will then post the pics here to show all. the pics dont do it any justice for how sweet it really looks.Originally Posted by kxl77

Thanks for the positive comments guys
Member
wow!!!!! that looks great!!!! i really like it!!!!!!!!
Fello Ambivero
Don't stop believin'
those damn lips fit on everything....gj looks different and great.
Member
Pretty cool, but I always hate how the center is spiit. That ruins it for me, as they tend to say after a few weeks.
A$$ to A$$
not bad, deff paint it though
I'm the Damn Batman
yeah that was my biggest dissapointment that it was 2 pieces, but with the way i bolted it, it should not sag.once its painted, the split in the center should be less noticable
i hunt milfs
hmm vr6 lip.. I am getting one for my golf, maybe I could try my 1 piece stock lip off of my golf on my 325 lol.
I'm the Damn Batman
go for it, thats the lip that inspired me
-=[DTM driven]=-
is it going to be in production? i bet a lot of pplz would buy it..hint hint
DTM driven 1 of 8 OG members
Member
u could just bondo the split, shud be pretty easy
Member
I could never live with a split in the lip, I don't even know how some of the VW owners can put up with it! Cool DIY though, painting it black def should be on the cards!
///Weisspower
raw-foodist
mad props, good work
Yeah mayne
Nice job. That looks great!
Member
cool, looks tuff
resident
i like it, it looks good and is definitely different!! mad props to you man
+1 on fiberglassing that split tho...cover that up, make it look PPPUUUUURRRRRFFECT!1
-ducky
I'm the Damn Batman
thanks again guys.
Yeah the split is kinda annoying. When i go to paint it and everything i might fill that in at the same time. Ill keep everyone updated
Member
Good job...I think you should leave it unpainted...it matches the moldings and if you got a set of M3 moldings it would really pull it all together...Plus, that thing is so low already that painting it is only asking for paint cracks and scrapes (which will be inevitable...trust me!)...
Props for a DIY--good to see something different. Any pics of the areas where you did cutting?
1997 328i Jet Black (Sold)
1995 M3 Daytona Violet (SOLD)
Planning his return to Bimmerdom...
Member
I like, resembles similar shape and depth to an alpina splitter, great job!
I'm the Damn Batman
i will take pics of that today and show just how far out the sides stuck. It might look a little rough, but when i do the finishing touches to the lip i'm going to sand them down and make it run a little better. Its not too noticeable, but to me it is because i know its there
EDIT: here are some more pics, here is the side view and a shot or 2 in the light
In this pic you see how it lines up now, the lip originally extended past that and almost touched the tire. I cut off about 3-4 inches off each side to match the bumper line

Last edited by spoonerDee; 10-28-2007 at 11:39 AM.
resident
when i read this, i agreed with you, but seeing the second set of pics made me realize it just looks unfinished...
-ducky
I'm the Damn Batman
indeed, as i stated earlier it does need some final fitting, but that will come when i fill the gap and paint it. im going to join the 2 pieces, sand and smooth it so i can hide the gap and paint it black
Also HOLEY CRAP!!!! i forgot what its like to drive around so low its been forever since i have driven around with a low bumper. really takes some getting used to, to not scrape lol.
in about 2 weeks ill finish it, this comming weekend im going to see a concert and having company. so the following weekend it will get finished
τhεy sεε mε rσllîn.. ♫♪
very cool.. im surprised people havent tried many other lips. i did that trick with 2 previous cars, you would be surprised how many lips would be close enough to make fit.
i say keep the lip as is and paint the bumper/door mouldings.
 Posting Permissions


 Reply With Quote
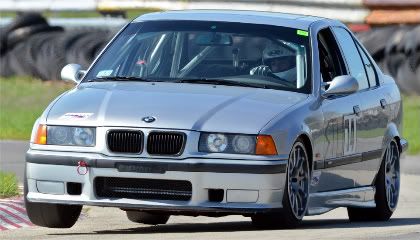


Bookmarks