
 Member
So I wired up my Spal electric fan today and here is how I did it. This may not be the trickest wiring job but I looked around for a while here and couldn't find anything like this.
Just the wiring took a couple of hours to do but I work very slow.
Dissconnect your negative battery cable first before doing any electrical work!!
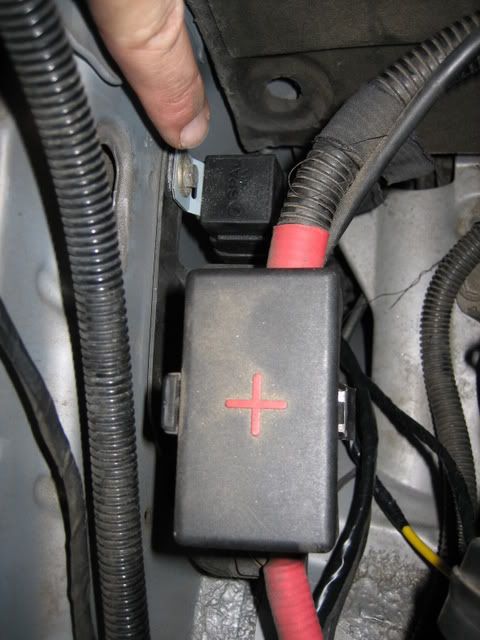
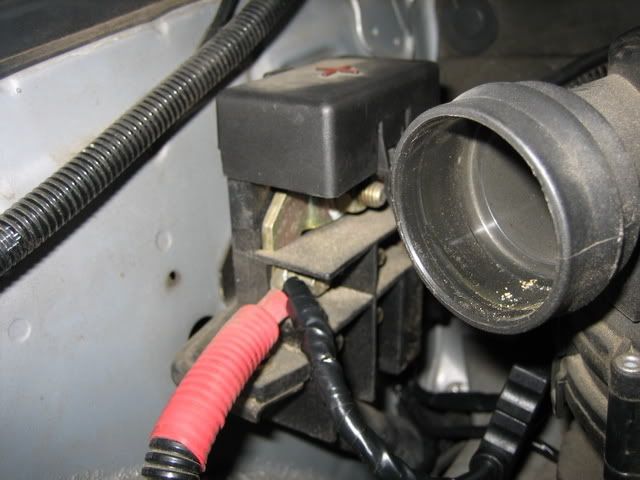
1st, I found a cool place to mount the Fan Relay. Right behind the power block on the pass side of the car is the perfect spot.
The only wires from the relay that need to go all the way to the fan are the red and grey wires. So I test routed them together along the top of the fender well and then down behind the right headlight. I figured out that they needed to be tape together for about 48" with about another 10" free so the grey wire could go up to the fan switch and the red wire to the fan plug.
The yellow wire from the relay goes to the power block but you can cut off all but about 3" of it and crimp on the fuse holder and terminal connector and tape it all up.
The orange wire from the relay needs to be about 21" long and taped up to about 18".
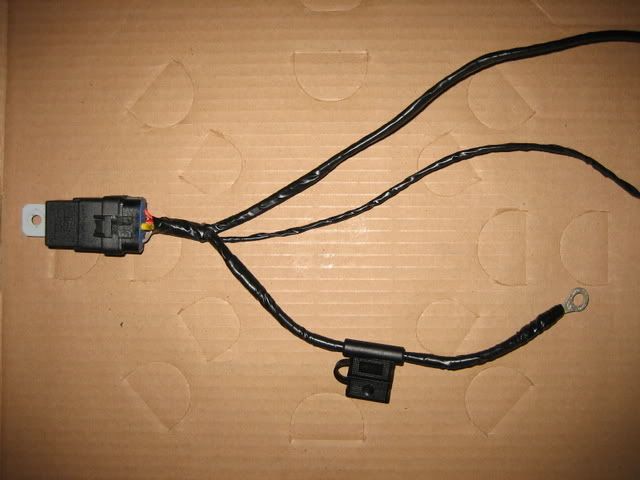
This is what the relay should look like now:
- top wire is the red and grey wire wrapped together
- middle wire is the orange wire that goes to the diagnostic port
- bottom wire is the yellow...dedicated power source and fuse holder
I then bolted the relay back into place behind the power block. I pulled the wrapped red and grey wires underneath all the wires that are clipped to the top of the pass fender well and then down behind the right headlight.
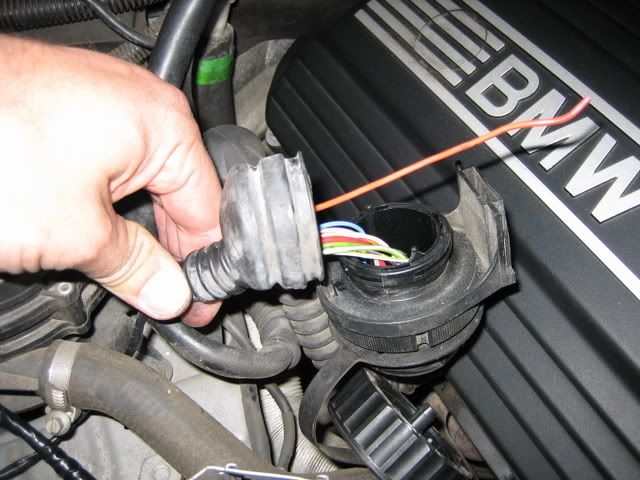
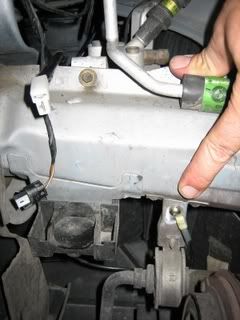
Then I pulled the diagnostic port off of its mount and pealed the boot off the bottom of it...routed the orange wire down underneath the secondary air pump and into the bottom of the boot of the diagnostic port. A little plastic/rubber lube works wonders here.
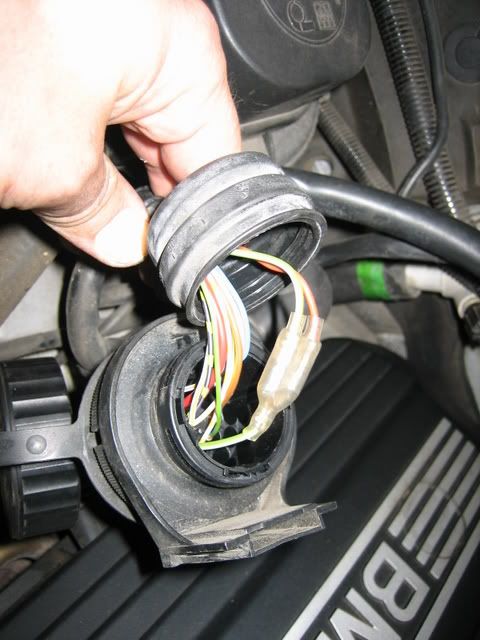
Then I cut the wire to pin 16 and installed a double connector on the pin side of the cut. Then put a connector on the orange wire from the relay and a connector on the Green/white striped wire that I cut and connected them all together.
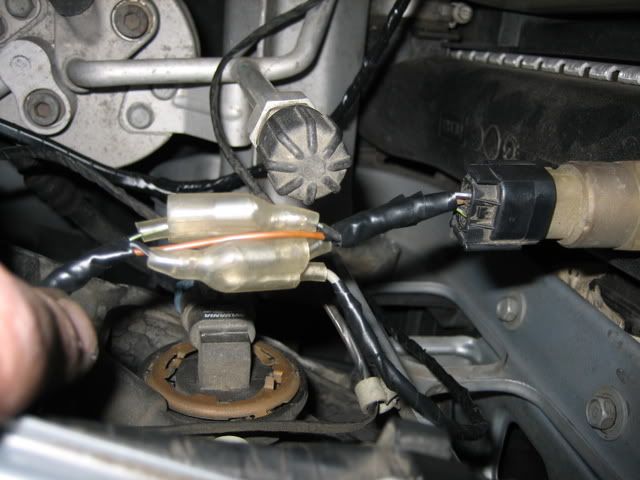
Then I installed a double connector onto the black/white stripe wire from the fan switch in the side of the radiator (I put a double connector on both wires for testing later but you prob only need to tee into the black/white stripe)
I then went back and popped the side cover off of the power block and connected the dedicated power source for the relay.
In the next couple of days I'll get around to installing the fan onto the radiator and I'll post pics of that too.
Last edited by E36M3E; 10-29-2006 at 09:48 AM.
Eric Paul Eviston - 1 Piece Silicone Hose M50 Manifold Conversion Kit
******M50 Manifold Install Trouble Shooting Guide Here: www.m50manifold.com
'98 M3/4 - ECIS CAI, S50 Manifold, Conforti Software, 16" Spal Puller, UUC Pulleys, Fan Delete, UUC Stage 2 Fly w/M5 Clutch, UUC Blacks w/TMEs, X-Brace, GC RTAB shims, GC RSMs,
M Roadster lever, 245x40x17 all 4 corners, Drilled Zimmermans, Motul RBF600 and Redline Synth fluids.My Dyno HERE
My Website: www.m50manifold.com
My Email: info@m50manifold.com
Member
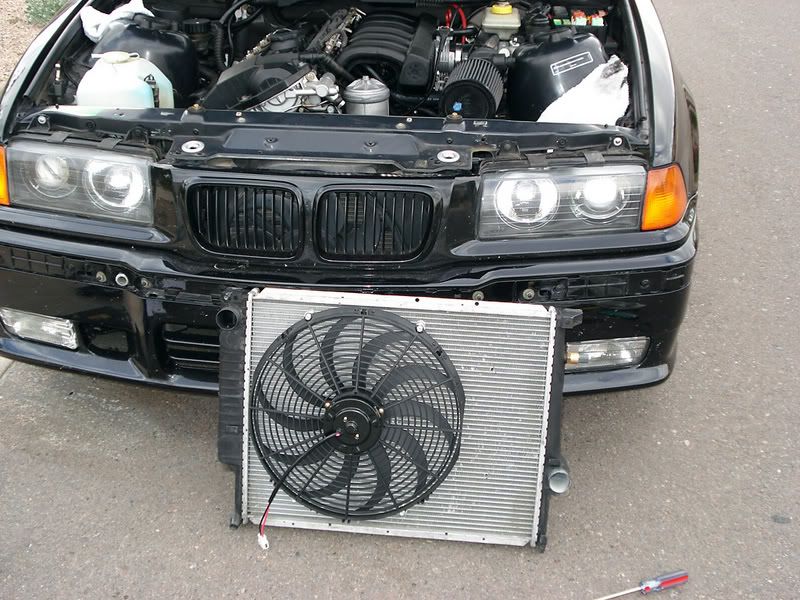
Here are the pics and tips of the fan install.
Drain the coolant from the system. 1st from the radiator drain then from the block drain back by the 4-6 exhaust header...use a giant pan, cardboard, and lots of rags. It tends to go everywhere from the block drain plug.
Remove the alternator cooling duct and the front top shroud.
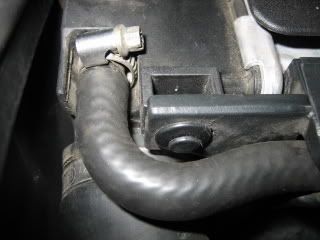
At the top left of the radiator disconnect the small hose from the radiator.
Remove the hose at the lower left side of the block under the throttle body.
Use a fan clutch tool or giant screw driver or pry bar to hold the clutch and loosen the fan nut...turn clockwise to remove!!
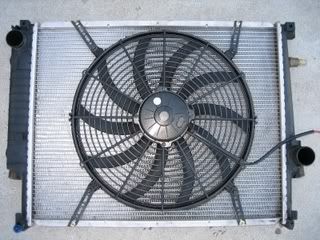
Take the small plastic rivets out of top left and right of the shroud that hold the shroud to the radiator. (pic above and this one too)
Remove the fan and the shrould together.
Loosen the 2 hoses going from the radiator to the the Tstat houseing.
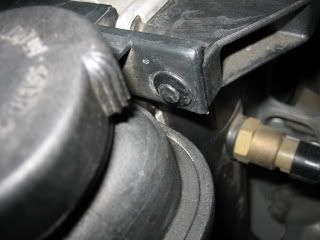
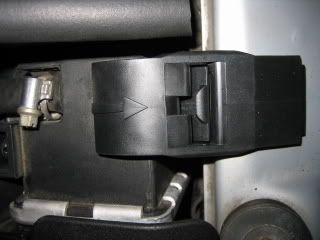
Try to, very carefully, pop the radiator top mounts loose by inserting a small screw driver into the slot and gently prying to release the cam lock.
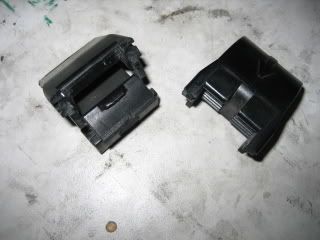
You may want to call your local dealer or indi parts store ($5/set) and see if they have these in stock because mine came apart like this:
Remove the radiator.
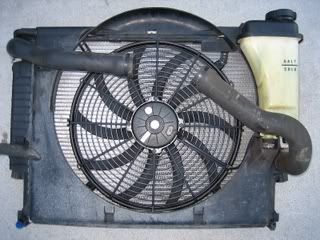
I layed the shroud back onto the radiator and put the fan in place and drew a circle around it with a sharpie marker.
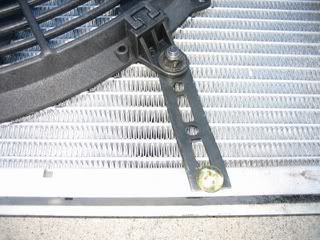
Then I used clip nuts and sheet metal screws to attach the fan mounting brackets to the existing holes in the edge of the radiator. And cut off the ends of the brackets.
Tighten everything up and remount the shroud. I found that I had to cut slots in the bottom of the shroud plastic to make way for the bottom brackets.
Also the brackets had to be bent slightly to get the fan to sit tight against the radiator. I also used the spal mounting darts to hold the brackets tight against the radiator.
I also cut a slot in the shroud for the fans wiring harness.
I used a body mount for the A/C compressor supply line for the ground from the fan harness. I ground the paint away, installed the wire and then repainted over it.
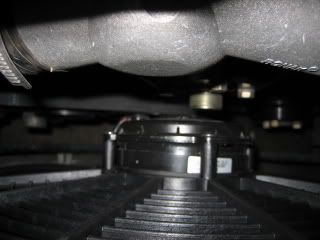
Reinstall the radiator with the fan and shroud attached. Hook up all the hoses and check and make sure the drains are all closed and torqued properly.
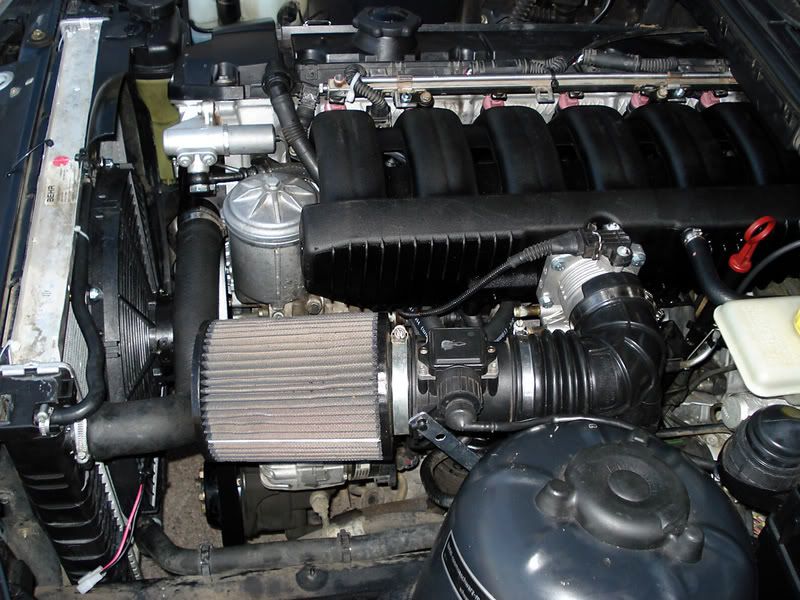
There isn't much room between the fan motor and the water pump shaft. But I don't think they will ever touch. You could use the 1600CFM straight blade fan if you want more room. Its only 2.5" thick as opposed to the 3.4" thick 2070CFM curved blade fan.
Loosen the bleed screw at the top of the radiator by the fill cap. Fill with 50/50 mix BMW coolant and distilled water. I found I needed 2 containers of coolant and 2 containers of distilled water. Only had 1 of each and I ran out the first time I tried to bleed the system. You could prob get away with just using more distilled water.
Have a helper start the car and hold the RPM and watch the temp gage for you while you bleed the system. Heater controls on full hot. (you can leave the fan on low)
I've prob left out some steps as I did this over a week ago.
Eric Paul Eviston - 1 Piece Silicone Hose M50 Manifold Conversion Kit
******M50 Manifold Install Trouble Shooting Guide Here: www.m50manifold.com
'98 M3/4 - ECIS CAI, S50 Manifold, Conforti Software, 16" Spal Puller, UUC Pulleys, Fan Delete, UUC Stage 2 Fly w/M5 Clutch, UUC Blacks w/TMEs, X-Brace, GC RTAB shims, GC RSMs,
M Roadster lever, 245x40x17 all 4 corners, Drilled Zimmermans, Motul RBF600 and Redline Synth fluids.
My Website: www.m50manifold.com
My Email: info@m50manifold.com
Member
Nice. there's a DIY somewhere around here that shows the exact same relay placement and wiring. thats how i did mine as well.
You also don't need to pull the radiator. You can pull the shroud up enough to slide the fan in, and then secure the mounting straps as you showed from below the car for the bottom and the engine bay of course for the top.
Good mod!
Member
yeah I imagine you could do it without pulling the radiator. I wanted to change my water pump and TStat housing and pulleys at the same time...and I'm a little anal anyway so I prob woulda pulled it because of that too. But it made getting to all that other stuff soooo much easier.Originally Posted by TXBDan

E
Eric Paul Eviston - 1 Piece Silicone Hose M50 Manifold Conversion Kit
******M50 Manifold Install Trouble Shooting Guide Here: www.m50manifold.com
'98 M3/4 - ECIS CAI, S50 Manifold, Conforti Software, 16" Spal Puller, UUC Pulleys, Fan Delete, UUC Stage 2 Fly w/M5 Clutch, UUC Blacks w/TMEs, X-Brace, GC RTAB shims, GC RSMs,
M Roadster lever, 245x40x17 all 4 corners, Drilled Zimmermans, Motul RBF600 and Redline Synth fluids.
My Website: www.m50manifold.com
My Email: info@m50manifold.com
Member
Wow that is complicated....I just spliced into the power wire to the aux fan (located in wiring loom behind drivers side headlight) and ran ground to grounding bolt in same location. I mounted to shroud to keep rubbing on radiator to a minimum. The only drawback is I had to buy a very thin spal fan with straight blades. LOUD - but at least I know it's running.
Member
as far as the wiring goes...I simply followed the manufacturers recommendation of providing a dedicated power source for the Spal. but I'm sure there are many other ways of doing it that work.
Eric Paul Eviston - 1 Piece Silicone Hose M50 Manifold Conversion Kit
******M50 Manifold Install Trouble Shooting Guide Here: www.m50manifold.com
'98 M3/4 - ECIS CAI, S50 Manifold, Conforti Software, 16" Spal Puller, UUC Pulleys, Fan Delete, UUC Stage 2 Fly w/M5 Clutch, UUC Blacks w/TMEs, X-Brace, GC RTAB shims, GC RSMs,
M Roadster lever, 245x40x17 all 4 corners, Drilled Zimmermans, Motul RBF600 and Redline Synth fluids.
My Website: www.m50manifold.com
My Email: info@m50manifold.com
OVERHAULIN'
did mine this weekend.
http://forums.bimmerforums.com/forum....php?p=7798129
Member
may I ask why you mounted it in that position?
Eric Paul Eviston - 1 Piece Silicone Hose M50 Manifold Conversion Kit
******M50 Manifold Install Trouble Shooting Guide Here: www.m50manifold.com
'98 M3/4 - ECIS CAI, S50 Manifold, Conforti Software, 16" Spal Puller, UUC Pulleys, Fan Delete, UUC Stage 2 Fly w/M5 Clutch, UUC Blacks w/TMEs, X-Brace, GC RTAB shims, GC RSMs,
M Roadster lever, 245x40x17 all 4 corners, Drilled Zimmermans, Motul RBF600 and Redline Synth fluids.
My Website: www.m50manifold.com
My Email: info@m50manifold.com
OVERHAULIN'
the nut securing the fan blade to the motor sticks out and would have hit the radiator so i had to space the fan away from the rad. this caused the fan motor to hit the water pump so i had to mount the fan offset. i was able to use half of my stock shroud so that expansion tank could still mount in the stock location.
hey eric, i noticed that the 3/4" hoses used in the M50 swap suck in a little bit at idle and then if i rev the engine they expand back to normal. is this normal? the car runs great, no CEL or weird noises, and i'm 99% sure everything is hooked up correctly... just curious since my 332i had non of this mess under the manifold
Member
yeah that's normal if you used a hose material with a thin wall. this is common when you use hose like heater hose. If you didn't use a fuel/oil resistant hose it will break down over time and you'll have to do it over again.
I use 3/4" fuel line so it won't break down.
Eric Paul Eviston - 1 Piece Silicone Hose M50 Manifold Conversion Kit
******M50 Manifold Install Trouble Shooting Guide Here: www.m50manifold.com
'98 M3/4 - ECIS CAI, S50 Manifold, Conforti Software, 16" Spal Puller, UUC Pulleys, Fan Delete, UUC Stage 2 Fly w/M5 Clutch, UUC Blacks w/TMEs, X-Brace, GC RTAB shims, GC RSMs,
M Roadster lever, 245x40x17 all 4 corners, Drilled Zimmermans, Motul RBF600 and Redline Synth fluids.
My Website: www.m50manifold.com
My Email: info@m50manifold.com
Dakarian Assault
Very nice writeup. So now your fan comes on when it's at temp? Nice. I ran the orange wire to a switch. I think I didn't wire the grey wire yet as I was waiting on a writeup like this....it's been several months so I forgot. Anyways, I just turn my fan on whenever I'm in traffic or when it's hot outside with my A/C on. Kinda annoying.
Member
yeah, for track days I switch the wires around so the spal fan comes on full blast at the low temp setting with the aux fan on low speed. the coolant temp will never get to the high temp setting on the switch with both of those fans running.
for everyday driving the spal is wired into the high temp position of the switch and it never comes on because the aux fan keeps the temp below the high temp switch point.
and as far as my fan nut...the nut was not touching the radiator so I mounted it flush against the radiator. hmmm. wonder why there'd be a difference.
Eric Paul Eviston - 1 Piece Silicone Hose M50 Manifold Conversion Kit
******M50 Manifold Install Trouble Shooting Guide Here: www.m50manifold.com
'98 M3/4 - ECIS CAI, S50 Manifold, Conforti Software, 16" Spal Puller, UUC Pulleys, Fan Delete, UUC Stage 2 Fly w/M5 Clutch, UUC Blacks w/TMEs, X-Brace, GC RTAB shims, GC RSMs,
M Roadster lever, 245x40x17 all 4 corners, Drilled Zimmermans, Motul RBF600 and Redline Synth fluids.
My Website: www.m50manifold.com
My Email: info@m50manifold.com
OVERHAULIN'
mine's not SPAL, its just an knock off, although it looks very much the same.
Dakarian Assault
Can you elaborate on this a little more please? When you say you switch the wires around for track days.....which wires are you talking about? The grey and orange?
Member
I swap the grey wire at the fan switch mounted in the side of the radiator...1 of the switch points in the fan switch is 91c(195F) which is where the aux fan would normally come on in low speed mode while the viscous engine fan would do the rest. the other switch point is 99c(210F) which is where the aux fan would normally come on in high speed mode in extreme cases of high ambient temps and stop and go traffic while using the A/C and the viscous fan is not sufficient.
for track days I wire the grey wire for the spal into the low temp switch wire so it comes on and keeps the temp below 200F. and for everyday driving I have it wired into the high temp switch wire so it, the spal, comes on at 210F and keeps the temp somewhere below 215F.
if you need the wire colors/stripes of the fan switch, I'll have to get them for you later as I don't remember them off the top of my head.
Eric Paul Eviston - 1 Piece Silicone Hose M50 Manifold Conversion Kit
******M50 Manifold Install Trouble Shooting Guide Here: www.m50manifold.com
'98 M3/4 - ECIS CAI, S50 Manifold, Conforti Software, 16" Spal Puller, UUC Pulleys, Fan Delete, UUC Stage 2 Fly w/M5 Clutch, UUC Blacks w/TMEs, X-Brace, GC RTAB shims, GC RSMs,
M Roadster lever, 245x40x17 all 4 corners, Drilled Zimmermans, Motul RBF600 and Redline Synth fluids.
My Website: www.m50manifold.com
My Email: info@m50manifold.com
Member
I was hoping you could provide the fan switch wire colors for the street/track swap you're talking about. Also, where did you get the cool double wire connectors? I've looked all over and can't find anything that's that secure.
Thanks!
1999 E36 M3 S/C
Man With The Plan
im def doing this, i didnt read all the posts but what are the dimensions on that fan ? List of parts used to install all this ?
+ can we get a vid on how loud you say this fan is ?>
...When you get a blackeye from trying to change the shift knob.
Member
Newbie here...what's the benefit / reason ppl do this mod?
OVERHAULIN'
your stock engine driven fan is:
1. Loud
2. Annoying
3. robs your engine of a few xtra HP
4. stresses your water pump
so it's better to not have it at all.
Member
the main reason I did it was to keep the engine fan from exploding and taking out my hood and new radiator. kinda like $175 worth of insurance.
and there maybe is a tiny bit of HP freed up.
E
Eric Paul Eviston - 1 Piece Silicone Hose M50 Manifold Conversion Kit
******M50 Manifold Install Trouble Shooting Guide Here: www.m50manifold.com
'98 M3/4 - ECIS CAI, S50 Manifold, Conforti Software, 16" Spal Puller, UUC Pulleys, Fan Delete, UUC Stage 2 Fly w/M5 Clutch, UUC Blacks w/TMEs, X-Brace, GC RTAB shims, GC RSMs,
M Roadster lever, 245x40x17 all 4 corners, Drilled Zimmermans, Motul RBF600 and Redline Synth fluids.
My Website: www.m50manifold.com
My Email: info@m50manifold.com
Member
low temp is the green stripe out of the switch and high temp is the white strip out of the switch.
there are 3 wires coming out of the fan switch mounted in the radiator.
on autocross days I plug the grey wire from the Fan Harness into the black/green stripe wire...OE aux fan come on at 91 in low speed and the spal comes on full blast.
for every day driving I plug the grey wire into the black/white stripe wire so the OE aux fan still comes on at 91c but if the coolant temp hits 99c the aux fan goes to high and the spal comes on full blast too. but my temp has never hit this switch yet.
oh and the wire connectors came from my days as a service manager at a motorcycle shop. I bought an electrical wiring kit put together for motorcycles and still have a bunch of the stuff in my toolbox. sorry. that's all I can say, as the electrical stuff you find at pepboys, autozone, etc is kinda junky if you ask me.
hope this helps.
E
Eric Paul Eviston - 1 Piece Silicone Hose M50 Manifold Conversion Kit
******M50 Manifold Install Trouble Shooting Guide Here: www.m50manifold.com
'98 M3/4 - ECIS CAI, S50 Manifold, Conforti Software, 16" Spal Puller, UUC Pulleys, Fan Delete, UUC Stage 2 Fly w/M5 Clutch, UUC Blacks w/TMEs, X-Brace, GC RTAB shims, GC RSMs,
M Roadster lever, 245x40x17 all 4 corners, Drilled Zimmermans, Motul RBF600 and Redline Synth fluids.
My Website: www.m50manifold.com
My Email: info@m50manifold.com
A D M I N
Jmargo helped me do mine. I love it. The plastic tabs it comes with are a joke.
U MAD?
Member
nice writeup. I will be doing this shortly.
Man With The Plan
So wtf was the size again of this fan ?
...When you get a blackeye from trying to change the shift knob.
A D M I N
Go to bimmerworld.com for the fan sizes.
U MAD?
 Posting Permissions


 Reply With Quote
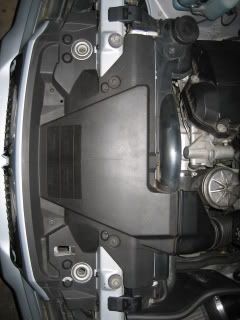


")

Bookmarks