
 Member
Looking good!
2008 Lexus LS460
2016 Lexus NX200t
PUREVIP
Island Elites - West Coast Elites
Team Airrex
ClubLexusHawaii
2002 540iA Sport (SOLD)
1998 M3/4 (SOLD)
Just say NO to nascar
thanks!
Just added more pictures!
Member
Are the SSR GT3s Rims factory or aftermarket? What size are those?
I have boost envy...
The new pics are very cool! Is the ride significantly more harsh over the stock sport supension?
99 540i/6 - 18" Breyton Visions, LED tail lights, Hella Euro Angel Eyes, ATE Rotors, Hawk HPS Pads, K&N filter, CDV-delete, ZHP Weighted Shift. Making life in traffic a little easier...
Just say NO to nascar
Thanks! just for that, i added one more
Its just slightly stiffer. Its not harsh at all. It feels good but I want to get rid of the body roll. I need to at least put the m5 front sway on. I have the m5 rear already.
We will just have to meet up one day and you can drive the car. I cant do it for a while though cause im crazy busy at work and the GF just surprised me yesterday with a 7 night cruise over thanksgiving (her treat) so Im going to be out for a while.
Last edited by John 540i6; 11-06-2006 at 06:17 PM.
Member
Shawn C the SSR GT3 wheels are aftermarket , the sizes are 18x8.5 front & 18x9.5 rear. They look like they could've been a factory option wheel.
2003 530i sedan , bluewater metallic , premium package , Axxis deluxe plus pads , SSR GT 3 wheels , Eibach pro springs , otherwise all stock for now.
I have boost envy...
Definitely - work is insane for me as well. New project with a lot of visibility. Next time me and my cousin (1st 530) go for a cruise in north Georgia we will give you an invite. Got a friend with an 03 Z4 who might go as well. Could probably give that suspension a bit of flex coming down some of the road between Hiawassee and Helen. Gave my kids motion sickness...Originally Posted by John 540i6

99 540i/6 - 18" Breyton Visions, LED tail lights, Hella Euro Angel Eyes, ATE Rotors, Hawk HPS Pads, K&N filter, CDV-delete, ZHP Weighted Shift. Making life in traffic a little easier...
Member
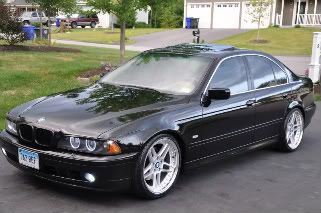
very nice - I like how the drop is even front and rear. The raked look of my eibachs are kinda bugging me... the front is perfect but the rears could be like a half inch lower.
Member
[quote=It feels good but I want to get rid of the body roll. [/quote]
Do you have STB? They work good for me.
Just say NO to nascar
cool. you got a deal. Ill take my car and im sure my roommate in his m3 wouldnt miss it for the world. I have been wanting to go back to the tail of the dragon at deals gap. It was so much fun.
Member
Hey John - gonna drop my new 540i, thinking about going the intrax route this time instead of the eibachs I had on my 528. What ebay seller did you get your intrax springs from?
Member
thanks for the write up. I hope to do mine this spring
Member
Just got finished replacing my blown OEM struts with some Bilstien HD's and I have a few extra pieces to add to this wonderful write-upI accomplished this 2 separate weekends(fronts one weekend, rears the next). The following is specific to my 1998 528I sport, and is to go in addition to the write-up in post one of this thread(and not by itself).
Overall:
* Having 2 people is immensely important, especially for the weekend warrior with no lift. You pretty much need one guy to push down on the hub, while the other guy is wiggling each strut assembly out.
* A spare jack is very useful to raise the hub to make getting the endlink out of the sway bar easier.
* You pretty much need a compressor and impact gun for the center locking nut holding the strut assembly together.
* The Bentley manual is pretty much worthless besides the diagram of how to properly align the front strut assemblies.
* The new center locking nuts provided by Bilstien are bigger than OEM(unless my originals were previously changed to smaller).
* PB Blaster, an impact gun, breaker bar, and good set of sockets are your friends
Fronts:
* As mentioned, removing the brake calipers in the front would probably be most beneficial(although I did not).
* The new center locking nut provided by Bilstien for the front sturts was not usable with my impact gun - there simply was not enough room to get a socket over the nut in the assembly.
* If you run into a situation where you cannot wiggle the tophat back into place, try attaching the tophat first, get the strut in the lower mount, and raising the whole assembly into place. Once in place, you can put the locking nut in place and tighten everything down. I had some issues getting the tophat to align back into place without doing this.
* Total time for the first strut was about 8 hours, however, the second one took 22 total minutes.
Rears:
* Apparently the backseats in my 1998 are a bit different than newer models. I watched this video on youtube to help, but it wasn't exactly the same: [ame]http://www.youtube.com/watch?v=MG_H8z8Hkp8[/ame]
Since the entire backseat folds down, I only need to remove the lower portion, and the two back (but side) portions - not the entire back portion. These two side pieces are held on by one bolt near the bottom. There is a retainer clip type deal near the top of this portion - simply apply a good amount of outward pressure on the top, and then slide the whole thing up when it pops out. This will allow you to remove the rest of the clips to get the back deck out. Follow the video for the rest.
* This may be different if your car is on a lift, but if you're on jackstands, I would highly recommend removing the swaybar bushing and mount on the side that you are working on in addition to the endlink. This will give you more room to get a breaker bar and wrench in there to remove the lower strut bolt. I believe the swaybar bushing was a single 13MM bolt on each side. Since the strut mounting bolt is in kind of an awkward place, you really need all of the room you can get.
* There is some sort of drainage hose on the passenger fender liner for the gas filler neck. It is a pain in the neck to get it back in the right place, so make sure you look at where it goes before reassembly since you'll be essentially "stabbing in the dark" to get it back in place.
* On the drivers side, there is a bump stop type thing attached to the exhaust, I removed this to give me more room as well. This rubber bump stop was attached using 2 17MM bolts(I think).
* The bump stops in the strut assembly cannot be reused without modification as stated by the original poster.
* The charcoal canister needs to be unbolted and moved out of the way for the drivers side, and the gas filler neck needs to be removed from the passenger side as stated by the original poster.
* The new center locking nut provided by Bilstien is again larger than stock, but for the rears, there are no space issues so you can use them.
* Total time to disassemble the interior was about 45 minutes, reassembly took about 25 minutes. Total time for the drivers side rear(which I did first) was about 3 hours. Total time for the passengers side was about 2 hours.
I hope this helps!
Cheers,
zubif
Last edited by zubif; 03-30-2008 at 02:08 PM.
Member
Very Nice
I Just purchased B&G suspension lowering springs which lowers 1.6" in the front and 1" in the rear. I just had a question... If i install these on the stock shocks... will they be okay? until i save up enough money to buy koni's
License Revoked
Clean looking car.
Member
cool write up. I'm not understanding the "Koni's are soft" comments. I had just my fronts installed and i found out yesterday they were on the Extreme Soft setting. The handling was much firmer than stock (I was non-sport maybe thats a bigger difference?). I just turned it to full firm, and man does it handle nice... There is so much less body lean, but that may be because I am lower. I paired them with Lowtec springs, which lowered me around 3 inches in the front, and 1.5 inches or so in the rear.
Now John540i6, the reason I don't have my rears on is because when installing them, the lowerspring pad/perch from my OEM rear struts would not transfer on to my Koni's. I checked and the Koni's are the correct 8240 1156 part number for e39's. So what do I do to get them to fit? I'd like to know soon, I don't like riding on OEM in the back, and Koni's in the front.
Last edited by legitsnowe39; 02-28-2010 at 07:50 PM.
Member
Wow, three inches in the front is a lot! I just got my Koni's and will be buying some mild lowering springs like vogtland or Dinan. I will probably set mine pretty close to full soft.
Besides the improved handling, hows the ride?
Member
the ride felt stiffer but almost OEM like with FULL soft on the koni's. But remember I don't have the rears in yet. Still I'm so happy with it, its really comfortable, but feels sportier and that is what I want. I would recommend Lowtec springs over any other one if your looking for a bigger drop, but they are just too rare. I'm about as low as most of the coilovers for our cars go.
I said earlier I turned it to FULL stiff today, and I like it even better now, but I'm a 17 year old kid who could really careless about having a comfortable ride. I had that for over a year, and I'm glad to get rid of it
Last edited by legitsnowe39; 02-28-2010 at 10:53 PM.
Member
Just to throw my experience in here, removing the wheel well liners is no joke. I've replaced shocks and struts on several cars with no issue, so I went to work on the e39.
Usually to replace a whole rear setup takes less than 2 hours from car up to car down.
Removing the passenger side rear shock took about 4 hours, and because I couldn't get the clearance to pull the assembled strut out, I had to disassemble the rear upper arm, and remove the upper strut mount (bolts to strut on top) while it was still in the car and remove piece by piece, then install the new Koni sport, Eibach spring, and reassemble it in the wheel well. After 4 hours, the car was still in the air, the arms were still loose and the wheels slept in the garage overnight.
So the next day I searched and found the bit about removing the wheel well. My first thought was 'It's plastic! What good will that do?' The driver's side was out and back in, took just over an hour, and didn't require removing any of the control arms. Plus I got to compress and install the springs safely in the fan circulated comfort of my garage, not in a wheelwell under a black car in 100 degree heat.
Removing the wheelwell covers is no joke!
Member
easy koni have 2 setup for the spring perch
regular = to bilstein
and lower = less gap
96 318is Sport --sold
96 528ia Premium Comfort seats --sold
98 528ia euro sport pack BR41880-- sold
01 530ia Premium CE52247
02 540ia Individual GG91507
 Posting Permissions


 Reply With Quote
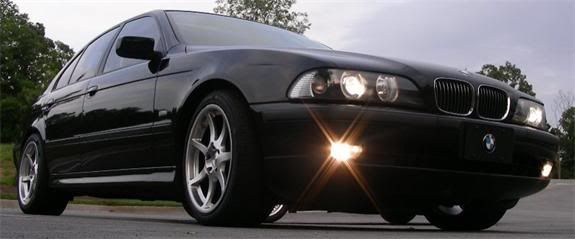


Bookmarks