
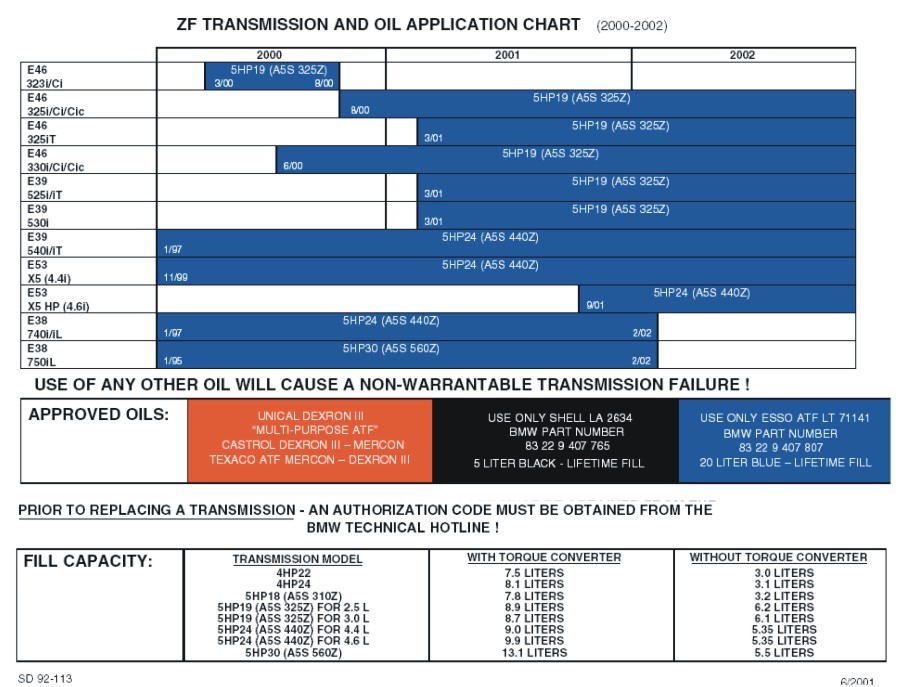
 BMWCCA 484984
Thank you John 540i6 for this write-up. I thought it might belong here in the FAQ.
Originally Posted by John 540i6

Member
Upon further research, I discovered that this feature was originally for the police to prevent their vehicles from being jacked by prisoners being transported. I thought everyone knew about it until I posted this original thread.
12CoolDude formerly ViolinARC
'00 540iA Sport w/235k+ Original TCG's, Vanos and transmission.*Trans failure at 244k+...FS Now
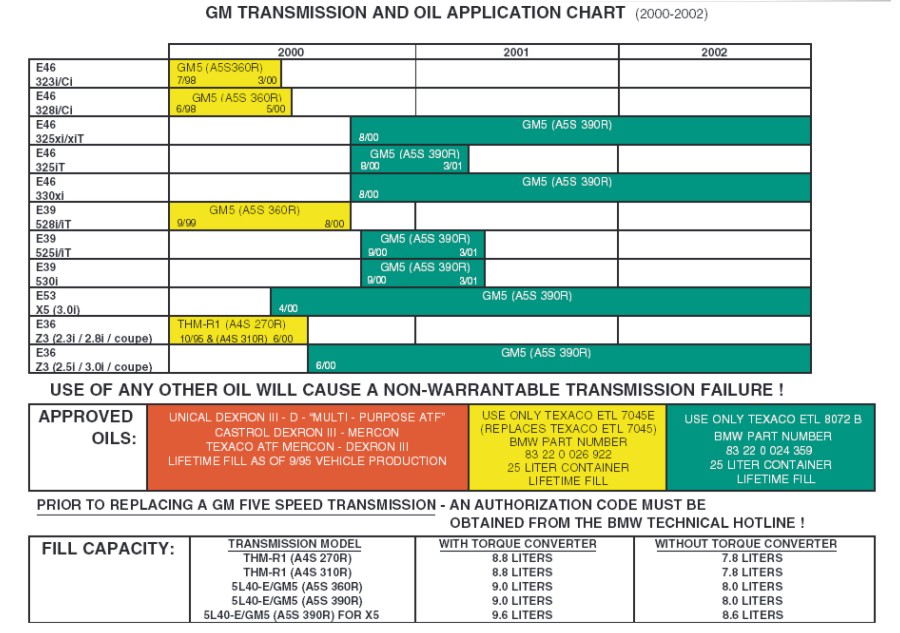
BMWCCA 484984
Thanks gray1g!
BMWCCA 484984
Thanks Qsilver7.
Last edited by jamesdc4; 03-29-2009 at 10:20 PM.
BMWCCA 484984

BMWCCA 484984
You must have a total post count of 15 in order to attach photos.
Last edited by jamesdc4; 01-10-2010 at 03:15 AM.
Prodigal Member
Here's an interesting site... Lots of different items from different places to compare prices....
http://www2.partstrain.com/store/cat...?make_text=BMW
UNDER CONSTRUCTION
- 2000 528i Sport -
Got any questions about my car? Feel free to PM me!
BMWCCA 484984
If you are interested in reading/clearing any fault codes your E39 might be throwing, there are a several ways to do it.
The least expensive solution is to take your car to Autozone where they will read/clear your codes for free and if requested, provide you with a printout. Another way is to purchase a Fault Code scanner like the Peake tool or obdcom.
The Peake tool is small, relatively easy to use, and doesn't require a laptop. The obdcom uses a laptop, but has many more features than the Peake tool and costs less (however, it can only clear fault codes and will not reset the oil and service indicator lights).
There are many others to choose from, but some are much more expensive or are not BMW specific.
Of course, you can always take your car to the dealership or an indy (one with a GT1 computer preferrably) and all is well.
Last edited by jamesdc4; 12-28-2010 at 03:40 PM.
Member
thanks guy for all this hard work...
doesnt this guy look like the kool-aid guy? ---->
BMWCCA 484984
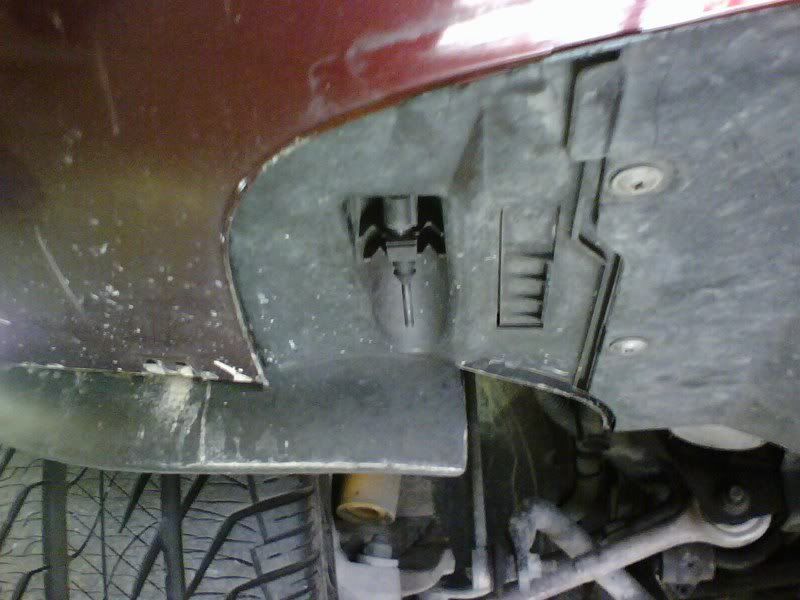
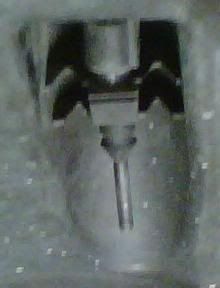
The external temperature sensor is located on the passenger side under the front bumper.
Here's a close-up.
Last edited by jamesdc4; 04-30-2009 at 05:25 PM.
BMWCCA 484984
*link fixed*
Last edited by jamesdc4; 01-25-2009 at 05:26 PM.
Member
After going to the dealership and being quoted $187 for a new key, I decided to seek alernative methods. I asked around and every said no you CANT replace the battery. So I assumed this was correct information. I had 2 dead fobs and wanted my keyless entry back. So I said why not crack the key open and see what you find. I didnt know if this would work so I didnt take any pics at the time, but I will take pics when I do my next fob.
Once open I saw the chip with the battery. This is where I started my own DIY.
ITEMS NEEDED:
3v battery per fob. A pack of two at wal mart will run you about $5
Epoxy or similar strong glue.
A small flathead screw driver, utility knife, and electrical tape.
Step 1. Pry open the key fob along the seam line using your tool of choice. I used a mini flat head and razor. Be careful not to crack the casing.
Step 2: Remove the chip. As you can see there is a 3v battery "welded" so to say, to 2 flat, flexible prongs. Separate the prong from the battery using a utility knife. I simple put the razor edge in between thebattery and the prong pressing down firmly, rocking the knife back and forth. Be care because when it separates, its suddenly.
Repeat this for the opposite side. (keep in mind which prong is positive and which is negative.)
Step 3: Now for the next step I suppose you could solder the prongs to the battery to make it better, but I didnt want to expose the battery to the heat, so I simply took a small slice of electrical tape and secured both prongs to the battery, wrapping the tape around both connections. You must make sure the tape doesnt interfer with the connections.
Step 4: Place the chip back in place properly and test the fitment. You can use a razor to feather the edges if necessary. Now before I permanently sealed the key, I programmed it using the instructions here http://forums.bimmerforums.com/forum...1&postcount=31. Use a piece of electrical tape the wrap around the key so it doesn't fall apart. Make sure to follow the step thoroughly. If you still cant double check the connection on the battery.(I had no issues).
Step 5: Now that your key is programmed, remove the strip of tape. Apply a glue... preferable something strong, I used epoxy because its strong, and can fill in any gaps, and sets fairly quickly...around the contact points of the half that contains the key (purpose of this is because the other side hold the chip, which you don't want falling out). Use an appropriate amount so it doesn't seep out everywhere.
Then put the halves together and wrap a piece of tape around them while the glue sets. You can feather out any seeping glue with a toothpick or any like item.
Step : Once the glue is set remove the tape. If neccessary apply more glue for a good seal. Repeat steps for other keys. Then enjoy your $8 dollar fix and laugh at the dealership!!
Member
I have that feature in my nav, cool to know those without nav can do it too.
Member
Is there an update to this? Auto zone no longer carries the 49-DL. When I asked if they had the 49-DL he said yes- but not for my car because they were causing shorts. We went to the rack and none was to be found. They took them all off. Any other suggestions?
BMWCCA 484984
Thanks for your post. It does look like the Duralast 49-DL has been discontinued. The closest replacements would be...
http://www.autozone.com/autozone/par...9459_359257_0_
http://www.autozone.com/autozone/par...2331_401285_0_
There are quite a few good replacement batteries out there for our cars. Any input to keep the archives current would be greatly appreciated. I still have my Duralast 49-DL in my 540i and it's still going strong. Using a smart charger weekly seems to be helping the battery longevity.
Member
Just to update this thread for the battery, Walmart sells one that fits (540i). It's the EverStart Maxx H8 (900CCA) and is a direct drop in (including vent tube). It has a 3 year full replacement warranty and then a 2 year pro-rated warranty, so a total of 5 years. Price is about $120.
http://www.walmart.com/ip/EverStart-...ttery/16782659
Member
jamesdc4 I really could use your help. Do the X5's have this type of AMBIENT TEMP sensor too? If so, where is it located?
forums.bimmerforums.com/forum/showthread.php?2055904-2005-X5-3-0-(E53)-AC-Compressor-won-t-engage-Ambient-Temp-probe-location
Just add http:// to the above link to see my post for help/info
thanks
 Posting Permissions


 Reply With Quote


Bookmarks