
 Member
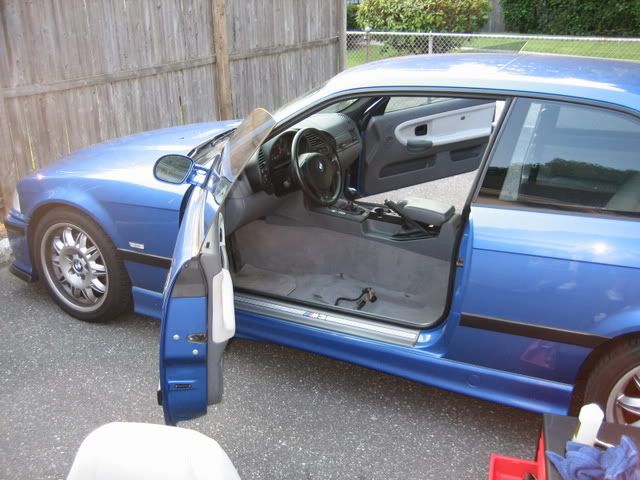
I used my Camera phone to take this pic..
I took the pic using a mirror and this is what it reflected
I then used Irfanview to flip the image horizontally
The area that I marked in RED..
Is that where the #12 Clip sits on ?
If it is then I am doing it right...
It keeps snapping the pencil pivot and the spring does a clunk de clunk sound before the compression springs falls out of place... Its insane.

Last edited by ZONDERVANUS; 01-14-2008 at 05:48 PM. Reason: Picture would not show
1995 E36
S54 E36 M3/4/5
ok-
perhaps u have broken pencil stuck in there? the metal clip thing dosnt really do that much, you can try not using it and just fit the plastic thing in that slot if its giving you installation problems.
get a pencil thing and poke it in the hole to see if there are any restrictions-
Member
What are the symptoms of a bushing going bad?
WTB: E36 ZKW Headlights, ACS Rear Diffuser,E36 M mudflaps front + rear
S54 E36 M3/4/5
squaking from the pivot when u press the pedal, pedal shifting to the side when depressed all the way
Member
Thank you for the suggestion.Originally Posted by wanganstyle

1995 E36
Member
I just replaced my bushing this past weekend also. Like everyone else says, it's a PITA. It's not comfortable by any means but taking the seat out helps alot. One suggestion I'd make is to get a light/flashlight that you can mount somewhere and have it stay. I only had a little flashlight and it was stuck in my mouth most of the time. Probably for the best because it prevented my from cursing at the top of my lungs while doing this job. So far, by far, the most frustrating job I've done on the car yet. Hope I never have to do this again.
I didn't take a pic of the original bushings but they were both split on a 45 degree angle. I don't know if that's stock or not. Also both bushings had significant wear grooves down the center of each bushing. I had 102k on the car and the clutch was squeaking as well as moving to the left. Now it requires a little more effort to depress but most important is that there isn't any squeaks and the pedal doesn't slop around.
Member
I'm replacing my bushings this weekend with the ones from uuc.
Hopefully it won't be too much of PITA!
Member
Just remove your driver's seat and get a good flash light like slipstream mentioned. Its really that not terrible of a job. When you get underneath, take some digital pics. This way, if you get confused putting it back together, you can just look at the pics.
Member
Can someone post a bushing picture, is it similar to the original BMW?
Member
Here is a picture of the stock bushings with the diagonal slits and the ones i purchased from the BMW Dealer in Miami...
The replacement ones I could not get in to fit.. so i went with the stock factory jobbers and put grease on it real thick like.
I found a way to put on the Clutch Master Cylinder without having to bleed the system... it worked really well and now i am driving my ride again.
1995 E36
Member
Here are pics of the compression spring and where it is perched underneath.
1995 E36
Member
I removed the seat but the seat belt was still attached to it as you can see by these pics.. i had to climb thru the rear passenger door in order to invert and get to the problem PITA that lay underneath.. check this pic out..
The seat belt is attached to a TORX bolt...
1995 E36
Member
^ Yes, that is different and more of a pita with your belts. The M3 and the 325i are different cars though. I think your "under dash" area looks a little different as well.
Member
I bled the clutch master cylinder outside of the car before i installed by replacing the yellow plug that comes with the Bilstein Master Cylinder..
since the hose from the reservoir is not pressurized but rather it flows downward by gravity it wasn't necessary to worry about the top. I simply removed the fitting in the back of the Bilstein clutch master cylinder and reattached it on the new clutch master cylinder. I do recommend replacing the mesh covered rubber hose that leads from the reservoir thru the firewall to the top of clutch master cylinder. I also recommend putting on a hose clamp or zip tie to prevent possible leaks.
I bought the Bilstein clutch master cylinder for $72.00
a well known BMW shop wanted to charge me about $400.00 for the part with labor.
I did it myself and saved me some dough... Baruch Hashem !
The first pic below is the Clutch Master Cylinder with the Yellow plug
The Second pic is of the Mesh Rubber hose which i replaced. It was simple by attaching one to the other sewn with a needle and fishing line to pass thru firewall. Like this i didnt have to remove the Fuse Box.
1995 E36
Member
ZONDERVANUS,
thanks for the pictures and info.
Member
^^ Just so you E36 M3 guys know....our Clutch Master Cylinder does not look like the picture about from ZONDERVANUS.
Ours looks different and I think setup differently under the dash area. I used to have pictures, but I think they got deleted.
Just wanted to let you guys know who plan on doing this.
Member
WRONG! Early E36's of all types including M3 look like that, in mid '97 they changed it to the easier to change shorter version. I get tired of peeps putting out assumptions...research before just putting it out there. All cars go through revisions throughout all the product life.
Ref this thread where I have been outlining my fun, replacing both Master & Slave. About to put it back together finally! (too much work with my Job all week, car's been sitting)
http://forums.bimmerforums.com/forum...d.php?t=785827
And you guys going back and forth about the Seat/Belt issue, it's not a M3/325 issue, its a 2dr/4dr issue! Don't any of you own a Bentley? It mentions it in there in the Seat removal section!
And the Fill hose is not under pressure, leaks are very unlikely as long as its a proper 5/16" or 8mm Hose......
Last edited by JETninja; 02-16-2008 at 04:34 PM.
John
'95 Hellrot M3 w/Dove
AA Euro HFM Stage II (w/21# Injectors & Software) W/Gen III Exhaust - URI Crank Pully - FDM w/3 Row M Coupe Rad - 3.23 LSD - Vogtland Club Spec/Koni SA - UUC Red w/Enforcers - TMS Shims/Rear Camber Bars w/QA1 inners/Sways - VMC F/TMS R End Links - X-Brace - Perf Ultimate/SS Brake Lines - GC Tower Mounts/RTAB Shims - ZKW's w/5000K Hid - Fog Delete - Alpine 9847/Pioneer TS-C130R Kevlar Components/Pioneer PRS-X340/Stealth Box's/Wired Zune 120GB - OE LTW CF Sills/Glove Box Plate - Staggered Black M-Spoke II's w/235/40 (front), 255/40 (Rear) Nitto NT05's - Rolled Fenders!
***Got a '95 M3? (actually pretty common on all years! Even happened to Racer Seth Thomas!) Check Your LSD! http://forums.bimmerforums.com/forum...d.php?t=390209
Member
Just finished doing mine a few hours ago. Although I am thankful for all the help I received from the forum, I apologize for not being able to contribute anything more than my personal experience. To anyone who is looking to tackle the job, don't be discouraged by the difficulty of the project. The difference in the feel of the clutch is like night and day. And thats coming from an M that even though a 95 has only 70.5k. The two bushing required only cost 3$ total.
Contrary to what many people have said, you DO NOT need to compress the release spring prior to installing it. The biggest issue I had was skrewing back the plate with the two sensors. I took out the seat (which I highly recommend, honestly only takes 2 minutes.) I found myself working on my stomach with my elbows on the floor, wrists up there trying to get the hold centered in the bracket with my forehead pressing into the break pedal. (don't ask why, but i swear it helped)
Last edited by 95s52; 04-25-2008 at 05:11 AM.
Mods: obd1 s52, SS replica headers, SS race mid-section, SS exhaust, euro intake, 3.5" hfm, turner tune, 24lb injectors, uuc flywheel, m5 clutch.
You've got red on you.
Just finished this, here are my tips:
Take out the kick panel.
Take out your seat if you really think you can't deal with 30 mins of discomfort.
You don't need to take off the brake or clutch switch or the bracket holding them.
Just remove the spring thingy, then remove the clutch master clip then remove the clutch pivot clip, slide the whole pedal to the right about an inch taking care not to hurt your master cyl, onc eyou have enough room remove the clutch master pin, you can then pull the whole clutch pedal out.
Pop out the old bushings, clean, lube all friction surfaces with lithium grease, white lithium if you have dove interior. Pop the new bushings in.
Slide the pedal onto the top pivot pin, but not all the way yet, work the clutch master's end into the slot it goes in, stick the clutch master pin in through it's holes, the master's end being one of them, once you think you're through all three holes push the clutch arm the rest of the way on, then throw each pins clips on.
Compress spring thingy and clamp with zip ties, assemble as it came apart, stick the pin through, clip on, kick panel back in, seat back in, and off you go.
Techno ViKing
i was too lazy to buy zip ties when i did this crap last year
it was messy
dirty
now that crap squeaks
i have to re lube it
and btw i poked my eye with a flat head screwdriver couldnt see shit for 2 days on left eye
99 Techno S50B32 6-speed ///M3 (Complete)
Mods:SOLD
You've got red on you.
Your UUC bushings squeak again?
Last edited by MauiM3Mania; 10-16-2010 at 01:53 PM. Reason: profanity
Member
Thanks for the detailed write up -- I was able to replace my master cylinder today in an hour or so without too much hassle. Long story short, I simply had one of the plastic spring guides (#14 on the chart) break apart and cause the pedal too much travel--allowing something to subsequently break off the plastic end off the piston on the master cylinder. A four dollar repair quickly turned into $204, unfortunately.
One note: I've read a ton of things about turkey basters, modified oil cans, and pressurized bleeder devices, but i did a lot of reading and this clutch system seems to be "self-bleeding", so I simply did a quick swap (using the caps that came with my new master cylinder), and got away without losing too much fluid in the process. I'd say about three tablespoonfulls spilled on the towel I laid down.
I made sure to install the master cylinder with the piston 100% compressed. After I reattached the reservoir hose I carefully drew back the piston, filling it completely with fluid (making sure that the brake reservoir up top was full). After everything was back in place, I began pumping the pedal carefully, and began to get back-pressure, until about 2-3 minutes later it was better than it was before. Now my clutch engages/disengages at the TOP of my pedal travel, not the bottom. Holy crap what a difference. Installed some new factory bushings with some lithium grease, and the pedal slop is greatly diminished.
Took my seat out in the process, and now I have an airbag warning light on the dashboard... which is disconcerting. Wondering if I made some kind of rookie mistake...?
Member
I just replaced my clutch pedal bushings this past weekend with UCC poly ones. My clutch pedal only had a little bit of play (to the left) before and still has the same amount of play after the install. However, it does feel a bit more smooth and has no squeak anymore. It still goes to the left of the stock clutch stop at times unless I push it down at an angle (toward the brake pedal). Here are my thoughts after doing this. I am a novice at working on car stuff (keep in mind).
Absolutely have some kind of light that you can use. I had a small flashlight that i held in my mouth for most of it (install was during the daylight). Some kind of strap on head light would have been great. Or a larger light that would have given a greater amount of light to the whole area. It would have been impossible without something.
Taking the two clips off the pins (one on the very top of the pedal and one in the middle) was not difficult. But did need a very small, thin scredriver to get up there and pry the taps back. To reach the top clip I undid the clutch pedal switch to get easier access. I don't think this is absolutely necessary, but I didn't want to accidentally break the switch with the screwdriver as I had to apply lots of force with the screwdriver and breaking a plastic bit would have been easy. Undoing the two bolts for the clutch pedal switch also unbolts the brake pedal switch. No biggie at all, easy to put back in. I did use a 10 mm ratchet with a flexible extension on there (the ones that are able to bend--forget the name) for one of the bolts as I did not have enough room otherwise.
Only when I unbolted the clutch pedal switch and undid both securing pins did the spring fall out. Mine is a 98 and had the two #14s in it (not pencil looking thing). When installing everything back in, I did not do ANY zip ties or anything like that. Put the new bushings (and washers) on the pedal and installed back on the topmost slide. Then put the spring and its internals back in place into the little indent where it went--had to look to see the wear marks on the metal indent to make sure it was in the right spot, otherwise it looks like it could have gone somewhere else on that same metal area--there are several indents there. Used my head (was on my back) to just hold the pedal compressed a bit, line up the hole in the top of the master cylinder thing with the holes in the clutch pedal and install the bottom retaining pin (used my hands of course to line this up and push the clutch pedal back for the pin to go through them all).
Overall, while it took me some time to get to everything and was a tight squeeze, it was not a difficult (complex or complicated) job. A bed pillow would have been nice to put at the door sill. Just moved my seat back as far as it could go and was enough. The diagram at Realoem is nice and helpful. This is absolutely a doable job if you are not rushed and keep track of where things go. Only need a 10 mm ratchet, screwdriver, light, pillow would be nice. I'm 5'11 and 180. Certainly would be less enjoyable if I was football player size. Matt
Member
I swapped the clutch bushings yesterday in about three hours without any cursing. I can see how this job could be a real PIA if you don't follow the tips here. The best one is to skip the cable tie spring compressors. They're not necessary if you first install the bushings and clip at the top of the pedal, then put the spring together and install it, push the pedal slightly to keep the spring from flying apart, then insert the pin for the master cylinder last. It's not necessary to remove the pin at the bottom of the spring at all if you use this process, but taking it off IS helpful to learn how the clips come off where you can see it better. once you've figured this out, you can get the other two clips out which are harder to access.
Eric Lee
Monterey, CA
91 M5 - sold
97 M3 - sold
04 V70R - sold
03 525iT
03 Carrera 4S
19 Accord 2.0T 6MT
Tee Hee...
did u also change the pedal? im wondering if its needed to be changed as i just ordered the akg delrin bushings and OE pedal and wondering if swapping everything over would be a pain in the butt.
 Posting Permissions


 Reply With Quote


Bookmarks