
 Member
well, if you plan on opening/closing the sunroof, then yeah....if you plan on welding the sunroof panel shut, then you can make do without the shuttle....Originally Posted by driftedtofu

Paul
Current Cars:
1995 BMW 325i
2013 BMW X3
2017 Infiniti QX30
Past Cars:
1997 BMW M3
2011 Chevrolet Avalanche LTZ
2010 GMC Terrain
1998 BMW 328is
2006 BMW 325i
2007 Saab 9-3ss AERO
2004 Saab 9-3ss Linear
2003 PT Cruiser
2001 Volvo S40
1990 Honda Accord EX-R
I drink your milkshake
the fabric part can be removed and left out.
To argue with a person who has renounced the use of reason is like administering medicine to the dead. ~ Thomas Paine
You can safely assume you've created God in your own image when it turns out that God hates all the same people you do. Anne Lamott
Custom watch straps for sale
FOR SALE: watch straps!!
E36 DIY: My articles are now located in the E36 DIY page
Member
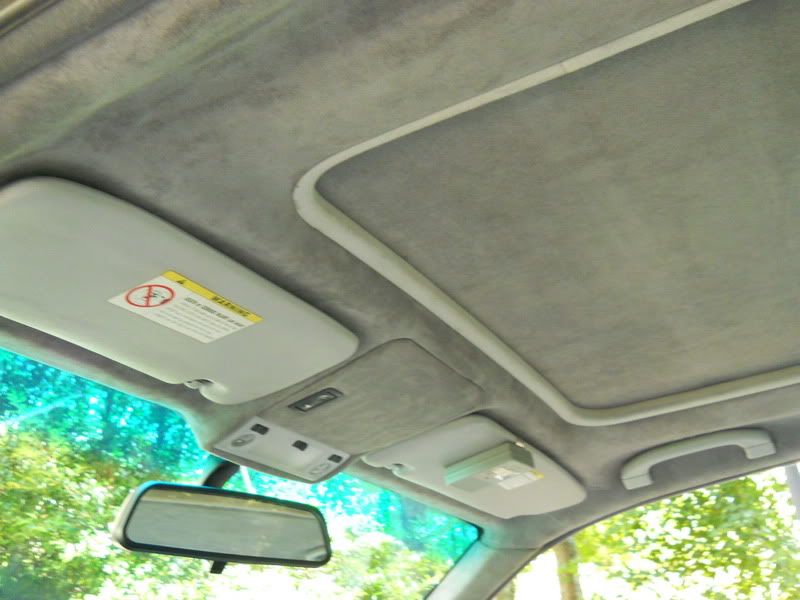
I took a few pics while I was recovering my shuttle with suede this weekend.
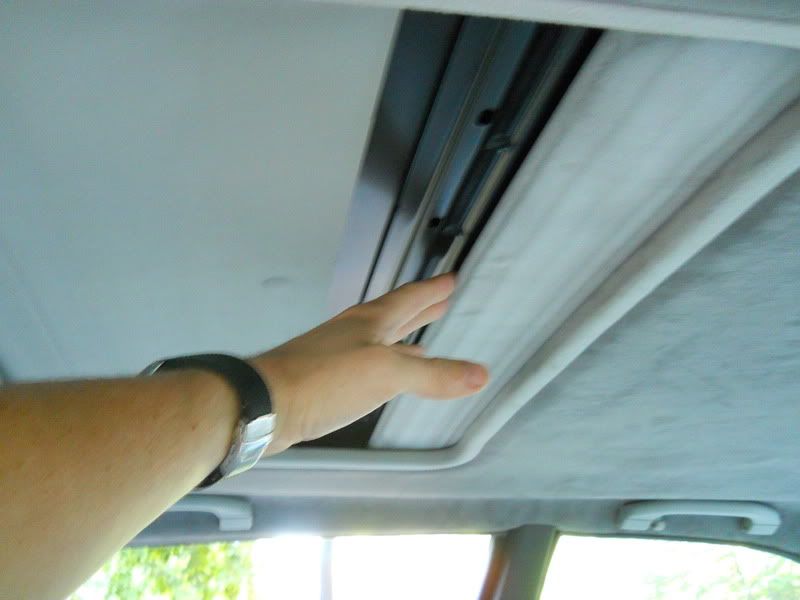
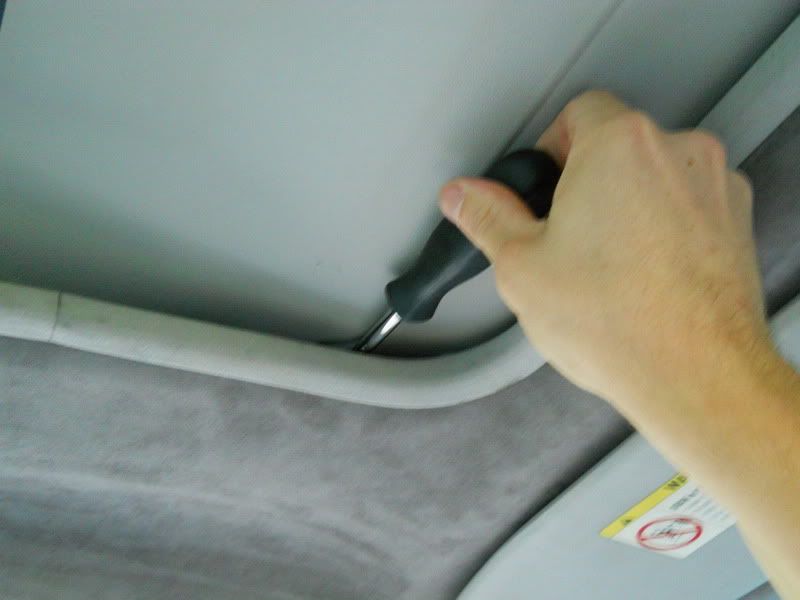
First, retrieve the emergency sunroof tool from your trunk-mounted tool kit. Turning the sunroof motor manually allows for much better control of everything compared to using the switch to try and bump the motor back and forth:
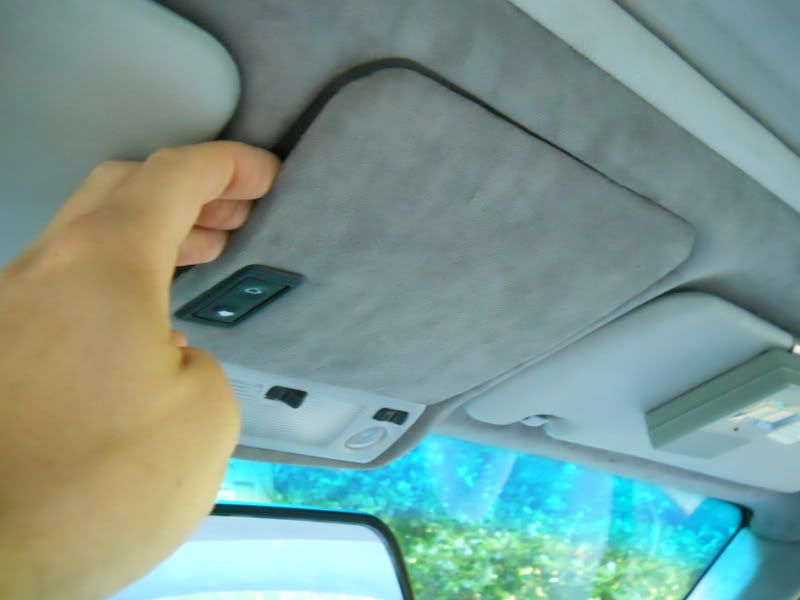
Then remove the sunroof motor cover:
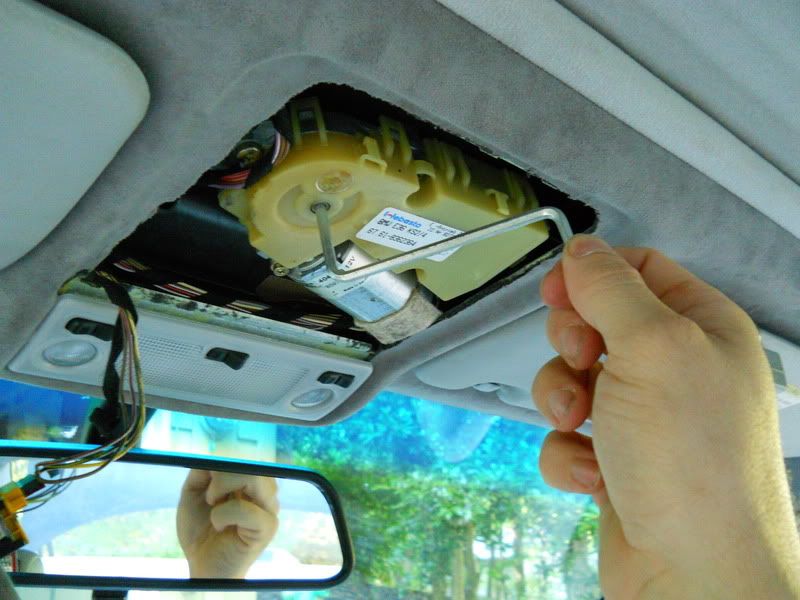
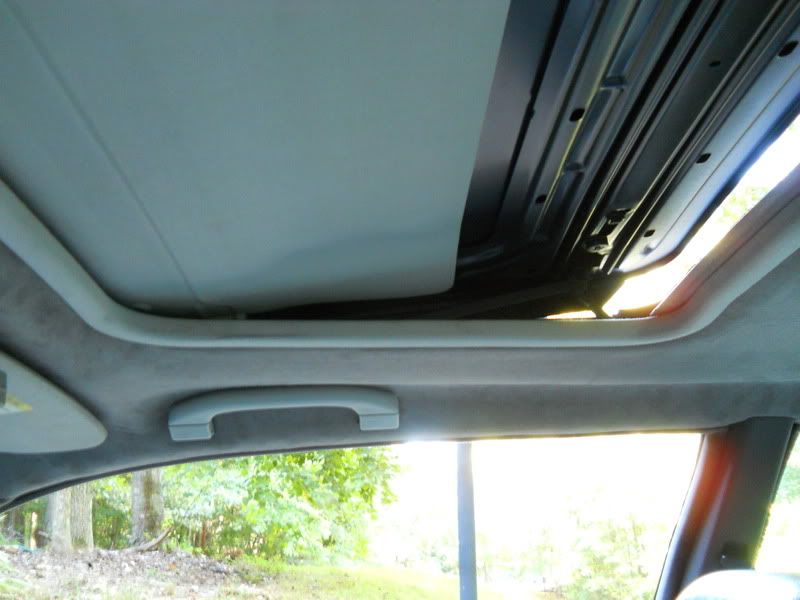
Use the emergency tool to manually lower the back edge of the sunroof a few millimeters:
Now you can push the shuttle all the way to the rear:
Manually raise the sunroof to its fully tilted position:
Remove the 3 17mm nuts holding the rear of the roof to the crossmember:
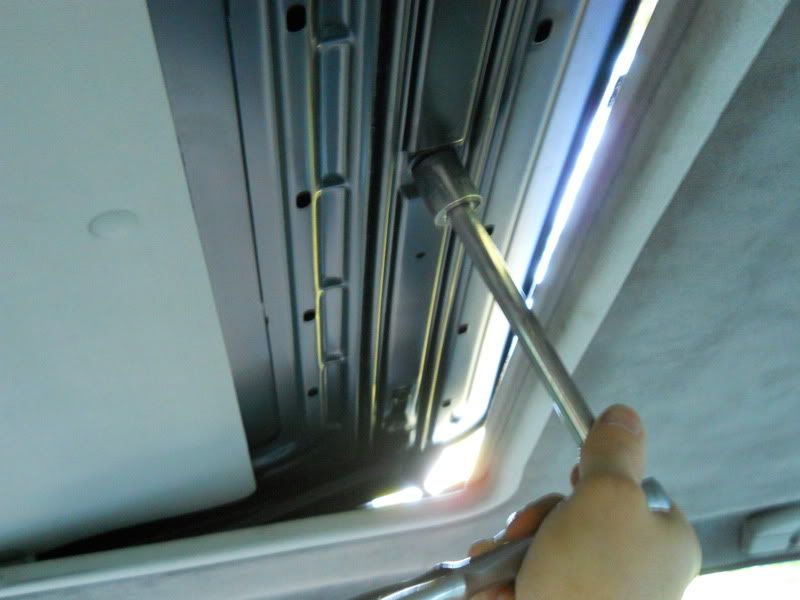
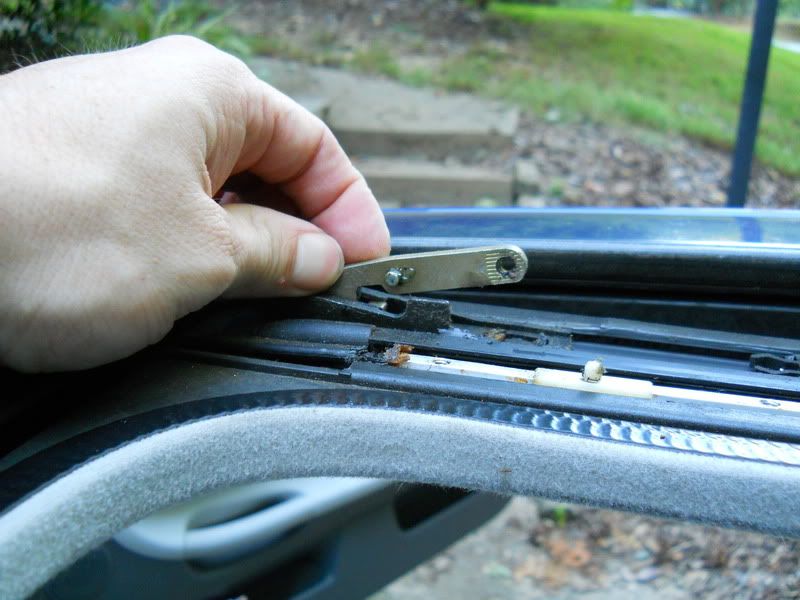
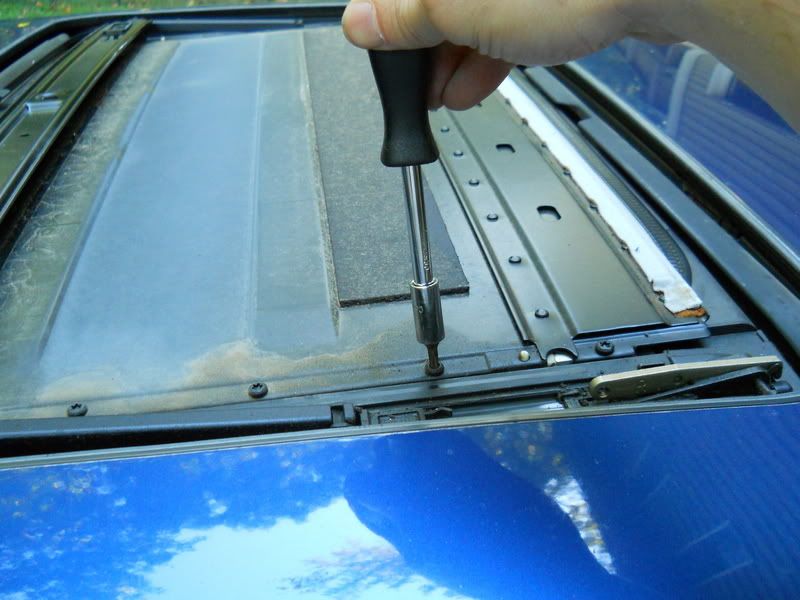
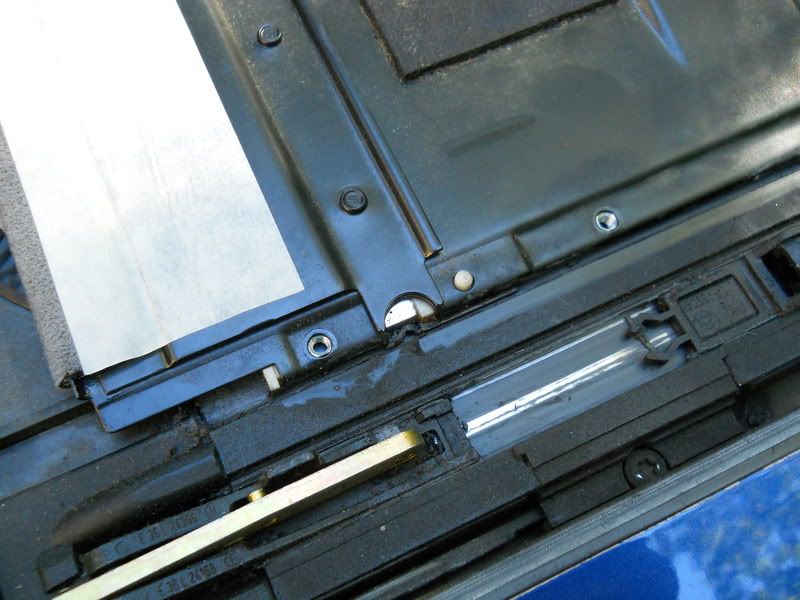
To detach the front edge of the sunroof, one must remove a T-20 bolt on each side and push a locating pin out of the tab on the roof panel. This pic of the mounting bracket shows the screw hole and the pin location:
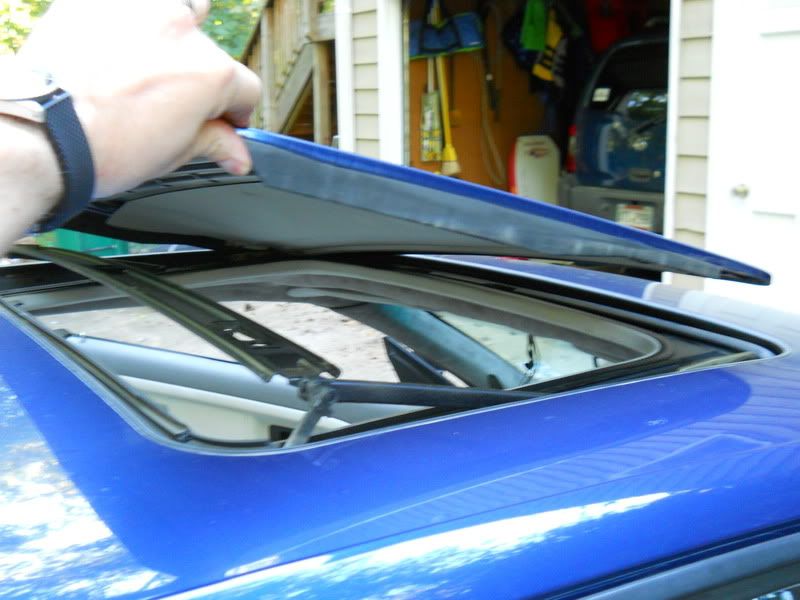
Now you can carefully lift the sunroof off the car:
Turn the sunroof motor to lower the control rails to the closed position and pull the shuttle all the way forward:
Remove 5 T-20 bolts on each side of the shuttle:
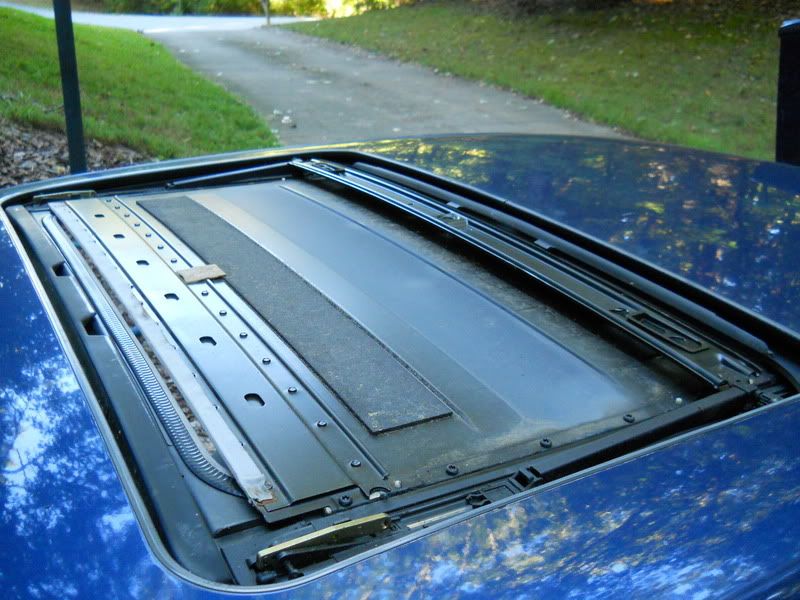
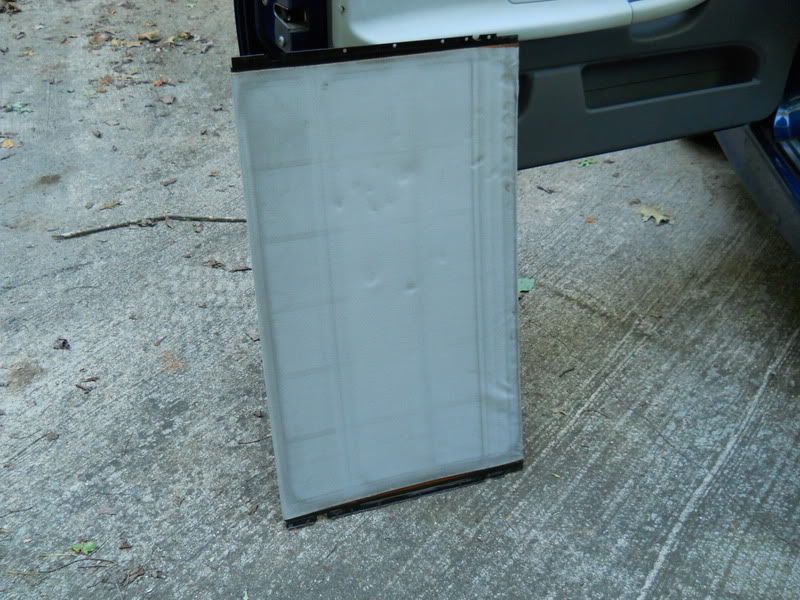
The shuttle can now be lifted out, carefully clearing the crossmember at the rear. Here it is:
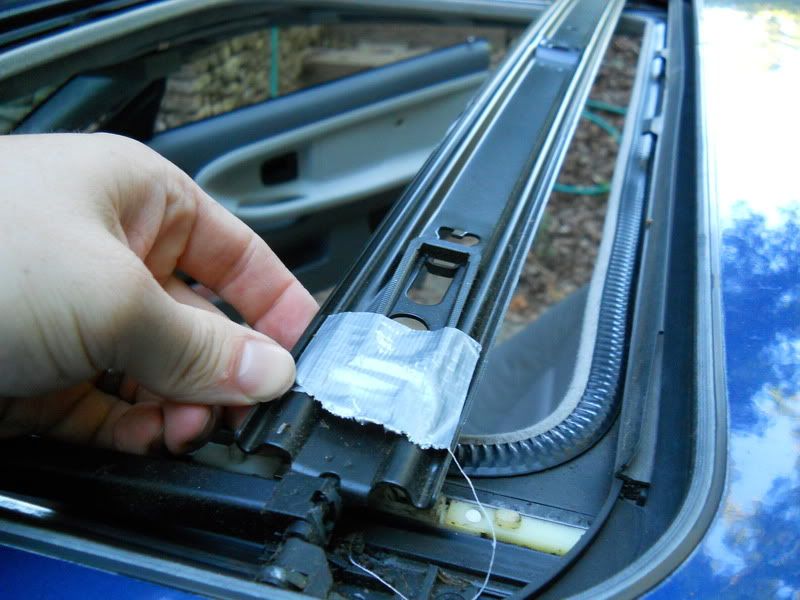
It's a good idea to tape down these adjusting shims so they don't move while the roof is off the car:
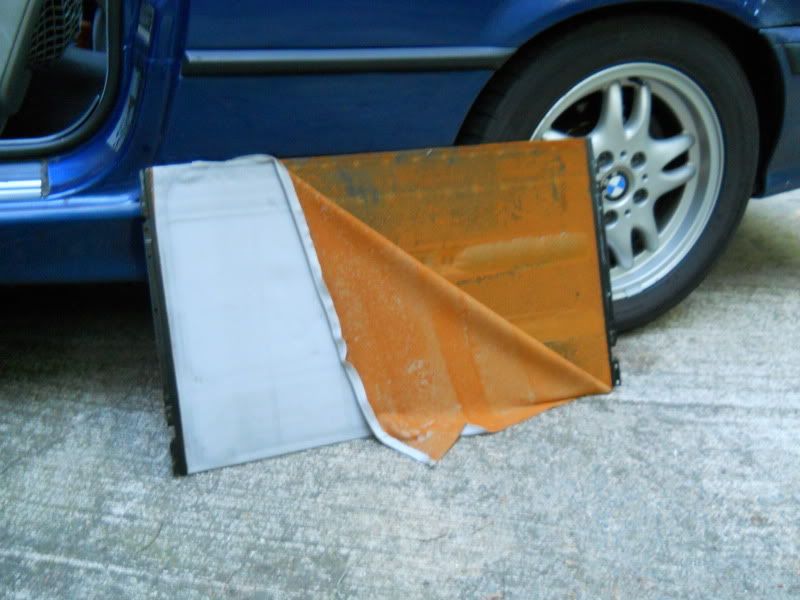
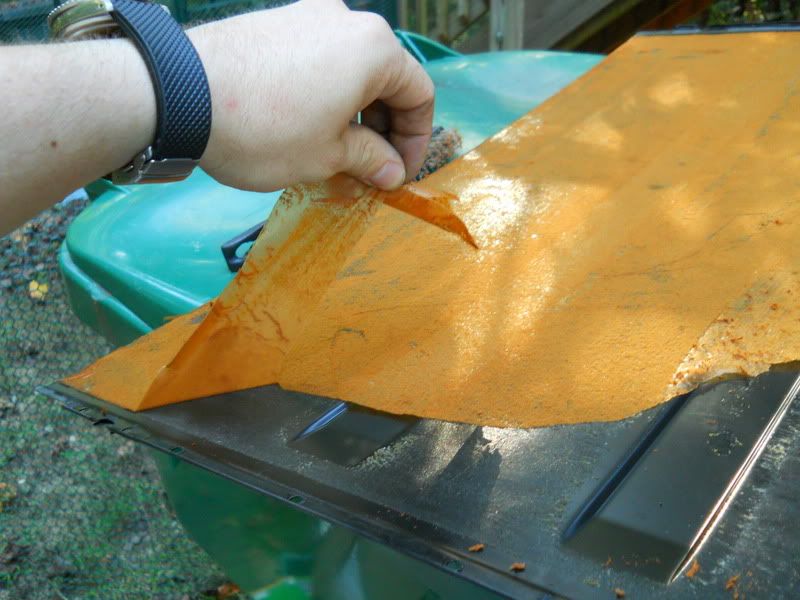
The fabric pulled off the shuttle easily, so did the foam/glue layer:
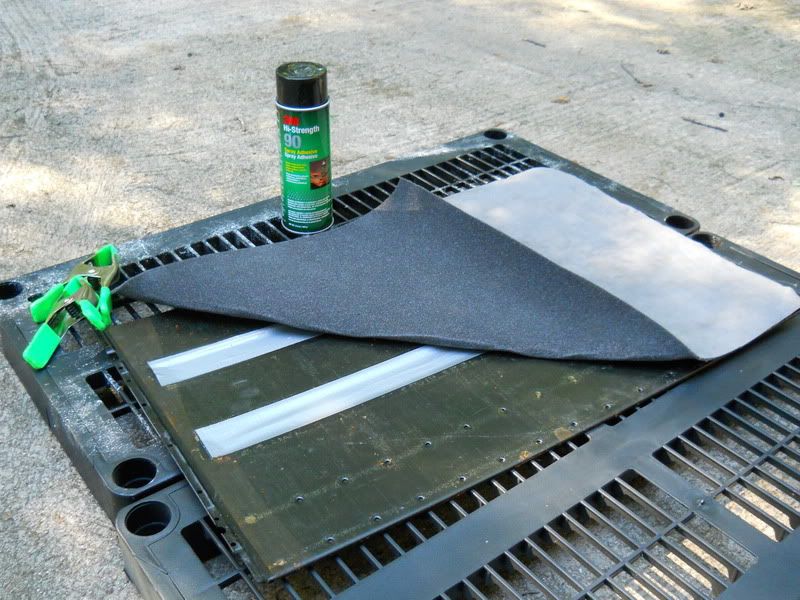
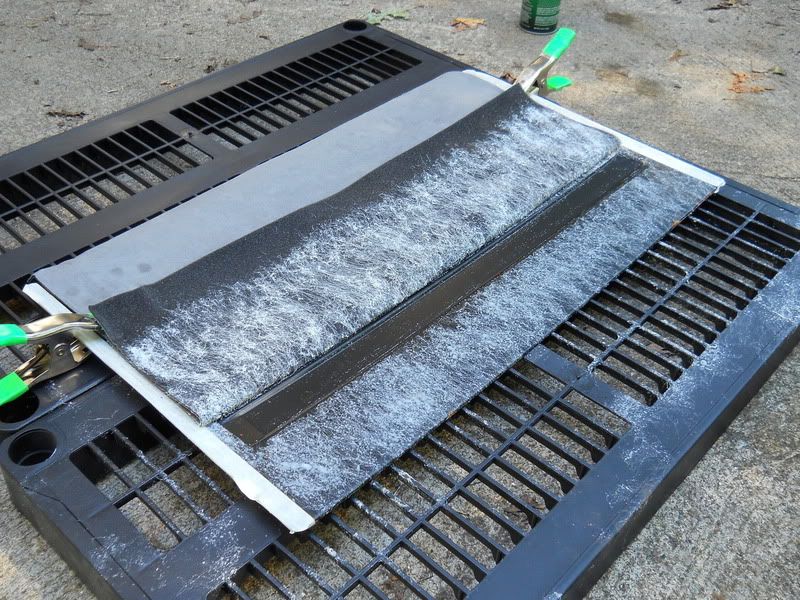
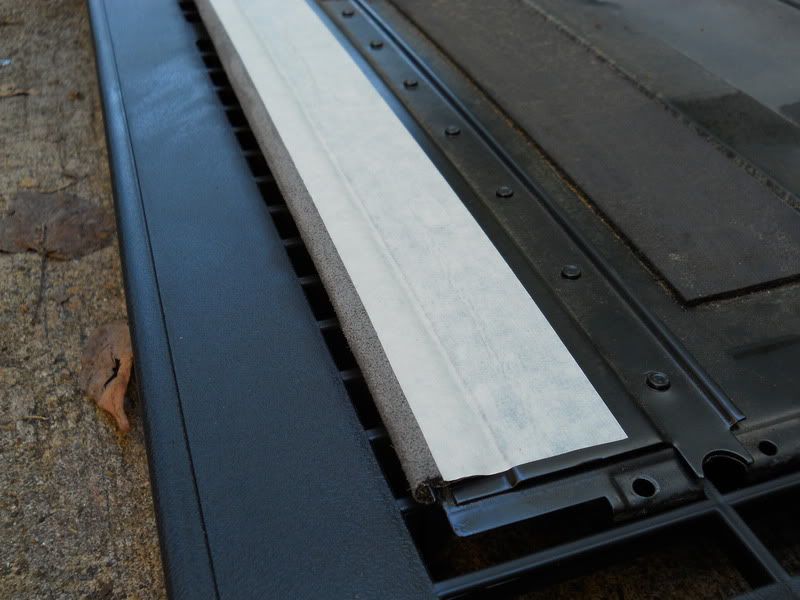
I cut my suede 20x28 inches and got my glue & clamps ready:
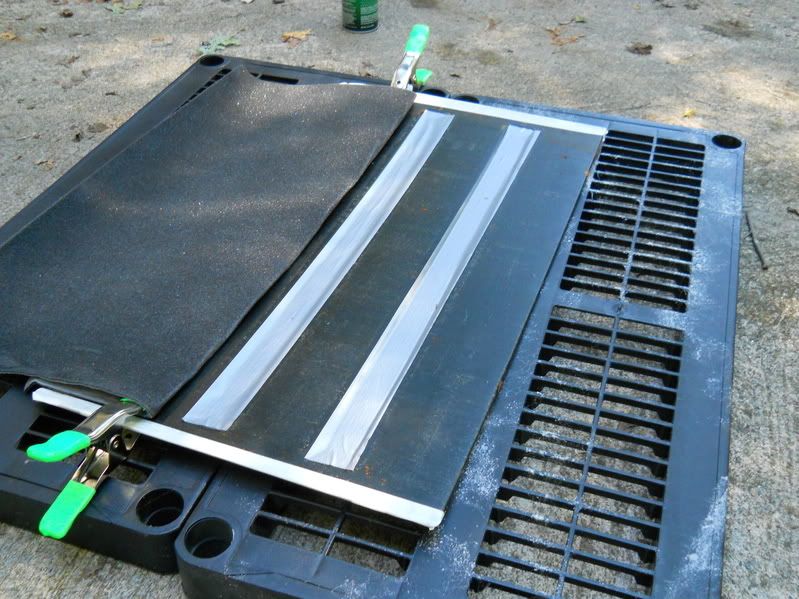
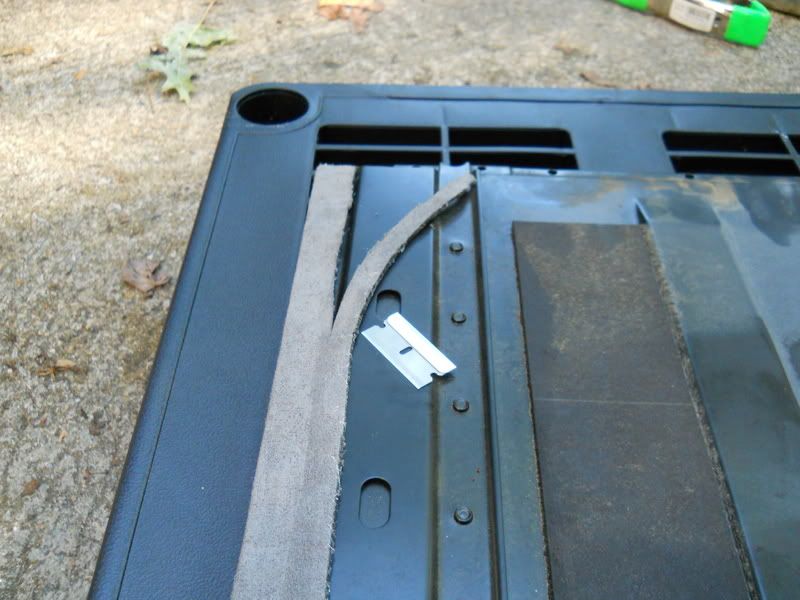
Be sure to tape off the areas you don't want glued:
I sprayed the contact adhesive one section at a time, letting it dry about 90 seconds before sticking the pieces together:
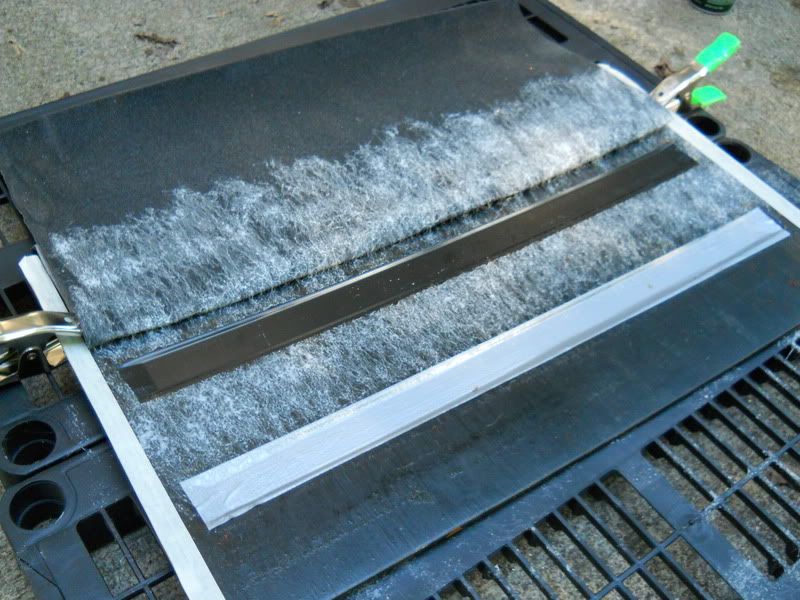
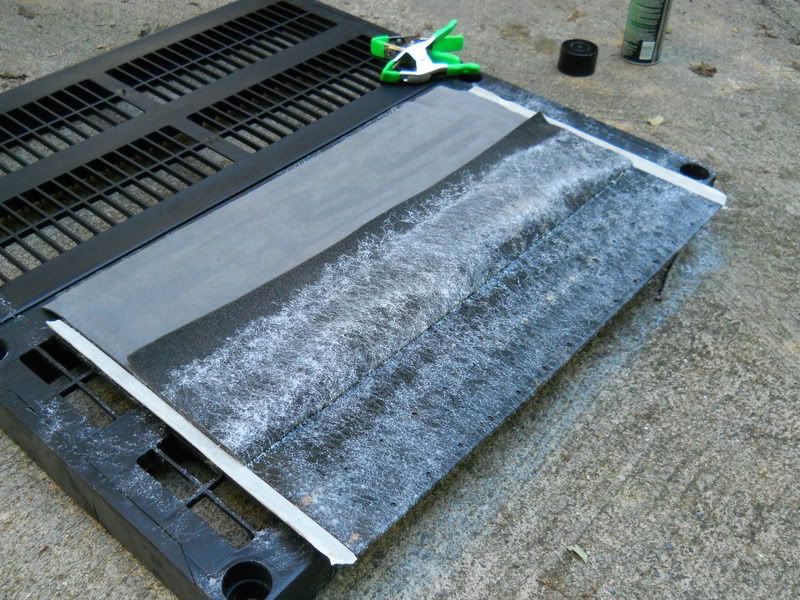
For the edges, I masked off the area, glued, trimmed and put a bit of tape to keep the edge from getting pulled up:
I also added a strip of sound deadener to the middle of the shuttle:
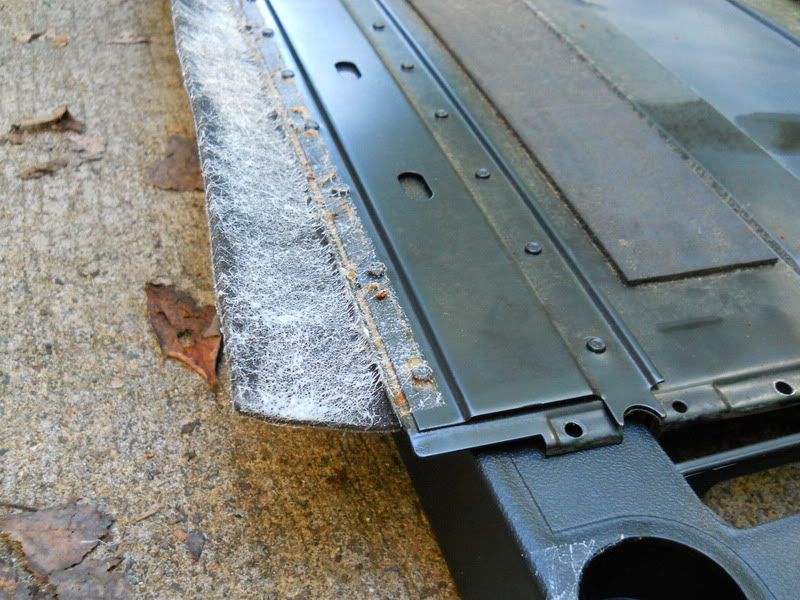
All ready to go back in:
Make sure that all of the plastic tabs and screw holes are lined up before you bolt the shuttle back in:
Slide the shuttle back into the roof and raise the control rails to the fully tilted position:
The rest of the reassembly is the reverse of removal. Getting the T-20 bolts in and the pins aligned at the front is a real pain, but the rest is pretty simple.
Done:
Member
I too did this this weekend. Getting the torx 20 and pins realigned is a big PIA but the end result is worth it.
John
2001 540i/6 - 144k
1997 328 ic - 67k
hardtop
2008 328i 6spd 88k
2008 328i 84k auto
1998 328i sedan 5 speed - 190k RIP
1995 325i sedan - Hellrot - 124k RIP
Member
Just changed shuttle from grey to factory black. I did everything as mentioned at first page but I have a problem. It looks like that sunroof gets wrong neutral position. It does not stop where it should, but it gets to next position. Any ideas?
[ame]http://www.youtube.com/watch?v=47aDWXvkzXE[/ame]
life is a dance...
BMW CCA Member
Close your sunroof manualy using special tool. then reconnect motor from the sunroof. Use your sunroof swicth to get your motor in neutral positioin. Then put motor back on suroof.
Member
It was easier that I thought.
1) Run sunroof to the right position (how it should be, when it is neutral)
2) Removed sunroof engine and then run it to neutral position
3) Installed sunroof engine

Member
So if one of the torx screws is stripped...then what...lol. its one of the first 2 that you take off from step 1. This is pathetic
NM. unlike the how to, if you have the thing out of the car you can just get the lower part to slide back and unbolt it without having to mess with the metal sun roof part.
Last edited by TAMUmpower; 09-13-2011 at 10:28 PM. Reason: Automerged Doublepost
Member
When I did mines, I preferred to take down the whole headliner. That way I wouldn't have to misaligned the sunroof. Heavy and not easy once it's off but more mistake proof. That baby is like 35 lbs.
Last edited by shogun; 12-24-2015 at 07:15 AM.
Member
Just to clarify, this DIY is to remove the fabric shuttle while the sunroof is still installed in the car? I'd really rather not remove the entire sunroof to reupholster the inside.
Member
This is an EXCELLENT tutorial! I was really nervous about removing the sunroof after hearing so many stories of people breaking tabs or the sunroof not working properly after reinstalling. On top of that, some tutorials make it sound like removing the fabric inside panel while the sunroof is still in the car is extremely difficult. Following this tutorial, I was able to get the fabric panel from my sunroof out of the car in less than 20 minutes! Piece of cake!
Last edited by shogun; 12-24-2015 at 06:48 AM.
Member
@mzmtg
That sticky plastic film was NOT easy to get off. I had to take a scraper to it with some windex. However I am curious, is it a good idea to leave the two trenches open without any cover? Does that run the risk of letting moisture in and down the line ruining your job?
Member
Hello! First of all sorry for my english!
I need your help about this DIY...
my situation is a little bit different from this tutorial...
First of all i've detach the entire sunroof from my headliner, then i've followed the DIY and put all the way rear the interior panel.
So i've read this...
Manually raise the sunroof to its fully tilted position
i thinked that "manually" means with my hands and not with special tool.
So the sunroof was stucked and can't raise it to fully tilted position.
I've decided to put the new fabric removing the interior panel from the all rear position because i supposed that the motor and sunroof was in neutral position so basically i could do what i want.
Then i've pushed manually the interior panel to start position... but it doesn't want go more then 3/4 of the sunroof hole...
I've reassembled all.
I used the special tool to put the sunroof to closed position but the interior panel seems to be stucked to 3/4 position...
Now i'm little bit scared...
What should i do?
How can i understand that the motor is in neutral position?
Thanks to all!
Last edited by massimoce; 02-07-2013 at 02:16 AM. Reason: Automerged Doublepost
Member
I have just completed this job it came out fine but my fabric shuttle is not functioning with the vent option on the sun roof. It slides back and forth to fully open and close but the shuttle will not open with the sun roof vent feature. Any thoughts on what it could be?
Last edited by shogun; 12-24-2015 at 07:19 AM.
Member
I have a similar issue where the shuttle will slide back but will stay inside the roof. I can't pull it back out because something is in the way. Now my sunroof will only open about half way...
Living Comfort Eagle
Jelbaum, I also just completed this job and have the same exact problem. Did you ever figure it out? If so, please share.
I just completed recovering my headliner, A pillars, C pillars, sunroof shuttle, sunroof motor cover, and rear deck with beige micro-suede. It looks fantastic (if I may say so...) and I never use the sunroof "tilt" mode, but I will not be satisfied until everything works as it should.
Rick
<><
Member
Just finished this job using the DIY posted. Thank you so much!!
Getting the little tabs back in was a process. And getting the shuttle pushed back all the way forward when I was done was a process. But at least the fabric isn't falling on my head anymore!!!!
Member
Hi, thanks for posting this. My sunroof works perfect, but like everyone else the lining is sagging. I followed these steps originally posted by mzmtg, but once you say I can push the shuttle back, mine won't slide. I've even gave it a bit of force but it doesn't feel like it's supposed to move manually? It's very stiff. I have a 1998 BMW 318ti if that helps.
Last edited by shogun; 12-24-2015 at 07:23 AM.
Member
Another satisfied user of this DIY! Just used this today to replace my sunroof shuttle. Perfect! Thanks, mzmtg!
A few observations from doing mine:
- The (2) Torx screws holding down the sides of the sunroof panel are actually T25, not T20. But you can use a T20 bit when you put them back in to get some play in the angle to help you get the threads started. (The (5) screws per side holding down the shuttle are indeed T20.)
- Putting back the sunroof panel itself and aligning the pins and (2) T25 screws are not that big of a deal, to my pleasant surprise. I set the rear of the sunroof panel down first without putting the (3) nuts holding it down, then set the front down, then proceeded to coax the pins into the holes on the sunroof panel. After that it wasn't hard to put the (2) T25 screws back in since the panel tab hole is lined up with the threaded hole on the mounting bracket.
- I noticed that the (3) nuts holding the rear of the sunroof had red thread locker (Loctite or similar) on them. I believe they came like that from the factory, hence the reason why they're sized for a 17mm socket, yet the studs they go on can't be more than 8 or 10mm. Anyway, apply red thread locker on these on re-assembly.
- Take advantage of the opportunity to clean the area between the sunroof panel and shuttle while the panel is off, especially along the tracks. It would be a great time to lube said tracks, too.
Last edited by tnE30fan; 01-12-2015 at 06:27 AM.
Member
I'm bumping this.
Would taking apart the sunroof be easier with the assembly out of the car? I'm dropping the headliner and figured it might be worth taking it off completely to recover the panels anyway.
Member
BMW CCA Member
This thread looks like it will be very helpful for replacing the sunroof shuttle covering. I just pulled out my headliner today to get it re-covered, and I see that my sunroof shuttle also has some sags in it, so I'll be pulling it out and getting it done at the same time.
One thing I found interesting...the EXCELLENT photos posted by iamaarongeorge show an Avus Blue M3 with Dove Grey interior, which is the same combination that my car has. However, the headliner in my car is a DARK grey (charcoal grey?) and not a light grey like shown in the photos. Did BMW change the color somewhere along during the 1995 model year? Mine is a 10/94 build, and 1995 models were built for about 20 months. Avus Blue was only offered in the USA for the 1995 year and was replaced with Estoril Blue starting with the 1996 models. Just wondering...
-rb
Last edited by RBNetEngr; 02-22-2015 at 11:59 PM.
Member
BMW CCA Member
So, I completed the headliner replacement, and it turned out very well. I went with a suede material, and the color match is excellent. This thread was especially useful in guiding me, particularly the post by MZMTG which included those excellent pictures.
I do have some comments from my experience...
Regarding the removal and replacement of the sunroof shuttle: When removing mine, I found the the shuttle was held in with five T20 Torx screws on the passenger side, and SEVEN T20 Torx screws on the driver's side. It turns out that the two additional screws attach to a movable bracket in the rail for the sunroof shuttle, and it's what actually pushes and pulls the sunroof shuttle. In my case, when I went to re-install the shuttle, this movable bracket was retracted all the way back into the sunroof cassette. I used the sunroof motor to move it forward (by moving the sunroof from the tilted to the closed position), but it did not come out full to be able to re-attach it to the sunroof shuttle. I had to use a coat hanger to snag it and pull it forward enough to be able to re-attach it to the sunroof shuttle. It was a bit of a PITA, and took a few attempts to figure out how to do it, but it all worked out in the end. My sunroof fully opens and tilts, without problems.
I also found that the two aluminum rails that the sunroof shuttle mounts to had felt pads at each end, but the felt was pretty much disintegrated. I removed the remainder of the pads, and then used stick on Velcro (the cloth side, not the hook side) as a replacement. I purchased it from Lowes, cut it to size, and then peeled off the backing and stuck it in place. It ended up being the same thickness as the pads it replaced, so was a perfect solution.
Also, prior to putting the sunroof shuttle back in, I used a Teflon dry lube, normally used for bicycle chains, to lubricate the channels for the sunroof shuttle as well as the channels for the sunroof mechanism. There wasn't much grease in those channels, and I really didn't want to take it apart in the future to lube it, or to replace parts because of breakage due to lack of lubrication.
When re-installing the metal sunroof, you have the opportunity to adjust the height of the four corners so that the closed sunroof is level with the roof. For the rear corners, there are two metal wedges built into the rear support rail for the sunroof. Sliding these left or right will raise and lower each corner of the sunroof. When you get it positioned to have each rear corner level with the roof, tighten the 17mm nut to secure it in place. I used blue ThreadLocker on the studs for the three rear sunroof nuts.
Similarly, you can adjust the height of the front corners as well. Once you get the T25 screws in place in the front brackets, but prior to fully tightening them, insert a T25 driver into the screw, then step outside the car, raise or lower that front corner of the sunroof until it is level with the roof. Then, holding the corner in place, tighten the T25 screw. Repeat for the other side.
Overall, replacing the sunroof shuttle by removing the sunroof was a relatively easy process. I don't think it's any more difficult than replacing rear shocks. And the results are worth it!
Member
Has anyone experienced their sunroof opening by itself? Usually while parked after driving and after having had the roof open.
Last edited by shogun; 12-24-2015 at 07:28 AM.
Member
Hey everyone.
I have a problem. My fabric shuttle is stuck about 1/4 of the way down. My sunroof will not open or tilt. How can I get the fabric shuttle to move freely? I don't want to fix my sunroof. I just want to close the shuttle so j don't hear wind while driving.
shade tree mechanic
Moderator
Some info on the sunroof motor zero settings:
The sunroof motor has a built-in switch to stop the motor when the roof is completely closed, which prevents it from popping open at the rear. This completely closed position is called the "zero setting," or "zero position." If you need to remove the sunroof motor from the car, be aware that you need to reinstall the motor with its position set to the zero setting. Start by setting the sunroof panel and assembly at the fully closed position. For sunroof motors prior to mid-1994, the zero position on the sunroof motor is when the shaft center points of the motor, notch, and pin all line up (yellow arrow). For motors in cars manufactured from mid-1994, the zero setting is no longer visible to the naked eye. Instead, set the motor to the zero setting by plugging it in and pressing the switch until it stops by itself. When you have the motor electrically unplugged from the car, you can move it quite easily by placing a 4-millimeter hex socket into the back of the motor gear and turning it slowly (inset). This is useful for troubleshooting the assembly when it is out of the car, with the motor still attached.
source, more info and pics: BMW Sunroof Removal and Repair http://www.pelicanparts.com/bmw/tech...78-Sunroof.htm
Headliner Replacement DIY and pics, showing all the various items and objects that need attention in order to remove the headliner http://www.pelicanparts.com/bmw/tech...-Headliner.htm
Shogun tricks and tips for the E32 series are HERE!
 Posting Permissions


 Reply With Quote
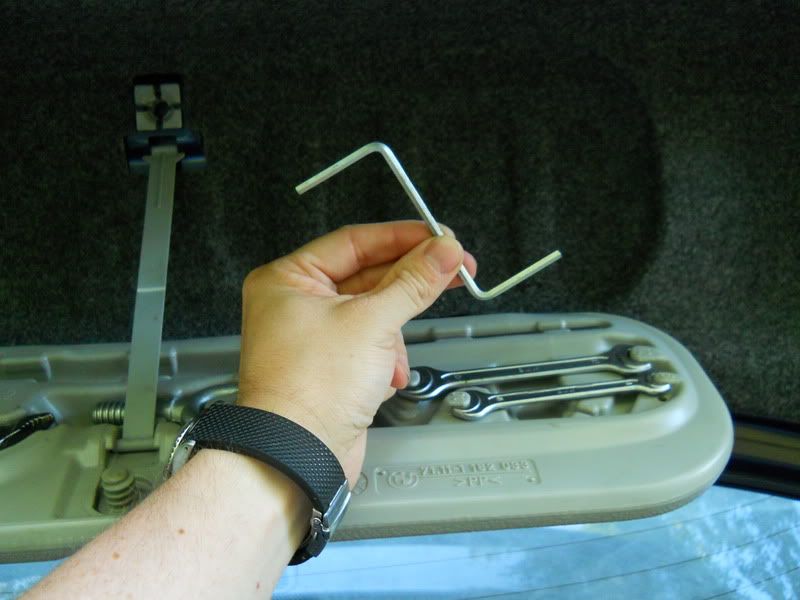


Bookmarks