
 Member
Intended just as a "possible solution" post, since something like this would have been helpful to me at the time. I pieced together info from across several sources, and this ended up being not too bad a job -- provided you have the tools and the nerve to drill into your aluminum cam caps!
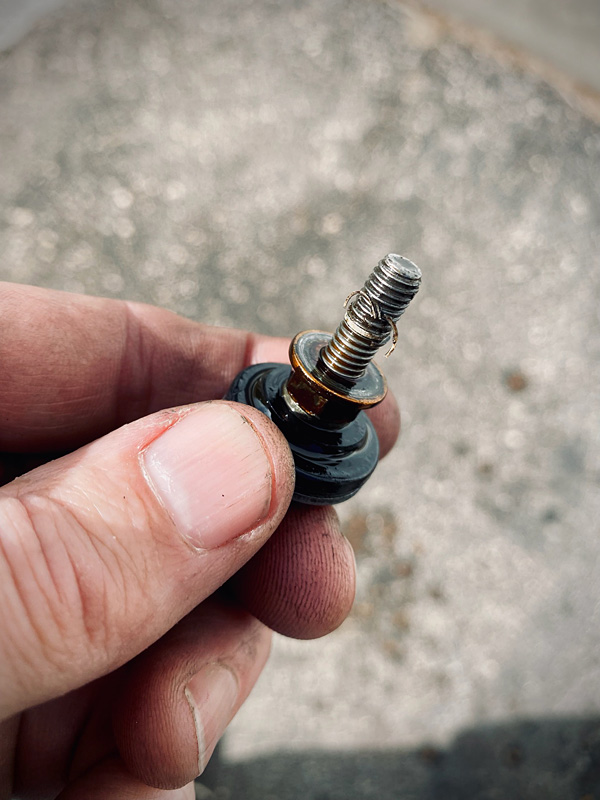
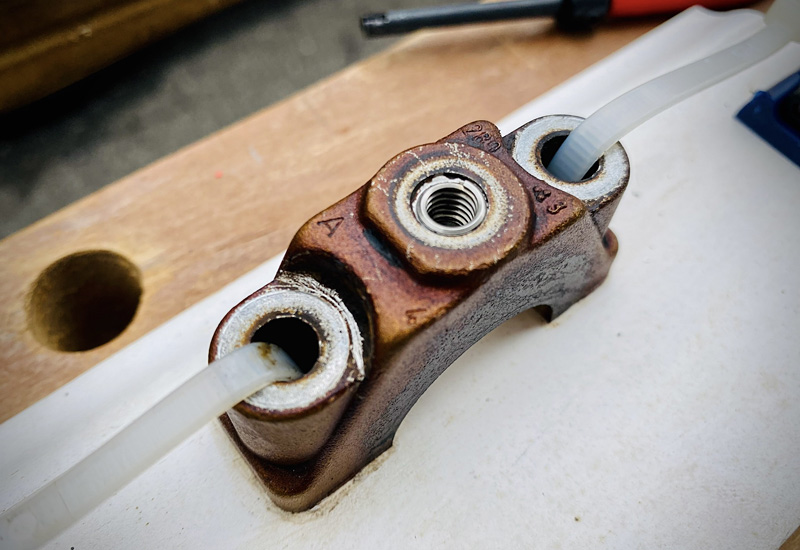
So there I was, finishing up a tune-up and replacing the valve cover gaskets on the passenger side (had a bit of oil leaking into the spark plug well), just two more fasteners left on the valve cover, and as I was tightening the nut, it let go. Torque wrench set at 9Nm, so not a matter of me over-cranking it. The stud in the center of the camshaft bearing cap stripped the threads.
"Son of a ..."
The two possible solutions I found were:
A) Get another camshaft bearing cap from another engine -- make sure it's the correct Intake or Exhaust cam cap, depending on what you're replacing. Put it back on in the proper orientation (VERY important), and you're done. NOTE the markings on the cap: A = Exhaust, E = Intake. They're in German (Auspuff and Einlassoffnung? Dunno if that's exactly right, my sprechen sie Deutsch is pretty sketchy).
B) Put in a TimeSert / Helicoil / Thread insert -- M6, 1.0.
To be fair, I *did* initially try using some Red Loctite (figured hey, might as well give it a go) and letting that cure 24 hrs, but it didn't hold even the 10Nm torque.
If you can source the correct replacement cap, that's certainly easier -- according to some of the threads I found (I think it was JimLev who mentioned this in the e39 forum, if I'm remembering right), as long as you get the same intake/exhaust cap and the installed orientation correct, the fact that it's from a different engine really doesn't matter, if the surface is in good shape.
That was my Plan B in case I screwed up doing the insert.
Here's the culprit:
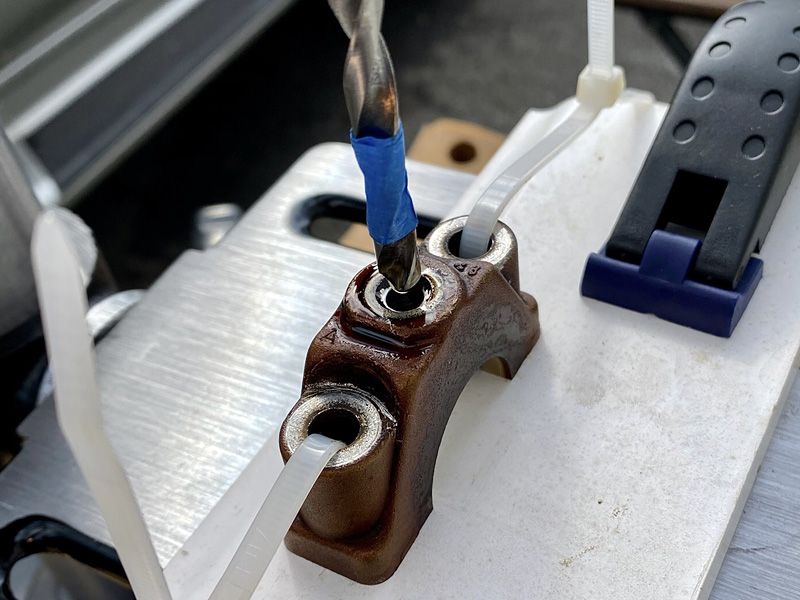
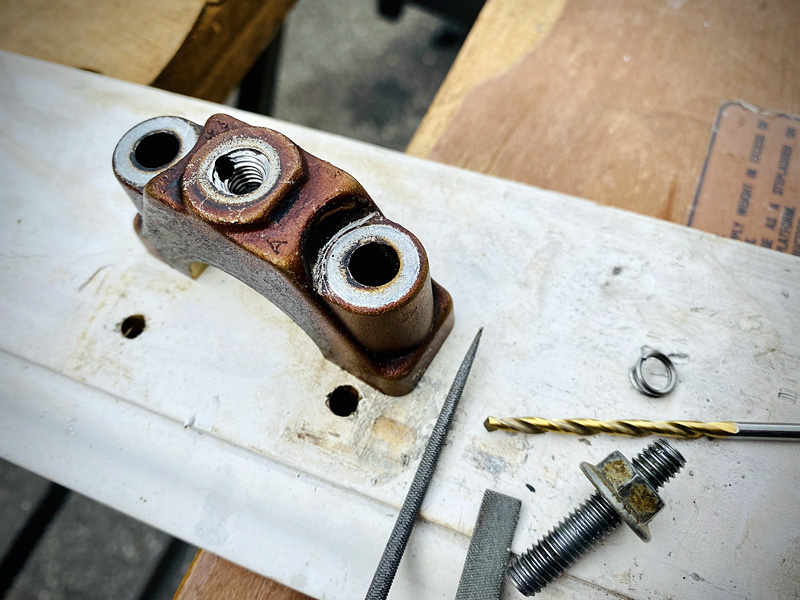
Undo the 11mm bolts to that cap, take the stud out (if it's not already) and find a way to secure the cap for replacing the stripped threads. I used zipties run through holes on a scrap piece of wood, I didn't want to put any kind of metal screw down into the holes of the cap, but if you're up to doing this job, you'll figure something out. Bolts + washers + nuts would work, I'm sure, but I had the big zipties handy.
I got a metric insert kit from Amazon, this stud only holds the oil rail and the valve cover nuts at 10Nm, so it's not critical to get the high-dollar TimeSert, unless that's just how you roll. The kit came with the inserts, drill bit, thread tap, and installation tools. What you're after is the M6 1.00 insert.
You'll also need a drill press -- I wouldn't trust this to my ability to accurately hand-hold a drill exactly straight and also control my depth. If you don't have a drill press, Harbor Freight has small ones for cheap, and these caps are aluminum, so it's easy drilling. I used a dowel rod to see how deep the hole for the stud was, then marked it on the kit's drill bit with tape, minus just a tad -- I didn't want to drill all the way through the cap! The insert itself is pretty short, too -- about 8mm.
Drill out the stripped threads -- use the slowest speed on the drill press. I used a little WD40 as a lubricant, but the aluminum is easy to work, so it doesn't really need it. Drilling out the old threads goes quickly.
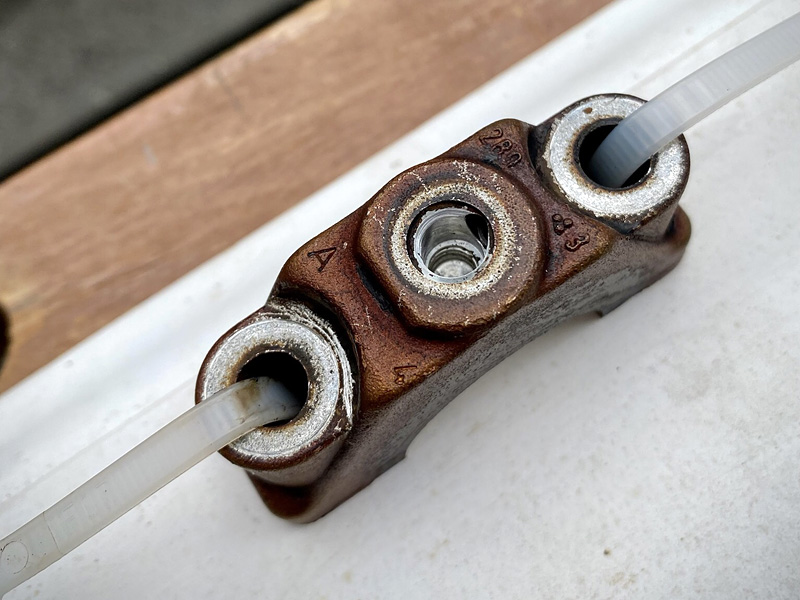
Old stripped threads gone. Notice in the bore on the right side, there's an oil passage -- that's going to be covered by the insert, and you'll have to drill that out, or it'll block oil feeding the camshaft lobe from that oil rail. dannyzabolotny made sure I was clued into that part of this job, so thanks very much to him!
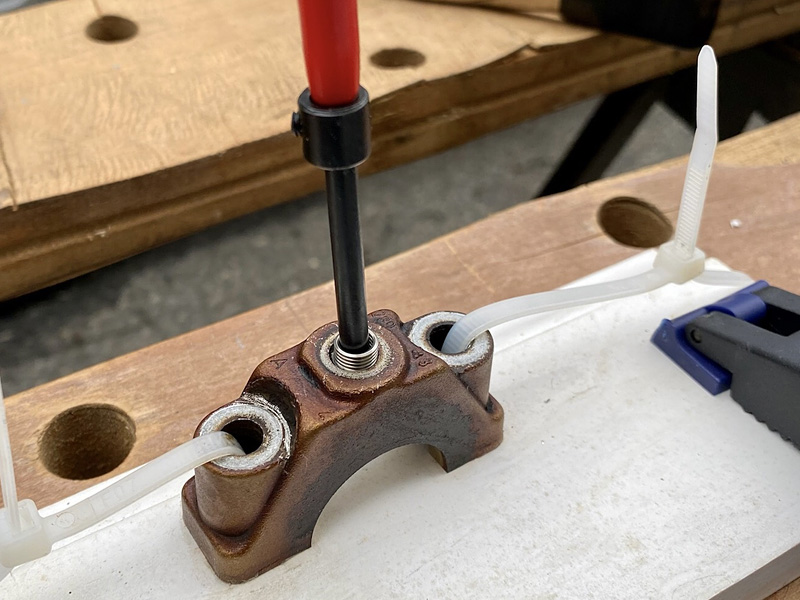
Now that the old threads are history, you can use the tap to put in new ones. You'll need a tap wrench, or you can get some nifty tap sockets for a ratchet wrench, or you could just fit the tap into a regular socket, if you have one it'll fit in.
Go slow, keep it as straight as you can, but again -- it's aluminum, it works easy.
With the new threads tapped for the insert, use the tool to ... insert the insert.
Run the insert down until it's at least below the level of the cam cap top. The oil rail sits there, you don't want to interfere with that. In my case, there was a little tab at the bottom of the insert, and I used another tool from the kit to bust that installation tab out of there.
See how that insert is now covering up the interior oil passage hole? Opening that back up was (to me) the hardest part of this, and even that wasn't bad.
If you can figure a way to rig the part so the drill press can do this, it's probably better -- in this case I did just use a hand-held drill with a 1/8-inch titanium drill bit. Look on the bottom of the cap, you'll see where the oil passage comes out at the "foot" of it. I just went slowly, lined it up, used a bunch of WD40 as lube and putting the bit through the bottom hole drilled into the insert. Go slow, be careful. The insert is steel, so it'll take longer to get through than the aluminum, but it will eventually get there. I used a small round file to clean up the hole drilled through the insert.
At that point, you can use the "double-nut" method to put the stud back into the cap -- take a pair of the nuts from the oil rail or use a nut plus the valve cover fastener, put one on the stud normally, then flip the other one over and screw it down to the first nut. They'll "lock" together and you can use that to run the stud on into the cap. If that seems confusing, search for it -- there's a ton of videos showing this easy technique, it'll make instant sense once you see it.
Put the cap back on the camshaft (look at the letter markings on the others to see how they go -- there IS a proper orientation) and evenly tighten the 11mm nuts back down, 14Nm. The oil rail goes on over the studs, those 10mm nuts get tightened to 10Nm. It was a little nerve-wracking to tighten, wondering if it would hold, but it held fine. I was more worried another one would let go as I put it all back together! Reinstall the valve covers, and don't over-tighten the nut!
Then go for a drive in the mountains.

Member
Great writeup!
2001 BMW 740i | 2013 Ford SVT Raptor | 2018 Mazda CX-5 Touring AWD
Member
Loved this engineering solution!
Member
Great fix....my e38 visited Asheville many times over my 10 years of ownership.
 Posting Permissions


 Reply With Quote
Bookmarks