
 Member
Most likely a few readers know this product already and describe the features and pro's and con's.Originally Posted by Hyper

I'm just here to demonstrate the installation into the E31.
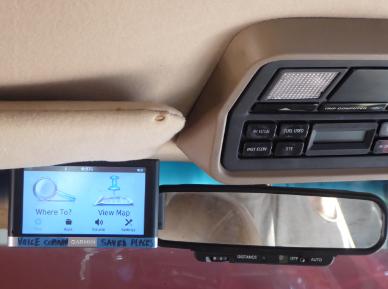
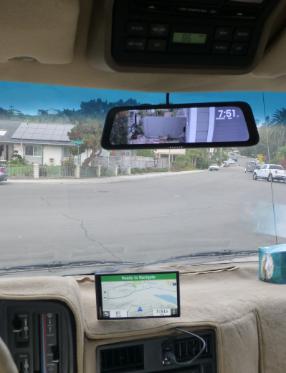
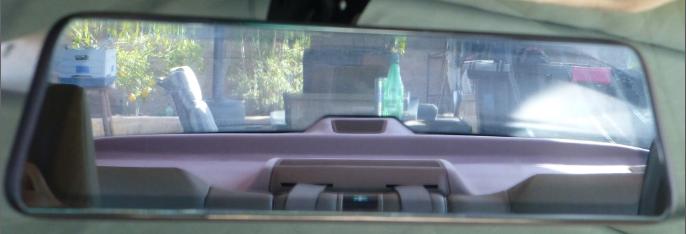
Mirror and forward camera
Rear camera, the ten foot look.
Fyi, there is a paint project in progress.
Prequel, how did we get here
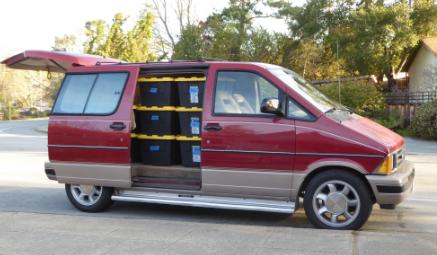
Pic: my red Aerostar minivan, aka Rojostar, with stock mirror and 5" Garmin navigation.
The mirror is pretty fancy but stock.
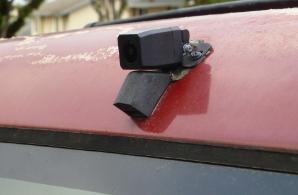
A Garmin BC-30 backup camera outputs via wireless to the Garmin display.
The camera is mounted near the top of the vehicle, above the window sprayer.
This is shown to illustrate an "external" mounting option, unsecure and crude, that I reject for the E31.
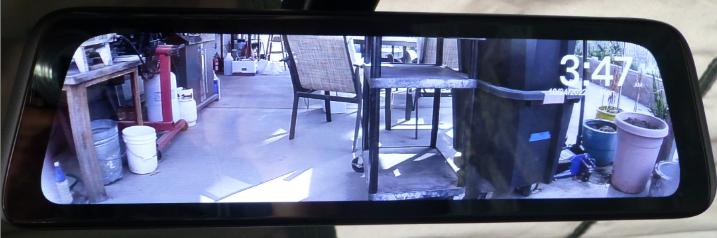
This legacy BC-30 system has relatively low resolution and poor contrast, poor light sensitivity.
I was interested in an upgrade to a larger 7" screen and to get the unit onto the dash, out of the forward view.
A follow on task was to find a higher resolution backup camera, with known compatibility to the 7" Garmin.
Going thru the research, that is when I rediscovered, became interested in, dedicated backup cameras.
Some of these had something to do with the rearview mirror.
How does that work?, I thought.
I went $$ high end to avoid disappointment due to corner cuts, and selected the Auto-Vox V5 Pro.
Originally targeted at the E31 for install 2022 April, instead it got diverted to the minivan for an upcoming trip.
Missing from the image in the rear view V5pro "mirror" is this photographer's camera, for the reason that we are actually viewing content from the vehicle's rear camera.
Not just a backup camera, it operates full time and is quite useable for driving.
Even better than a legacy rear mirror at night, due to its low-light sensitivity.
{ed 10.30.22}
Another perk: Pack in people or bins all the way to the max…you can still see out the back.
{/ed}
Sidebar: One bugaboo from trying to function as a rear view mirror for both driving and backup, is that the requirements conflict, between looking into the distance and looking down low.
When problem was brought when the camera mount was high on the vehicle and I couldn't cover both the road and a parking space.
My contact at Auto-Vox (in China) quickly presented a 2-camera solution, which will be easy to implement with some circuit boards in my inventory.
After months of using it in the minivan, and finding it decent but with some issues, a 2nd kit was procured for the E31, now installed 2022 Oct.
There was initial confusion about features, whether it was a mirror with imaging overlay or just a monitor screen with no reflection.
So here it is
- It is a mirror, useable as such when you defeat / turnoff the image. Just a bit darker than typical mirrors.
- Screen turned on, the image (mostly) overrides the mirror reflection. In certain lighting conditions the two images do fight with each other.
- When the vehicle is put in reverse, then this forces the camera image and guide bars appear.
- Has a forward camera, can be swiveled to offset mirror adjustment.
- Deep memory captures both the forward camera and rear camera.
- Has a GPS receiver. Video gets geo-tagged
- Video can be played back on the mirror or files played on an app that shows video and route on map.
- Even when keyoff, will video capture if disturbed by, say, parking lot bumps.
- Configuration menu lets you set modes and adjust backup guides.
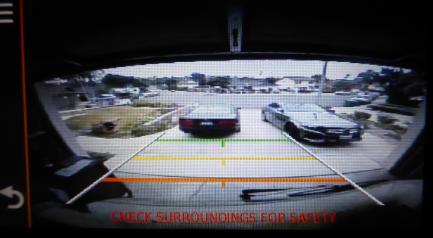
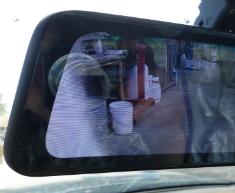
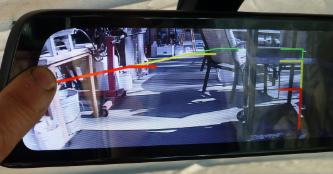
V5 Pro image from this project, driving mode.
{ed: Note that the image is wide-angle rather than flat-mirror. Pro's and con's similar to passenger mirrors. "Objects are closer than they look"}
The camera is calibrated horizontal and the cart is 4ft away.
{ed: Correction: The camera is MOUNTED horizontally but the field of display is PANNED fully downward in the configuration settings. See footnotes, post 2}
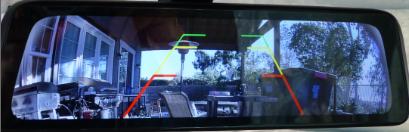
Tranny in reverse, aka backup mode, guides added. Guides are configurable, suggesting the distance you want suggested. {ed: See footnotes post 2}
Real mirror mode, screen image turned off.
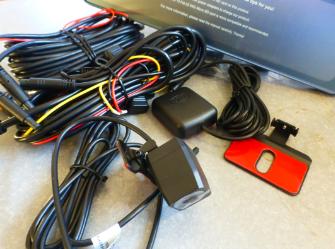
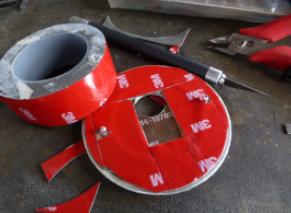
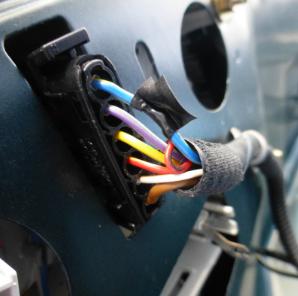
The kit
Pic: Mirror in back, camera front, GPS ant middle, 2 harness routing sections left.
Other cords are harness sections hardwired to the camera, mirror, gps and these plug into the routing sections.
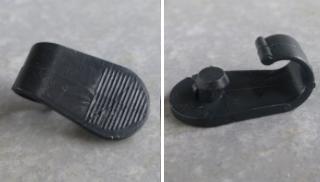
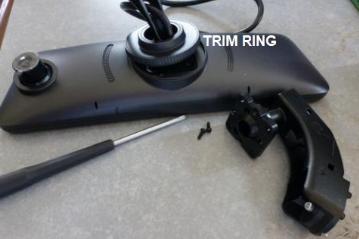
Unfortunately the mirror's mounting bracket is incompatible with the E31's ceiling.
However, the factory has alternate bracket designs and I was able to get them to ship (from China) something compatible.
The alt bracket has the proper shape and fits our mounting point without any additional adaption.
Swapping their stock bracket for their E31 compatible bracket.
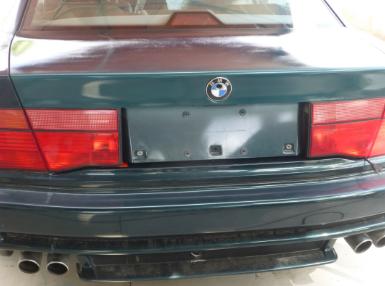
Rear camera: Location
As noted above, an external mount was rejected for security reasons.
It would get stolen or messed with, although that hasn't happened (yet) with the high mount on my throw-away minivan.
For internal mount, a cabin location was rejected because of potential glare and frost on the rear window.
Once outside the cabin you are into the trunk lid as the only possible.
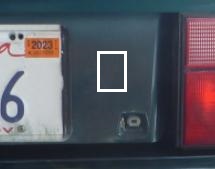
There appears to be space either left or right of the license plate, but…
A typical vehicle reversal / backup is into a parking space, so our priority is to get the camera centered left to right.
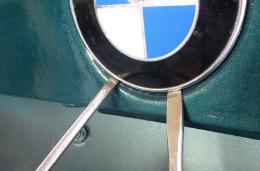
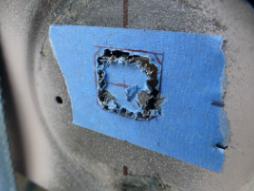
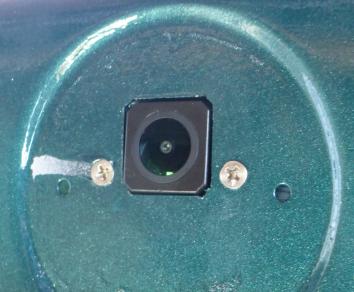
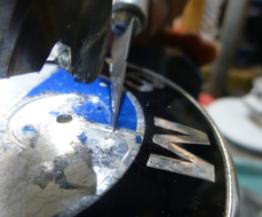
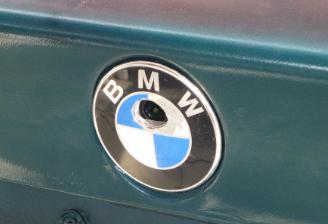
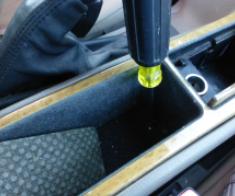
Skipping over one or two other considerations / requirements, I converged on a mounting behind the roundel with a hole cut thru.
The roundel is held on by double sided tape, and is positioned (but not held) by two pins, left and right. No clips.
Release comes from slowly working two screwdrivers for several minutes.
You are unlikely to break the roundel.
I found from machining, that it is surprisingly thick aluminum.
The cutout for the camera is plotted, drilled, clipped.
The camera center is exactly 10mm above the center line for the roundel mounting holes.
This exact position was selected to avoid a collision of the camera with trunk latch mechanisms below and a minimal amount of internal sheetmetal structure above.
Still we had to slightly shape the internal sheetmetal to pass the camera.
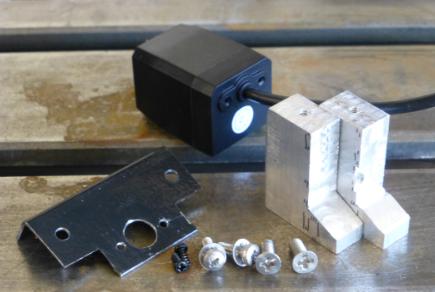
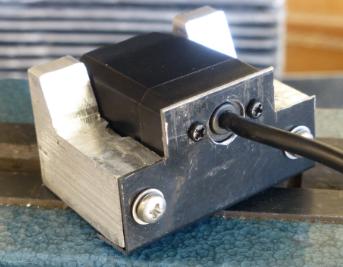
Rear camera: Mount
Here is my shop-made mounting kit.
Assembled.
Fyi, shown in the upside-up position.
Back story, factory instructions don't give a hint as to the camera rotation and there is no image rotation in the config menu.
Luckily ingress was possible, although I did have to mount it in two stages, legs first.
Also seemed to have gotten the depth right.
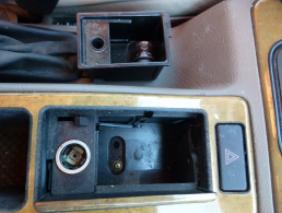
Roundel mod
The hole in the roundel is originally calculated at 16mm.
After procuring a new roundel as backup (pn 51141970248), the original was machined.
A several problems were revealed.
The first problem was that the legacy paint shattered as it was touched by the end mill bit.
I then tested a knife to pre-cut the paint, but it too broke up the paint.
The second issue was with bore style.
The camera has a wide-angle view.
Therefore the surprisingly thick roundel needs to anticipate the angle and sport a chamfer rather than straight bore.
Third issue is hole shape.
Since the camera image gets cropped to the shape of the mirror, we actually could use a mirror shaped hole, not a round one.
Our test hole, originally round, was whittled out while looking for any occlusions at the corners of the mirror screen.
Double-sided trim tape, covering both the perimeter and around the camera.
We don't want water trapped inside.
Note: dirt accumulation might be an issue with the recessed design.
Promise, it will get less ugly next time.
Still missing touchup paint.
Probably the camera gets keyed by some owner, forgetting where the real lock is.
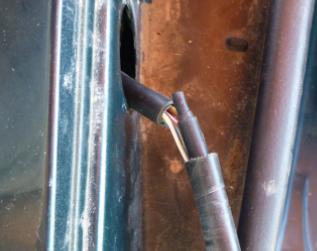
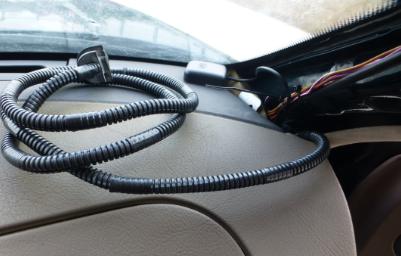
Harness route
Still at the trunk, here is the splice into the backup lights, telling the V5pro you need guide bars to show up.
Here the start of our routing harness route, from trunk to footwell.
The end of the harness is exiting the existing tube going from trunk lid to body.
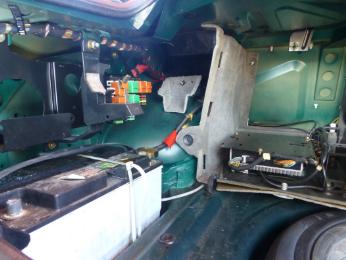
The route continues along the existing harness above the battery and fuse panel to the rear wall,
then to the cable pass-thru below the ski pass-thru.
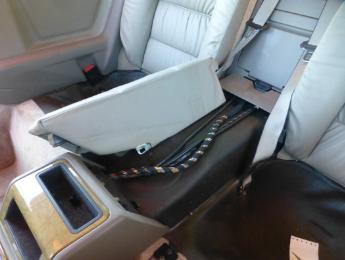
Thru the wall and under the center bins.
Under the center bins.
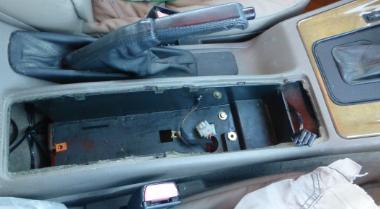
Holes in the console provide waypoints for routing.
Here, my routing fish, seen in the fetch mode.
At the popout point, the harness is (electrical) taped to the fish and pulled forward.
Earlier in the route, from the other direction, the fish was used in a push mode, sending it thru to the next waypoint, then taping the harness to what hasn't been send thru yet.
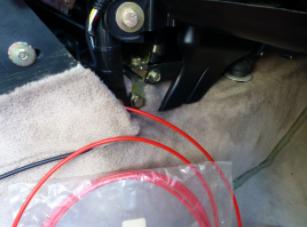
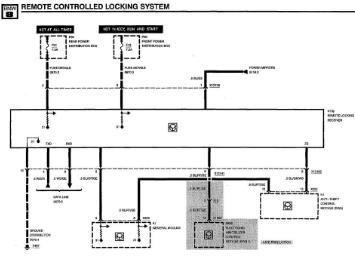
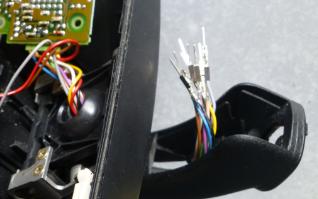
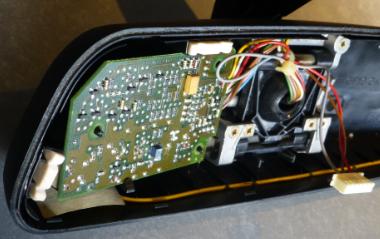
Remote Lock Receiver
Once into the footwell, we turn our attention to the mirror.
The original stock mirror contains inside it the radio receiver for the key clicker.
We won't need the mirror, but we do need to retain the RLR, somewhere.
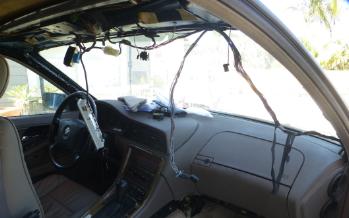
Because of limited space in the overhead, and to reserve accessibility, it was decide to pull the 10-wire RLR harness back along its route, eventually down into the (US) passenger footwell.
Fyi, I have the headliner out because of that project, but it's probably not possible to pull the RLR harness with it in place, because of hidden clips, etc.
{ed: clip pn deleted, see footnotes/clipology}
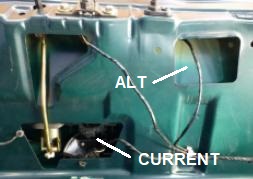
Power and ground enters the V5pro harness need the junction of the two long routing harnesses and this could be positioned in the footwell, convenient for access.
It was discovered that the RLR harness contained these feeds and it was convenient to grab them there instead of looking elsewhere.
In order to splice into the harness, slack was needed, so the harness was released from tie wraps internal to the dash and pull down into the footwell.
I've pulled the front passenger seat and can lay on my back or side, next to a solder station and tools.
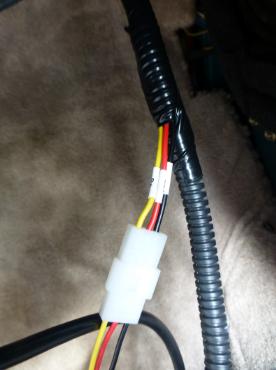
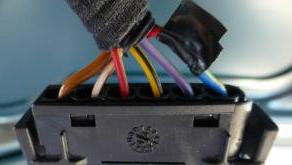
Spur off into a keyed Molex connector.
- Always Hot because of video capture when bumped
- Accessory Hot
- Ground
Remote Locking Receiver
Hmm, where to park the RLR harness until I get to it?
Could change my mind but I kept it in view, to remind me.
The RLR receiver might also end up high on the rear window, in which case the harness would be extended.
V5pro GPS ant in the corner of the dash, gets route, plugged in down in the footwell.
{ed, added:
RLR extracted from stock mirror.
Works, needs box.}

Last edited by Hyper; 11-01-2022 at 02:46 PM. Reason: as noted in text
Member
Reserving post #2, to be edited as I recall and develop content.
- Configuration menu, mirror touch screen
- Alternate location, rear camera
- Drawing, rear camera mount
- Trim removal, trunk lid
- Trim removal, rear elbow rest
- Trim removal, central console
- Footwell trim removal
- Trim removal, overhead
- Pinouts, Trunk lid lamp assembly
- Pinouts RLR, harness wire colors
- RLR relocation
- Clipology
Configuration menu, mirror touchscreen
Double tap to enter menu.
I this example menu shot, we localize.
Is is alleged that it will GPS sync (when that function is activated) but I did not observe this happening.
Slide finger left-to-right to force backup mode (otherwise start the car, put in reverse).
Now put a finger on a backup guide line and drag it, shape it.
Here's something I wasn't aware of when ranting about field of view.
Drag your finger up-down to pan the image.
It pans quite a bit and apparently default was full down.
Here's the other extreme, towards the horizon.
I suspect two pan settings, for backup and drive, and that could satisfy my original complaint.
Alternate location, rear camera
Here we avoid internal sheetmetal and external license and frame.
No roundel mod, but more trouble depth positioning the camera up to the rear cover (not present in the pic) and getting everything sealed.
Off center and lower on the vehicle.
Inside the trunk, the lid structure has several openings allowing access to the external sheetmetal.
Only two of these make sense due to outside features.
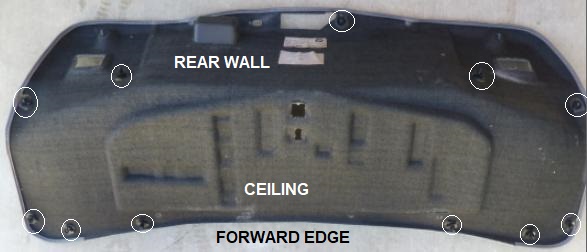
Trim removal, trunk lid
The objective is access to the camera mounting point and the route for the camera harness.
- Sensor switch. Because it retains the carpet. A 2-wire harness on the inside end. The tab connection is right angle and will resist extraction and disconnect.
- Latch trim. Because it retains the carpet. Slowly pry out along edges (iirc).
- Tool pan. Screws on the rear edge retain the carpet.
- Lid carpet. Two rotating retainers and 11 snap-in clips. The clip is 2-piece design, with one half snap-in to the sheetmetal, one half glued to the carpet. In this project, all but 4 of these released at the sheetmetal, while the 4 tore away at the (urethane) glue. Rare, none were damaged, all reusable.
It is not necessary to remove the license plate or the trim panel (pn 51131970559).
If for any other reason you need to...
- Unscrew the license lamps as these are clamping the top edge of the trim plate.
- If convenient also unbolt the side lamp assembles as some hooks retain the license trim panel.
- Pry up the qty 3 pin&inserts along the lower edge, prying straight outward from the sheetmetal
- Pull trim plate downward to free the upper / outer edge.
- An outward rotation is required for the license mounting holes to clear short bosses.
This procedure is further documented > over there.
Regardless of the license plate trim decision, it may be desirable to disconnect and remove the license lamps in order to pull back the harness and work on it.
It is not necessary to remove the hand pull recessed into the lid carpet.
Trim removal, rear elbow rest
The objective is access the route path.
- Rear medical bolster. To provide access to nuts at the rear of the elbow rest. Remove the (2) nut covers, nuts and the retainer panel holding down the rear edge of the elbow rest.
- Rear seat bottoms. To provide access to nuts on the lower edges of the elbow rest. Just pull up on the lower front edges and rotate up and away.
- Elbow rest. Remove the (2) nuts retaining the elbow rest. Expand the mounting tabs out and around the studs.
Trim removal, center console
The object is to access way points (openings) in the inside floor of the console while passing thru, the camera harness.
The center console is retained by 3 screws.
Two screws are hidden under the pad in the rear bin.
One screw is located under the (removal) ash bin.
A lever ejects the bin, exposing the screw.
It is not necessary to remove the rear container box.
IF for any reason you do so, start by pulling out the rear most bin.
This provides access to the screws holding down the entire assembly.
Then remove the left and right screw, then rotate the rear of the assembly upward, freeing the hooks along the front edge of the assembly.
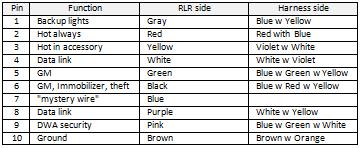
Remote Locking Receiver harness wire colors
The 3 wires we are borrowing to power the mirror do not have their colors listed in the ETM schematic.
Should be…
- Always Hot, pin 2, Red w/Black stripe
- Accessory Hot, pin 3, Violet w/White stripe. NOT White w/Violet stripe, a comm signal.
- Ground, pin 10, Brown w/Orange stripe
Pinout, Trunk lid lamp assembly
ETM indicates the left and right assemblies are in parallel on all circuits.
- Ground (brown solid). Common to BU and running lamps.
- Inside courtesy (white w/brown). To ground via trunk lid open switch.
- Inside courtesy (red w/yellow). To power via consumer relay.
- N/C. On my US car the harness side was wired but the lamp assembly was not loaded.
- Running light (gray w/violet).
- Backup light (blue w/yellow). Here, we need to patch in the rear camera.
Pinouts RLR, harness wire colors
Note that backup lights are made available to the mirror dimmer (to disable dimming), but the V5pro harness is designed to pick up this signal not here, but at the back end of the vehicle.
Likewise, it is not convenient to tap V5pro power & gnd at the RLR connector, but has to occur mid-harness, in the footwell.
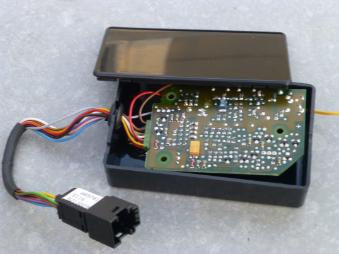
Remote Lock Receiver (RLR) relocation
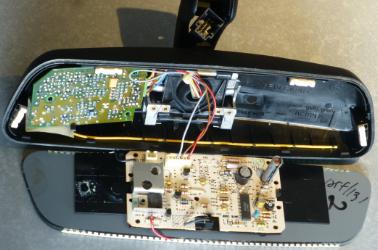
Open stock mirror
{Pic coming}
RLR and glass dimmer.
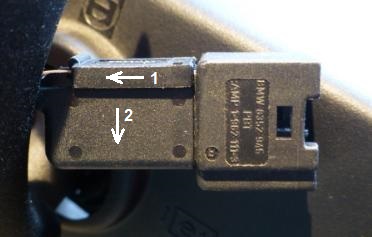
Stock mirror connector does not pass thru the housing.
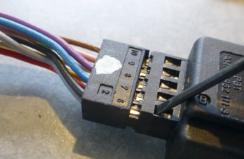
Need to disassemble connector, extract RLR, re-assemble connector.
Plug into loose harness. Test.
Project box. Nominally 1" x 2" x 4".
Relocated.
The project box could not be fitted into the overhead lamp console.
Yes, it could fit into the space, but would ultimately collide with the sunroof switch and the reading lamp assembly.
{Pic coming}
It might me made to fit if, instead of encased in a project box, it was wrapped or bagged, to avoid damage or shorts.
An alternate location is high on the front window, blocked from driver's view by the mirror.
The cable and antennae are then routed back thru the mirror mount.
{Pic}
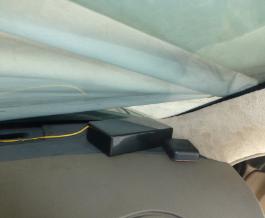
Still another alternate is the dash top, in the (US pass) far right, forward corner.
Here is keeps company with the GPS antennae for the V5pro.
{Pic}
Clipology
Harnesses route around the top of the front windscreen, are secured by J-shaped clips.
These are relatively sturdy but I still broke 2 out of 4 that I attempted to remove.
The other two snapped back into place, good as new.
I see previous techs had perhaps broken clips in yet other places along the route and reverted to taping the harness in place.
I went looking for replacements and came up with the PN 61131370742
Expensive ($5/ea).
Parts received look VERY similar to originals but ultimately they didn't fit the space AND did not snap in and stay put.
Last edited by Hyper; 11-16-2022 at 09:45 AM. Reason: Continuous updates as content created
Member
Thats fantastic Hyper. For the E31 mount, is there a specific part number to request from Autovox?
Member
In my correspondence with customer service I stated "we (the bmw community) need a specific product code that identifies a kit packout specific to our application."
I received the naked bracket seen here, but no part number and no app specific product code.
Now that I have street cred from posting the app here, and also your "future customer" question, I will go back to factory and ask again.
Note that when you order from Amazon, the standard pack out is already at distributor inventory.
App specific pack out or naked bracket will have to ship direct from China.
Member
That's a tidy install, particularly with the receiver relocation.
It looks like the E90 mount did the trick?
Member
Iirc, you made that suggestion on the thread referenced at the top of post #1.
Due to the proprietary joint between bracket and housing, the bracket solution necessarily has to come from the Auto-Vox library.
***
RLR relocation was gated by the successful demo'ing of the mirror swap.
Now I'm free to "crack" open the stock mirror, retrieve the receiver.
It also helped to discover that the receiver (mirror) dangled off a dedicated harness that could get moved around substantially.
This awareness was enabled by a headliner project that was already in progress.
Member
I put on my stylish bizdev hat, made another pass at the CSR, made the smallest of incremental progress, but hit the nebulus CS wall.
The ultimate would have been a formal catalog order number for a e31 specific kit, but would have also enjoyed a cat number for a e31 specific bracket with trim ring...but wall.
I offered to liaison factory-to-community, perhaps taking on inventory...but wall.
What we have then is for each individual owner/installer to ...
* Buy the generic kit from your favorite distributor
* Contact factory CS for bracket #11. I suggest you ask to have it come with trim ring installed (around the bracket), as a ring swap is impossible in the field
Member
Am I the only one not seeing any photos?
Member
Guessing: Pics are served via the older HTTP protocol, you might have your security narrowed to the newer HTTPS.
Try relaxing and see what happens.
Alt: PM me, and I'll shoot a matching PDF with pic.
Member
Thanks Hyper will do. Did they just send you the bracket at no cost? Am assuming you had to pay something?
Member
My situation was unique in that I was informally and unilaterally providing apps engineering to the factory.
There was credible evidence that I had bought the universal kit, iow's I was a real installer, not a talker.
So with that as leverage I negotiated the bracket at no cost, and they got their E31 apps engineering and public review at no cost.
Guess who came out ahead.
***
In my latest factory contact from several days ago the CSR used the word "free" when speaking about a compatible bracket update to the universal.
This does not contractually obligate them to do so.
Could be real, could be just a CSR overstepping, could be a head fake.
For me to "a priori" confirm real policy I would have to get thru to product management or marketing.
That could be done, but I have other hobbies.
***
There is some possibility I could shop fab the camera mount for others.
But it's also on my mind to just publish a drawing & instructs in post 2.
Member
One big unknown was whether the Remote Lock Receiver aka RLR could be extracted from the stock mirror, still operating.
This has now been accomplished.
Details on stock mirror hack procedure near the end of Footnotes.
Here, the simplest of 3 options, corner of the dash. Easy.
fyi, car cover out there.
The other two options...
* Tightly wrapped or bagged (to present shorts) and stuffed in the overhead.
Fyi, although the slim project box size is nearly correct, the shape has it colliding with other components up there.
* Behind the mirror (from drivers perspective), secured to the windshield.
Some issues with harness exposure.
Last edited by Hyper; 11-08-2022 at 01:02 PM. Reason: Pic add
Member
I know what you're thinking.
If I get a dashcam, will I ever capture anything viral, like say (Youtube>>) a car flying thru the air and crashing right in front on me ?
This morning I was literally out on a beer run and there was an incident.
Cops came out, many of them. Blocked off traffic. Made the news.
I would post my dash video of the motorcade of The President of the United States,
arriving to Viasat in Carlsbad, but I was 6th back in the blockade.
OK cam clip for me, but not Youtube material, not even BF material.
Last edited by Hyper; 11-06-2022 at 08:44 AM. Reason: Pic add
Member
Contacted Autovox, they replied in a short amount of time. Theyre sending the bracket free of charge. They did say it would take 3-5 weeks to receive but thats fine as I have other small projects with the car
 Posting Permissions


 Reply With Quote
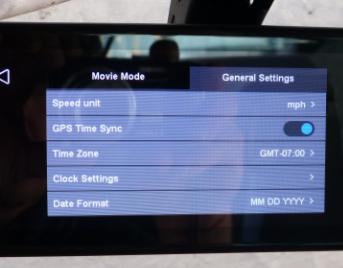


Bookmarks