
 Member
NASA Spec3 Constructors’ Guide
Written by: Taylor Johnson and Sean O’Hara - Last Updated 6/19/2023
Please reference the live version of the document for the latest updates: https://docs.google.com/document/d/1kgpDmcWk75KYhQyVoJ8IR3GB31xQMVdK40VX32yDxn4
Welcome to the NASA Spec3 Constructors’ Guide. Please reference the official NASA Spec3 Rules for any part specific compliance issues. This guide serves to walk you through the “process” of building a NASA Spec3 race car. This does NOT replace the official rules of the series. Please double check the CCR and Spec3 rules before acting on anything in this guide.
This document’s purpose is to share useful information related to building a SPEC3 race car to compete in the racing class of the same name of the National Auto Sport Association. Auto racing is dangerous and this guide is not a definitive set of steps on how to be safe or how to drive or build in a responsible manner. Ultimately the final decisions are upon the builder and driver and due care should be taken at all steps.
Official Website:https://drivenasa.com/road-racing/spec3/
Facebook Media Page: https://www.facebook.com/NASASpec3
Instagram: https://www.instagram.com/nasaspec3/
FB Discussion Group: https://www.facebook.com/groups/spec3
Sanctioning Body:https://drivenasa.com/
Parts List https://docs.google.com/spreadsheets/d/1OlOMni51nbqwuyZUN7aE8V9y77sN1THtBnFW9rwHqmM/edit?usp=sharing
Logos/Files for decals: https://drive.google.com/drive/folders/1duTOMlrXnQavBIuO1j21PQbNSKkSSFXb?usp=drive_link
Table of Contents
Table of Contents
Formal Rules
What is Spec3?
Why not allow the 318i,323i/328i?
How do I get started?
Possible Order of Operations on a fresh build.
Preparing for your first track event
Finding the Right Donor Car
Parts Required
Eligible Vehicle Table
Minimum Weight
Maximum Power
Motor
Engine Management
Transmission
Flywheel/Clutch
Intake
Exhaust
Suspension
Camber Plates
Front Control Arms
Front Struts
Rear Suspension
Rear Shocks
Springs
Anti Roll Bar (erroneously referred to as “sway bars” colloquially)
Wheels
Tires
Brakes
Brake pad part number explanation
Drivetrain
Motor Mounts
Any non-solid motor mounts of the stock height. See Rule 9.3.1.8.1.
Transmission Mounts
Differential
Differential Bushings
Rear Subframe Bushings
Reinforcements
Chassis
Shock Towers
Bracing
Building Tips (in order of front of the car to the back)
Reaching minimum weight
Cooling system
Euro Coolant Tank
Heater Core Delete (not required)
Air Conditioner Pulley delete
Water temp sensor install
Brakes
Brake caliper rebuild
Brake cooling
Anti-Lock Brake System (ABS)
Three channel and four channel ABS
Suspension
Wheel studs
96+ M3 control arms vs Non-M control arms
Front strut assembly
Electrical
Transponder
Killl switch wiring
Defrost/Defogging
EWS disable
Wire Harness Thinning - Chris Araj
Rain Light
Rain Light Wiring Tips
Engine
Oil pump nut
Oil Pan Baffle
Oil pump pickup tube
Engine Harness Diagram
DME Chip install
Chassis
Roll cage Design
Sound deadening removal
Mounting an E36 on a rotisserie
Sunroof delete
Dual fuel pumps/fuel starvation fix
Mounting Ballast
Subframe reinforcement welding photos
Rear control arm reinforcements
Rear trailing arm bushing preload
Exhaust install
Car setup and maintenance
Regular Maintenance Intervals
Engine/Drivetrain
Chassis/Suspension
Safety
Alignment Specs (base line)
Suspension Setup
Brake pedal feel
Body Panels
Cylinder Head rebuild
Head rebuild parts:
Transmission removal/flywheel conversion/clutch replacement
Tires
Toyo RR
Toyo RA1
Buying tires
Tire Mounting and Rotation
Fluid Capacities and weights
Oil Filter Housing Welch Plug o ring
CamShafts
In Car Camera
Rear Wheel Bearing Replacement
Reading codes from the DME/ABS
Towing
Ball Joint Pressing
Build Threads
Taylor’s 325
Sean’ 325
Tom Neely
Edward Higginbothom
To-Do List
Formal Rules
https://members.drivenasa.com/rules/spec3_rules.pdf
What is Spec3?
The NASA Spec3 (S3) racing class is devoted to BMW E36 325 models. The goal for Spec3 is to create high levels of competition between similarly prepared cars at a reasonable cost. Purchase and preparation of a car for these series should be less than $15,000. A Spec3 is great for HPDE and Time Trial duty while being built.
Spec3 is similar to Spec E30 but for the newer chassis. With limited engine and suspension modifications allowed, Spec3 ensures close racing, while not breaking the bank due to a plentiful supply of low cost street vehicles to convert. A spec Toyo tire and Koni/Swift suspension package take the guesswork out of building a competitive car and the series platform has proven to be as reliable on track as any existing class.
Why not allow the 318i,323i/328i?
- The 325i and the M50b25tu engine from the 325i/525i is extremely plentiful and sells for $300 all day, every day. If you aren’t willing to sell your 328i to buy a 325i, reconsider how committed you are to racing.
- The m50b25tu torque curve is vastly superior to the m52 variants and makes good power all the way to fuel cut. It is a proper racing engine
- The 325i is OBD1, meaning the DME(ecu) does not need to be programmed or flashed. Simply buy the Spec3 tune chip and install it on the board. This makes compliance testing simple
- Weight penalties to balance engines with different power levels and torque curves have proven to never be successful for tight racing. Spec3 is focused on car parity and the racing is tight enough that minute differences in torque across the rev range would cause disparity for consistent/fast drivers. (See other classes that allow the 328i). Spec Miata is one Spec class that allows different engines and the non VVT NB1 engine has proven to be a complete ringer and dominates the field. All 1.6 NA Spec Miata builds were instantly irrelevant when the NB was added.
- Spec E30 (325i) and Spec E46 (330i) do not allow other engines either. Need we say more?
How do I get started?
- Come visit a NASA event! Find the registration table and ask for a map. Ask for the places to park and watch the racing action. Find the Spec3 paddock area and introduce yourself and ask questions!
- Read the rules! Read the NASA CCR, Spec3 rules, and your region’s supplemental CCR.
- Set your budget! Make a plan for how fast or slow you want to go. Ready to dive head first? Great! Make a plan and start sourcing parts! Want to stretch it out over a few years, no worries! Spec3 cars are great in HPDE and will be perfect for you while you build and work towards racing.
- Make some friends! The best part of racing are the friends you make along the way.
- 0Most importantly, have fun! Very few of us are racing for anything more than a trophy to put on a shelf. If you aren’t having fun, take a step back and reevaluate.
Possible Order of Operations on a fresh build.
This section will walk you through a potential order of operations when building a car and working your way through HPDE. Expected time to start in HPDE1 and make it to competition school is 2 years.
Year 1: HPDE 1 -> HPDE 2
Year 2: HPDE 2 -> HPDE 3
Year 3: Competition School in first event and rookie season of Spec3
This can be done faster or slower all depending on skill level, experience, and of course, luck.
- Join the Spec3 Facebook group!
- Read the rules and this manual!
- Find a donor car
- Do basic maintenance such as change all of the fluids, flush the brakes, and replace any worn suspension and brake components
- Install good brake pads (Something like a Hawk HT10) and do you first event! Get your feet wet and participate in an HPDE1 weekend.
- Search for safety gear. If you’re ready to take the plunge, it’s never too soon to get a full cage welded in and secure the relevant safety gear, but for now we will assume you aren’t ready for all of that. So source a quality roll bar, 2 race seats, brackets, harnesses, a helmet, and a HANs device
- After basic safety components are taken care of, you can continue driving HPDE1 weekends and we can assume you’ve moved up to HPDE2 at this point. The next logical step is to assemble your suspension and start removing interior pieces. Pull the carpet, AC components, radio, window regulators, and any other stuff you don’t need.
- Cooling system refresh! Pick up an aluminum radiator and a performance water pump with a metal impeller. Now is a good time to replace hoses and install a quality thermostat. Make sure all of your ducting around the radiator is intact!
- Install a fire extinguisher or fire suppression system!
- Start shopping for M3 control arms, m3 strut housings, the koni shock inserts, swift springs, sway bars, camber plates, chassis reinforcement pieces(rear subframe, trailing arm pockets, engine mount/subframe, sway bar), and buy some new poly/solid bushings (engine mounts, transmission mounts, stock front control arm bushings, stock rear trailing arm bushings with limiters, poly subframe and diff bushings, upgraded diff bolt, and new ball joints for the rear control arms)
- Pick up an oil pan baffle and drilled oil pump nut
- Install yourself, or take to a shop. Most of the chassis reinforcements need to be welded in. It makes sense to do all of your suspension work and bushing replacement at the same time since both the rear and front subframe must be dropped to complete the reinforcements. The front subframe must be dropped to do the oil pan and oil pump nut, so now is the time to do those as well
- Winter after first season. Congrats! You’re probably in HPDE2 or HPDE3 now. Time to get serious!
- Time to pick up a Spec3 exhaust and DME chip
- Now is the time to start contacting shops to see about getting a full cage welded in. You’ll probably need to book a few months out. See if they are willing to use your roll bar as a starting point for the main hoop and plan accordingly with what they say
- Additional weight loss. Now is the time to consider thinning your wire harness some more and gutting your doors in preparation for a full cage
- Get a fire suit if you haven’t already. This is your last season before racing, so get used to being in the fire suit with the shoes, socks, balaclava, and other fire safety gear. Ideally you already did this before you stepped on track!
- Now is the time to also go trailer shopping. You may have been driving to the track before, but with a full roll cage, this is no longer a good idea.
- Install the head light intake duct
- If you haven’t already, consider installing water temp, oil temp, and oil pressure gauges. The factory gauges are not very useful
- Strip your interior and get your cage welded in. Ask them to weld in your sunroof as well!
- Final prep. Rain light, install your stickers, rookie designation, kill switch, fire surpression system, window net, center net, a steering wheel with a quick release, etc.
- Complete competition school and go racing!
Preparing for your first track event
It’s very intimidating going to your first event, but it doesn’t need to be! Don’t be afraid to ask questions. Every single person there has been in your shoes before and can relate.
First things first, be prepared! Ask off of work for the event well in advance. Figure out your lodging (tent camping? Sleeping in your trailer or car? Getting a hotel? Hotels fill up fast so book early!). Find out where the restrooms are at the track. Do they have showers? Do they have food vendors or will you have to pack in everything. Does the track have a gas pump or must you bring fuel?
What to pack! Basic things like sunscreen, wallet, phone charger, your helmet are easy to remember, but there are some things you may not consider.
- Way more bottled water than you’d expect
- Paper towels and hand washing water jug
- Spare parts for your car. Extra set of brake pads? (Not just for the track, but for the drive home!)
- Towel for the shower
- Snacks
- Mode of transportation in the paddock? Bicycle? Scooter? No skateboards!
- Chairs and canopy
- Air compressor
- Torque wrench and sockets
- Small tool set
- Jack/Jack stands, but also wood to place under the jack and stands! Most tracks require this
- AAA or insurance? You may need a tow home
- Tire Pressure Gauge
- Zip ties
- Tape (painters and duct)
Now, here are some basic E36 parts to bring as spares
- Brake light switch (cheapest part that will ruin your weekend. You can’t go on track without working brake lights)
- Brake light bulbs
- One front brake line and one rear brake line
- Throttle pedal (these are plastic, and you’ve probably never looked at yours to see if it isn’t already broken!)
Okay, you’re all signed up, you’ve arrived at the track. Now where do you paddock? Drive around the paddock until you find someone in a similar car (in your case, an E36) and ask them if you can paddock near them. Even if they say no (very unlikely) they will probably have a good idea for where you can paddock and set up camp. Find the Spec3 racers near you and tell them you’re interested in the class and they’ll surely take you in. Having knowledgeable folks with the same car as you is invaluable.
You’re paddocked and ready to drive. What’s next?
- Take stock of your surroundings. Where is the medical area, where is registration, where is the tech station? Where is the entrance to grid, where are the restrooms, where can you get food, where can you get warm/cool/dry in case of inclement weather. Where is the closest spill clean up station, fuel station, or fire extinguisher?
- Prep your car. Clean out your car, no floor mats, no loose items, take out your spare tire, etc. Tape your numbers on, cover your battery terminals with tape, make sure your belts and everything are tight. Torque your lug nuts and check your tire pressure.
- Get your car tech’d. Go to the tech station (consult your schedule to see when they are open) and get your car approved by the tech inspector.
- Check in at registration. This varies region to region, so check your pre-event emails to see what they want you to do. Some don’t require check in and just call attendance at the driver’s meeting.
- Check the schedule and see where you need to be first thing in the morning. Usually there is an all hands driver meeting early, then your first class room session or run group meeting will be right after. Figure out where these will be and don’t be late!
- REST! Get a good night’s sleep. Wake up early and give yourself time to prepare and double check everything before going to the classroom. You may not have a lot of time after class to prepare for your first session.
- Have fun and ask lots of questions! HPDE is about learning, so soak it all in.
Finding the Right Donor Car
Sedans or Coupes are legal, but convertibles, compacts, and wagons are not. There is great debate on coupe vs sedan, but ultimately it’s down to personal preference and what clean chassis you can find. The coupe provides larger doors which aid egress, however the sedan’s rear doors aid in access to the rear seat area. The most important thing to consider when sourcing a car is the quality of the shell. Cars that have been in significant collisions should be avoided because the unibody may be out of alignment. Cars with significant rust should be avoided because rust may compromise structural components, rust repairs can be expensive, and the rust may reappear in the future. High mileage drivetrains are often still competitive and high miles should not discourage a potential buyer. The best cars to look for are 93-95 5 speed manual 325i or 325is models with the winter package for the 3.15 limited slip differential. Some later 95 models with the winter package may have traction control (the second throttle body being a telltale sign) and these will NOT have a limited slip differential.
Areas to inspect when looking at a potential shell/car:
- Shock towers front and rear. If not reinforced, they can blow out or “mushroom”
- Rear trailing arm pockets - This can rust out and pose a potentially build-ending safety risk
Spec3 Discounts/Benefits
The following deals and benefits have been arranged by the stewards of Spec3 or NASA itself to facilitate affordable builds
OGRacing
Spec3 has arranged for great “Special Pricing” with OG Racing. All Spec3 racers and those that are about to complete comp school (and have informed Taylor Johnson) are tracking on a list for approval by OG Racing. Once on the list, call or email them with your order and mention the Spec3 Special Pricing.
Konig Wheels
Spec3 racers can purchase Spec3 legal wheels from Konig for ~30% off retail. Visit this link for details
https://konigwheels.com/nasa-spec-3/
RaceGerman
Spec3 racers get a discount across the entire https://racegerman.com/ parts calaog. Contact your series leader for the discount code.
General NASA Mebmer Discounts
All NASA Members have access to the following benefits as well https://members.drivenasa.com/benefits
Parts Required
Parts list: https://docs.google.com/spreadsheets...qmM/edit#gid=0
Eligible Vehicle Table
The Spec3 class is designed around the 1993 – 1995 BMW 325i sedans and 325is coupes. See Rule 6.3.1 and Appendix A. In addition, any 1992 – 1998 BMW E36 chassis may be used provided that all relevant components (motor, engine wiring harness, transmission, brakes, etc.) are used from a 1993 – 1995 production vehicle. See Rule 9.3.2.2.
Minimum Weight
2825lbs including driver, fluids, etc. See Rule 9.2.1 and Appendix A.
Maximum Power
195.9 horsepower and 179.9 foot pounds of torque as measured by a dynamometer at the rear wheels. See Rule 9.3.1.9.1 and Appendix C.
Motor
2.5 Liter single-vanos inline six cylinder motor known as the BMW M50b25TU. See Rule 6.3.1. and Appendix A.
Engine Management
Stock Bosch DME, part numbers 0-261-200-413 or 0-261-203-506, with Bimmerworld performance chip, part number #Chip_BWS3. See Rules Section 9.3.1.7.
Stock DMEs are commonly known as Red Label (no EWS) and Silver Label (with EWS)
https://www.bimmerworld.com/Chips-Software/Chips-/Spec3-Performance-Chip-by-Epic-Motorsports_2.html?
Transmission
Stock Getrag 250 five-speed transmission
Automatic to manual swaps are fairly straight forward.
Here is a great guide http://shatteredk.blogspot.com/p/e36...325is-bmw.html
Flywheel/Clutch
Stock flywheel and clutch or an approved single mass flywheel kit of the same weight as stock.
The Valeo Single Mass Flywheel conversion kit is the most popular
BMW Flywheel Conversion Kit - Valeo 52281208
https://www.fcpeuro.com/products/bmw-clutch-kit-323i-323is-325-325e-325es-325i-325is-525i-52281208
Intake
Stock air intake with K&N or Green Filter air filter and optional “S3 Air Duct” sold by Bimmerparts.com and available via the Ebay store of seller “cmuzyy.” See Rules Section 9.3.1
https://www.ebay.com/itm/BMW-E36-Headlight-Air-Duct-Insert-For-Spec3/284060071541
If the Ebay link ceases working, you can order directly from Bimmerparts:
Chris Muzylowski
Zygmunt Motors
www.bimmerparts.com
215 348 3121
215 688 1350
cmuzyy@aol.com
New for 2023, the Race German Headlight Duct is also legal. This duct has much better fitment, but costs a little more. Spec3 racers get a great discount on this part, so do not pay retail! Ask a Spec3 racer how to get the discount for the entire RaceGerman Catalog https://racegerman.com/products/e36-headlight-duct?_pos=2&_sid=f167ceb55&_ss=r
Exhaust
Stock exhaust manifold and collector pipes followed by the Spec3 exhaust sold by Mitchum Enterprises Richmond, VA (804) 402 1239; richard.mitchum@gmail.com. See Rule 9.3.4.1.
Installation of this exhaust requires you cut the exhaust on your car right after where the two pipes join in a “Y” after the header, before the catalytic converter. This exhaust will then clamp on using exhaust clamps. You may weld any of these portions together.
You can also build your own exhaust, but it must meet the specifications of the Spec3 exhaust listed in the rules
Suspension
The Spec3 suspension setup is Swift springs and koni yellow strut inserts on an M3 (1996-1999) strut housing modified to take a strut insert. These are paired with Vorshlag camber plates and 96-99 front lower control arms.
There is a spec eibach anit roll bar kit that must be used as well. This kit is NLA as of 2021. The replacement for this part are similar sized H&R bars. See the anti roll bar section later in this document.
The rear suspension is just a koni yellow shock and a swift spring.
Basically they make aftermarket shock inserts that allow you to cut your stock m3 struts and pull the factory shock tube out. Then you slide the aftermarket one in and attach it with a bolt through the bottom.
Camber Plates
Vorshlag Motorsport part number VM-CP-SPEC3 and spring perches part number VM-SP-96S-14. See Rule 9.3.8.1.
https://vorshlag-store.com/products/vorshlag-camber-plate-and-perch-kit-for-spec3
Front Control Arms
BMW part numbers 31-12-2-228-461, 31-12-2-228-462, and 31-12-9-069- 035 from the 1996-99 BMW M3. See Rule 3.8.2.
These are sometimes hard to find. Note that the 96-99 M3 arms are DIFFERENT than the 95 M and 92-99 NON M arms. The M3 arms use a centered bushing while the other arms must use an offset bushing to have the same geometry and they are NOT ALLOWED. Pick up a used set of 96-99 M3 arms and press in new ball joints. If you want more information on how to identify the correct arms when buying new, search for the control arm section later in this document.
Part numbers for the ball joints needed !!!YOU MUST RUN THE LEMFORDER E30 M3 BALL JOINTS. ALL OTHER BALL JOINTS ARE NOT HEAT TREATED AND YOU WILL RISK SNAPPING THEM!!! - PER RRT
Outer BMW Ball Joint - Lemforder 31121126254
x2
ttps://www.fcpeuro.com/products/bmw-ball-joint-front-outer-31121126254l
Inner BMW Ball Joint - Lemforder 31121126253
x2
https://www.fcpeuro.com/products/bmw-front-inner-ball-joint-e30-lemforder-31121126253l
Front Struts
BMW part numbers 31-31-2-228-007 and 31-31-2-228-008 from the 1996 – 99 BMW M3 modified with Koni front strut inserts, part number 8641-1342S3. See Rules 9.3.8.4.1 and 9.3.8.4.3.
For detailed steps on how to assemble the front struts, look in the Building Tips section later in this document.
Rear Suspension
Stock M3 upper and lower ball joints, part number 33-32-1-140-345, and stock rear trailing arm bushings, part number 33-32-6-770-817. RTAB shims (limiters) are highly recommended. See Rule 9.3.8.15.One thing to note is that the NON M cars have a bushing for the rear lower outer control arm connection to the trailing arm. It is legal and recommended to upgrade this to the M3 ball joint, which is used on the rear upper outer trailing arm connection. 33326775551
33-32-1-140-345 has been superseded by 33-30-6-852-895 and is also legal
It is highly recommended you weld in the rtab pocket reinforcement plates. Here is an example of RTAB Pocket failure https://www.youtube.com/watch?v=J4zPECASIrs...
Subframe bushings can be poly, delrin, or any other non-metallic material but you must also weld in the reinforcement plates if you do that.The inner bushings on the upper and lower control arms are usually fine to leave alone but not a bad idea to replace if everything is dropped. It is recommended to replace your diff bushings while you are in there and upgrade to the LARGER front diff bolt.
Rear Shocks
33-32-1-140-345 33-32-6-770-817
Koni part number 8240-1115S3. See Rule 9.3.8.3.1. Stock rear shock mounts, part number 33-52-6-754-096. See Rule 9.3.8.12.
8240-1115S3 33-52-6-754-096
Springs
Swift Race Springs, front and rear, part “NASA Spec3.” See Rule 9.3.8.7.1.
These springs are designed specifically for Spec3 and have a front spring rate of 375# and rear rate of 550#. The rate is progressive and the springs lower the car substantially.Contact RRT Racing in Sterling VA as they carry these.
https://www.rrtautomotive.com/rrt-racing/spec3/
703-661-4222
DO NOT FORGET TO INSTALL THE PLASTIC SPRING RETAINERS OR YOUR SPRINGS MAY FALL OUT
Anti Roll Bar (erroneously referred to as “sway bars” colloquially)
Eibach front and rear, part number 2033.32. See Rule 9.3.8.8.
https://stillen.com/products/eib2033320?fbclid=IwAR3pD3ybOpgumbQBLoShwFm-VkVrzKZSLnuwGKr1EHXO9tYul-NU6-vVaKs
As the Eibach kits are harder to find, new for 2021, you can run this H&R kit in its place
https://www.bimmerworld.com/H-R-Sway-Bar-E36-M3-Rear.html?fbclid=IwAR0QLho6JcgeQsjyLmSFKrrSsHDngnz ACO4Ag72-S_QPRuKu2U-mYIcKn_s
https://www.bimmerworld.com/H-R-Sway-Bar-E36-M3-Front.html?fbclid=IwAR1OcT4rMs0nqyKDy_ZgG3el6Xx2wY RBX9rL1mqdr_kmjwEelbZMKJxMDik
Wheels
Wheels shall be either 15 inches by 7 inches, with a minimum weight of fifteen and one half half (15.5) pounds OR 17 inches by not more than 8.5 inches with a minimum weight of sixteen and one half (16.5) pounds, and can be any brand, unless otherwise specified in these regulations. All wheels on the vehicle must be of the equivalent size
Wheel spacer guide: https://www.facebook.com/groups/spec3/permalink/2712605542173903
To fit 17x8.5 ET40 wheels, you must run a spacer on the front of the car to clear the spring perches. Any spacer smaller than a 12mm should not be used as they lack sufficient “lip” material on the center bore. A 15mm spacer in front and a 12mm spacer in the rear is normal as usually you can not achieve enough camber in the rear to clear the fender with a 15mm spacer. Cars running a 17x8 et38 such as the Konig Hypergram can run without spacers at all, however, this is not the most performant setup and you will rub the inner fender well at full lock. If you are lucky enough to find 17x8.5 ET20 wheels, you do not need spacers at all, but may have issues with rubbing in the rear.
Rain wheels
The best wheels to buy for the 15 inch rain tires are the stock wheels from an E34. They will be 15x7 ET20 which gives the correct offset with no spacers. These wheels are basically worthless, so you won’t see them for sale. Just make a “WTB” post somewhere and people will throw them at you. Expect to pay ~$25 a wheel.
Tires
Toyo Proxes RR in size 235/40/17 (dry conditions), or 225/50/15 Toyo RA-1 (wet conditions). See Rule 9.3.9.1.
Brakes
Stock non-M calipers and rotors with Hawk DTC-60 front pads, part number NBS3F or HB136G.690, and Hawk DTC-60 rear pads, part number NBS3R or HB227G.630. See Rule 9.3.10.1.
FCP Euro carries our brake pads and they honor the lifetime warranty, so you can buy one set and then warranty them for a new set again and again forever.
These can be found at Andrew-Racing as well
https://andrew-racing.com/i-23456440-nasa-spec-3-front-nbs3f.html
https://andrew-racing.com/i-23456442-nasa-spec-3-front-rear-combo-nbs3f-nbs3r.html
The stock caliper brackets can be upgraded using the same part from a Z3. https://www.facebook.com/groups/spec3/posts/3654181118016336/
Brake pad part number explanation
Hawk brake pad part numbers consist of:
The part number “HB136”
The pad material “G” for DTC-60
The pad thickness including backing plate “.690”
Drivetrain
Motor Mounts
Any non-solid motor mounts of the stock height. See Rule 9.3.1.8.1.
Transmission Mounts
Any non-solid transmission mounts of the stock height. See Rule 9.3.12.5
Differential
3:15 ratio limited slip differential. See Rules 9.3.11.1, 9.3.11.2, and Appendix A.
These differentials were standard on OBD1 cold weather package cars.
Differential Bushings
May be upgraded with aftermarket bushings, including metallic. See Rule 9.3.11.4.
It is a common mod to drill the front diff bushing and install a larger bolt. E36s are known for snapping the stock size bolt under hard acceleration.
Rear Subframe Bushings
May be upgraded with non-metallic aftermarket bushings. See Rule 9.3.8.9.1.
Reinforcements
Reinforcement of the following components is highly recommended but not required:
Chassis
Rear sway bar pick-up points, front subframe motor mounts, rear lower control arms, rear trailing arm pockets, and rear subframe attachment points, BMW part numbers 41-00-2-256-495, 41-00-2-256-496, 41-11-2-256-497, and 41-11-2-256-498. See Rule 9.3.8.11
Shock Towers
Front shock tower, part number 31-31-2-489-795, and rear shock tower, part number 51-71-8-413-359. See Rule 9.3.8.13
Bracing
Front X-brace, part number 51-71-8-410-212, and any bolt-in front and rear shock tower braces. See Rules 9.3.8.14 and 9.3.8.10
Building Tips (in order of front of the car to the back)
Reaching minimum weight
The following most likely need to be done to a prepped car to reach race weight
- Wire harness thinning
- Polycarbonate rear side windows (windscreen and rear glass must remain stock)
- Wire harness thinning
- Heater core removal
- Door gutting
- Lightweight battery
- AC/Cruise Control delete
- Interior stripping/Sound deadening removal
Cooling system
The achilles heel of most BMW engines is the cooling system. Early M5/X engines came with a plastic composite water pump impeller that would come apart and let the engine over heat. These engines do not tolerate high water temps (260+) and will quickly warp or crack the head.
It is suggested to upgrade to a performance water pump with a metal impeller such as a Stewart unit, along with a metal thermostat housing (replacing the stock plastic part) and an aluminum radiator such as a CSF or Mishimoto. Some racers elect to run a lower temperature thermostat as well.
It is IMPERATIVE that you have at least the factory radiator ducting (top, sides, and undertray) to ensure adequate air flow through the radiator. The next step to upgrade beyond that is an undertray with an integrated radiator baffle (such as the Motion Motorsport unit) or a dedicated radiator duct such as the Kinematic Speed Radiator Duct kit.
Euro Coolant Tank
The late model E30 tank / E36 Euro tank is self bleeding and allows you to delete your fan shroud. It is a major upgrade over the stock unit.
E30 late-model 6 cyl. tank (17111712641)
Front Plastic Clip: (17111719190)
Rear Euro Mount (41122256492)
First, relocate the battery terminal by notching the metal:
Drill a couple holes and mount the battery terminal:
Make a bracket out of aluminum stock for the front plastic clip:
Rivet the rear euro mount/bracket to the firewall:
Wedge the rear of the tank into the euro mount and snap the front clip into place:
Heater Core Delete (not required)
To get down to the class weight, most Spec3 drivers delete their heater core. This has the added benefit of removing hot coolant from the passenger compartment, simplifying the cooling system greatly, and clearing up space under the dash. See the image below for a basic visual of what hoses to delete and which ones to connect.
Air Conditioner Pulley delete
If you delete the AC pulley on the crank, you will need to either add washers to the crank pulley bolts or to use shorter bolts. The E36 M3 LTW came factory with no AC, so there is a part number for these bolts. You need 6. https://www.fcpeuro.com/products/bmw-hex-bolt-with-washer-m8x12z31-07119913011
A block off plate must be installed on the rear of the head http://www.hardmotorsport.com/hard-motorsport-heater-core-coolant-block-off-plate-bmw-e36-m3/
Then, a heater core firewall block off panel MUST be added
http://www.hardmotorsport.com/hard-motorsport-firewall-hvac-block-off-plate-bmw-e36/
Water temp sensor install
In the diagram above, there are three ports on the intake side of the head. The farthest to the rear of the engine is a coolant passage that gets blocked off when doing a heater core delete. This nipple can be removed and replaced with a water temp probe. Most likely, you will need an adapter such as this: Extended 12x1.5 to 1/8" NPT Adapter https://www.bimmerworld.com/Gauges-Data-Acquisition/Data_Gauge_Sensors/Extended-12x1-5-to-1-8-NPT-Adapter.html?gclid=CjwKCAjwx8iIBhBwEiwA2quaq71wS-gWFhSysWSp0VhRg-hrU2ZEkc1Z6SVpuZsVKUX-lT6-Ssf4AhoC3MEQAvD_BwE to thread into the head, which will then accept the water temp probe.
Alternative: Part number A2C59517248S threads right into the extra port on the head without any adapter
https://www.summitracing.com/parts/vdo-a2c59517248s
Brakes
Brake caliper rebuild
The piston for the front brake calipers may be listed incorrectly. This is the correct part https://www.rockauto.com/en/moreinfo.php?pk=13228349&cc=1433882&pt=1724&jsn=10
Brake cooling
This topic is up for debate, but the general consensus is that running at least the factory brake ducting is recommended if you are a front runner in the class. The Hawk DTC-60s operate fine and do not fade or drop off unless you are pushing the car 10/10s in a hot summer event. Expect to replace your rotors every 3-5 events as they will crack. Some racers elect to run dedicated brake ducting systems and results are unclear. Brake pad temperatures will be kept lower and basically eliminates brake fade, but at the potential cost of cracking rotors more often. Some racers elect to block off the brake ducting for better aero and better rotor life. If this is done, you should at least remove the dust shields behind the hubs. Your mileage may vary.
Anti-Lock Brake System (ABS)
Before reading any further, understand that an E36 with no ABS, all else held constant, is slower than one with ABS. If you hold the false bravado stance that you are better than ABS, you do not drive fast enough on track. If your Spec3 build does not have the stock ABS in a functional state, you will be faced with an exercise in frustration. Do not modify your ABS, do not mess with the wires. Leave it alone. With no ABS on an E36, the brake bias is not correct. With no ABS on an E36, you can not push the car to the edge as required to compete in a spec class without ABS.
Wheel speed sensor connectors can get wet during very heavy rain and cause an intermittent failure that will turn your ABS off. Clean off the connectors, apply dielectric grease, and seal them up. Otherwise, the ABS system is maintenance free and fairly simple.
Three channel and four channel ABS
Late model cars may have 4 channel ABS (the difference being separate ABS control over the rear wheels instead of one single ABS valve for both). In theory this may provide an advantage, but no advantage has been observed in practice. 4 Channel ABS cars usually came with ASC+T when equipped with the winter package whereas 3 channel cars would come with a limited slip with the winter package. There is no different in maintenance, handling, or build prep for these two systems.
Suspension
Wheel studs
It is highly recommended that you convert the wheel lug bolts to wheel studs. Only use a high quality kit such as the race studs from Bimmerworld and replace them every 1-2 seasons.
96+ M3 control arms vs Non-M control arms
The 95 M3 used the same control arm geometry as a regular E36 but with an offset bushing to give extra caster.
- 1995 M3 control arm part no: 31 12 2 227 249/250 (L/R)
- 1995 non-M3 control part no: 31 12 6 758 513/514 (L/R)
- 1995 M3 offset LCA bushing part no: 31 12 9 064 875
- 1995 non-M3 LCA bushing part no: 31 12 9 059 288*
From September 95 onwards BMW did away with the offset bushing and fitted all M3s with concentric/non-offset bushings, with the additional caster coming from a new control arm design.
- 1996+ M3 control arm part no: 31 12 2 228 461/462 (L/R)
- 1996+ non-M3 control arm part no: 31 12 6 758 513/514 (L/R)
- 1996+ M3 concentric LCA solid rubber bushing part no: 31 12 9 069 035
- 1996+ non-m3 LCA bushing part no: 31 12 9 059 288*
A lot of online vendors will list the NON M part as fitting the M3 and pair it with an offset bushing. This is NOT the arm you should use for Spec3. The easiest way to tell the arms apart is that the M3 arm has the outer ball joint centered in line with the control arm where the non-m (and 95 M3) arm has the ball joint offset and this creates a little “dog leg” bend.
Pictured below (the non M arm on top (black), the M3 arm on the bottom (silver)). Note that the color and number of holes in the arm are not indicators.
Source: Vorshlag
Front strut assembly
The front strut is a combination of a 96-99 M3 strut housing, plus a koni sport shock insert, Spec3 Swift Spring, and Spec3 camber plate from Vorshlag
- Use a spring compressor to compress the spring on the strut (if installed) and remove the top nut on the upper spring plate (top hat/strut mount)
- Remove the spring and spring compressor
- Drill a small hole in the bottom of the strut housing to drain the oil oil
- Cut the top of the strut housing off
- Remove the “insides” of the strut
- Enlarge the hole in the bottom of the strut housing
- Install the koni insert and secure the fastener on the bottom. *NOTE: Sachs struts may have a smaller inner diameter than the genuine BMW strut housings, so the Koni inserts may need to be sanded down to remove excess paint in order to fit*
- Optional: Unthread the top of the shock insert a few turns and apply blue loctite to ensure the shock does not unthread itself from the vibrations and twisting forces of racing
- Place the spring and Spec3 camber plate onto the strut and fasten the top nut
Fender Rolling
To fit the wide 235/40/17 tires and 17x8.5” wheels, you must roll (the process of flattening the inner lip of the fender) and aggressively pull (physically stretching outward) the fenders, or else your tires will rub on your fenders causing smoke and burnt rubber smell at best and a damaged/punctured tire at worst.
Front control arm bushing install
Spec3 runs the 96+ M3 version of the front control arm bushing. These are usually NOT found already pressed into the lollipop. Use of a press or a front ball joint tool kit will aid in pressing these bushings into the lollipop. Image below.
The M3 bushing differs from the non M bushing by having more rubber and, naturally, less holes. An M3 bushing will only have two small holes and they are supposed to be to the left and right of where the control arm installs into the bushing once everything is assembled on the car. However, for added stiffness, you can rotate the bushing 90 degrees before installing it into the lollipop.
Install of the bushing in the lollipop onto the control arm can be done by hand by spraying windex or soapy water (NOT something that will leave a slippery residue) on the control arm and pushing the bushing on with both hands, however, there are tools you can buy or make that allow for easier install, especially wit the control arm already on the car.
Rear trailing arm bushing preload
Rear spring retainer install
The Spec3 swift springs are short enough to fall out when the suspension is at full droop.You must drill a pilot hole in the “nub” that centers the stock spring and install the supplied spring retainers with the supplied bolt to “extend” the nub to retain the stock springs. Drilling this hole is easiest when the upper control arm is in installed, however, if you use a small right angle drill or an electric/air ratchet, you can still get to the nub. (Source: Ross Shull)
Steering Wheel Lock delete
From the factory, the E36 has a lock that will prevent the steering wheel from turning when the key is not inserted into the ignition and turned to “run”. Per the Spec3 rules, this MUST be removed. Removal is as simple as drilling a small hole in the bottom of the ignition, reaching into the hole with small needle nose pliers, and pulling out the spring.
Electrical
Transponder
A transponder is a box that transmits a unique number to the timing system as you drive over the start/finish line. Most organizations use what NASA uses, which is an AMB/MyLaps system. Your transponder should be placed as low and as far forward on the car as possible. Any obstruction between the transponder and the ground can negatively affect the signal to the timing loop. A transponder being farther forward on the car can mean the difference between 1st and 2nd place on a photo finish.
A popular place is on the frame rail.
Killl switch wiring
Per the CCR, every race car must have a kill switch. This switch must not only disconnect power from the battery when turned off, but it must also disable the car and turn the engine off. The only exception here are items like electric fire suppression, radios, cool suits, etc. This switch should be placed in a place easily reached while you are strapped in your seat, and also by emergency workers from outside the vehicle. Purchase a quality switch as you don’t want this part failing in the middle of a race, or 5 minutes before the flag drops! See below for a common way to hook up a 6 pole switch on an E36. A 2 or 4 pole switch will not work. Source: https://www.hardmotorsport.com/hard-...ll-switch-kit/
Defrost/Defogging
It is suggested that you install something like the bimmerworld defrost kit, or install a blower motor to blow air from the transmission tunnel to the windshield to use as a defroster. At any rate, you should invest in some RAIN-X Defogger spray or dish soap to coat the windshield with.
EWS disable
On OBD1 cars, if the chassis was equipped with EWS (silver label DME), you need to remove that link between the EWS computer and the DME as well as use an EWS delete chip (Spec3 chip). The wiring can be disconnected at the DME side (pin 66) or at the X20 side (pin 7). The X20 is the easiest to access and cleanly modify.
We recommend pushing the pin out of the X20. (big round plug by the fuse box.) If you unscrew that connector, pull back the boot, find pin 7 (green wire), twist the lock mechanism on the connector, push the pin (pin 7, green wire) out of the connector, re-lock the connector, fold the pin/wire back into the boot, put the boot back on, and reconnect the connector.
For EWSII equipped cars, there is also a starter lockout. We recommend bypassing that as well. On the EWSII module itself, there are only two large wires. Those are the wires for the starter solenoid. Cut them near the plug and butt connector them together and your car will start even when the key transmitter or antenna fails. (https://www.trmtuning.com/2013/10/11/ews-e36-chassis/)
Wire Harness Thinning - Chris Araj
Tools
- Schwaben 23 Piece Terminal Tool Kit (029009SCH01A - 23 Piece Terminal Tool Kit | Turner Motorsport)
- Small Flathead Screwdriver (2.0 mm or 5/64 in)
- Drill with 9/64 bit
- Wire Cutters or Diagonal Cutters
- Lock-back Blade, Box Cutter, or similar
- Multi-Colored Zip Ties or Multi-Colored Tape
- A variety of standard tools like sockets, torx bits, lighting, etc. (just for access to the right places)
Method
The general concept is to remove unnecessary wires without leaving any wire stubs or exposed wire ends. To do this, you will need to depin the terminals where the wires end.
The two logical ways to work are:
- From known unnecessary end points to the fuse box
- From known unnecessary fuses to end points
In either case, it is easiest to work with one wire at a time. Depin or clip (situational) the wire that you no longer need. Feed the wire through the wire bundles until you reach its end point. If necessary, use a blade to cut a small break in the electrical tape and unwrap a wire bundle. Depin or clip (situational) the end. Add your removed wire to the discard pile and watch it grow! (weighing your removed parts is very satisfying)
If you get into a situation with several partially removed wires, keep them organized with color coded zip ties or tape. Bright colors are easiest to see through the mass of wires.
Depinning Common Terminals
Wire terminals have small flanges which catch the terminal housing and prevent them from coming out. The function of the terminal release tools is to compress these flanges and allow the user to pull the wire out of the housing. (see example CNTCT socket here)
- CNTCT Socket (fuse box):
- Use tool #5 from the Schwab set referenced in the Tools section.
- Grip wire and press lightly upwards into the housing
- While holding the wire upwards, press downwards into the housing using the tool until you feel it settle just a bit more than where it initially encountered resistance.
- Pull down on the wire.
- “Comb” style
- Pull the metal “comb” from the plastic sheath.
- Use the small flat head screwdriver in a twisting/prying motion to lightly raise each of the curled metal flaps on both sides of the terminal you want to release.
- The wire should easily free up by the time you get to the last metal flap.
- NOTE, there is probably a tool for this, but a cheap screwdriver works very well.
- Pin style
- Select the correct circular tool from the Schwab set above
- Grip wire and press lightly upwards into the housing
- While holding the wire upwards, press downwards into the housing using the tool and twist the tool
- You should feel the terminal release and be able to remove the wire
- NOTE, I found these to be the most consistently difficult terminals to release using the correct tools, particularly the female end. I found it much easier to use the drill with a 9/64 bit to bore out the terminal. THIS RENDERS THAT PARTICULAR HOLE UNUSABLE IN THE FUTURE. You must be certain that you want to remove the wire before drilling.
- Sealed “Comb” Style (behind turn signals)
- Not designed to be opened or serviced.
- Just clip the unnecessary wires close to the base
- Cover the exposed ends with sealant. Liquid electrical tape might be a good option
Tips
- The job is FAR EASIER when you have very little in the way. Removing the seat, dash, and bumper saves some time and headache. The job CAN be done without removing these things, but you’ll spend more time aligning your light and fishing wires around obstacles.
- Depining terminals can be incredibly difficult with the wrong tool. BUY GOOD TOOLS and save yourself the headache.
- Even with the right tool, proper technique is required to depin terminals. YouTube has some good videos. Below is a general video, but you can probably find some BMW specific videos too.
- Don’t let fear of mistakes stop you. If you cut the wrong wire, you can always repair it with new wire, shrink tubing, terminals, and a crimper.
- If you would rather pay someone to do it, Kevin Tulay with Tulay’s Wire Werks will do it for a fee ($800ish at the time of writing)
- Tulay's Wire Werks – Specializing in BMW wiring (tulayswirewerks.com)
- To do this, you must fully remove the wiring harness and get it to his shop. You must also be able to reinstall the remnants of the wiring harness.
General Wire/Housing Colors
Below are trends I noticed, not necessarily a fully accurate guide
Wires:
- Red = primary power
- Brown = ground
- Purple = accessories?
- Blue = lighting?
- Green = horn?
- Black = ??
- Yellow = ??
Wire Terminal Housings:
- White = seem to be non-essential and can be mostly (totally?) removed
- Black = can be thinned, but frequently contain essential wiring
Sample Thinned Fuse Box
(pictures of mine coming soon when I finish reassembly and make sure it works)
Rain Light
Some regions require a rain light to be installed (notably, NASA Mid Atlantic). Be sure to install an FIA approved light such as the Lifeline or Afterburner unit. You will be disqualified if the race is announced to be a rain race and you do not have a rain light
https://www.pegasusautoracing.com/productdetails.asp?RecId=560
https://www.bimmerworld.com/Safety-Race-Interior/Battery-Electrical/Lifeline-FIA-Approved-LED-Rain-Light.html
NASA Mid Atlantic (the only NASA region to require a rain light), AER, and BMW CCA require the rain light to flash at 4hz at all times, except when braking, at which point the rain light should go “Solid”.
Rain Light Wiring Tips
Pegasus Afterburner: Simply connect power and ground, then connect the third wire to a signal that goes 12v high when the brake pedal is applied (such as your brake light wire)
LifelIne: Purchase the relay adapter https://www.bimmerworld.com/Safety-Race-Interior/Battery-Electrical/Lifeline-Rain-Light-Adapter-On-Flashing-Brake-Solid.html?fbclid=IwAR0WCDxnEKTozp8iMOI3qfiod9cYA5 DvCgNaBbEP8MzvuKL3_gdEwkQLkyk
Or wire yourself like this (Source: Jon Kozlow)
Cartek:
Wiring should be straightforward with the Cartek. Hook the solid light wire into the tail lights and the strobing/flashing light wire into your brake lights.
Engine
Oil pump nut
The oil pump nut on these engines can get loose when the engine is turned backwards due to a spin on track. This problem is made worse by the lack of a tensioner on the oil pump chain. The slack creates an impacting motion on the sprocket which can work the nut loose. The fix for this is to safety wire the oil pump nut to the sprocket.
https://www.bimmerworld.com/Engine/Engine-Performance/M50-Drilled-Oil-Pump-Nut_2.html?gclid=CjwKCAjwx8iIBhBwEiwA2quaq5qiA3Omh 696IfRMIlDTTmXsKPKvrYpETHoKvZCvAn-1uIaqgOdRxRoCElEQAvD_BwE
Source: https://shop.bimmerbum.com/products/...5x-s5x-engines
Oil Pan Baffle
It is suggested to run a baffled oil pan and also overfill by 1-2 quarts to avoid oil starvation during sustained later Gs.
Oil pump pickup tube
It is HIGHLY recommended you replace your 25+ year old oil pickup tube with the upgraded z3 part which is reinforced to avoid cracking. A cracked oil pickup tube will destroy your engine.
https://www.fcpeuro.com/products/bmw-suction-pipe-11411703930
Don’t forget the gasket! https://www.fcpeuro.com/products/bmw-oil-pump-gasket-11411703947
Engine Harness Diagram
The following is not 100% accurate, but should assist in figuring out what goes where if you did not label them during disassembly
Source: https://www.r3vlimited.com/board/for...ram-simplified
DME Chip install
- Locate the DME cover on the passenger side firewall
- Unscrew the screws holding the cover in place
- Slide the DME out and unplug the connector
- Use a screwdriver to pry back the metal tabs
on the bottom of the DME- Lift the cover off of the DME
- Locate the chip on the board and
pry up gently with even pressure all around- Install the new chip with decoder board in place
of the old chip. Press gently and evenly to secure it- On later cars, you will need to cut the green
wire on the main DME loom on the driver side
of the car to disable EWS
Valvetrain maintenance
It is highly recommended by the author of this guide that the 30+ year old 200,000 mile valve spring retainer plates be replaced before forcing the engine to live at 6500 RPM for 40 minutes at a time. This is easily done without removing the head from the engine as long as the proper tools are used. The valve can be kept in place using pressurized air in the combustion chamber or something like pushing string into the spark plug hole and rotating the engine to top dead cylinder. Then a spring removal tool can be used to press down on the spring, remove the valve stem keepers, then the spring can be released and the upper spring retainer plate replaced. New stock plates are more than enough for the rigors of racing (for the E36. E46 is a different story), If this maintenance is not done, you risk a plate cracking and a valve falling into a combustion chamber, destroying your engine. This can happen without warning with 30 year old plates.
Chassis
Roll cage Design
Some important things to remember when designing your roll cage. Please read section 15.6 of the NASA CCR thoroughly
- This class only allows a 6 point cage, meaning the cage can contact the body at the base of the A, B, and C pillars only. Foot protection bars are allowed. No gusseting of the cage allowed along the pillars.
- You should see that the bars of the cage as close to the roof sides of the chassis as possible to aid in egress
- Make sure provisions for a window net, center net, kill switch, and fire suppression system pulls are considered in the design
- 15.6.4 Padding All roll cage surfaces that may come in contact with the driver’s head, knees, and elbows must be padded with high-density padding such as Ethafoam or Ensolite or other material labeled “high density padding” and manufactured for road racing use.
- Optimal tube sizing for our cars is as follows
- 2501 - 3000 lbs 1.500” x 0.120” Seamless Alloy (4130), Seamless mild steel (CDS Mechanical), DOM, or Docol R8 (only) 1.750” x 0.095” Seamless Alloy (4130), Seamless mild steel (CDS Mechanical), DOM, or Docol R8 (only) 1.750” x 0.120” ERW* (No issuance of logbooks for cars with ERW cages) *Note- Specifications listed only for reference for inspection of grandfathered vehicles
Sound deadening removal
There are two ways to remove the sticker tar-like sound deadening material. Heat or dry ice. Most cars respond well to the dry ice method where you freeze the sound deadening and then hit it with a hammer to break it away from the chassis, but these cars do not respond will to that and the clean up can get nasty. Most find success with a heat gun, a scraper, and mineral spirits or some other adhesive remover.
Before: After:
Mounting an E36 on a rotisserie
Polycarbonate Windows
Often referred to by the most popular brand name as “Lexan”. Polycarbonate can be used to replace the side window glass to prevent shattering and to reduce weight. Polycarbonate CANNOT be used for the front and rear windshields. Popular options are Condorspeedshop and Hard Motorsports for prefabricated solutions of you can purchase the raw material and cut your own. The weight savings between the full glass and polycarbonate is not much. In our tests we found that stock rear glass from a coupe weighs about 6 lbs, the condorspeedshop coupe window weighs 3 lbs, and the Hard Motorsports window weighs about 2 lbs. At most, you are saving 4 total lbs by swapping your free stock glass, for polycarbonate you paid money for.
Sunroof delete
The sunroof cassette should be removed and the stock panel or another piece of steel should be fixed in place in the roof. No aluminum, titanium, carbon fiber, fiberglass, etc.
After removing the cassette, remove the sunroof panel from the cassette and attach it to the roof with tabs, either welded in or screwed in with the factory holes. Seal around the sunroof panel with sealant of your choice. Wrapping the roof in vinyl provides a clean look and superior sealing.
Dual fuel pumps/fuel starvation fix
With the 25+ year old fuel pump in your car, you may experience fuel starve in long right hand turns when below ⅓ tank. There are a few legal options to remedy this.
- Some people have found that simply replacing their pump with a new one allows them to run down below ¼ tank without issue. Your mileage may vary
- Most people install a second fuel pump in the driver side of the tank, replacing the sending unit. There are multiple ways to do this
- You can run the 95+ model year blue top pumps and just plumb the feed lines together going to the fuel rail, this is not suggested
- The better option is to run two white top pumps and plumb the return from the rail into the return on the the driver side pump, then send the feed from the driver side pump to the passenger side return, then have the passenger side feed the fuel rail like normal. The Bimmerworld kit does exactly this. https://www.bimmerworld.com/Intake-Fuel/Fuel-Filters/E36-Fuel-Starvation-Kit.html?gclid=CjwKCAjwx8iIBhBwEiwA2quaqzD52jLP1Vv CK1vPxBKv9AhBbFOb7P-3Mjk4Xu9K2q6tnSTmr1qM4BoC98MQAvD_BwE
Mounting Ballast
15.20Ballast All ballast shall be solid metal such as steel, lead, or depleted uranium, and consist of a minimum of five (5) pounds per piece. Each piece shall be bolted in place with through-bolts, fender washers, and a locking-nut / system (e.g. jam-nuts, Nylock, etc.). All ballast shall be secured sufficiently, and all bolts shall be of grade five (5). Nylock nuts or metal crimping lock nuts should not be reused.
9.3.13.2 Ballast is permitted, and shall be securely mounted in the passenger foot well, aft of the firewall, and shall be forward of the rear seat riser.
9.3.13.2.1 Ballast shall be in segments no heavier than fifty (50) pounds.
9.3.13.2.2 Ballast may not exceed one hundred (100) pounds maximum. Spare Tire weight per 9.3.9.7 is considered separate from this rule and may be added in addition to the allowed 100 pounds.
9.3.13.2.3 Each segment shall be fastened with a minimum of two (2) one-half (1/2) inch bolts and positive lock nuts of SAE grade 5 or better unless the ballast is mounted using the four (4) passenger seat mounting points and replacement bolts, and shall utilize large diameter, load distributing washers.
9.3.13.2.4 Holes may be drilled in the passenger footwell floor pan for purposes of mounting the ballast and the floor pan may be reinforced for the same purpose.
Subframe reinforcement welding photos
Transmission
Transmission Shifter lever
The stock shifter is more than adequate for racing as long as the bushings and bearings are not worn. If your car has a sloppy shifter, consider rebuilding it properly for $50 before spending $500+ on a chassis mount or short shift kit.Some race shops claim anecdotally that chassis mount shifters cause extra wear on transmissions due to the increased shift speed and pressure on synchros. These claims have not been proven, however.
(Image source: https://www.r3vlimited.com/board/for...sem-getrag-250)
Transmission shifter rebuild
Unlike the ZF from the 328i and M3, the Getrag 250 never needs any kind of rebuild to assist in alignment of the shifter, so there are only two areas of concern.
If you’d like an easy button, one click refresh kit and an upgrade to your stock shift lever, the Z3 shifter is widely considered the best OE shifter available. A kit like this contains everything to bring your shifter back to life as well as and upgraded shift lever for a shorter throw. https://www.fcpeuro.com/products/bmw-short-shift-kit-e30-e36-e30ssk
Shift Lever
This is the part you physically grab to shift gears. The length of the shaft above and below the pivot “ball” where it sits in the cup of the shift linkage determines the “throw”. The Z3 shift left offers one of the shortest “Throws” of any BMW shifter and is easy to find.
Shift Linkage
This part of the shifter attaches to the rear of the transmission with a pin through a bushing in the front of the linkage and then slides into a bushing attached to the chassis on the underside of the transmission tunnel. This part of the shifter, when worn, will allow the shift lever to move vertically, rotate in place, and be vague during shifting. The shifter lever sits in a “cup” in this linkage and this is the pivot point. This is the part removed and deleted when installing a chassis mount shift since the pivot point then moves above the transmission tunnel. To rebuild this part, source the following parts:
Bushing for the front of the linkage https://www.fcpeuro.com/products/bmw-shift-lever-bushing-oem-25117519669
Bearing Cup for the linkage https://www.fcpeuro.com/products/bmw-shifter-bearing-top-ring-25111220600
Rear bushing for the chassis
https://www.fcpeuro.com/products/bmw-shifter-bushing-rear-25111222015
Selector Rod
The lower part of the shifter is the “Selector rod” that connects the bottom of the shift lever to the actual shifter rod of the transmission. There is a bushing in the bottom of the shift lever where the selector rod connects, a circlip to hold the selector rod in, and then a “selector rod joint” which has a foam bushing inside and connects the selector rod with the shifter rod in the transmission. Older style selector rod joints needed little plastic shim washers whereas the updated style you can buy currently do not need those washers anymore. The selector rod is the main reason for side to side movement of the shifter as the joint bushing wears and simply due to the “single shear” design of the selector rod.
Selector rod joint https://www.fcpeuro.com/products/bmw-selector-rod-joint-25111222688
Selector rod shims (if you don’t change the rod joint to the updated version. You can also add more of these washers than stock to increase the rigidity of this joint) https://www.bimmerworld.com/Driveline-Shifter/Shifters-Parts/Yellow-Plastic-Shim-25-11-1-220-439.html
Some people have found that wrapping the selector rod in safety wire or something similar and then wrapping it in tape, you can add weight to the shifter to improve the feel further
Shift knob
The stock 325i shifter can easily be upgraded with a ZHP weighted shift knob for better shift feel.
Dual/Single Shear Selector Rod
Something like a dual shear selector rod can be installed during your rebuild (to replace the stock single shear selector rod) to eliminate side to side movement of your stock shifter. The selector rod is different depending on what year car you have.
BMW beefed up the "gear shift rod joint" starting in 9/1994 and also made it 10mm shorter. To accommodate this, the selector rod was lengthened 10mm. In the photo, the pre-9/94 linkage is on the bottom with the post-9/94 linkage on top.
Up to 09/1994
Selector Rod - 25111221547
Gear Shift Rod Joint - 25117503525
From 09/1994
Selector Rod - 25111222664
Gear Shift Rod Joint - 25117580281
Rear control arm reinforcements
It is recommended that the rear control arms have a reinforcement plate welded on.
https://www.bimmerworld.com/Suspension-Steering/Control-Arms/E36-E46-Rear-Lower-Control-Arm-Reinforcement-Kit.html
Rear anti-roll bar endlinks
Most racers use the stock endlinks for the anti-roll bars. If you choose to use adjustable endlinks, such as bimmerworld or AKG endlinks, you will likely have to shorten the threaded rod of the endlink by cutting it to avoid having the endlink contact your lower control arms in the rear.
Exhaust install
- Cut your stock exhaust behind where the two pipes from the manifold join, but in front of the catalytic converter
- Leave extra pipe uncut as you can always cut more off, but adding it back on is more difficult
- Use an exhaust pipe expander if needed to slide the Spec3 exhaust over the cut end of the stock exhaust
- Weld the pipes together or use the supplied clamps to secure the exhaust
- Transfer the exhaust hangers to the Spec3 exhaust and secure it to the chassis
E34 exhaust manifolds and downpipes
Although the E34 525i did come with the M50b25tu in later years, the exhaust manifold and downpipes are slightly different as the flanges are clocked in a different orientation. Beware when purchasing an E36 engine that you will have to swap the exhaust manifold
Safety Equipment
SAFETY IS A SYSTEM. When you are in HPDE, the safest your car will be is STOCK until you install every and ALL safety items designed to work together. Do not install fixed back seats without harnesses and rollover protection. Do not install harnesses without a roll bar or cage. Do not install a roll bar or cage and drive it on the street if there is any chance any part of your body can make contact with the bars. Do not wear harnesses without a head and neck restraint. Do not remove your airbag unless you are always going to wear a harness with a helmet with a HANs. See how this works? It’s a system. Complete it, or it’s unsafe. Once you install harnesses, it’s probably time to start towing the vehicle to the track. Yes, the people you follow on instagram all have racing wheels, fixed back seats, and harnesses in their street cars. They are posers. You are the genuine article. Recognize and understand that those setups are less safe than stock unless they are wearing a helmet and a HANs at all times.
Seats
Seats are important. They hold you in place and also connect the most important sensor in the vehicle (your butt) to the car. NASA requires an in data FIA rated seat and (if made of a composite material) a seat can be used up to 5 years after expiration with the use of a seat back brace. Be sure to purchase a quality seat from a reputable source (such as OGRacing, Competition Motorsport, HMS, TMI, etc).
It is always recommended to run a containment “halo” seat to protect your head from side impacts. It is required if you do not run a center net, but a center net is always recommended as well.
To mount a racing seat in your car, you will need:
- BMW specific floor mount adapters (an example can be found in the Spec3 Parts list)
- Side mount (or less commonly, bottom mount) brackets (example also in the Spec3 parts list)
- A seat
- A roll bar or roll cage with a harness bar to attach the shoulder harnesses to
- Harnesses
- A way to secure the antisubmarine and lap belts to the chassis (easiest way is to drill holes in the floor of the car and use thread backing plate)
Shown above, an image of floor adapters mounted to the floor alongside eyebolts for the antisubmarine belts.
Shown here: the backing plates underneath the car that the eyebolts thread into.
Seat back brace
Harnesses
6 point belts should be used
Harnesses with the thinner 2 inch shoulder straps are preferred with use of a HANs
Fire System
NASA requires a full fire system. A fire system consists of a charged bottle of some fire suppressant, tubing, nozzles, and pull cables.
Roll Bar (for HPDE)
Vinyl/Decals
Required stickers for the car:
RRT Spec3 Stickers
NASA sticker on all 4 corner
Koni sticker on sides
Numbers on sides per CCR regulation
Class designation
Last name on windshield and side windows
Contingency:
If you want to claim contingency prizes for any eligible vendor, you must consult their decal placement guidelines and also submit the proper paper work. Popular contingency programs in Spec3 include Toyo and Hawk. https://drivenasa.com/contingency-programs/
Spec3 Logo and dimension
We suggest all Spec3 racers run the largest “Spec3” logo they can on their car. It leads to great photos and promotes the class.
The rear quarter panel of an E36 can accommodate up to about a 29”x9” Spec3 logo.
If you have a primary sponsor that requests the quarter panel location or you just don’t want to run a Spec3 logo there, you can fit a Spec3 logo underneath the door molding line as long as it’s under 7 inches tall.
Car setup and maintenance
Regular Maintenance Intervals
You should “nut and bolt” your car before every race weekend, and check some items between every race. Some things should be inspected more thoroughly in the off season by removing them or testing them, and sometimes even proactively replacing them when nothing is visibly wrong with them.These are rough suggestions for how often to check items and does not indicate an item does not need replacement or inspection more or less often than stated.
Engine/Drivetrain
- Engine Oil - Every 3-4 Race weekends
- Differential Oil - Every season
- Transmission Oil - Every season
- Engine/Transmission Mounts - Inspect before every event
- Shifter bushings - inspect/replace every season
Chassis/Suspension
- Wheel bearings - Inspect daily, replace every 2-3 seasons
- Shocks/Struts - Inspect every event, replace every 5 seasons
- Front control arm bushings - Inspect every event, replace every 3 seasons
- Rear trailing arm bushings - Inspect every event, replace every 3-5 seasons
- Rear subframe bushings - Inspect every event
- Differential bushings - inspect every event
- Front control arm ball joints - inspect every event, replace every 3-4 seasons
- Rear control arm ball joints - inspect every event, replace every 4-5 seasons
- Camber Plates - inspect every season, replace every 5-10 seasons
Safety
- Belts - Inspect every event, replace as needed
- HANS (Head and Neck Restraint System) - Inspect every event, replace as needed
- Seat - Inspect every event, replace as needed
- Seat mounts - Inspect every event, replace as needed
- Fire System - Inspect every event, replace as needed
Alignment Specs (base line)
https://www.bimmerforums.com/forum/showthread.php?995556-The-Definitive-Alignment-Guide-for-your-E36-M3
Front
Camber: -3.5 to -4.0 deg per side
Toe: 0
How to achieve that much camber in the front.
- Cut a section out of the lip of the strut tower reinforcement plate if you have one installed to allow the camber plate to be adjusted to max camber. DO NOT CUT THE SHOCK TOWER ITSELF. THIS IS ILLEGAL
- Add washers or shims to the bottom of the strut where it meets the hub/knuckle
Rear
Camber: -1.8 to -2.2 deg per side
Toe: 0 to 0.10 total toe in (IIRC this is 1/8" total toe in)
Suspension Setup
A good baseline is to set the front anti-roll bars to full stiff and the rear to full soft. Also set the front shocks to full stiff (then turn it back a turn) and the rear to full soft (and turn it back a turn)
Brake pedal feel
The E36 is known for sub par pedal feel at times. The easiest fix for this is to bleed your brakes at least every other event and try to keep fresh brake pads on the car. If your pedal feels vague and squishy, it’s likely your pads are worn. Replacing the brake pads will bring back a surprising amount of pedal feel.
A lot of racers also install solid brass caliper bushings to normalize pad wear and reduce the taper of the pad material. These must be cleaned and lubricated every event.
Anti lock brakes
99% of issues with ABS on these cars is due to the wheel speed sensor. If you have an ABS light come on and the ABS itself not functioning, disconnect the sensors, dry them out, and reconnect with some protection from moisture. If this does not work, check the gap between the reluctance ring and the sensor. If it’s off slightly, the ABS may function intermittently and not throw a code properly.
If this does not solve your issue, inspect the wires from each sensor back to the ABS module on the passenger side under the dash and confirm there are no breaks in the wires.
A proper BMW scanner such as the Schwaben Foxwll unit can read ABS code, show live data, and even active ABS components. These are very useful.
Body Panels
Coupes and Convertibles share body panels except for the trunk. Sedans do not share body parts with the coupe or convertible except for the front and rear bumpers. Body panels from 92-99 models will all fit, however, the nose panel and bumper are different on 92-95 and 96-99 models. The E36 compact (318ti) is a sedan from the a pillar forward, so hood and fenders will swap to a sedan.
Cylinder Head rebuild
It is the general consensus that a healthy, strong, front running motor can be had with a simple head rebuild and leaving the bottom end alone. You can mill the head .03mm before needing a thicker head gasket. If you mill beyond .03mm, there is a thicker head gasket made by victor reinz that will make up the milled material and restore your compression ratio to factory spec. The more you mill without making up the space, the higher your compression ratio will be and your cam timing may eventually be slightly off. Hot tanking the head, lapping and grinding the valves, and refreshing the Vanos will net a strong motor, assuming the bottom end is fine. E36 engines have been known before to have valve retainers crack and cause a valve to drop due to age or high revs. It is wise to replace all the retainers and springs, but most do not. If you have a noisy engine when hot, it may be worthwhile to replace the lifters as well when you rebuild the head. Note: It is rumored that BMW upgraded the spring retainers after 1995 to a hardened steel part, so any engine with the original spring retainers will have the weaker pieces and any retainers purchased new will be the stronger versions.
Head rebuild parts:
24 x BMW 11341724991 (Valve spring plate “retainer”)
https://www.fcpeuro.com/products/bmw-upper-spring-plate-11341724991
48 x BMW 11341461405 (Valve keeper)
https://www.fcpeuro.com/products/bmw-valve-keeper-collet-11341461405
ELRING Head Gasket Keep (includes valve seals) BMW 11129064467
https://www.fcpeuro.com/products/bmw-cylinder-head-gasket-set-elring-11129064467a
Engine Rebuild
The M50b25tu rarely, if ever, requires more than just a head refresh (covered in the section above). However, if you choose to rebuild your engine’s “Bottom end” keep in mind that oversized pistons allowed in the rules, in conjunction with a freshly rebuilt head, will likely place you over the horsepower cap. Oversized pistons can be sourced from CS-Parts.de is not found stateside. If possible, just go up a size on the piston rings after a light cylinder hone, and inspect/replace rod bearings.
Crankshaft bolt removal
The highest torque bolt on the E36 chassis is the crankshaft bolt. Even with the engine in the car, in 5th gear, with the handbrake pulled, this bolt can put up quite a fight. Crafting a holding tool either from cut metal or by welding a pipe to a spare harmonic balancer will assist in removal. The pipe can either wedge against the floor or a frame rail. The CAD files for the custom cut tool can be found in the files section of the NASA Spec3 Discussion group on Facebook. (Images courtesy of John Buffington and Scott Gress)
Transmission removal/flywheel conversion/clutch replacement
- DISCONNECT THE BATTERY AS YOU WILL BE WORKING NEAR THE STARTER
- Remove exhaust.
- Remove heat shields.
- Rip out the insulation on the transmission tunnel. This stuff is likely falling apart already and makes seeing what you’re doing much harder
- Unbolt the CSB.
- Unbolt the guibo and move driveshaft out of the way
- Optional: unbolt driveshaft from diff to completely remove it.
- Unbolt slave cylinder with the two 13mm nuts
- Unclip reverse switch
- Disconnect shifter linkage on top by removing the circlip from the selector rod at the bottom of the shift level
- Remove the "bitch clip” that holds the DSSR to the top of the transmission. Use a flat stubby screwdriver with the handle towards the front of the car and slide it under the clip to pop it up. Rotate the clip vertical and slide it to the side to pull the pin out of the DSSR
- Drop the shifter out
- Loosen engine mounts a bit so the transmission can tilt.
- Remove transmission cross member and support trans with jack.
- Tilt the transmission back and use 2-3 feet of extensions to get to the bell housing bolts and starter bolts (Early model cars may have a nut on the other side of the starter bolts)
- Level engine and transmission and slide the transmission straight back.
- Inspect and replace guibo and CSB at this time. Pay attention to guibo orientation. The arrows point towards the flange. Preload CSB properly.
- REPLACE CLUTCH FORK PIVOT PIN with the stainless steel one from an e31, NOT BRASS. https://www.fcpeuro.com/products/bmw-ball-pin-21511223281
- Replace throw out bearing
- Replace pilot bearing. This can be removed by stuffing wet paper towers into the hole of the bearing until the space behind is full, then tap a socket through the center of the bearing. The paper towels will push the bearing out. Some people use bread or soap as well.
- inspect transmission input seal and output seal.
- Inspect rear main seal.
- Use the valeo single mass flywheel conversion kit if not reinstalling the factory dual mass flywheel. Do not replace the dual mass flywheel with a new one as they all fail. If replacing the flywheel, use a legal single mass kit.
- Fly wheel hardware should be replaced
Tires
Toyo RR
- Operating Temperature: 160°F to 220°F
- Hot Inflation Pressures: High 30s to Low 40s (psi)
- Camber: -2.5° to -5.0°
- Caster: As much positive as possible
Toyo RA1
- Operating Temperature: 160°F to 220°F
- Hot Inflation Pressures: High 30s to Low 40s (psi)
- Camber: -2.5° to -5.0°
- Caster: As much positive as possible
Buying tires
As of April 2023, the best price for our tires can be found by emailing Phils Tire Service and asking to join their “Toyo Club” which is free. Then order your tires from them and mention the toyo club when you do. They also take Toyo Bucks.
https://philstireservice.com/
Tire Mounting and Rotation
https://www.toyotires.com/media/1720/tsd-12-023-rr-dot-mounting-orientation-recommendation.pdf
Fluid Capacities and weights
Item Weight Capacity Engine Oil 5w-30, 10w-30, 5w-40, 10w-40, 5w-50, 10w-50 6.5-7.5 qts Gear Box D4 ATF (most common factory fill, but not most common refill) Most use Redline MTL (70W80) or Redline MTL-90 (75W90) or equivlalent 1.5 qts Differential 75w-140 GL5 1.8 qts Coolant Distilled water + water wetter 11 qts
Oil Filter Housing Welch Plug o ring
The oil filter housing went through various revisions. Some units having press fit plugs while others have threaded plugs. If your housing was threading plugs, they use an o ring to seal and this can start to leak. This is the part number that can be used to replace it.
https://www.facebook.com/groups/spec3/posts/4372544982846609/
CamShafts
In Car Camera
NASA requires a front facing camera for all competitors. Some regions will even issue a fine for racers without footage. Some things to consider when looking for a camera.
- Reliability
- Ease of use
- Quality/Angle
- Mounting Options
- Price
Whatever camera you use, it must be reliable. It must work every time, not die in the middle of the race, and the footage needs to be easily accessed. GoPros are the most common, however, they are difficult to hardwire to the car, so you must stay on top of battery life. Something like an AIM SmartCam is very reliable, but expensive and has worse quality.
Ease of use. GoPros are at the bottom of the spectrum for ease of use for racing. Keeping the camera charged is a constant worry and remembering to turn the camera on is a hassle. There’s nothing worse than lining up for the flag and remembering your camera isn’t on. Something like a dash cam or SmartCam will turn on automatically with the car or with a switch.
Quality/Angle: GoPros and other high end cameras have the best quality, often recording in 4K 60FPS or higher. AIM Smarty cams and similar are middle tier, and dash cams are often the worst quality. GoPros can be mounted in a lot of different ways and the price point and the fact they are battery operated means you can run multiple GoPros in interesting locations. DashCams usually have a fixed field of view and need to be mounted on the front or rear glass, so you won’t capture much cockpit content unless you spring for a dashcam that also captures footage inside the cabin.
Mounting options: The general rule of thumb is that capturing the action in front of the car is most important. A clear view through the windshield to show the action on track is crucial. The footage captured is used in compliance rulings when an incident occurs, and not having the footage to prove it’s not your fault is a massive bummer. If the camera can also capture your steering, gas, and brake inputs, that’s even better as it can also help capture your intent and your actions behind the wheel. This is also good for coaching/data. Many people find that mounting a GoPro to the main roll cage hoop places the camera too far to the rear of the car to get good footage, so a mount that can move the camera forward in the cabin is good.
Price: Dashcams are uber cheap. GoPros and the additional hardware are a bit more expensive, and then options like a SmartCam or Garmin Catalyst top the market in the quadruple digits.
Data: The Garmin Catalyst and AIM Smartycam can fully integrate with your data, the AIM can also integrate with your car’s sensor data to allow some neat stuff. GoPros can capture speed, direction, GPS, G forces, etc and overlay. Dash cams may provide GPS/Speed.
Rear facing footage: It is a really good idea to at least get a cheap dash cam to capture rear facing footage in the event that something happens behind you.
Example of good and bad angles. Both images are a GoPro Hero 7 Black The top image is using a fancy mount that moves the GoPro up and forward. The bottom is a normal GoPro roll bar mount. Notice how the top angle captures the driver’s inputs but also maximizes the amount out the windshield that can be seen.
Rear Wheel Bearing Replacement
Symptoms of a bad wheel bearing are grinding or popping noises and/or excessive play in the wheel hub when shaking it back and forth. Wheel bearings should be replaced every 2 seasons or so for a full time race car. At best, a failed wheel bearing will slow you down and make the car handling unpredictable, and at worst, it can cause the wheel to come off or cause damage to expensive parts like the trailing arm assembly or axles. Replace the rear wheel bearings is a serious job that requires the correct tools. If you are considering replacing the rear wheel bearings on your Spec3 without proper rear wheel bearing tools, you are in for a tough time.
Parts required:
New Wheel bearings
New hubs (if the hubs are original to the car or you aren’t certain you can remove the old ones without damaging them)
New axle nut
New bearing circlip
Tools required:
BMW Rear Wheel Bearing tool or FWD Bearing Tool
Hub Puller/Slide Hammer
- Start just breaking the 30mm axle nut loose on the axle
- Jack the car up and secure it
- Spray the axle shaft splines with penetrating oil. This are usually stock in place
- Remove the brake rotor and caliper
- Remove the external torx bolts that hold the axle to the differential.
- Unbolt the exhaust and/or sway bar to allow the axle to drop down away from the diff
- Thread the axle nut out, but do not remove it completely
- Attach a puller (I use a 3 jaw puller) to push the axle shaft out of the hub to the rear
- Remove the axle nut and finish pulling the axle shaft out
- Attach the hub puller/slide hammer to the hub and slide hammer it out of the bearing. The hub should come out with the inner race of the bearing still attached
- Optional: If you are reusing your old hubs, cut a slot in the inner race stuck on the hub with a dremel and use a cold chisel to break the race off the hub
- Remove the wheel bearing circlip on the outside of the bearing
- Insert your bearing tool with the “cup” on the outside of the hub and the smaller diameter puller on the inside of the hub. Pull the bearing out to the outside of the trailing arm bore
- Be careful not to damage your wheel speed sensors when doing so
- Use a wire wheel to clean up the trailing and snap ring groove
- Optional: Place your wheel bearings and hubs in the freeze to shrink them
- Place the wheel bearing into the trailing arm and flip your bearing tool around to pull the bearing into the trailing arm bore from the outside. Continue until it bottoms out. You may apply anti seize compound to the bore
- Install the bearing circlip
- Place the hub into the bearing and draw it in with the bearing tool. You may apply anti seize to the inner bore of the bearing. Be sure to support the inner race on the backside when drawing the hub in
- Reinstall axle shafts into the hub
- Bolt the axle onto the diff flange
- Install the axle nut and torque, then punch in the locking tabs Reinstall brakes, wheels, tires
Reading codes from the DME/ABS
Despite being OBD1, the E36 325i does offer up a lot of information from its various modules if read with the correct scanner. A tool like the following can read live data and pull codes from the DME as well as the ABS module including temps, misfires, wheel speeds, etc. It can also activate certain things like the ABS pump, ABS valves, and even individual fuel injectors. https://www.turnermotorsport.com/p-555295-professional-bmw-scan-tool-with-20-pin-adapter-cable/?gclid=CjwKCAjwl6OiBhA2EiwAuUwWZejJ3dUOYLX_qjwo_yD vaQ9HMtQcjLweaDTTnxjUx1zJ_o1-BWZsARoC8FMQAvD_BwE
If you have the appropriate computer and connection cable, applications such as INPA and ISTA can be used to read directly from the 20 pin diagnostic port under the hood. This is what BMW dealerships of the time would have done.
Towing
You need at least a 15 foot deck to tow an E36 safely, most elect for an 18 foot deck to keep the rear of the car off the “dove tail”.
You can tie the car down with wheel straps, or more commonly, use the factory tie down holes above the plastic “jacking pads”. “T hooks” are designed to fit in these holes and then your straps can attach to them. https://www.bimmerworld.com/Trailering-Tie-Down-Hook-Set-of-4.html
However, using the factory holes requires a “Cross strap” tie down method which has its own set of pros and cons.
https://racer.com/2020/02/26/towing-101-tie-down-gear/
Ball Joint Pressing
1-1/2” pipe fittings can be used for pressing new ball joints into control arms.
Build Threads
Taylor’s 325
https://community.drivenasa.com/topic/58630-the-cart-before-the-horse-my-spec3-build/
Sean’ 325
https://www.bimmerforums.com/forum/showthread.php?2330121-NASA-Spec3-Build-v2-0
Tom Neely
https://community.drivenasa.com/topic/60919-car-163-build-thread/
Edward Higginbothom
https://grassrootsmotorsports.com/forum/build-projects-and-project-cars/1995-bmw-325i-racer-trying-to-hit-a-moving-target/140480
Last edited by SenorTaylor; 06-29-2023 at 12:22 PM.
Member
Added alt part number for water temp sensor and to-do list
Member
Updated some dates and some wording
Member
Added wire harness thinning section and tire pricing
Member
Reorganized build tips to put it in order of front of chassis to back
 Posting Permissions


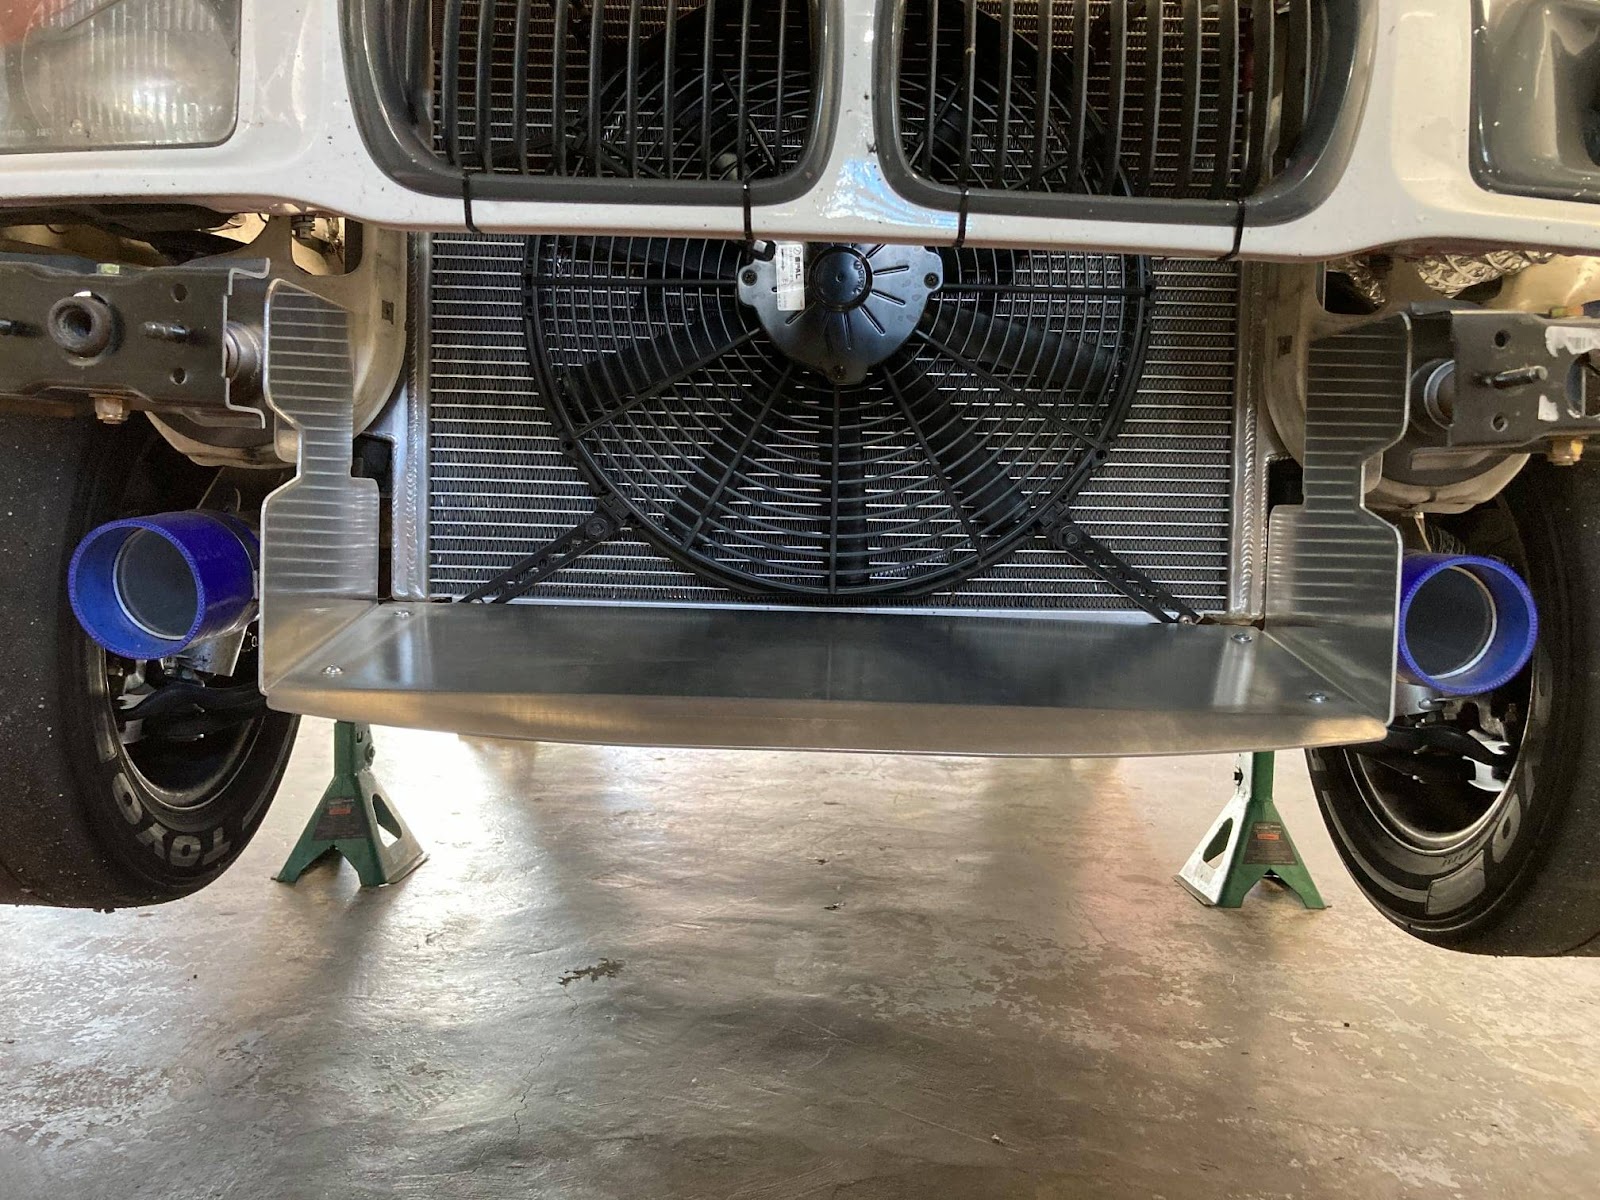


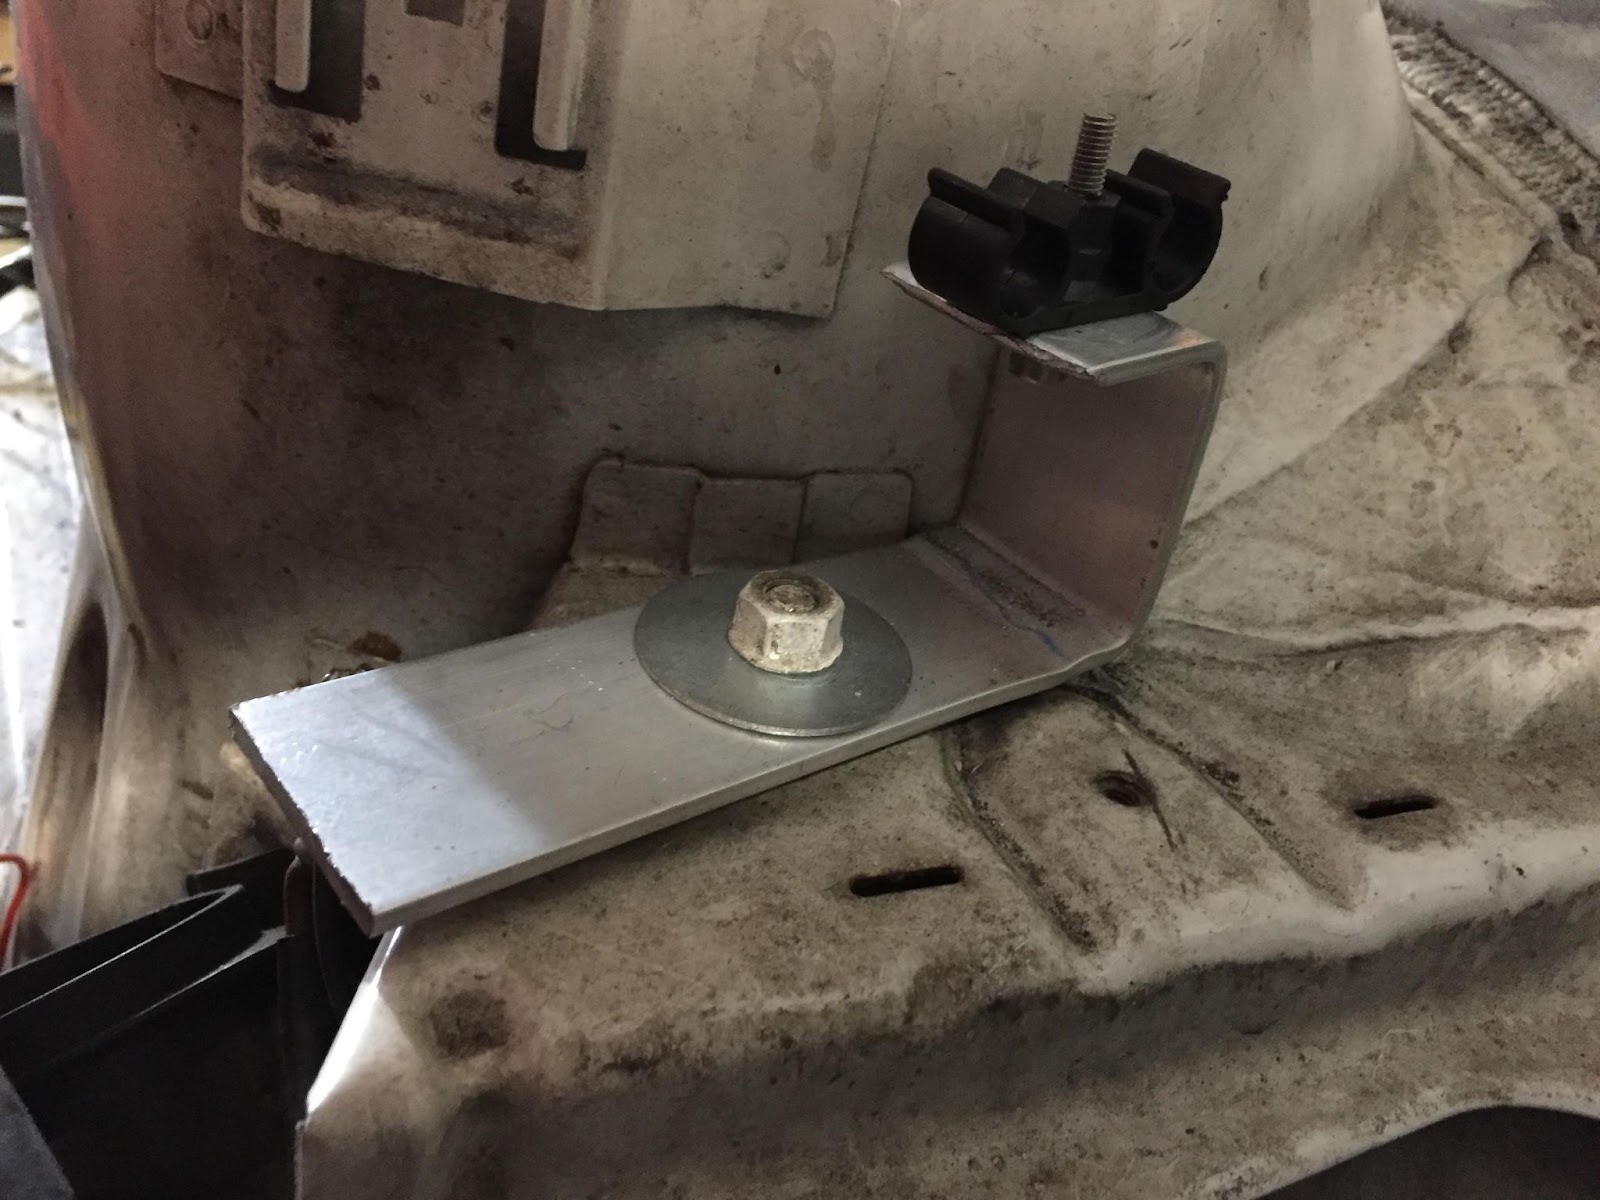
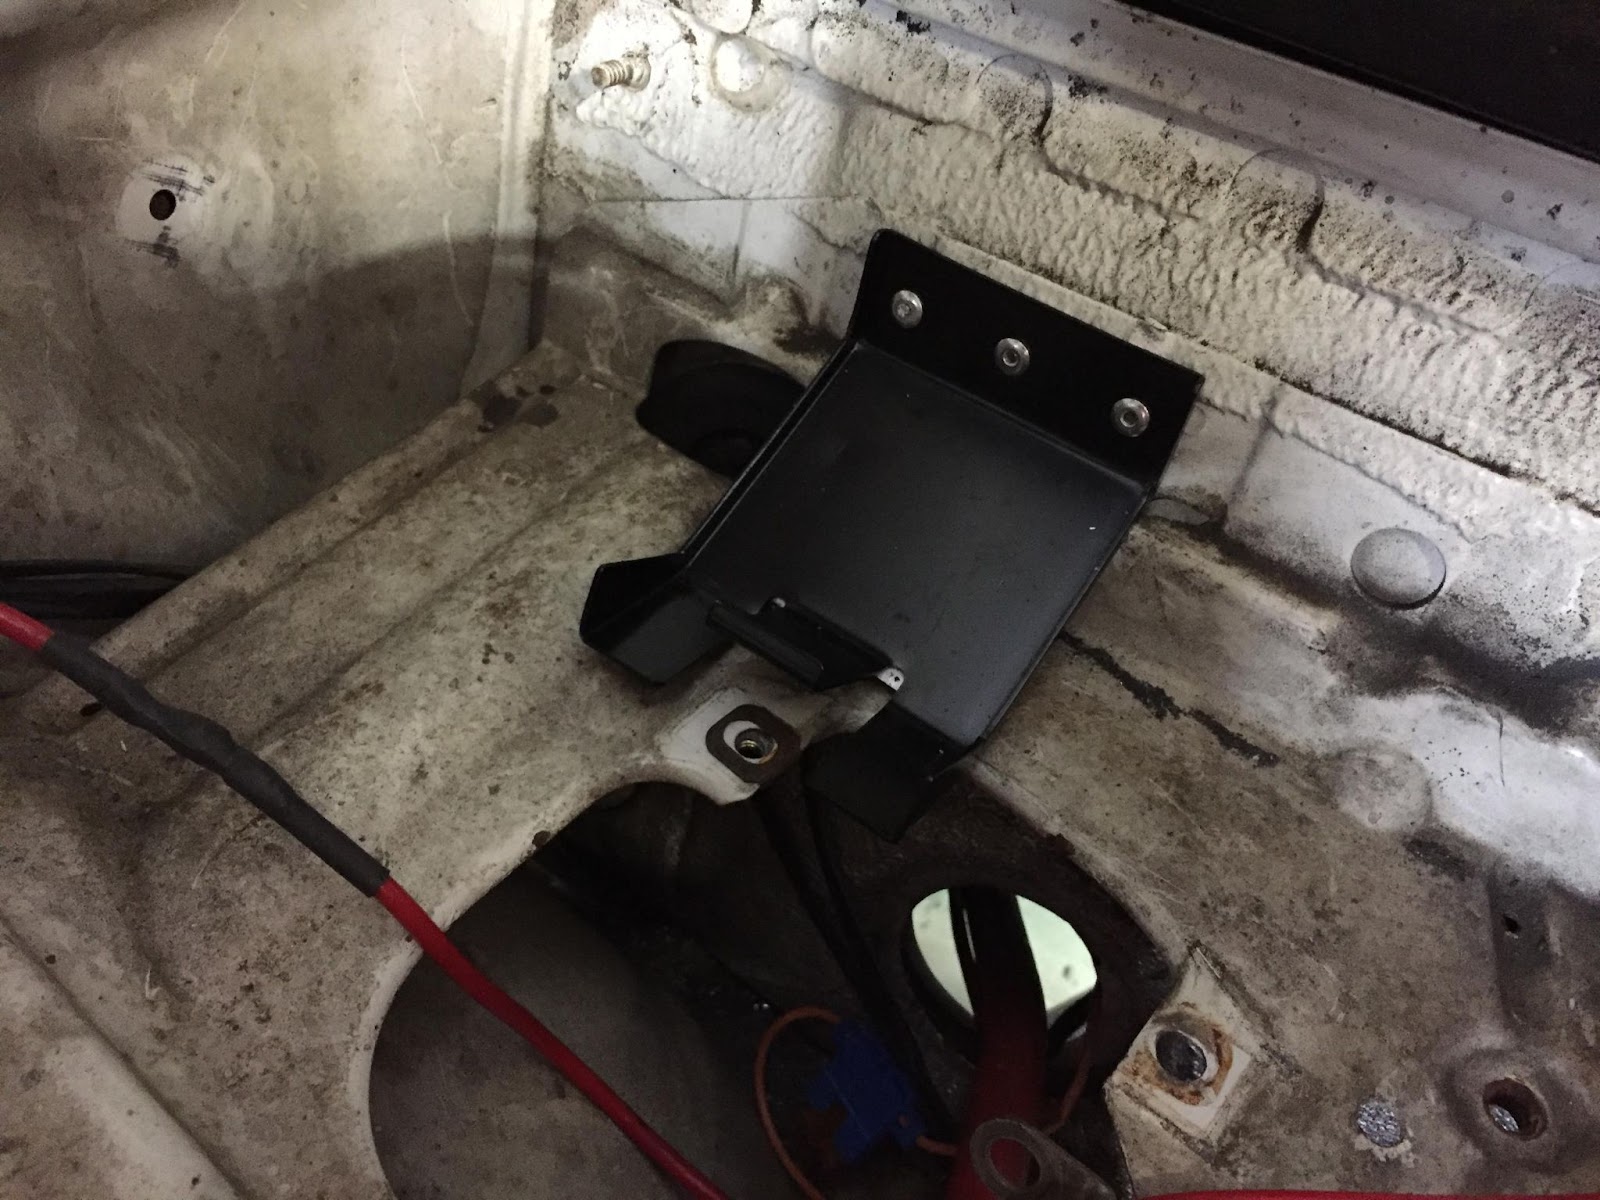


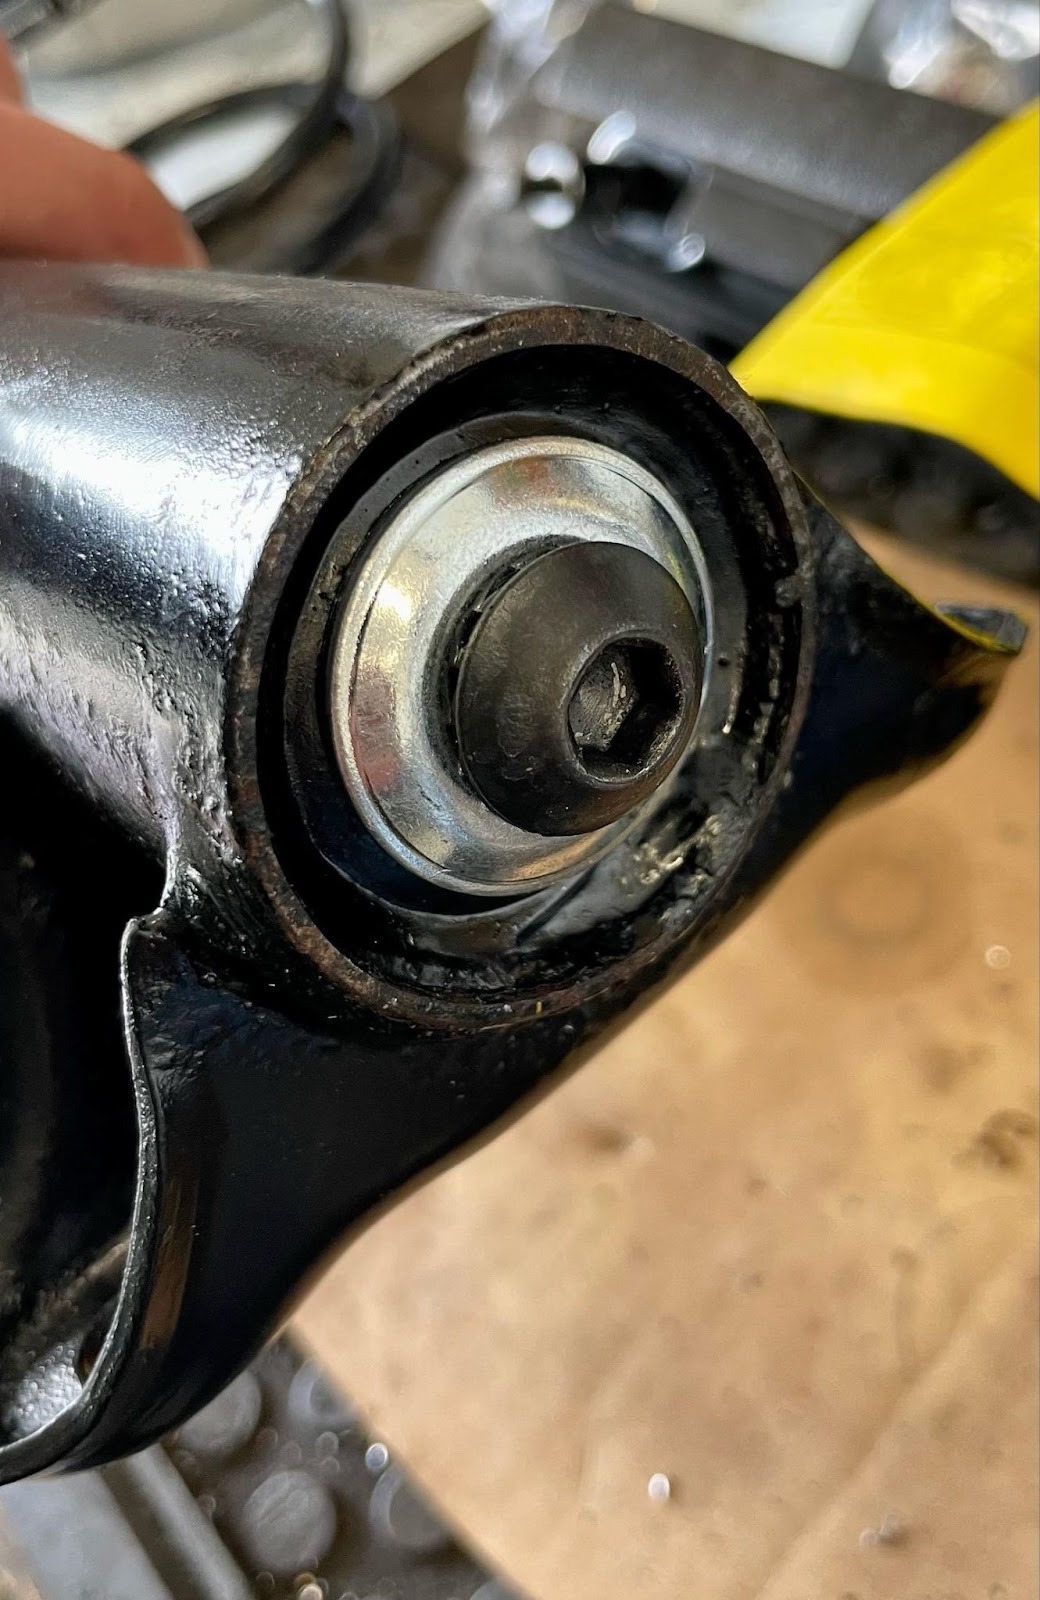


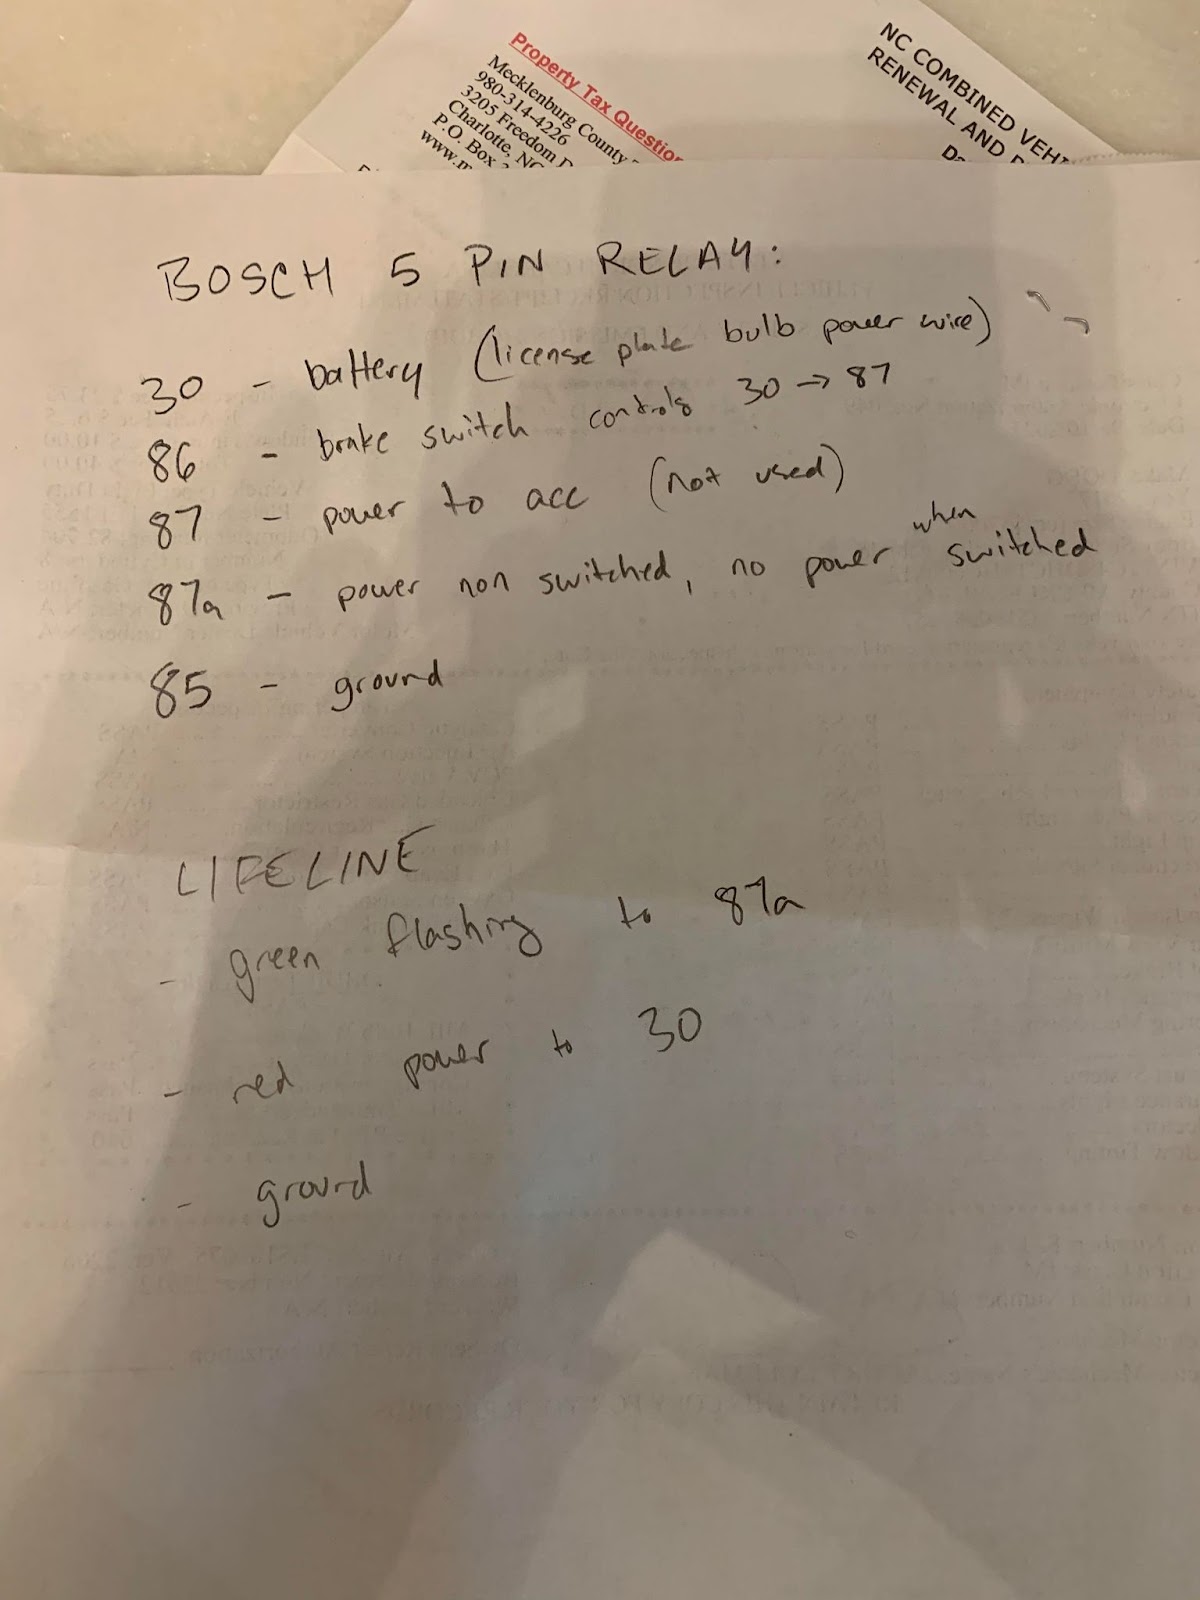

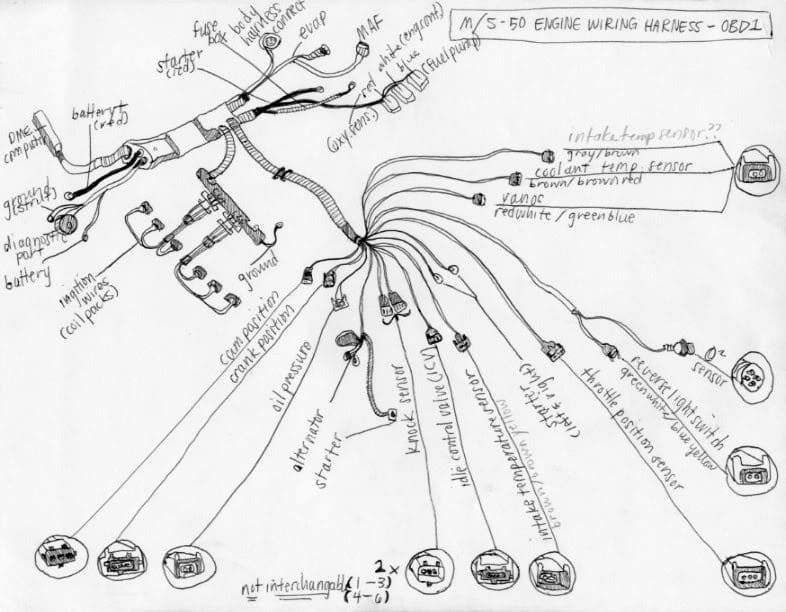
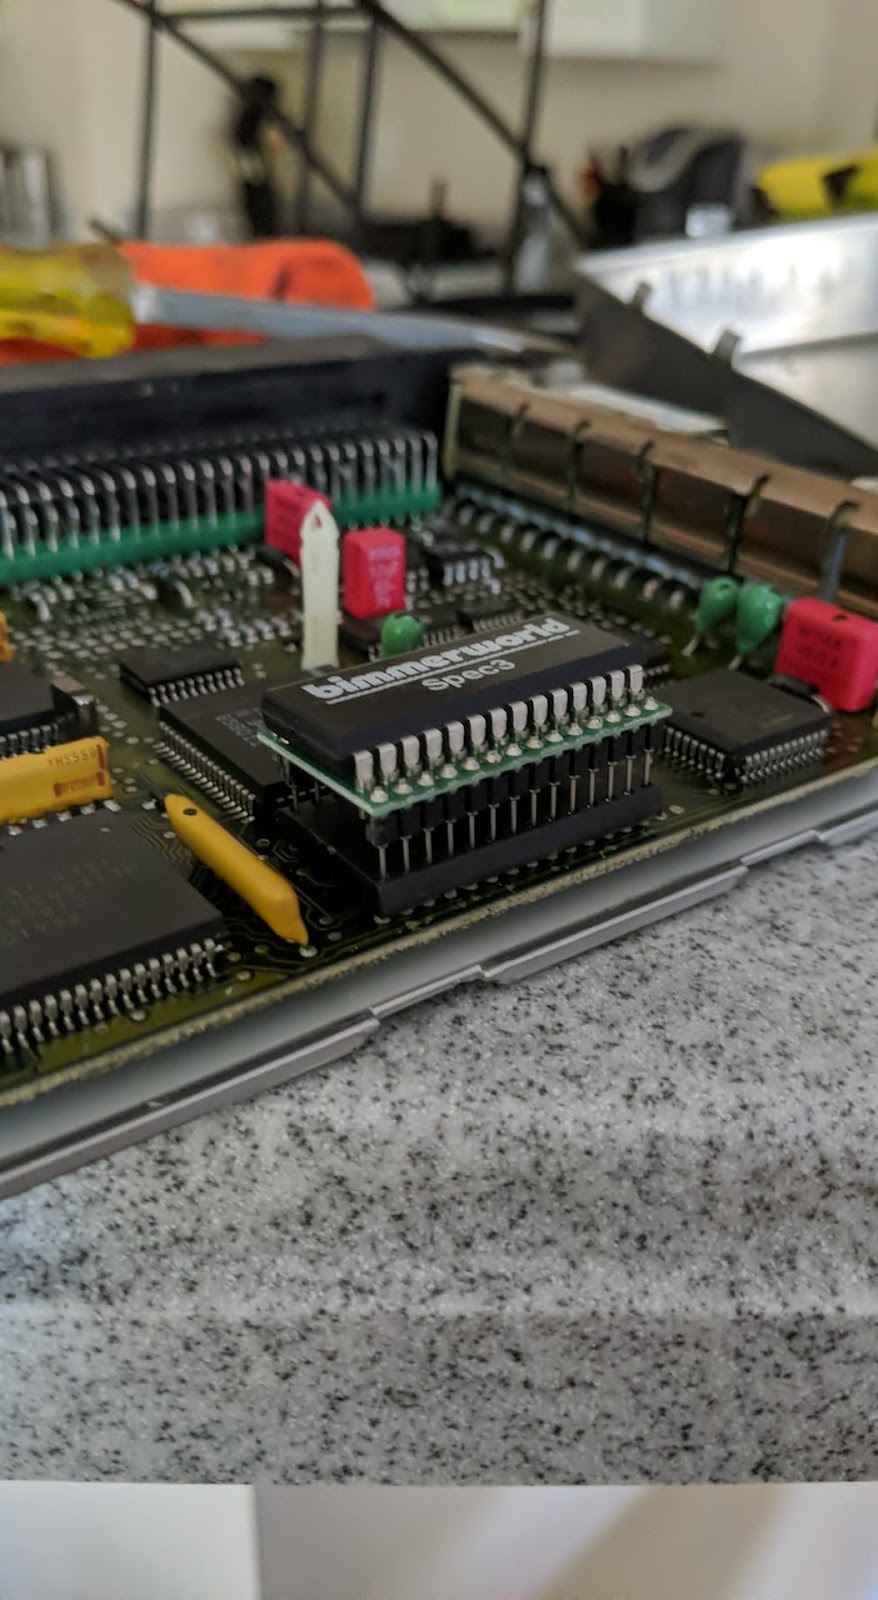
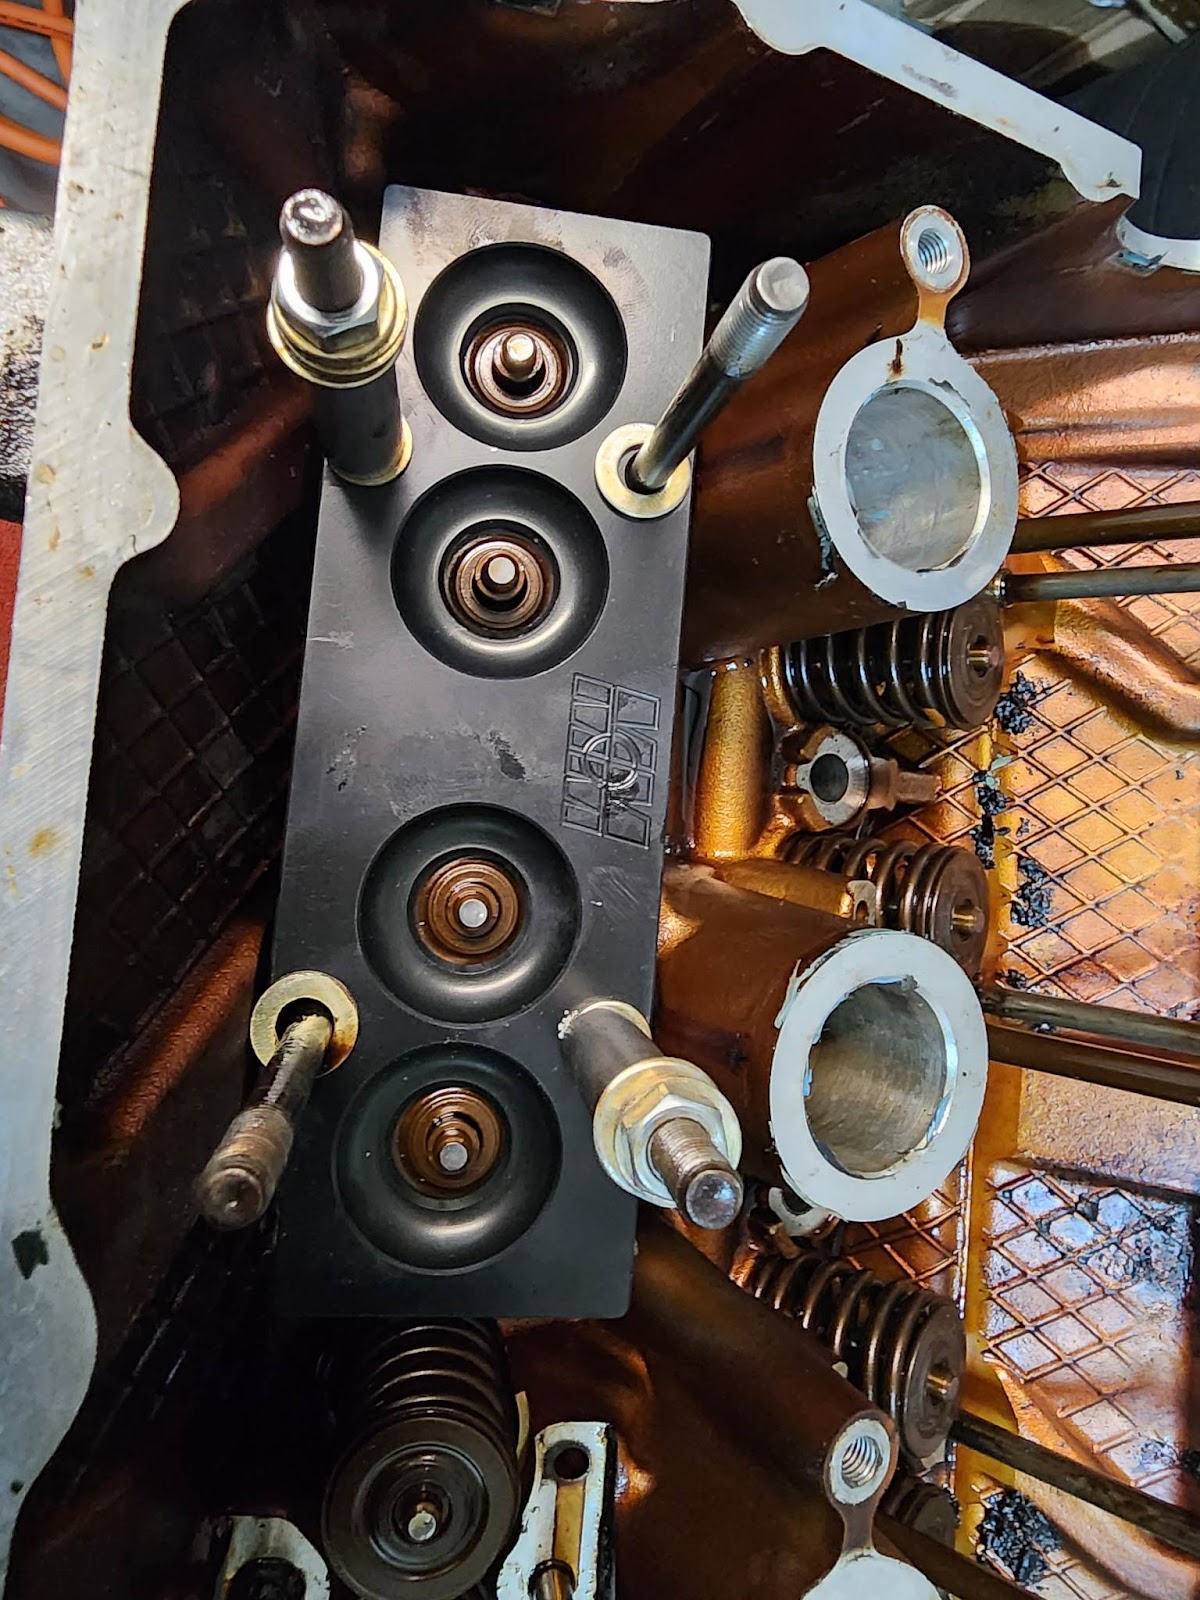
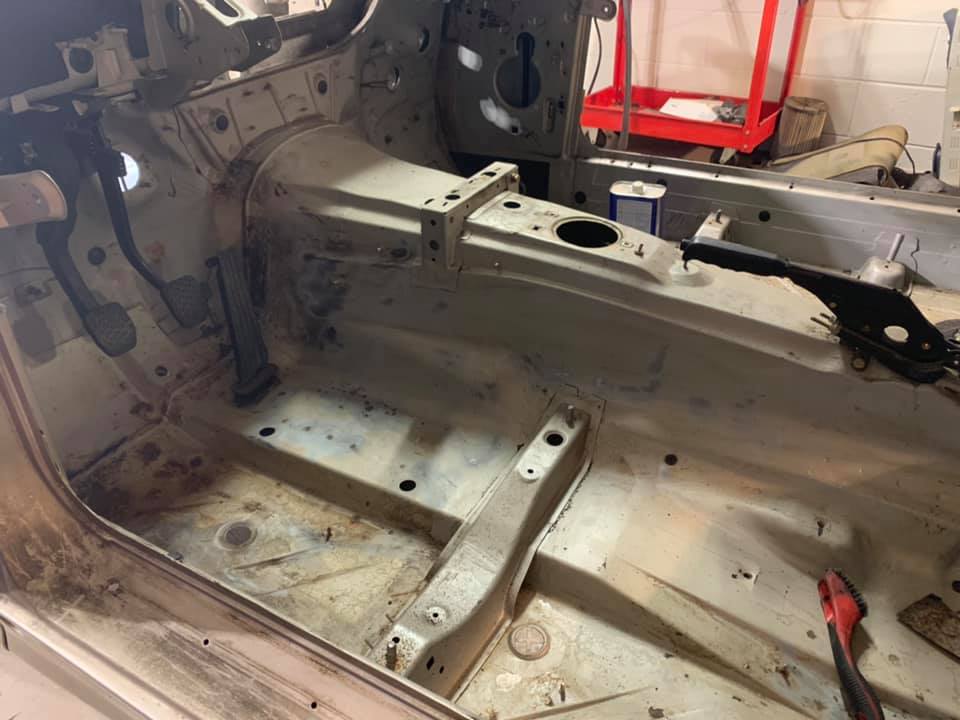
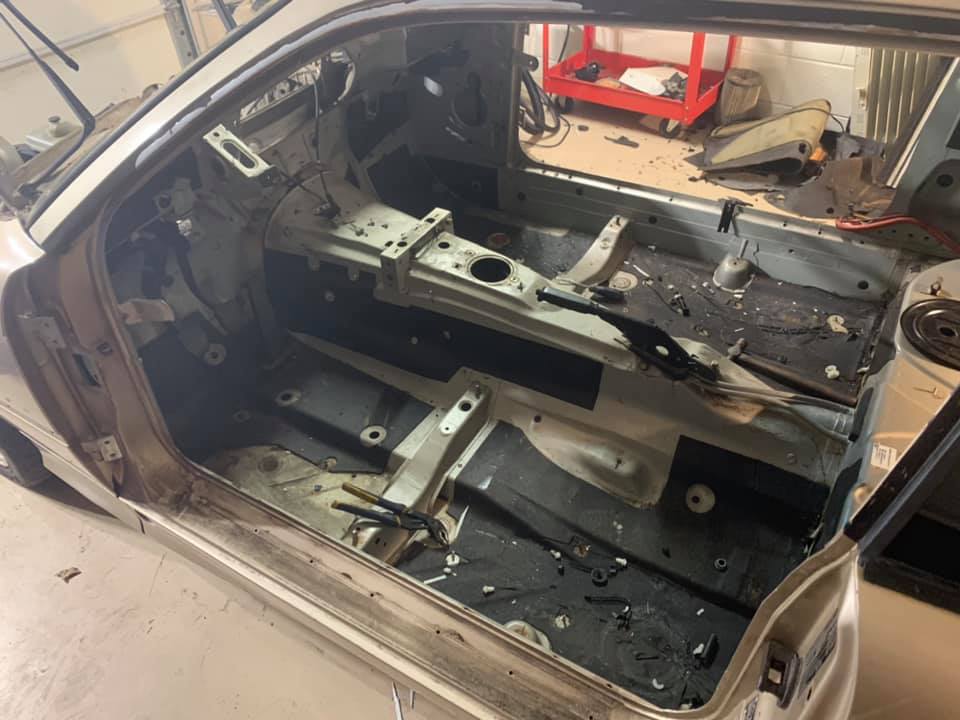

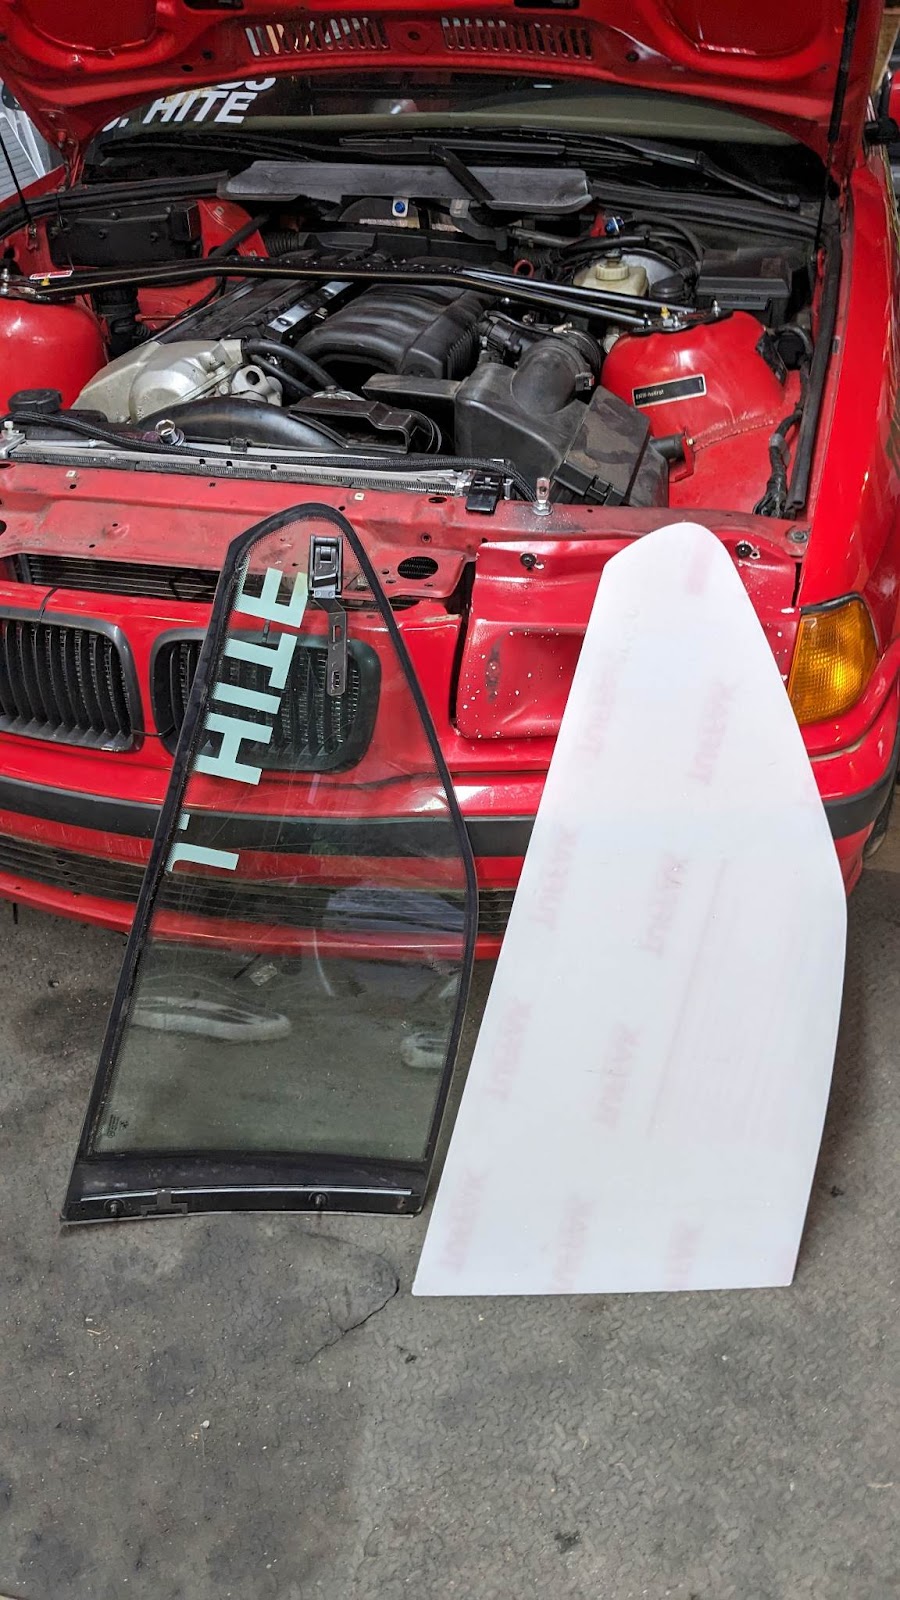
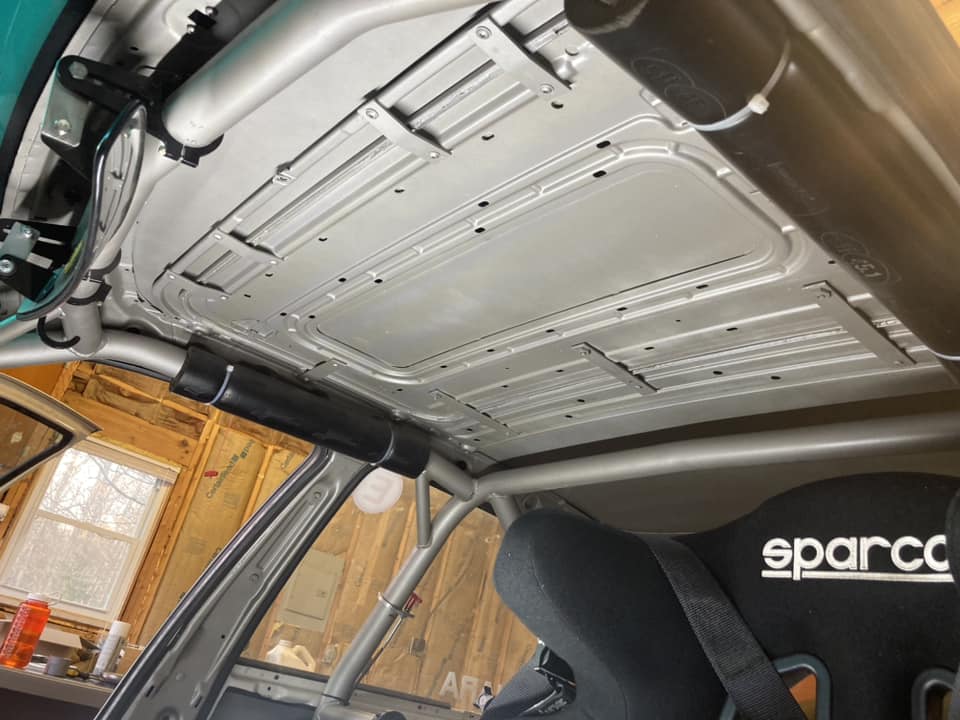
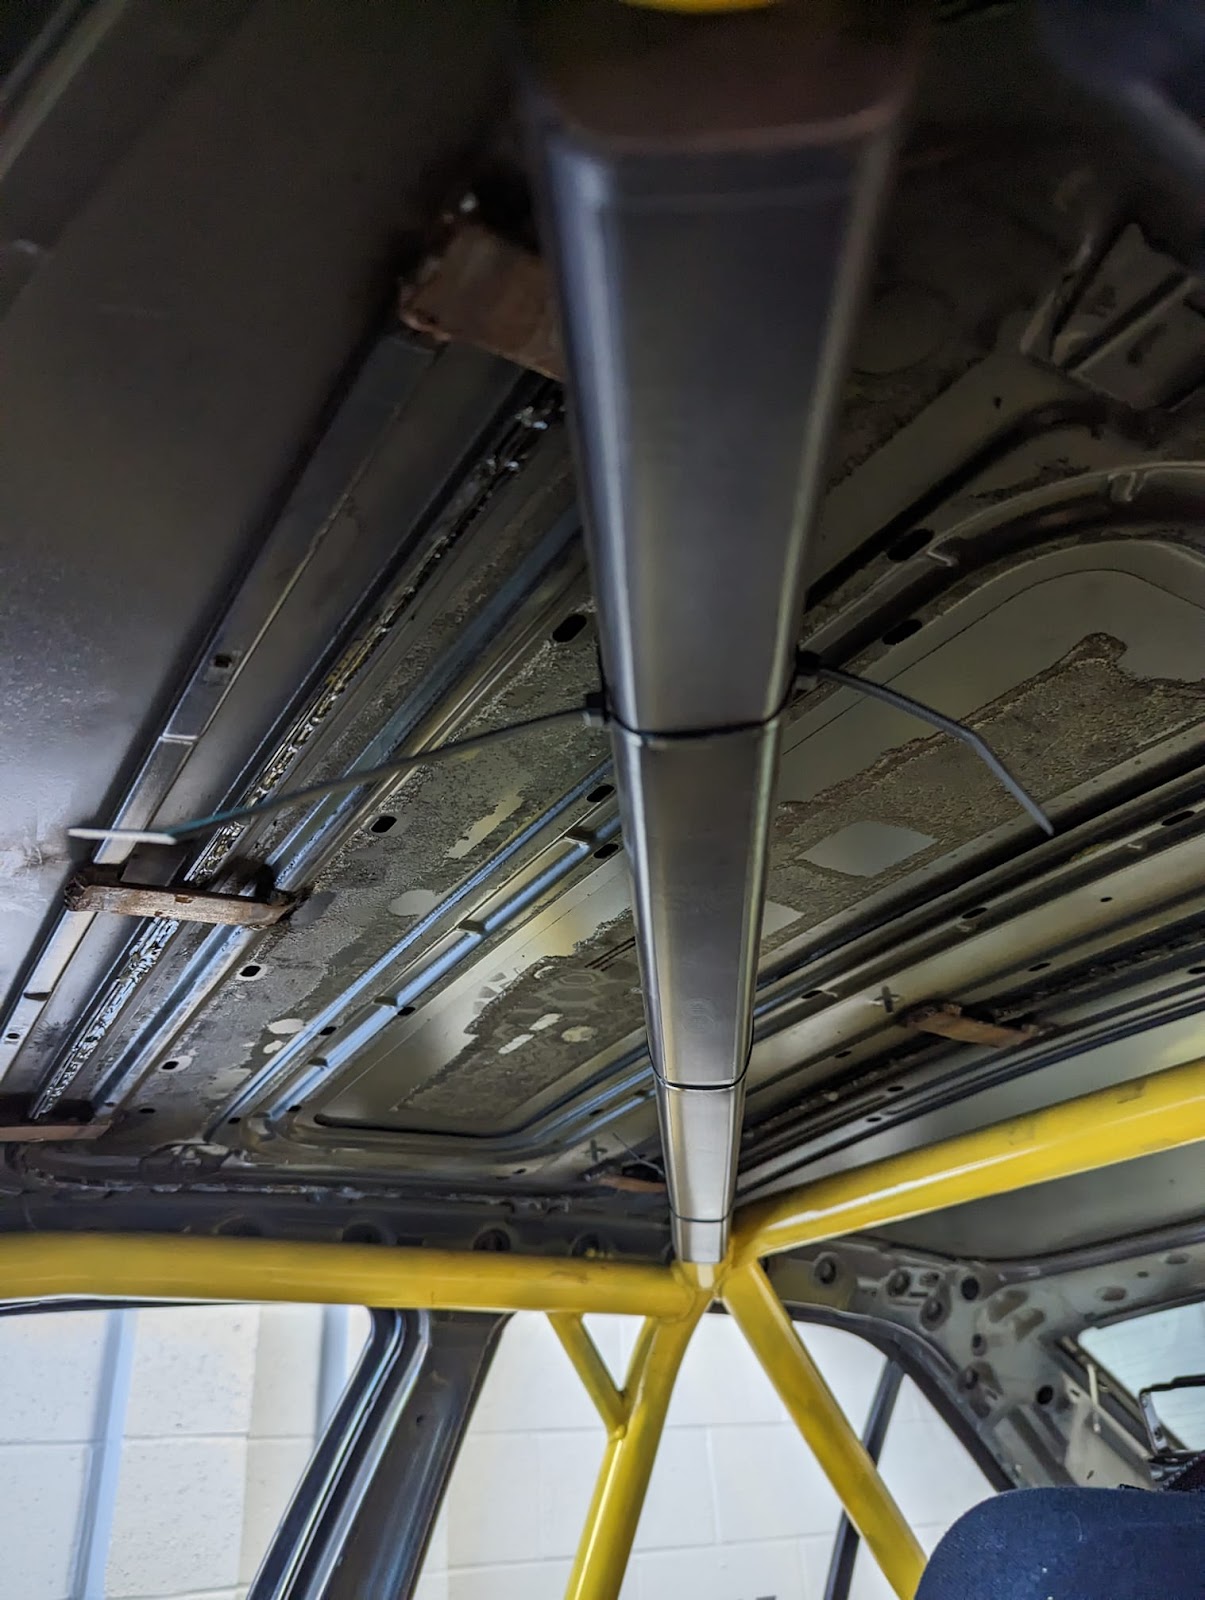


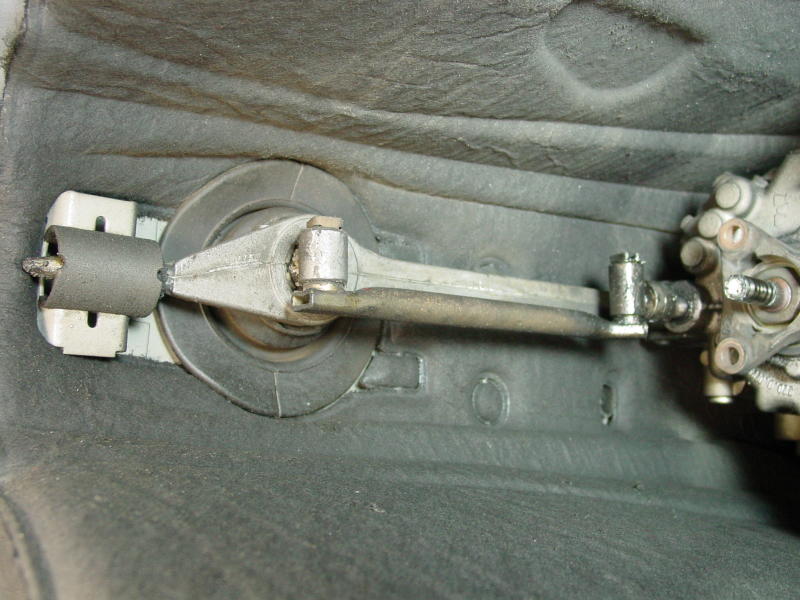


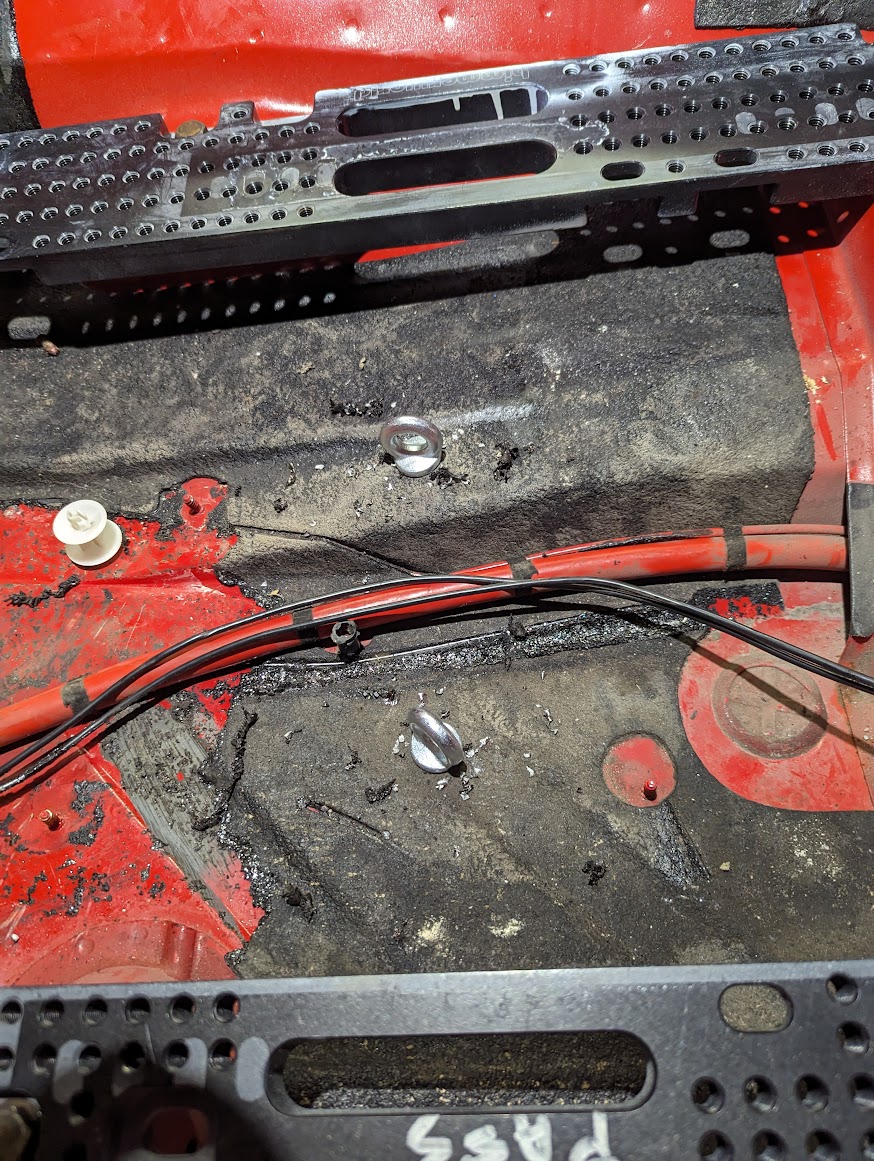
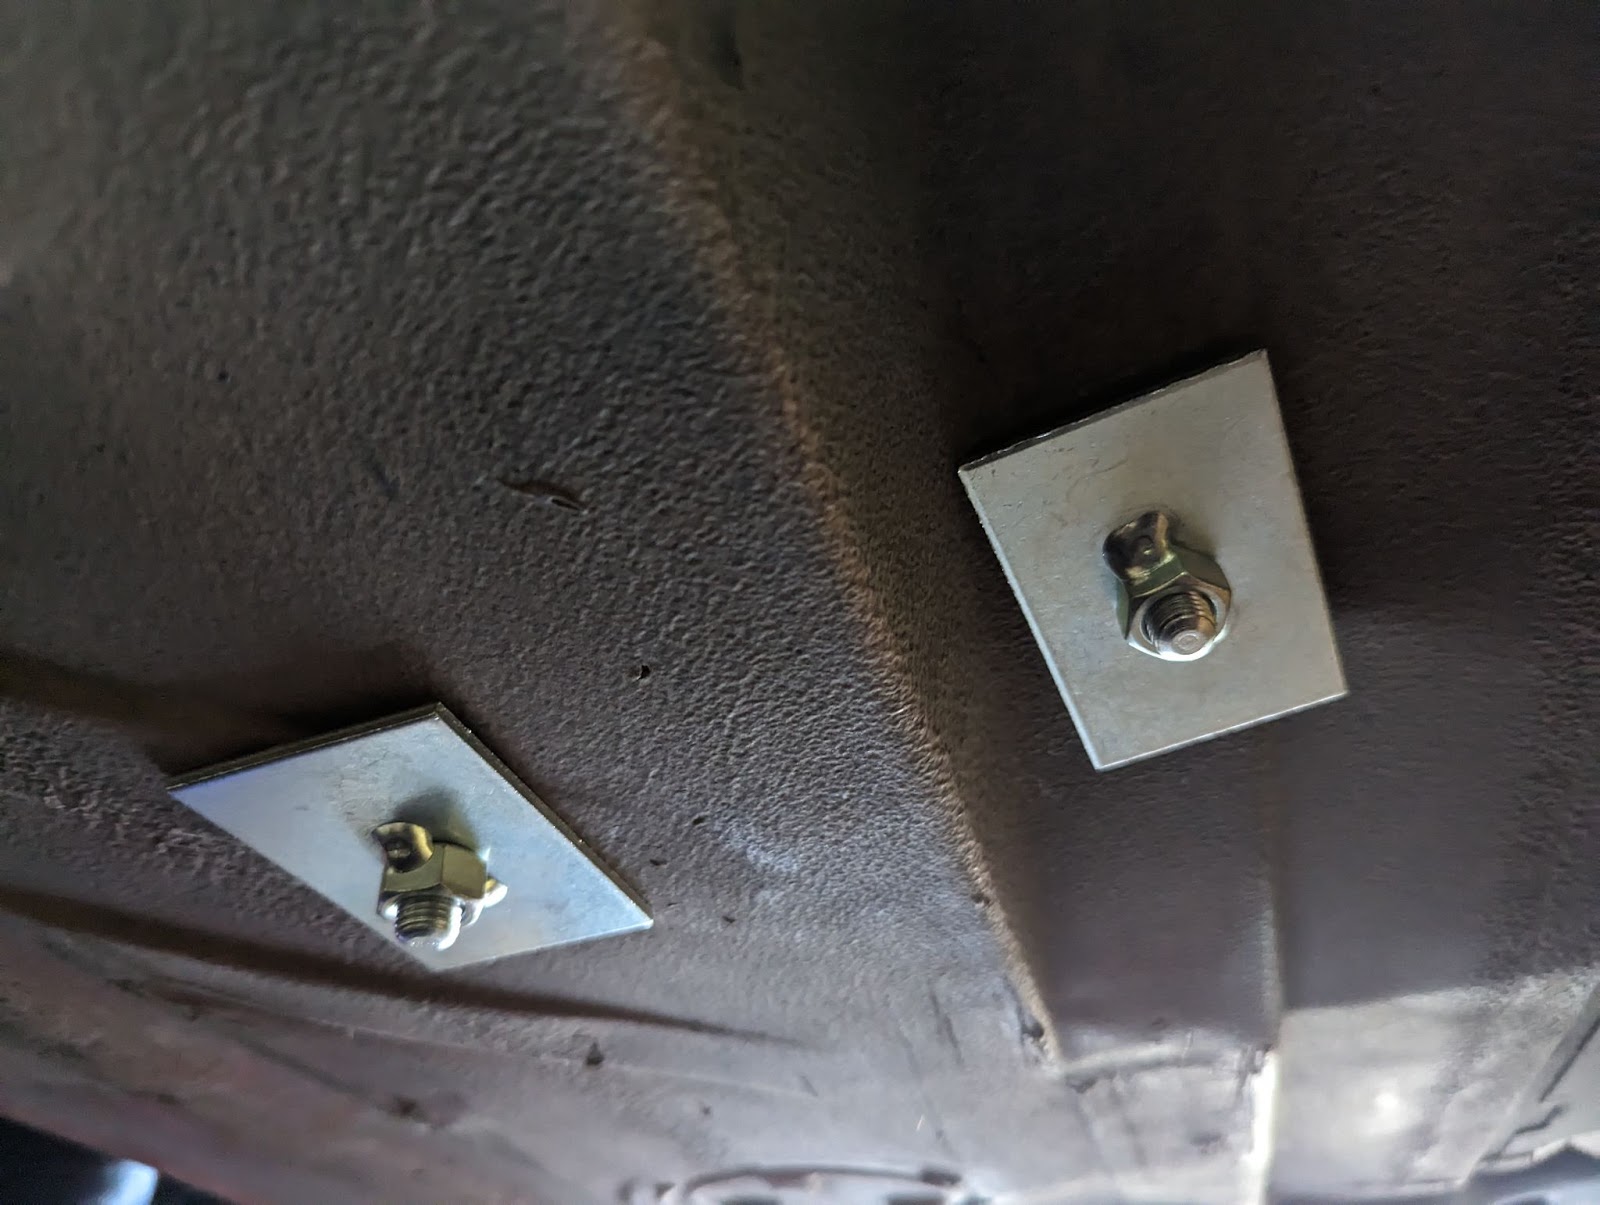
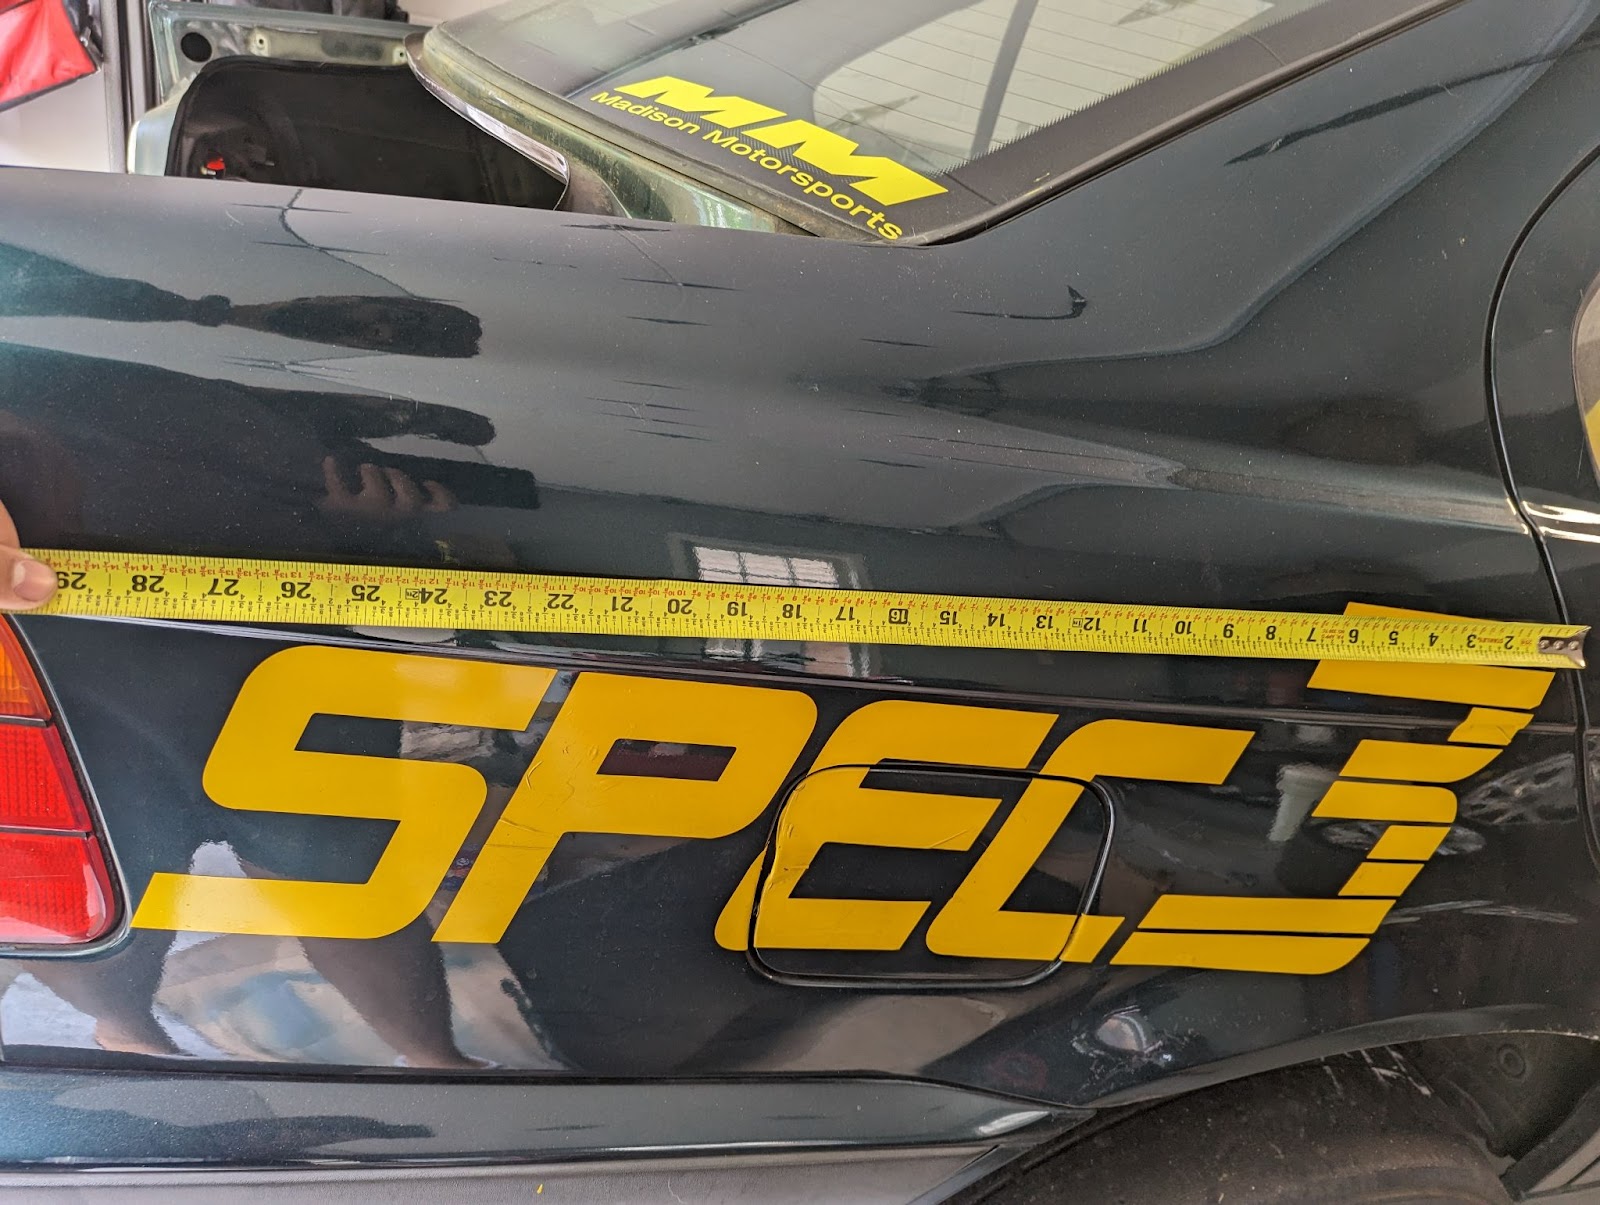
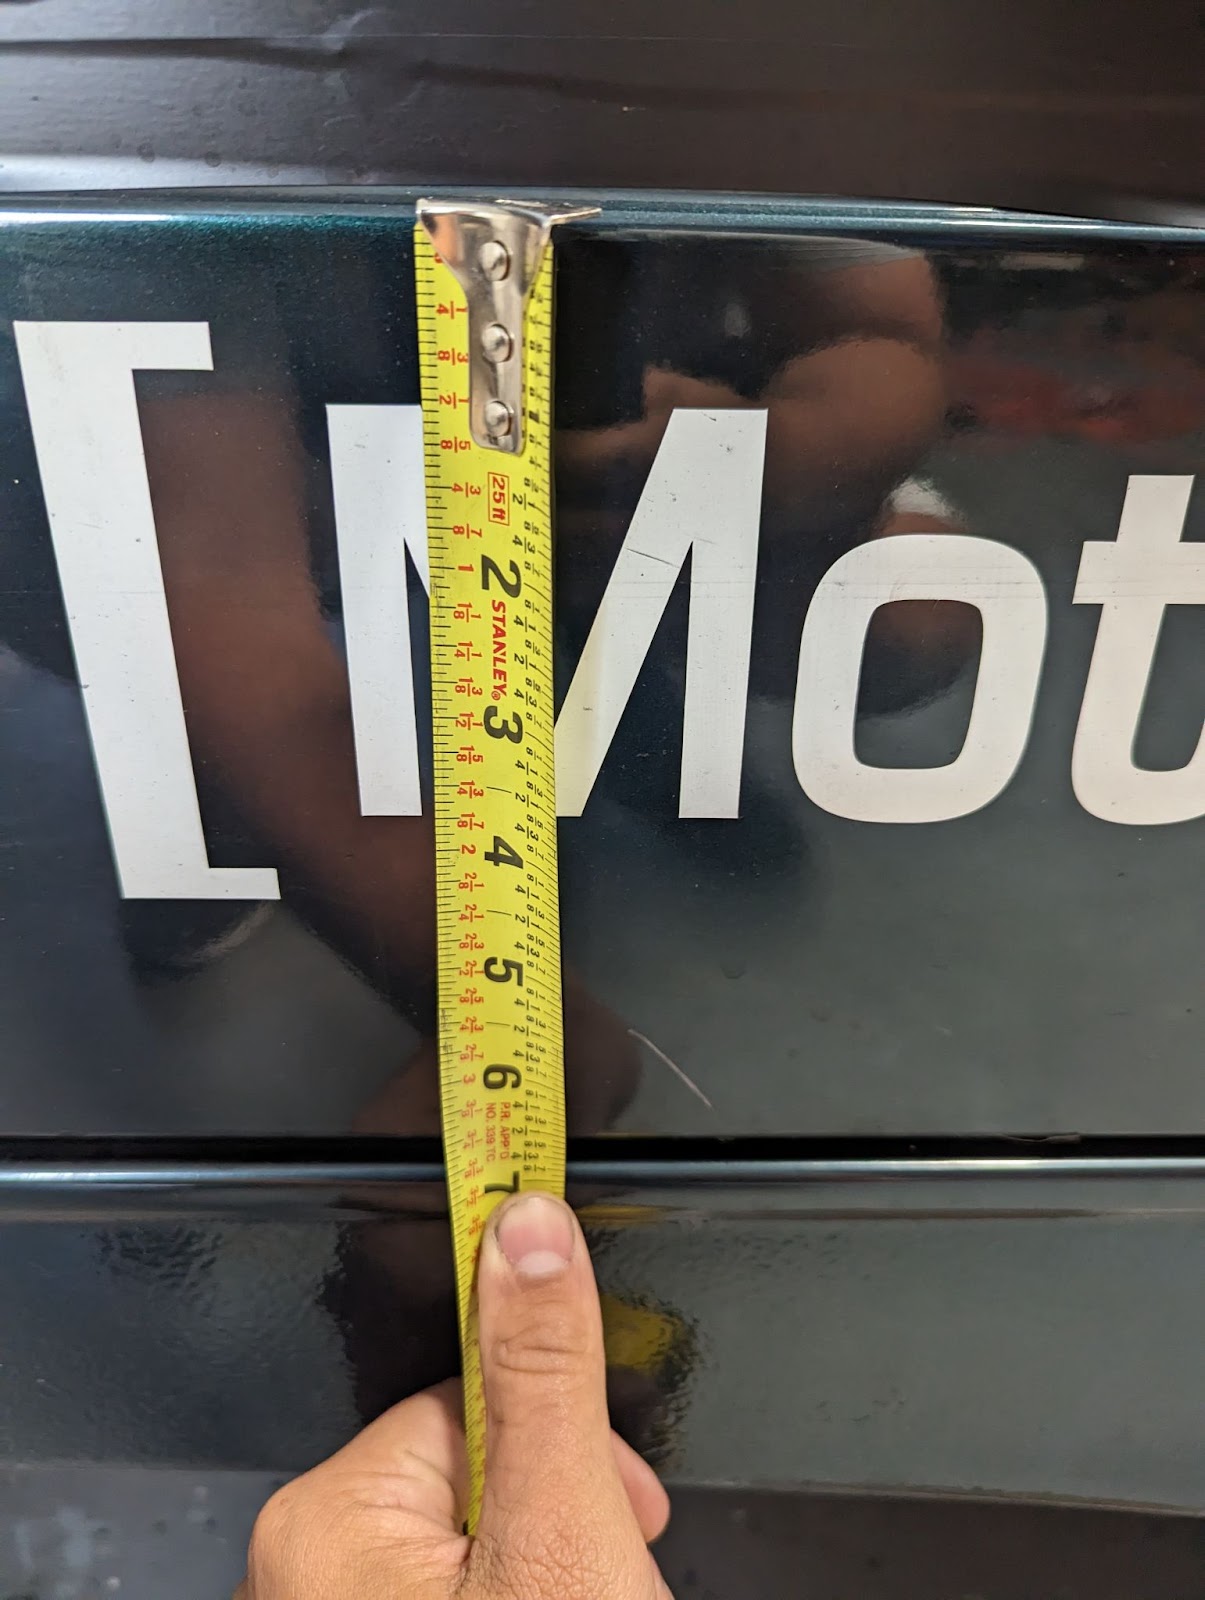
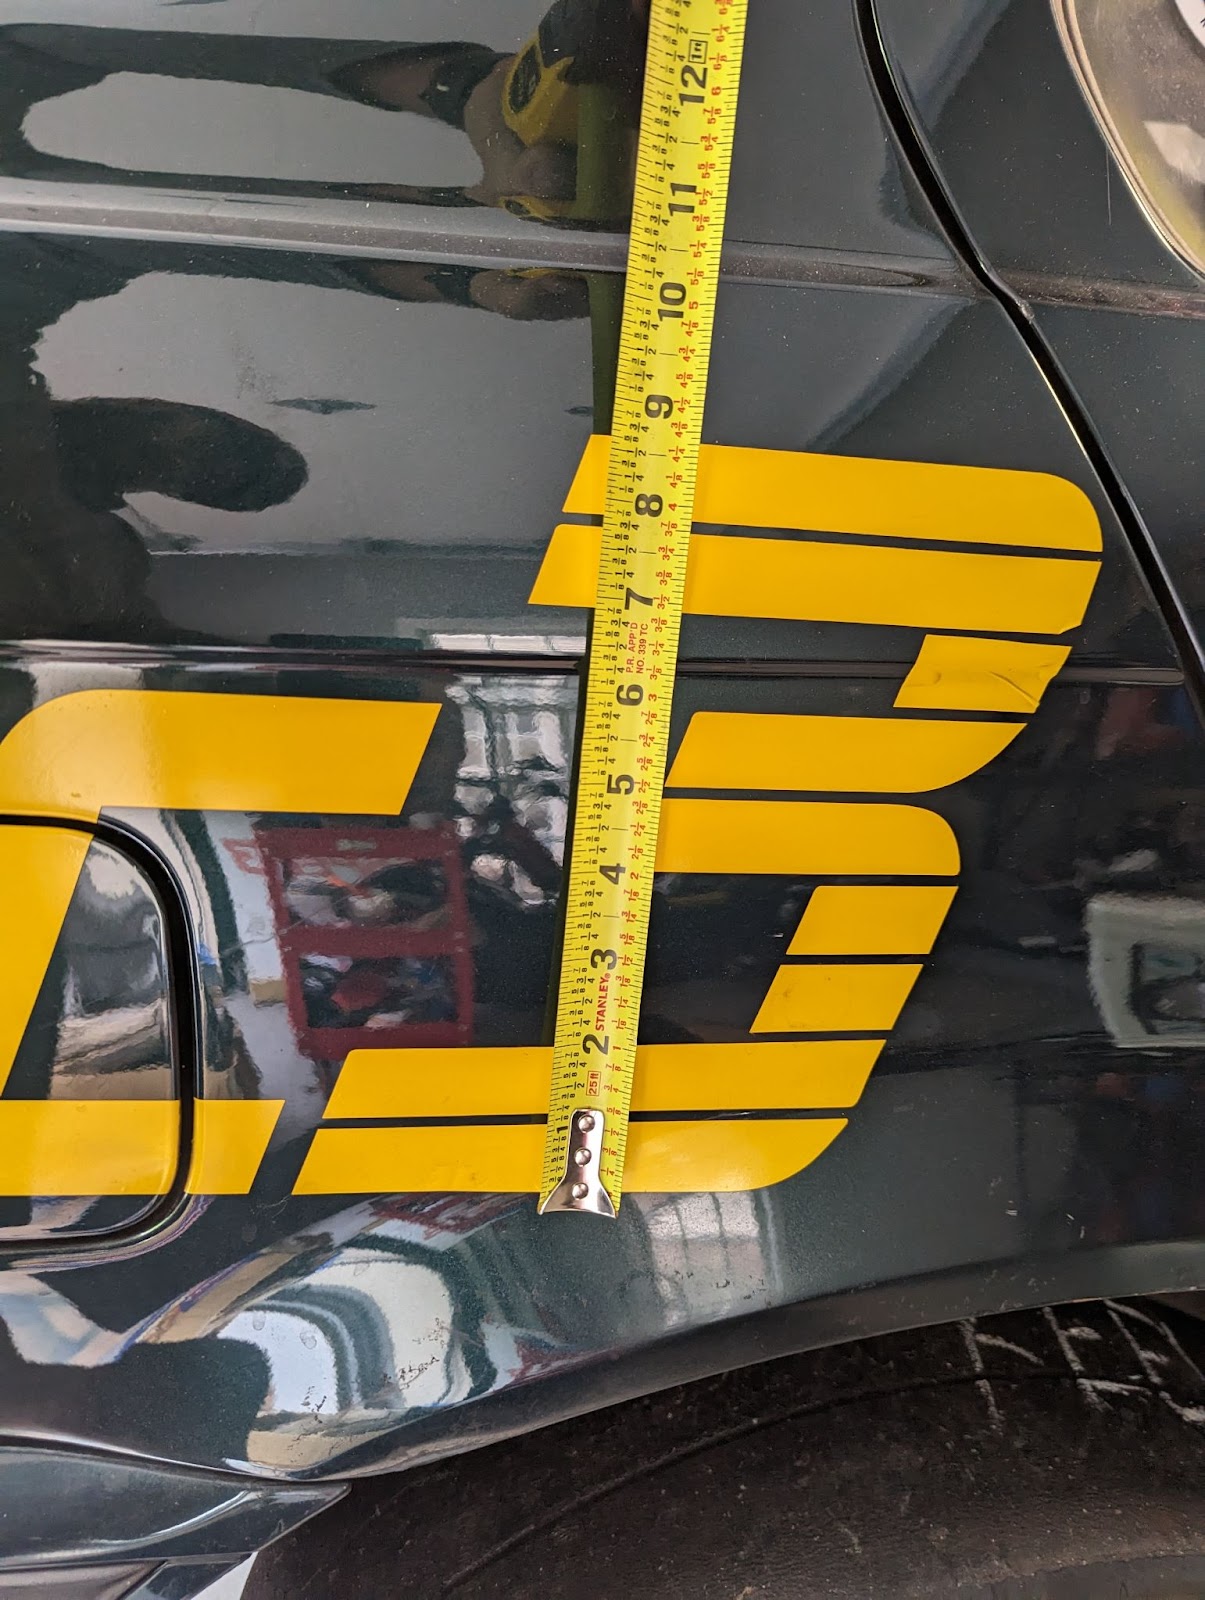
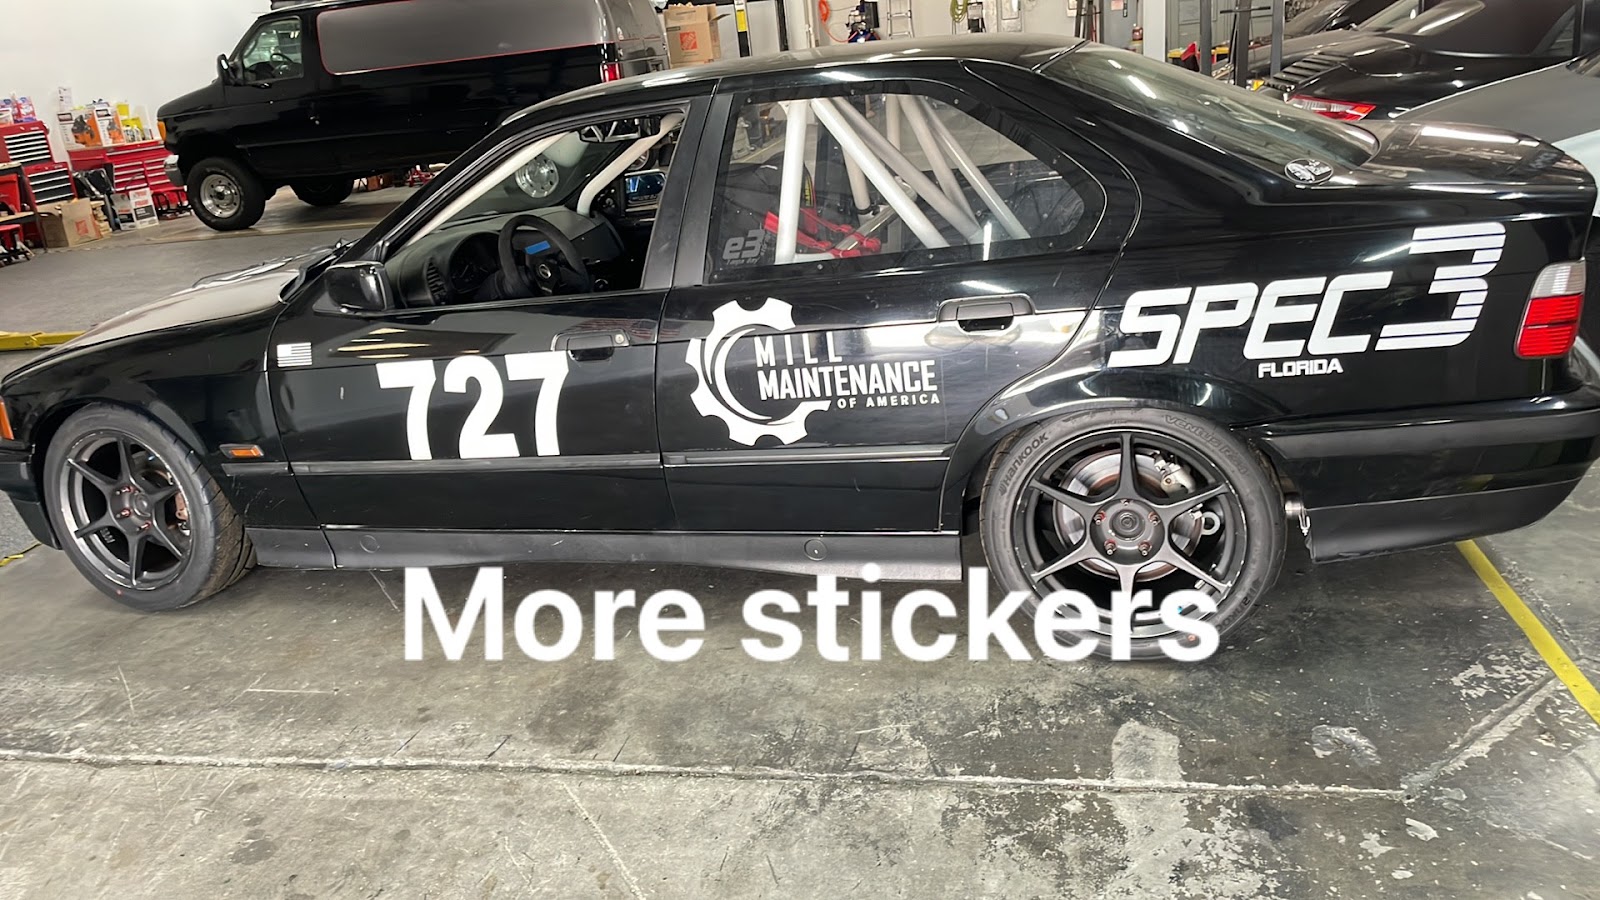

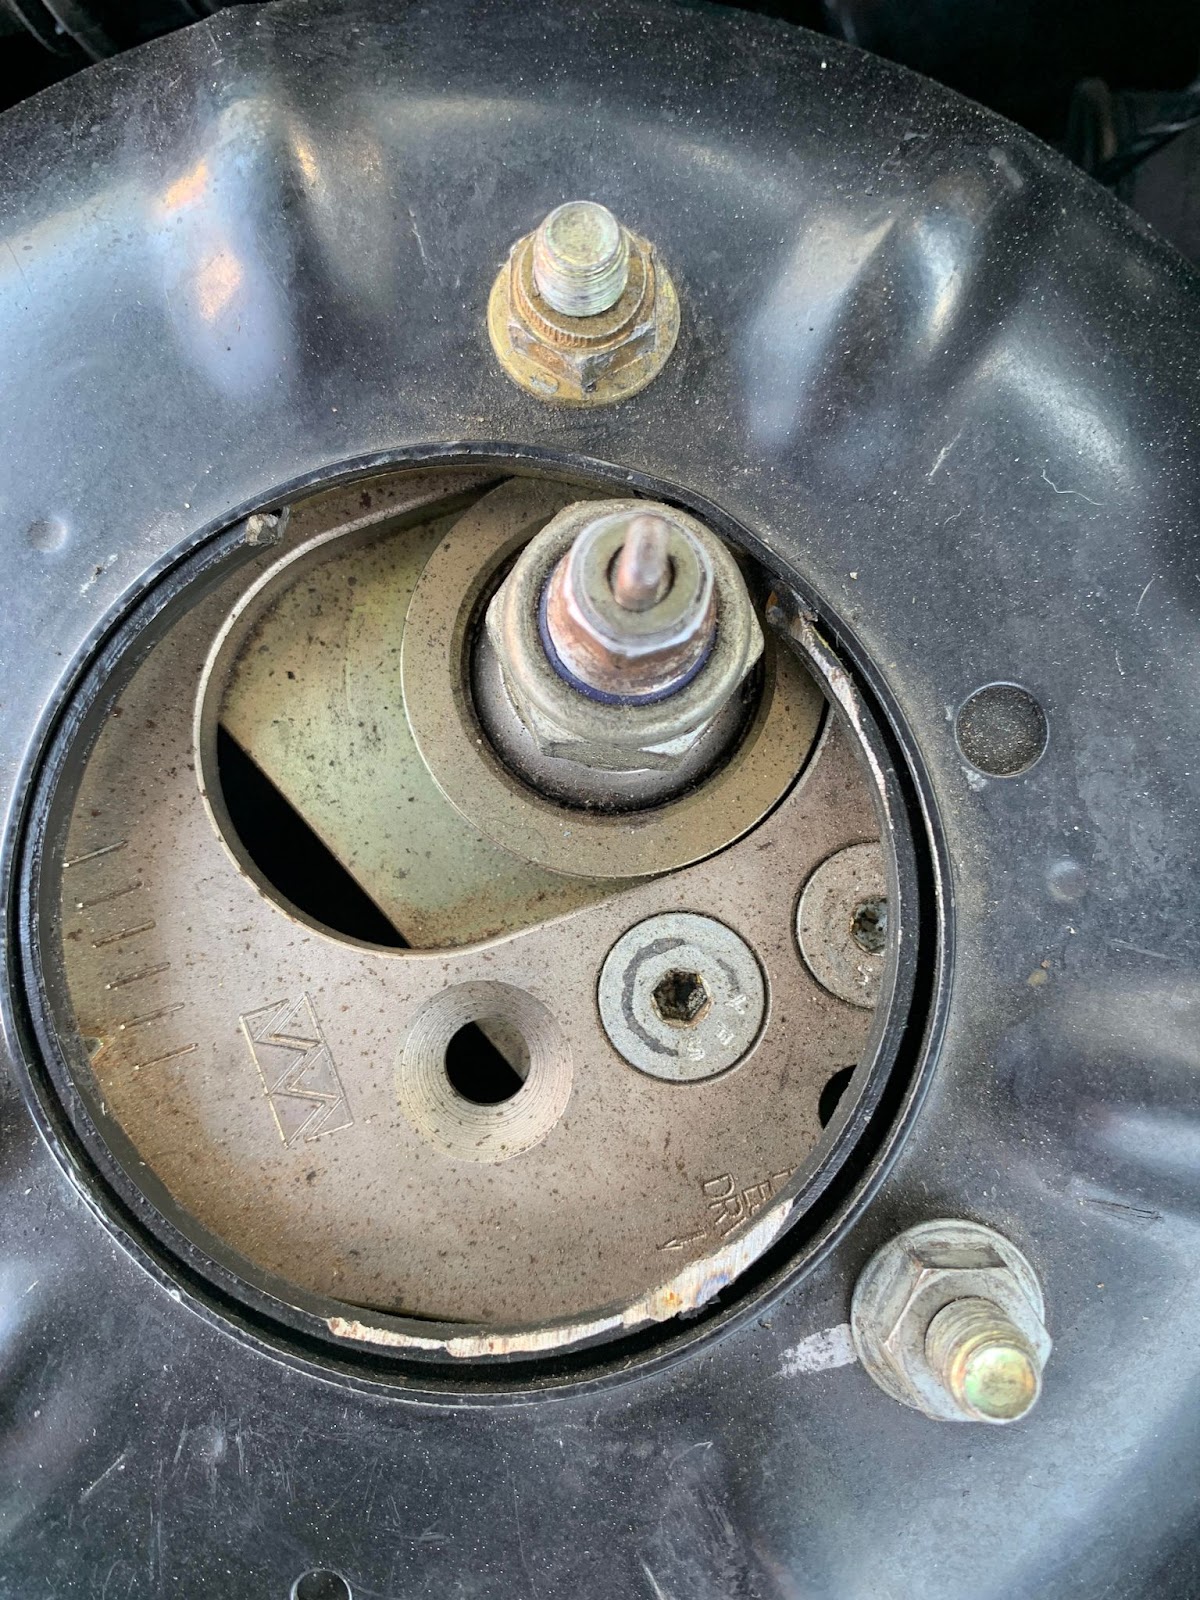
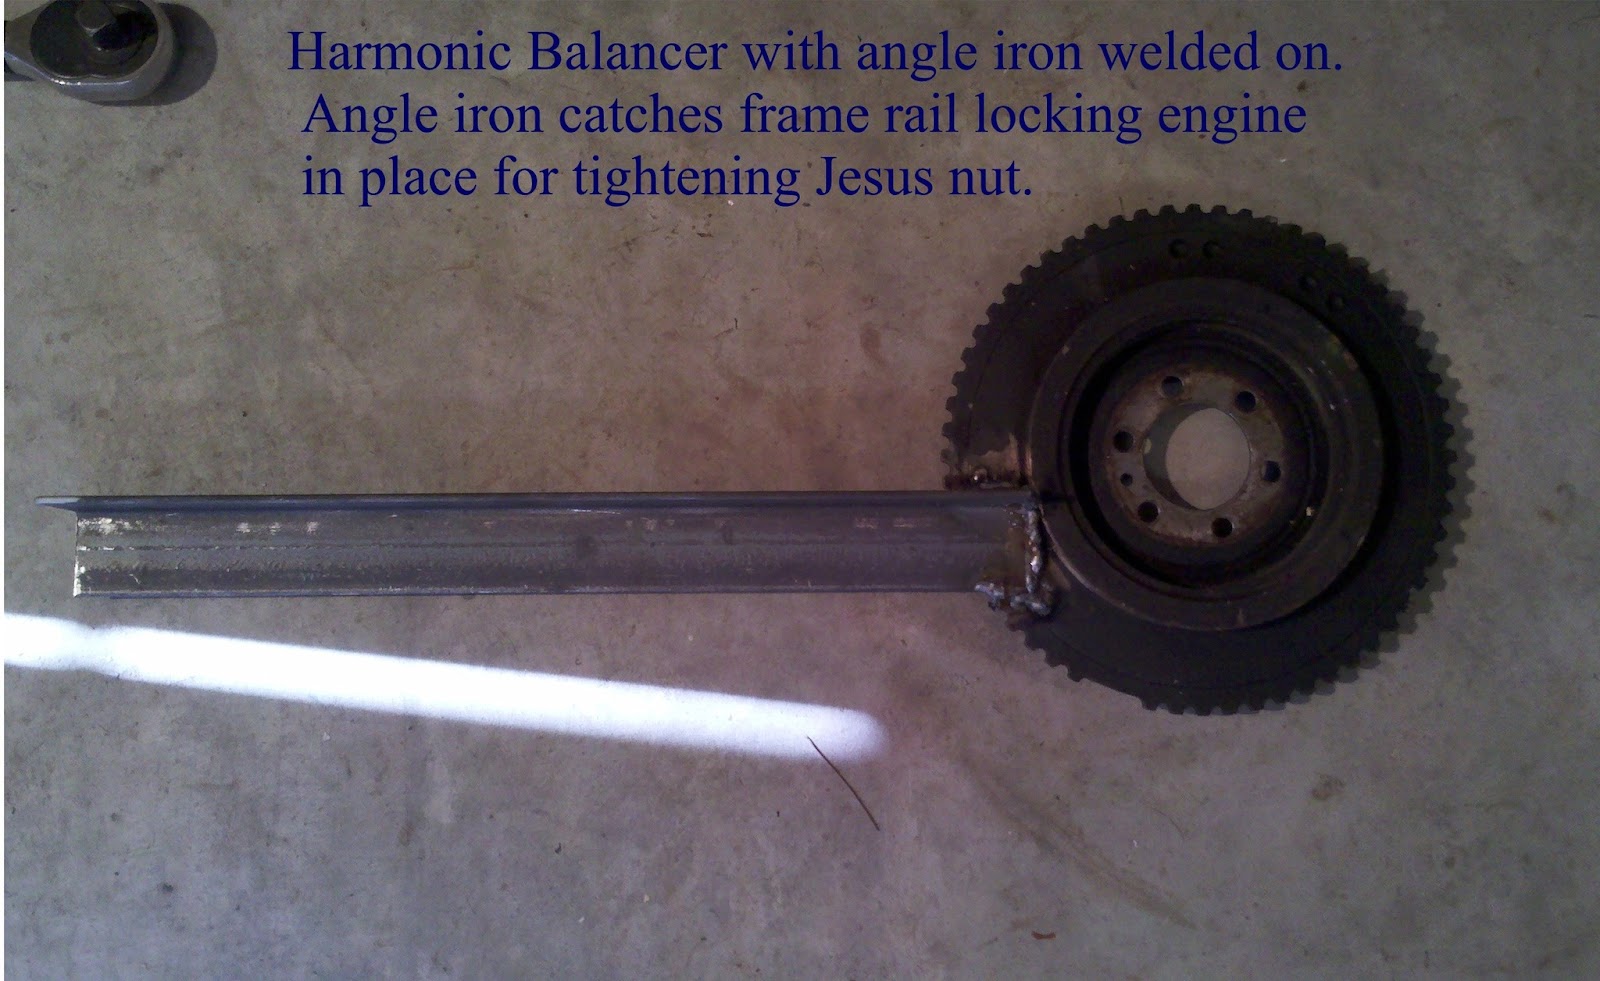


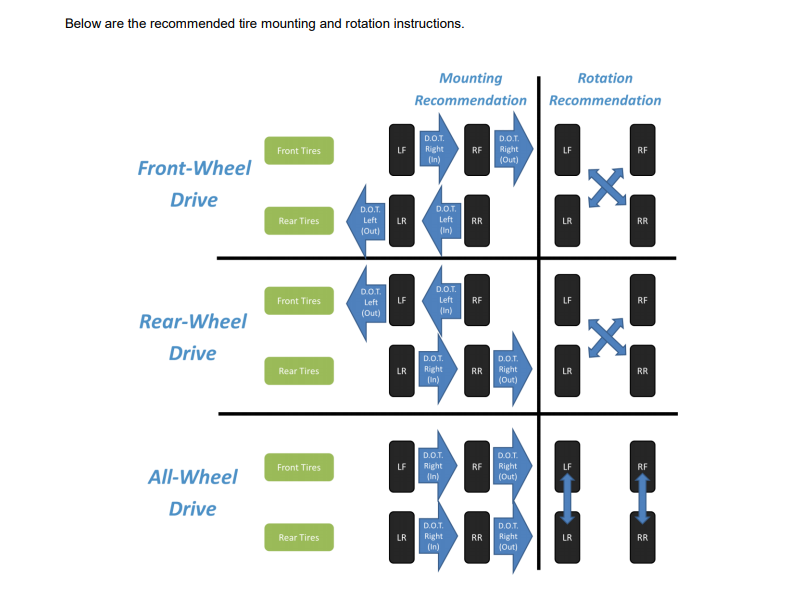

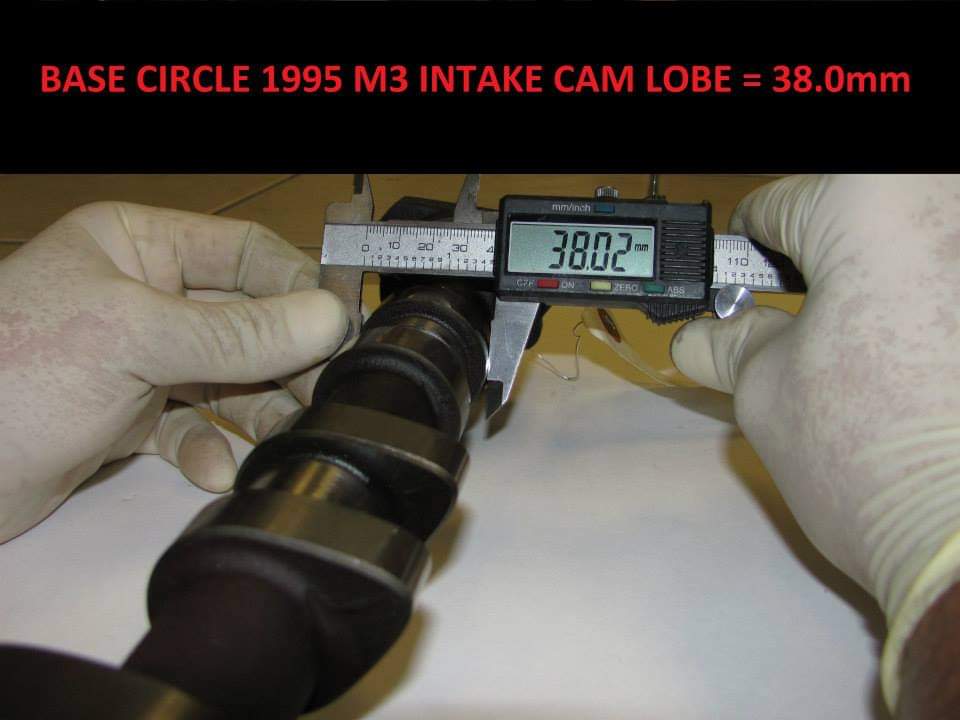
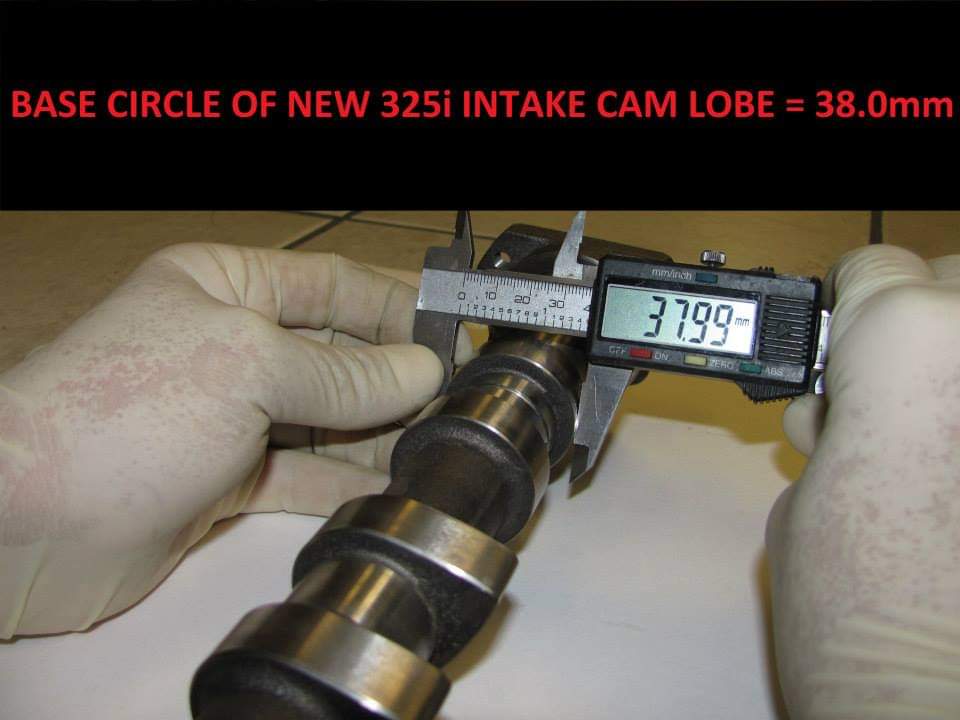
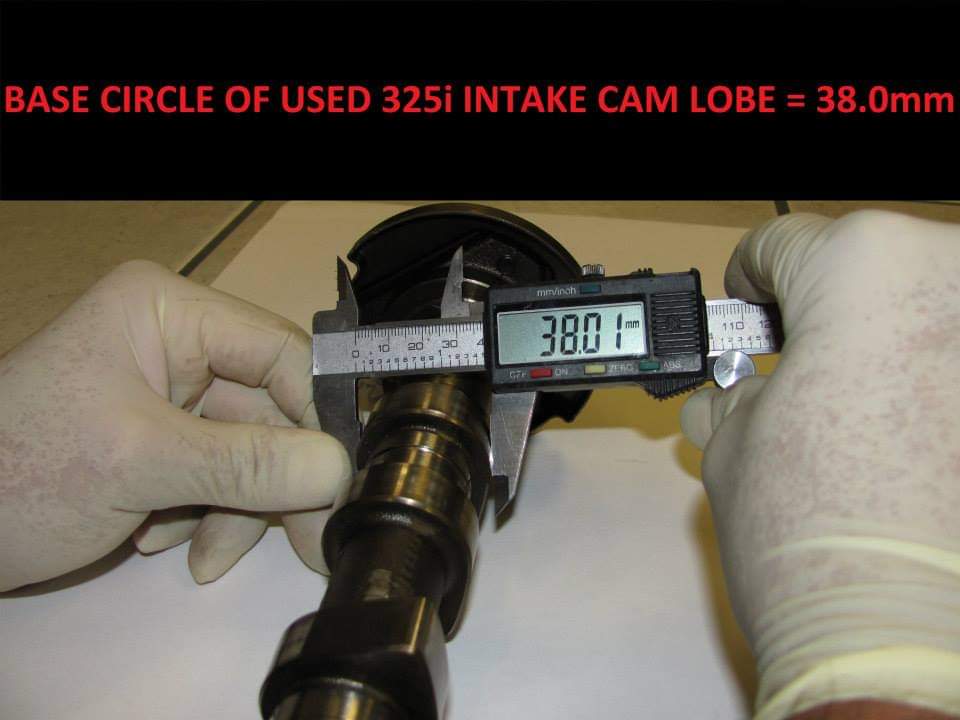
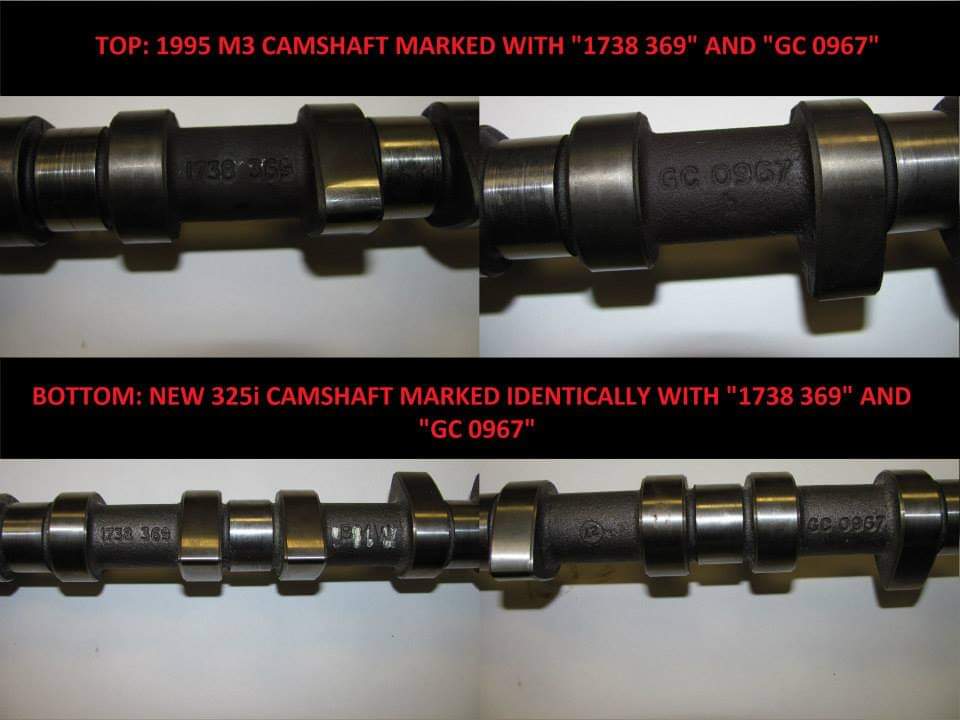


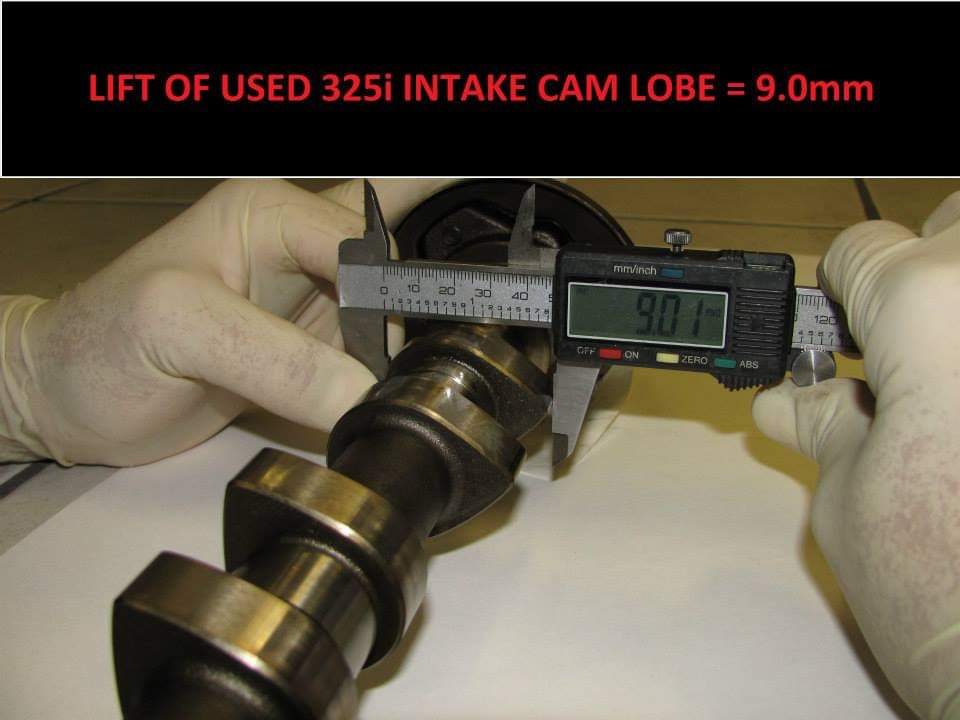


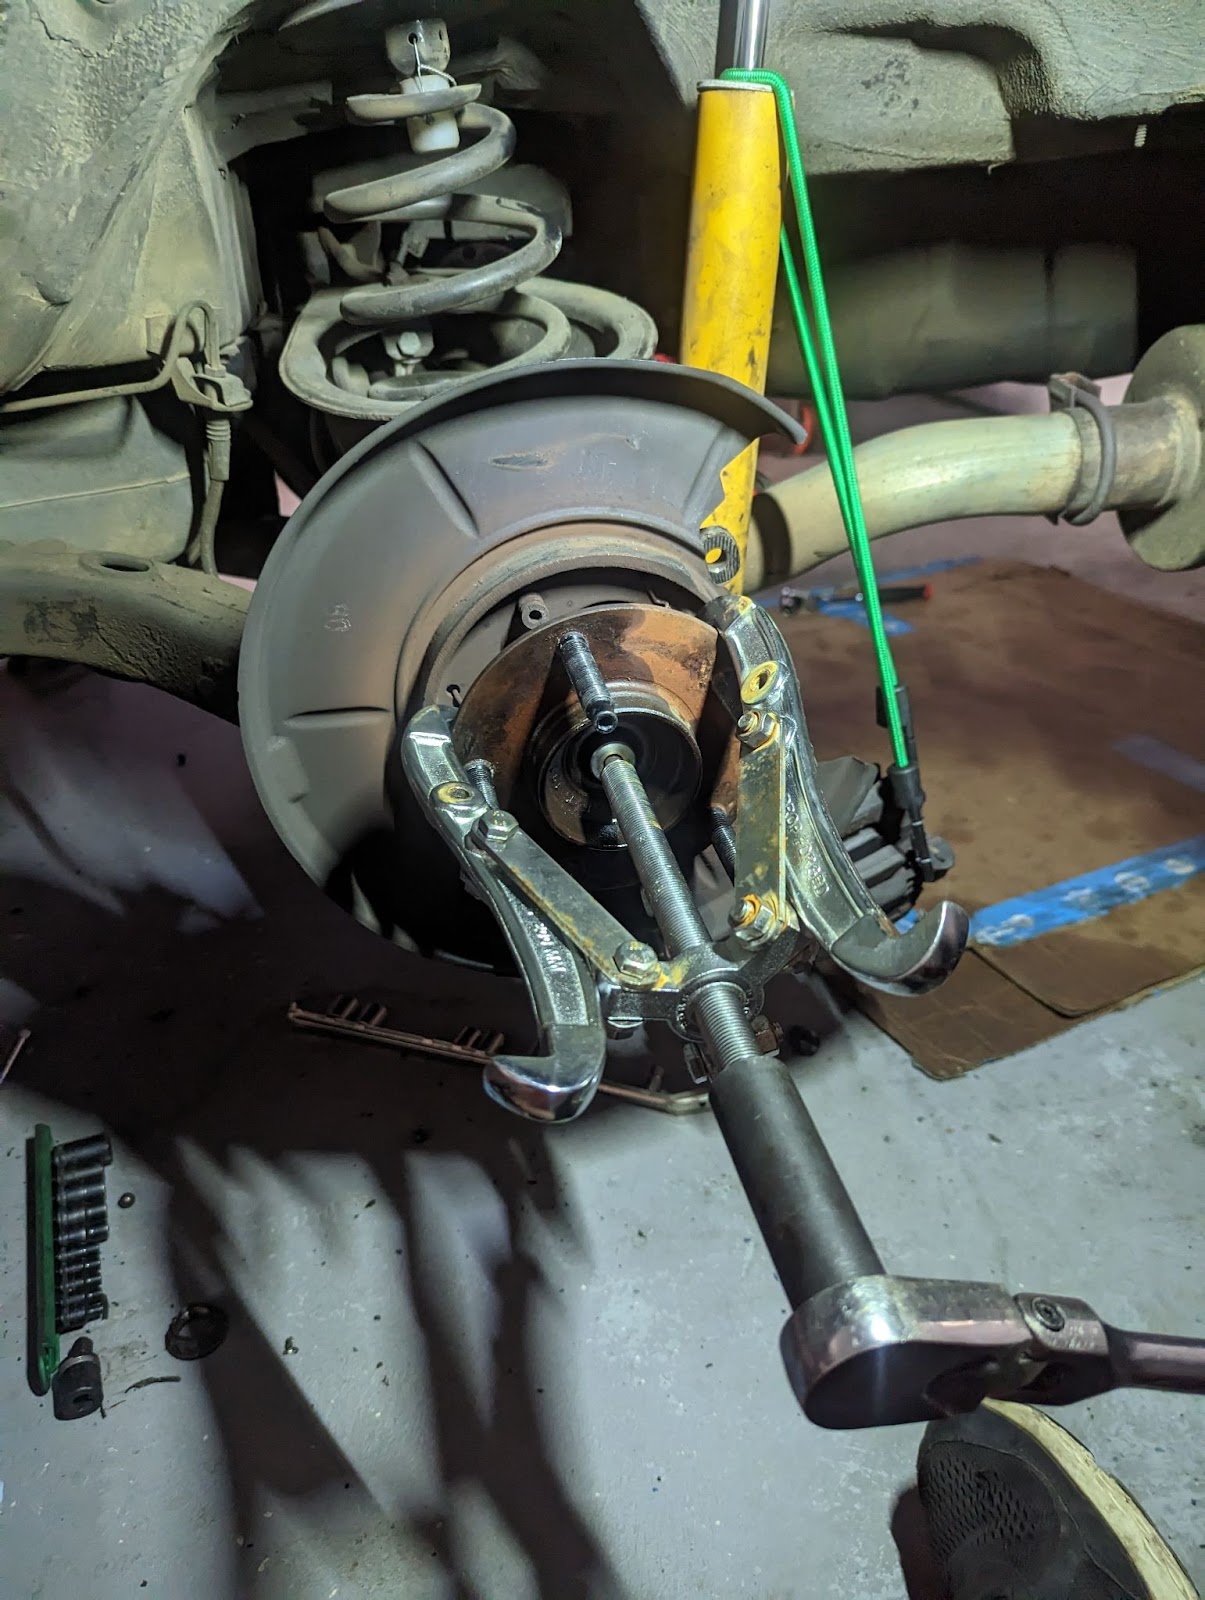
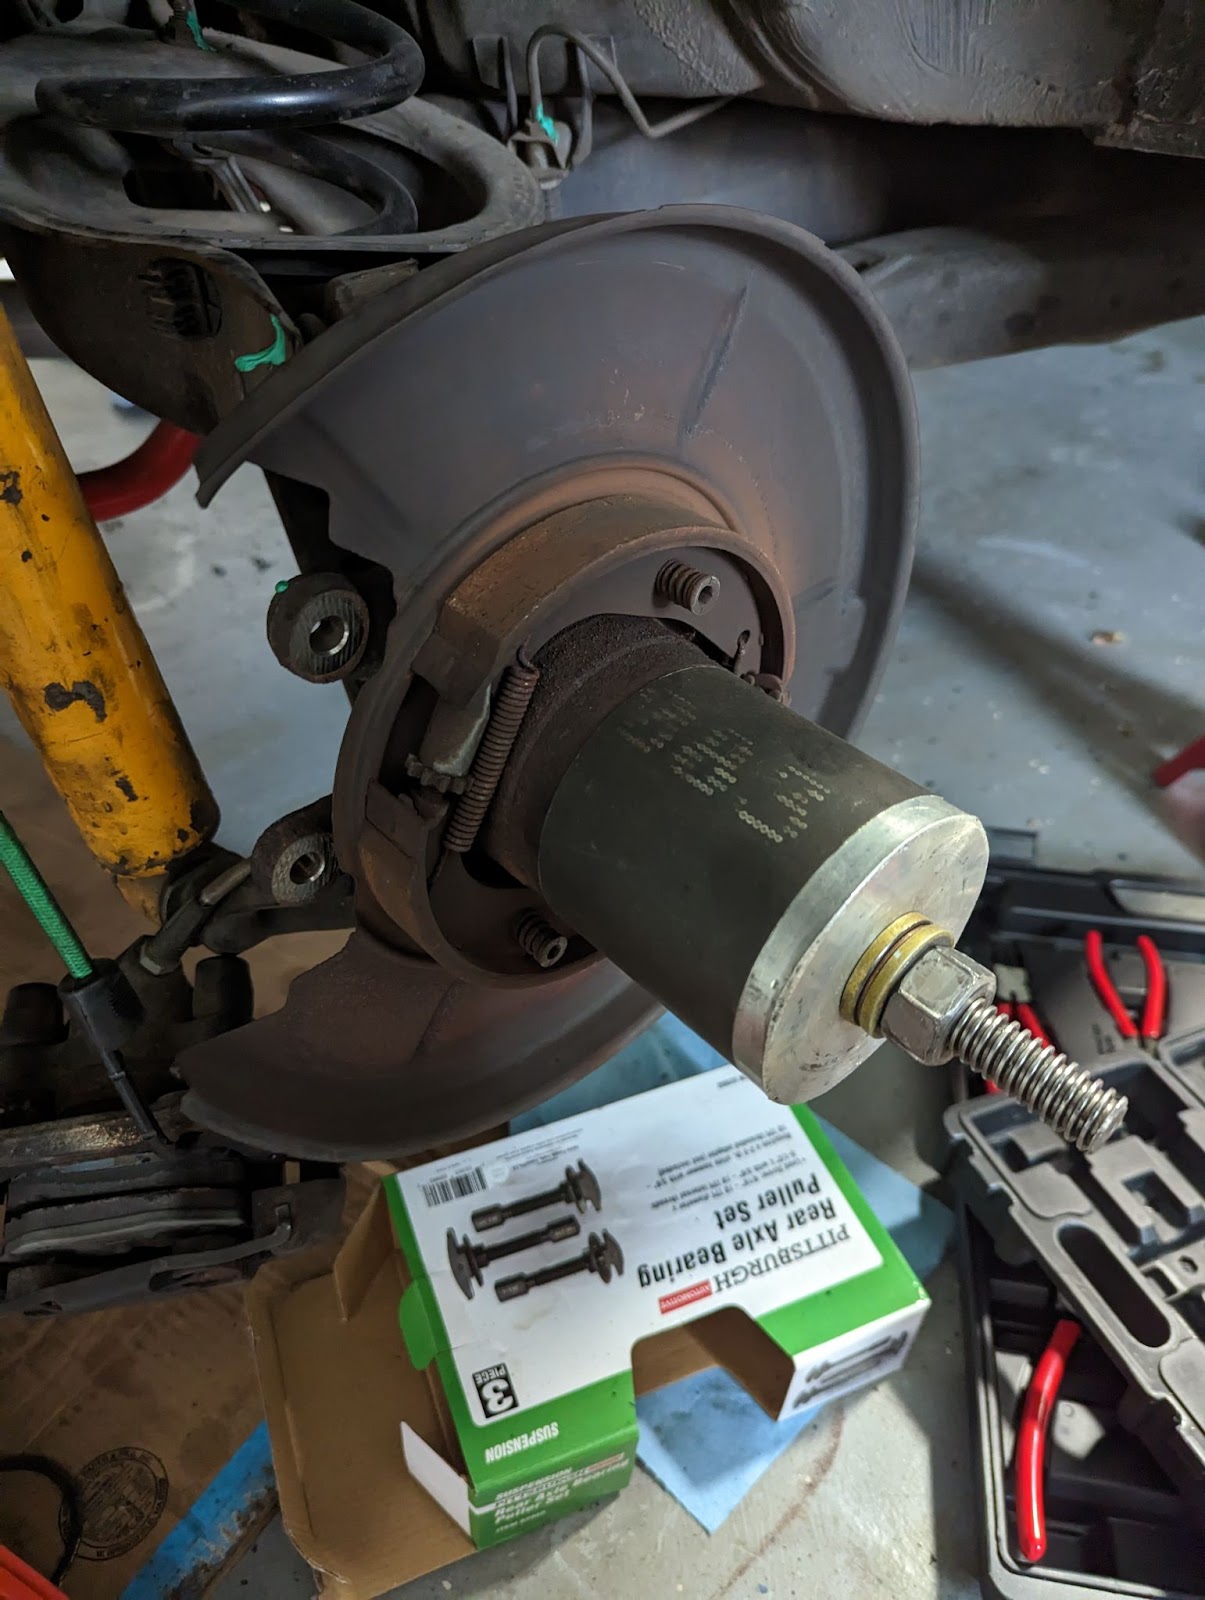


 Reply With Quote
Bookmarks