
 Member
Man I love seeing the resto threads. Great work! I need to go do a little work on mine.
Sent from my SM-G960U1 using Tapatalk
Member
Thanks! I still have about 3 months worth of work that I've done that I just haven't had time to post up yet. Planning to update this thread soon.Originally Posted by crqflier

Member
Next up on the list of things that needed replaced were the transmission detents. This was to address the horrible fifth gear lean, and the sticking revers detent. Just getting the shifter to go all the way to the left required you to basically hit it with your palm.
I'm going to break this into a bunch of smaller posts as I did a lot of work over three months time when I was able. The more I took apart the more I replaced because I was in there and they either needed to be replaced or I just decided I wanted to.
Let's start with getting the transmission out which was a total pain.
The easy stuff. Driveshaft, heat shield and exhaust out again.

Removing the transmission bolts were not too bad other then trying to access the top bolts. As many other threads have mentioned it helps to loosen the transmission mount bolts to lower and tilt it down. Then using about three feet of socket extensions, and dealing with the transmission tunnel sound insulation getting in the way, I was able to get the bolts out.

I ran into an issue with getting the transmission separated from the engine. My son and I tried and tried to wiggle it loose but to no avail. I ended up buying a set of pry bars and gave that a shot but wasn't getting anywhere and decided to do some more research. I quickly came to the conclusion it was the starter connected to a dowel pin on the transmission. I focused the prybars on that area but was unable to get it to separate and didn't want to damage anything so I stopped. Since I planned to replace all the cooling system including hoses I ended up deciding to pull off the throttle body and intake.

I then had easy access to get the starter off. It still was a bear to get twisted and pulled off. But after that it was a breeze getting the transmission out. For anyone in the future having issues separating the transmission from the engine, this is the dowel pin the starter was seized onto.
Intake sitting and waiting to later have the injectors pulled and rebuilt.

On a side noted...
Bought this to get the windshield wipers off as they just wouldn't budge. Can't believe I didn't already own one of these.

Member
BMW E36 M3 Expert
You do not need a puller for the arms. They remove as shown in the video below. Even crust belt cars pop off easily with the proper technique.
https://www.youtube.com/watch?v=ibFj32gxvPA
Member
I would normally have agreed with you. I never needed the puller before on my 95 or any other car to get a wiper arm off. Just wiggling with the right technique always got even the most crusty ones off. But the driver's side wiper arm wouldn't budge regardless of what I tried. Maybe if I would have spent more time I could have got it off. Either way it's a pretty cheap price for the puller and after a min it popped right off. The passenger side came off without the puller.
- - - Updated - - -
I forgot to mention the video shows private for me.
Member
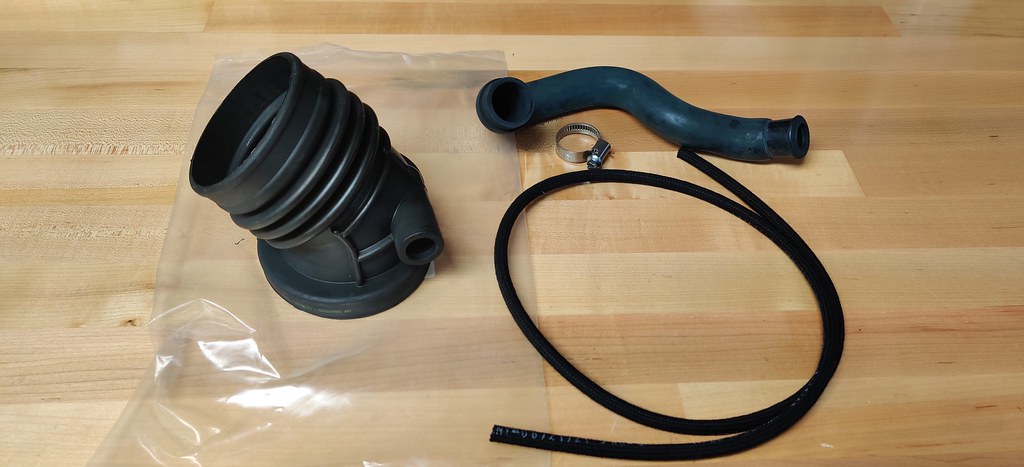
When pulling off the intake and throttle body I noticed the boot was cracked severely in two places, and the throttle cables bushings were crumbling away.

I ordered a new intake boot, some vacuum lines and idle control valve hose.
I also ordered some billet aluminum throttle cable bushings from Garagistic.

Transmission finally out!

Transmission needing some serious cleaning even though the one in my 95 was covered with way more oil sludge. Sadly I cleaned it while on the transmission jack so the bottom was still dirty when I put it back in the car. I plan on cleaning that off at some point.


I cleaned it up in prep for replacing the detents.

Nice new Clutch Masters clutch and pressure plate next to the old one which was last changed in 2005 according to the previous owner.
The old flywheel that I ended up replacing with a factory one as I plan on driving it mostly on the street. Also ordered new flywheel bolts.
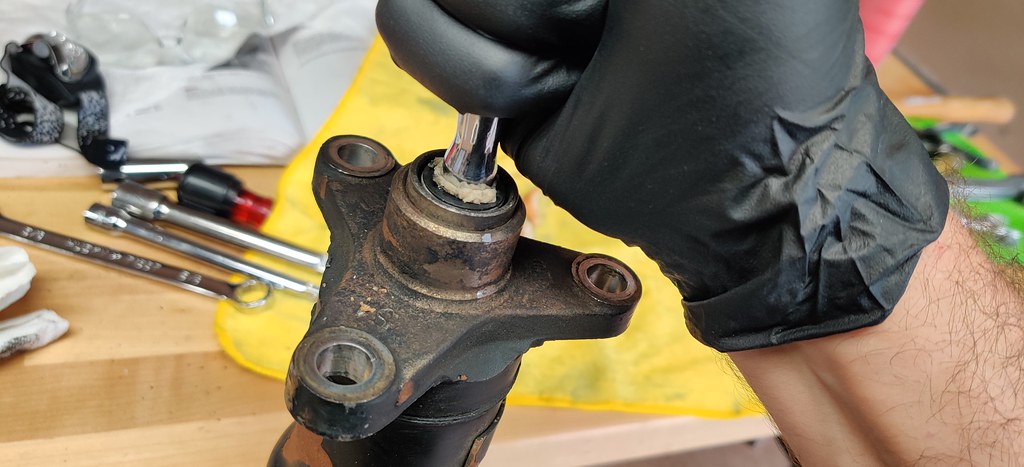
The old pilot bearing needing to come out.
I rented a puller from O'Riellys but it was not narrow enough to fit.
To get the bearing out I ended up just using the bread removal method. In case you haven't heard of the bread method.... You literally use a few pieces of bread to get it out. Using a hammer and something roughly the width of the bearing internal diameter and just pound the bread in. Then pack more bread in, hammer, rinse and repeat. The bearing will eventually pop right out. We also used this to remove the drive shaft end bushing.


And it's out! An added benefit is the area was nice and cleaned from the bread.


New pilot bearing installed as well as a new rear main seal and housing and bolts. It was the BMW Crankshaft Seal Kit.
The pretty looking new dual mass flywheel and bolts. As well as the BMW Flywheel Lock Tool that was awesome for keeping it stationary while torqueing the bolts. I put a bunch of zip ties on it so I didn't end up forgetting about removing it after I torqued the bolts.
Here are the pics I forgot to post before of using the bread method to get the drive shaft end bushing out.

Old bushing out and new ready to go in.
More to come later.
- 13541740073 ASC+T Intake Boot
- 11657803732 Engine Vacuum Hose, Black Cloth, OEM
- Part# N/A Garagistic Billet Aluminum Through Cable Bushings 2
- 26117526611 BMW Driveshaft End Bushing - Genuine BMW
- 11142247867 BMW Crankshaft Seal Kit - Genuine BMW
- 11211720310 BMW Clutch Pilot Bearing - Genuine BMW
- 11222243051 BMW flywheel bolts
- 03005-HD00-R Clutch Masters FX100 Clutch Kit (Rigid Hub)
- 4150109100 OE Dual Mass Flywheel LUK
- 83300493938 BMW Flywheel Lock Tool
- 13411435781 Idle Control Valve Hose
Last edited by E85STI; 10-23-2021 at 11:44 PM. Reason: Spelling and adding parts list
Member
Time to address the reason I pulled the transmission in the first place. The shift detents!
The most difficult part of getting the detents removed was actually the c-clip. But once those were removed it was quite easy with help from a slide hammer I bought on Amazon. I won't get too involved in the method as there are many great videos out there. Long story short you use a screw and twist it into the plastic cap and the pry it out.
You will need to pull out this sticking detent.
Using the bearing puller and slide hammer they popped right out.
Of all the pics I took this was the only one I took of the detents.
These are the drift tools used to set the detents. Use a dead blow hammer and the right drift. Then install the springs and use the other drifts to hammer in the caps.
One down and one to go.
Both the reverse and 5th gear done.
The remaining detents were removed and installed.
Now that the detents are complete it's time to address all the transmission seals while it's out.
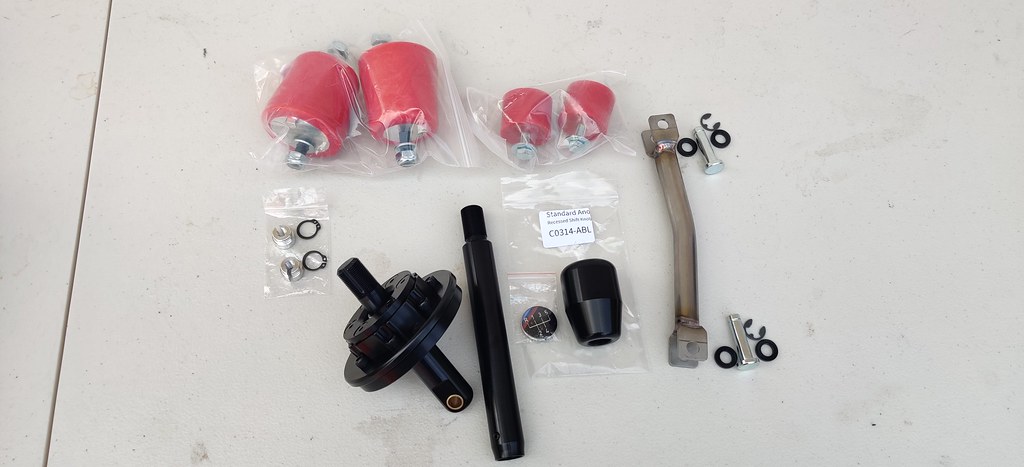
Here are some of the parts I ordered for the transmission/clutch refresh.
Input shaft seal installed
Removing the output flange.
New output shaft seal installed. But it looked like I damaged it a bit getting it in so I just bought another and installed it when it arrived.
I must not have taken a pic of it but I also replaced the shift rod bushing as well.
Nice new Clutch Release Bearing Guide Tube and bronze clutch fork pivot and spring/clip installed.
New clutch pivot fork and throw-out bearing installed.
Clutch Masters FX100 clutch and pressure plate installed.
Next up will be installing the transmission, transmission and engine bushings, and the slave cylinder.
-23128677736 Genuine BMW Manual Transmission Shift Shaft Seal
-23111224799 Genuine Manual Transmission Output Shaft Seal
-21511223302 Genuine BMW Clutch Pivot Fork
-25111434194 Genuine BMW Manual Transmission Selector Rod Joint Bushing
-23211224820 Genuine BMW Manual Transmission Input Shaft Seal
-23111224845 Genuine BMW Clutch Release Bearing Guide Tube
-21517570284 Genuine BMW Clutch Release Arm Spring
-AGACPP223328 BMW Bronze Clutch Fork Pivot
-N/A Clutch Disk Spline Grease
-03005-HD00-R Clutch Masters FX100 Clutch Kit (Rigid Hub) - E36
-11222243051 VNE-9000182 BMW Flywheel Bolt $3.19 each
Member
BMW E36 M3 Expert
Get that brass ("bronze" w/e) pivot pin out of there immediately. That will crush and fail on you within 5k miles. They are known junk. OE Plastic or OE (850csi) stainless steel only!
https://www.instagram.com/p/BnuPuo4nob3/
Video for pulling the arms was made public again. https://youtu.be/ibFj32gxvPA
Last edited by Braymond141; 10-26-2021 at 07:09 PM.
Member
Well, today I learned about "the bread method" hahah
Member
I wish I knew that before hand. Everything is already back together and off the lift. I am just going through and posting all that I did over the last 3 months or so. I honestly didn't think I needed to do research on a part that FCPEuro sold as an "upgrade" I figured they wouldn't sell it if it was garbage and prone to fail. I guess I was wrong.
I wonder, is there a difference in build quality between brands for the bronze/brass type? The one I installed seems like a beefy and solid piece. Garagistic sells a brass one and FCPEuro sells a bronze one. Both talk about lasting longer than the stock plastic. If they are as crappy as people are saying, then why in the hell are they still selling them? I would hope they would pull them if the parts are defective. One would hope at least.
Edit: I did some reading and it "seems" like some of the failures are on the much softer brass not bronze. However this is just me doing a quick search. It is not comprehensive by any means. The one I bought is made of silicon bronze which is supposed to be pretty tough stuff. I will just have to see how things go over time.
- - - Updated - - -
I was happy it worked so well after seeing it in the past on YouTube.
Last edited by E85STI; 10-26-2021 at 10:47 PM.
Member
That new flywheel looks beautiful. I didn't replace mine at 134k there weren't any major hot spots or wear but that thing is a beaut. Contrary to many I prefer the OE dual mass flywheel, the car still has excellent throttle response and it gives it a smooth refined 'sssshhhhh' feeling (sorry hard to express) that is common to BMW's of the era. I've driven a few M3's w/ lightweight flywheels and chassis mounted shifters and stuff and it makes it feel like garbage in a way.
btw, I found the transmission detent tools valuable for many other duties. One is the perfect size for the pilot bearing and the driveshaft guide bushing.
Member
I've never been a fan of lightweight flywheels for a car mostly used on the street. I do understand the benefit for a track car though. But I do have to admit I freaking love the chassis mounted shifter I installed. It feels amazing. That will be in the next few posts.
Good to know the detent tools can be used for other things.
Member
to be fair the two friends M3's I drove w/ chassis mount aren't exactly prime examples - they're a bit rough all around.
Member
Mine started out a bit rough but it is getting better with each new part. The Garagistic chassis mounted shifter is paired with Garagistic red polyurethane trans and engine bushings. It is what I was hoping it would feel like when I purchased them months ago. Very satisfied with it all.
Last edited by E85STI; 10-26-2021 at 10:32 PM.
Member
May I ask, did you notice any grooves on the crankshaft, tranmission input or output shaft from the old seals? Did you install the new seals at the same depth as the old ones, and are they all sealing tight now? Did you drive since?
You mentioned damaging the transmission output shaft seal when installing, how did that happen? Any advice on how to do it right?
The crankshaft seal carrier has a metal gasket, did you put additional sealant on the back of the carrier or block surface or does it seal well without any additional sealant?
I'm doing mine soon.
Last edited by importbanana; 10-26-2021 at 10:49 PM.
Member
I don't remember there being any grooves from the old seals. I tried to install them at roughly the same depth that they were before. When I installed the seal the first time I thought it looked a little a little bent or dented from when I used the large socket to tap it in. I think I went a little too quick and it just looked a bit off. Honestly it was probably fine but I was second guessing myself so I just ordered another one and took my time installing it the second time around. I have driven about 100 miles since I got it all back together and I cannot see any leaks anywhere.
I think this video might be helpful.
Member
Regarding the crankshaft rear main seal and housing. I followed this install how-to from FCPEuro. Even though it is for an E46 engine it is the same on ours from what I understand.
Member
did you end up cutting or removing the insulation material in the transmission tunnel too?
Member
I ended up just cutting out/removing the insulation that was hanging over the transmission. It was just falling down onto everything. I definitely reinstalled all of the hard heat shielding material though.
Last edited by E85STI; 10-27-2021 at 03:52 PM.
Member
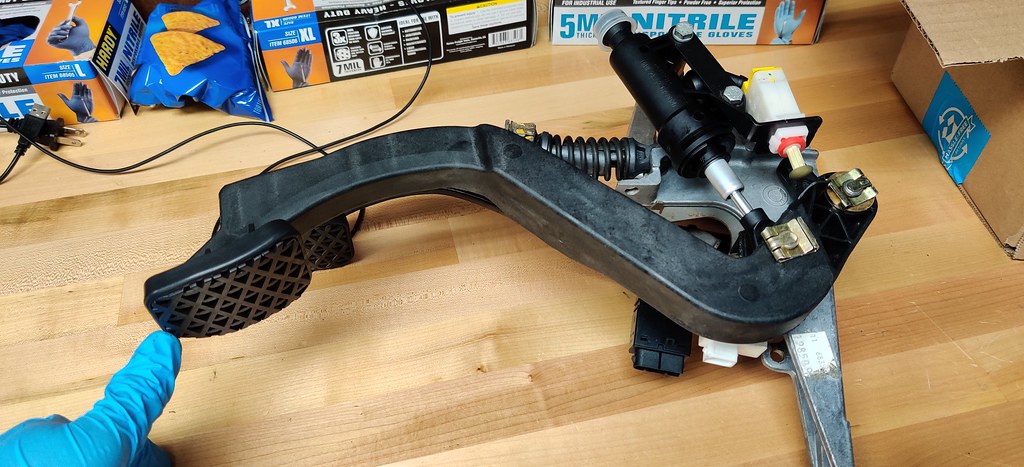
Next up the was reinstalling the transmission, starter, transmission mounts, engine mounts, clutch master cylinder, clutch slave cylinder and new clutch lines. As well as new clutch pedal, pedal pad, and pedal bushings.
Some of the new parts.
New Bosch starter, mounting bolts, clutch hose for reservoir to master cylinder, and BimmerWorld stainless steel clutch Line without CDV.
New starter motor installed.
The old slave cylinder and line out.

The new slave cylinder, master cylinder, clutch pedal and pedal pad.
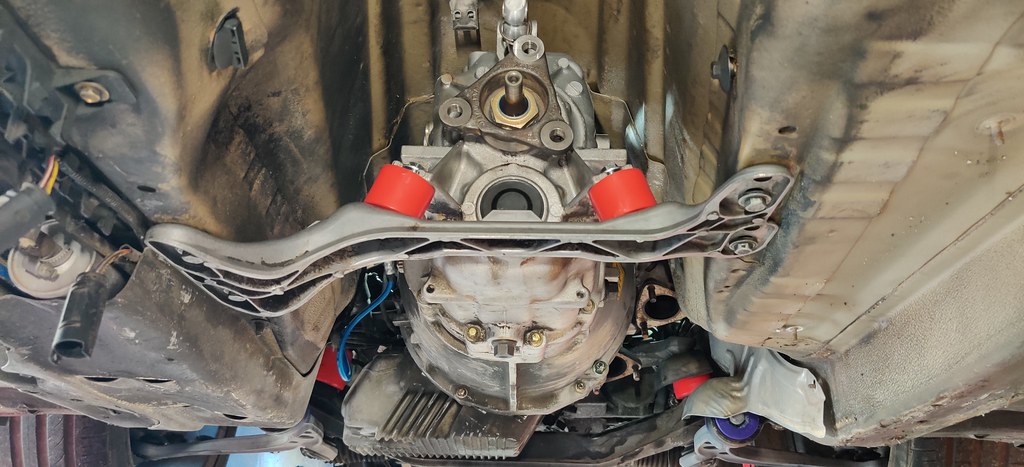
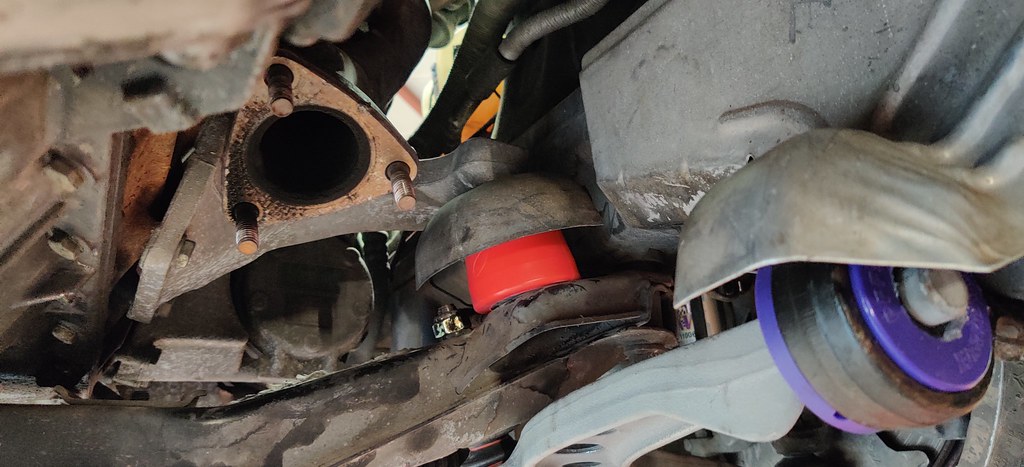
New Garagistic poly engine and transmission mounts.
Old and new transmission mounts.

Old and new engine mounts.
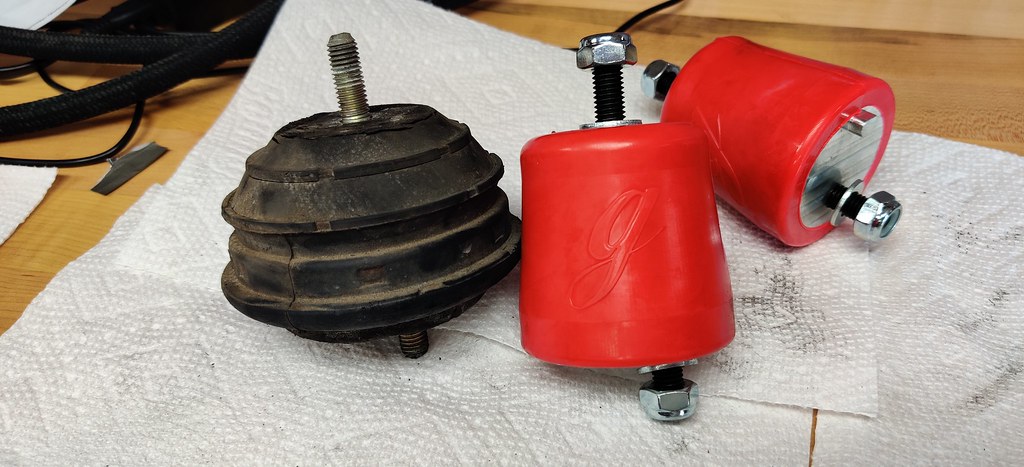
One of the engine mounts was in pieces.
Clutch line and slave cylinder installed as well as the engine and transmission mounts. Ignore the dirty underside of the transmission. That was the part that was still on the transmission jack that I couldn't get clean. I plan on cleaning that up in the near future
Bronze clutch pedal bushing.


The pedal assembly needed to come out to replace the clutch related components. From the videos I watched it seemed easier to replace bushings and the master cylinder and hose with everything removed.
All the clutch and pedal related parts laid out on the bench. This was a bit of a pain to get it all out and back in, all while twisting and contorting the body under the dash. But I am glad I did it all. Also below are the brake pedal bushing which I didn't get a pic of but after pressing them into the brake pedal. Also the "BimmerWorld "Junior Puck" Clutch Stop". I still haven't put this in but will eventually.


New clutch pedal with bronze bushing installed.

New pedal pad.

Clutch pedal and BMW master cylinder all back together. With both the master and slave cylinders I didn't want to go the cheap route so I ordered genuine BMW units.
After getting everything back in it was time to bleed the clutch. I've read many threads about having issues with getting all the air out of the master cylinder during the bleeding process. Thankfully after using the Motive Power Bleeder I didn't have any issues. I purchased a new one with BMW specific reservoir cap as I lent mine to a friend a long time ago. The "European Power Bleeder Black Label and Power Bleeder Catch Bottle Set 2". Using that catch bottle made it a clean mess free operation. Well for the most part.


Next up I will focus on the shifter install.
- Garagistic Motor Mounts Poly
- Garagistic Trans Mounts Poly
- 12412354693 Starter Motor Bosch New
- 7129904681 Genuine Starter Mounting Bolts 2
- 21521163714 Genuine Clutch Hose - Reservoir to Master Cylinder OEM BMW
- 100235360002 BimmerWorld Stainless Steel Clutch Line Deletes CDV
- 21526758820 Clutch Master Cylinder - Genuine BMW
- 21526775924 BMW Clutch Slave Cylinder
- 35311158659 OE Clutch Pedal
- 35211108634 OE Clutch Pad
- Garagistic Bronze Clutch Pedal Bushing
- MOTIVE0109 European Power Bleeder Black Label
- MOTIVE1820 Power Bleeder Catch Bottle Set 2
- 35-21-1-158-290-M9 Brake Pedal Bushing
- 100.35.536.0001 BimmerWorld "Junior Puck" Clutch Stop
Member
Dang, this is both inspirational and overwhelming - as mine likely needs this same level of trans/clutch overhaul!
Member
The funny thing is your thread makes me feel the same way, lol. I'm extremely impressed with all the work you've done to your car. Btw, who did you get your awesome three spoke from?
Member
Next up is the shifter.
Back in 2012 I installed the UUC short shifter kit with DCCR in my 95. I planned to move it over to the 98 when it arrived but soon after decided to go a totally different route. I settled on the Garagistic chassis mount shifter.
I love when new parts arrive!
Chassis mount shifter and components as well as the new DCCR. The throttle cable bushings I will install much later.
I also purchased their standard selector rod joint to go with the DCCR.

Such a well made shifter unit.

Very easy to install.


Decided to go with the medium length shifter. I also need to make or purchase a custom shift boot that will fit the thicker and taller shifter.

I freaking love how precise and direct it feels shifting through the gears. It has that bolt action feel to it. Not only is shifter awesome but it functions great with the new detents. On top of that, with the new clutch and CDV delete, it is totally different experience.
- K0412-61 Garagistic Solid Chassis Mounted Short Shifter (Medium length)
- K9009 Garagistic DSSR Selector Rod
- K0564 Garagistic Standard Selector Joint
- K0103-80 Garagistic Motor Mounts Poly (I didn't include the part numbers in the previous posts)
- K0007-80 Garagistic Trans Mounts Poly (I didn't include the part numbers in the previous posts)
Member
I rolled the dice on having it shipped from one of the eBay sellers in eastern Europe. The quality of the wheel is actually terrific, the actual airbag component has a bit more wear/tear than I'd like, but I can't complain too much. I ordered it right after I got the car and I think it showed up in January - so took about 90 days to get here (I assume it had to go by sea due to it coming w airbag). Who knows how long it would take now given the current state of things.
Member
Thanks for the info Jason. I will look around to see what I can find locally. Might not be worth waiting half a year to get one from over seas.
 Posting Permissions


 Reply With Quote


Bookmarks