
 Member
I've been a forum member for a decade now and never really posted much until Feb 2020. I started a post for my 95 M3 engine tear down and rebuild thread. https://www.bimmerforums.com/forum/s...engine-rebuild " I ended up having some shoulder issues combined with stressing about sinking money into a car with rust and eventually just gave up and left it apart in the garage to collect dust. For over a year I searched the forums and other sites looking at E36 M3s for sale and eventually found one that lived its entire life in Texas.
I am now the 3rd owner of this 98 Estoril Blue M3 with 155k on the odo and with no rust at all. However with all that heat, the clear coat and paint was beat on by the sun over the years. The interior was also baked pretty bad and needs to be mostly repaired or replaced. As if the E36 interior didn't already fall apart in the best of conditions. Thankfully I have relatively good seats and center console I moved over from the 95 to the 98. As well as the carpet which I will eventually get moved over as well. I purchased this about 4 months ago and have been working on it non stop in my spare time with some help from my son. This project has been great for teaching him how to work on cars but an even better opportunity to spend time together. And as you will see soon enough, a LOT of time has been spent on this car. It has literally been on a lift for around 3 months. And my Excel spreadsheet of new parts is getting out of control and growing as the days pass. My end goal is to eventually restore it back to looking factory clean with new/redone interior and dent removal and a complete paint job. However the first thing I am focusing on is addressing all the drivability related issues. I want to get to where I can drive and enjoy the car and then eventually focus on the aesthetics.
I will try to update all that I have done on the car so far and the new things I plan on doing in the near future. This will probably be quite pic heavy but I will try to keep it from getting too boring. Also I plan on trying to add parts and part numbers as much as I can.
Here are some pics to start this off.
The day it arrived.
Sitting here in my garage with the older 95.
Just under 155k on the odo.

Last edited by E85STI; 10-11-2021 at 02:56 PM.
Member
First thing I had to address was the horribly degraded interior. The seats were so bad the structural bar in the seat was digging into my shoulder and the foam was crumbling all over my clothes.
Here is a pic of the poor interior condition. The factory seats are completely destroyed from the heat. The leather is dry and you can break pieces off like plastic and the foam is hard, dry and crumbles away where exposed. It is a total wreck.
Here are the destroyed seats piled together. No idea what I am going to do with these to be honest. I would like to reupholster them but I can only find new foam seat pads. I know there are multiple vendors that sell the leather covers but without the factory foam they might look awful. Either way that is something I will deal with later in the future.
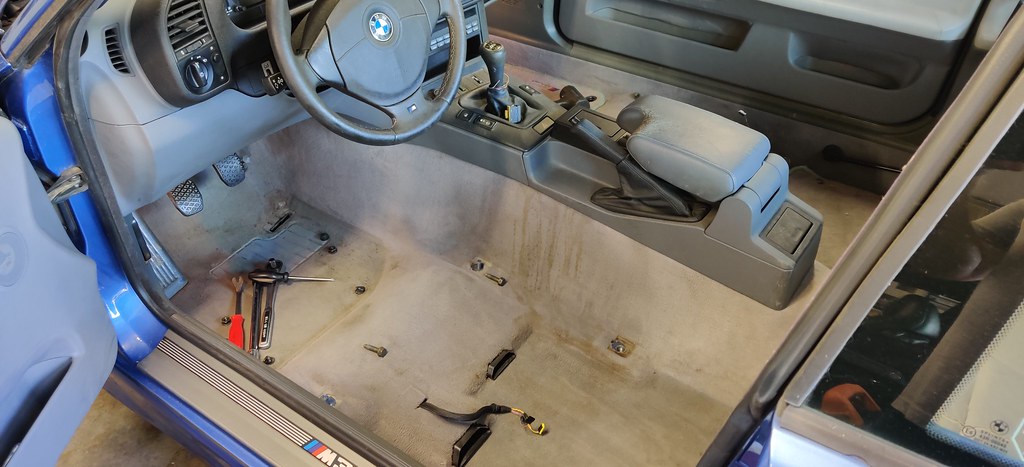
The carpet looking nastier in person than in the pics. Years of spilled drinks and food eaten in the car.
[
After removing the seats we started to work on cleaning up the carpet. My son started off by vacuuming a lot of years worth of filth.
After some elbow grease with a bit of carpet cleaner the carpet looked a lot cleaner.
[/url]
I think this looks much nicer in black rather than the faded and torn up gray. I eventually want to convert everything over to all black for the interior.
I have gathered many extra E36 parts over the years that I can choose from, including armrests, center consoles and cup holders.
With the black center console and armrest.
Some pics with my 95 Black seats installed. My seats have a lot of wear but they are still serviceable for the near future. I can figure out reupholstering or getting new driver and passengers seats in the future. I think the black seat actually look decent in contrast to the other gray.

Last edited by E85STI; 10-11-2021 at 03:06 PM.
Member
Looks great! I like the black on grey look in the interior, as well.
Member
Thanks. I like it for the time being. Not too shabby.Originally Posted by hardtosee

Member
Right around the time I was trying to swap out the seats the gas pedal broke off at the base. On top of that the pedal/lever popped out due to the cracked and crumbling bushings that hold it in. Fortunately the lower pedal in my 95 was in really good shape so I swapped it out. I also swapped out the pedel/lever from the 95 which was held in via clips on the end and is made of metal vs plastic.
After I got the pedal installed I tried to drive it around the block a few times but turned around and came back home due to the drive shaft noise from the CSB that I knew needed replaced asap. However when I pulled into the driveway and stopped for a second the accelerator pedal no longer worked like the cable snapped. It was not the cable but the brake pedal bushing at the top that held the cable in. The one in my 95 was also falling apart so I ordered a new one. I forgot to take pics of the bushing.
BMW Throttle Cable Pedal Bushing: BMW-35411152331
Getting the pedal out of the floor was difficult until I found a few good YouTube videos. Using a flat head screwdriver made it pop right out.
The broken accelerator pedal and the good one.
The pedal lever falling out from the failed bushings.
Pedal lever from my 95. Didn't realize it was this gross and dirty.
I also forgot to take some pics of the assembly after I got everything back in. Next up the passenger side window. What a mess..
Member
Nice thread so far, reminds me of where I was at about a year ago w mine!
Member
I've really enjoyed following your barn find thread. Really love seeing your car come together.
Member
Looking good so far. It's always satisfying to read about a car being rebuilt and to see the before/after pictures. So what lift do you have in the garage? I'm still deciding which one to get.
Member
Thank you! I have to admit - I hope to never need to take the interior apart again - I think I have PTSD, haha.
Member
Looking forward to seeing more!
If you ever want to sell parts from your 95, please IM me
 Member
I recently encountered a similar issue with the throttle pedal bushings in my '98 M3.
I swapped in these nice late model 97+ Delrin bushings from Red Eye Garage:
https://redeyegarage.com/collections...pedal-bushings
97FLGST
Member
I honestly don't remember the brand of lift. It is at the shop of a good friend of mine.
- - - Updated - - -
Those look really nice.
- - - Updated - - -
Thanks Jason. I am planning on just trying to sell it all together at once.
- - - Updated - - -
I know the feeling. I think I have it already from what I've done on the car in the last 3 months. This is going to be a long thread.
Last edited by E85STI; 10-12-2021 at 10:33 PM.
Member
Before getting to the CSB I needed to address the passenger side window. The window would go down a bit but not back up without being pulled on at the same time and even then it felt like it was snagged on something. I figured the regulator popped out of the plastic sliding clip. Of course that was only a tiny part of the issue. The window was missing components as well. It seems like the previous owner had tried or had someone try to fix the window and gave up midway.
Let's start with getting the regulator and motor removed. As most of us know the regulator is secured with rivets. I didn't have much luck with drilling them out so I had to cut them out with a Dremel cutoff wheel. Always a fun time.
The regulator did pop out of the plastic clip because it had fallen apart in pieces.. The track was dry as a bone and all the grease had long turned hard like epoxy. I fully removed the window to attempt to scrape out lower metal tracks with all manner of tools to allow the plastic clip to slide without resistance.
In this pic you can see the track and a little something missing. The two L-shaped brackets that connects the bottom of the window to the track and also acts as the stop for the plastic slides were both missing. Not easy parts to get quickly. In comes the 95 to the rescue again. I cleaned the crud out of the window from top to bottom before putting it back in.
This is how the rear track should look with the L-shaped bracket in place and with the new clip and track greased.
Another snag, pun intended was the front felt/rubber window track or guide. With the window not being anchored in place it forced new grooves into the that strip so the window wouldn't go down correctly regardless of what I tried. This was all before I installed the regulator and motor. I just wanted to make sure it would glide smoothly which it did not. Another part I took from the 95.
The 95 guide.
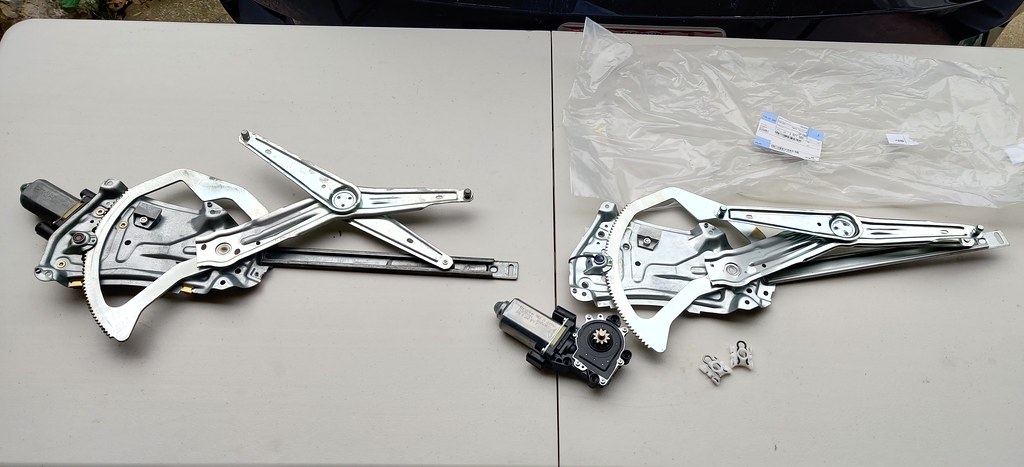
Now on to the regulator and motor. Should be straight forward... Nope. See if you can spot the issue in the pic below. Old setup on the left and new on the right.
Here is the issue up close. I ordered the passenger side motor, but received the drivers side.
Not the end of the earth, I just called them and had to purchase another one then send the DS motor back via an RMA and then get my refund. Quickest way to get the part. A few days later the exact same drivers side motor arrived that I got the first time around. So now I have two motors I don't neet and wasn't too happy about it to say the least. I called and someone helped me purchase another motor. So at this point I had purchased 3 motors. Three days later I finally received the correct motor. I guess the third time is the charm.
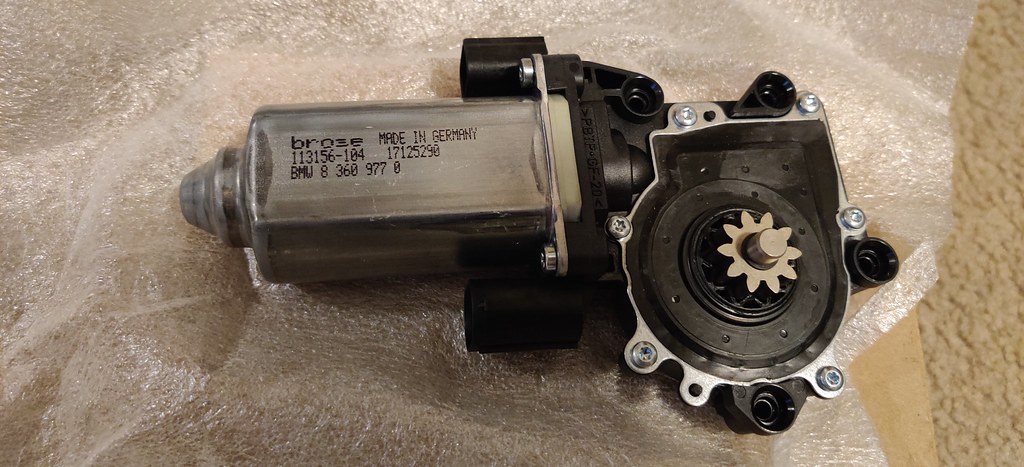
The correct motor!
[
Crap, how did this get here.
And finally after all that mess the windows was installed. I made all the tweaks and adjustments to get it to track straight and did the reset procedure to get the auto close and open correctly.
I won't be installing the door card until I clean it up and possibly reupholster it. But I purchased some nice aluminum brackets to replace the cheap brittle plastics that holds it to the door at the top. Got it from Turtlelaboratories.com
Parts ordered.
Window Motor Front Right Genuine BMW 67628360977
Genuine BMW Window Guide Slide 1 51321938884
Window Regulator - Front Right Genuine BMW 51331977580
BMW Door Panel Clip - OE Supplier 20 51418224781
BMW E36 COUPE DOOR PANEL REPAIR BRACKETS #N/A Turtlelaboratories
Last edited by E85STI; 10-12-2021 at 08:17 PM. Reason: For my horrific spelling and grammar errors!
Member
Now on to the CSB. I didn't get any pics of the center support bearing but here is a video showing the destruction of the rubber. No wonder the banging was so lound!
This is how little projects turn into big expensive ones. "Of course while I have everything apart I might as well replace this and that"
New CSB from BMW.
While I'm in there might as well replace the Guibo, bolts and nuts, as well as the drive shaft centering sleeve. New exhaust gaskets and header to exhaust pipe nuts. The old O2 sensor clips broke in half so I ordered those as well.
It's dirty in the pic but I took the UUC catback from my 95 and swapped it with the factory catback.
The new CSB installed and waiting to be bolted back in. With the proper preload of course.
It was over 100 degrees with the heat index so I didn't take many pics of this process or the end result unfortunately. Just wanted to get it over with. The exhaust and drive shaft have come out multiple times over the last 3 months so you will see more pics later in the process.
Center Support Bearing BMW OEM 26122227278
BMW Drive Shaft Flex Joint Kit SKU: KIT-26112226527KT
BMW Exhaust Seal Ring HJS-83122890
BMW Exhaust Seal Ring FIS-101048
BMW Exhaust Manifold Gasket FIS-669390
Header to exhaust pipe nuts Genuine BMW 18301737774
O2 Sensor cable clips 3 Genuine BMW 11787539016
UUC cat back Exhaust Kind of free from the 95 M3
Member
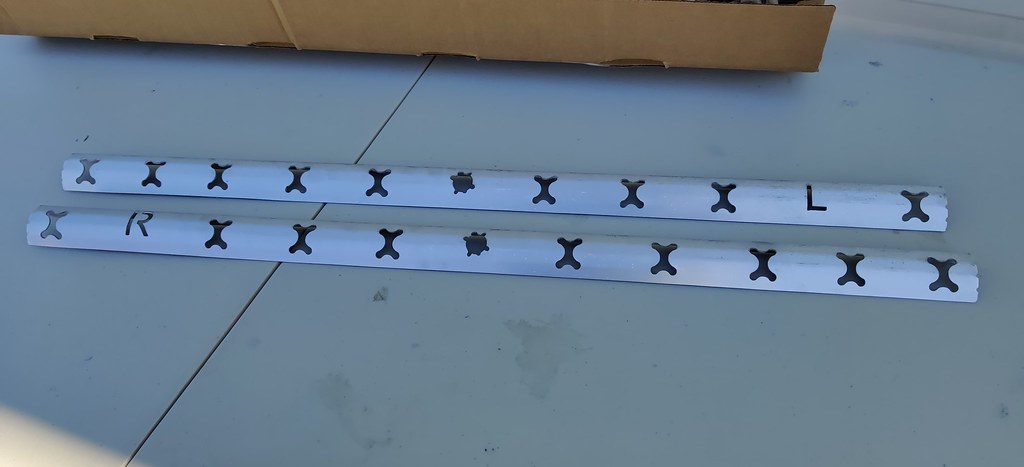
What's in the box? Something cool for sure.

Member
Next up was addressing the blown and leaking struts and shocks and crappy lowering springs. And of course while I am in there....
Here are some of the new parts.
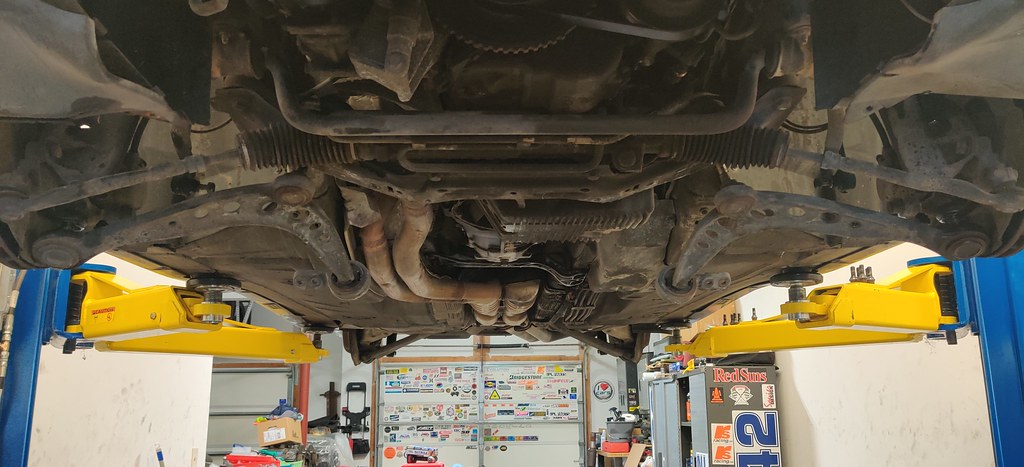
Thankfully my friend had some time for me to swing by and use his two post lift with the movable arms. The one I normally have access to is only a drive on style lift. Before getting to his house I decided to replace the missing jack pucks. I ordered some genuine BMW ones because I wasn't sure how crappy other alternatives would be.
While I was installing the KW V2 coilovers I also replaced the front ball joints. Rather than having to press them out and in, I just bought a pair of new genuine BMW units. It was so much easier and quicker, but in hindsight I probably should have saved the money and just had them pressed in.
Looking pretty on the lift.
Time to get these old blown out struts and shock and lowering springs removed!
The rear looking so much better.
Now on to the front.....
Time for the control arms and the Powerflex bushing set. I had another pair of the brackets that had old UUC offset poly bushings in them from my 95. I was able to easily pop those out and install the new centered bushings.
Then on to the front coilovers.
The old.
The new! I guess I forgot to take a pick after I installed the sway bar end link.
After putting the front wheels back on I realized very quickly that I had run into a major issue. I forgot to order spacers to move the wheel and tire away from the coilovers. The tire was literally touching the strut/spring. Some friends and I went to the auto parts store to look for spacers and were able to pick up some cheapo generic ones so that I could at least get my car home. However I also needed to get longer lug bolts and or a stud kit which was not going to be an easy task since it was Sunday afternoon.
We called around and drove to many different locations with no luck. Fortunately one of the guys that stopped by thought about a friend of his that owned a performance shop called Chicane but they are always closed on Sunday. The owner called him back and said one of his techs was there finishing up an engine rebuild for an up coming race so we could stop by and pick up a used kit that he had lying around which saved the day.
Now on my list of items to purchase as soon as possible is a good set of spacers and a longer stud kit. I keep putting it off since the car has been on a lift for months. What spacers do you all use for your coilovers and what thickness did you go with? I am thinking of going with a 10 or 12 up front that is hub centric so I can easily center the wheel. These were just flat crappy spacers and we spent a while trying to get the wheel centered. I should probably order spacers for the rear wheels as well so they don't look off compared to the front.
All the brakes and steering will be updated in a later post.
KW V2 with Adjustable Rebound Dampening KW-15220012
Bushing Set Powerflex (Front Lower) 09-7532-020-M1333
Front Right Control arm with ball joints OEM 31122228462
Front Left Control arm with ball joints OEM 31122228461
Strut Mount Front Right 31-33-2-227-898-M270
Strut Mount Front Left W0133-1611567-WPC
Cheapo Weell spacers
Used extended stud kit and lug nuts
Last edited by E85STI; 10-14-2021 at 07:50 PM.
Member
BMW CCA Member
I just got ST XTA Plus 3 coilovers and installed them two weeks ago.
I bought 12mm spacers for the front, 5mm spacers for the rear, and a stud conversion kit.
Got great parts, at a great price, from Motorsport Hardware:
https://motorsporthardware.com/
Ordered on Monday, and the parts arrived today!
-rb
Member
Great update! Question on control arms (as I will also be doing the ones on my 95 soon) - I've heard folks swapping in e30 arms saying they are the same part for much less money - any truth to this? For me I am thinking I will just press out / in new bushings.
Member
Thanks for the info on the spacers. Did the rear ones have a lip on them so you could still center the wheel easily?
- - - Updated - - -
I have heard the same thing about the e30 arms but I'm not 100 percent sure. On my 95 I just had a friend help me press them out with his huge hydraulic press, then press the new ones in. I would have used those but the geometry is different on the 95. Which sucks because they only had a few thousand miles on them before I started the engine tear down.
Member
BMW CCA Member
Spacers thinner than 10mm do not have a center hub section. The 5mm spacers still allow 8mm of the hub to extend beyond the face of the spacer (the center hub is 13mm on the rear hubs).
I also used this opportunity to convert from lug bolts to studs:
I took time to slowly and evenly tighten the nuts, making sure that the wheels were seating evenly against the spacers. I went for a short drive afterwards, and there were no vibrations from any of the four wheels.
-rb
Member
Thanks for the pics RB! This was very informative. I will get my new stud kits and spacers ordered!
Member
Haven't had a chance to update this thread yet. Yesterday I found water coming in the 3rd brake light on my Ram 1500 and I ended up pulling up the carpet to get the water out and to dry it all out. And of course replace the POS gasket that comes on it. It appears that this is a major issue with the Ram for the last 10 years.
Your mom goes to college
Put the ambers back on
98 Estoril ///M3 4/6
S54 swapCSL
Member
Amber and blue is a winning combo.
Member
I have them in one of the boxes of parts that I got with the car. The will be going back on later when I address the entire front end.
- - - Updated - - -
I agree.
 Posting Permissions


 Reply With Quote


Bookmarks