
 Member
Not really comparable, but maybe a worse situation than yours was.
25 or so years ago, I had fits finding why my belts were coming off, not on a BMW, but on my '66 Chevelle, 427 BBC-600 hp drag car, and on my '69 Chevy C-10, 355c.i.-350 hp daily driver/tow truck, simultaneously. Until I found the solution to either one throwing/shredding belts, I probably went thru 30 of them (including the 8-10 I later gave to friends, unused).
Serpentine conversions were very expensive back then, so I was stuck using V-belts w/o automatic tensioner systems. I tried tight, tighter, looser, and even made some bent-wire (stiff) guides to try to re-direct errant belts on both. I swapped out several alternators, water pumps, and even crank pulleys on both trying to keep from losing belts. Eventually, I was able to fix my problem(s).
On the BBC drag car, after buying a complete set of deep-groove pulleys (rare, and expensive), and trying several water pumps, and alternators, and still losing a belt on every trip downtrack (up to 7200 rpm), I ditched the alternator, mechanical water pump, and belts entirely, and that solved that problem. Using dual batteries, charging at 40amps back in the pits between rounds, and a 55gpm electric water pump became my solution. High rpms were defeating the V-belts, so they were eliminated.
On my '69 Chevy pickup, the problem left me stranded, at night, many miles from home, twice. The second time was 150 miles from home, after a race, about 3am. After I used three belts getting home (at 6am, due to be at work at 7am, 60 miles away), I was fed up, for the last time. After installing a third "high-performance" water pump (Milodon this time), I used a laser pointer a friend had, set up a magnetic holder to aim it precisely, and monitored all my pulleys (including the A/C), to see which one (or two) was the culprit. All had a bit of movement, but the brand new water pump's shaft was visibly moving in and out (no water leak though), just enough to start the belt out of the groove. It occurred at 3500-4000 rpm (I drove it hard, and it had 3.73 gears, so it saw those rpms frequently). I never retested the pumps, pulleys, and belt guides I had tried and removed before, but I traded my BBC deep groove pulleys for some small-block deep groove puleys, and installed a Stewart (I think) water pump, that was given to me by an engine builder friend. Problem solved.
God help me if my X5 gets a similar belt problem; I can no longer afford throwing so much money at cars anymore, being retired. And, my experience, mechanical ability, and like skills (shadetree mechanic/red-neck engineering) probably won't help me with the BMW. And the parts are so much more expensive.
Member
Thats quite a story, and one I can really appreciate. Its always something with these cars! Obviously Im hoping the new alternator pulley does the trick, but in the back of my head I wonder if there is a problem with the rebuilt LUK steering pump I installed. The Bentley instructions were straight forward: torque down the two main bolts, then screw down the knurl headed nut finger tight, then torque down the backer bolt. Its impossible to see with the motor in, but I may need to remove the stiffener plate to see if that unit is misaligned at all. Im considering getting a flexible fiber optic inspection tool for my android phone so I can better see stuff like this, diagnose leaks on my cars, etc.
Last edited by Henn28; 03-07-2022 at 03:45 PM.
Member
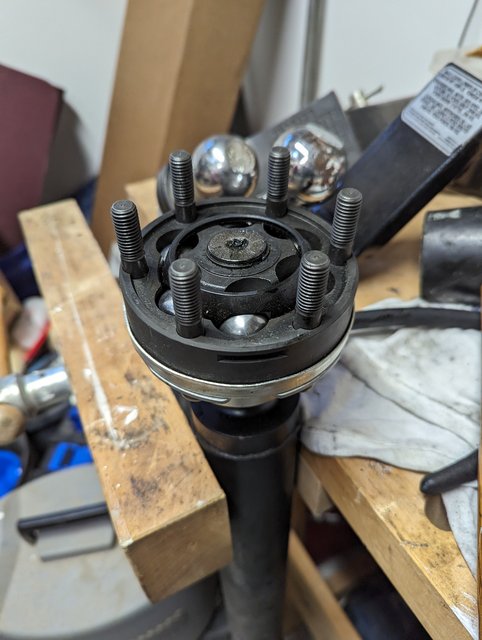
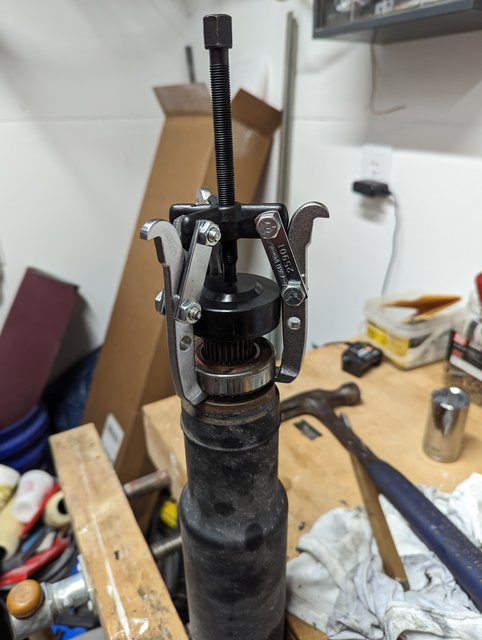
Pulled the fan, shroud and intake boot on Friday so I could go over the belt and pulleys with a fine toothed comb. All the pulleys looked good and the torques were good on the bolts holding them on, except for of the water pump pulley attachment bolts which had backed off a tiny bit (I witness marked almost every nut and bolt I installed on the motor). They are tiny M6s which don’t take a lot of torque, so I pulled them and reinstalled with some blue loctite. The real culprit I think which was causing odd wear patterns on the aft, upper edge of the belt was a loose nut holding the tensioner to the lever, which mounts to the block. The tensioner pulleys had lots of wiggle, so I torqued the nut with some loctite.
Buyer be ware I guess. I bought the full belt refresh kit from a common vendor and got the wrong belt (a 4.4) and poorly assembled parts. Nice.
fingers crossed. Drove it around town and to the airport on Friday and all seems well. It’s on the slightly frayed belt while I wait for a new 4.6 belt to show up
Member
A week in and the X is running strong. In fact my wife drove it to work yesterday and I didn't get any phone calls! Looks like the belt woes were a result of the wonky alternator pulley that somehow got out the door at FCP and the wobbly belt tensioner, caused by an improperly torqued nut connecting the pulley assembly to the tensioner (thanks BimmerWorld). In both cases a better mechanic would have caught these things on installation, but you definitely get what you pay for in my case. Over the past few weeks, while chasing down the belt issue the belt issues, the X has also gotten new stainless brake lines on all four corners, two remanufactured OE rear axles, new bump stops on for the rear hatch (new ones are have a spring function to soften the impact of closing, which is nice).
Finally some pics:
pulley with belt...
belt-pulley.jpg
Finished product, so far:
Cop-X5-finished.jpg
Swap in progress:
X-swap.jpg
too much floor stand and not enough engine hoist equals this....
X-swap-2.jpg
Fork lift to the rescue.
X-swap-3.jpg
Last edited by Henn28; 03-25-2022 at 10:25 AM.
Member
More pics:
Motor installed:
Attachment 702453
installed.jpg
Oil cooler back in and finally plumbed. I have added several hose clamps at the various turns where the lines snake through the facia, down the brake vent and up to the gulf filter housing. After I tackle a new headliner and a/b/c pillars in black, my goal is to fabricate an unobtrusive brush bar to protect the cooler and allow me to mount a couple vintage Hella lights a friend gave me. Although the CSF Boss cooler is a serious and very heavy duty piece, I worry about someone backing into it, etc. I think this cooler may be the best investment I made on this project as it likely saved my motor from melting down when it ate the main belt at the top of the Mississippi river bridge, where stopping would have gotten me killed by a truck. Full overheat on the guage by the time I had coasted down the other side of the bridge and off the next ramp (about 2 miles maybe). The gulf cooler thermostat is set to open above normal engine temp (221 deg or so, I think) and the inbound line to the cooler along with the first 1/3 of the cooler are always hot after I drive the car for a while. The other 2/3 of the cooler is warm at worst to ambient cool on the side opposite the lines...super efficient I think.
X-Oil-Cooler.jpg
Attachment 702454
A bit of a vanity project on the coil covers, but I had them painted grey to match the hood/roof with mat black letters. The pic isn't the greatest, but my buddy did a great job on them.
Attachment 702455
Covers installed, with new rubber gaskets so they actually fit well. They had been missing from the old motor for 15 years. Still a crazy cluttered engine bay, especially the way the coolant tank and various hoses aren't more inconspicuous, huge intake box and assorted intake plastic bits/tubes, vents, etc., and the absurdly large windshield washer reservoir. You can see the SAP valve I had to reinstall to get the code to go away at the top of the pic. Just need to find time to swap it out with a resistor.
covers-installed.jpg
Attachment 702456
I did spurge on a new fresh air intake cover as the upper and lower parts of mine have been slowly separating for years and no amount of epoxy could keep them together. Pretty cheap on Pelican, if I recall, probably because no one wants them!
New-Intake-cover.jpg
Next up is to have a new headliner and pillar re-cover job professionally done (swapping over to black from tan). I was hoping to do Alcantara but can't justify the cost at this point, especially since the 20 year old front seats desperately need to be re-bolstered and recovered in leather, which won't be cheap and I still need to complete the stereo upgrades with a new amp and speakers to go with the Kenwood unit I installed. I'm anxious to get rid of the maze of wires, line coverters, etc. needed to get the Kenwood to play with the OE amp. I'm working with BMW Fabric to find a quality black or charcoal grey fabric liner material.
Last edited by Henn28; 05-19-2022 at 11:09 AM.
Member
Awesome build! Much more thorough than the 1 I just started. picked up an excellent condition 04 3.0, poly spring+strut spacers and 245/75/17s. Mild weekend rig, 3.0 is much less HP but about as gas and go reliable you'll get with a BMW. I just moved back to Maine from New Orleans. Do you know about the Secret off road area on edge of 9th ward/Arabi? Few miles of mud, trails, bayou/pond, lots of us local to 9th ward ride our dirt bikes and trucks there
Member
I did not know of that area, I'll have to check it out. NOLA to Maine, that is a serious move, in every sense of the word! Our neighbors are moving to Portland for her job, and are finding the real estate market insane in Portland...I had to make sure we were talking about Portland ME when they told me they are priced out right now. They said all the Bostoners moved up there during the pandemic?
3.0 is a great motor for the X5, and lots more room to work. The manual tranny 3.0 is one of the most desirable of the E53 models, it seems. Not many of them made. I looked at a manual swap into my E53, but the torque of the 4.6 (or 4.4) is way above that of the manual gearbox they used in the E53 3.0. Not sure if they used a different transfer case either as I stopped researching when I saw the torque differences.
Been a while since I've update this thread, but aside form finally sorting out the belt issues its been very slow going as I've been trying to save some money for impending college expenses for Thing 2! However, I pulled all the plastic pieces/parts together, along with the headliner materials (thanks ASC Fabrics) to swap the headliner and A/B/C pillars over to black. I think it turned out very well and I'm glad I took the time to find all the pillars on ebay so the plastic bits would match and not be tan. Makes me really want to do the front seats now as they are completely worn and smashed down after 20 years of butts. I am thinking of BMW Uberkaro plaid or maybe houndstooth inserts and new tan leather. BMW still sells the lower seat foam/padding, which may be worth doing too since my goal is daily driver and comfort. The drivers seat especially isn't very comfortable any longer.
I took the opportunity while the shop had the headliner out to run RCA cables in the roof for part two of the sound system upgrade some day. Two jack cable ran down the right side roof for a powered sub that will reside in the right aft cubby and a four jack cable ran down the left side roof for the new amp that will sit in the left aft cubby. I plan on using the existing speaker wires that all terminate in the left aft cubby currently and adding components up front (no mid) and a two way speaker in the rear doors. Nothing cosmic, or too expensive, but it should sound a lot better. Right now Ive got a line output converter jammed behind the Kennwood receiver and the RCAs will allow me to delete that complexity.
original tan:
headliner-brown.jpg
headliner out:
headliner-2.jpg
new liner and pillars:
headliner-1.jpg
headliner-3.jpg
Last edited by Henn28; 05-19-2022 at 11:18 AM.
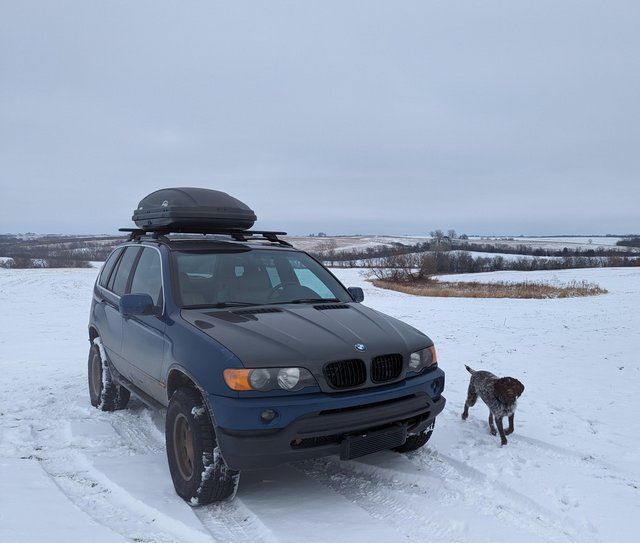
Current BMW
2002 E53 X5 4.6i (4.4 to 4.6 swap)
Former BMWs
1996 BMW Z3
1998 BMW E36 M3 Sedan
2004 BMW E46 M3
Member
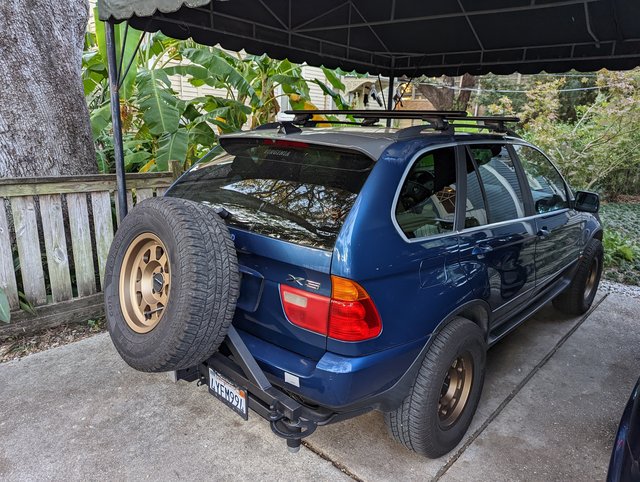
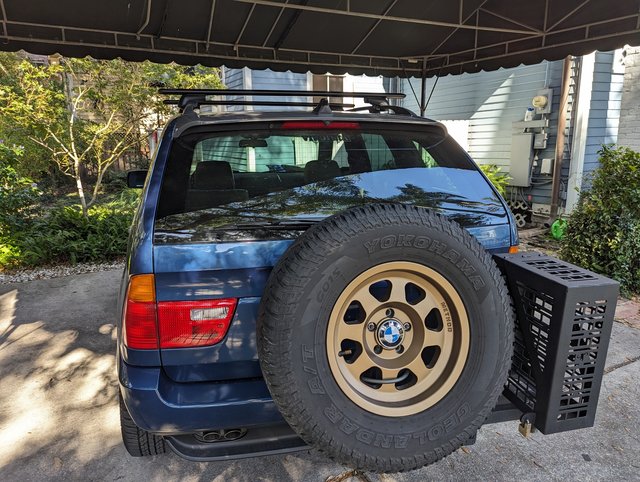
It’s been a while since I’ve updated thread. The 4.6 has around 2k on it and is running strong. The X5 is a beast with the motor in it and it’s way too fun not to occasionally show that to the random factory trucks or SUVs that get pushy at stop lights, etc. i try to be careful though as I’ve got the 4.6 hooked up to the 4.4 gearbox. I added a 6 Monkeys rear spare tire swing out carrier for a spare finally and have a bolt on jerry can container headed my way to help with peace of mind on longer drives. The MPG of the 4.6 sucks.
Beyond that though, really the only issue I’ve been fighting is a tendency for the car to crank for a long time, or think too hard about starting but generally only after it’s been running for a while then shut down for 30 min or longer. I think the fuel pressure is leaking down at the rail, but I have the older fuel filter in my x5, which i dont think has a check valve in it. I did put a new fuel pump (Delphi) in the car a few months ago, to no avail. I am fairly sure I have a leak in the vapor recovery system (occasional code), and I wonder if that will bleed pressure off the system on the delivery side?
Progress on the interior of late finally. After picking up two very nice comfort seats from a guy on Xoutpost who swapped a black interior into his 2006 e53, and shipping them to New Orleans last week, I spent the morning stripping them of plastic bits, controllers, etc. then I dropped them off at the excellent local upholstery shop that did my new headliner and pillars, along with the uberkaro fabric for the inserts and brand new seat bottom foam pieces that I finally tracked down after some effort. Since I’m not doing new leather on the center/insert sections he thinks I’ll only need one hide.
I ended up doing the right (non lazy) thing and swapping the (new) drivers seat in to my car just to make sure it would work. The donor’s car is a 2006 3.0 sport and cold wx package car so I was just a bit worried there would be problems, as mine is a 2002 e53 with stock comfort seats and no heat. Interestingly, while they seem to be “comfort” seats, the backs of his seats are several inches taller and they have heat, lumbar and adjustable head rests. Sport package maybe?
Hapiliy I can say that it all works great when plugged into my 2002 harness, which is a relief. The only thing I couldn’t test was the heat, but I’m hopeful that will work too as soon as the eBay console switch with heat buttons shows up and I sort out what relay and/or fuse(s) is are needed. I think there is a rear fuse block relay for heated back seats, according to the inter web, and I can see wires going up into the relay plug, but no relay is installed. I’m not finding a relay for front seat heat, but may be overlooking something or the fronts use the same relay as the rear seat.
Up next is some normal maintenance before a long drive to Iowa in a few weeks to bird hunt. I’ve got parts and fluids laying around for a front brake job, rear parking brake refresh, transmission fluid/filter change, and an oil change. It looks like the new motor will go through roughly a quart every 3k. But I’ll report back when I change it.
Last edited by Henn28; 11-05-2022 at 05:37 PM.
Current BMW
2002 E53 X5 4.6i (4.4 to 4.6 swap)
Former BMWs
1996 BMW Z3
1998 BMW E36 M3 Sedan
2004 BMW E46 M3
Member
The front brake job is complete, and aside from having to break out the angle grinder again and attack the back of the calipers, I like the TRW ceramic pads and zimmerman rotors. Aside from some powdery coating on them that needed to be burnt off (according to the instructions), I don't think the rotors are anything special. The pads seem to have good bite though. They definitely needed to be "bedded" in, much more than any other brake pads that I've ever used tho. I'm happy to report that the vibration on braking I was getting from 60 to 40ish MPH is gone, which is a relief since all the suspension arms and bushings in front are new with the motor swap. Frankly, I was a bit surprised that the brakes fixed it as it seemed like a classic control arm vibration and my fear was that the lift, wheels, etc. were simply overpowering the thrust/control arm bushings.
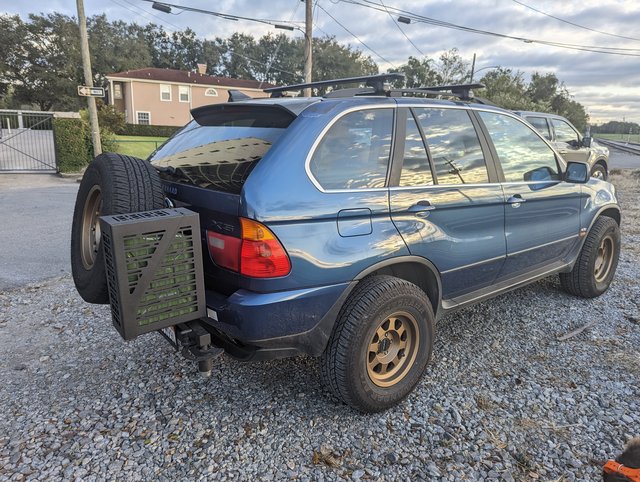
Bird season is here, so I needed to get off my butt and come up with a spare tire solution. I think the Geolander tires are tough but getting a flat in the middle of no-where would be pretty stupid, even for me. I decided on the 6 Monkeys receiver hitch swing out arm for a few reasons: the company's focus is on Jeep products and they get good reviews from that community, they were happy to work with me to add a few inches to the receiver and swing arm to clear the X5 bumper and tailgate/hatch, and I still have a long term goal of learning to weld and the 6 monkeys solution would be a great jumping off point to incorporate off the X5 bumper or other structure. It also has a receiver incorporated into it so I don't lose the ability to occasionally tow.
Given the crappy gas mileage that I'm getting with the 4.6 in the car now, I asked them to also design a locking jerry can carrier that attaches to the frame. I think they knocked it out of the park with the design. It holds a 20L jerry can (I specified a Wavian can, but it should work for most 20L cans) and locks on the bottom. This "aux tank" should give me a bit more peace of mind, to the tune of maybe 70 miles on the hwy. I had to buy an LED capable trailer plug (Curt 5704) to get the X5 to play nicely with the LED license plate light provided by 6 Monkeys. The light just blinked on/off every 3 or 4 seconds, which I assume is due to the pulsing the car uses to test that the bulbs are working. Unfortunately, short of going to an incandescent set-up, I can't see how I can hard-wire the light into the hitch wiring.
Next up is a transmission fluid and filter change, new e-brake pads and a new fuel venting system pump and filter to see if that will clear an occasional code in that system and help with the occasional starting issues I'm having. The pump and filter were cheap and I'm not against throwing parts at the car since its 20 years old. I'll have the rear wheels off anyway so pulling the fender liner on the right side to access the venting plumbing/parts shouldn't be a bit step...hopefully! I thought ahead and bought a bunch of the pop rivets and screws that will need to be replaced due to me breaking them during the job. Pressure seems to be leaking down at the rail after the car is shut down for a bit and I've put a new fuel pump in recently. My fuel filter is the old style that doesn't have an integrated check valve, so short of a leak in the venting system, so I'm at a bit of a loss. Fortunately, it isn't a show-stopper at all as I've taken to moving the key to run, taking a few second to strap in and then starting it.
On the "nice to have" list is fabricating a 3/4" ply floor in what used to be the spare tire well in the trunk. There is tons of room for storage back there, even with the rear air suspension compressor still in. I plan on somehow precisely cutting a piece of ply to fit around the compressor and cleanly into all four corners, adding support feet to keep it off the wiring and other important bits running over the floor of the car back there, covering the bottom with Dynamat on the bottom and maybe some sort of weatherproof membrane on the top. Best case is that I can eventually incorporate a locking function for the upper (carpeted) floor so that I can more securely store gear on trips.
Last edited by Henn28; 11-21-2022 at 09:29 AM.
Current BMW
2002 E53 X5 4.6i (4.4 to 4.6 swap)
Former BMWs
1996 BMW Z3
1998 BMW E36 M3 Sedan
2004 BMW E46 M3
Member
Time for an update, for the 3 other E53 guys on the board…although that may be generous! As always thanks to the (mostly) M62 E39 5 series guys who are ready with advice and knowledge when I get in over my head, or contemplate doing so.
the spare tire well floor went in a few weeks ago. My first choice would have been a 10 or 15 gal aux fuel tank, but since that isn't in the cards, I can definitely use the space for additional storage in the X when I've got my dogs in the back. I carry a Thule box on top, but more storage is always better.
My goal was to have a flat and stable floor that would protect all the wiring and air suspension plumbing. I opted to go with two pieces of finish ply, that I would later join together. The two halves were much easier to transfer all the cut-outs needed to clear the various bits and pieces sticking up in the spare tire hole. Once I got the initial dimensions correct and ply cut to match, it was simply trial and error...measure, cut a little test fit...rinse and repeat.
After getting a good fit, I joined the pieces together with some 2x4 material ripped to create a good base, front and back, cleaned the edges and applied some self adhesive weather stripping to any spots that could rub, bounce, etc. and make noise. I had some old exterior grade rug/mat material laying around so I trimmed it up to (almost) fit. Eventually I'll do something more permanent and a better fit, but I want to live with it a while and see what may need tweaking.
The air spring compressor takes a lot of room obviously, and eventually I'll go with springs perhaps, when it fails, but I do like the ride the air shocks in the back give and I can tweak my ride height (When INPA works for me, unlike now).
I'll live with it a while and then eventually make some brackets to secure the stuff I end up storing back there and traveling with so it doesn't rattle around. Things like the air compressor, tool kit, fluids, breaker bar and deep well socket I need to get my wheels off, platform for the factory jack so it will go high enough to get the wheels off, etc. Oh, and the custom sticks I use to secure the windows when the F-ing regulators/clips fail far from home.
After this job, I tackled the emergency brake pads and hardware. This went fine, except that those springs are tough to get on. A quick adjustment and the e-brake finally works as needed again. I was going to do a transmission drain and refill, with a new filter, but 1) the fluid looked fine and 2) I cannot find the filler port. Not kidding, and yes I feel dumb. I know where it should be, based on Bentley and YouTube, but it’s not there. I pulled a port that was in the same neighborhood and although it must go through into the body, there is a blockage that keeps my pump tip from seating. The drizzle of fluid that came out looked new and didn’t smell, so I decided this was a project for another day. I am going to snap a pic of the identification plate on the gearbox and make sure I got a BMW 5HP24 when I bought the remanufactured unit roughly 50k ago.
So last week I packed up and headed to Iowa to chase pheasant and quail with my mutts. 2000 miles round trip and aside from me sweating the load over temperatures. MAP cooling metrics and general integrity, she was a beast and ate those miles up, at a rate of maybe 16 MPG! We had the best luck I can recall in the field, for a few reason. Bird numbers were lower, as usual, but my dogs are hitting their prime, my buddies dogs are storm troopers (that’s what living in Iowa will do), and he is able to get us on lots of private land. Getting coffee in the morning at 23 degrees in Osceola:
I will say that a few times I blundered off the gravel roads into 35 deg dirt and mud and was reminded why x5s are cars, not serious off road vehicles with limited slip diffs! Xdrive is probably better, but ABS was working overtime trying to simulate anLSD, and not well. Luckily I was able to quickly back out before we needed to walk out.
My overall good feeling bubble was promptly burst when the day after getting home my X crapped the starter in the grocery store lot, with my wife. I tried to swap it out with a rebuilt unit I should have dropped in during the motor swap, but I needed to put it in the air a bit so I had it towed and dropped in my driveway. I did manage to swap it out without pulling the stiffener plate the next day and she’s back in top form. In reality, the starter was 20 years old so what are you going to do.
My “new seats” are still at rhe upholsterer waiting on the cow hide…still! Pics when they are done and installed.
Last edited by Henn28; 01-14-2023 at 06:51 PM.
Current BMW
2002 E53 X5 4.6i (4.4 to 4.6 swap)
Former BMWs
1996 BMW Z3
1998 BMW E36 M3 Sedan
2004 BMW E46 M3
Member
I’ve taken an interest in LSD options for the X5 since my open diff adventures, or mis-adventures on mud and slop in Iowa this past season. Options are few and far between, as you may imagine, but quaife does makes a model for the E53 rear diff. It’s not cheap, but neither is a wasted day stuck, or worse.
I’m not any sort of expert on these things, so I’ve been researching LSDs and AWD cars as much as possible. What I’ve learned can be summed up with “an LSD rear diff is better than nothing (nothing being two open diffs), but certainly won’t make an AWD car an off road machine”. Some guys say quaife (torsion) diffs are great, some say they are crap. Best I can tell is that with an LSD rear diff and open front diff, traction on slippery stuff will be better than that from two open diffs, until all traction is lost on one wheel, then the helical diff will open up too. However, I’ve read that the poor man’s LSD in the AWD vehicles (Simulated by ABS) will actuall work in in concert with the quaife/LSD and keep sending torque to the wheel(s) beyond when an open diff will.
Im basically looking for some added stability and peace of mind when I’m in more remote areas if I mistakenly get into some slippery stuff again. I fully get the limitations of the X5 and try to be very careful where I take it in the wet and cold. Given this, any learned opinions would be appreciated.
I think I’d buy the LSD and rebuild an eBay e53 rear diff to swap in, they are a dime a dozen and it would be a fun project regardless. That way I could toss my OE diff back in if it stinks or doesn’t play well with the car. Quaife claims there will be zero problems with the DSC logic and I think I understand that the LSD doesn’t affect the final drive ratio since it is bolted to the original ring gear, which is what determines final drive. I’d love to lower that a bit for better gas mileage, but I don’t think anyone makes different ratios for the e53 diff, especially the front diff.
Last edited by Henn28; 01-20-2023 at 07:28 PM.
Current BMW
2002 E53 X5 4.6i (4.4 to 4.6 swap)
Former BMWs
1996 BMW Z3
1998 BMW E36 M3 Sedan
2004 BMW E46 M3
Member
Long time since I've updated this thread, which isn't bad as it means my X5 has been relatively trouble free as a daily driver. A new starter was needed a last winter when the OE piece finally gave up the ghost in the grocery store lot, and then she did strand me in the New Orleans airport employee parking garage a few weeks ago with a dead battery.
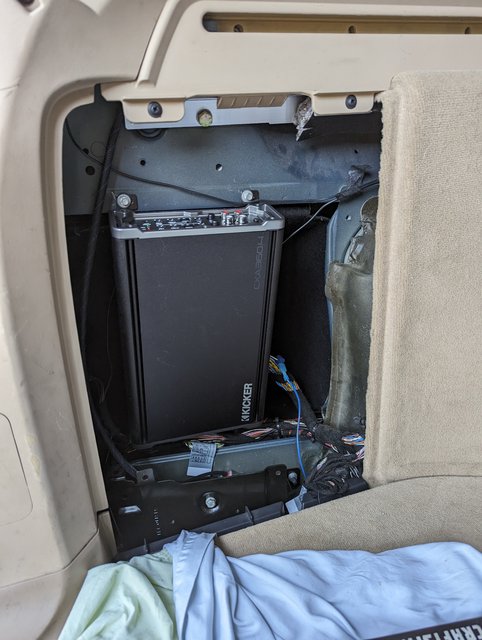
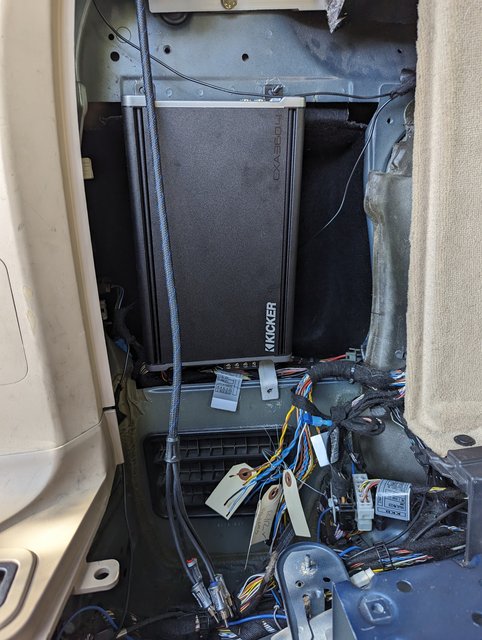
This morning I finally got around to sorting out how I am going to fit and mount the Kicker amp which will power some new Kicker speakers. This stuff is the "final" part of a sound system upgrade that has dragged on way too long.
My plan is to mount it in the left rear cubby and use the existing speaker wires to power two-ways in the rear door OE locations and components in the front door and pillar/side view mirror locations. I can delete the line output converter that is between the OE amp and the Kenwood head unit as I've previously run RCA cables across the roof when the head liner was out. One set is already in use for a powered sub in the left rear cubby.
Initially I was going to fit the new amp into the OE location but decided that mounting and wiring could be a pain with it stuffed down in that hole. I ended up with a vertical installation and drilled holes for temp sheet metal screws on the top (eventually will use bolts) and made a simple offset bracket for the bottom right corner which will be bolted into the sheet metal lip at that location. I'm hopeful three anchor points will be plenty as the bottom left corner could be a pain. If not, I'll fab another small bracket and install it when I pull the trunk apart to yank out the old amp. That hole should make a nice oil, ATF and other fluid storage spot with the OE amp out.
I've got the speakers installed (glued) into ebay enclosures and ready to install in the doors, with their leads soldered to the OE tabs so I can use the OE plugs hopefully. I am going to fix an airbag light while the door panels are off which may just mean figuring out how to better secure the plug to the front pax airbag. The shorting bar is OK I think, but the plug is so worn it backs off the airbag over time. I can't find this plug anywhere unfortunately. I also need to fix the "bracket" that secures the driver's side door card to the door, under the "SRS/Airbag" cover at shoulder level. The plastic bracket that the screw goes through exploded the last time I had the door off. I am going to try to come up with a block of plastic of the same dimensions which I can glue to the inside of the door and screw through.
I expect some drama with all the above, so I will wait until I've got several days off in a row before finishing it all.
Beyond some fuel vent system codes I need to throw some parts at, and a set of seats at the upholstery shop for way, way too long but may be finally on the horizon, my overland X5 is back to being my daily driver and would suck up endless money on upgrades and maintenance if I allowed it to. I plan on sourcing a used transfer case so I can do a leisurely full rebuild and install it when I've got time, and I am still considering a helical LSD swap for the rear or front diffs, or both. I am also trying to save some money to begin a rebuild of the M62TUB44 that came out of it. Once I find some M60B40 heads and get the motor into my new work shed I'll begin a thread for this project. My backup plan will be to use M62B44 heads since somewhat hotter cams are still made for these. Cat Cams makes a wide selection of performance cams for the B40 heads, but only OE and "sport" cams for the B44 heads. B40 heads are proving difficult to source however.
Last edited by Henn28; 09-27-2023 at 01:06 PM.
Current BMW
2002 E53 X5 4.6i (4.4 to 4.6 swap)
Former BMWs
1996 BMW Z3
1998 BMW E36 M3 Sedan
2004 BMW E46 M3
Member
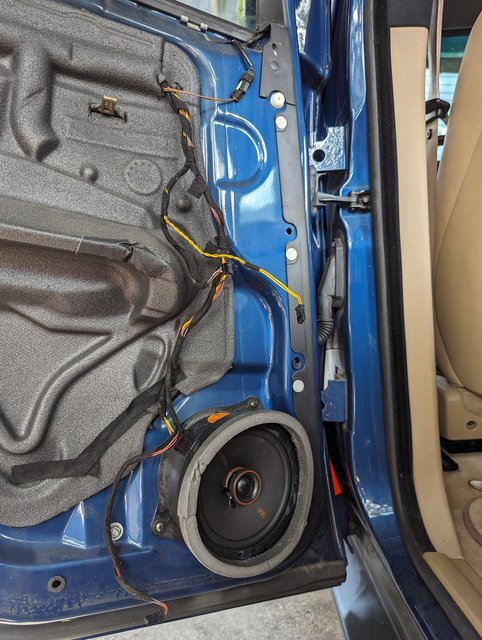
I began the amp and speaker installation today on the X. The basic plan is to use Oe speaker wires from a new Kicker 4 channel amp to drive Kicker two-way speakers in the OE rear door locations and components in the front door and pilar locations. Today was spent pulling the old amp and bracket, removing the rear door panels and speakers, installing the new rear speakers, sorting out the wiring to these rear speakers, and finalizing the amp location and mounting.
I did start with an easy win, a BMW roundel mounted over the Method center cap on my spare:
Then I pulled the left trunk cubby and trunk floor apart to get to the amp bracket and remove it, with the amp. The door cards were a pain, as usual and I'll be off to autozone tomorrow to load up on JB Weld. In a new twist, the right rear door pocket/ash tray came off, along with a number of previously unrepaired plastic brackets. Good times.
The speakers went in easy (I'd previously installed them into ebay enclosures) but I noticed the wire colors on each side were the same (Yellow and Brown). This dashed my cunning plan of simply tracing different colors back to the amp plug and splitting them off to attach to the new amp. Bentley to the rescue. The left rear is yellow and brown all the way to the amp, but the right rear is spliced somewhere and comes out a different color at the amp. Bentley was right on all but one of the front doors, but by that time the only two remaining similar gage wires in the amp plug were easy to spot. I labeled all of them and tested each speaker location with a flashlight battery to ensure I could hear a faint pop from each. This also served to check the polarity at the newly installed rear speakers as I could see them flex outward when the battery was attached to the speaker wires. I am using the factory plugs at the enclosures and bridged those to the speaker connections. End result:
Last up for today was to test mount the amplifier and drill the holes. I bought some rubber washers just to isolate it and keep any rattles, rubbing, etc. down, and will hit the holes I drilled with some primer and paint before the final installation. I left too much RCA cable in the back, but I wasn't sure how I was going to mount it. I know its going to be a stretch in the dash to the head unit, so I'm hopeful I can pull some of the extra from back to front. I may need to remove the front left A pillar to do this.
I'll get the rear door cards glued up tomorrow and pull the front cards to install the two way speakers. I also need to repair the front right airbag as the plug is so worn it backs off and triggers a light in the dash. I may end up pulling one of the rear door airbag plugs since these have never been turned on since we've owned the car.
In theory there isn't much to do in the dash except remove the line output converter and plug in the RCA cables. I also want to tap off the cigarette lighter wiring to make the head unit dim at night. I missed this on the initial install. Last but not least will be to pull the negative terminal on the battery and connect the amp to ground, power and the OE amp trigger. I'll take another swing at a phantom voltage test with my new multimeter and hopefully not brick this one up too.
- - - Updated - - -
.....Part Two/the next day......
Aside from having to come up with another bracket for the lower support of the amp (the one I made didn't work), the sound upgrade on my X5 is finally complete. It took way too long at the end of the day, mostly because I put off this last part for a while due to the fact that this sort of fiddly work isn't my strong suit. Its also been way too hot down here to work on the car outside until this month. Thanks to Chrystalworks on XOutpost for advice and pointers along the way. His upgrade as documented on a different site is fantastic.
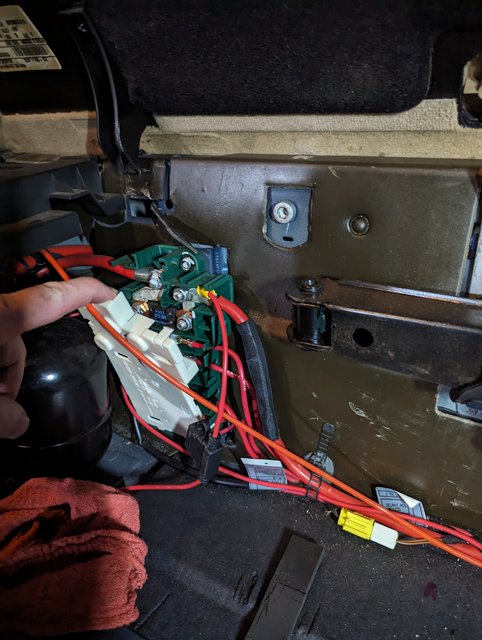
The amp connections were straigh forward. I grounded it to a convieneint ground point at the rear left of the car, under the floor (where the wire harnesses run left/right arcoss the from cubby to cubby. Like the sub I installed earlier, the power for the new amp comes from the fusible link box, near the left air spring compressor accumulator:
The amp wiring has its own fuse so I secured it to the left side of the top (FL1, 200 Amp) fuse, which comes directly from the battery. The trigger for the amp is the same as the powered sub, the original amp trigger which now goes directly to the new amp. Speaker wires were previously sorted out and tested for which speaker location they run to and polarity, since some of the wire colors change at some point in their runs to the speakers.
Next up was to pull the Kenwood receiver out and remove the line output converter which was needed to make it work with the OE amp. Then I did my best to simplify and square away the wiring mess I had simply shoved into the hole in the dashboard when I put the Kenwood in. There is still a ton of wiring as the receiver supports the backup cam, an added Sirius radio antenna, a GPS antenna, FM antenna, RCAs for sub and new speakers, the box that allows some of the steering wheel controls to work, grounds, etc.
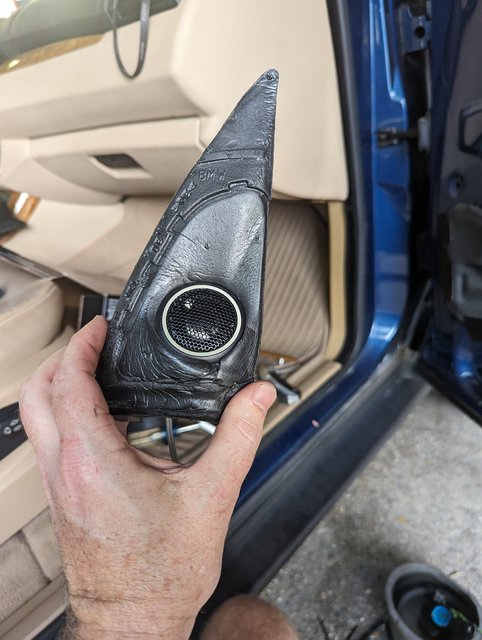
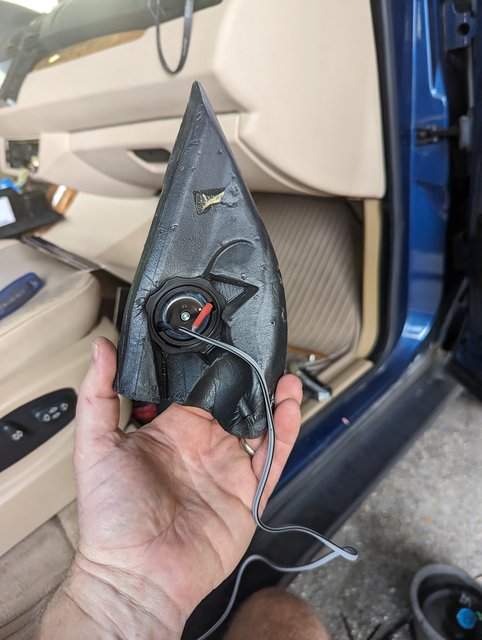
I was dreading pulling all four door panels again, and they didn't disappoint. Two tubes of JB Weld and some of the black weather strip sealant later and I had the new speakers installed in the OE locations, panels repaired as needed and the right front airbag plug swapped out with one from a rear door. My plan to put the tweeters in the side-view mirror posit hit a snag when I saw how the OE tweeters were mounted with a bracket that wouldn't work on the new tweeters (larger diameter), but then I realized that the new ones fit very securely into the triangular OE foam surrounds:
They even point in the OE direction towards the listener. Shockingly simple for the X5. I glued the foam pieces back onto the door frames and ran and spliced all the cables. I was stumped on where/how to mound the crossovers boxes in the front doors, and I was running out of time, so I ended up just wrapping them in packing foam and dropping them to the bottom of the door. This should work fine as they are wedged into the bottom and don't interfere with the window, but I'll probably try to raise them up a bit with two sided 3M tape the next time I'm in the door, just in case I develop a door leak.
I tested everything before putting all four door cards back on and am very happy with the results. Super crisp sound, way, way more base than the OE system, and zero distortion at levels far beyond what I'll listen to the system at. Running the android auto phone through the Kicker amp makes it sound much, much better to the person on the other end of the phone. For some reason the BMW amp didn't do a good job processing this signal.
At some point I need to re-jigger more wiring behind the receiver for a better fit, and eventually I'd like to come up with a better surround to go around it. The plastic piece from Crutchfield is clunky and cheap, to my eyes. I've wanted to learn how to work with veneer for some time, so may experiment in making a wooden surround at some point to match the X5 wood.
All in all, I would consider this upgrade a 7 or 8 on the PITA scale (out of 10). Nothing was overly complicated, just lots and lots of fiddly work that can't be rushed. I was smart enough for once to work out a detailed plan based on other's experiences and advice, and mostly stick to it. I also think using the existing speaker wires was the way for me to go, personally. Probably not the best option for someone looking for a really high-quality sound system upgrade, but I doubt I could personally tell the difference between the OE and new speaker wires. The thought of dragging new speaker wire throughout the car and out to the doors made me want to vomit. Running the RCA cables over head when I had the liner out last year worked out really well too. Zero interference from power cables, etc. this way.
Last edited by Henn28; 10-05-2023 at 11:32 AM.
Current BMW
2002 E53 X5 4.6i (4.4 to 4.6 swap)
Former BMWs
1996 BMW Z3
1998 BMW E36 M3 Sedan
2004 BMW E46 M3
Member
I still have my 4.4 from the x5 to rebuild, but I’m taking a small detour before starting on that project. Sort of a christening project for my new workshop. To that end, I’ve finally embarked on a slow motion LSD upgrade to my rear diff. I’ll post my progress here for the few X5 guy’s interested!
The backstory is that I’ve inadvertently gotten into some icy and muddy farm roads while bird hunting with the X5 that the DSC simulated LSD really struggled with. I’m very careful, especially when I’m in remote areas, but occasionally I have blundered onto a farm road that looked ok, but had me really worried that I was going to have to walk out. The X5 has 2 open diffs and like most modern cars uses the DSC to simulate a limited slip. Usually this works great, but it can get completely overwhelmed when in stuff it was likely not designed for, to be fair.
After lots of reading I decided to go with a quaife helical design for a few reasons. They make one that actually fits the E53 3.6 rear diff (a big plus), by all accounts it’s bullet proof, it has excellent highway and around town manners (unlike a true mechanical locker), is relatively quiet, and is plug and play…no adjusting, special lube, etc. The drawbacks are that it isn’t the best off road LSD design and will still loose traction if both wheels have little or no traction. However, this can be overcome, apparently, by tapping the brakes to simulate traction. Therefore they tend to work well with DSC systems as well. They put them in Army Humvees for years and instructed the army drivers in a tap the brakes technique to transfer torque and regain traction.
Since my X5 is a daily driver, I bought an EBay complete rear diff into which I will install the LSD, along with a full rebuild. I’ll swap it in when I’m done, or have my Indy do that bit. That way I can always swap the original diff back in if I don’t like it. To that end, I’ve been struggling to find part numbers for the bearings and some other bits and pieces. BMW wants to sell complete rebuilt diffs, not internal parts it would seem. However, the Quaife BMW distributor (Birds Automotive) in England was kind enough to drop the full parts list on me. Cut and paste below….I expect much of the below would work on the front diff too:
—————-
1x pinion seal (BMW part number 31507609535)
1x pinion crush tube (BMW 33121744368)
1x pinion securing plate (BMW 23211490120)
1x pinion bearing front (BMW 33121204312 or Timken HM88542/HM88510)
1x pinion bearing rear (Timken HM801349/HM801310)
2x output bearings (FAG F-801298). Or you can use a ball bearing style used on later models which is the same size (FAG F-234976)
And the last thing is 2x output seals but we supply those FOC with the Quaife.
We would normally order the pinion seal/tube/plate from BMW then order the bearings from someone like https://www.bearings-online.co.uk/
————————
I’ll post a write up when I get to this project. Hopeful before early January when I’ll be headed north again with my pups to chase birds.
Last edited by Henn28; 11-04-2023 at 04:58 PM.
Current BMW
2002 E53 X5 4.6i (4.4 to 4.6 swap)
Former BMWs
1996 BMW Z3
1998 BMW E36 M3 Sedan
2004 BMW E46 M3
Member
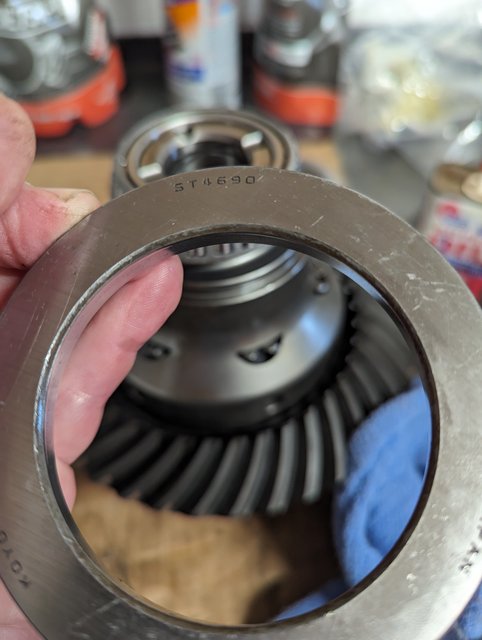
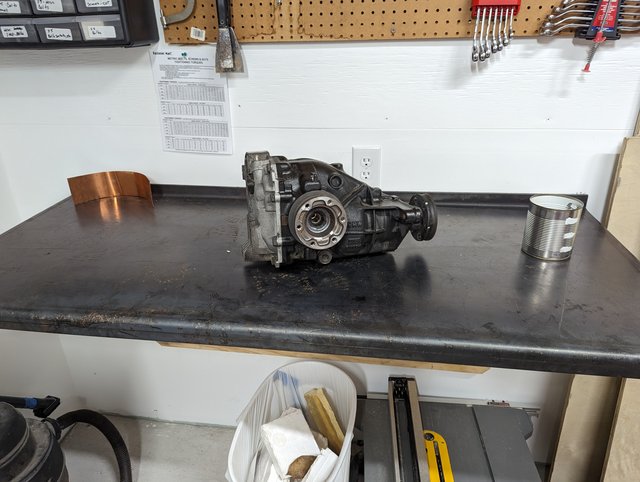
I finally got moving on putting an LSD into the rear diff of my E53. After some research and reading I opted for a Quaife LSD, which uses sets of helical gears in the carrier to seamlessly transfer torque to the side with more traction. Plusses are that its seamless in its operation, quiet on the highway, progressive and most of all, they make one to fit the E53 rear end....supposedly. Minuses are that if there is Zero traction, there is nothing to bias so the quaife will act like an open diff. However, they play well with DSC and traction control in the sense that the car will lock the brakes for a split second, which will then cause the quaife to transfer torque across the diff. I half expect something to show up that the ring gear won't fit on.
Since the X is my daily I bought an complete diff off of ebay to rebuild and am pretty happy that what showed up is in very good shape. It had obviously been rebuilt at least once, and fairly recently, and the oil was very clean with no debris in it. My initial plan is to not touch the pinion gear since it feels smooth when turned and the pinion gear looks like new. Those bearings are a pain to remove without a press, but should last for a long time if the diff is set up correctly. In fact, the output bearings too should last the life of the X5 generally, but new ones are needed for the new diff as they can't be removed and reused.
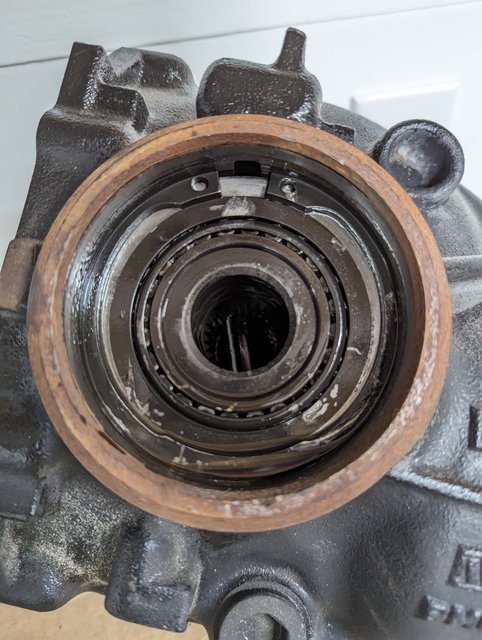
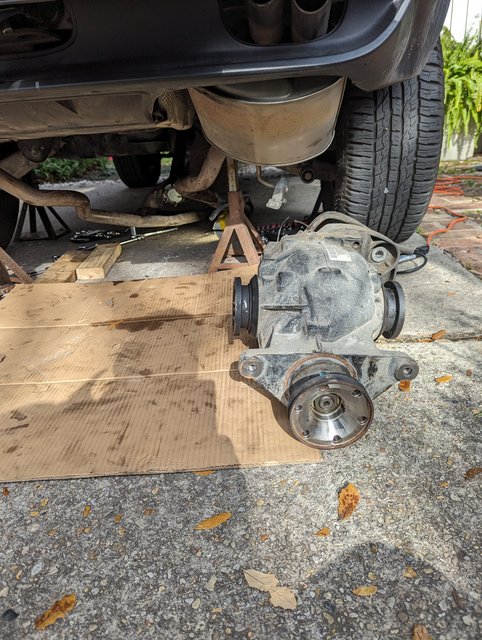
The stub axles pop out with a crowbar and the splines look factory fresh and the oil seals pop out too with long bar and some persuasion. Things came to a screeching halt then as I broke two snap ring pliers on the bearing retaining snap rings, which double as spacers. Northern tool came to the rescue with a larger (internal ring) tool and I wrestled them out today.
The output bearing races then simply fall out with the snap rings out, unlike the pinion races which need to be pressed or hammered out with a punch. With the races out the diff carrier can be eased out of the pumpkin, and disassembly is complete. These are 188K BMW "medium" diffs (no output flanges), so its a pretty simple job with the right size snap ring tool. I labeled the kept the races as I'll toss toss the diff carrier with its bearings in the parts pile, just in case...
As far as new parts, I have output bearings and races coming, and the Quaife will have new seals and clips for the stub axles (I think) with it when delivered this week. Quaife, and the shop I bought it from, claim that the same shims can be used without screwing up backlash, etc. so it is key not to mix the snap rings up before labeling them "L" and "R" with a sharpie. Assembly should be quick, in theory. I intend on testing backlash and how the gears are meshing with colored paste once I get it back together with the LSD.
Shim sets are available for these 90MM non flanged output cases, but hopefully I won't need to spring for it. Sadly, the output bearings are difficult and expensive to find. New ones are needed for the new diff carrier. The pinion bearings are much more common and less expensive.
Next up: get the impact out and hopefully the ring gear will play nicely when I try to remove it. I'll also do a deep clean of the pumpkin and cover while I wait for the quaife and bearings to arrive.
One other note, with the old rear diff out I was able to compare it to some pics of the front diff carrier I found on line. They are different in width it looks like, and the front ring gear is held on by 8 bolts while the rear has 10.
Presumably then the same quaife unit cant be used up front.
Last edited by Henn28; 11-12-2023 at 01:09 PM.
Current BMW
2002 E53 X5 4.6i (4.4 to 4.6 swap)
Former BMWs
1996 BMW Z3
1998 BMW E36 M3 Sedan
2004 BMW E46 M3
Member
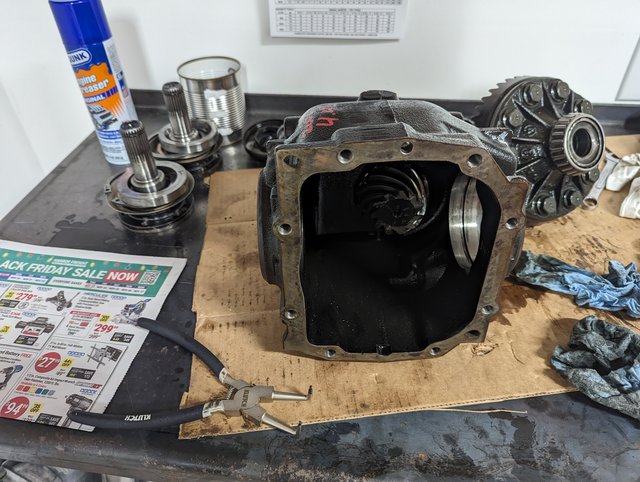
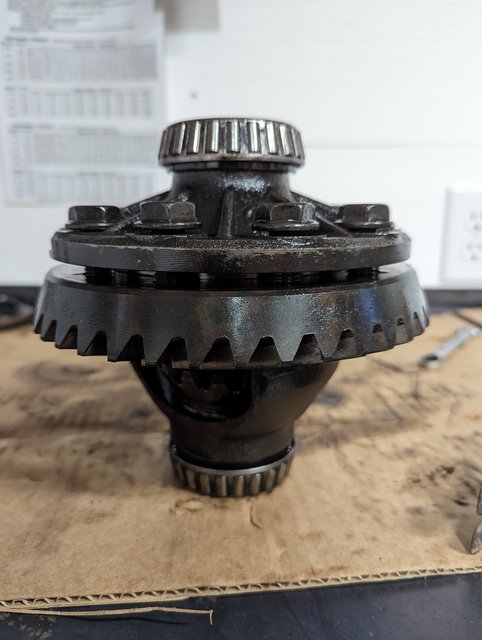
I finished breaking the diff down today and cleaning the pumpkin, ring gear and cover. It seems to have been recently painted, so I'm going to save myself the trouble and not shoot it with some spray paint.
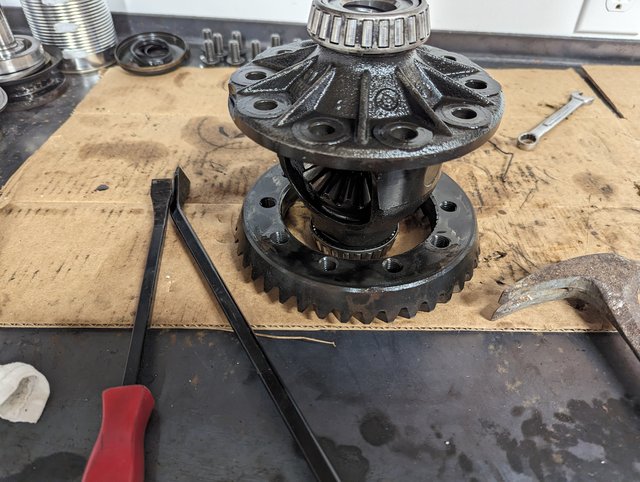
My cheap impact wrench made quick work of the 10 ring gear bolts. Once loose I threaded them in about 50% and very gently tapped with a hammer on opposite heads to start working the ring gear loose.
Once I had a bit of clearance, pry bars on either side popped the gear off. Neither the hammering or pry bar work took very much effort at all. The bolts are 12.9 grade so I think they could take some abuse. Fortunately working around the both heads with a gentle tap was all that was needed to start it working free.
Next up was a good clean with degreaser for the pumpkin, ring gear and cover. The oil was very clean when I drained what was remaining, but there was definitely build up on the inside of the case and cover. The pinion and ring gear look pristine to my untrained eye.
Finally, I put a 30mm socket on the pinion flange bolt and tested the pinion bearing preload with my super cheap craftsman beam wrench. From what I read 20 inch lbs is roughly what the pinion pre-load should read (running, versus break away torque which will be higher). I read about 2 ft/lbs, which equals about 24 inch lbs. I may drive the thing out to my indy and ask his opinion on how smoothly it is turning as it feels a bit rough noisy to me. I, however, don't have any idea what it should feel like. Its also likely full of degreaser now, despite my efforts to drain the whole thing, so I'll work some oil into the pinion shaft and see how it feels then.
The quaife diff is supposed to be delivered today and then I"m just waiting on the output bearings. I do need to find a roughly 50mm diameter something to drive the bearings onto the diff. The inner race from the old diff bearings would work great, but that would entail getting them off and that is a chore. An axle nut socket is just a hair too small unfortunately.
I should add that I bought the Quaife from Birds Auto in GB and the output bearings from Diffs Online. Both were willing to answer my questions and get me to the best solutions. The bearings in particular were a challenge to find for the x5 diff, but Diffs Online had two options, including the OE taper bearings that I ended up going with.
Last edited by Henn28; 11-13-2023 at 03:56 PM.
Current BMW
2002 E53 X5 4.6i (4.4 to 4.6 swap)
Former BMWs
1996 BMW Z3
1998 BMW E36 M3 Sedan
2004 BMW E46 M3
Member
Sorry for the stream of consciousness updates, but I figure if I don't do them as I chip away at this project, I wont do them at all.
To the eye the quaife is dimensionally the same as the OE. The crown ring is a very tight fit, and would not seat all the way on the flange when I tried with the ring cold.
The install was straight forward and per the instructions, which called for heating the ring to 100c in boiling water. Since I don't have compressed air to blow the threads out and avoid hydraulic lock, I stuck the thing in the oven at 230 degrees for an hour or so (after my better half left the house for work). After this all it took to get it to seat was some very light tapping with a rubber mallet. I then gave the bolts an initial torque, hand holding the diff, just to make sure it was seated on the flange as it cooled.
The instructions call for red loctite (or 271 permatex), an initial torque to 100 NM followed by an additional 30 degrees. There are two flat spots on the on the casting which work nicely for a vise to hold. 100NM was quick, then I marked the bolts, and the case at 30 degrees past the bolt mark (6 pointed bolt head makes it easy to estimate 30 deg. Plus, the red loctite should make up for any slight errors).
The final 30 degree torque was a pain and I'm happy I had my long wrench. I'm guessing a couple hundred FT LBs, and probably closer to 250 ish.
Finally assembly, with the quaife model number.
My cheap Amazon magnetic dial guage showed up, but I'm at a standstill until my output bearings, diff bushings, and pinion nut locking thingamajig show up (ebay diff showed up without one installed), and I get back from work early next week.
Last edited by Henn28; 11-14-2023 at 02:42 PM.
Current BMW
2002 E53 X5 4.6i (4.4 to 4.6 swap)
Former BMWs
1996 BMW Z3
1998 BMW E36 M3 Sedan
2004 BMW E46 M3
Member
Update is there is no update. Work intruded last week and this weekend, and I’m waiting on parts. My output bearings came in though and once installed this week I can assemble the diff and check the backlash and gear mesh. I also ordered some misc driveshaft parts like a new center bearing and a new CV joint. It will be much easier to get the rear half driveshaft off since the diff will be removed, and at 160k, a refresh is likely due.
Meanwhile, before leaving for work last week I spotted a decent size cooling puddle under the aft part of the stiffener. Looks like it’s coming through the bellhousing unfortunately. Fingers crossed it’s a heater or rear manifold hose connection loose and not the valley. I’m trying not to think about the rear cooling passage cover leaking.
Current BMW
2002 E53 X5 4.6i (4.4 to 4.6 swap)
Former BMWs
1996 BMW Z3
1998 BMW E36 M3 Sedan
2004 BMW E46 M3
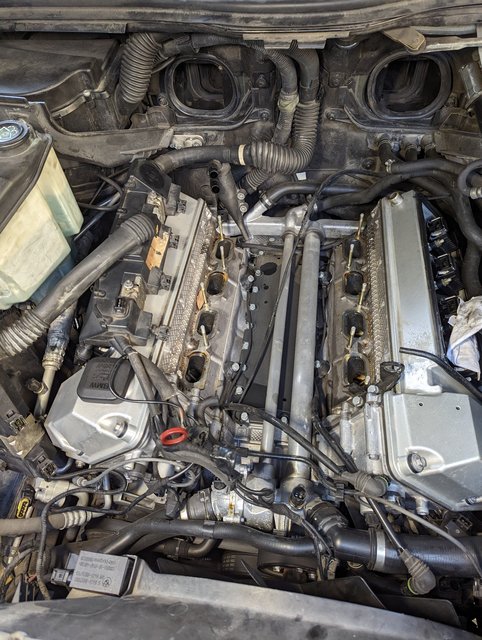
Member
Intake is off...took me about 1+45, and thats after shooting the $hit with my neighbor for 20 mins. Not something that I want to get good at, unfortunately. I reused the coolant pipes and got an eBay rear coolant manifold when I built the motor up, and I wonder if that course of action bit me, or did the motor simply spring a leak because it’s a BMW.
The leak appears to be from the large coolant pipe at the rear manifold. It wasn’t a simple hose leak, and it will be a PITA, but nothing compared to "door 3": the rear coolant cover. I was a bit concerned about this because the motor is so new I figured it could be anything, not just the usual suspects.
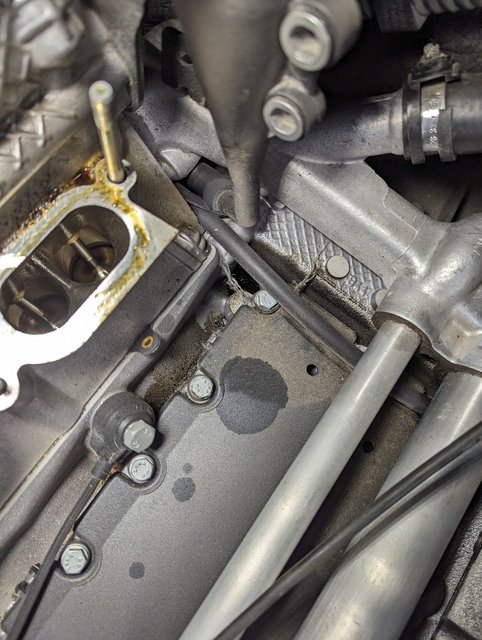
Sure enough, a mirror shows coolant dripping from under the large pipe, and the valley full to the weep-holes.
I cleaned up the valley mess and stuffed a rag under the pipe to see if I may also have a valley pan leak. That would be super unlucky, but it is a BMW and I'd rather do both jobs now than have to pull it apart again.
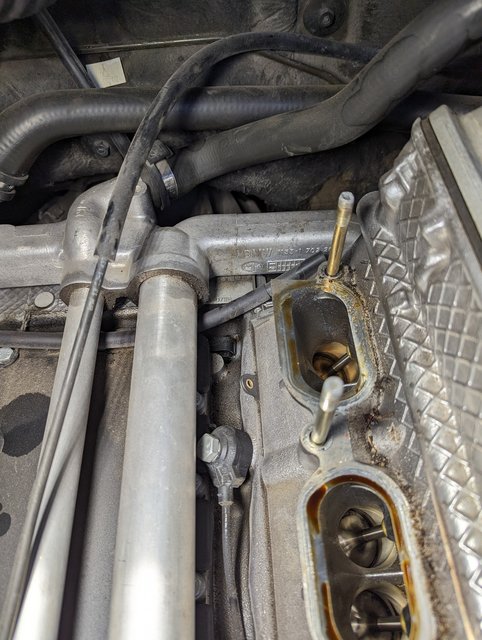
I noticed oil around several intake holes, and the small oil return line from the dinky plastic nipple on the breather valve was off. This was a huge pita to get attached while dropping the intake on, and clearly I didn't do a good job. I'm wondering if this would cause oil to be drawn into the intake. I'll pull the valve and look at it, and the intake. The car doesn't use very much oil at all however, so I'm a bit stumped about the oil under the intake gaskets.
I sprung for new pipes, o-rings and rear manifold gaskets. I think I'm going to pull the manifold and get the pipes out that way. I reused my old ones, and my old manifold on the new motor, and I'd like to check the manifold out. It didn't leak for close to 2 years however, so I suspect I just rolled or cracked an O-ring.
On a positive note, I took the Quaife diff down to the local steering shop and had the press the new output bearings on. Much easier than me banging on them with a hammer and a big socket. It’s ready to assemble and test for backlash and gear mesh. The FAG OE taper bearings have been replaced by a ball bearing design, but DiffsOnline had a set of taper bearings that will work. I know nothing about bearings, but the Quaife folks said tapered roller bearings last a lot longer than ball bearings in thier experience. The set on the eBay diff I bought look pristine.
Last edited by Henn28; 11-30-2023 at 08:18 AM.
Current BMW
2002 E53 X5 4.6i (4.4 to 4.6 swap)
Former BMWs
1996 BMW Z3
1998 BMW E36 M3 Sedan
2004 BMW E46 M3
Member
When I left for work last Friday it seemed that I had fixed the coolant pipe leak with a new pipe and O-rings all around, and a re-seal of the rear coolant manifold. The large pipe is available new so I went with that, but the small one is not any longer so I cleaned the old one up and used it again. My big problem was I was after putting it all back together again, including new Bosh coils/NGK plugs I kept getting multiple misfires on several cylinders, which eventually settled down to just a misfire code on number 1, and the motor was definitely missing. Swapping the coils 1 and 5 didn't change the location code.
Back from work last night and after checking under the car (dry, happily) I went to limp the car onto the road for the tow to my Indy shop and she fired right up and ran strong. I drove it around for 30 minutes, cleared the codes and the motor sounded strong and no codes returned (except for the occasional right front door airbag code and light I've been fighting for a few years). My fear was that I broke a wire in the harness when I peeled it off the motor and laid it off to the right side of the engine bay. The insulation and wires are quite brittle at this point. But now my working theory is that I got water into the harness boxes and or other critical point(s) during a heavy rainstorm last week while the motor was apart. The cowl was off and I found some water in the valley the next morning and despite a thorough towel dry, shop vac vacuum and a final compressed air blow out, I suspect some had worked into the in the harness. The past three days have apparently been very dry while I've been traveling.
She's still headed out to my indy today under her own power since I have an appointment I don't want to waste. In her near future are new Bilstein B4 struts, strut bearings, etc. to replace the OE struts that are shot, a vacuum bleed of the coolant system, a new throttle plug wired in, maybe the new LSD diff installed if I can get it together while the car is with him, and I'll get him to put all the ridiculously challenging injector clips on. I found all 8 of mine on backwards when I put the harness back on. I reused my OE harness when I did the motor swap and didn't notice they were installed backwards. The new motor ran great for 2 years, but clearly the plugs were not 100% seated.
In other news, the LSD swap came to a halt because the new diff wouldn't fit in the housing with the OE snap ring shims. I suspect the taper bearings I bought are ever so slightly different. I am new to working on diffs, but I've learned that the shim tolerances are measured in tenths and even hundredths of MMs. Fortunately I found a package of 10, 188K "medium" diff snap ring shims from Racing Diffs (in Serbia I think) that run incrementally from 3 to 4 mm and which will arrive tomorrow. Hopefully some combo of these shims will give the proper backlash. The OE shims will fit but are way too tight and jam the crown gear against the pinion, not allowing the diff to turn at all. My OE snap ring shims are marked 3.64 on the left and 4.0 on the right. I suspect I need maybe a 3.5 or 3.4 on the left side.
If I can get the thing together, and with the proper backlash while my indy still has the X5 this week, I'll take it out to him to install along with the new driveshaft CV joint I bought and center bearing. I've been getting a definite 'ping' sound when I select drive and reverse which could be quite a few things, but I'm hopeful that the new diff, center bearing and CV joint will take care of it.
Current BMW
2002 E53 X5 4.6i (4.4 to 4.6 swap)
Former BMWs
1996 BMW Z3
1998 BMW E36 M3 Sedan
2004 BMW E46 M3
Member
The X5 has stayed leak and misfire free this past week so shes at the shop for a full front strut refresh, a vacuum bleed of the coolant system, some ride height tweaks with INPA (my version stopped working on my laptop), and correctly installed injector clips which my Indy says he can get on without pulling the harness…again. Unfortunately my diff shims from RacingDiffs hadn’t shown up in time for me to finish that job and toss it in the car, with the new bushings for him to install before I dropped it off. I don’t have easy access to a bushing tool so would have liked him to do that part.
The shims arrived all the way from Serbia on Thursday evening so yesterday I got to work. 10 snap ring shims from 3 to 4 mm, in .1mm increments.
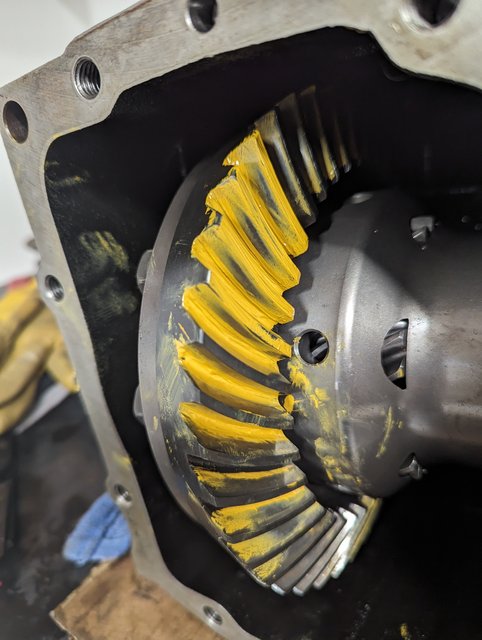
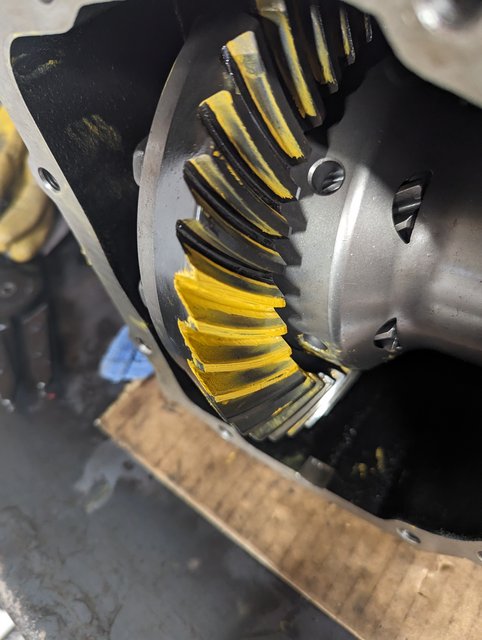
The OE left shim (that locked the new diff up) was 3.6, so I went with the 3.4 on that side, and the OE 3.8 shim on the right. The fact that the diff would at least turn told me I was on the right track. The gear mesh pattern told me that the diff needed to shift to the right however…the drive side was too far to the heal side of the crown, and the coast was not engaged very much, and was too far to the toe side:
3.5 mm shim for the left and 3.7 for the right gave me what to my amateur eye looks like an OK mesh pattern…a tiny bit off, but I decided to stick with it due to fact that the shims were gettingdifficult to get in (and out if needed) with a race driver and punch as needed:
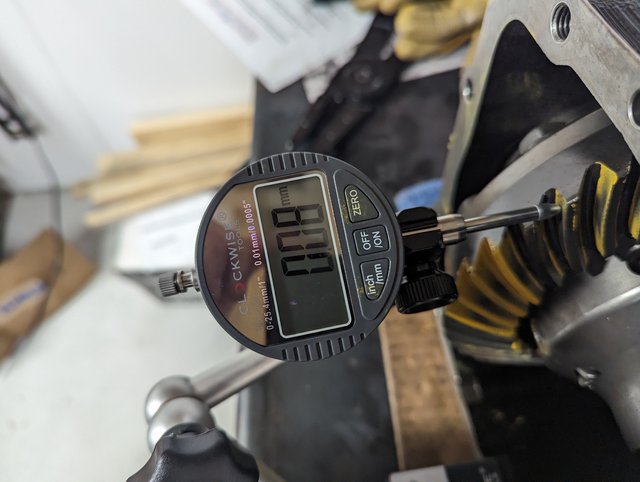
Next came the backlash measurement which came in right at .08mm, which is right in the acceptable range according to Quaife.
I may fiddle around with the backlash measure technique a bit more next week as I’m not 100% sure I have it right. A few more YouTube videos will get me squared away!
Next I gave the bearings, housing, etc a good clean and popped some OE BMW seals in each side with no drama. New circlips on the stub axles and in went the left side reasonably easy. The OE stub axles are a tight fit in the Quaife, but some antiseize in the bore and gear oil on the axle splines helped. A rubber mallet was needed to get it to bottom out in the inner grove.
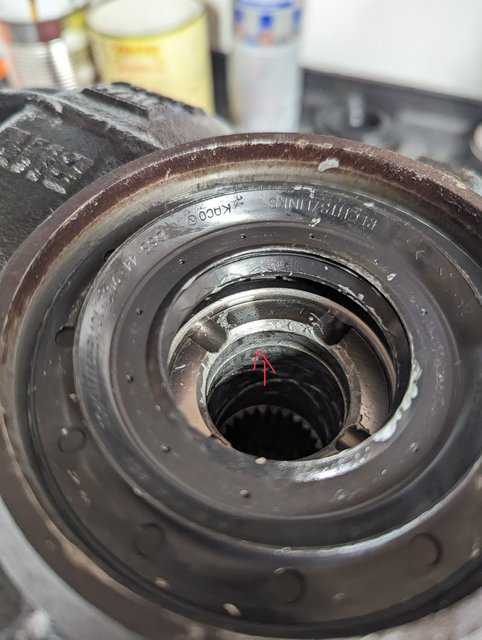
The right sided however was real PITA. The Quaife has a grove milled into its output stub axle bore on the right side that kept catching the retaining clip on the stub axle and freezing it. I could not get the stub axle past this point and into the splined section of the Quaife. I finally had to pop it back out with a punch from the other side, which broke the snap ring. After locating the two pieces I put the original snap ring back on the axle stub and was able to work it past this point and down into the splined section and finally bottom it out with a rubber mallet.
The pic below shows the grove(arrow) which grabbed the snap ring on the output stub axle. The old snap ring was happily a bit more squashed and worn I guess:
All in all not a terrible project, so far. The Quaife was no where near correct with the OE shims, which could be the Quaife, or more likely is due to the new taper bearings being slightly different dimensions than the OE FAG units (which aren’t available any longer). The Quaife seems like a really tightly machined piece of gear.
The 188k medium differential is a pain in the sense that it uses snap ring shim rather than bolt on flanges with shims. They are not readily available, are a pain to work with ( broke 2 snap ring tools) and need some hammer and punch persuasion to get seated. Getting them out, with the preload on the bearings, for adjustments sucks too. The old races from the oe bearings were very helpful as spacers, something to tap on so I wasn’t tapping on the new races to get them in, and to get the output seals in.
Next up is to get it in the car. Time will tell if my decision not to pull the pinion was a good one. I will have a spare Diff though if I need to revisit something on the Quaife diff after it is in. Buyng the eBay diff for the Quaife was a good decision I think as I could take my time building it up, waiting for parts, etc. and I have a spare now in case something goes south due to my handiwork.
Take everything above with a grain of salt, or 10. Nothing on this project was cosmic, but I relied on YouTube, Quaife’s instructions and forum reading. Bentley says nothing about rebuilding a diff unfortunately. I was amazed at how the diff is really not even as advanced as refrigerator technology, but the tolerances involved are very, very small. I found a caliper an essential tool for the job, and a dial indicator is obviously needed for the backlash measurement. The caliper was very handy for ensuring the output races were going into the bores evenly, and where corrective tapping was needed. Beyond that a race a seal driver kit, long punch or drift and a good torque wrench for the crown gear bolts were needed.
Last edited by Henn28; 12-17-2023 at 12:40 PM.
Current BMW
2002 E53 X5 4.6i (4.4 to 4.6 swap)
Former BMWs
1996 BMW Z3
1998 BMW E36 M3 Sedan
2004 BMW E46 M3
Member
Brief update: I re read the Quaife installation instructions, did some more YouTube research, and emailed the Racing Diffs experts directly about backlash measurement and the fact that the diff with the Quaife in it has a very small amount of rotstional play (less than a mm) in the input flange (pinion).
The upshot of the above is that the output bearings are preloaded such that testing backlash takes a bit more leverage than just pushing on a crown gear tooth with a finger as I had done. Seems silly now, but there is some drag on the diff carrier and once I applied some additional force on it I got a backlash reading of .14mm. Quaife says that .08 to .14 is within spec, and up to .2 can be acceptable depending on your application.
The Racing Diffs Guru said that the minor lash in the pinion at the input flange isn’t a worry, as long as the backlash and pinion preload checks good.
so I’m happy with the “new” diff it as it sits in my work shed on Christmas Eve. The X5 is back from the shop with new front struts and all the misc bits that go along with that job. I still have a slight “clunk” from the right front over bumps, which I had hoped the struts would fix. I’ll check the torques on the sway bar links, and everything else up there, but I suspect I’ve got a bushing that is going.
Next up is to install the new diff, along with a center bearing and a new driveshaft cv joint. Might as well, since getting the drive shaft out will be easier with the diff out first. Seems like lift work, but I’d rather do it in my driveway frankly. I have access to two lifts, but neither are convenient in my lazy estimation. I will see what auto zone has for rent regarding bushing tools, and hope something will work on the diff bushings.
Current BMW
2002 E53 X5 4.6i (4.4 to 4.6 swap)
Former BMWs
1996 BMW Z3
1998 BMW E36 M3 Sedan
2004 BMW E46 M3
Member
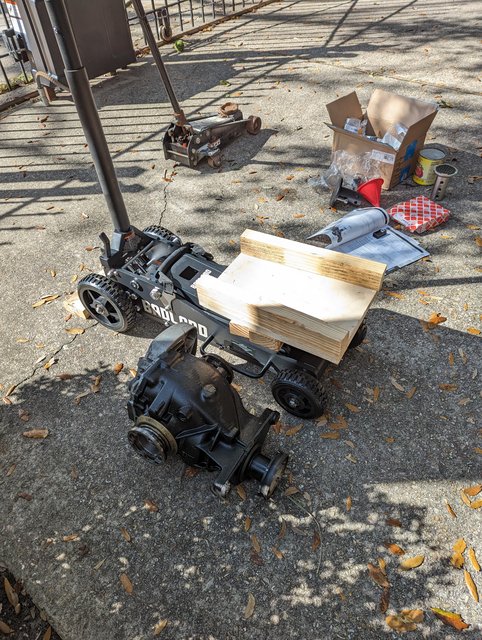
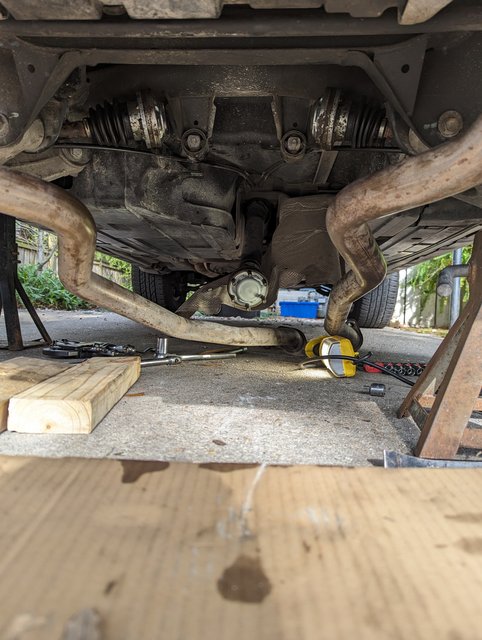
Diff install took two days of driveway work. A lift would have made things a lot easier but I wasn't sure I could get it done during my days off and didn't want to get the car stuck on the lift I share.
I put the rear of the car up on jack stands and left the wheels on. There are times when you need to keep the wheels from turning so either the parking brake, or be ready to let the car down a bit onto the pavement, then back up when you need to turn the wheels. The parking brake worked for me most of the time, but some of the fasteners need a lot of torque to loosen and then re-torque at the end. Two floor jacks are nice as the axles pop much more easily into the output flanges if the rear suspension isn't fully extended. Or you could lower the car a bit onto the ground.
- drop the exhaust from the resonator back. I didn't do this at first, but eventually caved in and did it. Should have done it earlier and removed it fully. As it was I just let it swing down, which helped a bit.
-Undo the heat shield back tot he resonator and bend it down.
- Undo the driveshaft CV joint bolts from the diff input flange. A ratchet wont fit unfortunately so Its tedious and the driveshaft must be held with a pry bar, the parking brake, or put the wheels on the ground.
- Undo the torx head bolts that hold the axle to the diff output flanges. These are a pain and can only be reached when the bolts are at certain clock positions due to the rubber boot, etc. Do one or two, then turn the wheels, lock them with the parking brake, rinse and repeat. I bought 6 new ones just in case some of them were too mangled to reuse. The torx heads can get nasty after repeated use. There are six per axle. The axles can then be levered free of the flanges and tucked up by the parking brake cables.
- Get a jack into position and support the diff, then remove the 3 bolts. They are torqued to 122 ft/lbs, so they are a pain on your back. The diff is now free and will drop down on the jack.
I made a jig out of wood to help support it. Not super necessary to remove as gravity is quite helpful, but it was a huge help installing the new diff.
Diff finally out of the car....this took most of a day, but as these things go I could probably drop it again in several hours.
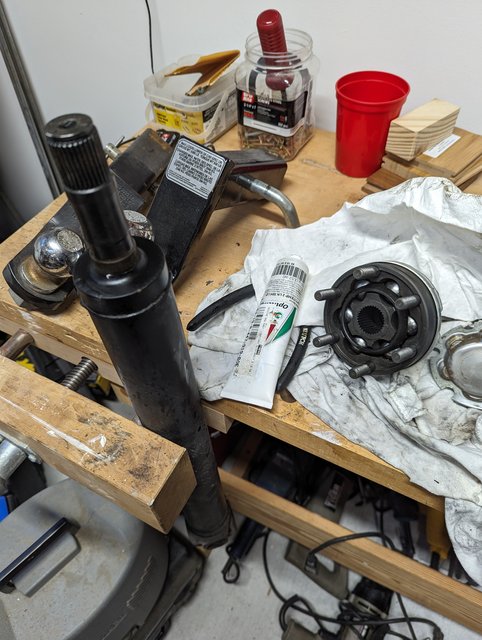
Next came the driveshaft as I needed to replace the CV joint and the center bearing. Its a straight forward exercise with the diff out. Way easier than with the diff in. Three bolts at the guibo (t-case end) and two holding the bearing up and it drops out.
The bolt holding the two halves together is a pain as the 18mm (I recall, maybe) wrench will only turn a few mm at a time inside the U joint. As the bolt comes out, keep knocking on the driveshaft flange (tcase side) with a hammer to separate the two halves and pull the bolt back in so the wrench will continue to fit. Slow, but it it will eventually come out. Mine was on insanely tight, but I recall it only needs to have 50 something ftlbs on it.
The CV joint comes off with a few taps of a rubber mallet after the circlip is removed. Note, I chose to reuse the metal cover, but getting it off was a pain. A new one is cheap and buying one would have saved me some time trying to get the old one off without too many bends where I pried with the pick, screwdriver, etc.
I cleaned the splines, put a little grease on them and tapped the new CV joint on with a big socket. Then the circlip went on and I packed it full of the special grease BMW calls for. Keep working the joint up and down, in and out, etc. and work as much grease in as possible. Then clean up the flange where the gasket goes and set the cover back in. I held it on with the two of the old nuts for the installation.
Next came the driveshaft center bearing. The rubber was mostly intact, but really dry and brittle. A mat knife cut must of the rubber off, to allow my three leg puller to pull the rest of the rubber off the actual bearing. The puller popped the bearing off easily after that.
The new one went on easily tapping with an appropriately sized socket.
After this it all went back in...driveshaft first, supported by wire at the cv joint, then the diff on the jig, slowly went up and I slide the cv bolts and axles home as it went into place. The axles needed to be unflexed a bit with floor jacks under the rear suspension. For all these parts as I popped two fasteners in as the parts connected, just to hold the mess together.
Then the diff went all the way up and I slide the front bolts in and caught a few threads. Then the back bolt and nut finally. After that it was just tedious reassembly, tightening, refastening and final torques. I witness marked everything so I can keep an eye on it all to make sure it stays torqued.
So far so good. The drivetrain is noticeably more quiet and has less vibration, and the loud "ping" I've had for two years when selecting reverse or drive is gong. Time will tell how the Quaife performs in bad weather, etc.
Current BMW
2002 E53 X5 4.6i (4.4 to 4.6 swap)
Former BMWs
1996 BMW Z3
1998 BMW E36 M3 Sedan
2004 BMW E46 M3
Member
I’m hunting in Iowa and gaining more confidence slowly with the X5 on roads I wouldn’t have taken up here before the Quaife diff was in. I’m still not, and won’t go down anything really greasy, but it’s 25 degrees so things are pretty solid. Under the snow and a bit of mud late-day if the sun is out.
I chickened out on one approach to this field and went all the way around to the other side as the road from that direction didn’t descend through a deep drainage wash. I did head out thru the wash and the x5 blasted right up the snowy hill. The rear end wont come out any more. It will start but the Quaife pulls it back in after a split second as it transfers torque. Occasionally I can feel the DSC working too and it seems to be playing nicely with the Quaife, as advertised.
I picked up an odd whistling sound when the car is cold, and only at certain RPMs…my anxiety tells me it’s an output bearings, or cv, etc., but frankly it could be anything, just car noises from a car that only sees the real cold once a year. It actually sounds a bit like alternator whine thru the stereo, but why now!?
Last edited by Henn28; 01-08-2024 at 08:06 AM.
Current BMW
2002 E53 X5 4.6i (4.4 to 4.6 swap)
Former BMWs
1996 BMW Z3
1998 BMW E36 M3 Sedan
2004 BMW E46 M3
Member
Loving your build man! I have an E53 X5 which I'm looking to lift and get some beefy tires like yours! I realize you have a bigger engine, but how bad did the gas mileage drop after you installed those wheels?
 Posting Permissions


 Reply With Quote
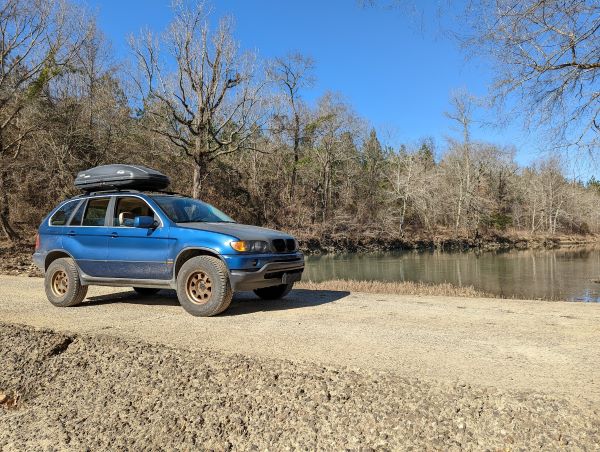


Bookmarks