
 Member
This story starts like any turbo build. You get bored with your car and you need a new project like you need a hole in your head.
A quick shoutout to the Bf.c FI community. Ive learned tons about turbo M5xs since December. A lot of my inspiration came from reading someguys build thread as youll see.
A quick background:
I bought my e30 in July of 2016. At that point the M50 had been in the car for quite a few years and had proven itself reliable. It came with a G240 and a 2.93 LSD, was sitting on Bilstein HDs with the worlds softest springs (Bavauto). I replaced the Bilsteins with a set of BC coilovers that I got a really good deal on and replaced the G240 with a G260 and put a 3.73 LSD in. That was a tremendous move in the right direction. I eventually ended up replaced all the bushings front and rear. Factory rubber trailing arm and subframe bushings, poly diff bushing, and treehouse style front control arm bushings. I threw a e46 rack in and added RX7 front calipers.
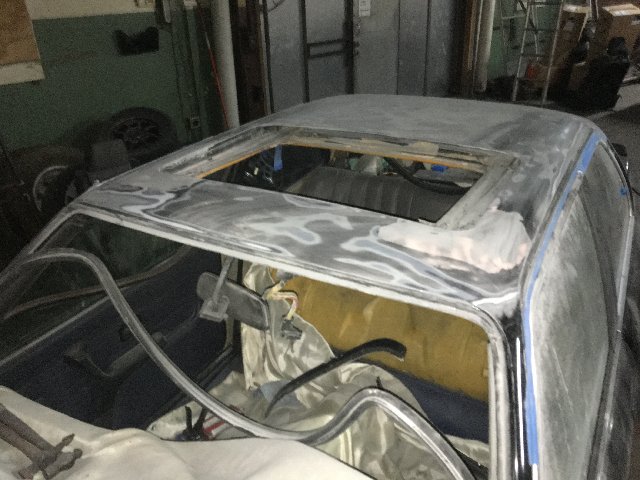
My next step was to repair the rust that had been eating away at my roof since I got the car. Riding around with a gorilla tape covering massive holes had gone on long enough, plus my SO was tired of getting wet when it rained. I picked up a rust free roof locally and with the help of a few friends we cut out the rusted sections of my roof, sanded the roof, and welded the replacements in. After that it was metal filler time to get it all smooth.
We have a automotive paint shop here local so I picked up some primer, some Schwarz single stage, and the NICE Harbor Freight spray guns and went to town. All in all it turned out great for my first attempt at body work. This was completed about a week before Vintage 2019.
Fast forward to present day. Ive been getting better at Vintage prep, so instead of waiting until April to get myself together Ive started in January!
My original plan was to start piecing together the parts I would need to boost the M50 and have a solid turbo build by January 2021 and have a NA M50 running Megasquirt by May 2020. That didnt happen I started shopping around and kept finding good deals.
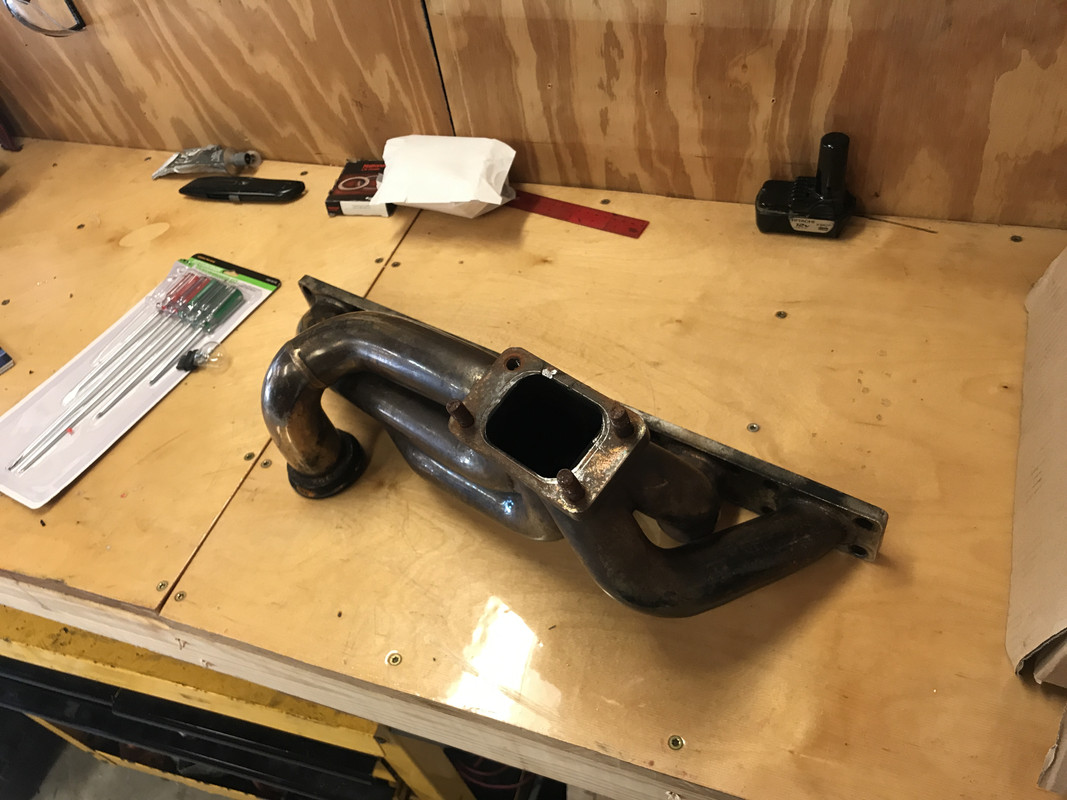
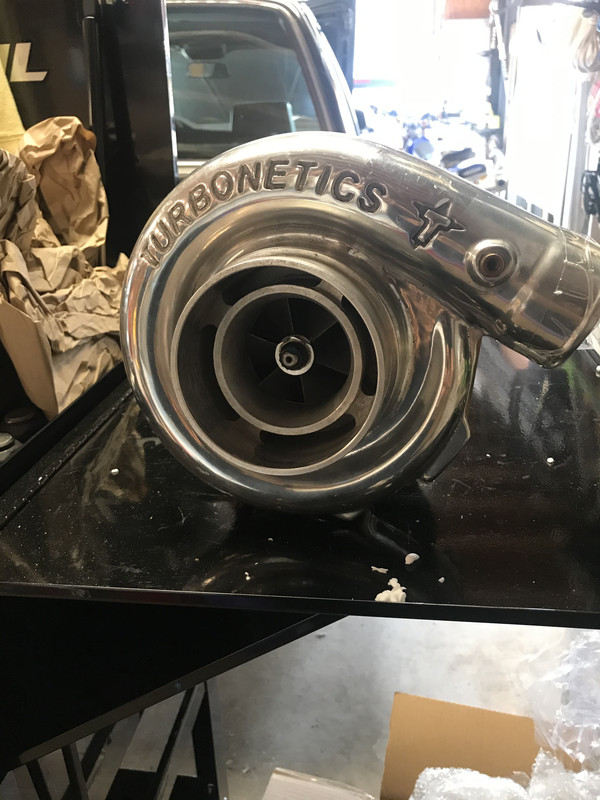
I picked up a RSI M50/E30 manifold locally on FB marketplace for under retail. Then I found a Sachs 618 pressure plate on sale through Turner for WAY under normal price. Then I found a rebuilt single ball bearing Turbonetics here on Bf.c
(T-58 (58mm) compressor wheel F1-65 (65mm) turbine wheel)
After getting a few of the large purchases out of the way within a couple weeks I decided how hard could it actually be to have this thing running 15PSI by mid-May?
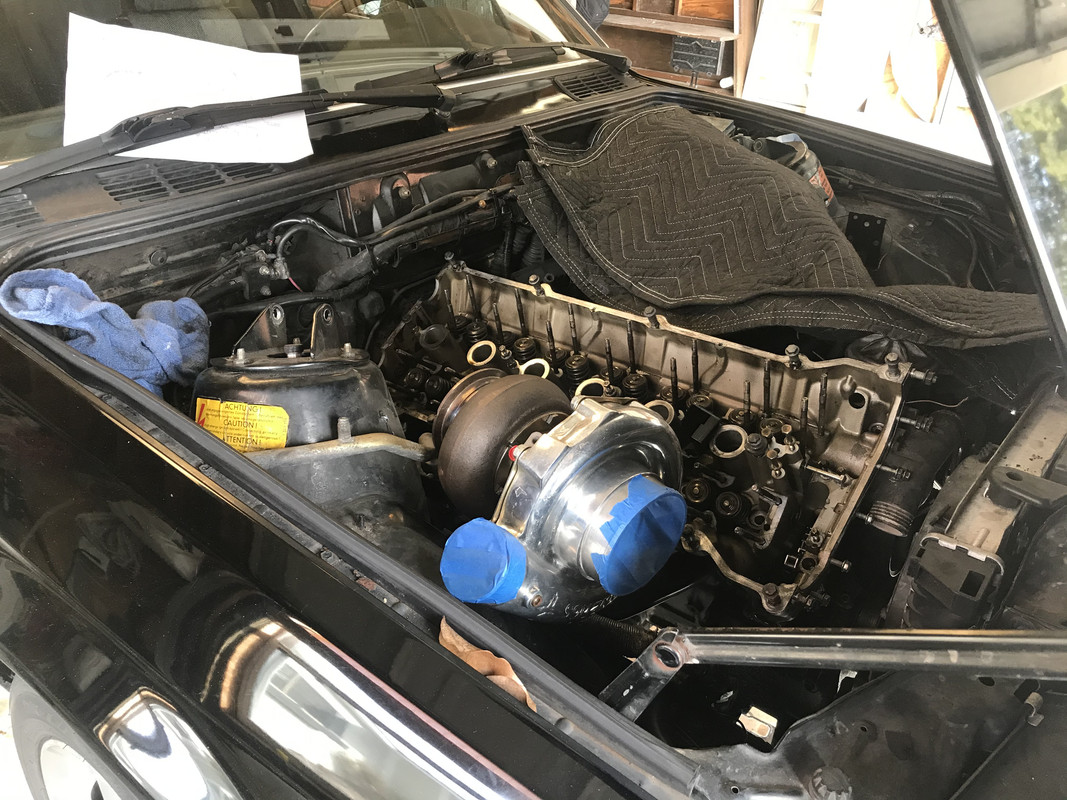
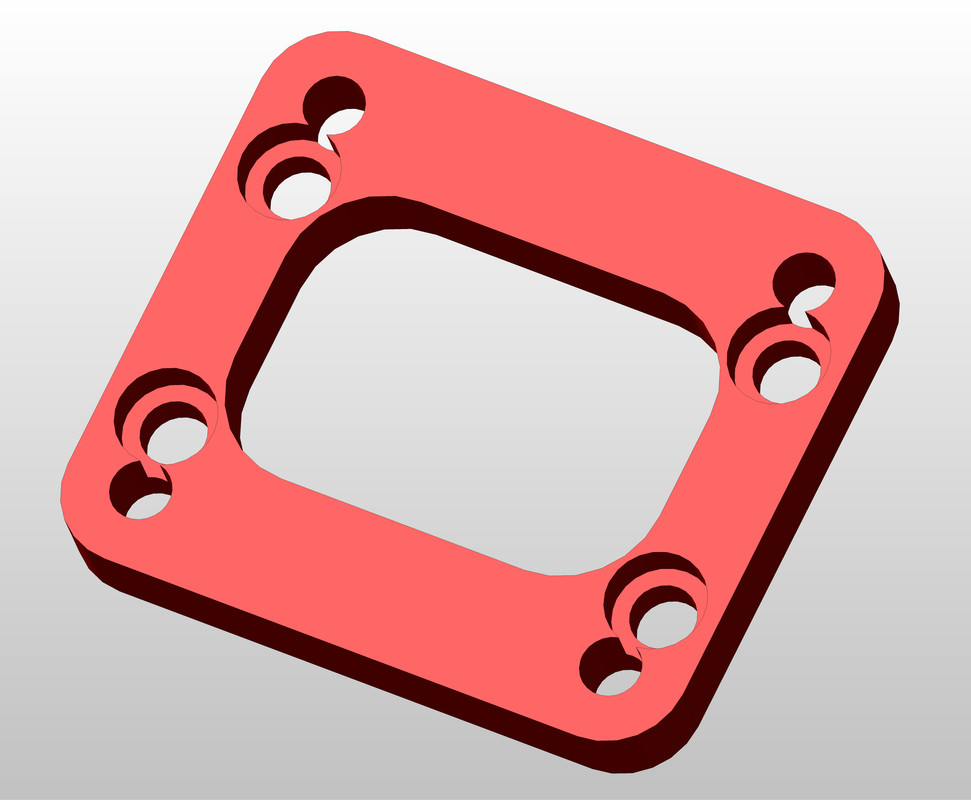
Unfortunately when I got the manifold I had been thinking about a GT35R with a T3 flange. The Turbonetics has a T4 flange. I figured I had two options, chop off the T3 flange and weld on a T4, or run an adapter. After looking at the RSI manifold I decided an adapter should work. The width of the opening on the manifold is the same as a T4, the only differences are the bolt pattern and length of the opening.
My plan is to setup the manifold in the Bridgeport and port out the T3 opening to match the T4. (There is plenty of meat there I won't be eating into the welds)
I CAD'd up a T3->T4 adapter plate and 3D printed it to make sure the turbo would still fit in the engine bay with the extra height. I actually think it will fit better this way and give more clearance to the low pressure AC hose.
Goals: 350-400 reliable whp which should be doable between 15-20 psi WHILE keeping A/C because Florida
This isnt my only car so I drive it maybe 200 miles a month at most with 1-2 track days per year.
Stage 1 Mostly rebuild the engine
To start off I pulled the head off in the car. I did it this way so that I could reach the upper bell housing bolts from the engine bay. Im planning on leaving the transmission in the car. Id be a naysayer if I hadnt seen it done in a M20 swapped e21 with even less room in the engine bay.
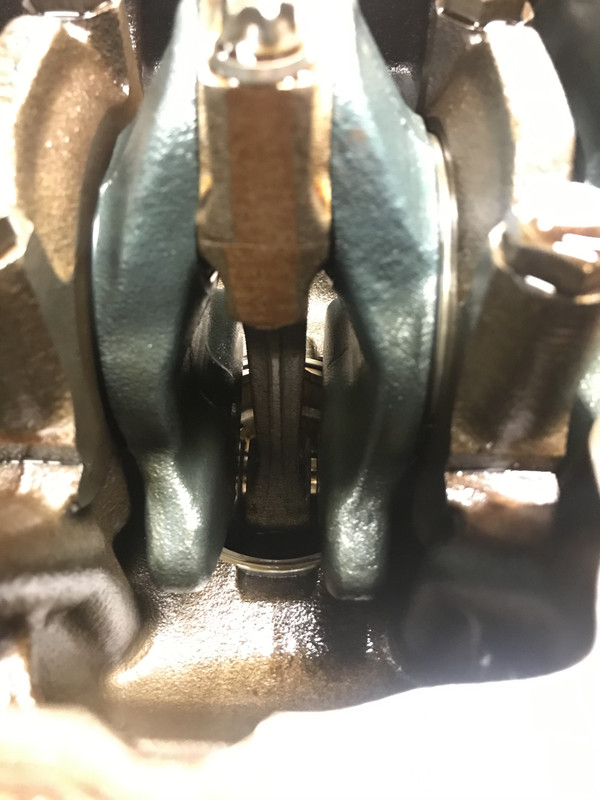
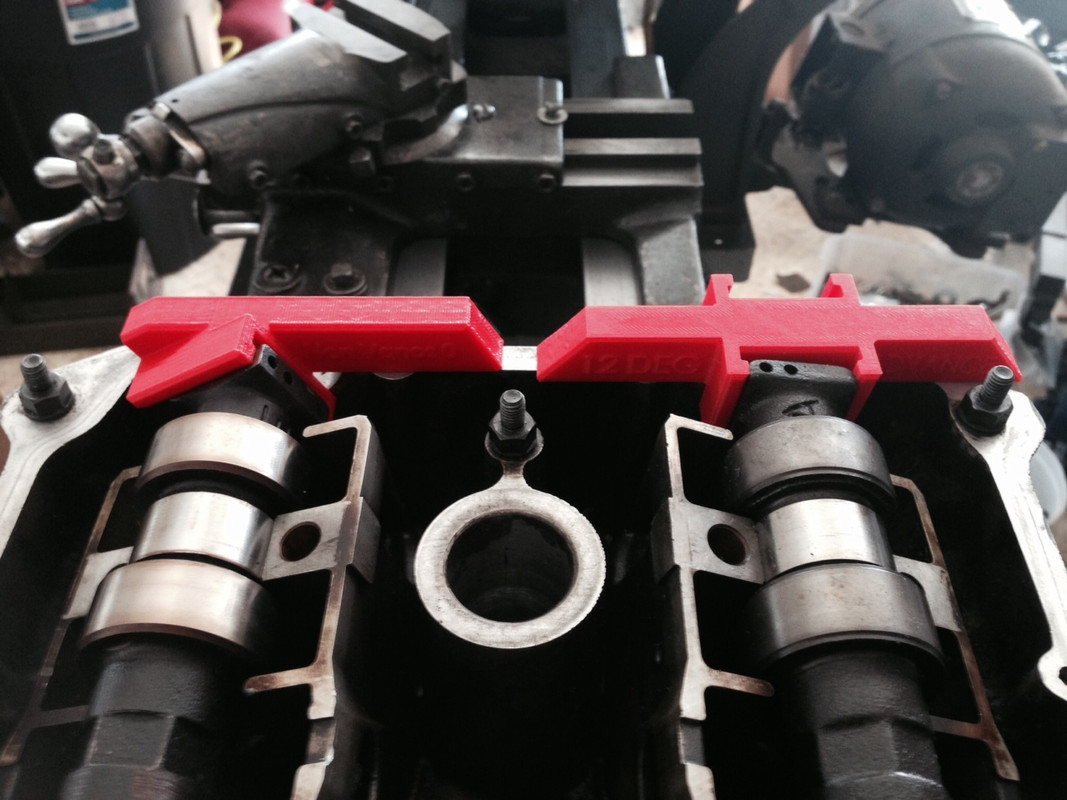
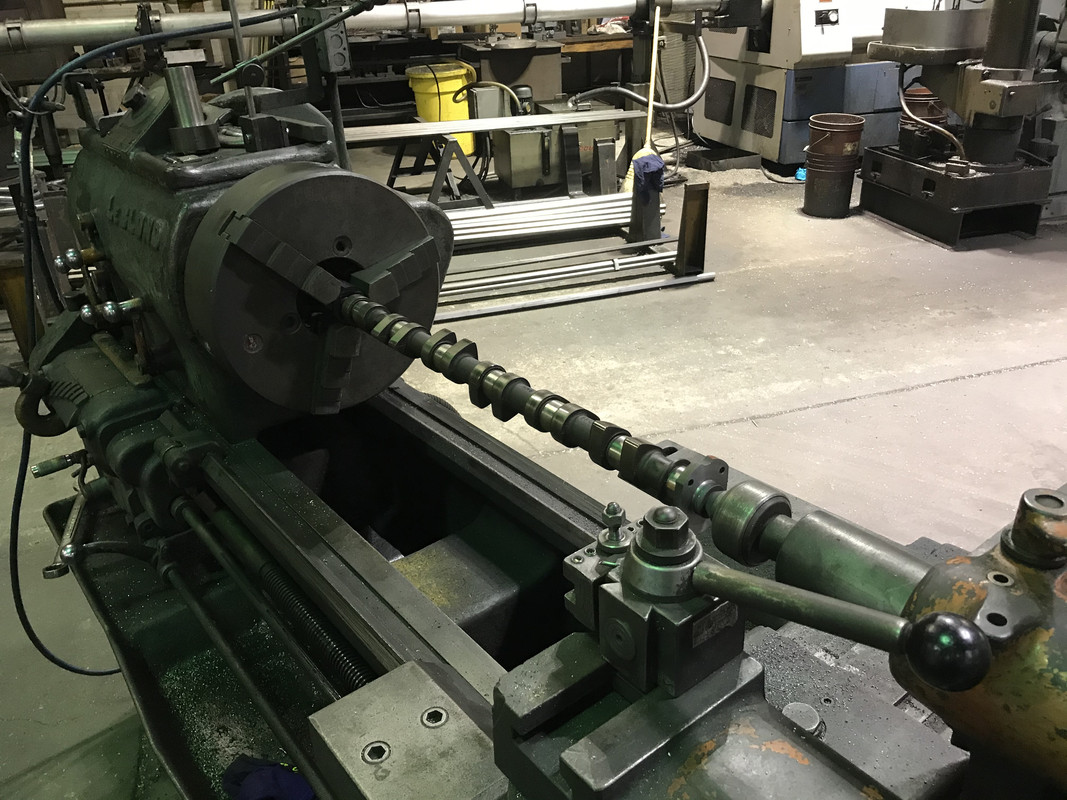
Since I was going to pull the engine and head I wanted to swap out my factory exhaust cam for another NV intake cam. I knew I needed to remove some material from the sprocket mounting face.
Taking someguys advice I 3D printed a cylindrical adapter so that I could mount the cam in a 3 jaw chuck. I was extremely surprised to only have ~0.0005 of radial runout once I got it on the lathe. I measured the current thickness of my exhaust cam and I removed 0.090 from the face of the new one.
Now that I head the head off and got something fun out of the way I got the head ready for the machine shop. When I dropped the head off they noticed that the intake valves sit barely under the deck of the head. I ended up taking the head back up and pulling all the valves. Not a huge deal as I wanted to replace the stem seals, however, it wouldve been nice to know before driving across town.
Now that the head was off getting to the upper bell housing bolts was a breeze. I used an overhead chain crane in my garage to pull the engine straight up and supported the transmission with a floor jack until I could get the engine out of the way to support it with a strap.
I got the engine out and on the stand a finally realized where all my oil had been going. I think I had about a 1/8 of oil/dirt coating my timing cover.
If I get nothing else out of this build at least Ive have a leak-free BMW
Before
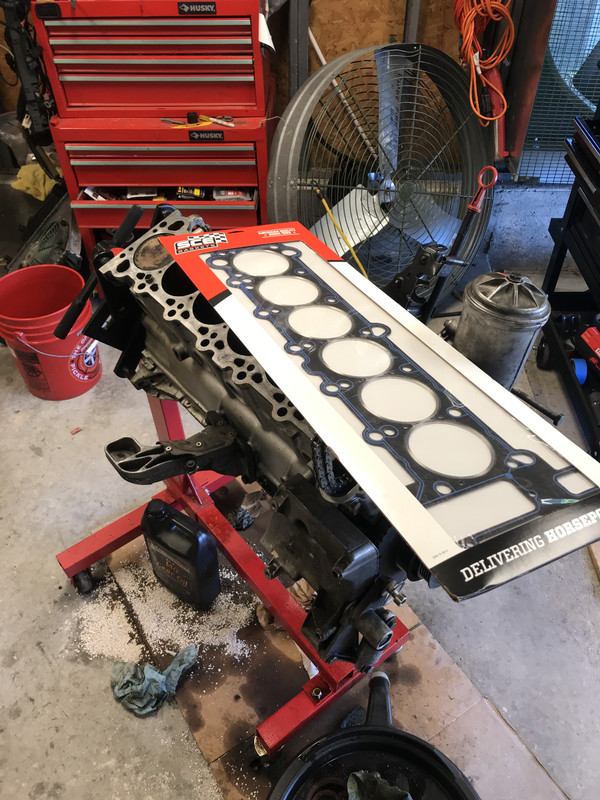
From the research Ive done Ive decided to run a factory head gasket with ARP head studs. I think with the right surface prep and torque I shouldnt have any problems with the power Im looking for.
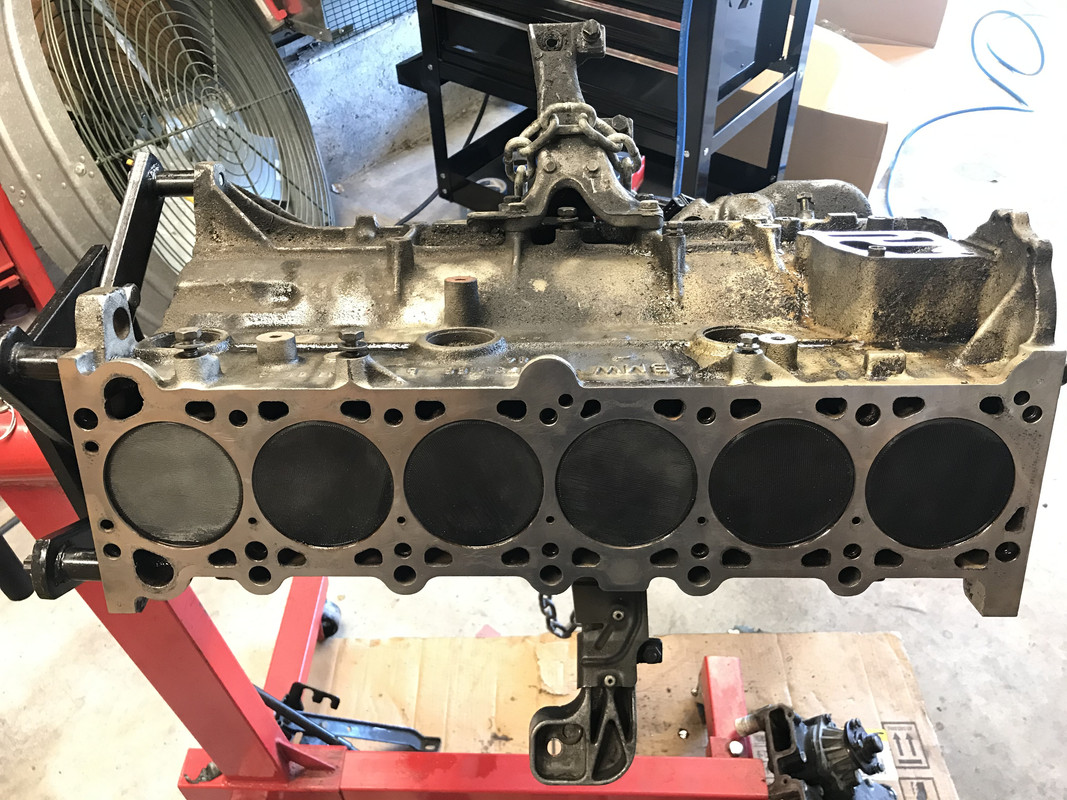
Because I didnt feel like completely tearing the insides out of the block I opted for the DIY block resurface:
https://www.bimmerforums.com/forum/s...oning%20stones
I picked up a dual-sided sharpening stone on Amazon and used some 400 grit and 1000 grit wet sand paper I had left over from painting the roof.
I wouldnt call it amazing, the high spots should be gone. To block off the cylinder bores I 3D printed some press in caps. These worked wonders and kept all the crud off the cylinder walls.
When I finally pulled the oil pan after surfacing and pressure washing the block I noticed someone has already safety wired my oil pump nut! A quick look inside the block and everything looks clean. Im not going to inspect any of the main bearings because ignorance is bliss. Are all M50 cranks blue?
For now Im waiting on my head to come back from the shop and my new timing chains, gaskets, and seals to come in.
The next step is to put the engine back together and get it back in the car. Once Ive got it bolted up Ill start on my Megasquirt harness. Im planning on using a flying lead harness and my factory connectors where theyre needed.
u owe my mule an apology
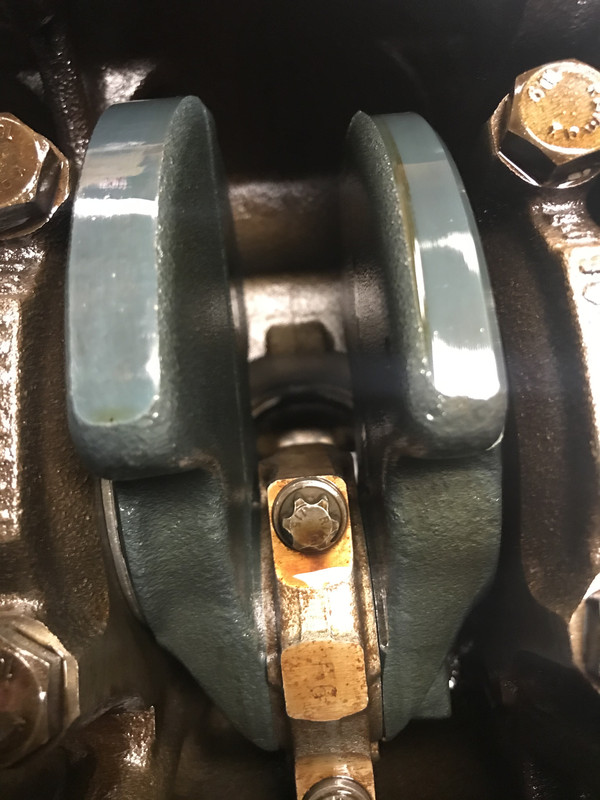
Looking good. Do you have a picture of the crankshaft and the tops of the pistons? From the little bit I can see it looks like an M52 crank.
86 325es, 2.8L m50, S476sxe, ProEFI 128 ecu, e85, solid rear axle, TH400 trans, 28x10.5w slicks, zip ties, popsicle sticks, tape
best time 9.06 @ 151.8 mph, best 60 foot 1.30
Member
I guess my hands were dirty after I removed the bore caps. I'll grab one tonight.Originally Posted by someguy2800

Here's a better picture of the crank.

u owe my mule an apology
That is either an M52B28 or an M54B30 crank. Also appears to be M52 or M54 connecting rods. Turn the motor over and measure the stroke with a caliper.
I can't quite tell but I'm not sure if the head is a non vanos head. Does it have dual valve springs?
86 325es, 2.8L m50, S476sxe, ProEFI 128 ecu, e85, solid rear axle, TH400 trans, 28x10.5w slicks, zip ties, popsicle sticks, tape
best time 9.06 @ 151.8 mph, best 60 foot 1.30
Member
Well that may be some awesome news!
It's definitely a NV head. It is date stamped 1991 and has dual valve springs.
What are your recommendations for cam timing? Should I run factory spec on the intake and exhaust? I had thought about slightly advancing the intake.
u owe my mule an apology
What intake cam are you using?
86 325es, 2.8L m50, S476sxe, ProEFI 128 ecu, e85, solid rear axle, TH400 trans, 28x10.5w slicks, zip ties, popsicle sticks, tape
best time 9.06 @ 151.8 mph, best 60 foot 1.30
ßMW///MµrÐêr§þðr
yup
that BLUISH tint may just offer you the classy 89.6 mm strokery.
Member
Stock non vanos on the intake.
Stroke measured out to 84mm so should be a M52 rotating assembly.
Heres some pictures of the crank and pistons.
u owe my mule an apology
Definitely M52b28 pistons and an e36 style m52b28 crank. I’m 90% sure they are m52 rods as well.
I would retard the intake cam 10 degrees and install the exhaust cam at 101 degree LCA. I make tools for timing the non vanos cam in the exhaust or there are other was of doing it with measuring or angle finders.
86 325es, 2.8L m50, S476sxe, ProEFI 128 ecu, e85, solid rear axle, TH400 trans, 28x10.5w slicks, zip ties, popsicle sticks, tape
best time 9.06 @ 151.8 mph, best 60 foot 1.30
senior LOUNGE creator
Now thats what I call fancy
Sent from my iPhone using Tapatalk
If liberty means anything at all, it means the right to tell people what they do not want to hear.
― George Orwell
Member
Picked up my head from the machine shop today!
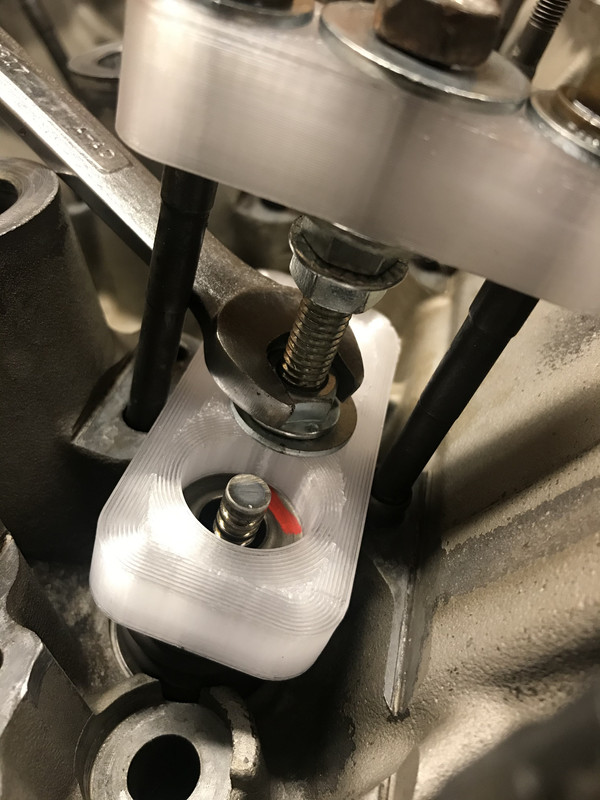
I installed new valve stem seals and tested out my 3D printed valve sprint compressor. It works! No cracking and holds them open perfectly to sneak the keepers in.
I installed the first two intake valves and checked for light between the valves and the seats. Looks like Ill be lapping them.
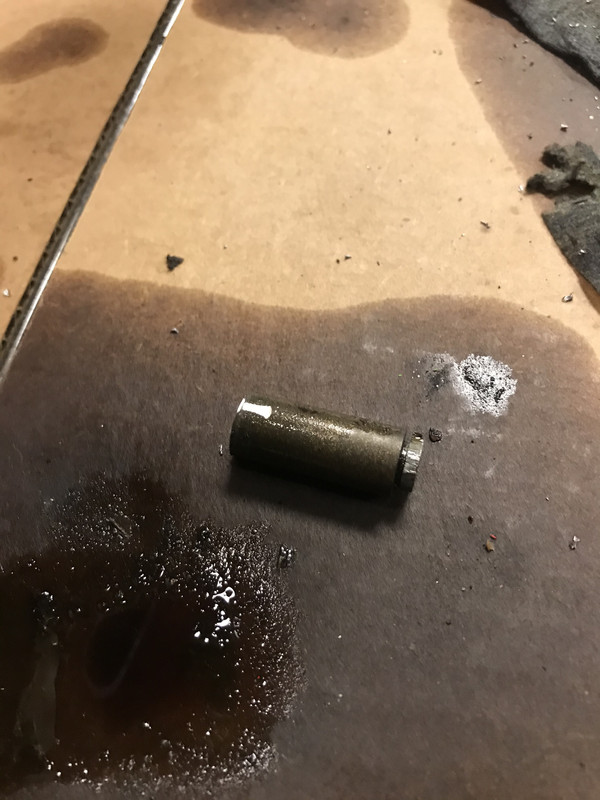
When I was disassembling the engine I guess the chain got caught between the tensioner rail and the crank sprocket while I was turning the engine over. I ended up bending the tensioner rail dowel pin... luckily I didnt break any teeth on the crank sprocket. Anyways. I found the pin on FCP after the dealer said it was 10 days out from the motherland.
I ended up cutting the pin below the bend with a die grinder and hammering it into the block. Thank god BMW didnt make that a blind hole.
DAMN. My pictures are out of order. Ill fix it when Im not on mobile. Fixed...
Last edited by cokeisgood00; 01-28-2020 at 10:49 PM.
Lurker
Cool build man, good start! Im pretty sure M50tu cranks are blue too, but you already measured stroke, Id get rid of those rods if it were me. I also used to be a elring-HG+ARP proponent up to 20psi, however I just did my first cut-ring, and they are WELL worth the money, unless you plan on opening up the motor again soon.
Nice spring tool, is that pla, kinda looks like PC?
Member
Are you running the copper spacer too?
Clear PETG at 100% infill. Pretty solid. Cant even bend it by hand.
Member
That adapter plate is available online. No need to make your own
Member
Where's the fun in that?
Lurker
Nah, I have low comp pistons, I haven't used a spacer since the MLS days. Then switched to Elring-Arp's stock comp E85, that worked pretty well, but I would get a little coolant pressurization. There just not meant for the heat and pressure.
Thanks for the clarification, I might give that a try!
Member
I got my head all back together with the valves lapped in Friday night. My parts that I was waiting on for the block finally came in today but of course Im out of town until tomorrow.
I should be getting the engine put back together this week.
After completing the head I thought I would calculate compression ratio. Im regretting that decision.
After a couple head shaves my cylinder head volume has dropped down to ~29cc.
I measured everything twice and Im looking at around a 11:1 ratio. A little on the high side especially for the m52 rods.
I really dont want to do bottom end work so I think Im just going to run it and keep the ignition modest.
Im looking now at the SCE cut ring gaskets. They sell a 2.0mm thick one and I emailed them about a 3-3.5mm thick one after reading another post.
Im thinking of running 100% e85 when Im driving around town since we have plenty of selection down here.
For road trips Ill turn the boost down and run 93...
Also welded in my oil drain bung!

Vader Solutions
bad ass, how much power are you shooting for ?? unless i missed that part
u owe my mule an apology
11:1 is 100% no problem on E85. I run 11:1 with 45 lbs of boost.
For those times that you have to run on 91 pump gas I would set the boost cut at like 8 psi and put a concervitive ignition map in it. Vanos M50's are pretty close to 11:1 stock so its really not that high.
86 325es, 2.8L m50, S476sxe, ProEFI 128 ecu, e85, solid rear axle, TH400 trans, 28x10.5w slicks, zip ties, popsicle sticks, tape
best time 9.06 @ 151.8 mph, best 60 foot 1.30
senior LOUNGE creator
Gotta love having easy access to e85.
Sent from my iPhone using Tapatalk
If liberty means anything at all, it means the right to tell people what they do not want to hear.
― George Orwell
u owe my mule an apology
It is miracle juice
86 325es, 2.8L m50, S476sxe, ProEFI 128 ecu, e85, solid rear axle, TH400 trans, 28x10.5w slicks, zip ties, popsicle sticks, tape
best time 9.06 @ 151.8 mph, best 60 foot 1.30
Member
400ish at the wheel
Sent from my iPhone using Tapatalk
Member
Hey nice build! I think 3D printed parts are the best thing to land in the hot rod shop in recent history. You should post up some of your .stl files for community benefit. Ideally, there should be a repository of them for each car forum... I would even post CATIA models and CNC code, if someone had a CNC mill available.. Then again, most are looking for a return on investment at that point.
Sent from my VS995 using Tapatalk
Member
Received the SCE cut ring today! Shes coming together. Hoping to have the engine in the car this weekend.
Im a cheap SOB so I bought 1ft of UHMW rod on McMaster to make some Condor style engine mounts. $100 vs $16 and a little bit of work.

Member
Only 36 posts?! Psh, noob
 Posting Permissions


 Reply With Quote


Bookmarks