
 Member
I did, if it pops I’ll warranty it through fcp euro for free. But it shouldn’t as the head was resurfaced and the block was flat. How much different can composite gaskets be?Originally Posted by GG///M3

- - - Updated - - -
NCM Motorsports Park in Bowling Green KY and Putnam Park outside Indianapolis IN. Auto-X has a good turnout at the UofL stadium parking lot. Just check motorsportreg.com for all events within a search radius.
Last edited by bimmerboy318; 01-03-2020 at 04:58 PM.
E36 M3 journal https://www.bimmerforums.com/forum/s...-Build-Journal
F80 M3 journal https://f80.bimmerpost.com/forums/sh....php?t=1734421
Miata K24 build https://www.miataturbo.net/build-thr...ine-up-105885/
Member
Waiting on a bunch of things to arrive to finish the interior. Most of it will be covered anyways, but I couldn’t stand the exposed wires any longer. A bunch of split loom makes it look great... although troubleshooting later will be harder later. The shifter surround is going to remain as I’ve retained the power windows and 4-way flashers. I’ve actually used both during track use. Power windows during a red flag because of an accident in what seemed like a monsoon. 4-ways when I had to limp back into pit and got sick of sticking my fist out the window.
73DBF273-011D-440E-A5AF-79DD31A3314F by D S, on Flickr
FC2947A3-C913-4952-AF7F-6CBD11B02259 by D S, on Flickr
BF7D70F8-C247-43AC-98A1-EEEE0FAFF111 by D S, on Flickr
Last edited by bimmerboy318; 01-03-2020 at 07:40 PM.
E36 M3 journal https://www.bimmerforums.com/forum/s...-Build-Journal
F80 M3 journal https://f80.bimmerpost.com/forums/sh....php?t=1734421
Miata K24 build https://www.miataturbo.net/build-thr...ine-up-105885/
Member
Man! Looks good! Wanna come clean my E36 up? Lmao, its my track toy aswell, helrot 2550lbs S52 318ti
Sent from my iPhone using Tapatalk
Member
Awesome build, I hope to see this out at Putnam this year. I have a white E30 with an S50 in it. Im swapping out my MLS head gasket this winter, going back to a standard gasket. I highly recommend the baffles in the oil pan. I think I had it done by VAC for about $200 all said and done. My oil consumption at the track reduced dramatically, and I dont have to overfill as much for track use.
Member
An unsolicited recommendation. Use the shells of the rear seats (plastic) to block off opening. I pulled my rear seats apart to get these (made to fit) and used Rivnuts to create mounting points. They do a great job of reducing noise and keeping junk in the trunk. I had tried an aluminum panel to block the opening but it was flimsy, weak and loud!
Clean build!
Member
Aluminum door cards from Turtle Labs. These are the boxed version as I kept the power windows. The motor sticks out nearly 3/4 so the flat panels wouldve had a bow.
316AD93D-E352-4C31-867E-5AB99D744145 by D S, on Flickr
E872BB54-1B43-44CE-8CC1-577E0521A5E3 by D S, on Flickr
C5D23E4F-11B3-4A33-AF90-5BBA19F29956 by D S, on Flickr
Last edited by bimmerboy318; 01-20-2020 at 08:21 PM.
E36 M3 journal https://www.bimmerforums.com/forum/s...-Build-Journal
F80 M3 journal https://f80.bimmerpost.com/forums/sh....php?t=1734421
Miata K24 build https://www.miataturbo.net/build-thr...ine-up-105885/
senior LOUNGE creator
I have basically the full Mkah door panel delete, gauge vent holder, center stack relocation, full rear seat delete panels, and lexan front windows.
Not sure where you are located, but Ill be unloading them soon
Sent from my iPhone using Tapatalk
If liberty means anything at all, it means the right to tell people what they do not want to hear.
― George Orwell
Member
MKAH Floorpans installed. I spent quite a few hours massaging these to fit. Kinda dis-appointed in how much work I had to put in. Driver side is kinda flimsy too. I wanted the pan to sit below the pedal instead of on top. I ended up trimming the entire side against the tunnel. I also trimmed the front against the fire wall so it would sit level. Passenger side was a little better but still needed trimming where the tunnel and firewall meet. To stiffen this up, I’ll probably rivet a piece of 1/2”x1/2” aluminum angle under the driver side pan.
C8C3B686-6CC5-41EE-9CDC-54D344F68F3C by D S, on Flickr
508AF940-940D-4469-8877-7712BEC0C542 by D S, on Flickr
The dead pedal also needed to be notched at the top to make room for the wiring harness. Also notched the floor pan so that the pedal would sit up against the car instead of there being a gap.
1448B858-5DB3-49B9-84AA-DDD37BA1C774 by D S, on Flickr
9C129BF2-A8B6-411B-801E-E2CE3F2A2111 by D S, on Flickr
E36 M3 journal https://www.bimmerforums.com/forum/s...-Build-Journal
F80 M3 journal https://f80.bimmerpost.com/forums/sh....php?t=1734421
Miata K24 build https://www.miataturbo.net/build-thr...ine-up-105885/
senior LOUNGE creator
Odd. They usually fit great, and the owner Grant is a member on here.
Sent from my iPhone using Tapatalk
If liberty means anything at all, it means the right to tell people what they do not want to hear.
― George Orwell
Member
Ordered on Dec 29, 2019 and received. Nicest single mod I’ve put on my E36! Splurged on the carbon fiber version of the S2R Tuning sunroof delete panel. The quality is amazing, no waves or defects at all. On my particular car, the right rear corner was slightly lower than the rest but that might be variances between the original donor car and mine. My MOMO steering wheel with Rogue Engineering disconnect is a close 2nd.
Made my own drill stop for the 4 rear screws on the inside. Used 3M window weld and some careful masking. Even bought the more pensive clean edge tape LOL. Soapy water and a nitrile glove to tool. Why can’t they make household caulk this nice to work with?
E0D2E961-B125-4BCF-B574-DB247F3605A3 by D S, on Flickr
E7B0C8F2-D0E6-4528-BA5A-0FB1BE718C28 by D S, on Flickr
7AE4B61B-7EBF-4E08-958B-F2415B7ACFD7 by D S, on Flickr
148DE37D-5BD2-44FF-99B4-83D9A88ADF37 by D S, on Flickr
803ADB6B-B699-4267-9F49-912BBC5CAFA6 by D S, on Flickr
B6402E2C-C2D0-4B9E-80D6-D5A1B287BE00 by D S, on Flickr
9CB85142-5C8B-486D-90F5-2BF904630CA3 by D S, on Flickr
Last edited by bimmerboy318; 02-04-2020 at 06:56 PM.
E36 M3 journal https://www.bimmerforums.com/forum/s...-Build-Journal
F80 M3 journal https://f80.bimmerpost.com/forums/sh....php?t=1734421
Miata K24 build https://www.miataturbo.net/build-thr...ine-up-105885/
senior LOUNGE creator
Love mine
Sent from my iPhone using Tapatalk
If liberty means anything at all, it means the right to tell people what they do not want to hear.
― George Orwell
Member
Didn’t even know this was a thing until I used search. One of the o-ringed plugs on the oil filter housing gasket was leaking pretty bad. The o-rings were pretty square in profile when removed. The correct size is No. 118 7/8” ID x 1-1/16” OD x 3/32” thick. Rubber will work but Viton lasts longer. Replaced the oil filter housing gasket and idler pulley while I was in there. Spent more time cleaning than I did wrenching!
1552EF4A-9B31-490B-8D38-140D50841C30 by D S, on Flickr
54799FC8-2D80-435E-9CD9-630C74C1BE94 by D S, on Flickr
E36 M3 journal https://www.bimmerforums.com/forum/s...-Build-Journal
F80 M3 journal https://f80.bimmerpost.com/forums/sh....php?t=1734421
Miata K24 build https://www.miataturbo.net/build-thr...ine-up-105885/
Member
Got the driver side harness mounts in. I put the seat where I wanted it and used a level to put a mark plumb vertical from the anti sub hole. I put the eyebolts 2" rearward and spread 5" apart from that point. The anti sub is at approx 15deg in my seating position. This allows the seat to move 1" forward or 3" backward and still be within the Schroth recommended 20deg angle.
The limiting factor is actually the harness bar as I have the Ben Sipson Bar WITHOUT the extended layback. Even though the seat can move further back, at the 3" rearward from my position there is only 2" between seat and harness bar which is the minimum according to Schroth.
The lap belt mount on the outside of the car is between the 45-60deg spec. However, it is probably closer to 45 than to 60. pulled away from the seat but still within 25deg.
I know harness mounts have been covered in great detail on this platform but alot of the photos are gone so hopefully this helps someone in the future.
FA3271A7-8554-4B2D-AF2A-B21B49459C50 by D S, on Flickr
7E7AFCE5-A2FA-4E06-8BBF-CEE1FE68DADF by D S, on Flickr
8FC5B951-E5CB-490A-B869-FA9B5AFC8160 by D S, on Flickr
Last edited by bimmerboy318; 02-08-2020 at 01:52 PM.
E36 M3 journal https://www.bimmerforums.com/forum/s...-Build-Journal
F80 M3 journal https://f80.bimmerpost.com/forums/sh....php?t=1734421
Miata K24 build https://www.miataturbo.net/build-thr...ine-up-105885/
Member
Here it is fully installed.
Some notes:
- The seat is centered! It is an FX1 Pro. The Passenger is a regular FX1 and would not have been centered had it been in the driver position. I'm short so the seat is is not what most would think is in a low position. I lowered the steering wheel 1/2" with a spacer. Otherwise, I would've wanted the seat another hole up in the seat mounts. I'm also running a 1" slider. And the bottom corner of the seat is bottomed out against the trans tunnel. A taller person can slide the seat back and it moves away and down.
- I ended up putting the passenger side Motion Motorsports side mount on the driver side. It seemed to center itself better on the seat and the hole, instead of the slot, was at the rear. The seat is mounted 2nd hole from the bottom in back and 3rd hole from the bottom in the front. I had to cut the floor mount lugs off the rear of the Corbeaus in order to do this. At first, I thought the seat was too far reclined. The back felt correct but I didn't like how the headrest was so far away from my head... until I put my helmet on and it fit perfect!
- The lap belt adjuster on the tunnel side is VERY hard to loosen because it's up against the tunnel. That's also where the camlock stays when unbuckled so that belt will be set. I will only loosen the left side lap belt when getting in and out of the car
- If you can, get 2" lap belts over 3" belts. It's much harder to get the 3" belts tight, and I have to keep the door open to do so. Also, because the seat is further forward, and I'm using the factory lap belt mounts, a pull up belt worked. But more than a couple inches back, the adjuster will jam itself into the seat hole.
- Interior work, seats, harness, etc are a PITA!
A2DC0104-4765-43AE-B032-20EC3EBBEE04 by D S, on Flickr
Last edited by bimmerboy318; 02-09-2020 at 09:39 AM.
E36 M3 journal https://www.bimmerforums.com/forum/s...-Build-Journal
F80 M3 journal https://f80.bimmerpost.com/forums/sh....php?t=1734421
Miata K24 build https://www.miataturbo.net/build-thr...ine-up-105885/
Member
Good work.
"- Interior work, seats, harness, etc are a PITA!"
Vastly understated.
Member
FYI, (I'm not a mechanical engineer), but this is a little borderline to me. You don't want any of the belts to extend on an impact.
Could this bracket collapse some due to the fact it's not fully supported flush against the belly of the beast?
Rotate the plate 180 deg, or install a larger plate?
(Edit, actually, I don't think either of those would help).
49505884321_1a07f1d547_k.jpg
Last edited by aeronaut; 02-09-2020 at 09:51 AM.
Member
The floor is fairly thin there and that’s where it wants to sit. However, the bend that it is hanging off is probably stronger than being just flat. I just don’t see 1 of the 2 anti sub mounts pulling out of the floor with that square plate. If that were to happen I feel as if there would be other worse problems during impact.
- - - Updated - - -
Running out of tasks to complete. Car is basically done except for a track weight oil change, brake fluid flush, and passenger harness. I go to the alignment shop this coming weekend to adjust ride height, corner weights, and the alignment.
Installed fresh Motorsport Hardware studs and lugs. Also noticed that I better order another set of front rotors as the cracks are getting closer to the edge.
251B137C-6D49-4976-9E04-53BEABC51807 by D S, on Flickr
C82B2AC3-BF36-4E86-AD3F-1E784F1A9935 by D S, on Flickr
E36 M3 journal https://www.bimmerforums.com/forum/s...-Build-Journal
F80 M3 journal https://f80.bimmerpost.com/forums/sh....php?t=1734421
Miata K24 build https://www.miataturbo.net/build-thr...ine-up-105885/
Member
Corner balanced and aligned. 95 M3s are camber limited to around -3.0 so shims had to be used to gain another -0.75 or so. I had requested 3/16” rear toe in but shop owner was adamant that it would be too much. Conversion charts shows that .18 deg toe in is around 1/16” toe in so we’ll see.
Pretty happy that the car weighed 2,967 lbs including driver, minus 4 gallons of fuel. Still have heater core, blower, power windows, and a few cosmetic items like aluminum door cards, center console.
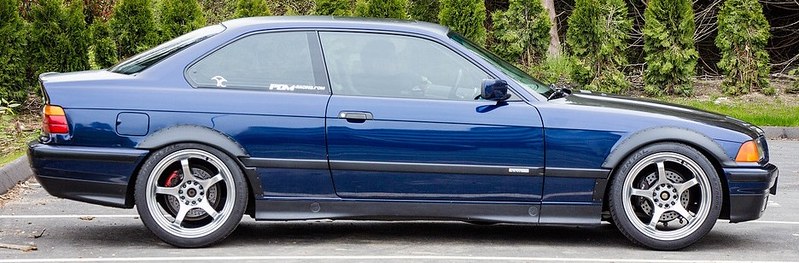
New Apex 17x9 et42 ARC-8s in silver with 245/40 RE71Rs look very period correct!
0CBE0351-6DE7-4F24-BE96-3E6FAAAD3E94 by D S, on Flickr
99240829-8B1C-4498-B3FE-6E64E5820CBB by D S, on Flickr
Last edited by bimmerboy318; 02-25-2020 at 08:59 PM.
E36 M3 journal https://www.bimmerforums.com/forum/s...-Build-Journal
F80 M3 journal https://f80.bimmerpost.com/forums/sh....php?t=1734421
Miata K24 build https://www.miataturbo.net/build-thr...ine-up-105885/
Member
Looking good! Yea, I have camber plates and shims to get me to -3.5 of camber.
Member
Almost 4sec off my previous best! Maybe all this work over the winter actually paid off!
F3BD9E31-BED4-48EB-AADB-7F382ED09BA5 by D S, on Flickr
E36 M3 journal https://www.bimmerforums.com/forum/s...-Build-Journal
F80 M3 journal https://f80.bimmerpost.com/forums/sh....php?t=1734421
Miata K24 build https://www.miataturbo.net/build-thr...ine-up-105885/
senior LOUNGE creator
Awesome
Sent from my iPhone using Tapatalk
If liberty means anything at all, it means the right to tell people what they do not want to hear.
― George Orwell
Member
A few thoughts after the first outing and all that work over the winter.
1) Rear subframe bushings. Do it! Stiffer the better!
2) VR head gasket and new BMW bolts. Holding up fine!
3) Freshened head and Vanos seals can be felt in mid range.
4) Weight reduction is real and seems to have correlated directly to reduced laptimes. Almost 4 sec faster that I cant rattribute to any power mods other than head refresh. Interestingly, top speed on the straights did not improve so it must all be in the corners.
Member
Do the chassis reinforcement for the subframe mounts at the same time if you have t done it already. And I have a set of of used Poweflex Purple subframe bushings that I don’t want a lot of money for it you’re at all interested in used.
Member
Hrmmm... thanks for reading my thread!
E36 M3 journal https://www.bimmerforums.com/forum/s...-Build-Journal
F80 M3 journal https://f80.bimmerpost.com/forums/sh....php?t=1734421
Miata K24 build https://www.miataturbo.net/build-thr...ine-up-105885/
Member
I really like that chassis spec sheet. Love all the details such as shocks, rebound settings and tire pressures cold/hot. What a great way to keep track of any changes in setup!
 Posting Permissions


 Reply With Quote
Bookmarks