
 Member
My son decided to play submariner with my 1995 840ci. It didn't work out well. Apparently, the ram air system is equally as good at ramming water.
Time for a new engine. Of course, I couldn't leave well enough alone and decided to do a little upgrading. I heard rumors of hybridizing M62's with M60 parts to bump displacement and power. I did a bit of reading and found these links most useful:
https://www.bimmerforums.com/forum/s...#post_29060913
http://www.bimmerforums.com/forum/sh...t+pickup+plate
http://forums.bimmerforums.com/forum...wap-in-94-540i
https://www.r3vlimited.com/board/sho...4&postcount=17
https://www.r3vlimited.com/board/sho...16410&t=316410
https://www.sssquid.com/v3/ssshop/m60b44-chip/
http://www3.sympatico.ca/mdsylva/
http://garagistic.com/index.php?page...-using-m60-dme
https://www.bimmerforums.com/forum/s...l-modification
I had the car towed to a shop, where the owner made me wait two months before he could start work. That should have been my first clue I was in the wrong place. I discussed having him do the mods and he agreed. However, when he actually got serious about the build, he started backing off his commitments and boosting up his price estimate. The discussion that ensued ended with him saying something snarky to the effect that it would be better if I did the modifications, and to his surprise I said I would. So back to my house the car came, and I went out and bought an engine lift. I have never wrenched on cars for a living and have no desire to do so, but I've been an avid shadetree mechanic for a long time. I knew I was biting off a lot, but I've owned my 840 for almost 20 years and I've done most everything required to change out the engine, just not all at once. In one weekend, the engine was out.
The removal procedure went pretty much according to BMW's repair procedures, except I had to remove the left rear exhaust header to clear the steering gear. I went very slowly with the lift because I work alone and was repeatedly checking clearances. I probably could have dropped an identical M60 in the following weekend and have been done with it, but I was helpless against the siren song of more power. I decided the best route for me was to use an M62 with the ECU for the M60. The major modifications required are 1. welding a bracket for the crank trigger on the lower timing case and 2. cutting the cam timing wheel to match the M60 setup. I sourced a non-vanos M62 from a 1998 E39 540 as a replacement. The engine looked pretty good and came with a warranty. It had 92k miles. I figured I'd replace wear items and check the timing chain, a notorious failure item around 100k miles on this engine. Unfortunately, I found some evidence of rubbing that should't be there.
So I bought a new timing chain and guides from FCP Euro, which sells a nice kit. I don't have the equipment to time the engine nor to weld the crank position sensor, so I decided to outsource those tasks. The shop I gave the job to had a few hiccups, detailed in this thread:
https://www.bimmerforums.com/forum/s...sensor-air-gap
The lessons learned from this part of my build adventure are:
1. The thread I posted above about cam sensor wheel modifications is spot on.
2. Positioning the crank trigger isn't hard because the bracket, the M62 block, and the M60 harmonic balancer are marked with TDC. The air gap is critical and should be set about 30/1000. I previously had a problem with a very slightly out of round harmonic balancer that caused a misfire at high RPM's.
3. You need the cam locks that lock onto the back end of the cams, otherwise the cams will jump when you loosen the reluctor ring.
4. The M60 uses variable reluctance triggers on the cam and the crank. The M62 uses VR on the crank and hall effect on the cam. The M62TU uses hall effect on both cam and crank. There is some inaccurate info out there that the M62 is all hall effect.
5. Because of lesson 4, it is worth investigating if the M62 crank trigger could be used with the M60 ECU.
6. The M60 cam sensor does not seal properly on the M62 timing cover. I used hylomar to seal it.
7. Neither the upper nor lower timing covers for the M60 fit properly on the M62 with M62 heads.
I'm going to continue to document this build here, highlighting the differences that must be addressed between the M62 and M60 that the threads I referenced above seem to gloss over.
Brett
Last edited by ltbrett; 01-05-2019 at 11:19 AM.
BMW CCA Member
Good luck with your project. I will be following along, I love this kind of stuff.
Desecrator of all things Sacred
Member
Why not just balance, blueprint, port and polish an M60 to get the extra ponies?
Member
I'm in the home stretch, with the frankenmotor installed, waiting for what I hope to be the last parts shipment. I finally have some time to document the differences between the M60 and M62 that affected this build. I'm not posting an exhaustive list of differences, just the ones I had to address when I put OBD I engine management on an M62. The procedure I used is included in the links I posted earlier in this thread.
My biggest pain in the butt was getting the reluctor ring and cam positioning sensor modified. The problems I had were due to the shop not following the procedure I gave them. Here is a picture of the unmodified M62 reluctor ring and cam position sensor. Note the orientation of the sensor. The M60 is oriented vertically and has the fuel tank purge valve attached to it. The M62 also has a small boss that holds the o-ring in place. I had to use hylomar to seal the M60 sensor in the M62 head and re-route the sensor wire. It barely reaches. I still haven't figured out where the M62 purge valve mounts.
IMG_0497.jpg
Compare to the M60 single pole cam trigger:
IMG_0062 (1).jpg
Speaking of purge valves, the M60 is an inline design and the M62 is a right angle.
IMG_0107.jpg
In the same area of the engine, the oil dipstick is longer on the M62. This is curious because the oil pans are the same.
IMG_0068.jpg
The oil level sensors are different, requiring you to swap over the M60 sensor.
There is a line for something on the M62 intake
IMG_0065 (1).jpg
that is blanked off on the M60. I blanked it off.
Apparently I'm limited to 5 pictures. To be continued...
Member
Blanked off line:
IMG_0066 (1).jpg
The M62 water pump has temperature sensors that are located on the back of the M60 engine:
IMG_0064.jpg
In order to fit the M60 water pump, you have to grind a small relief around a bolt head.
IMG_0037.jpg
The other thing related to the water pump is one coolant pipe running across the top of the engine is longer for the M62. If you use the M60 water pump like I did, you need to use the M60 coolant pipes.
IMG_0036.jpg
The temperature sensors are on the back of the engine. This pipe must be transferred over.
IMG_0034.jpg
Member
Here's a good summary of the differences on the back of the engine. Note the lack of coolant temp sensors, one vacuum line off the intake manifold that is blanked off on the M60, and the toothed flywheel where the M62 usually gets its crank position signal.
IMG_0493.jpg
There are several differences in the engine valley. First, the M62 knock sensors use two plugs vs 4 on the M60. Transfer the sensors over. Second, the red wire to the alternator runs through the valley on the M60, but around the engine on the M62. Route it through the valley and transfer over a protective black pipe. Third, the black wire to the alternator runs down the left side of the engine, through a little tray that must be transferred over. Fourth, the positive jump start terminal is on the left of the M62 but in the engine bay on the M60. I removed it. Fifth, there is a sneaky little temperature sensor in the intake manifold that the M60 uses but the M62 does not. Transfer it over. Sixth, the fuel rail is different. Swap it over. Finally, the mount for the idle air control valve is different. This doesn't affect anything, I just couldn't use my old rubber mount, which was in better shape than the mount that came with the engine. Here is a picture of knock sensors from both engines. M60 sensors have 2 wires per plug, M62 have 4.
IMG_0033.jpg
The other major modification to the M62 is welding a bracket for the crank position sensor to the lower timing cover. Use the M60's toothed harmonic balancer. Here's mine.
IMG_0029.jpg
The motor mounts will most likely need to be changed. My motor came from an E39. The left motor mount has the lines for the oil filter. By the way, those oil filter lines should be swapped too. They are flexible, but not all that flexible. Use the ones meant for the E31. The right motor mount is also the a/c bracket. I did not have a right motor mount on the M62 so I can't comment further.
IMG_0107.jpg
Use the M60 alternator. The M62's wired differently.
When I started putting on belts, I noticed the M62 a/c belt is too big. I used the M60 belt. The belt tensioners are different. I wanted to use my old one on the alternator side, but it clearly doesn't line up.
IMG_0106.jpg
I think that's a wrap for now. At least those are all the differences I can think of.
meeknet.co.uk
Excellent work! Some of the differences you are seeing are due to the M62 coming from an E38/E39 rather than an E31. For instance, on the E31 version:
The B+ post is not on the engine
There is a vacuum blanking plug under the throttle body
The large vacuum take-off point on the PCV valve is blocked off as is the smaller one
There is a temperature sensor on the manifold
The purge valve is in-line
Timm..2007 E64 650i Individual Sport..1999 E31 840ci Individual Sport..ex owner of 2000 E38 740..1999 E38 740i V8 M62..1998 E38 735i V8..1993 E32 730i V8..1988 E28 518i
My BMW Repair YouTube Channel
My Current 840ci Sport Individual
My Current 650ci Sport Individual
My E31 Repair and Information Website
My E38 Repair and Information Website
My E63/E64 Repair and Information Website
Chase - Heroes to a generation
Member
It's alive! (sort of) After nearly 8 months, I started the beast today. It's not running on all cylinders, so I've got some troubleshooting to do.
Last edited by ltbrett; 02-09-2019 at 11:55 PM.
Member
I just noticed that I never closed out this thread. I had a bad ignition coil. Simple solution. The new chip for the DME was a bit more problematic. Apparently, my factory DME was somewhat unique and required me to send the chip to the coder to create a custom program. It took forever and I cannot recommend that particular coder. The biggest problem, which should come as no surprise, was the work that I outsourced. It leaks. I'm guessing the knuckleheads heat warped the lower timing cover when they welded on the bracket and never bothered to check for true. When I brought it to their attention, they said I must have disassembled what they assembled and it was all my fault. They generously offered to spread their incompetence throughout my engine if I paid them a slightly discounted rate. I hate them with a passion. Beware of innovative motorsports in Milford CT. So the car runs great, but leaks. After two years of psyching myself up for rework, I'm about to rip into the engine again to fix their miserable job.
Brett
Member
A granite measuring slab (they are used in industry to check the flatness and measure parts and can be purchased from surplus liquidators for a song), black sandpaper, and Permatex 1B non-hardening form-a-gasket, can get you back. If you cannot find granite, a large thick high gloss floor tile glued to 1" plywood can work. What you want is FLAT stone.Originally Posted by ltbrett

Put the part that is not flat on the sandpaper on top of the stone slab. Sand (re-surface) by moving the part in all directions until the high spots are removed. Then put a thin film of the 'form-a-gasket' on both sides of your gasket re-install. That should seal it.
Member
Good advice. Thanks. Glass also works--mirrors are best. You can get better than any milling machine by making sure to rotate (clock) the part and change your own position frequently to eliminate unconscious biases in your sanding method. I'm a fan of Hylomar, but I've heard great things about Permatex 1B. I'm hoping that my guess is right and a little re-surfacing is all that will be required.
Brett
 Posting Permissions


 Reply With Quote
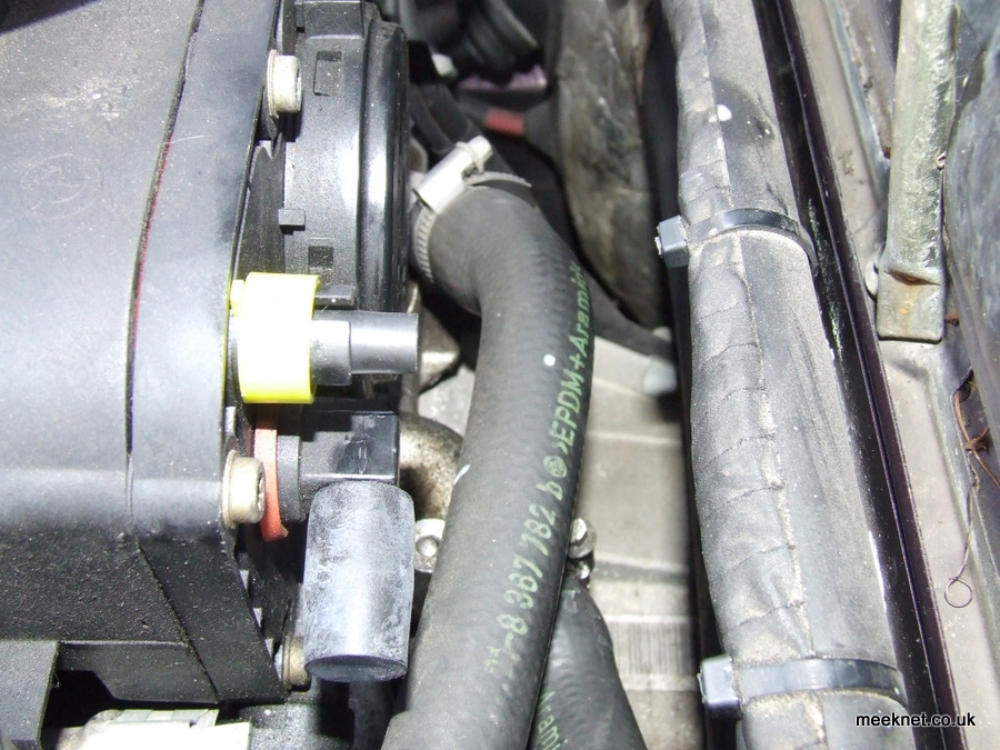

Bookmarks