
 Member
Omg very clean. How it should have looked like from the factory. If you ever end up doing door panel reupholstery, id bet you get a lot of demand
Last edited by bmwstephen; 06-20-2020 at 06:05 PM.
Off-Topic King
Originally Posted by DrftKingIII

I've talked to TC about that once and he's always maintained that. It's not a problem really since tons of racers have been using these parts for decades. You just have to make sure that they align when putting the car back down on the ground (and be ready for the eventual loud single POP every single time when they fully seat after a little bit of driving post-dropping the car on the ground)
-Rich-
Member
My rear height adjusters are on the bottom and they were installed by TC Kline himself. Also, regarding the pop... doesnt everyone lower their car as fast as possible NASCAR style? It self seats then for me 😎
Member
Subscribed. Really great job on the upholstery.
Member
You mentioned not loving the stitching on the door panels, but I think it looks great. It seems like a high-end touch. Very nice work! Your patience and attention to detail are impressive.
VSCERL
Thanks guys.
Once I finish them up completely and install them in the car I'll likely be stripping the second set for a Version 2 now that I know a bit more.
At which point these V1's will make their way to the marketplace!
Past: '99 Hellrot/Dove M3 | '97 S14 1JZ | '06 Triumph Daytona 675 | '01 330I M-Tech I | '99 Silvia S15 | Current: '96 Estoril/Black M3
Member
In one picture the main piece and the pocket pieces are not stitched together, and then you wrote "now glueing in the small pieces" and then the stitches were already there. I see you wrote "then i stitched it together", does that mean you stitched it together by hand?
Last edited by samy01; 07-21-2020 at 04:13 AM.
VSCERL
I may have missed a photo in there. First I glued the main piece, the big one. Then I glued in the two map pockets and the door pull. I then let the glue cure overnight and then hand stitched the two pieces together.
Past: '99 Hellrot/Dove M3 | '97 S14 1JZ | '06 Triumph Daytona 675 | '01 330I M-Tech I | '99 Silvia S15 | Current: '96 Estoril/Black M3
Member
It would be great if you had some detailed pictures of that. This is the most critical part of the door restauration for most people.
How did you get that stitching to be so nice? It looks like it was made by a machine.
How did you get it glued on so accurately so that the two pieces are in the correct distance so the stitching/seam won't be standing up or too far apart?
So basically you left a flap of leather hanging over so you have some material to stitch together?
VSCERL
The whole project is spread out of about two years in this thread, so I understand it can be a bit confusing if you don't read everything from the beginning. Also I don't think I added every single photo to the thread. Over the next day or so I'll try and find time to compile everything into one post.
The big main piece and the smaller separate pieces (door pull and map pockets) were given to a local seamstress to run through their machine using my given markings. The only hand stitching is then tying the two pieces together after the glue has set.
It took about three separate tries to accurately get the templates for the pockets, which I'll show in the compiled post. Many frustrating hours of trial and error led to the final result.
The only flap of leather left hanging over is what wraps around and glues to the backside of the door card, hidden from view.
Past: '99 Hellrot/Dove M3 | '97 S14 1JZ | '06 Triumph Daytona 675 | '01 330I M-Tech I | '99 Silvia S15 | Current: '96 Estoril/Black M3
Member
That's the exact part i'm wondering about. Did you glue it on flat down onto the doorcard? (But then you couldn't place any stitching there if it's glued down?). So you had to leave that small strip of leather that required stitching un-glued, then stitched it, and then left it that way, so the stitches are "standing up", or then glued it flat down as well ? (I don't know how that would work because when it's all glued flat down you can't sew it anymore.)
Last edited by samy01; 07-22-2020 at 01:59 PM.
Member
I've done this when I redid my steering wheel, but Mike's work looks way more professional than mine does. One of these days we'll get together to compare notes.
He had a seamstress sew the edges of the pieces, so that all looks super professional. Once that's done, he placed it with the adhesive so the pieces were lined up perfectly (which took several tries).
The part you hand-stitch on a job like this is after it's adhered. It's not quite just for decoration, but it's for the cosmetic aspect of it. You're just looping thread under the stitch on one piece, and then looping it under a diagonally opposing stitch on the opposite piece of material. It looks amazing, but it's actually pretty simple. When you leave a little gap, the stitching pulls it together tight and pulls the material tight and looks fantastic.
It took me two tries to get my steering wheel passable to where I didn't hate it (using the same piece of alcantara). Next time will be better, but I've got other fish to fry before I go back and spend more time on it.
-Josh: 1998 S54 E36 M3/4/6 with most of the easy stuff and most of the hard stuff. At least twice. 271k miles. 1994 E32 740il with nothing but some MPars. 93k miles.
Member
Okay, i see.
If it's all glued down (adhered), how do you get below it with your needle for connecting the two pieces? Because if it's glued down you can't access the back side of the leather anymore. Or do you leave that little bit un-glued so can get your needle through and out of the back of the leather?
Member
You sew it on top. Let me see if I can find a picture.
Member
Here we go:
The red and light blue were just stitched along the edge of the Alcantara, and then it was wrapped around the wheel and glued in place. Then I used the dark blue to go under opposing stitches and pull it tight together.
This is what Mike did - he just did a much better job than me.
20200725_160701.jpg
-Josh: 1998 S54 E36 M3/4/6 with most of the easy stuff and most of the hard stuff. At least twice. 271k miles. 1994 E32 740il with nothing but some MPars. 93k miles.
VSCERL
Haven't done much with the car lately but planning to devote some time tomorrow to knock some things out. In the meantime, here are some photos from the last time I drove the car about a month ago.
IMG_3533 by Mike Ellington, on Flickr
IMG_3534 by Mike Ellington, on Flickr
IMG_3514 by Mike Ellington, on Flickr
IMG_3500 by Mike Ellington, on Flickr
IMG_3497 by Mike Ellington, on Flickr
IMG_3485 by Mike Ellington, on Flickr
Past: '99 Hellrot/Dove M3 | '97 S14 1JZ | '06 Triumph Daytona 675 | '01 330I M-Tech I | '99 Silvia S15 | Current: '96 Estoril/Black M3
VSCERL
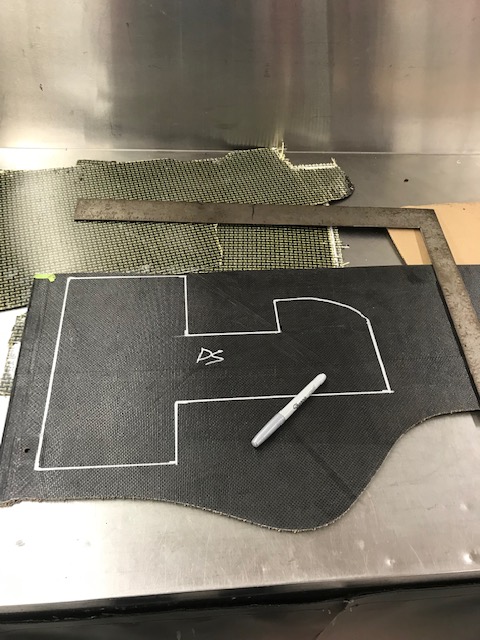
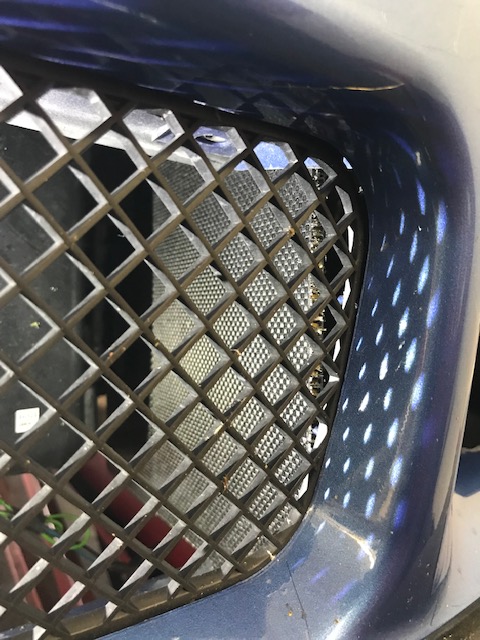
In the continued chase to try and offset the incredibly hot Texas summers and improve the efficiency of the cooling system, I spent some time knocking out a few more steps towards my carbon fiber radiator ducting.
There are plastic trim pieces that accomplish this to a certain degree but those are long gone. Rather than spend the money to replace them with OEM pieces I decided to build a better sealed setup.
I started with some leftover cardboard to make the general templates. It would have been much easier without the A/C condenser there.
Once the base template was established I traced it onto a sheet of carbon fiber I had. Although thin, this piece is as sturdy as it is lightweight.
In just one piece, it goes from the bottom of the lower grille opening all the way up behind the nose panel, forcing all air from both the kidneys and the bumper through the radiator, rather than around it. It fits very snug around the bumper support. Ill continue to use the Euro upper radiator shroud to duct any of the upper air to the top of the core.
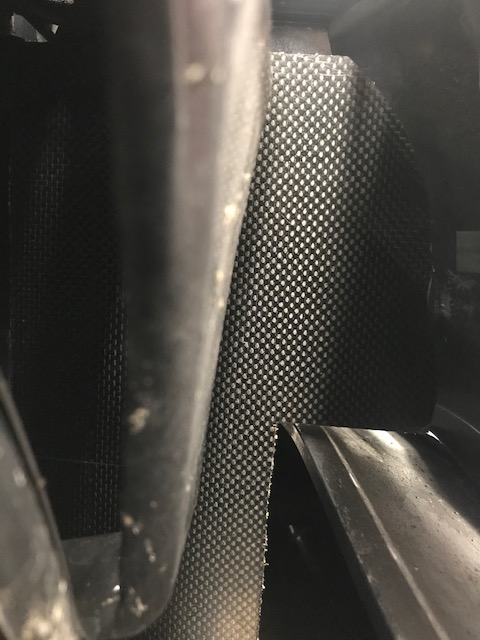
It butts up right against the grille, almost to the edge of the opening.
A little more trimming required. Once thats done the edges will be sealed so air and water dont get into the honeycomb center.
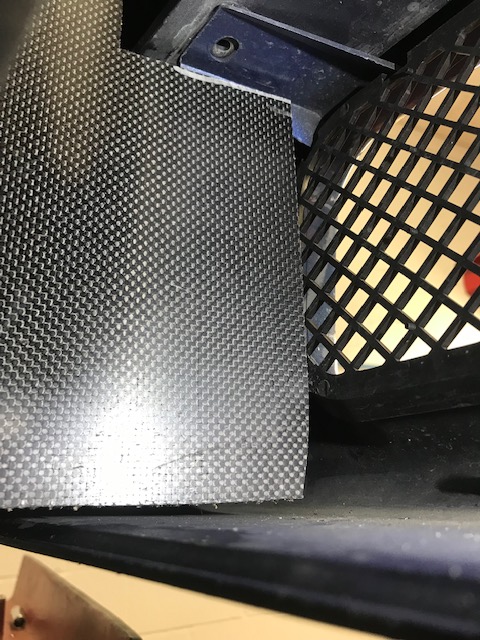
Same thing on the passenger side, just with a relief cut for the A/C hardline.
Here are the two side pieces mocked up. These photos are older and Ive since removed the front AUX fan entirely which helped lower my water temps a couple of degrees.
A carbon fiber L bracket riveted to the core support will locate the side pieces to the car securely.
Both sides mounted up and edges sealed. Next was to file the edges smooth after the epoxy hardened and create the lower center piece.
Center piece complete, but ran out of time to button it all up. Ill use another carbon L bracket to attach them. Ill need to seal the bottom piece as well as get some sealing foam to plug some of the small open areas.
Not my best photography. Walking past the car itd be hard to notice this ducting, but its cool once you start looking that you see the duct setup is full carbon. Im looking forward to wrapping it up and seeing what it does for my water temperatures.
Past: '99 Hellrot/Dove M3 | '97 S14 1JZ | '06 Triumph Daytona 675 | '01 330I M-Tech I | '99 Silvia S15 | Current: '96 Estoril/Black M3
Your mom goes to college
interesting... let us know
98 Estoril ///M3 4/6
S54 swapCSL
Member
Very nice!
I go out after the elections are over every year and grab a couple old signs - 4x8 sheets of corrugated plastic. They come in handy for all kinds of things. (I made an Optimus Prime rig for my son for Halloween a couple years ago).
I made side blockoff plates like yours out of these a couple years ago - they've held up OK, but the squishy rubber pipe insulation I used to make a seal on the ends blew out, and I never fixed them to the sides of the radiator, but I did see a difference in temps, especially at sustained high speeds. I just don't drive that far in this thing anymore, so it's hard to really tell how much their benefit has eroded. All the long trips are in the family hauler.
But you should make a pattern and sell these - this is something everyone struggles with.
VSCERL
Still haven't bolted up the bottom piece sealing it off entirely, but with just the side pieces in I have noticed my highway cruising temperatures staying steady around 195, before it would slowly creep up. Then again, ambient temps have cooled off a bit so that may be the contributing factor.
Nothing much new, aside from finally replacing the worn out and flat spotted Dunlop Direzzas with new Bridgestone RE71Rs.
These are supposed to be a faster tire than the Dunlops. Looking forward to getting on track to see if theres an improvement.
With the new tires on, it was time to check the alignment and make some adjustments to the front end.
I noticed that whenever my headlights are on everything works as normal .
But when I enable the high beams, the driver side is not getting the signal. The inner hood on the projector doesnt open up and the high beam bulb doesnt illuminate, and the parking lot goes off. Weird.
Not sure how that managed to happen, I havent messed with anything recently. Ill sort that out another day. For the mean time, now that the weather is cooling off, I decided to take a little night drive.
Past: '99 Hellrot/Dove M3 | '97 S14 1JZ | '06 Triumph Daytona 675 | '01 330I M-Tech I | '99 Silvia S15 | Current: '96 Estoril/Black M3
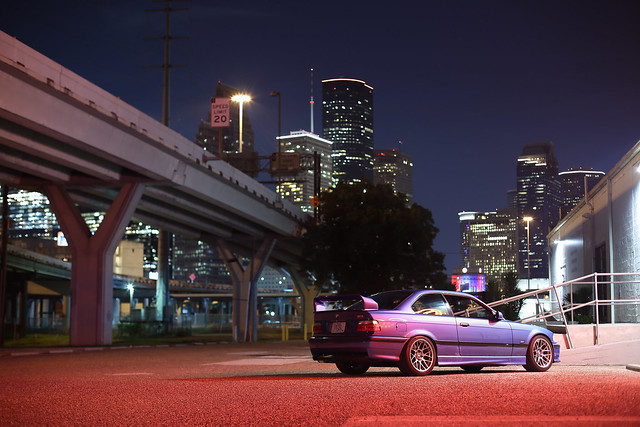
📷: @nholmes74
I haven't been around the forums much these days but things are looking great, dude!
I might have to do some custom ducting like that if my S54 cooling doesn't workout after the swap.
VSCERL
Thanks Holmes, happy to be of assistance if I can!
Past: '99 Hellrot/Dove M3 | '97 S14 1JZ | '06 Triumph Daytona 675 | '01 330I M-Tech I | '99 Silvia S15 | Current: '96 Estoril/Black M3
Member
BMW E36 M3 Expert
Love your door panels and the ducting. Awesome car and good work.
TRM Coilovers 670F/895R | BBS LM | Corsa RSC36
VSCERL
Part one of a lengthy and detailed update on the M3 that Im excited to be closing in on wrapping up. As usual life and work has been busy and progress on the blue car has been slow. I recently had my other project car shipped down to Texas after having sat in storage for roughly the last five years. Its been neglected for a while and needs quite a bit of love to get back to where it ought to be. Having both my 90s sports cars sitting next to each other has been something Ive looked forward to for years, just need to clean up the white car.
It seems I have a type. The M3 is a small car by modern standards, but the Silvia makes it look big-ish.
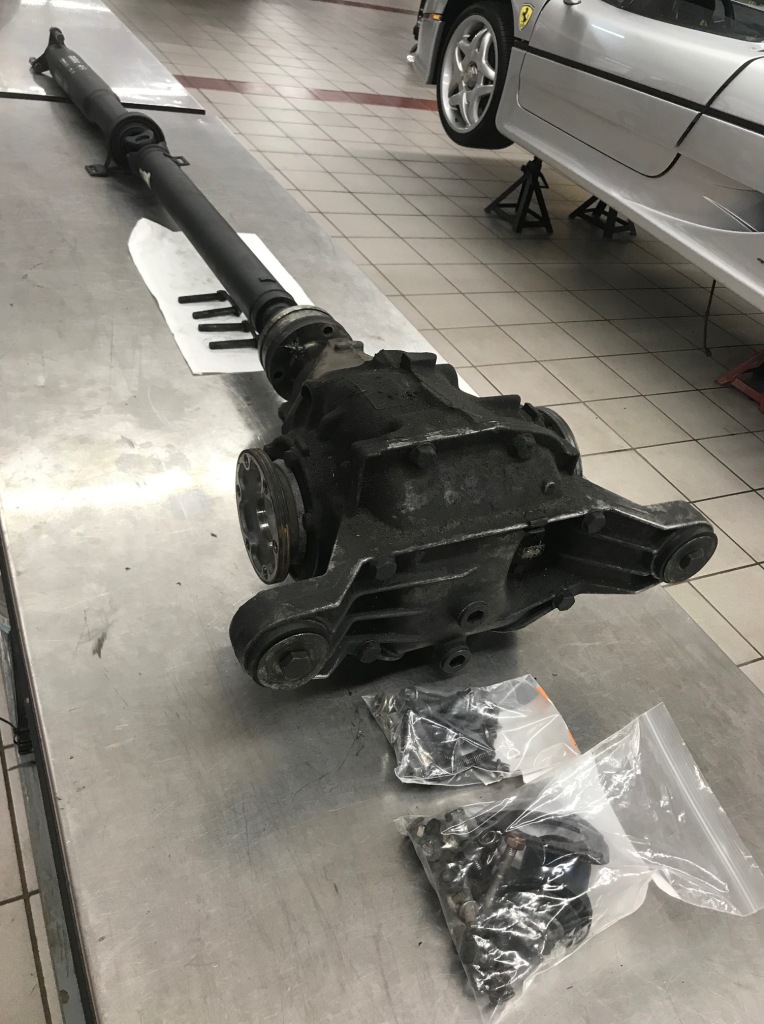
Last summer, during our day trip out to Austin, on the way home I noticed a faint whine from the rear end that increased with wheel speed. It was pretty subtle at first and I didnt think all too much of it. Over the last year it increased in ferocity, louder and louder, to the point of obnoxiousness at highway speed. Through some diagnosis I eventually landed on the diff bearings being shot and started ordering up parts. Hours of reading up on different clutch and ramp setups, I decided to keep it simple with the Thayer 3-clutch 40% static lockup/low preload setup and factory 45/45 pressure ramps. A little more reading, and a little more while Im in there going, I decided to change the final drive from 3.23 to 3.46, so I sourced a new ring and pinion from overseas.
As usual, I had the parts for quite a while before actually mustering up the motivation to start tearing everything apart. When the time finally came to pull the diff out it didnt want to cooperate all too well. Although the driveshaft was replaced only 6 months or so ago, for some reason the input flange on the diff was seized to the driveshaft. With a limited amount of time that day we ended up dropping the subframe slightly and removing the diff and the driveshaft as one entire piece.
Certainly not the ideal outcome I wanted but none of the other options worked. Torch and heat, prybars, hammers and punches, even using the driveshaft as a slide hammer at the expense of the new CV joint, nothing worked. With all options exhausted, it came down to completely disassembling the CV in order to get the two apart.
What a yucky and stupid problem to have but sometimes thats just the way it goes. With the main issue out of the way I could get started on disassembly, cataloging, cleaning, and sandblasting the factory hardware that wasnt being replaced.
Ive probably said it before but cleaning, sandblasting, and re-coating hardware is strangely therapeutic for me.
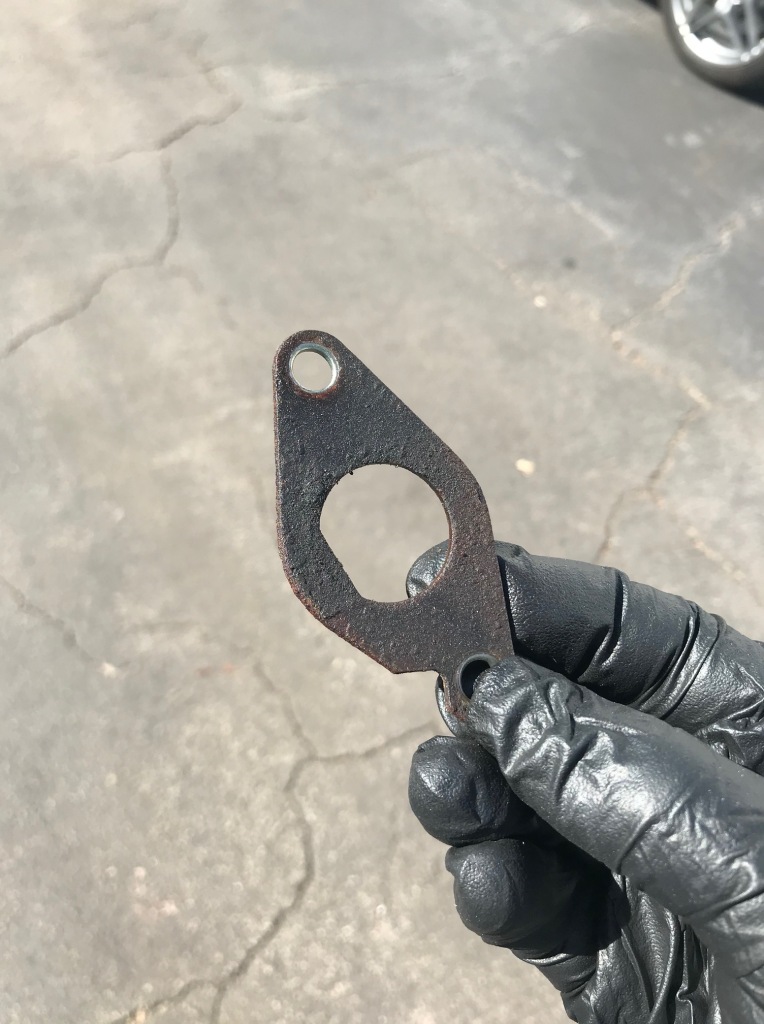
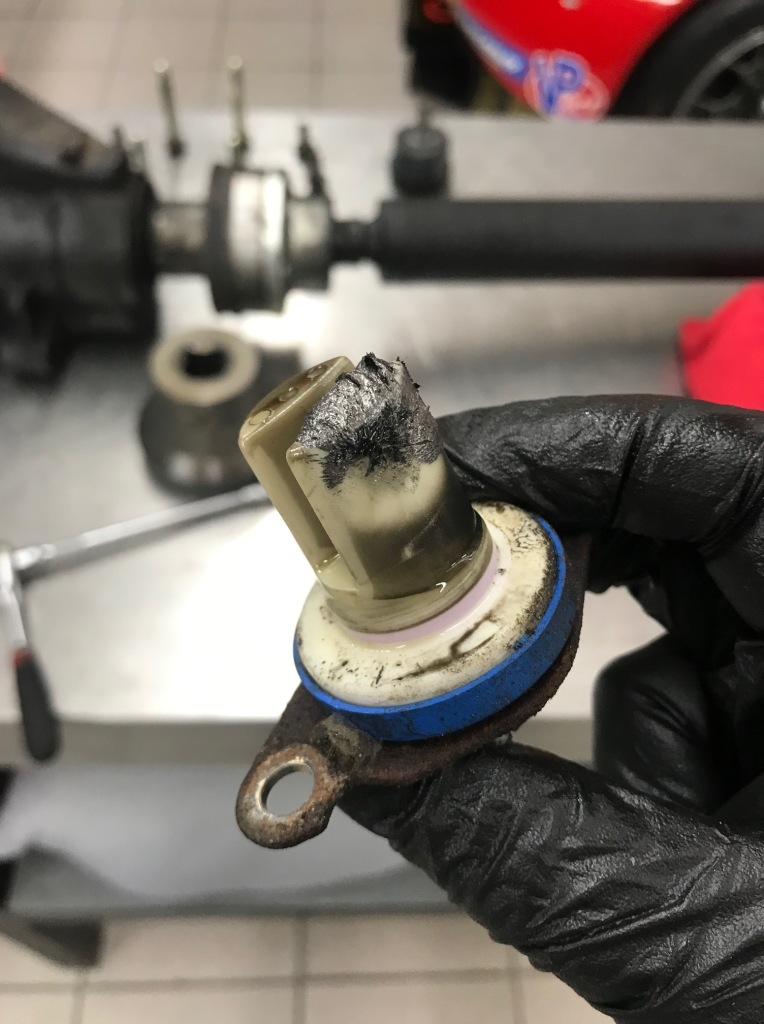
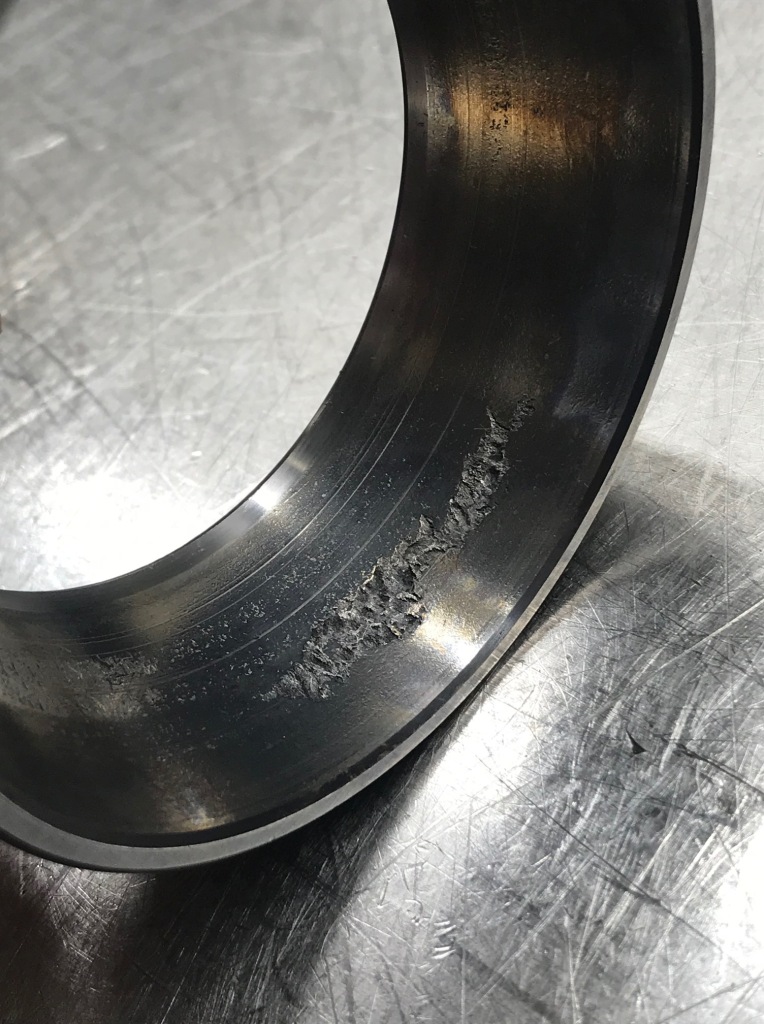
The speed sensor was pretty caked up with metal shavings, yikes. Originally I thought this to be from one of the carrier cap bolts having backed out and eaten to death by the diff, but that ended up not being the case.
All eight carrier cap bolts were fully seated and in tact. Surprisingly enough seven of the eight bolts came out without a fuss and I had to get creative with only one of them.
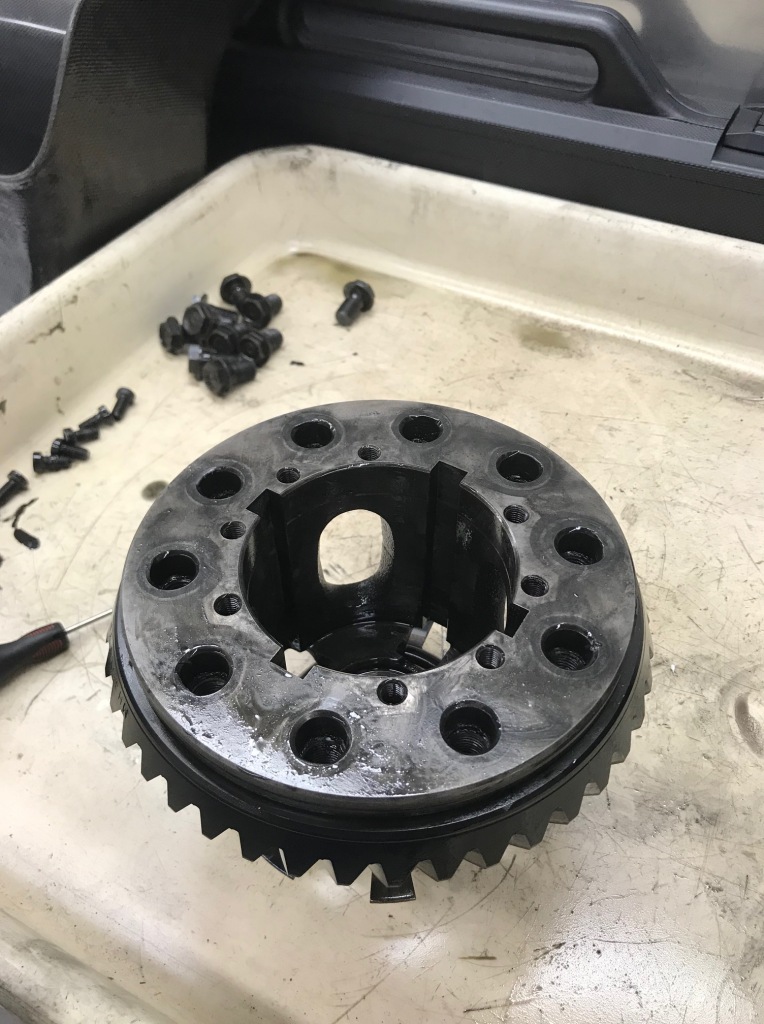
A couple of zaps with the impact made quick work of the ring gear bolts. Thank whomever for power tools. Now for the fun part, disassembly of the clutches, dog plates, spider gears, pressure ramps, all the washers and the magic of a clutch-type limited slip differential.
This is also the part where I find the real carnage done to those parts as well. I expected some wear and tear for a car of this age, but not quite this much.
Some pretty serious gouging and scoring in the dogs and the pressure ramps. The clutch plates were completely toast as well. Luckily new dog plates come with the Thayer clutch replacement kit. Unluckily, I didnt plan to have to replace the ramps as well. The damage was too deep to try and machine smooth again. Rather than complicate anything any further, I sourced another set of OEM 45/45 ramps that had been refinished and were in perfect shape.
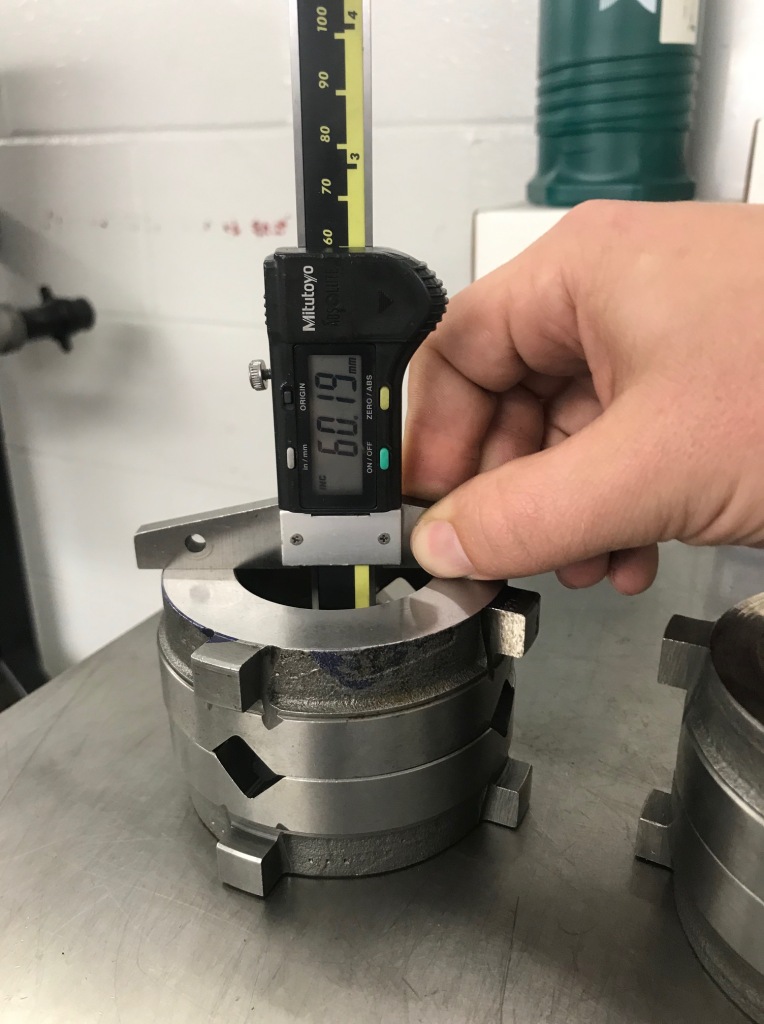
About a .15 mil difference, good enough for me. But before reassembly of all of the LSD internals, it was time to take care of some of the other items first.
Starting with installing the new 3.46 ring gear. If I recall correctly the 3.46 ratio out of a medium case/188mm diff was from an E28s and certain E30s. These cars used 12mm ring gear bolts as opposed to the E36 M3s 14mm bolts.
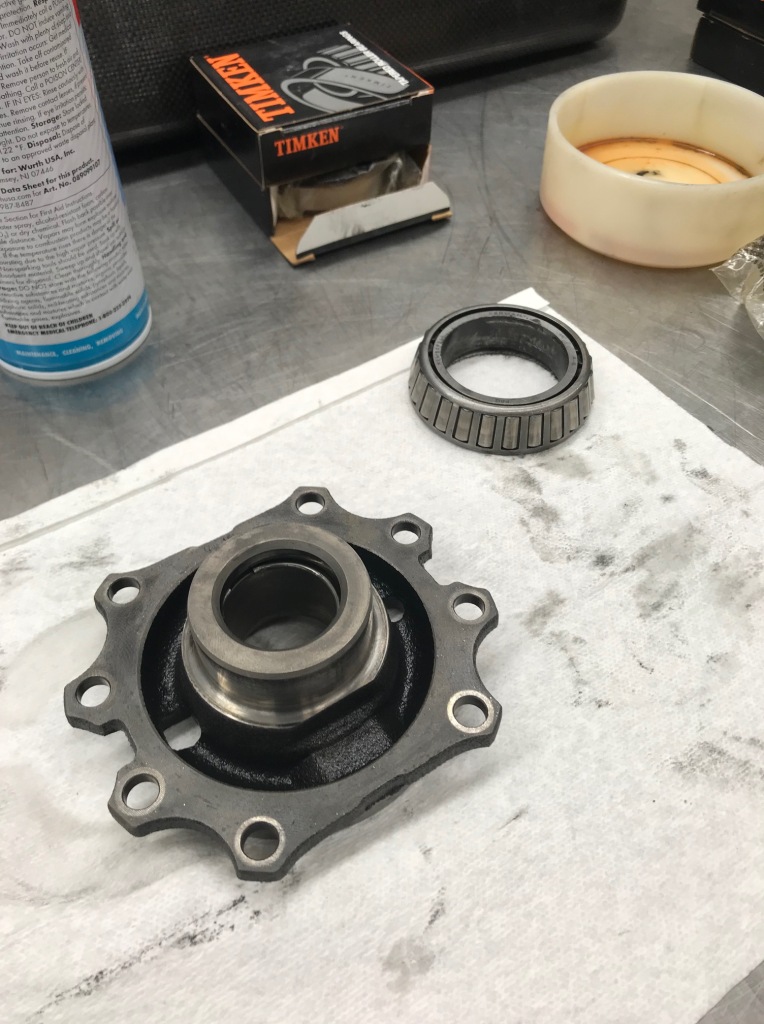
New OEM bolts and adapting hardware squared that away. Next task was removing both carrier bearings.
No fuss in removing the old ones and pressing the new ones on.
Next up was to clean up and re-paint the carrier caps and then replace the seals, o-rings and corresponding bearing races. While working on these I had the differential housing in the parts washer running for a few hours to try and clean out all of the metal shavings that were lingering inside.
Old and tired and dirty it was, even after a lengthy bath. A little time with some cleaners, wire brushes and a couple of coats of fresh paint and itll be good as new.
While working on all of this during the evenings, and after a little hiccup with the driveshaft shop, the remand driveshaft showed back up.
Quick pause to take a trip to the east coast to hike some mountains and eat clam chowder.
Back to Texas a little bit later, I stopped by the local Autozone to grab a 30mm socket and to be reminded of the awe in the lack of customer service or automotive knowledge. Ground down the socket to fit and again a couple bumps of the impact had the pinion nut right off. The plan is to put this input flange on the lathe to ensure its fully rounded and wont seize onto the differential flange again, but in the meantime its off to the sandblaster.
Years of road debris and grime and corrosion, gone just a couple minutes later.
And almost good as new, still waiting on some lathe time.
Seriously, sand blasters are the best.
With the pinion gear now pressed out of the diff housing itself, it was time to get down to what started this entire project in the first place.
Andddddd now we know where those metal shavings came from. The roller bearings and races on the pinion were absolutely destroyed, pitted beyond what I anticipated. It feels good to see this and know that all of the work thus far wasnt for nothing. Now Im stoked, not only to see how the 40% lockup acts, but how quiet and smooth this thing is going to be.
Old races driven out
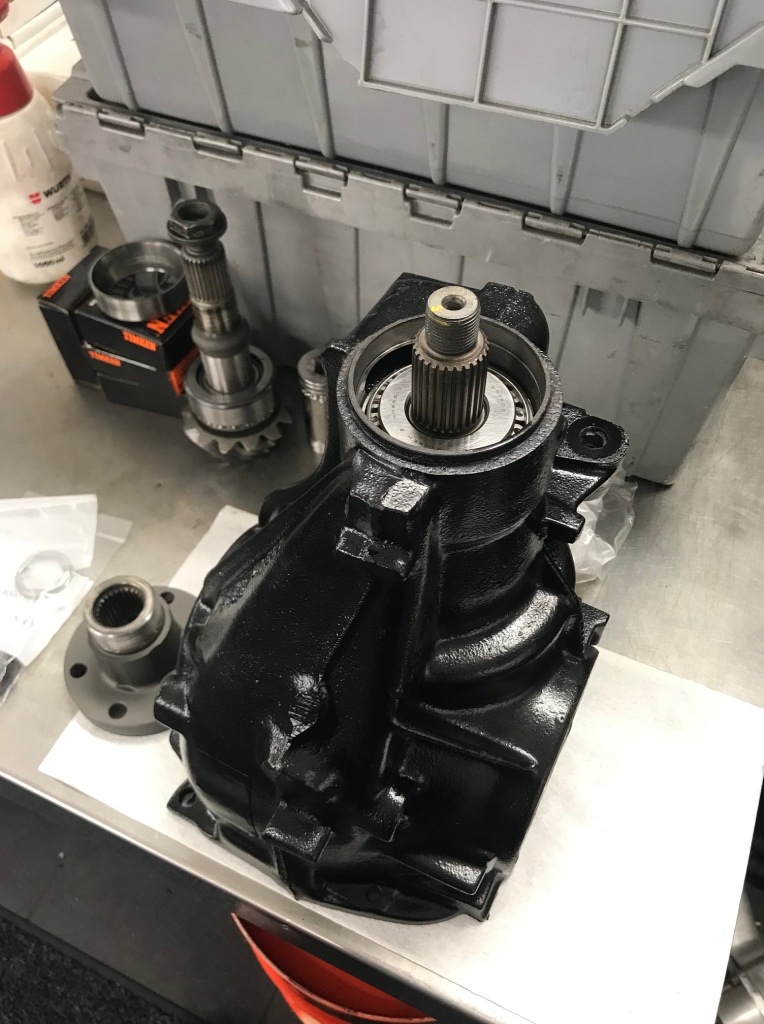
..and coming back to the workbench a few days later to find the new ones were already driven in, the new pinion installed .
.and some math on the table with requested shims? Perks of having a full-time gearbox tech that took an interest in helping a clueless guy out. A few days later I had a pack of shims from friend and BMW whiz Jon Eye at Kinetic Motors in St. Louis. With the new shims in, Richard tested backlash, preload, and wear pattern on all of the components and gave me the green light to reassemble the LSD itself.
He also threw the input flange on the lathe and said it was quite a bit, a couple thousands, smaller than the flange on the drive shaft, likely why the two wouldnt come apart after being assembled last time.
Diff cover with new OEM rubber bushings pressed in. More on the reason why I removed the poly and replaced them with rubber in the next post.
With all of the work on the differential pretty much done aside from putting the cover on and filling it with fluid its time to focus on the other half of this big task, which will be covered in the next post after its all done.
Past: '99 Hellrot/Dove M3 | '97 S14 1JZ | '06 Triumph Daytona 675 | '01 330I M-Tech I | '99 Silvia S15 | Current: '96 Estoril/Black M3
Member
Great documentation and fabulous pictures. Do tell me about the F50 we see in 2 pictures.
Last edited by frbz; 12-26-2020 at 05:48 PM.
 Posting Permissions


 Reply With Quote


Bookmarks