
 Member
Man you've done some incredibly cool, comprehensive and creative work on this car. Nice work.
- 98 m3, techno/anthrazit cloth, 124k and officially worthless - 89 m3, alpine/black 143k and officially old - 2000 323it, tiag/grey, 169k and officially boring
Member
well done!!!...it was great to be able to read through all the modifications...can i ask where you got those M decals for the cluster...and did AKG poly bushing end up being 95A?...im asking because im going to pick-up some revshift bushings and trying to determine if i should go 80a or 95a...keep it going!!!...really enjoying it....
VSCERL
Thank you, Chris. I'm trying to keep the car in an OEM+ and tasteful yet unique state, while also being able to hang with the quicker modern sportscars at my local road course. I've had an idea in the back of my head for quite some time to make the car a bit more unique, poised and balanced while not straying too far from it's roots. Hopefully I can get started on it over the winter months.Originally Posted by notMpowered

I got the M decals off of Amazon, a sheet of 10 I believe. I can put one or two in the mail if you like, I have no need for all of them. I did end up with the 95A on the FCAB's, as AKG doesn't make a 80A. Like previously mentioned, I went back and forth on the 80 vs 95 vs derlin vs rubber for hours. I wanted something that would perform well on the track but retain a level of refinement on the rough street roads for when I occasionally subject my girlfriend to taking the car to dinner. That said, I already have stiff sidewall 200-treadwear tires, coilovers and chassis bracing, so the fact that I don't feel an increase in NVH may not translate to other users with a different setup.
Past: '99 Hellrot/Dove M3 | '97 S14 1JZ | '06 Triumph Daytona 675 | '01 330I M-Tech I | '99 Silvia S15 | Current: '96 Estoril/Black M3
VSCERL
Following CWest's advice and took something nice-ish for a drive somewhere nice for some fish tacos and shrimp nachos.
Took the car down to the beach and jumped into the Gulf of Mexico.

Past: '99 Hellrot/Dove M3 | '97 S14 1JZ | '06 Triumph Daytona 675 | '01 330I M-Tech I | '99 Silvia S15 | Current: '96 Estoril/Black M3
Member
I'm with you. I have delrin FCABs and I didn't notice any NVH difference either (on Billy Sports and H&R Sports w/ 245/40/17 PS4S). I later did delrin RTABs, too (yes, with reinforcements) and I only notice additional NVH in once place in our neighborhood where they cut the curb down and left a 1" lip instead of making a smooth transition for a new street. Aside from that one place where I hit it going 25+ mph, I have no complaints.
But then again, my rear ball joints and bushings were totally shot. Fresh ball joints and bushings on the rear control arms made it so much better I don't know that I'd have been aware of what I was missing.
Then again, my wife is in the car maybe 4 times a year, so I don't care too much. I have a line I don't want to cross, but it's way past where she'd draw the line.
-Josh: 1998 S54 E36 M3/4/6 with most of the easy stuff and most of the hard stuff. At least twice. 271k miles. 1994 E32 740il with nothing but some MPars. 93k miles.
VSCERL
Took an spontaneous trip up to Austin yesterday. We ran Lime Creek twice and went up towards Balcones Canyonlands and Marble Falls. Very jealous of the roads you guys have at your disposal, blckstrm.
Past: '99 Hellrot/Dove M3 | '97 S14 1JZ | '06 Triumph Daytona 675 | '01 330I M-Tech I | '99 Silvia S15 | Current: '96 Estoril/Black M3
VSCERL
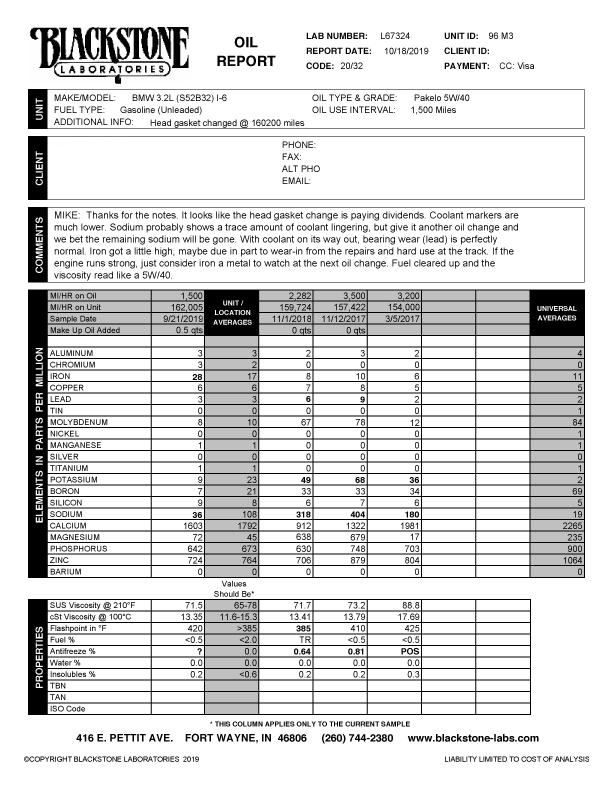
Fresh oil in today, anxiously awaiting the analysis back form Blackstone. Also picked up a full-frame DSLR I've had my eye on for a while.
IMG_9369 by MIke Ellington, on Flickr
IMG_9374 by MIke Ellington, on Flickr
IMG_9376 by MIke Ellington, on Flickr
IMG_9379 by MIke Ellington, on Flickr
Past: '99 Hellrot/Dove M3 | '97 S14 1JZ | '06 Triumph Daytona 675 | '01 330I M-Tech I | '99 Silvia S15 | Current: '96 Estoril/Black M3
Member
Those are some great pictures!
And yes, we have some nice roads around here - glad you made it over here to the dry side of the state! (and I hope you didn't get too wet last week)
I use my turn signal
Wow, cool stuff in here. Keep it up!
Member
Amazing pictures. Which camera and lens did you get?
Member
I don't often give good advice, but I'm glad someone took it when I did.
- 98 m3, techno/anthrazit cloth, 124k and officially worthless - 89 m3, alpine/black 143k and officially old - 2000 323it, tiag/grey, 169k and officially boring
VSCERL
I was on a literal island for a few hours at work, but everything went down and none of the goodies got wet there or at home thankfully.
Thank you, I'm excited to pick an old hobby back up. I got a Canon 6D with the 50mm 1.8. Looking forward to getting my hands on the 35mm next month.
Here's another from last Sunday.
IMG_9421-2 by Mikellington, on Flickr
Past: '99 Hellrot/Dove M3 | '97 S14 1JZ | '06 Triumph Daytona 675 | '01 330I M-Tech I | '99 Silvia S15 | Current: '96 Estoril/Black M3
Member
So nice man.
VSCERL
Not much of an update in terms of the ongoing "build" but took some good photos over the last few weeks, still getting the new camera dialed in.
IMG_9480 by Mike Ellington, on Flickr
IMG_9489 by Mike Ellington, on Flickr
IMG_9496 by Mike Ellington, on Flickr
IMG_9501 by Mike Ellington, on Flickr
IMG_9538 by Mike Ellington, on Flickr
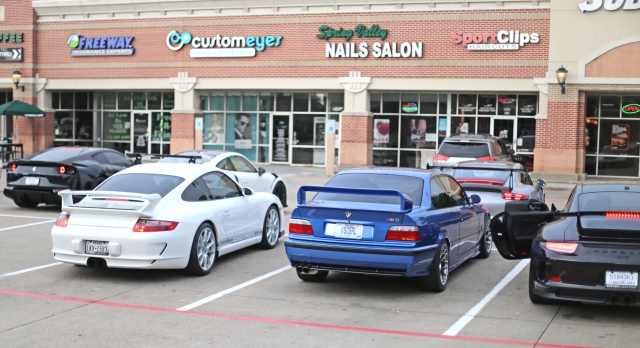
Met up with some friends on a Sunday morning, felt very outclassed. 997.1 GT3, 991.1 GT3, three 991.2 GT3RS's, a GT4 and a 812 Superfast.
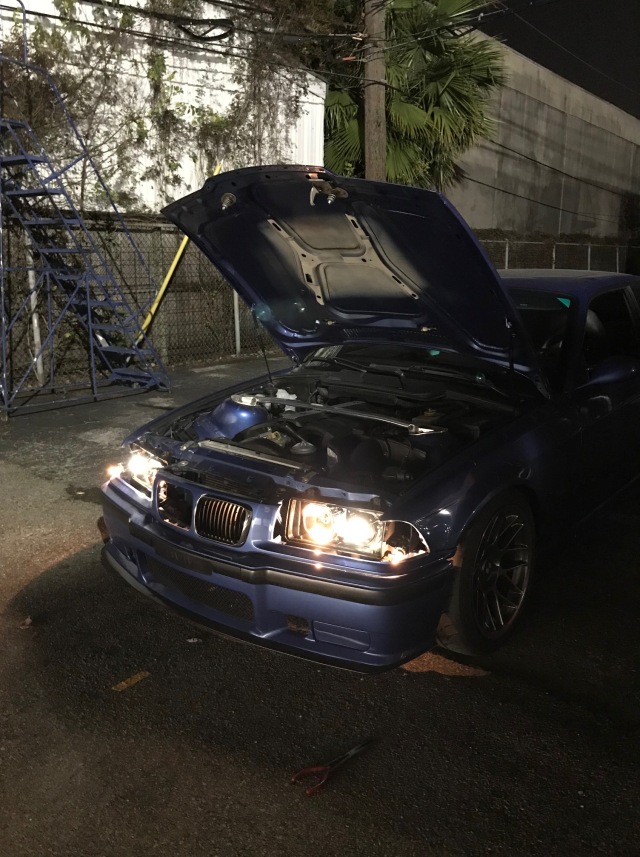
Something I've been wanting to do for a long time, a proper projector retrofit. The light output using generic HID's and the standard DJ Auto/Depo projectors is horrid, so I'm stoked to have finally picked up a proper retrofit kit from a semi-local board member. Assembly is pretty straight forward, but probably won't get them into the car for another couple of weeks.
-Brand new glass DEPO housings with the TRS FX-R projectors
- Phillips DS2 Philips 85122 (4300K) low beam HID bulbs, Osram Nightbreaker H1 bulbs in the high beams. XB35 ballasts.
-Internal wiring modified for the sun-at-night QUAD high beam (standard halogen high beam bulb illuminates with the internal Bi-Xenon projector)
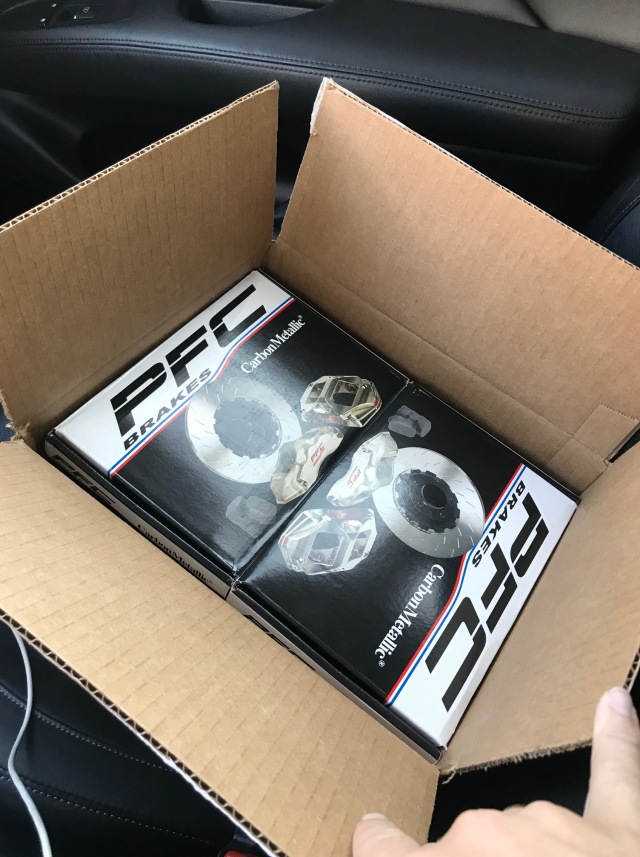
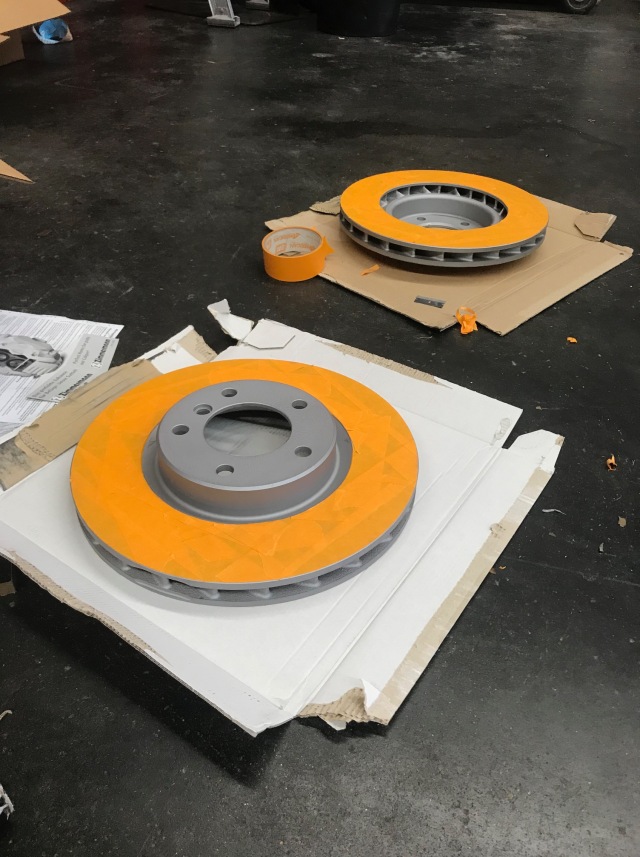
Picked up some PFC 08's the other day, still haven't ordered the caliper rebuilds bits or the rotors yet, but the expensive part is out of the way. I flipped the tires yesterday after work and the lip on these rotors is pretty......comforting.
During the last oil change I sandblasted and coated the oil filter cap, was looking a little grungy next to the other refinished parts. Looking forward to getting rid of the factory fan shroud soon.
Lastly, after about three weeks of the oil sample being lost in the mail on it's way to Blackstone, it arrived and I got some very relieving results. This year's oil was a 5W40 but after the last two track days getting some fairly aggressive lifter tick coming off track, I'm dumped some 10W60 in this time to see how she likes it.
Past: '99 Hellrot/Dove M3 | '97 S14 1JZ | '06 Triumph Daytona 675 | '01 330I M-Tech I | '99 Silvia S15 | Current: '96 Estoril/Black M3
VSCERL
Another bit of a hiatus from the M3 with no major updates. Took a trip home for a friends wedding, finishing up some big projects at work, and after years of dreaming, spent two weeks in Japan. Absolutely fantastic place, I hope to live there before I die. Heres one photo from the trip of the R33 GTR I put about 700 miles on.
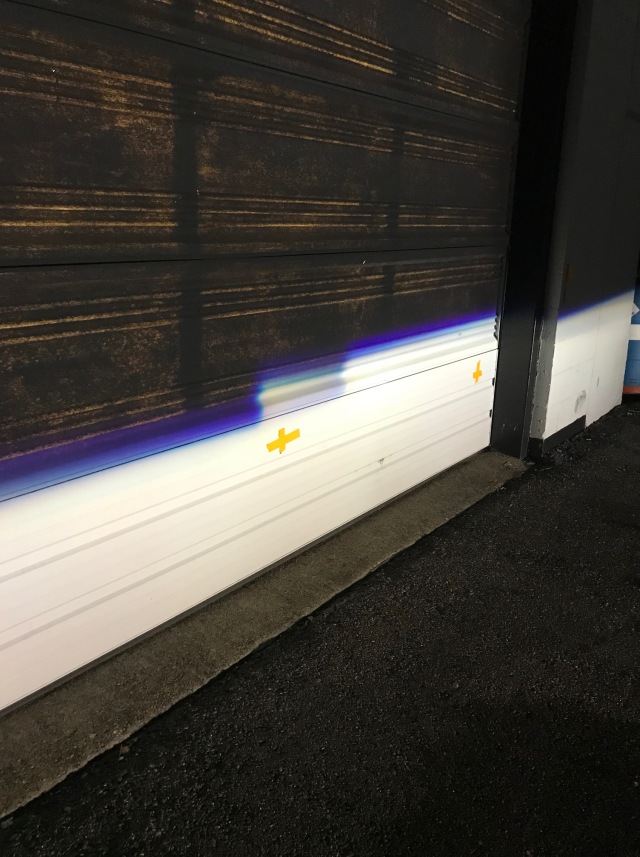
Now that Ive settled back into the routine and gotten (most of) the holiday shopping down, Ive been updating a few things on the M3 that have been on the back burner, starting with the headlight retrofit. I dropped off the inner lenses with a glass company and they said they had a 50/50 shot of making it work or completely destroying them trying, I like these odds.
Once assembled I started to notice that their cut on one of the lenses was way off center. In the photo above you can see the trace of the original circle in the middle of the lens. It was obviously cut a bit low and left justified. This of course started a butterfly effect
As you can see the projector itself was way off centered, triggering a bit of an OCD meltdown. Taking the headlight back apart I found that the projector itself was rested against the headlight bowl housing itself, rendering it impossible to physically move the projector down and re-centered.
With the help of my buddy again, he trimmed the bowl and moved the projector down to where it needed to be.
And thennnnnnn testing. Testing testing testing, probably two hours of testing. There are a number of ways to align these, as out of the box they were very low. There are the two shanks that move the entire bowl housing up and down and left and right, but with this retrofit added the effect of making sure the projector was aligned right without the high beam bowl being too high, and then again with the whole headlight angle/height screws that locate the headlights themselves to the chassis. There are a lot of moving parts to getting the cutoff perfectly horizontal with the ground, the hot spots where they need to be, and just generally aligned to where they need to be without blinding everyone going the opposite way.
Look at that cut-off! I think all said and done we wrapped up after roughly 4 hours of back and forth, which is probably why I didnt get a final photo of it all reassembled and aimed.
But I will, soon. After driving with these for a few nights the past week I can surely say this is one of the best things Ive done to the car. The factory halogens are decent for what they are, the DJ Auto/Depos factory projectors throw light every which way, and Ive never used the factory ellipsoids so I cant make a comment about them. Its so nice having a nice, bright, crisp and clean headlight in the car, especially for when Ill be in the back country where I couldnt see a deer if it was in the road 30 yards in front of me. Overall the kit can add up in price, but its definitely worth the money to anyone considering it.
I spent a Saturday disassembling the brakes, cleaning, sandblasting, and rebuilding the rear calipers with new seals. I kept the factory guide pins instead of the bronze ones, as I dont have any pad taper and dont want to have to remove them to inspect and clean regularly. I was excited to get rid of the red paint someone did before for some super exciting matte black. I planned to both the front and the rear but ran out of time and only rebuilt the rears. The fronts will have to be done soon.
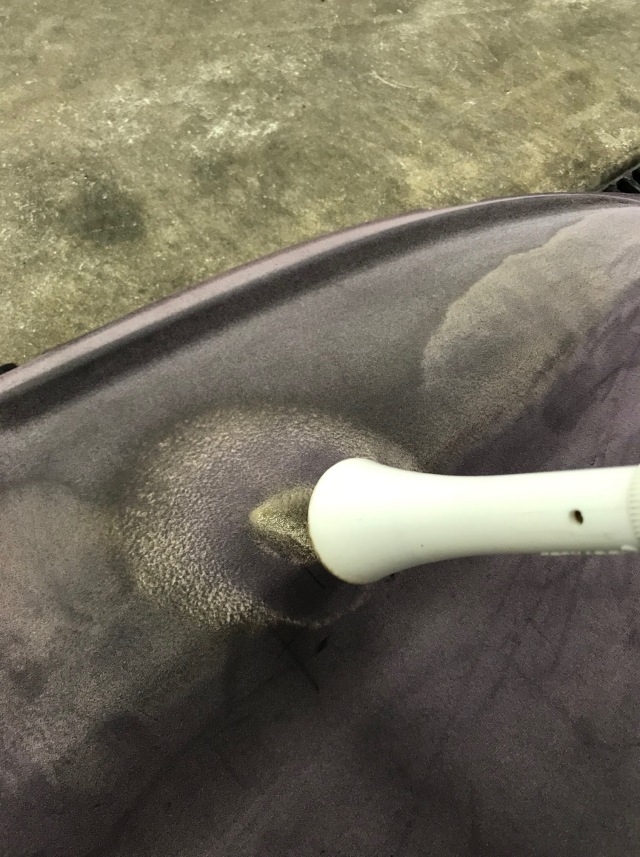
Wasnt certain if the rotors I ordered had corrosion protection on the vanes or hubs, so lemme hit em with some high temp black real quick.
Just in time for these long overdue rotors.
Threw these on the fronts just to get an idea of caliper temps, but maxed them out while bedding in the new PFC08s, DOH! Ill throw a new one on before my track day this weekend. Side note, PFC08s are super noisy, its almost comical. Far more noisy around town than the Hawk Blues that came off of the car.
Speaking of track day this weekend, I threw the car on the corner balancer to check the alignment. All good, just some small adjustments to the front toe and the car is good to go. Ive had an intermittent ABS light and after hooking it up to a computer that reads ABS codes, seems to be a intermittent power fault, likely a loose ground somewhere. Other than having to adjust for driving ABS/non ABS, Im thinking the car is good for high 1:47s this weekend with a bit more confidence and fresh brakes.
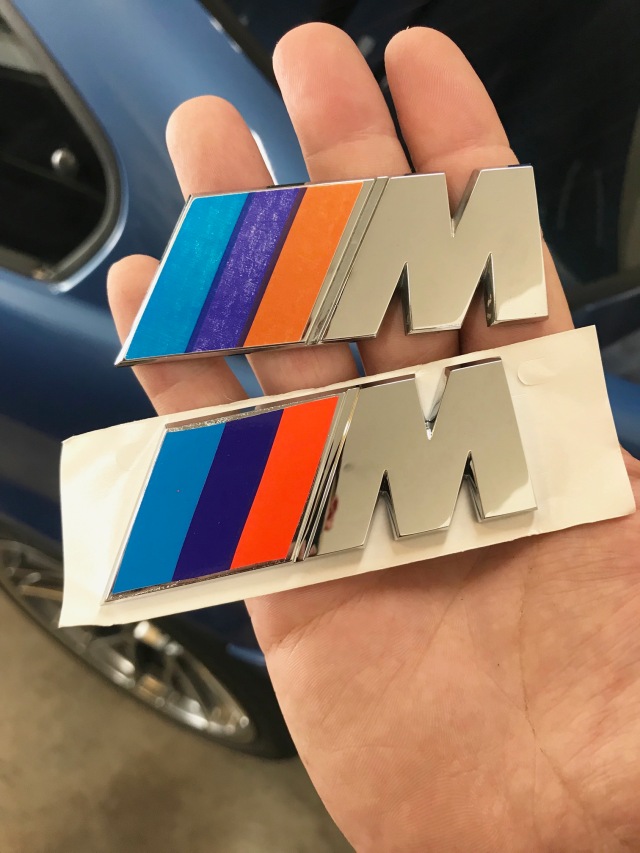
Ill wrap this post up with some important maintenance. Ive had this badge replacement for over a year, guess its time to put it on.
Past: '99 Hellrot/Dove M3 | '97 S14 1JZ | '06 Triumph Daytona 675 | '01 330I M-Tech I | '99 Silvia S15 | Current: '96 Estoril/Black M3
VSCERL
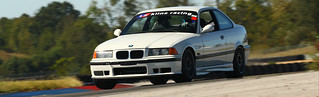
The last track day was mildly successful, getting myself a high 1:47 on some tired Direzza Star Spec 2's, but flat spotting one of them in the process ending the day early. I think I'm going to give the RE71's a shot next. Still havent done too much with the car, although Im 50-70% done with about four separate projects for it. Those updates will come once Im closer to wrapping them up.
However, I did get some new seats for the car, but havent mounted them yet. Not sure how much Ill like the bright red against the blue, but well see. Theyll serve the purpose theyre needed for, saving weight and holding me in place on track days, then back to the Vaders afterwards.
Got some fresh OEM floor mats, very exciting.
I think the door panels that Ive been intermittently working on for the last year are finally ready for me to try and adhere new vinyl to. I still think the map pockets are going to need to be sewn in separately, as I dont think even a good vacuum bag will hold up the test of time. More on this when I finally make a decision.
And lastly, I had some free time on a Saturday and felt like burying my head a bit. The car lives in the garage and is washed after nearly every other drive, so it didnt need much, however I put it on the lift and started doing some paint correction. The process may be mind numbing to some, but its therapeutic to me.
The rear bumper was the worst, the top edge was very hazy.
And after:
I ended up spending about 7 hours doing the entire passenger side and the rear bumper. Ive still got the entire driver side, trunklid, roof, and a second pass on the hood to finish. However she was looking good as the sun went down at the end of the day.
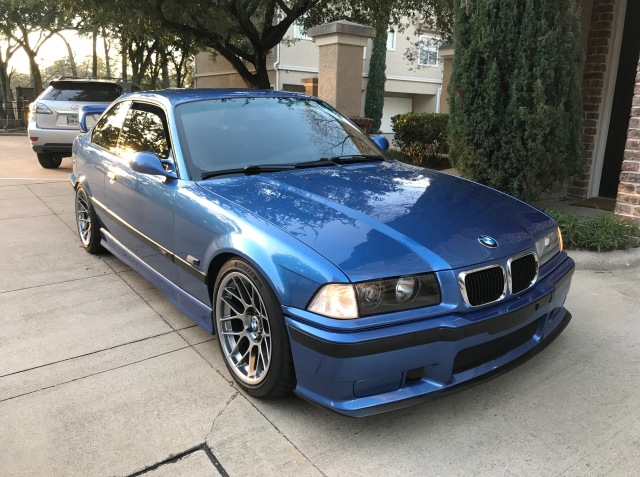
Took the car to C&C the following morning and snapped a quick pic.
IMG_2062 by Mike Ellington, on Flickr
I'm thinking about removing the tint and going back to the fishbowl, with a 70% Ceramic to help keep out as much heat and harmful UV as I can. Still unsure.
Hopefully more to come soon!
Past: '99 Hellrot/Dove M3 | '97 S14 1JZ | '06 Triumph Daytona 675 | '01 330I M-Tech I | '99 Silvia S15 | Current: '96 Estoril/Black M3
Member
I was just thinking "would look great with no/way lighter tint."
Totally understand the benefits of protection from the sun down in Texas, but the UV film does lots these days.
- 98 m3, techno/anthrazit cloth, 124k and officially worthless - 89 m3, alpine/black 143k and officially old - 2000 323it, tiag/grey, 169k and officially boring
Member
Seeing this car makes me wish I kept the interior in it. Nice work and great car!
E36 M3 journal https://www.bimmerforums.com/forum/s...-Build-Journal
F80 M3 journal https://f80.bimmerpost.com/forums/sh....php?t=1734421
Miata K24 build https://www.miataturbo.net/build-thr...ine-up-105885/
VSCERL
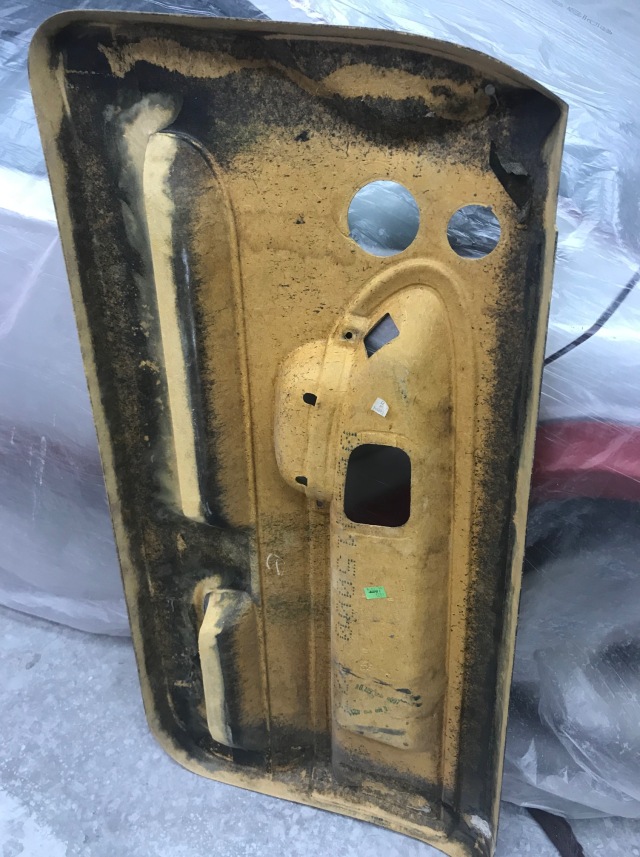
I've been thinking lately about how awful some of the drivers in Houston tend to be, which reminded me that I don't have a formal third brake light since my car came with the OEM wing with integrated brake light. Not wanting to give anyone any more reason to rear end me in traffic, or to fail tech at an out of town event, I decided to pick up another rear deck lid that has the factory third brake light.
As usual, the deck had faded to a nice shade of purple, so a re-dye is in store after a thorough cleaning.
It doesn't smell like smoke, but this looks like nicotine stains. WOOF.
Quick polish on the brake light itself.
Probably a good ten coats of black fabric dye down, almost there. Unfortunately the fabric in the center is matted down past the point of repair. I wonder how it would look if it were flocked?
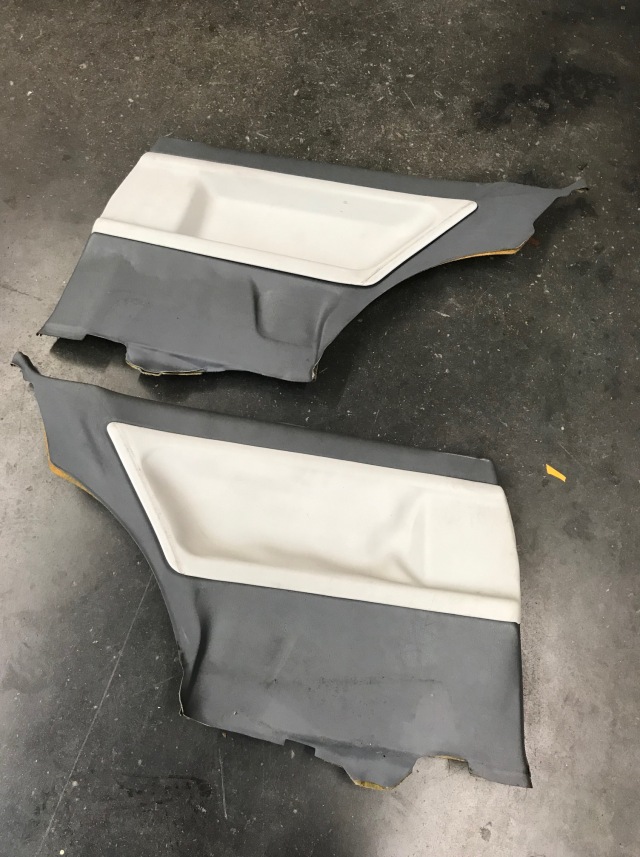
Grabbed a spare set of rear door panels to practice on before I tackle the front door panels in my reupholstering project.
Stripped of their material.
Prepping to sand all the dirt, grime and glue off.
Sanded down and finished with a 180 grit to smooth out the surface but still have a rough surface for the adhesive to bite in to.
Same procedure for the backside as the fabric will wrap around and be glued down.
Mocking up the new fabric and working from the bottom up.
Halfway there. I'm using a high temperature heat resistant yellow contact cement and brushing it on rather than spraying it on. It's very time consuming as you have to do multiple coats, letting each coat set and tack up before adhering the two materials together. The adhesive is very strong so once the two are together its very difficult to pull the them apart without damaging or wrinkling the vinyl.
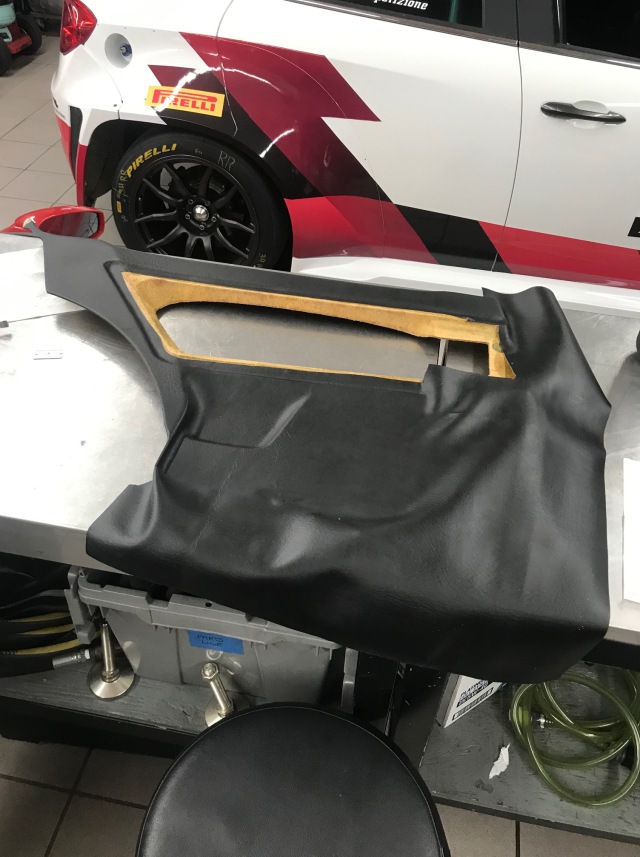
The end result, which took about three hours. The grain in the vinyl isn't an exact match to the original, but it's damn close and it'd be hard to tell a difference without having two panels side by side. The feel and sheen is a direct match, however.
Backside of the panel. A little trimming may be done after the glue has set for a day or two. Overall I'm pretty happy with the result and feel comfortable finally tackling the front door panels, hopefully in one piece instead of separate map pocket pieces.
After that, I spent two hours removing the tint from the car while it's not visciously hot outside. Once I'm done with the rear deck lid and it's reinstalled I will re-tint the car in a 70% (Clear) ceramic that will help cut down on heat and UV inside the car. I wasn't sure I was going to like the fishbowl, but I think the car looks much more proper this way.
Lastly, celebrated 3/6 day by driving the car to work, dinner, and a little night cruise. I sure do love this thing.
36day by Mike Ellington, on Flickr
36day2 by Mike Ellington, on Flickr
Past: '99 Hellrot/Dove M3 | '97 S14 1JZ | '06 Triumph Daytona 675 | '01 330I M-Tech I | '99 Silvia S15 | Current: '96 Estoril/Black M3
Member
Now this is dedication!! Awesome work!
VSCERL
Still nothing major to report, things are moving a bit in slow motion right now.
I started the door panel project at least a year ago and partially convinced myself, before I even started, that I wouldn't be able to do the map pockets in one piece, it just wasn't going to happen. The stretch was going to be too much for the grain of the fabric to look right and too much for even the strongest adhesives to hold up over time. I continued to put it on the back burner, not having a solid plan on how to tackle it in one piece.
Having gained some confidence after reupholstering my rear door panels I decided to give the fronts a shot with some high-temp contact cement, a heat gun, and some patience. I started by picking up a bag of sand that I could pour into smaller bags and use as "moldable" weights to fit down into the pockets and hold the fabric against the fiberboard overnight.
Using the same method as I did on the rear door panels, I lathered both the door panel and the back of the fabric in multiple coats of the contact cement. I heated the fabric up and started working the fabric in little by little, starting from below the smaller door pocket to establish my baseline of where the fabric should lay.
And the final product after sitting overnight.
This might work for some people, but it doesn't work for me. Between the excessive heat trying to make the fabric more malleable and working it down little by little, it created these wrinkles in the material. Having confirmed my doubts of being able to rectify my door panels in a proper one-piece format that could pass as OEM to most, I must say I'm pretty bummed out. I spent about two hours on just this one pocket, I'm not sure there is another method that I could have tried to achieve a different result.
However I am not ready to give up on this project. I've made some templates of the door panel with separate pieces of fabric that will be sewn into the pockets using a black stitching, hopefully predominantly hidden along the edges of the pocket itself, which will eliminate a lot of the tension in the fabric leading to failure. I've turned them over to our local upholsterer to run through his sewing machine and will update when I get them back and get started on them. I've got a positive outlook that it may be a tolerable solution that lasts long term.
Having some time at home due to the quarantine I got a couple of little tasks done while still being a bit lazy. First up was to finish up dyeing the rear shelf, wire in the third brake light, and then install the rear shelf. Fortunately the proceeding rounds of fabric dye hid the matted area so I'm happy with it.
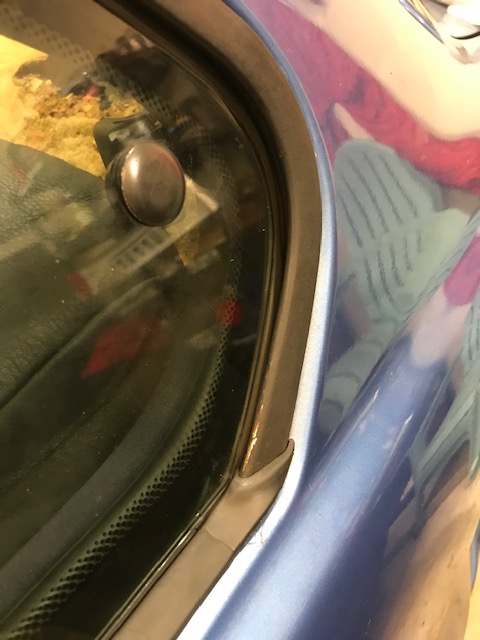
I've had the rear vent window lower seals on my list for quite a while, along with the plan to repair my ambient temperature sensor and replace the headlight positioning knobs that have long cracked and looked like ass.
As usual it was filthy in there and the original seal crumbled into a hundred pieces upon removal. Now I've got to touch up the little exposed part of metal on that metal trim piece as well.
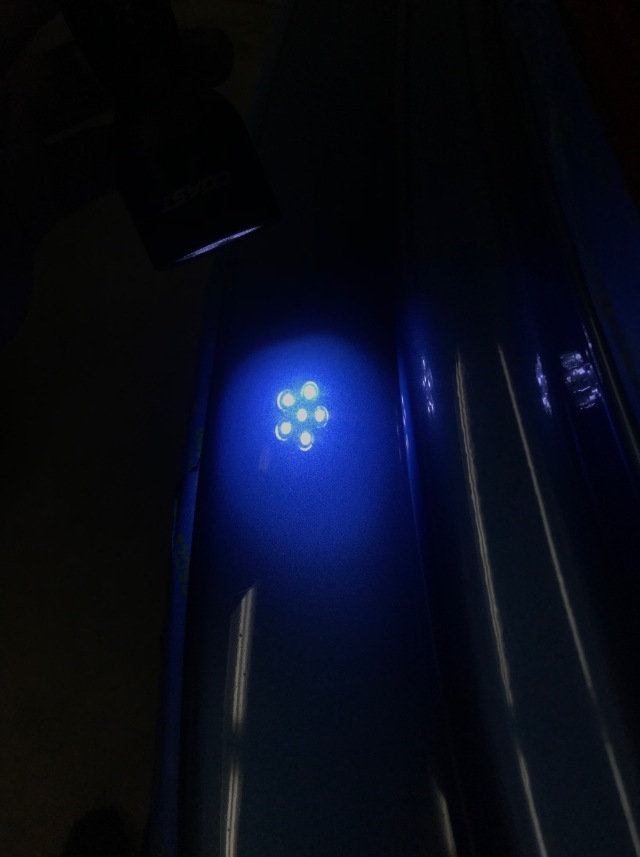
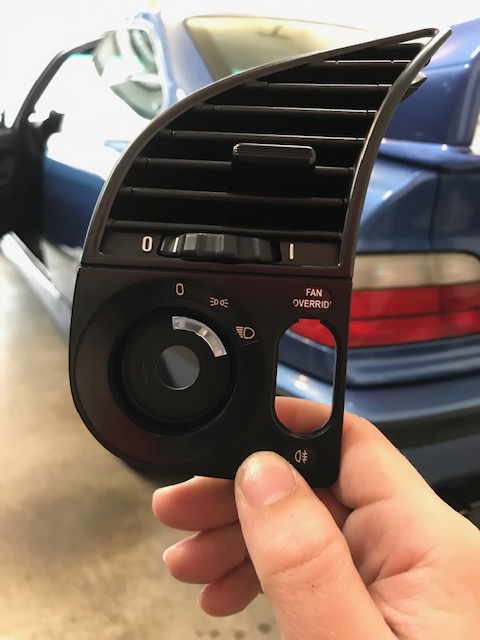
I replaced the illumination bulb for the headlight switch. Originally I got a generic bulb from the local store but it turns out even 5 watts is too much for this and it melted the inner plastic, forcing me to find another switch assembly to rob the plastic from. Turns out the BMW bulb is a very specific .36 watts. $8 for one tiny bulb!
I've had the idea of labeling the fog light switch to be used for a manual override of my SPAL radiator fan. I had some spare stickers at the shop so I threw it together to see how it looked.
Unfortunately it's just slightly too big, but I don't think I hate the text being there.
I've had a very slight cut/miss between 6,000-7,000 RPMs but no CEL's or otherwise warnings. Decided to pull the plugs, check condition of them and the coil boots, and re-torque. About two years ago I had a strange misfire at idle that came out of nowhere and it turned out to be one or two of my spark plugs had loosened over time. Luckily all looked well and after re-torque I didn't notice any missing up top, maybe one was just slightly loose.
I was content with the overall performance of the aftermarket head unit I had; it was simple, it streamed music via Bluetooth, and I could adjust the color from 20,000 options to match the factory BMW amber, and I even went so far as to paint the volume knob black and sand down the gloss black portions to a matte finish, but at the end of the day it still looked out of place. So I grabbed a C43 radio that was in great shape and ordered a Bluetooth retrofit.
This kit provides the ability to stream the music wirelessly, which was my main requirement. It also has the ability to connect via an AUX port or USB cable. I plan to install the black box underneath the center arm rest trim and run the USB port up underneath there to connect my phone and charge it when need be. It should be well hidden when I'm all wrapped up with it. With everything wired up and re-installed, I'm happy with the outcome. A much better look with the same features I had before, I should have done this the first time.
I picked up a pair of amber corners, but I can't decide which I like better. I have clear sides and tails as well, so if I did amber I would have to do the rest as well. Maybe I'm just bored.
I took old girl to the park the other day for some isolation and social distancing but outside the four walls of my house.
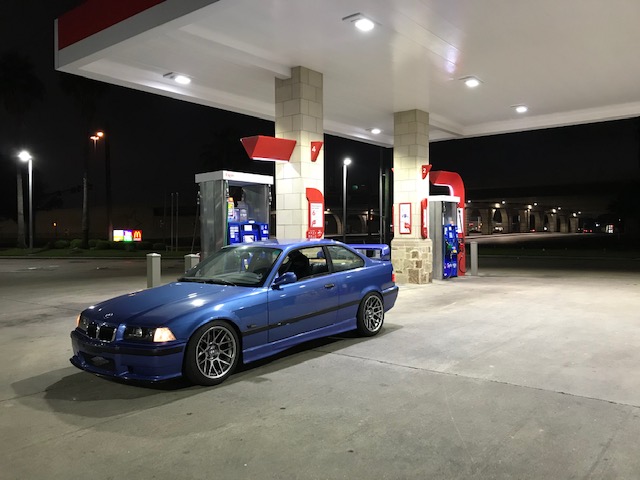
And lastly, taking full advantage of the completely desolate roads which is an extreme rarity here. A 1:00 AM blast around our local highways and downtown, it was very peaceful to rip around without anyone else around. As much as I miss being able to socialize and eat dinner in a restaurant, I wouldn't mind the evenings staying like this for a bit.

Past: '99 Hellrot/Dove M3 | '97 S14 1JZ | '06 Triumph Daytona 675 | '01 330I M-Tech I | '99 Silvia S15 | Current: '96 Estoril/Black M3
Member
Got a link to that audio kit? Looks like the perfect project to tackle during this COVID-19 lock down.
Member
BMW E36 M3 Expert
man your car is beautiful and I love the mods and care you do to it. Nice work
TRM Coilovers 670F/895R | BBS LM | Corsa RSC36
VSCERL
https://www.ebay.com/itm/Bluetooth-M...72.m2749.l2649
This is what I used. It was very straight forward, plug and play.
Many thanks! I need to start driving it more often, especially before the dreaded Texas summer hits.
Past: '99 Hellrot/Dove M3 | '97 S14 1JZ | '06 Triumph Daytona 675 | '01 330I M-Tech I | '99 Silvia S15 | Current: '96 Estoril/Black M3
 Member
NICE! how's the USB interface working with the iphone. Does it charge the phone only? Can you run audio through it? can you access the phone in anyway through the radio controls?
 Posting Permissions


 Reply With Quote


Bookmarks