
 Member
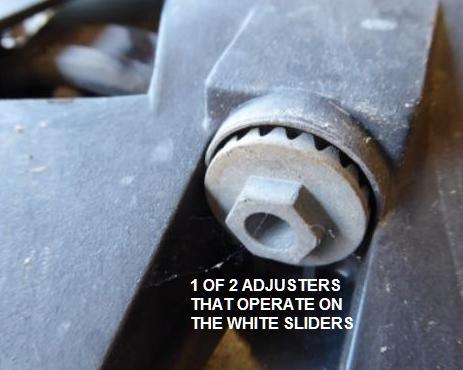
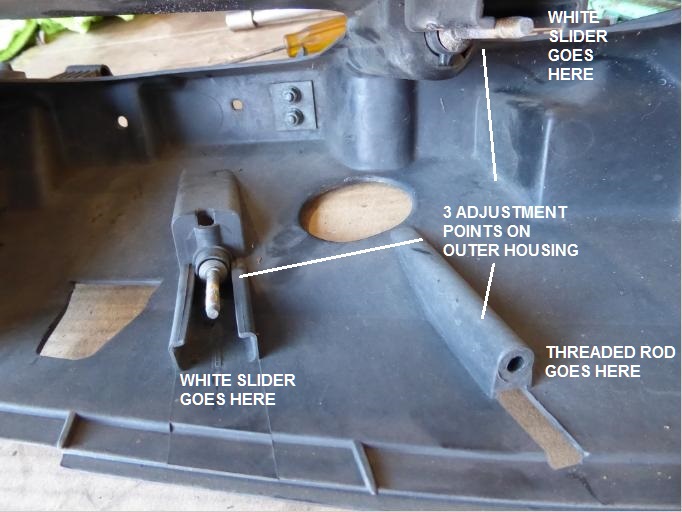
I'm in the process of repairing the adjustment system for my headlights, using the cups/thimbles and gears printed by Dr. Physic last winter. I've just started with the right headlight, and have the metal containing system disconnected from the car. I have removed the lights from the plastic bucket, and replaced the two thimbles that were broken. The top thimble and gear were fine. The two lower ones were broken, and the lower 'gear' was gone. I got the new/printed thimbles to accept the OE 'knob' via some heat from a heat gun. After cooling, the connection is very firm.
I'm now trying to separate the plastic container for the lights themselves from the metal bracketing. The front pivots have a 13mm hex head bolt that has the worlds narrowest 'nut' on the other side of the plastic bracket. I can't find anything that will hold that nut in position while I use a ratcheting boxed end wrench to unscrew and remove the bolt. Any suggestions???
I'd really appreciate help in getting the plastic light bucket removed from the metal 'contraption'. I need that flexibility to be able to get the lights installed and adjusters connected properly in that plastic bucket.
For future 'shadetree mechanics working on this project, I've found and ordered replacement shock absorbers for both lights. They are aftermarket - Stabilus #SG401014 - at about $100 for the pair including shipping. BMW branded ones were about $130.
Thanks for any and all help.
Gary Knox
Last edited by Gary Knox; 07-24-2018 at 05:04 PM.
Gary Knox
'97 BMW 840 Ci
'03 MB SL55 AMG
'07 Mini Cooper S hatchback
'09 Aston Martin DB9 Volante
'13 Audi A8
'90 MB 560 SEC and '94 Porsche 928 GTS recently departed but long enjoyed
50 or so others over the past 70 years of driving
Member
Hello Gary,
Hyper and I just did this today. He took some pics, hopefully he will chime in. We found a specialty thin 15mm wrench that we could squeeze int he middl while the 13mm was used to take off the outside nut. I broke the old plastic bucket where while the new shocks for headlight was being installed and low beam and fog light 75watt HID lights were upgrade. We took the broken plastic bucket off of a parts car and refitted it.
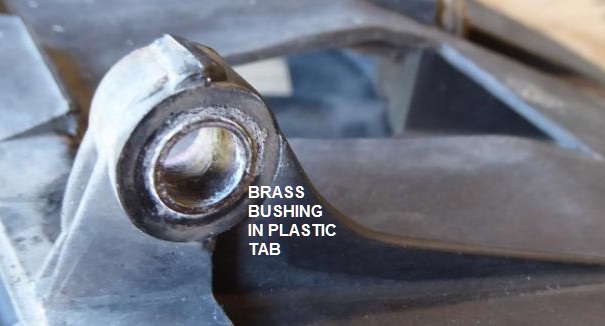
The brass lining inside the attachment was stuck on the screw.......but that is a whole another story, hello grinder and where the hell is my mandrel tool
Originally Posted by Gary Knox

Member
The bolt is actually a ball joint shaft that will spin unless immobilized.
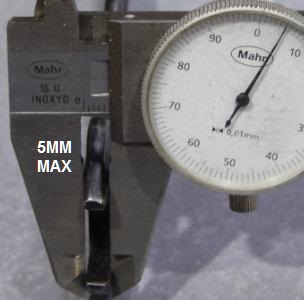
Problem is that, when the end nut is fastened, there is little room between the tab and the BJ boot.
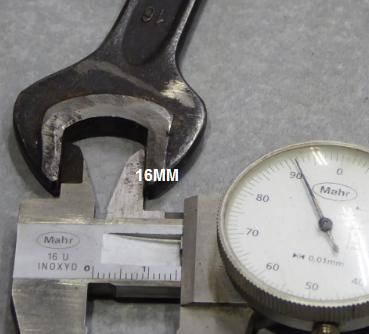
Here, a specialty wrench, 16mm x 5mm thick.
BJ shaft got a bit rusty, plastic tab got a bit old.
Brass bushing decided it wanted to stay with the shaft, forever.
Grabbing onto the bushing with pliers just bound the two tighter.
Member
Hyper and Alex840,
Thank you so much. I had decided overnight that I needed to take a wrench to my grinder to reduce the thickness. Hadn't decided on the size, but your counsel of 16mm is a big help. I'll tackle this later today - put some Penophite penetrating oil on the nut yesterday afternoon, so that should help. I'll try not to break anything!!
Cheers, and thanks for being so helpful.
Gary Knox
PS: I didn't want to grind down one of my good metric wrenches, so I found an old 'cheap' 5/8" wrench where the jaws measured 16.04 mm. I ground it down, but found I needed to get to ~4.5mm width to access the nut on the shock side. With the Penephite penetration for about 20 hours, the bolt/nut unscrewed easily. Thanks again for your help in solving this dilemma. I learned a lot in working on the right side, so I know the left side will progress much faster!
Last edited by Gary Knox; 07-25-2018 at 12:22 PM.
Gary Knox
'97 BMW 840 Ci
'03 MB SL55 AMG
'07 Mini Cooper S hatchback
'09 Aston Martin DB9 Volante
'13 Audi A8
'90 MB 560 SEC and '94 Porsche 928 GTS recently departed but long enjoyed
50 or so others over the past 70 years of driving
Member
...good thread. Subscribed. I have had to buy some cheap wrenches at the autoparts store to use as sacrificial tools for jobs like that. So 4mm - 5mm in thickness...yeah. Those wrenches are hard to come by and can be expensive if available.
Member
Gary,
After breaking it I was going to Hyper's place for the approach below, but I was having a brain fart that I had a spare one on my parts car. For some reason I know Hyper would have Aerospace Aluminum laying around. If all fails and spare to repair, the L approach is not a bad one but using a black paint to blend it in: It is a good write up:
http://ourlifestory.ca/how-fix-broke...ounts-bmw-850i
Member
yup..making the tool...i was lucky inherited a bunch of different "thin" spanners that my dad had collected over the years. They mostly were for removing nuts of vaious sizes from other tools like table saw(s) that he had....I am rebuilding my headlamps at the moment also so thanks for sharing the your info. Mine are both broke and I was reading up on this topic. Good luck!
1991 BMW 850i
2007 Honda Odyssey
2017 Hyundai Elantra
2013 Honda CRV
2003 MotoGuzzi 850 Jackal
Member
Thanks for the bicycle wrench sugestion, but I haven't had one of those in about 60 years! - ha.
By the way, I have concluded that Niccolo Machiavelli was actually an engineering professor. He taught the course regarding headlight assembly design that the bright German engineering student took in about 1980. After graduating with his Doctorate in mechanical engineering (Niccolo gave him an A+ in that course) the bright young engineer accepted an employment offer from BMW and moved to Munich. JUST IN TIME to have a major impact on the e31 model that was in design stages.
Seems to me that Niccolo is still laughing at all of us! And, there is a rumor that the engineer was fired after BMW found how failure prone the system was, the manufacturers of the plastic components went out of business - embarrassed by the poor longevity of their products - and the engineer finally found work in Silicon Valley with one of the social media companies.
Gary-
Last edited by Gary Knox; 07-27-2018 at 12:27 PM.
Gary Knox
'97 BMW 840 Ci
'03 MB SL55 AMG
'07 Mini Cooper S hatchback
'09 Aston Martin DB9 Volante
'13 Audi A8
'90 MB 560 SEC and '94 Porsche 928 GTS recently departed but long enjoyed
50 or so others over the past 70 years of driving
Member
Re: response to a PM
I have no knowledge of factory procedures and it was not my responsibility to remove, install or adjust on client's vehicle.
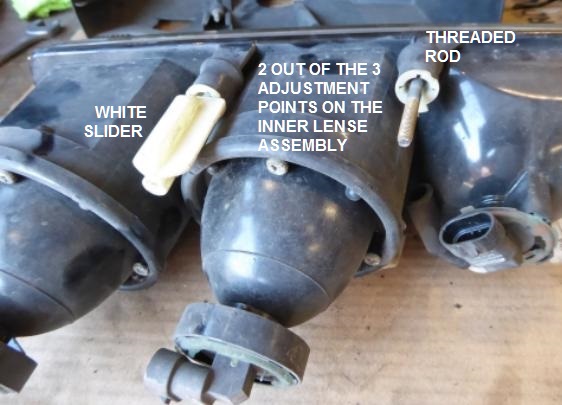
This bench top session involved merely the swapping of the outer housing.
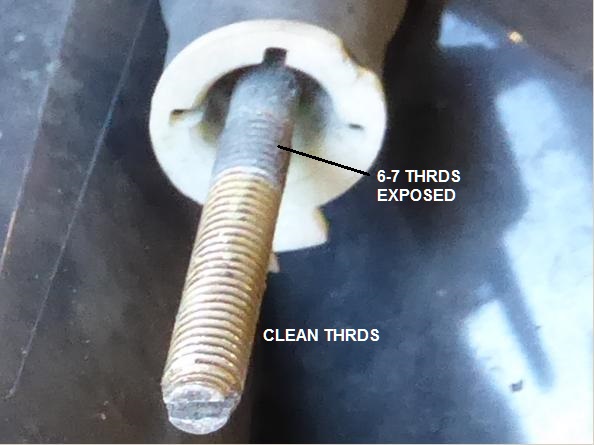
The rule for the session was to return the threaded rod to the same stopping point on the rod.
This point was easily identified by the clean versus exposed threads on the rod, and in our particular case there were 6 or 7 threads indicated exposed previously.
Note that this is not necessarily the same as returning the lenses assembly to the same position with respect to the housing, as there may be other differences outside the influence of just the rod.
Regardless, this formed the starting point for a more rigorous aiming procedure once back on the vehicle.
Make BF Great Again
My post was accidentally deleted. I must mention that bicycle wrenches work perfectly here and saves the need to grind down from a thicker starting point.
Member
Yep 15mm bicycle wrench from your local cyclery shop. Paid around $10.00 some years ago.

Last edited by Lou840; 08-06-2018 at 11:11 PM.
 Posting Permissions


 Reply With Quote
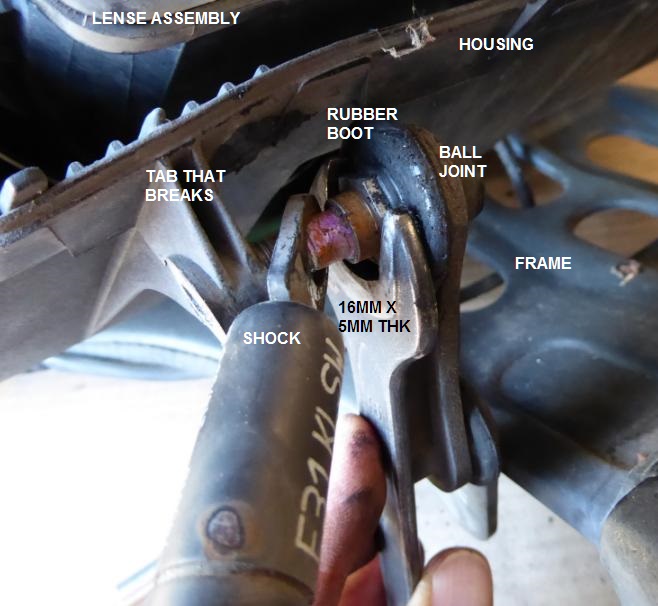

Bookmarks