
 Member
That's basically how you replace m50/2/4 engine oil pan gasket without dropping the subframe, since the gasket is metal and you have oil pick up tube in the way... (my 528i weeped tiny bit of oil; never fixed it)Originally Posted by georgebest

Question to the OP: Why do you need to replace the whole upper oil pan gasket? If it's not leaking, leave it be; it's a huge hassle to replace it.
Current: 2007 Z4 M Coupe (blue/black)
Previous: 2001 740iL Sport (black/black), 2000 528i Sport (black/tan), 1995 318is (black/black), 1991 318is (white/black)
Member
i don't recall having much difficulty except for the reinstall. If I remember right I lifted the engine a few inches on the driver side to get room to remove the bolt. Loosen the engine mount top nuts so the engine can be lifted with a floor jack, put some wood on the jack contact point so as not to damage the bottom of the engine, easy, not much pressure is needed.
2001 BMW 740i - Anthracite Gray - Style 32 Wheels --------- 2004 BMW 330i - Silver Grey Metallic
Convenience Pkg - Cold Weather Pkg - PDC ------------------- Sport Package - Auto - Mroof - Hseats
Member
Jerry,
Please dont post duplicate threads requesting the same information. I took the time to post photos and help you out as best as possible in another thread. Then I even take the time to follow up requesting clarification in order to help you further. You never replied.... and then post a whole new thread.... *sigh*
Please see my clarifying question and comment below. I specifically showed you a socket/extension setup that should work on that bolt. There is no reason it should be so difficult to access.
1998 BMW E38 740il - Vermont Grün Metallic, 150k miles, all stock. 11/98 build.
2011 Range Rover Supercharged - Rimini Red, Jet/Jet Interior.
2018 Mercedes GLE 350 - Diamond White, Soccer Mom kid-hauler.
1970 Chevy Chevelle - Pro-touring, 496ci BBC, custom everything.
Member
Lots of questions in the above....
So here it is:
1) Here is the correct diagram:
https://www.realoem.com/bmw/enUS/sho...diagId=32_0694
2)Unless your frame or engine mounts are damaged, a standard shallow 19mm socket + universal/flex adapter + extension should give access from above. It is a snug fit but not difficult/fiddly/impossible. Please reference my original detailed reply to your original post on the same subject.
3) Yes. If you wish to replace both hoses that run to the steering gear then you must remove both the 19mm and 22mm banjo bolts. The 19mm attaches the pressure hose to the box and the 22mm attaches the return hose.
Last edited by BillConn; 07-03-2018 at 12:58 AM.
1998 BMW E38 740il - Vermont Grün Metallic, 150k miles, all stock. 11/98 build.
2011 Range Rover Supercharged - Rimini Red, Jet/Jet Interior.
2018 Mercedes GLE 350 - Diamond White, Soccer Mom kid-hauler.
1970 Chevy Chevelle - Pro-touring, 496ci BBC, custom everything.
Member
Opening a 55 gallon can of worms screwing with that gasket Jerry. Leave it alone and take
care of the gallon can you already have opened.
Member
I thought you were doing guides? Don’t you have the valve covers off? When I changed the PS hoses for the first time I had the valve covers off. It was still difficult to get at these but I got them. Used a box wrench as I think Bill suggested in the other thread. Lifting the engine a bit is a great idea too although you’ll probably discover your motor mounts are shot.
Member
Easiest way to access this is to disconnect the drivers side engine mount and raise the engine.
Member
September is not always the rollout month of a new model year. The 1999 model year was VERY short (9/98-3/99)...and this extended the 2000 model year's early production by 5 months. And the 2001 model year also had a different (from norm) production range. Look at the 10th digit of your VIN...is it a Y or a 1?
In the US market...the federal DOT (department of transportation) requires that that the 10th digit of the VIN indicate the "official" model year regardless of the car's production date. This has been in affect since the 1985 model year. The 1985 model year's 10th digit was an "A" and each consecutive year moved on to the next alphabet (I/O/Q/U/Z were skipped as not to confuse them with numerical digits) then the numerical digits 1-9 are used. The whole process starts over using alphabets (starting in 2010), then onto numbers again:
- 1985 - A
- 1986 - B
- >>><<<
- 1995 - S
- 1996 - T
- 1997 - V
- 1998 - W
- 1999 - X
- 2000 - Y
- 2001 - 1
- 2002 - 2
- 2003 - 3
- >>><<<
- 2009 - 9
- 2010 - A
- 2011 - B
- 2012 - C
Last edited by Qsilver7; 07-03-2018 at 10:32 AM.
Become a BMW CCA member! Click HERE to join and feel free to use my BMW CCA member #191509 as a referral.
2015 650ix GC (Moonstone/Cohiba Brown) <<~>> 2014 X5 50i (Space Gray/Mocha)
WDS junkie
^100%. Makes all the difference. I'm shocked at how clean everything still is. This thing would be covered in oil if I didn't do that. Very thin skim that's all. Not the RTV mess you see where one tube does a valve cover
'98 740il | 9/97 build | schwarz 2 | sandbeige | 5AT | 270k
'04 330i ZHP sedan | Mystic blue | Alcantara | 6MT | 120k
'00 540i sport | Titanium silver | Black | 5AT | 152k
'85 Mustang GT convertible | Medium charcoal metallic | Gray | 5MT | 216k | one owner, all original
mods: m-pars | Bilsteins & B&G springs | ValentineOne | StealthOne
retrofits: full nav | MKIV | bluetooth TCU | BM53 w/ AUX input | video module w/ AV input & backup cam | oem sirius xm | xenon | shades | PDC | rain sensor | BMW DWS TPMS | lighted door handles | front seat heaters | heated steering wheel | euro rear fog lights | ski pass | folding mirrors
Moderator
Moderator
This. If I wasn't on vacation, I would be merging your multiple threads. Going into another forum saying you are getting no help in the E38 forum is not going to get you any favors either.
Member
While I am sorry to have caused you the trouble you incurred from my duplicate threads; (I don't know how I did not reply as I have a history of replying to all posts). I certainly want to thank everyone that does reply. As far as posting a new thread: I was not getting anymore responses to the old thread and unfortunately none of the responses were replying with an answer to my problem. I also felt maybe I was getting lost in the shuffle with all the new threads out and no one was paying any attention anymore. Basically, I was desperate for a solution..I've tried every suggestion including the wobble head. It would have worked if I didn't have the disintegrated engine mount. Your latest response was dead on. The bolt you highlighted is correct. (How do you do that?)
The Engine Mount is toast. See picture. I just learned what an engine mount looks like and now I'll learn how to replace it. Every time I hear someone write "lift up the engine", I have a panic attack. When I see, "there is no reason it should be so difficult to access or so difficult to do", I am in total agreement, but I know there is an answer, even if an unlikely one. Your conclusion of the engine mount being bad never occurred to me. I didn't connect the bad mount resulting in the cylinder head being so close to the bolt; I just thought I wasn't doing something right. I'm still a "Newby" and I did make a mistake; which I will not duplicate. Sorry again for the trouble. Thanks for your ultimate solution that should allow me to move on to the next challenge. Hope I get a "mulligan" on this one.
Member
I'm sorry for the trouble; I wasn't trying to insult anyone or break protocol and rules. I was desperate for an answer that would help me resolve the problem, and I did try all the previous suggestions with no solution. I understand the reason for your comments and your point is understood. Won't happen again. In my own defense, I am still relatively new to using the site, so hopefully you will know there was no intentional purpose to "break the rules". I did get a great response from BillConn who I think nailed the problem of a bad engine mount restricting my access to the bolt.
- - - Updated - - -
Thanks for your reply. I think a bad engine mount is causing the difficult access. BillConn nailed it. Soon as I looked I knew he must be right.
- - - Updated - - -
Thanks Bill: Great diagram with parts list and great picture. I owe you. Sorry again for my lack of posting etiquette.
Member
Thanks Chris. Will have to do some research on lifting the engine and changing the bad motor mount.
Member
Not a difficult job, bit harder on the driver side though. The key is lifting the engine high enough to have enough space working on it. I made it unnecessarily too difficult by not lifting it high enough. Just jack it up from the oil pan.
Member
Bill: I think I just realized why one of my return posts did not get to you. Today, after responding to a post, I hit reply with quote and only realized when going to the bottom of the thread that a message informed me I had to refresh the page as it did not go through. It does not tell me at the place I'm on that the post did not go through.
- - - Updated - - -
Thanks Q. My number is 1. Interesting perspective of the production dates.
- - - Updated - - -
George; As always, thanks for sharing your expertise. "Just jack it up from the oil pan" is a little vague. I'm thinking of structurally where to jack it up from and the visual I get from the oil pan is not good. I will research this for pictures. Appreciate your kind response regardless. Sure is nice to see the light at the end of the tunnel.
Last edited by Jerry Scholder; 07-04-2018 at 10:12 AM.
Member
I will look into FCPeuro. Thanks for the responses.
- - - Updated - - -
Not sure if I responded to this. As I'm now searching for parts I will remember this advice. Have you ever tried Autohausz; seem to have good pricing.
- - - Updated - - -
Have written this information down. Very helpful. Thanks for sharing.
Member
Nice idea. I was recently looking for an oil separator and was reluctant to use "used part" because of the tendency of the plastic to become brittle. Plastic parts worry me when they're 17 years old. Just saying.....
Member
Thanks "blu". I have since learned from (a reliable source?) someone who told me the tensioner in the middle provides different hydraulic pressures depending on the vehicle it is used in.... The pulley wheels seem interchangeable as I stripped a bolt on one recently.
Member
That was the exact problem; but was able to dislodge after knowing what I was facing. Thanks for the reply.
Member
Member
Since you are doing the timing chain guides anyway everything should be disconnected already. Check out Chriss33's video, I wouldnt be able to do it in 10 minutes for sureYou have three bolts, one from the top and two from the bottom. You need a long socket extender to reach the top one, or just put a few shorter ones together. There is a specific torque for the top one when putting the new one in, but not sure you if you have a torque wrench.
Btw: best would be if you just have one forum thread about your car, it's hard to follow what's going on with it
Member
Surpentine belt hydraulic tensioner and AC belt tensioner is typically different part numbers.
It would not be suprising that different engines is different part numbers as well.
Sent from my iPhone using Tapatalk
Member
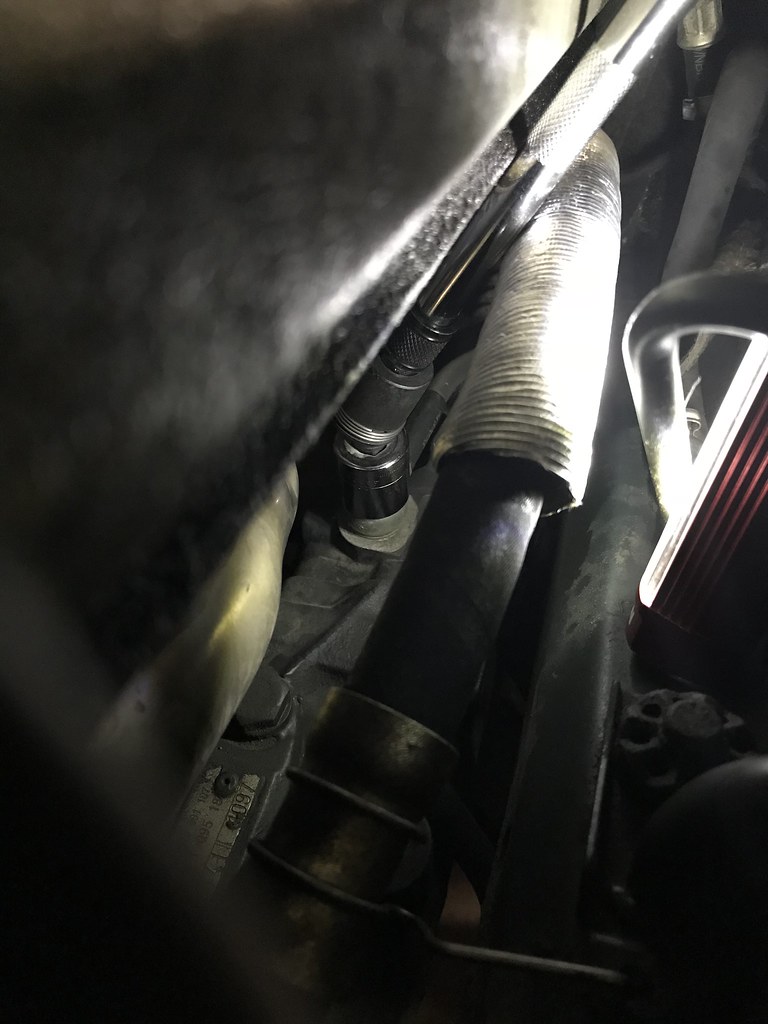
Thanks, but wasn't impressed with this "teaching" video. Didn't show much of what this "secret star" was doing and he seemed to be having a lot more trouble than I was once I learned the procedure. The nuts on the 2001 740i were really easy to access on drivers side; haven't done passenger side yet. Waiting for parts. What would happen if you lowered the frame without a engine mount installed? By the way, lifting the engine from the oil pan was a piece of cake and an added benefit was access to my Power Steering bolts on the gear box. Thanks to BillConn for figuring out why I was having so difficult a time doing an easy Power Steering bolt removal. The bad engine mount caused the cylinder to be right on the head of the bolt. Picture of what was left after removing the portion of the engine mount. Does the remaining piece come out also? The above portion is also pictured next to the hose. Not sure if there is supposed to only be a hole with that remaining piece punched out.
engine mount top.jpg
engine mount drvr side.jpgengine mount removed.jpg
Last edited by Jerry Scholder; 07-05-2018 at 08:52 PM. Reason: picture placement
Member
O.K., new thread will be "Jerry's Car" and hopefully the moderator will be able to put everything under this thread. Drivers side engine mount was a piece of cake, but not sure if I got the whole piece out. An added benefit when I raised the engine was the PS bolts were easily accessed and got those suckers out. Put a big order for parts in yesterday. Used mostly Autohausz, but also some Ebay. Bought a new floor jack today at Harbor Freight. First time actually resting the car on the jack stands; saw a video about it. Sometimes I think I'm in a college course and then other times trying to get out of first grade. I have a good torque wrench. Do I need an angle gauge? About the pictures; one is after the engine mount was removed on drivers side and the remaining bottom piece still attached. Am I supposed to punch this out? Also photo of top of engine mount. Not sure if I'm just supposed to have a bare hole after removing it. I'm cruising along again.
Member
It went pretty well, but not sure if I was supposed to remove the whole piece as I had a portion of the engine mount still on. Not sure if I'm supposed to just punch this piece out. Top part is next to the hose in the picture. Setting up the jack was easier than I thought it would be.
 Posting Permissions


 Reply With Quote
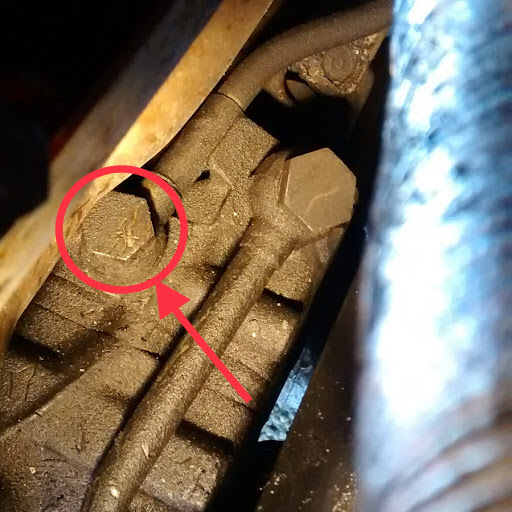


Bookmarks