
 waaa sappening!!!
I couldnt find any of the DIYs in the forum with active pics of the things I needed to see so Im creating this and adding some photos along with some questions.
Koni Yellow 8641 1342SPORT (front)
Koni Yellow 8240 1115SPORT (rear)
H&R Sport 29 910 VA (7/98 M3) Black Springs (front) - 29910VA - 29910 VA
H&R Sport 29 936 HA (7/98 M3) Black Springs (rear) - 29936HA - 29936 HA
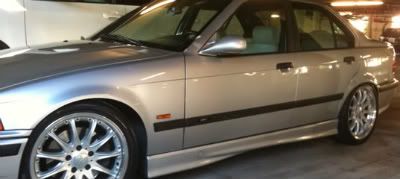
Wheels: Hartge Classic 18x8.5 et40
I cut the strut housing with an angle grinder about 1/8" below the crimps on the strut housing. I had it in a vice while cutting. The cuts weren't the cleanest or the straightest but the angle grinder got the job done in about 5mins. I tried to even everything out with a dremel grinder and then filed the burrs and rough edges off. Not certain if I cut enough off but I wouldn't see how that would really matter. The struts are seated after a few bangs on the ground with the bottom of the housing
4EB8BA54-23F3-45CE-AC26-2244FD7ACE1E.jpg
022661D6-6009-45F6-9E0D-B4BFF121B894.jpg
I drilled the holes in the bottom with a 1/8" cobalt bit which was easy and then a 9/16" titanium bit using a bit of motor oil for lubricant. The drill I was using wasn't powerful enough so when I got the the point that the metal was thinning and the hole was getting bigger the drill bit would just jam/stop. I punched through the rest of the way and filed the rough edges and the holes and then used the drill again to clean everything up. The holes weren't 100% dead center but they still worked with the struts - I didnt know how close to center it had to be so I provided pics of what worked for mine.
DBE6734E-C21F-4B71-8727-BF2B61310B15.jpg
CE1BB294-D483-4FBB-894A-B89761BA0E97.jpg
I cleaned up the housings with brake cleaner and the paint started to come off so I repainted after inserting the struts using black rustoleum. I used Permatex Threadlocker RED on the bottom bolts when I torqued them to 55ftlb/75nm
FC8B43C8-364E-4282-A995-636847D688C9.jpg
There is a plastic disc piece that came with the struts that I assume goes on top of the strut and gets covered by the rubber dust booth they provide however I cant get any visual confirmation from the DIYs I have looked at. There is also a crush washer that came with that plastic bag that I assume goes under the 22mm nut used to lock the strut mounting plate to the strut/spring
The large support washer from my original struts was broken and had to order two more of them @$7.50ea (31332227342) + the metal gasket that was just under the mounting plates (31331110196) + the caps that cover the 22mm nuts (31311139453)
I ordered new bump stops and will need to cut them but I am not sure where to cut them. I read somewhere that they should be cut at the first indention from the bottom. Does this sound right? (using H&R Sport Springs)
Last edited by persiandude; 04-26-2018 at 01:05 AM. Reason: Adding photos
[SIZE="1"]1997 M3/4/5 18x8.5 Hartge Classics, F1 Stage 2 Clutch Kit
:one This Year :: Koni inserts, HR Sport, Rogue RSM, Ball Joints, Powerflex LCAB, Adjustable Sway Links (DIY), Headliner, MM Underpanel, 3 spoke wheel swap, BavSound Speakers, Bluetooth radio adapter
waaa sappening!!!
Also, where does this Spacer/Washer go?
Last edited by persiandude; 04-26-2018 at 08:08 PM.
[SIZE="1"]1997 M3/4/5 18x8.5 Hartge Classics, F1 Stage 2 Clutch Kit
:
My Drip Loops Are Better
Yes, the plastic washer goes on top of the strut and the rubber sleeve helps to hold it in place.
Why would you need to cut the bump stop? Slide it on from up top. If you cut it it won't be function as much of a bump stop anymore.
Star lock washer goes on the bottom bolt that holds the shock in place. Also I wouldn't have used red thread locker or any really. It's going to be a pain I'm the ass to remove should you ever need them rebuilt (lifetime warranty on them). Next time use blue if anything. That in combination with the lock washer won't be going anywhere.
Sent from my SAMSUNG-SM-G920A using Tapatalk
waaa sappening!!!
Here are pics of them complete + the Adjustable Sway Bar Links I made from UUC DIY
Pegasus Racing / Coleman Racing UUC DIY Adjustable Sway Bar Links
- - - Updated - - -
I was just reading several install threads and and I saw people recommending cutting bump stops a bit since the car was being lowered.Originally Posted by LockDots

I have the star lock on the bottom, what about the crush washer in the pic above? Does that go under the nut that locks the strut assembly together?
I also ordered replacement bolts for the steering knuckle, spindle etc... $50
[SIZE="1"]1997 M3/4/5 18x8.5 Hartge Classics, F1 Stage 2 Clutch Kit
:
Member
The stock strut shaft is tapered transitioning from the shaft diameter to the threaded diameter.
My memory is a bit fuzzy but as I recall the Koni Strut cartridge is stepped, so the conical washer is not required.
Also I would place a couple of wraps of electrical tape where the Koni insert meets the strut casing to keep moisture out (preclude rust bonding of Koni cartridge to strut casing.)
Common for the large tapered support/clearance washer to be cracked or broken. This is especially true with H&R Sport or Race springs.
And the spring lock washer does go under the nut on top of the strut mount. Seems like there is also a flat washer that goes there also.
Last edited by bluptgm3; 04-27-2018 at 04:54 AM.
waaa sappening!!!
ok nice, thanks for that info - I was a little concerned that the washer was broken like that. Also good info on the conical + moisture, I’ll put some tape or RTV around the housing before putting the sleeve back on
[SIZE="1"]1997 M3/4/5 18x8.5 Hartge Classics, F1 Stage 2 Clutch Kit
:
Member
Curious what the purpose of adjustable sway bar end links is?
Member
To remove any possible preload that might exist due to slight variations in the build process.
What year E36 M3 are these wheels going on. If this is a square setup, 8 1/2 in wheels all around, it is likely you will require wheel spacers up front, as there was a Spindle/King Pin geometry change that places the tire closer to the strut casing.
Sent from my iPhone using Tapatalk
Last edited by bluptgm3; 04-27-2018 at 02:23 PM.
old but slow...
Estoril/Modena '97 M3...sold for the second time.
------------------------------------
You only live once, and I'm running out of time...
Member
Nice bunch-o-photos, I had forgotten about the insert attach fastener dish washer.
Sent from my iPhone using Tapatalk
waaa sappening!!!
This will be a square set up all the way around. Will be mounting the wheels then measuring for spacers. I have to use hub centric rings for these wheels (similar to some BBS wheels) due to the bore of the wheel. So will be determining whether or not I can get a small spacer with a hub centric lip or if I will need both pieces.
[SIZE="1"]1997 M3/4/5 18x8.5 Hartge Classics, F1 Stage 2 Clutch Kit
:
My Drip Loops Are Better
Are they E39 hub (74.1mm)? If so, H&R makes spacer adapters in 5, 10, and 15mm that change the hub from 72.5 to 74.1
waaa sappening!!!
The old rings are 72.56mm (BMW) to 82mm (Hartge). Two of the old rings broke so I need to get some more. Maybe H&R has some other fitments, I will check
[SIZE="1"]1997 M3/4/5 18x8.5 Hartge Classics, F1 Stage 2 Clutch Kit
:
waaa sappening!!!
Confirming the install order before I put everything back on tomorrow (this is the issue with taking weeks to complete a job... forgetting installation order)
Does #9 face upside down (from the position in the pic) to cover the bearings on the bottom of the strut mount?

[SIZE="1"]1997 M3/4/5 18x8.5 Hartge Classics, F1 Stage 2 Clutch Kit
:
My Drip Loops Are Better
Good question. I had camber plates go in when I did mine so didn't use that.
Sent from my SAMSUNG-SM-G920A using Tapatalk
waaa sappening!!!
Just realized I forgot to include Reinforncement Plates and Gaskets... just ordered them
I was able to see from realOEM that it’s supposed to cover the bearings on the strut mount (concave up parabola :p)
Last edited by persiandude; 05-10-2018 at 02:02 AM.
[SIZE="1"]1997 M3/4/5 18x8.5 Hartge Classics, F1 Stage 2 Clutch Kit
:
Member
I highly recommend cut the bump stops with H&R sport springs. H&R recommends that they be trimmed by 0.75".
hr_technical_info.pdf
At first I did not trim the bumpstops, and the car was hitting the bumpstops over even the smallest little bump, causing a very harsh/bouncy ride. With the bumpstop trimmed, you will have about 1" of suspension travel before getting into the bump stop.
What I can't remember is which end I trimmed off. One end holds the bump stop at the top of the shock shaft, and the other holds the dust boot to the bumpstop. I believe I chose to keep the side that attaches to the dust boot and trimmed the top/flat part off but can't recall for sure. Also, I believe in your picture your bumpstop is upside down. The "ridge" on the cone side of the bumpstop slips into the groove on the dust boot.
Last edited by RightYouAreKen; 05-11-2018 at 12:11 PM.
1998 Titanium/Dove M3/4/5
2020 Toyota 4Runner
Member
The Dust Shield is placed directly below the Guide Support/Strut Mount and faces such that the cup (cup up) covers/shields the otherwise open-to-elements Guide Support/Strut Mount bearing.
Sent from my iPhone using Tapatalk
 Posting Permissions


 Reply With Quote


Bookmarks