
 Member
Please add me on IG @ls1_e36 to learn more about the build!!!!!!!!!!
Hello everyone,
Newish to the boards and would like to create a thread for my build, always wanted to have a project car and once I saw the kits and videos of LS1 into E36 I knew I just had to restore and build oneI have had several Camaro's in the past and am familiar with domestic muscle cars, this swap was even more special to me as I plan to give this car to my son once he's of driving age.. I will make updates as I go about my build but for now here's all the parts I have bought and plan to use on my build
About a month ago I purchased a silver 1998 328i and have been accumulating parts for my build, My plan is to rip out the old engine, get a full paint job in Lemans Blue and put the LS1 in, my plan is to get as much done as I would want to do and try to do things the best way possible.
Engine
- 1998 LS1 out of a Camaro - Full drop out from Hawks motorsports
- Texas Speed Magic stick 4 Cam, valve springs, push rods and any other random mods needed to make the cam work
- LS6 intake manifold
- LS6 Valley cover with internal pcv
- New LS7 Lifters and trays
- All new gaskets for engine
- High performance GM oil pump
- LS2 Timing chain
- New injectors
Drive line
- T-56 Magnum
- LS7 clutch kit with steel flywheel
- GM slave
- BMW OEM master
- Driveshaft - will be custom made by a local shop, still undecided if I should go steel or aluminum
- 3.91 LSD differential
Misc
- Replaced the crappy aftermarket stereo with an M CD43 business radio and bluetooth module
- Replaced various broken pieces such as broken vents, random trim pieces etc
- ICS coil over kit
- replaced suspension parts(Control arms, stabilizer bar links, tie rods and all bushings associates)
- Wiring specialties pro harness
Last edited by RulyLSX; 07-30-2018 at 11:13 AM.
Member
Ruly: Thanks for posting! Your intentions are not unlike ours...hope you post images - worth thousand words and gets more attention! Good luck and looking forward to your progress.
Member
Pic of car how it looked the day I bought it

Last edited by RulyLSX; 03-28-2018 at 10:36 AM.
Member
Engine when it first arrived
Picture of engine tear down
Start of engine removal
Removed the headers and noticed these AWESOME welds.....
Engine is fully out and on it's way to the paint shop!! Whole car including engine bay will be painted lemans blue

Last edited by RulyLSX; 03-28-2018 at 10:35 AM.
Member
-Noticed guys were running the corvette fpr so i purchased that
-ordered a new mishimoto aluminum radiator
-ordered an electrical fan from becool.com
-purchased a set of new wheels, will be running Apex ARC-8, 17x9.0 in front and 17x9.5 in the back
-purchased a set of new tires, will be running BFG comp 2's 245/40/17 in front and 255/40/17 in the back
-purchase an apex wheel stud kit
Last edited by RulyLSX; 03-27-2018 at 11:48 PM.
Member
FYI - Imgur is one of those that doesn't work well with hotlinking/embedding images (similar to Photobucket). Flickr still works, and a few others...
Member
dammit, i'll get em changed up. Thanks!Originally Posted by LSxDreamer

Member
changed host to cubeupload
Member
Updates
Stopped by the paint shop and the car's body work is completed, will be hitting the paint booth on Monday

Member
Block has been dropped off at a local machine shop, they will be doing the following
- LS CR807 KING
- LS MAIN bearing king BM5013
- Oil plug and bar bell plus
- Cam thurst plate
- Front and rear covers and seals
- total seal rings
- cam bearings
- torque and resize rods
- APR rod bolts
- torque plate hone with plateau finish
- square deck block
- serdi valve job
- vat wash
- micro fine polish crank shaft
Member
Moving right along!
I went with stock piston rings, file fit...which was expensive. Likely more than your Total Seal - better solution!
Member
Looks like a nice project! FYI given your rear tire size you may experience clearance issues in the rear. If it's not too late ask the body shop to roll your fenders before applying paint. Good luck with the build!
Member
Thank you for the heads up, I actually had a shop roll them heavily just before it went to the paint shop. I haven't test fitted yet though but I'm hoping it will be fine
Member
Oh my god this is gonna be so epic, youre going all in! Can't wait to see this done, this is going to be one solid car.
Member
Thanks man, The wait is killing me but I am stoked about it all!!
Member
Stopped by the paint shop and they have it all painted, next step is wet sanding/polish...all the after paint work
Also had them paint my LS6 intake the same color.... figured if I hate it I could switch to a FAST system lol

Member
Looking good!
Member
Blue engine bay looks better than the exterior of my M3!
Nice.
Member
Stopped by the paintshop today to drop off some random interior retainers they needed that broke off during the tear down, also got to take home some of the pieces they painted. Here is the intake! NOTE: it's super dusty and didn't try to dust it off for the pics
- - - Updated - - -
and other random one i took of the car
Member
Car is now home from the paint shop, stil needs a few trim pieces which are on the way

БМВ Фанат!
Are the injector holes painted too? If so might be a good idea to clean them off the paint.
- 96 328is 6.0L. (LS1 to LS2 build thread: http://forums.bimmerforums.com/forum...ad.php?2098938)
- 96 328is 5.7L. (LS1 build thread: http://forums.bimmerforums.com/forum....php?t=1289987)
- 95 ///M3 6.0L. (LS2 build thread: http://forums.bimmerforums.com/forum....php?t=1619249)
- 97 ///M3. (e46 Fender Flares/track car build thread: http://forums.bimmerforums.com/forum....php?t=1727098)
- 96 328is (Dual Fuel Pump to Surge Tank thread: http://www.bimmerforums.com/forum/sh...ad.php?1964025)
Member
Yes they are, they did a good job of masking certain things and not so great others..... Thank you for the heads up. I'll def do that.
Member
Was excited to get the car back and test fitted a front wheel on the car, Went on just fine but as I tried to roll the car I noticed the inner rim is rubbing against my coil over :/

Member
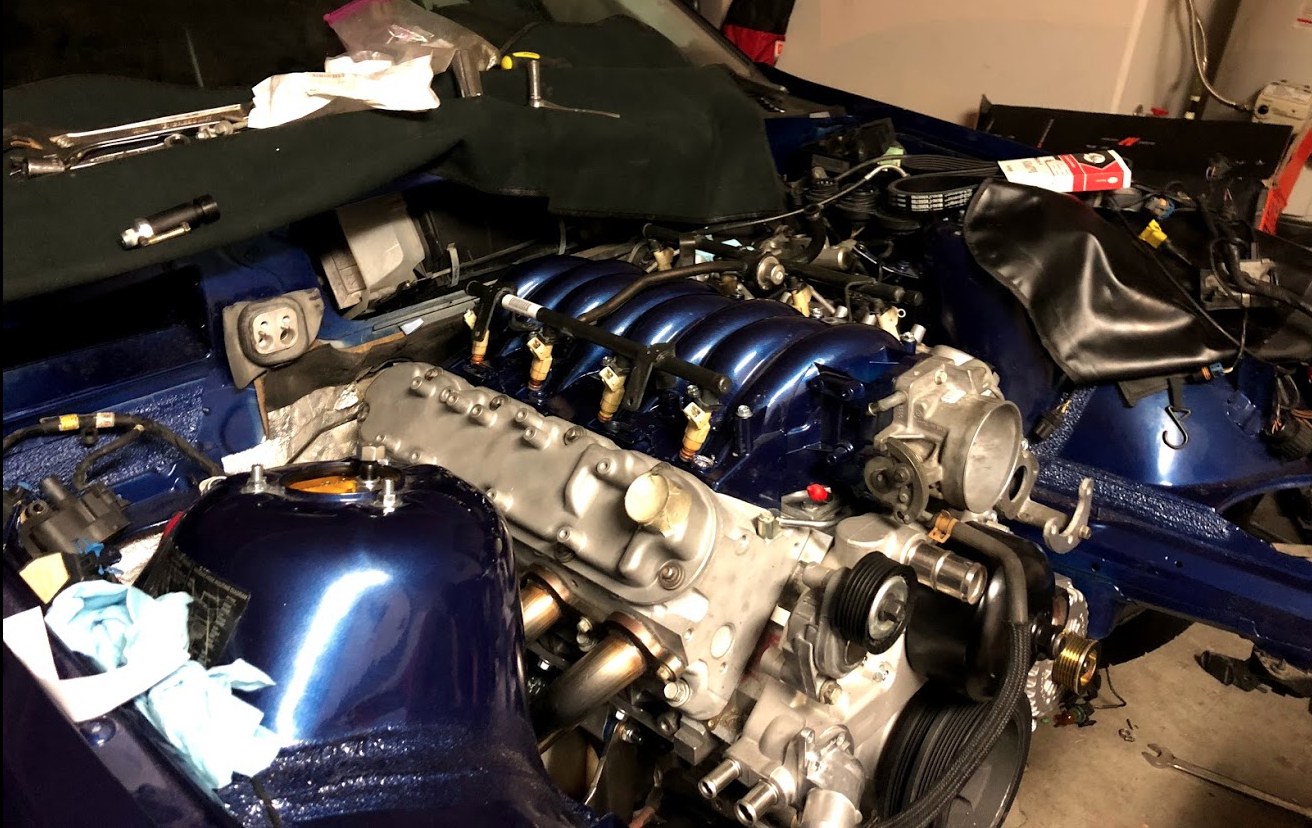
Finally got the engine back from the machine shop last week and started working on the car Friday, I pretty much spent all Friday/Sat/Sun/Monday working on it..... I had a buddy come over for an hour to help me with some stuff but overall I did all the work myself, my other jack became my best buddy as it helped me get the engine in haha.
Here's what I got done so far,
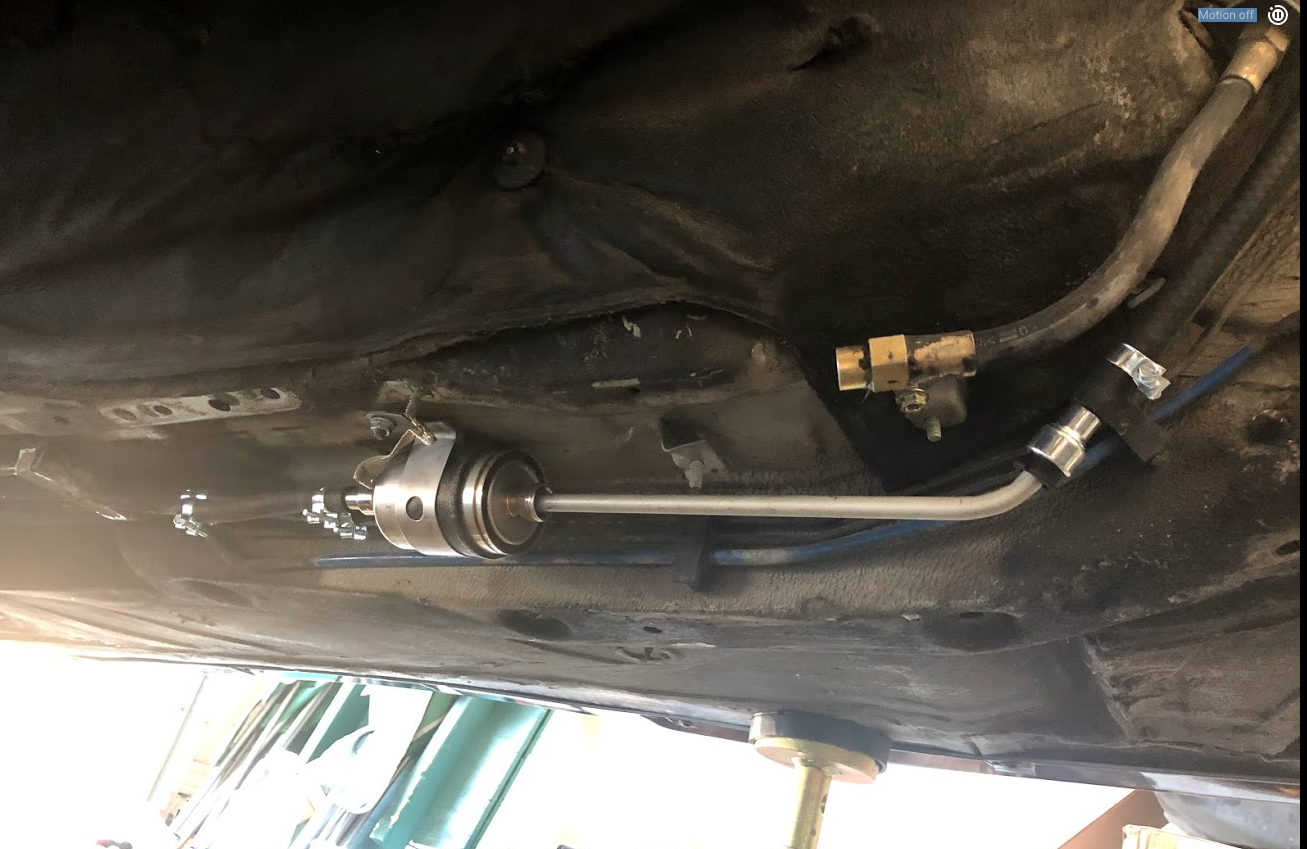
-Fuel filter installed and lines made, I copied Bimerok's setup as best I could, Thanks Bimerok for documenting your build, I have went through your giant thread multiple times. After the filter I have a 12" hard line in place then a soft line, The soft line is not long enough though so i need to figure that out.
-Engine/tranny are in, getting it in was super easy and took me maybe 15-20 mins alone, I took it out only another time and then back in again after making some modifications to the t56 magnum
-Headers, holy crap what a pain in the ass the driver side was, Being exhausted from working on the car all weekend and having a few beers in me I tried putting the header without removing the shift linkage... about 2 hours later after wrestling with the driver side header I finally realized I had to take the linkage apart...... after i did that the header slid in pretty easily.
I tried to take as many pictures as possible but it was a hot weekend in Arizona, I was all alone and my main focus was simply getting r done. I'll try to document more as I make more progress.
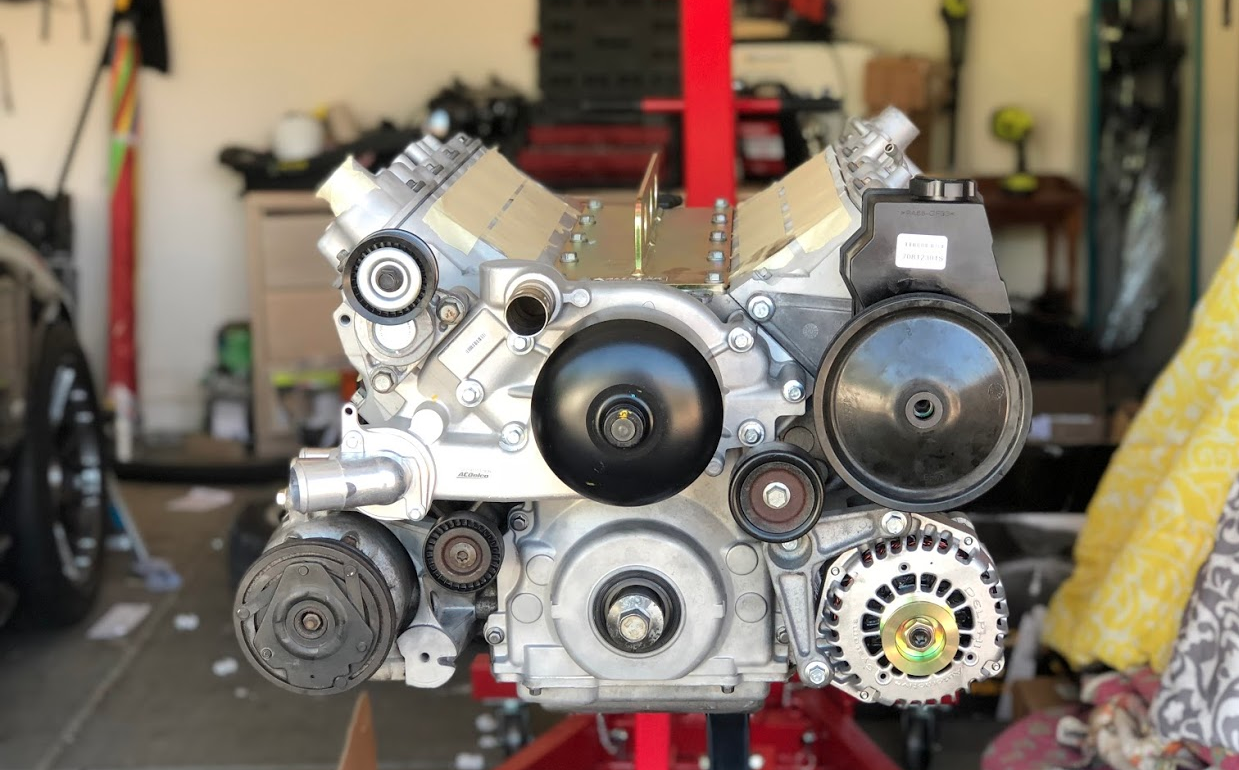
Pic of engine fresh from machine shop
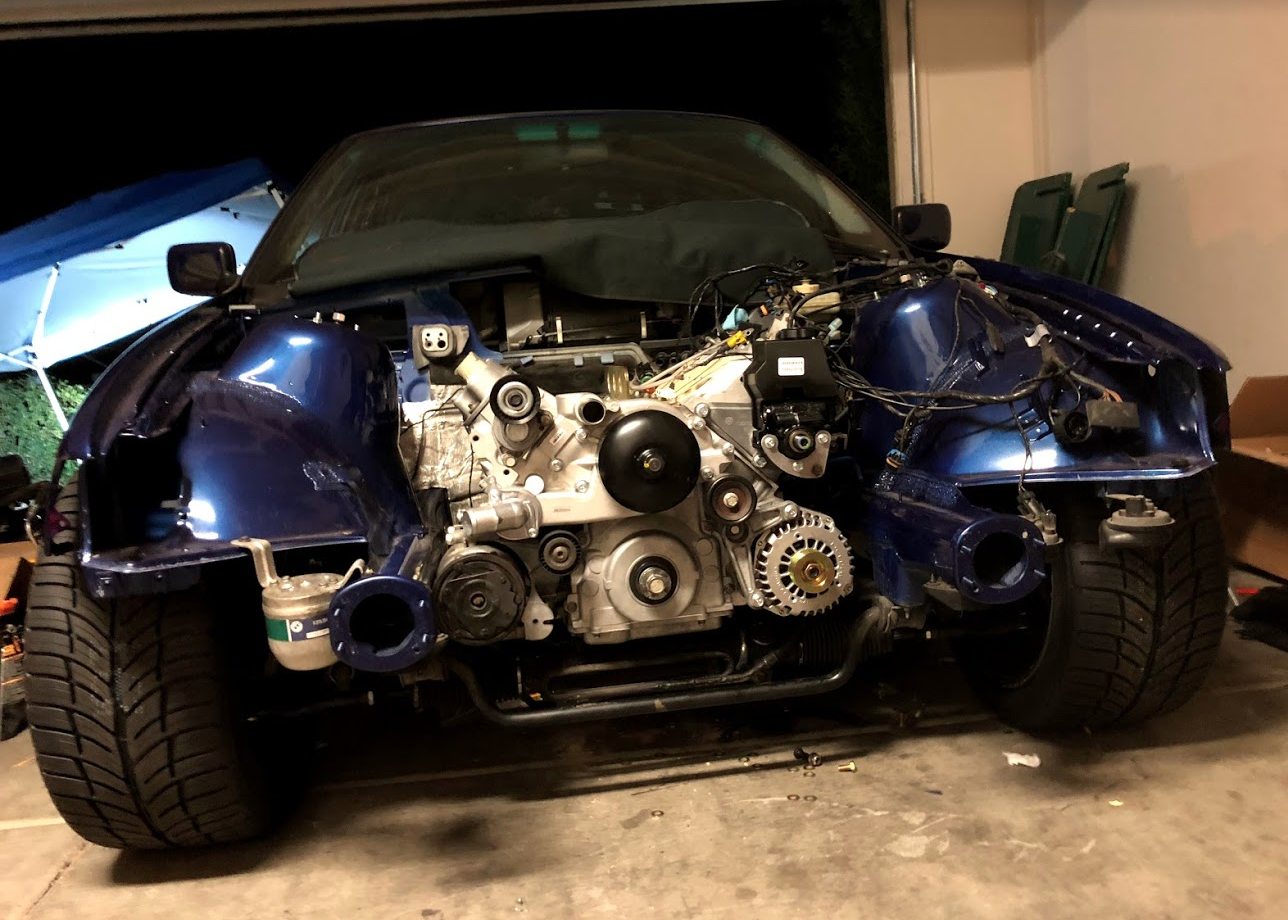
Going in
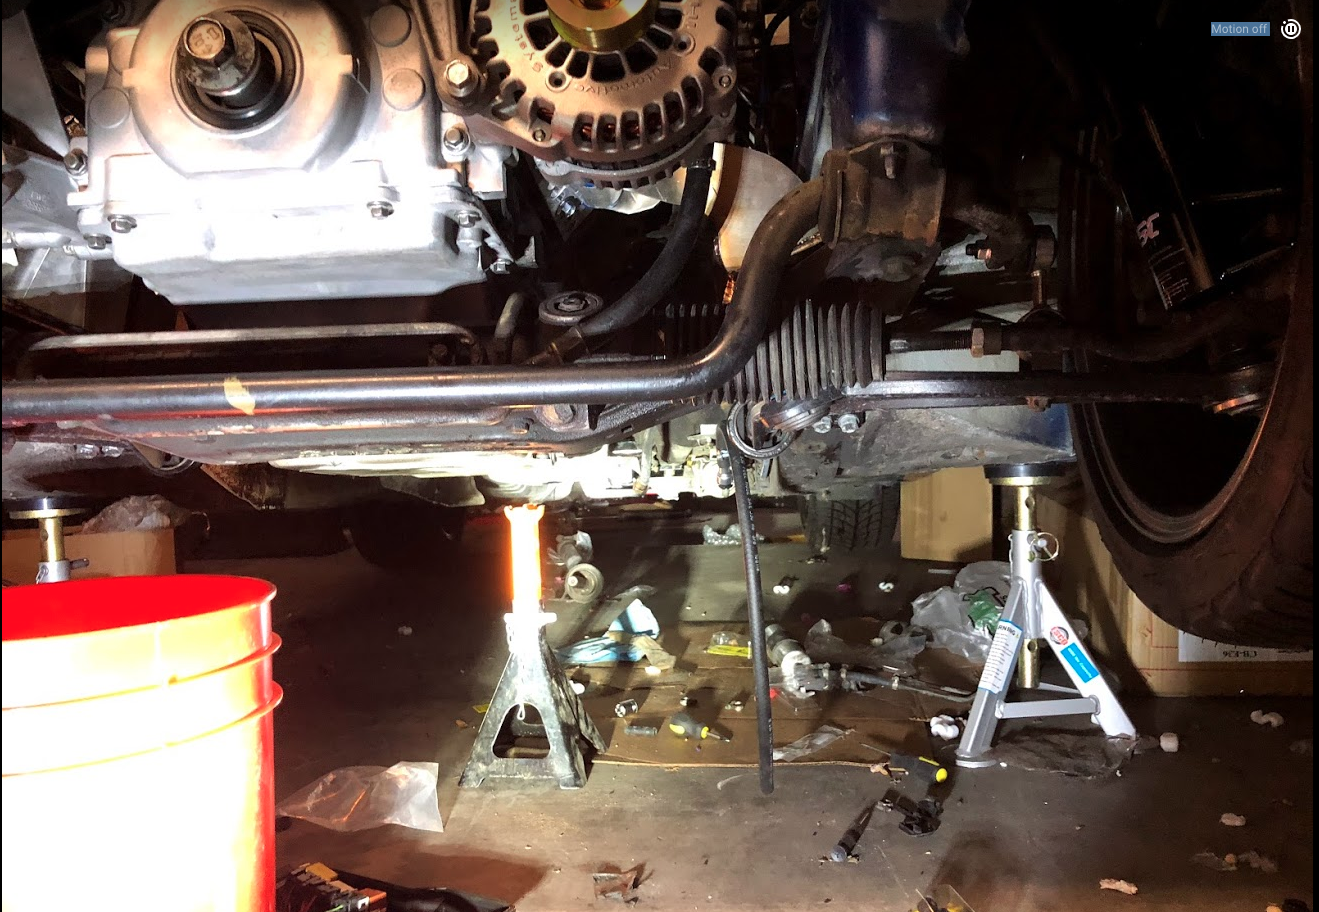
After the engine was in for the first time. NOTE: The stock ac compressor will NOT work, it rest directly on the side and it scratched up my paint!!!! I was more pissed off because I had to grind off a piece of the stock bracket for the compressor in order for it to work with the mount lol. Wasted about an hour grinding the bracket including a trip to home depot for a grinder.... I have an order already in to use another bracket and a sanden compressor which is smaller.
another shot of it in the car
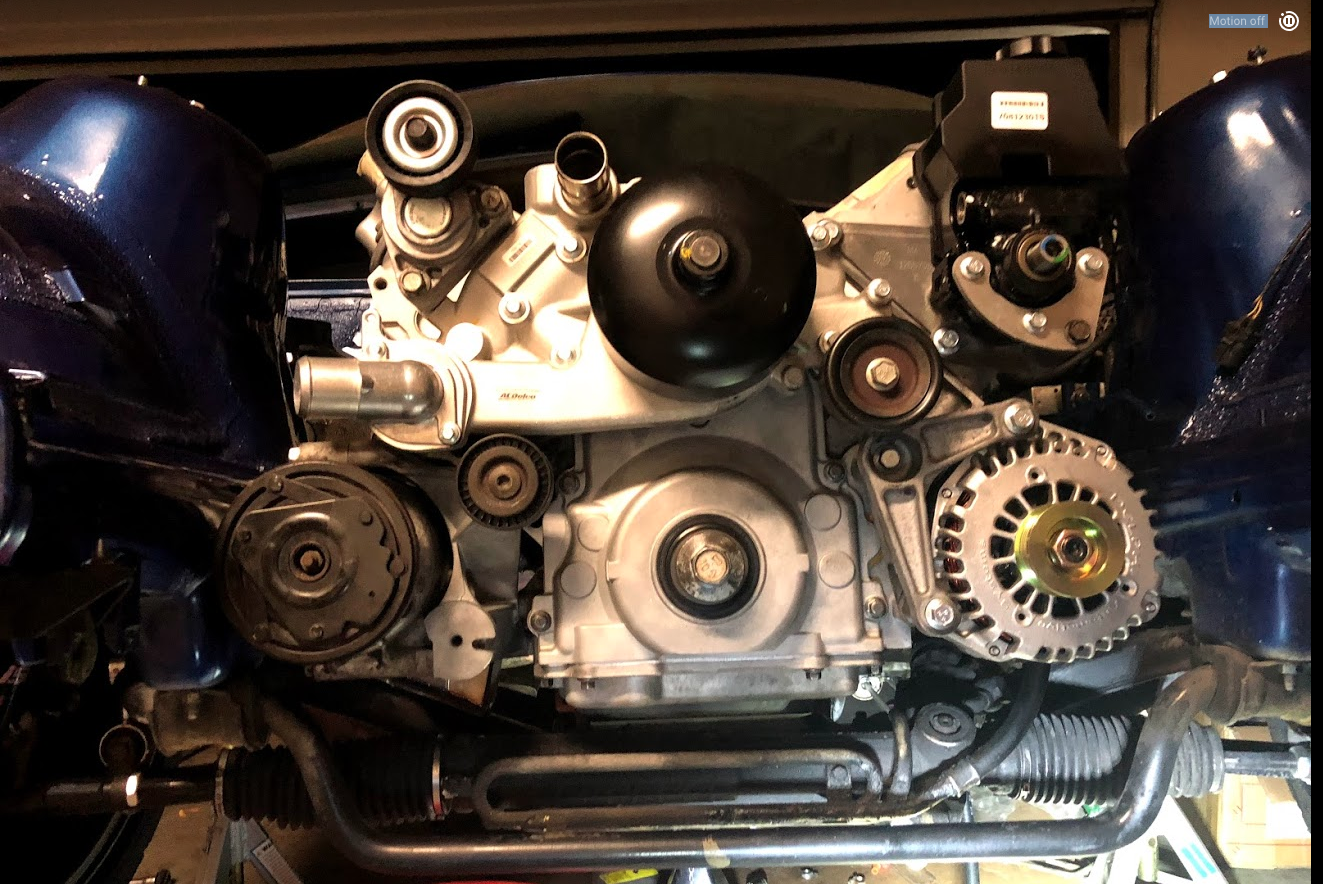
Header and intake installed
Clearance
Fuel stuff
Member
OH forgot to mention, I also installed a 3.90 diff and ICS suspension
 Posting Permissions


 Reply With Quote


Bookmarks