
 Member
Hello,
Figured I’d start my build thread, I’ve been lurking for a while now.
Mainly, I just wanted to document my process here. I picked up a 1983 320is earlier this year. Overall the car was in really good shape for its age, but some things needed to be addressed for sure.
It’s going to be a slow build, so updates probably won’t be that often, but I will make a conscious effort to maintain this thread and will be updating as I go. I just don’t have a lot of time to work on it as much as I would like.
My goal for this build is not to do a full restoration, the car is in pretty good shape overall. However, it is 35 years old and just needs some love. So the goal is to bring it back fairly close to original with some upgrades to suspension and a few other little things. Just adding some mild personal touches to it without losing too much of its originality.
Last edited by meeceboy78; 10-30-2017 at 01:06 PM.
Ryan | 1983 BMW 320is | H&R's, Bilsteins's, Eurometric
My Build: https://www.bimmerforums.com/forum/s...83-320is-build
Member
Tune up:
When I got the car, it didnt idle very smooth, so I did a tune up on it, (sorry no pics of that exciting stuff). Still ran rough after the tune up, (cap, rotor, wires, plugs) I took it to BMW shop locally here and he did a valve adjustment, set the timing and the air/fuel mixture. It runs great now and passed emissions with flying colors.
Seats:
it had some old crappy seats in it that were not correct. So I was on the search for some Recaros that came from an is. As you all are aware, thats a pretty hard task to find some decent seats for a decent price. Finally after a 4 month search, I came across some.
old seats.jpegseat 2.jpgIMG_3867.JPGIMG_3864-4.JPG
Ryan | 1983 BMW 320is | H&R's, Bilsteins's, Eurometric
My Build: https://www.bimmerforums.com/forum/s...83-320is-build
Member
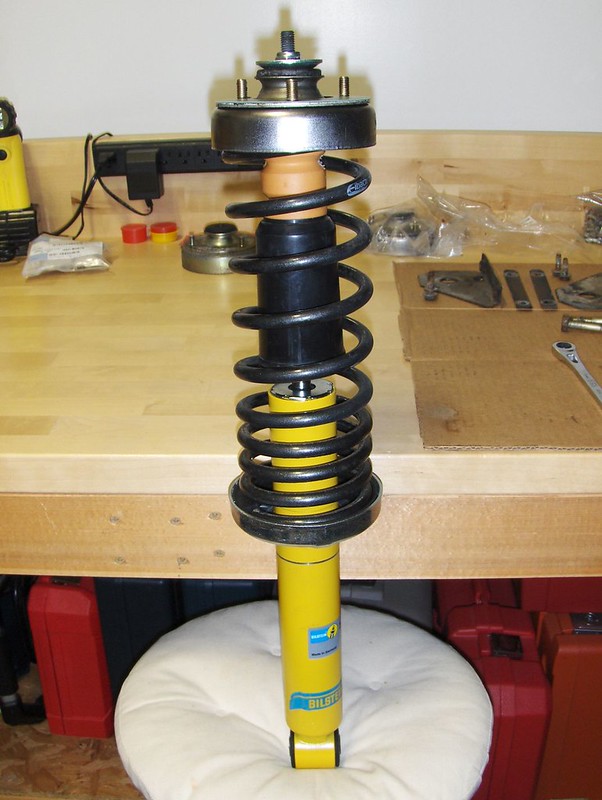
Front Suspension:
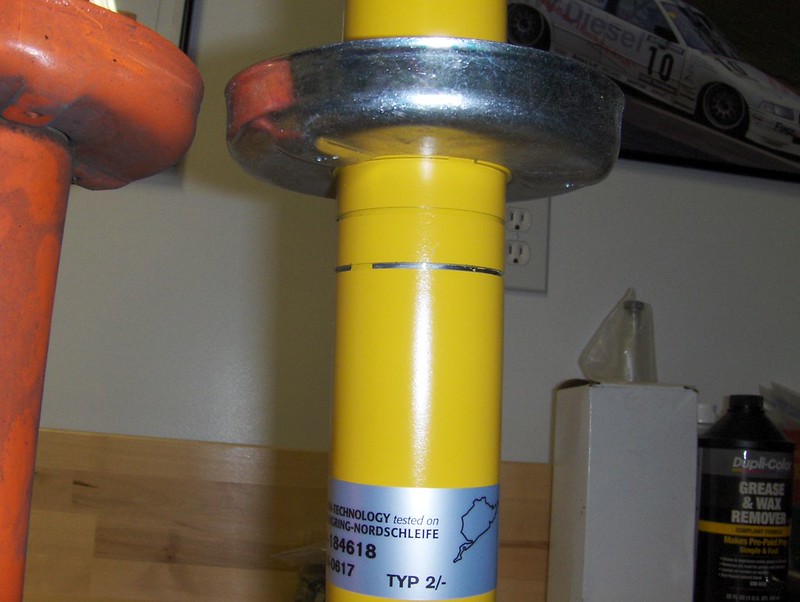
Since I have such little time this part of the project took, WAY longer that it should have. LOL! I started the front suspension August 12th 2017 and just finished it Sept 9th. I ordered up and installed new tie rod ends, new Meyhle control arms / ball joints. Pressed out the OEM rubber and put in Eurometrics bushings. Also got shock mounts, H&R springs and Bilstein shocks. The Previous owner heated the springs up and ruined everything suspension wise on it. This car was REALLY low and scraped on everything, so as cool as it looked from afar, the practicality was not there for me. I want to be able to enjoy this car and the ride quality.
before 1.jpgonjacks.JPG
- - - Updated - - -
I had Fun removing the passenger shock and spring assembly the top nut was stripped on tight as could be. So I couldnt even get the whole unit out. So I had to cut the spring up to remove the shock. Couldnt figure out how to get the top nut off, so I tried an air chisel and sawsall to cut the side of the strut mounts to get easier access . That didnt work too well. Finally put some heat on it and used a pickle fork and a hammer between the mount and the upper spring cup and that worked.
IMG_4503.JPGIMG_4504.JPGIMG_4586.JPG sorry i dont know why some of my pictures are coming out sideways
Ryan | 1983 BMW 320is | H&R's, Bilsteins's, Eurometric
My Build: https://www.bimmerforums.com/forum/s...83-320is-build
Member
Lookin good, man! I'm digging the Alpina style front air dam, looks good in matte with the rest of the car in Schwarz.
Past, Present, and Future
1974 BMW 2002tii (RIP)
1995 BMW 325is w/ FULL S50 swap, track prepped (SOLD)
1988 BMW 325ix Zinno/Black (RIP)
1988 BMW 325ix Alpine/Black (Sold)
1988 BMW 535is Alpine/Pacific Blue (Going Away...)
1982 BMW 323i (Current Project/Paper Weight)
2003 BMW 325i Sport Touring (Daily Driver)
Member
Finally got the front put back together it raised it about 2 ¾ inches. LOL! However, I think it has a nice sporty stance to it now. I drove it around a little and it feels so much better.
it will probably be another weekend or 2 before i start on the back now. that gangsta lean gotta go! haha
IMG_4589.jpgIMG_4595.JPGIMG_4597.JPG
- - - Updated - - -
just for a quick comparison:
Before with heated springsbefore 1.jpg
after with H&R springs IMG_4595.JPG front comparison only.
- - - Updated - - -
thank you very much!Originally Posted by MortyCrock

- - - Updated - - -
so this is where i am as as of today... i hope to get back on it by next weekend. i will be doing sub-frame bushings, rear trailing arm bushings, shocks/springs, shock mounts and probably new brake hoses at this point.
Ryan | 1983 BMW 320is | H&R's, Bilsteins's, Eurometric
My Build: https://www.bimmerforums.com/forum/s...83-320is-build
Member
ahh the rare "heated springs" option, you are a lucky man.
looking good, only a month!
and well worth it IMHO, good things are worth waiting for. owning these cars shouldn't be a rush job.
Member
thank you, i appreciate that. Yeah very rare option indeed. haha
Ryan | 1983 BMW 320is | H&R's, Bilsteins's, Eurometric
My Build: https://www.bimmerforums.com/forum/s...83-320is-build
Member
Nice project, car looks clean. I can only imagine how much better the car will drive by just correcting the springs!
It looks like someone did a front bumper tuck...and it looks right. Do you mind posting a pic of the side bellows so I can see how they spliced the two together? Most of the other bumper tuck pics on the forum are gone thanks to Photobucket.
Thanks and keep up the good work.
MJ
Member
If you use google chrome, there is an extension that fixes the photobucket links.
Member
nice work. upgrades that add value and fun.
Member
Love the work youre doing. Looks great! Its hard not to tackle all these side projects that are open to me, what with the engine out of the car and all these exceptional build threads.
Member
Yup, they were already done. i will post some pics in a little while for you. i think whoever did it, did a pretty decent job on it myself.
thank you so much! its been a lot of fun for sure, and i love learning about all the different models of BMW.
Thank you so much! i understand completely. i've been following yours as well. I wish i had more time to tackle more of it at once, but taking my time sure has paid off.
Ryan | 1983 BMW 320is | H&R's, Bilsteins's, Eurometric
My Build: https://www.bimmerforums.com/forum/s...83-320is-build
Member
Here you go MJ, let me know if you want a more detailed picture.
side bellow.JPGside bellow 1.JPG
Ryan | 1983 BMW 320is | H&R's, Bilsteins's, Eurometric
My Build: https://www.bimmerforums.com/forum/s...83-320is-build
Member
I gotta say thats one of the cleanest mods to the rubber bumper I've seen. Almost looks stock.
Member
Meeceboy78 - perfect, thanks for the close-up pics. I will be doing a tuck on my '82 soon and this helps get an idea of how the PO of your car handled the bellows.
MJ
Member
got to tinker with the E21 a little bit. as i'm a little nervous tearing out the whole sub-frame assembly, i just kind of analyzed the situation and trying to get a game plan together before tackling it. I did however get a few things done though this weekend.
i wanted to post a picture of what the suspension looked like before i touched it. as you can see the PO heated the springs, melted the dust cover to the shock all within inches of the gas fill tube... brilliant!
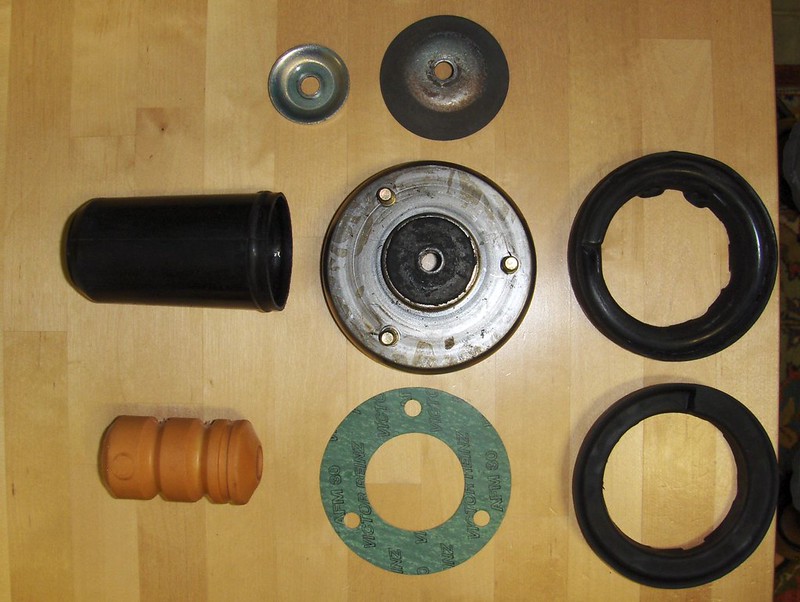
I cleaned up all the hardware and installed new shock mounts in the spring seats and got the coil/shock assembly put together.
trashed springs.jpgnew rear shock mount.jpgfreshness.JPG
Ryan | 1983 BMW 320is | H&R's, Bilsteins's, Eurometric
My Build: https://www.bimmerforums.com/forum/s...83-320is-build
Member
meeceboy78 - I find it amazing that those springs would still provide "spring"....fine craftsmanship there....ha ha.
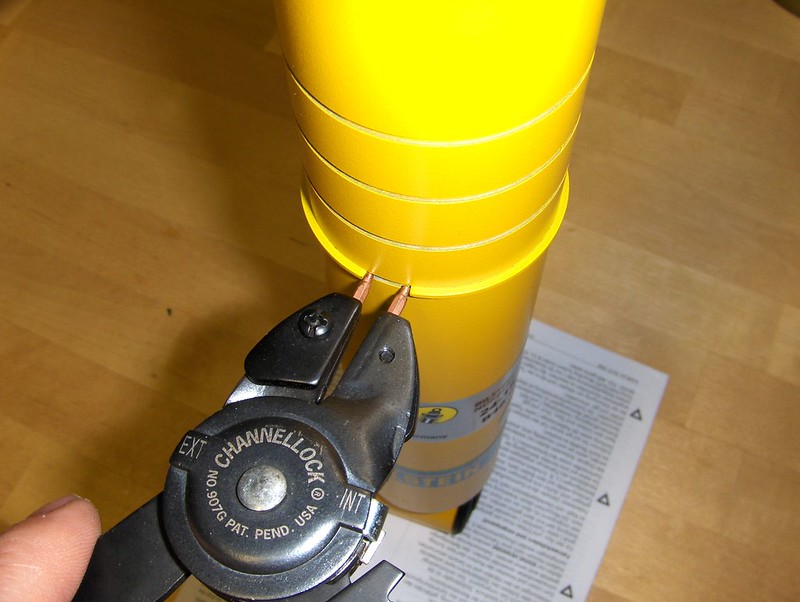
One quick item that you may have thought through but I will point out in case not...the lower spring perch on the Bilsteins in the lowest position will make the rear end sit too low compared to the front. I ended up moving the circlip to the third notch from the bottom and it sits level. My car has Eibach's but it should be the same for any spring since the spring gives the drop. I ended up at this measurement from measuring the OE shock - distance from lower mount center to spring perch.
MJ
Member
mjweimer - WOW!, thank you so much for pointing that out. i didn't know about the different settings. i will adjust that for sure.
Ryan | 1983 BMW 320is | H&R's, Bilsteins's, Eurometric
My Build: https://www.bimmerforums.com/forum/s...83-320is-build
Member
meeceboy78 - Could not find a way to attach pics to a PM so here they are:
Spring perches from stock to Bilstein
Close up of perch, circlip, etc.
I also noticed that you did not have a bumpstop or dust cover installed (the parts on the left side of this pic) - Bilstein's in this application do not have internal bump stop, the front struts do however.
I used circlip pliers to spread and move the circlip. It makes the job a little easier but you could use a couple of small screwdrivers, maybe needle-nose pliers, etc.
Here is what mine looked like finished.
Hope this makes things a bit more clear.
MJ
Member
mjweimer - thank you. that really does clear things up a lot. i don't have a dust cover as mine was melted. LOL
I'm curious if the bump stop is necessary though. my old ones didn't have one to swap out, so i may have to order a couple of new ones.
Ryan | 1983 BMW 320is | H&R's, Bilsteins's, Eurometric
My Build: https://www.bimmerforums.com/forum/s...83-320is-build
Member
Finally got a good chunk of work done to the E21 this weekend.
removed the rear subframe, doing a semi dismantle on it to clean it up and paint it. then i will be replacing the bushings
seemed like the hardest part (since i left the diff connected) was getting the driveshaft separated from the diff and drop it all down at the same time.
I ended up discovering that i had a broken E-brake cable though. so i need to get a new one, and i will probably end up just getting 2 so they are both new.
also my CV boots are trashed. if anyone knows of a good kit to buy and a DIY on how to remove and rebuild them, please let me know. LOL
ordered up CV boot kits, e-brake cables. also pressure washed everything. scraping and will be painting soon.
-mjweimer- i got the shock settings fixed, thanks a ton for noticing and letting me know.
here are some pics i took.
axle out.jpgsubframe out 2.jpgsubframe out 1.jpgsubframe off.jpgcleaning subframe.jpg
unfortunately the next day, my 4Runner got totaled in an accident. everyone is OK, thankfully, but now im in a rush to get this car put back together so i have a car. borrowing my dads truck at the moment, but it looks like the E21 will become my daily pretty soon.
Ryan | 1983 BMW 320is | H&R's, Bilsteins's, Eurometric
My Build: https://www.bimmerforums.com/forum/s...83-320is-build
Member
Great progress! I've been gearing up to do this exact job myself sometime this year. (along with some diff bearings)
Would you do it any differently next time?
Don't forget to use new lock nuts on the back of the driveshaft when you put it back together.
EDIT: when I did the boots on my 2002 long ago, I simply took them apart and cleaned it all up really well, and reinstalled with new grease, clips, and boots. I got the kind with screw clamps, because I've never owned one of those boot clamp crimper pliers (same as used with a rack boot clamp). Not sure there's anything else you can really do with it.
Last edited by cgifool; 10-04-2017 at 11:44 AM.
Member
Geez, glad everyone is ok, man. Get that thing back together!
Past, Present, and Future
1974 BMW 2002tii (RIP)
1995 BMW 325is w/ FULL S50 swap, track prepped (SOLD)
1988 BMW 325ix Zinno/Black (RIP)
1988 BMW 325ix Alpine/Black (Sold)
1988 BMW 535is Alpine/Pacific Blue (Going Away...)
1982 BMW 323i (Current Project/Paper Weight)
2003 BMW 325i Sport Touring (Daily Driver)
Member
Ryan,
Strong work! Sorry to hear about your 4runner and glad everyone is OK.
There are two different options for CV boots; Febi and GKN/Lobro (OE mfg of our CV's). The Febi's are cheaper by $5 however the Lobro kits come with new metal caps for each end of the joint (which I consider important to get the best seal) and utilize an Oetiker style clamp on the big end of the boot which allows better clearance for the bolts.
http://www.pelicanparts.com/catalog/...SUSAXL_pg1.htm
The blue book also recommends using Curil K to seal the end caps but a good gasket maker will work fine.
I used pommeree's DIY thread for the CV's as a guide when doing my project. It is well written and the pics show all the details.
https://www.bimmerforums.com/forum/s...ht=CV+boot+kit
MJ
Member
thank you! that's what i did... Ive just been collecting parts for several months and when i knew i was pretty much ready i tore into it. there is some things you don't know you need until you get it torn apart, so prepare for that as a possibility. I dont think i would have done anything any different for the exception of maybe removing the diff from the sub frame first and then remove the rest. i think it would have been a bit easier to manage getting it out, but it wasn't bad either way.
I appreciate that, thanks! i know im trying to. haha waiting on some parts to come in, then i can start making some better progress.
MJ, once again, a wealth of knowledge. i was searching this weekend on Pelican parts and did actually end up ordering the Lobro kit among some other things to get this back on the road. thanks a lot for the link. it looks fairly straight forward... i hope. LOL!
I will post a pic of the 4Runner.
Ryan | 1983 BMW 320is | H&R's, Bilsteins's, Eurometric
My Build: https://www.bimmerforums.com/forum/s...83-320is-build
 Posting Permissions


 Reply With Quote
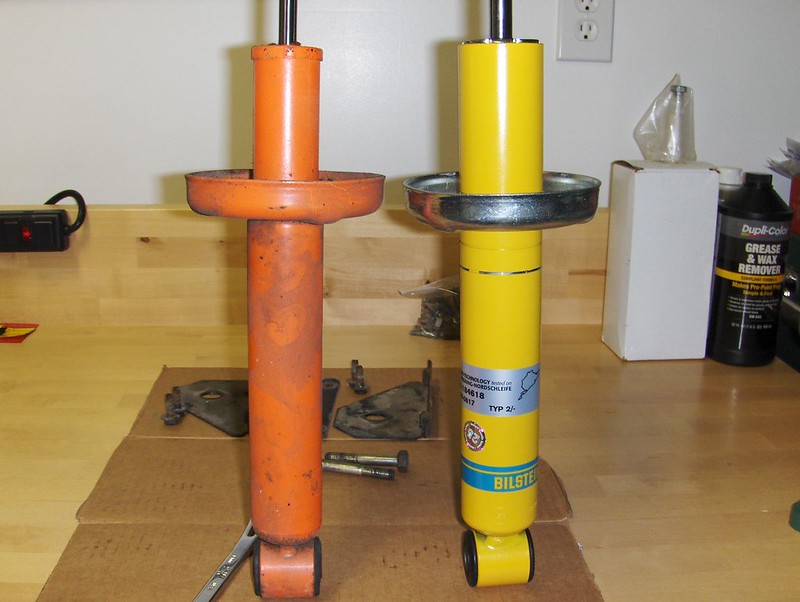
Bookmarks