
 Member
Wow, $15 for both the holder and a wrench? That's really cheap!
Has anyone bought the low-end ones? I don't need something that is durable enough for daily use, but it does need to be strong enough to remove a stubborn fan every year or two.
Dismembered
It really shouldn't take much to break the clutch loose, Just give it a jolt and the nut breaks loose, same thing going back on. It will not come loose.
Set the controls for the heart of the sun
Member
I used to think that as well. "What's all the fuss about?" I regularly used a stamped aluminum sheet metal bike wrench.Originally Posted by BimmrMeUpSnotty

Then I ran into the fan clutch nut from hell and had to say "Oh, that's what they were talking about."
Dismembered
Well obviously you weren't using the proper tool on a fan clutch that was over torqued by the nut before you, hence the reason why you should have the proper tool. A stamped aluminum 32mm bike wrench is not a proper tool for the application we are currently posting about. Don't forget, the proper fan clutch tool is over two and a half feet long.
Last edited by BimmrMeUpSnotty; 09-10-2017 at 12:30 AM.
Set the controls for the heart of the sun
Having No Trouble Here
BMW CCA Member
I haven't bought any of those sets, but the generic holder tool I have is not real different, although the key in selection is to choose the ones made from a thicker steel - i suspect some are so thin they don't really work.
For the wrench I use an actual huge cheapo combo wrench - it doesnt need to be bike-wrench thin really.
I have run across brutal stuck fan nuts before, just not on my BMW's.
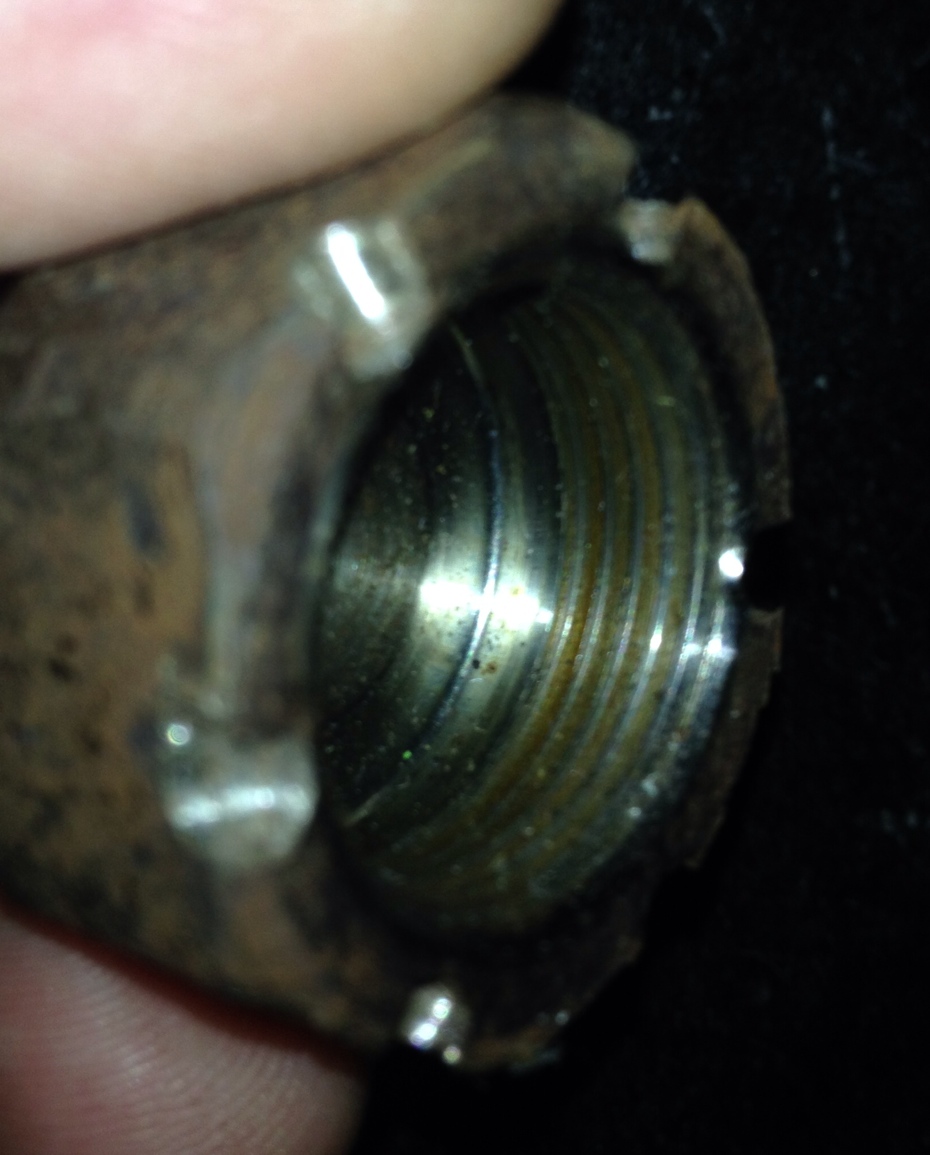
This is from my '96 Audi which was prob original and was like it was welded on.
First I just cut the fan visco assembly off with a sawzall to get the fan out of the way and room to work, which is why you see just a nut in my hand here.
Then I drilled holes down between the nut and the flange on each face of the nut. Those were to both try to break the face-bond but also to help with penetrating oil soak. Left soaking for overnight periods alternating with light torch application. Eventually popped off, and the minute it did it spun right off and you couldn't imagine why it'd been so damn stuck.
2003 M3CicM6 TiAg
2002 540iT Sport Vortech S/C 6MT LSD TiAg
2008 Audi A3 2.0T DSG (the daily beater)
2014 BMW X1 xDrive28i (wifemobile)
Former:
1985 MB Euro graymarket 300SL
1995.5 Audi S6 Avant (utility/winter billetturbobattlewagen)


Dismembered
And for that reason, I apply a thin amount of antiseize on the threads, guarantying me no corrosion build up in their.
Set the controls for the heart of the sun
Member
Hmmm... Autozone mentioned nothing about crediting me back upon return (though I completely get being fully charged and credited back to deal with theft!). I'll check next time I'm thinking about renting something from them.
For now, bought the clutch tool off eBay for $15 -- thanks!
Next weekend I'll make the trip to Harbor Freight for the jack / stands and get started on the exhaust. Getting interesting!
Member
Ok -- continuing my write-up of how it's going...
First off, radiator fluid container / shroud was REALLY a lot easier than I thought. There really are just a few push-clips and hoses. If, like me, you're trying to unscrew a lot more, you're doing too much. The hoses are generally pretty simple, just a few push-clips you loosen with a flathead screwdriver. Biggest issue with those is losing the clips, which has happened with a couple of them (ugh). You will lose all the fluid when you take the hoses off, so make sure you're someplace that won't be a problem. The other thing to do is to take note of the hoses and where they go. Maybe a piece of tape on the hose and on where it connects to, numbered together so that you don't lose track. Most of them I"m in good shape with, but the two on the bottom left I forgot to label, so hopefully I get those right when putting it back on!
In order to take that off entirely, you need to take off the fan. Just buy the $15 fan clutch tool (delivered, even!) off eBay -- made it SO much easier. And the 1 1/4" crescent wrench I bought at first was more expensive, at $20!
I went to Harbor Freight and picked up the jack and jack stands. Great deal -- $79 for the jack, and $21 for a pair of stands. I bought two pair.
Using those, I followed djb's advice from his other post and started on the exhaust system. From the back, there was one nut near the muffler, four holding a bracket in the middle, next to another support piece. I used an extra jack stand to hold up the exhaust system when I went to the front. I think there's one more nut I need to remove in the back, still. HOWEVER... I did remove the Inconel nuts at the downpipe to exhaust junction. Well, I removed three of them. A little WD-40 was enough to loosen them up. I got stuck there, though -- HOW THE HECK CAN YOU GET THE ONE IN BACK???? The fourth nut is behind the pipes themselves. I can't seem to get anything back there to get that off. Any thoughts? I tried the socket, crescent, the "other" (closed) side of the crescent / compound wrench, but there's just no room to maneuver. Again, thoughts?
Thanks!
Having No Trouble Here
BMW CCA Member
SMH.
You didn't drain the coolant first? You clearly aren't listening. This goes along with the fact that you were corrected several times about exactly how to take the radiator out but continued to randomly whack out screws.
Again, combination wrenches are not "crescent wrenches".
Time for me to unsub.
2003 M3CicM6 TiAg
2002 540iT Sport Vortech S/C 6MT LSD TiAg
2008 Audi A3 2.0T DSG (the daily beater)
2014 BMW X1 xDrive28i (wifemobile)
Former:
1985 MB Euro graymarket 300SL
1995.5 Audi S6 Avant (utility/winter billetturbobattlewagen)
Member
Are you using a deep 14mm socket on the downpipe nuts?
On my car I didn't even need to use an extension, although a wobble extension would provide additional clearance.
On the exhaust it's tempting to try to unhook the rubber+fiber suspension loops. That is difficult. It's much easier to just remove the 13mm fasteners.
Member
Thanks guys! I was playing with the screws very early on, before anyone posted anything about how to remove the radiator. With the fan clutch tool I was finally able to get it off this past weekend, so when writing it up, just included my own note about ignoring the other nuts now. Must have missed the part about how to drain it first. Honestly, as I read this stuff about 3/4 of it goes way over my head until I'm actually in there. Even with djb's very detailed write-up in the other thread (which is EXTREMELY helpful!), I'm still looking at that and like, um, so what do I do next? It's literally like reading in a foreign language. So I'm reading it, getting in there and doing what I can, then re-reading it with that little bit of context, then watching videos, then reading again... I'm a fast learner once I start *doing*, but I'm admittedly an idiot when it comes to the first step or two of any given new task / skill. Get a little overload as to where to start. So as someone said, I'm just turning this into a bunch of little tasks. Right now, I'm on getting the exhaust removed. I had hoped to have that done last weekend, but hopefully I'll get that off this weekend if I can get that last but removed!
One thing I forgot to note, the little electronic connector to the radiator reservoir has a little metal m-shaped pin on it. For this one, to remove the piece you need to push straight down on that pin (it's spring-loaded) and the piece will come off easily.
On the exhaust, I've been removing all the 13 mm fasteners. If I recall, there was one point where it looks like it's supported by a straight extension into what looks like a large rubber gasket - I was going to leave that until the end and slide it out when I had all others removed (I don't recall seeing fasteners on that one), but definitely removed all others, including the one by the muffler. I agree - seems much easier to just take out the fastener than to do anything else.
For the downpipe nuts, yes, I used the deep socket, and I can get it on the one trouble nut, but I just can't seem to get the leverage to actually turn it. If I recall from the angle, the socket wrench is between the pipes themselves on the one side and the undercarriage on the other, and so as I try and turn it everything's too close and it's not moving far enough to engage. I'll take a look again this weekend. I have a short extension that I also tried with the deep socket, but if I recall the positioning of it still didn't allow me to get the proper leverage. When I'm under there I'll see if I think a wobble extension might help.
Thanks again, guys!
Member
It's useful that you report your trouble following the guide. It's easy to forget that some things are not obvious to a first-timer.
I recall that long ago I need to remove a fuel injector connector on my e30. I didn't understand how the connector worked, and pried off the spring wire retainer. "Ping" and it was gone forever. I wasted an hour trying to find it, and more time trying to get a replacement. (The parts counter guy want to sell me an entire replacement harness for $$$$)
Dismembered
I hope you have been meticulous about bagging and labeling everything. Looks like you will be a long while before things start going back together. Even a good mechanic has a hard time remembering everything.
Set the controls for the heart of the sun
Member
Yeah, sorry, I need things REALLY basic! That's why I thought it would be helpful to do this. If I can get it done, every step will be detailed!
In terms of putting it back together, the method that seems to be working best now is writing a number on a piece of paper and taking a picture with the number in it, then sticking the bolts / connectors in a bag with the number, that I also label. For connections that are staying on the car, I'm putting a piece of tape with a number on it, together with a piece of tape with the corresponding number on the part. Though I didn't come up with that system until after I took off some of he hoses - hopefully I get those back in the right spot!
The other issue is yeah, those hose push clips come off entirely. I just loosened them and then took off the hose. But then the pins fell off. Could be a problem!
Member
There is very little that can be mixed up with cables and hoses while removing the engine.
The only hoses that aren't obvious are the medium size coolant hoses clipped to the fan shroud.
If I won't be reinstalling for a while, I tend to put bolts back in the holes they came from / nuts back on the studs. Leaving nuts on the end of studs also protects them a bit.
Hose clamps usually are slid up the hose and snugged up.
Once off the car I reassembled the radiator with the shroud. All of the hoses are clipped in place, with the two medium hoses joined together and the two large hoses joined with an old thermostat.
I'll put all of the fasteners for one section in a single bag if they can't be confused for each other. That way I won't have to sort through as many bags, and it's easier to figure out which part of the project it from. For the engine removal I think that there are only four or five bags:
Under-car fasteners: Exhaust and driveshaft bolts+nuts (ones that weren't reinstalled), transmission mount nuts (which could have spun a few more of those back on)
Engine cover: only two screws and two nuts, but with fragile clips on the trim pieces.
Front engine fasteners: A/C and power steering bolts, engine mount nuts, tensioner pulley cover disks, hose clamps
Bumper fasteners: including screws for air ducts and fender linings.
Member
Pictures?
Looking for an E39 belly pan , passenger front inner fender liner
Member
Recently completed my first engine swap on my '00 528i (6 cyl). I endorse all the step by steps you have seen here. Couple things I would add/emphasize:
I took radiator out, but left the rest of the front clip on.
I unbolted auto trans from engine and removed both separately.
However for installation, I bolted trans to engine outside of car and installed them together with a load balancer - I had to remove the hood to do this, which was easy
If i do it again, I would remove engine and trans together with balancer and hood off.
I unbolted both AC compressor and power steering pump and left them in vehicle as closed systems
Take extra care to make sure your e-torx sockets are fully seated on bell housing bolts- otherwise they'll strip
- Buy a cordless impact wrench - I got both the 3/8 drive and 1/2 drive from Lowes for like $200
- The small transmission jack form Harbor freight for $100 was also quite helpful
- I used 3 cheap ratchet straps for R&R. one ea front & back as noted in this thread, and one from the engine mount bracket below exhaust to hoist to prevent engine from rolling over (left, from front) toward exhaust cats.
Member
Thanks, guys - more good advice.
You're right - I've taken a lot of pictures (on my camera), but haven't downloaded them and so haven't posted any. Took a couple with my phone and will try now.
I was able to get that last nut off the downtube with the wobble extension - thanks again. Thing is, it still feels rock solid right there. In fact, the whole thing feels like it's still on pretty tight.
I'm assuming I missed a nut someplace in the back of the car, and as I mentioned there is one rubbber connector that looks like just a loose support that I might need to do something with, but had to wrap up before I could jack that side back up and look around.
Up at the downtube, should it just come off once the nuts are removed and the top bracket pulled off?
Member
Hope these photos of the downtube junction upload!
- - - Updated - - -
Looks like that worked! The pictures are actually upside down (but basically, so was I at the time!).
I have all the bits off, and removed the bracket in the second picture, but that junction still feels rock solid. I sprayed with wd40 in the event it's just rusted, but wondering if there's something more I should do there? Thanks!
Member
Ok - so it turned out I needed to remove one additional mount for the exhaust system. It looks like you can slide it off, but not really. Once I took that off, removing the exhaust was easy (ok, so it's heavy!). I'll try and post a picture of that support.
So it looks like the next step in djb's write up is to disconnect the transmission cable and battery cable. I wanted to be sure I'm at the right spot. Is this what I'm supposed to take off? Thanks again, guys!
Member
Yes, that's where you remove the shift cable from the transmission.
The large nut on right side of the picture releases the cable core.
It is slightly easier to remove the cable sheath from the bracket on the left by loosening the two nuts, but you can also remove the bracket from the transmission. Those two 10mm bolts are more awkward to reach than the picture suggests, and if you leave the bracket on the transmission there are fewer fasteners to keep track of..
Member
Thanks! Took last weekend off, but back at it this weekend. BTW Djb - was going back over some of the earlier posts, and yes, the fan wrench tool I got on eBay worked like a charm!
Ok - so picking up where I left off, and adding my dumbed-down description for anyone in the future as inexperienced as me: the picture on the right in the post above is upside-down. The rod slips in a hole behind the big nut on the right. You just need to loosen that to let it slip out. On the far left of my picture is what you need to loosen. Use a vice grip or other wrench on the far side (just out of picture) to hold it in place, and a compound wrench to loosen the side you can see. When loosened, it slides towards the nut on the right in this picture to expose a cable. With those parts separated, you can slide the cable through a slight slot (again, just out of picture). I'll try and post some pictures I've taken with my phone, but it's a little tricky doing this via mobile!
QUESTION: In your other post Djb, you suggest putting it into neutral. I get what you're saying that it's easy enough to feel the clicks, but with the arm starting at the front of the car (or should I start with it towards the rear?), how many clicks to neutral?
From underneath looking up, just to the left is an electrical connection. Just give it a quarter or so turn counter-clockwise (when viewed from the left side of the car) and it separates easily. Also disconnect the wire with a large red protective cowl over it.
Looking at Djb's next step from the "other" post, next step is:
"It’s easiest to unbolt the driveshaft with the transmission support removed. I’ve did it with the support in place, but the geometry is difficult for the high force required. Unless you are installing a new flex disk, separate between the flex disk and transmission and reinstall the support. That way the driveshaft will rest there with the transmission off. Otherwise you’ll have to rig up a driveshaft support.
My driveshaft bolts and nuts were 18 mm. This size is skipped on most tool kits and there is no close SAE size -- make certain that you have a socket and a wrench or two wrenches. These are lock nuts, so expect to need the wrench until the last few threads.
Loosen the nuts on the rubber transmission mounts to the top of the threads (13mm)."
Ok - so I took a few pictures that I'll try and post to be sure I know what's up, followed up with a few questions. Thanks again!
Last edited by BimmerDad17; 10-22-2017 at 06:04 PM.
Member
Hopefully photos:
Member
Ok - so the leftmost two photos are the after / before of the electrical connection. The second from the right is (I hope!) the after shot having taken off the power connection.
The other two shots (third and last) are of the driveshaft. If you look closely, it looks like there are two "layers" of nuts / bolts on the driveshaft -- do I remove all, or just the ones closer to the "bottom" of my picture? And I'm assuming the section at the top is the transmission support that Djb suggests we temporarily remove. On the left side of the last picture you can see the bolts for the support are under what I'm guessing is a heat shield? Should I pull that off to access the bolts? Seems mostly to be bolted on itself, but in some places it seems like it might be held on by rivets? And on the support itself, I assume I'm removing everything? If you look at the center picture, for example, there's a gold bolt on the right, and a silver one to the top and to the left of it. Both come off, correct?
Thanks again as always, everyone!
Member
The two layers of three bolts are the flex disk connection.
The flex disk is a specialized constant velocity joint. It's a critical part of driveline resilience. It handles small angular misalignments with no "cogging", while reducing the vibration to and from the transmission.
It's sometimes called a "rag joint" because internally fibers connect the input and output lugs. There are far more fibers in one direction, so it's important that the flex disk be installed correct -- so that the strong pairs are pulling when driving forward, using the weak pairs in reverse. You don't need to think further about the directionality if you only unbolt one set of three bolts. But certainly inspect it while it's trivial to replace. Minor rubber cracks are OK, but any exposed fibers means that it's time to replace it. Broken fibers means that it's long past time to replace it.
I left the transmission support in place to swap the engine, but I did have to remove the support when removing just the transmission. I don't remember any special challenge, although I may have had to gently push aside or unscrew a heat shield.
The reason to shift the transmission to neutral is so that you can spin the driveshaft in order to reach all of the bolts. There are some orientations when you can reach all of three bolts of a set without spinning, but you won't be that lucky. Just count the notches as you shift: P-R-N-D-2-1. ( I think that there are legacy internal detents for lower gears, even though the e39 doesn't use them.)
 Posting Permissions


 Reply With Quote


Bookmarks