
 Hairless Ape
For the past two weeks I've been rebuilding the M10 on my '82 320i.
I'm sure I haven't done everything as ideally as some of you would prefer but I've done my best. I'm nearing the end of putting everything back together. I've included some pics and maybe I'll have more as I go along.
Things I've done:
1. Piston rings
2. Connecting rod bushings (machine shop)
3. Connecting rod bearings
4. Main Crank Shaft bearings
5. Cylinder honing
6. Upper gasket kit from Ireland Engineering (Victor Reinz upper gasket kit for later model E21s)
7. Sand blasted all the aluminum components (Oil filter bracket, Intake Manifold, Long coolant pipe that attaches to the block, coolant junction piece, cold start valve pipe piece, exhaust manifold, valve cover, heat shield)
8. I sprayed the exhaust manifold with the Eastwood internal exhaust manifold coating inside and out. I figured spraying the outside wouldn't hurt anything. New fastening hardware for the manifold
9. New timing chain (this is looser than I'd like but it tightens after turning the camshaft a bit). I've got the crank and cam in TDC.
10. New timing chain tensioner and guide
11. Had the head cleaned and new valve stem seals put on
12. New intake hood between plenum and intake manfold
13. New oil pan gasket (haven't put this on yet)
I'm getting nervous because I'm running up against a time crunch but everything is going back together slowly.
I ordered some new alternator bushings (between alternator and air plenum valve/meter) because my old ones were cracked but I ordered standard 1" bushings from McMaster Carr and the screw terminals on them are shorter than I'd like so they may or may not work out.
1982 320i E21 Coupe, Manual, Cashmere Metallic, 162K+ miles (Daily Driver)
1997 318i E36 Sedan, Manual, Black, 388K+ miles (RIP)
Hairless Ape
Hairless Ape
Member
Looking good! About how long has that taken to do?
-John
Hairless Ape
Two weeks from start to now. I've been working weekends and evenings, burning the candle from both ends.
My girl was abroad on a business/family trip so I was trying to get it done while she was gone but because of constraints on when my buddy was free to let me work at his house/workshop, and oh my god rain--so much rain, I had to wait until the last two weeks. And I'm getting married in July so my bachelor party was this past weekend, therefore I didn't do any work this weekend except last night so I've run into three weeks this week. I plan on taking off early on Wednesday to do another long work session and hopefully I'll get finished.
I also ran into problems doing the pistons. I thought I'd be able to change the connecting rod bushings but I was wrong. They require reaming or honing and I didn't have access to that kind of equipment so I took them in to the machine shop last week to have them done and that delayed me an extra day.
Last edited by Hagbard; 06-19-2017 at 01:34 PM.
1982 320i E21 Coupe, Manual, Cashmere Metallic, 162K+ miles (Daily Driver)
1997 318i E36 Sedan, Manual, Black, 388K+ miles (RIP)
Member
Looks like good work so far.
Regarding your concern with the loose timing chain - if you have not done so already, don't forget to bleed the tensioner after installation.
It can be a bit of a bear with the upper timing cover and cam sprocket in place but a long screwdriver can reach down to the tensioner rail and allow you to manipulate it for bleeding.
Link to factory manual here:
https://www.bmwtechinfo.com/repair/main/027en/index.htm
Click on the first page to load contents, select section 11 "Engine" then navigate to Section 11-35 (listed on the right column).
MJ
Last edited by mjweimer; 06-19-2017 at 04:59 PM.
Member
Looking good!
Triple Check the cam timing by hand (must turn in normal rotation direction, CW looking at the engine front). I say this because it's easy to accidentally assemble it one tooth off.
And don't forget thread sealer on the exhaust manifold studs!
Tbd
Member
Nothing better than a head fresh from the machine shop.
Hairless Ape
I don't really understand the wording of that manual. How do I bleed the tensioner? I took it out and replaced the spring with one I bought on ebay. It was longer than the original spring. Do I just dump some oil down in the tensioner pocket and move the tensioner back and forth? Also, I did not see the ball bearing in my tensioner. I'm sure it's in there, but I didn't drive out the tip or anything to get it out. It looked clear and I brushed it with a brass brush and a bit of kerosene to make sure it was clear.
Also, to Epmedia, how do I know if my chain is one tooth off? The cam and crank are TDC but the chain is a tad loose at TDC on the guide side. Making it tighter seemed to put me one tooth off so I left it the way it is. Should the cam TDC mark be exactly aligned with the center of the oil pipe on the head or can it be slightly off the center? Still aligned with the oil distribution pipe on the head but just slightly off center.
Epmedia, are you 100 percent positive that (looking at the front of the engine) the cam sprocket turns in a clockwise direction? I would've thought the side of the chain going through the guide would be taught and the tensioner side would be looser. If so, I will have to redo that part of fitting the chain.
Also, what do you mean "thread sealer" on the exhaust manifold studs? Do you mean anti-seize? I actually didn't put anything on the exhaust manifold studs. I installed new studs and used new copper lock washers.
Thanks.
Last edited by Hagbard; 06-20-2017 at 10:08 AM.
1982 320i E21 Coupe, Manual, Cashmere Metallic, 162K+ miles (Daily Driver)
1997 318i E36 Sedan, Manual, Black, 388K+ miles (RIP)
Member
Looks good. To check the chain and marks always always roll the engine by hand twice and should land back on the marks. Should only feel slight resistance by rings and valve springs as you roll it over. Make sure the tensioner is in before doing any movement. I should of typed that first.
Last edited by autox320; 06-20-2017 at 12:01 PM.
88 M3
91 318is
91 318i
83 320is
08 X3 3.0si
"If it flys, floats, or f*cks, rent it!"
Member
Regarding the tensioner - yes you have it right. Fill the small pocket with oil, loosen the plug that holds the piston and spring in place (just enough to allow air to purge) and work the tensioner guide back and forth. What you are trying to accomplish is simply to purge air and make certain the assembly is full of oil.
You should feel the resistance of the guide increasing as the air is purged and you will know all the air is out when oil starts weeping from the threads on the plug. At this point, tighten the plug and (as Autox320 states) rotate the engine clockwise 2 turns. If everything is good your timing should be spot on and the chain will have minimal "slop". It is possible that the timing would be one tooth off initially because the pressure of the tensioner on the chain will slightly rotate the cam.
If you did not take apart the tensioner piston assembly when cleaning there should be no reason to assume the small ball is not in place - you should be fine.
Regarding the exhaust studs - the lower exhaust stud threaded holes are drilled/tapped through the casting of the head. If you do not seal them in some way then oil will weep out and on to the exhaust manifold.
Some folks recommend using only blue threadlocker (such as Loctite 242) to secure them and seal them up while others have used Curil T and no threadlocker. I did the belt and suspenders approach and spread Curil T on the inner most area of threads (with a small pick), screwed the stud in several turns and on the last few threads put on a drop of threadlocker and then ran the studs into the head until the end of the stud was just barely proud of the hole inside the cylinder head. Have not run the engine yet so I cannot comment on leaks, etc....but I see no reason why it would be an issue.
BTW: Curil T is a non-hardening sealer that has good high temp characteristics. It is not usually available locally (I ordered mine from Ebay).
Hope this helps.Originally Posted by Hagbard

MJ
Last edited by mjweimer; 06-20-2017 at 12:31 PM.
Hairless Ape
I did not seal the lower studs on my exhaust manifold. I guess that's some rework I'll have to do. It was difficult to get those studs in too, so that's going to be a huge pain in the ass. Great.
1982 320i E21 Coupe, Manual, Cashmere Metallic, 162K+ miles (Daily Driver)
1997 318i E36 Sedan, Manual, Black, 388K+ miles (RIP)
Member
I'd seal the top ones if need be too. Can look under the valve cover and if see the stud ends they also need it. On heads I have they end in the pockets of the valve springs. This is where oil sits due to the motor being canted over.
88 M3
91 318is
91 318i
83 320is
08 X3 3.0si
"If it flys, floats, or f*cks, rent it!"
Member
fyi: Many OE cam shaft sprockets have two marks, if yours is OE and has two marks, use the mark with the #2 stamped next to it.
cam-timing.jpg
: My description sucked... Turn the front of the crankshaft CW (by hand) as if you are tightening the crankshaft *balancer/pulley bolt (never turn the engine by the camshaft sprocket). Yes, the tensioner side of the chain will not be taught as the guide side. The guide side of the chain (not the tensioner side of the chain) must be taught when checking the timing marks. If it was off a tooth, the cam mark would not align anywhere to the oil tube. Worn cam-chain/sprockets and/or not-exact head-gasket thickness can make the cam mark not align exactly center to the oil tube. It's ok if it's not aligned 'exactly' center to the oil tube.
fyi: Newer dohc engines use a special tool in the chain tensioner to keep the chain taught because the chain is very long. Also a special cam locking tool.
I wish I knew which exhaust stud holes go all the way through, maybe it's just some top ones. I'm not sure, but maybe you can look while the valve cover is off. You can use Permatex® High Temperature Thread Sealant too 400f (probably at local auto store). Curl-T 482f. Loctite blue 300f.
Edit: is it just the top exhaust studs, or some bottom ones too? (I see mention of both)
Sorry for the confusion...
Last edited by epmedia; 06-20-2017 at 09:16 PM.
Tbd
Member
I think I was the one confused and posted bad info. The upper exhaust manifold studs are drilled/tapped through and not the lowers.
Sorry about that.
MJ
Hairless Ape
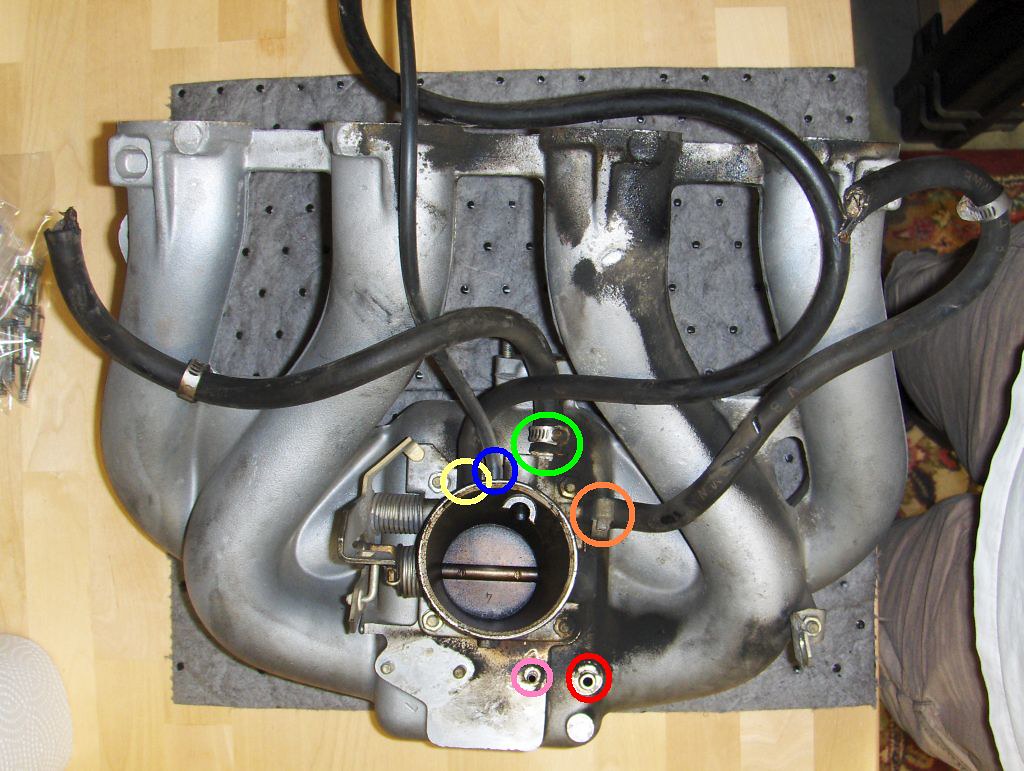
I've had trouble finding a good picture of the throttle body hose connections. I am a little uncertain where everything goes and which ports are capped off, etc. Does anyone or can anyone take a picture of their later model 320i throttle body connections and post it here?
Also, is there a Bentley manual for our cars? I can't seem to find one. The closest I get is for E30. All I can find are a Haynes, which I have two of, and the Chilton, which I'm trying to find a digital copy of. (If anyone has it, please post it here.)
Other than the digital manual posted above, which is great but has grainy pictures and incomplete descriptions, are there any other good manuals I should get that would help me avoid things like failing to put thread lock on my exhaust manifold studs? I want to stop working backwards here.
1982 320i E21 Coupe, Manual, Cashmere Metallic, 162K+ miles (Daily Driver)
1997 318i E36 Sedan, Manual, Black, 388K+ miles (RIP)
Member
I forgot to mention that if you removed the flywheel, the flywheel bolts need thread sealer/locker on them too (otherwise they may weep oil).
Last edited by epmedia; 06-21-2017 at 04:18 PM.
Tbd
Hairless Ape
By "flywheel" do you mean the cam sprocket?
1982 320i E21 Coupe, Manual, Cashmere Metallic, 162K+ miles (Daily Driver)
1997 318i E36 Sedan, Manual, Black, 388K+ miles (RIP)
Member
Robert is talking about the flywheel in the back of the engine, next to the rear oil seal where the clutch engages/disengages
as to your question about manuals...a combination of Haynes, Chiltons and the online manual linked many times here, is about the best combination of resources for tips and little things like the exhaust studs needing thread sealant, that you're going to find. there is no end-all, be-all of conclusive "things to remember" for our cars. however, this forum is a fantastic resource and now YOU are a part of that knowledgebase
I know it seems like a lot of gotchas, but having to go back and re-do something is probably the best way to never forget in the future. at least, that's been my experience. don't get discouraged. one last thing I could suggest is that you find a local enthusiast or mechanic near you that you can strike up a relationship with. then you can have some local support to bounce questions or ideas off of, or maybe get an extra set of hands/eyes when you need it. it's certainly helped me in the past having folks close by.
Last edited by sbcrockett; 06-21-2017 at 06:32 PM.
Member
Negative...
...this:
Hagbard; Are you satisfied with the cam timing, any questions, or elaborations needed?
Last edited by epmedia; 06-21-2017 at 07:31 PM.
Tbd
Member
Hagbard - Don't get frustrated. As said above we have all been there before and I continue to get in all sorts of trouble by pushing my limits, but I always learn something.
Let's see if this can help:
Yellow circle = charcoal canister line (fuel vapor recovery device mounted under battery tray)
Blue circle = vacuum line to T-fitting in valve cover breather hose assembly
Green circle = coolant line to nipple threaded into side of the block (flywheel end)
Orange circle = coolant line to nipple on metal pipe that runs along the side of the block (from water pump to heater core)
Red circle = Capped off unless your car has the hot start fix retrofit - if hot start kit is fitted this vacuum line goes to the diaphragm mounted on the intake manifold support rod
Pink circle = vacuum line to vacuum advance port on ignition distributor
I took tons of pictures of my rebuild because I knew the work would be done in spurts as time allowed and it has paid off tremendously. You are too far along at this point but something to remember for your next project.
MJ
Hairless Ape
Thanks, this is awesome. I've already saved it for future reference.
1982 320i E21 Coupe, Manual, Cashmere Metallic, 162K+ miles (Daily Driver)
1997 318i E36 Sedan, Manual, Black, 388K+ miles (RIP)
Hairless Ape
Cool, I did not remove the block from the car so I never disassembled the flywheel connections.
I'm not totally satisfied with the cam timing. I'm going to look at it again tonight. I'm going to try to keep the guide side of the chain as taught as possible while keeping the crank and cam as close to exact TDC as possible. There is some parallax when looking at the crank TDC mark from above but I think I've got it pretty close. I suppose I could use a mirror to look at it from the very front. That should be good from what I can tell. I'm pretty confident I'm there now anyway but I plan to triple check that tonight as well as take the top exhaust manifold studs out and seal them. That part sucks because I've already installed them with the manifold on and the head is in place and torqued down on the block already. But I'll get it done.
What's left for me is reassembling the fuel connections, throttle body connections, belts, crank pulley, radiator, fan and fluids plus oil pan. And then getting the ignition distributor back into the new bracket and setting the timing. I replaced my distributor bracket with one I acquired on ebay because it was cracked. Putting a new o-ring on the distributor makes it very difficult to get it back in. I'm not sure how I'll do that. I don't want to bang on it with a deadblow or anything. I'm thinking I'll use a c-clamp to get the new o-ring past the bracket and into place. Any tips would be great. I'm also not sure where the ground wires for the dizzy go if someone wants to post a picture.
1982 320i E21 Coupe, Manual, Cashmere Metallic, 162K+ miles (Daily Driver)
1997 318i E36 Sedan, Manual, Black, 388K+ miles (RIP)
Member
Did you mean a hose clamp? I think that would work better than a C-clamp. Don't forget the O-ring grease.
Hairless Ape
No, I meant a big C-clamp from the top of the dizzy (maybe using a piece of wood as a pad) to the collar on the bracket to push the dizzy back into its home. The new o-ring makes it near impossible to push it back in by hand, at least for me so far. I have only used engine oil to lube it up but I do have a tube of superlube. I'll try it tonight and see if it's better.
1982 320i E21 Coupe, Manual, Cashmere Metallic, 162K+ miles (Daily Driver)
1997 318i E36 Sedan, Manual, Black, 388K+ miles (RIP)
 Posting Permissions


 Reply With Quote
Bookmarks