
 Member
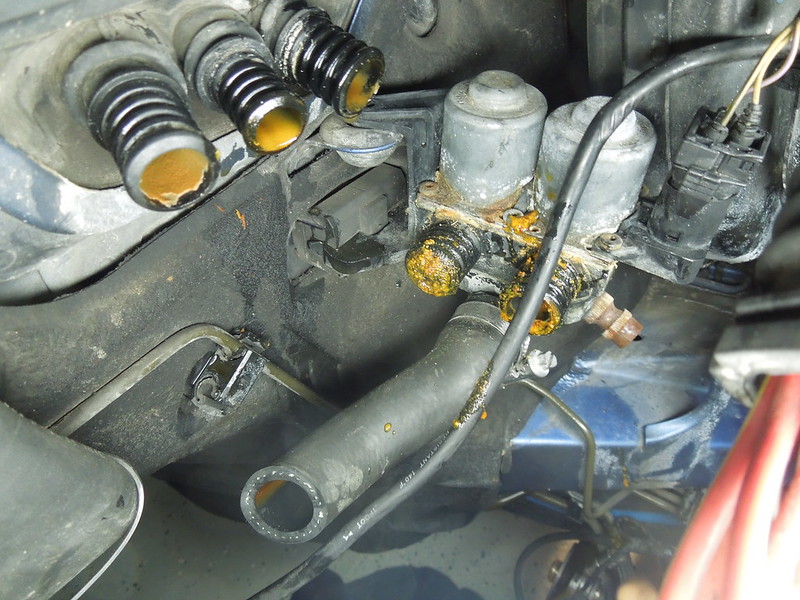
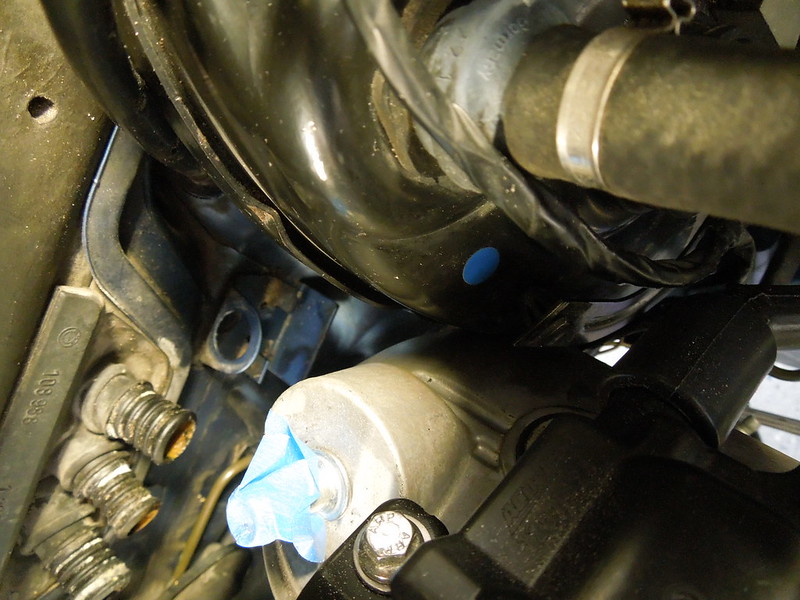
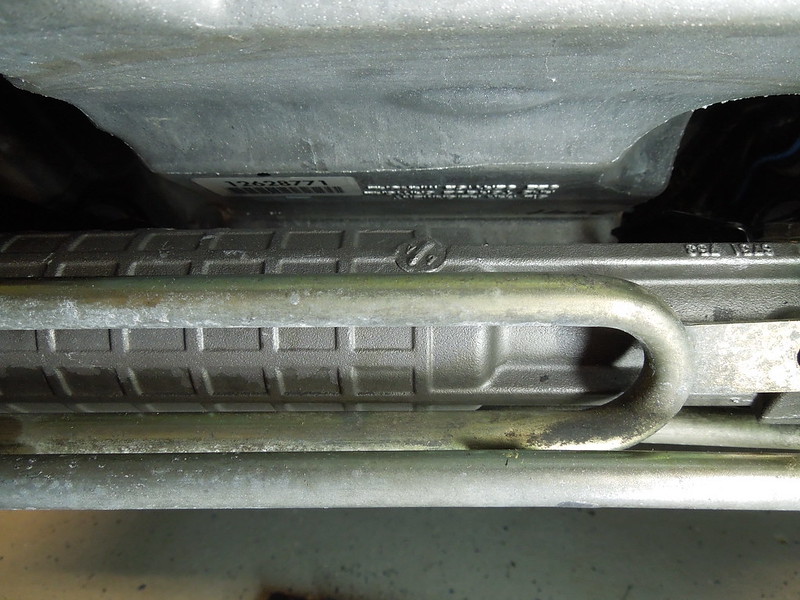
Car never had heat...another indicator...no flow!:
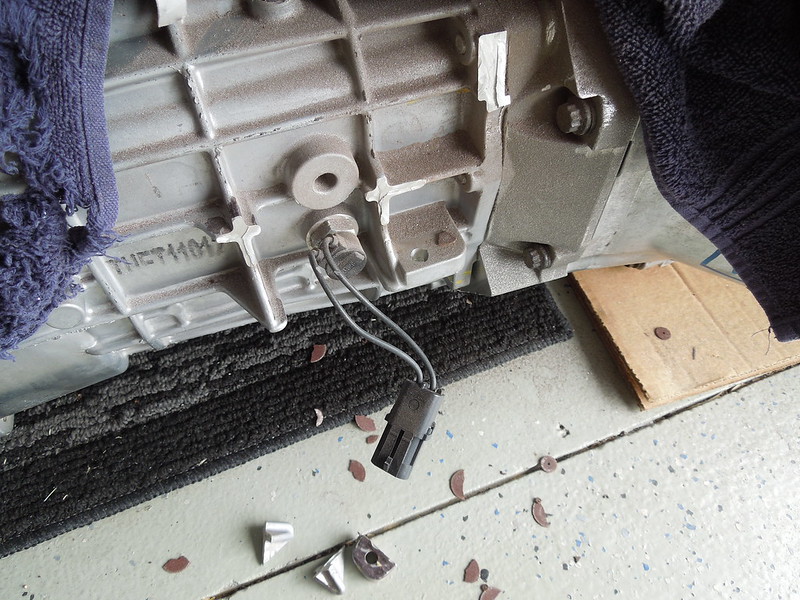
Hate to grind on a new transmission, but as others have pointed out - areas of interference (yes all I have is a Dremel and many cut off discs...;-):
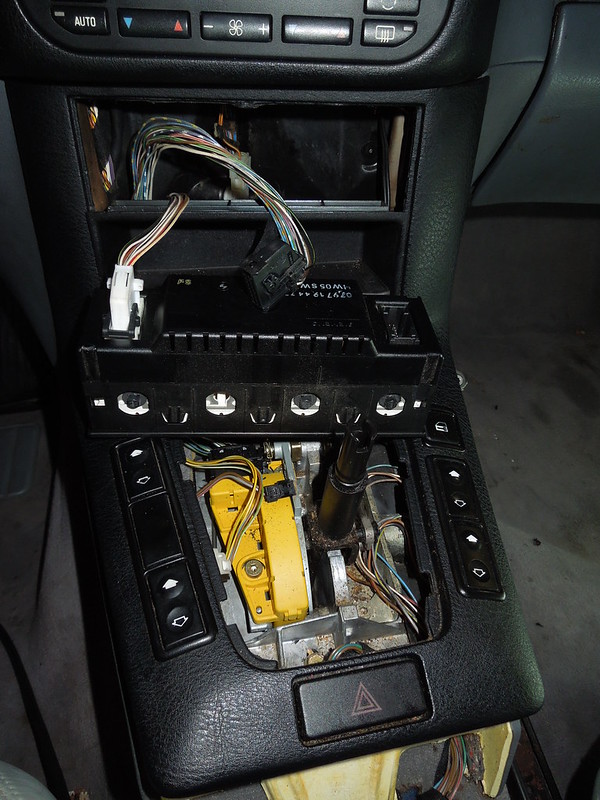
Automatic console disassembly:
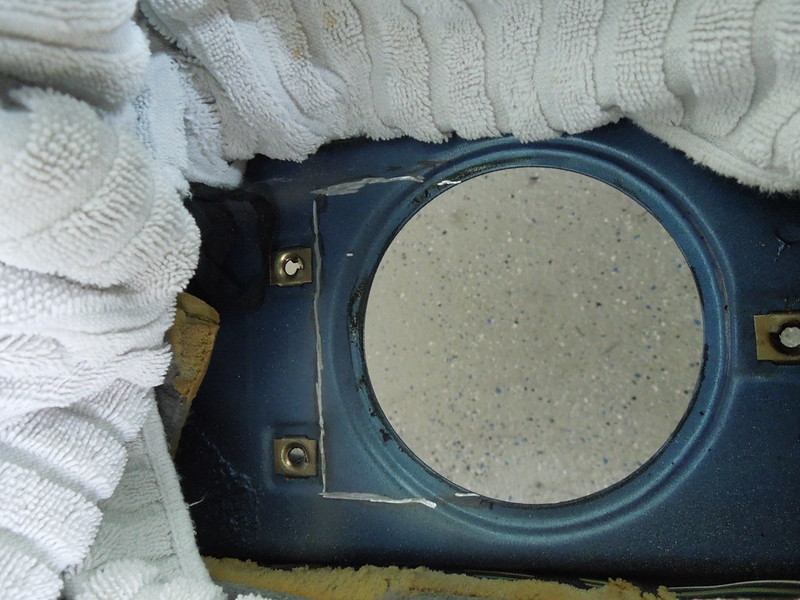
Virgin floor pan awaiting the Dremel:
БМВ Фанат!
Well, that will explain a no heat issue
The second computer was for your auto trans. Not needed.
You will need to figure out which wires from the shifter you need to connect/jump in order to bypass the neutral safety switch, which will prevent you from cranking otherwise. I just don't remember from back in the day when I did auto to manual swap.
- 96 328is 6.0L. (LS1 to LS2 build thread: http://forums.bimmerforums.com/forum...ad.php?2098938)
- 96 328is 5.7L. (LS1 build thread: http://forums.bimmerforums.com/forum....php?t=1289987)
- 95 ///M3 6.0L. (LS2 build thread: http://forums.bimmerforums.com/forum....php?t=1619249)
- 97 ///M3. (e46 Fender Flares/track car build thread: http://forums.bimmerforums.com/forum....php?t=1727098)
- 96 328is (Dual Fuel Pump to Surge Tank thread: http://www.bimmerforums.com/forum/sh...ad.php?1964025)
Member
Wow...that heater core/valve is ugly. I'm assuming that is the result of failure to flush the cooling system with any regularity?
It might be a good idea to rig something up to backflush some hot water through the core, using clear hose, so you can ensure the core itself is not blocked to the point of needing replacement.
Last edited by TipsyMcStagger; 05-21-2018 at 01:49 PM.
Member
I would definitely keep the diagnostic port for ABS troubleshooting.
You will have to check the BMW wiring diagram but there are two wires to splice from the shifter position switch and run over to a clutch pedal switch to have neutral/clutch safety. If I remember right, I used a brake light switch from an e30 as a clutch switch.
Also, the X20 connector is missing the wiring for the reverse lights on automatic cars. I added the wires to the X20 plug and ran them inside to the shifter switch connector which also has the reverse light wires. The X20 connector is a little tricky to get to release and lock the pins. There is a center piece with locking tabs that has to twist to allow pins to be removed and then twisted back to lock them in. I used two small screwdrivers to pry up the locking tabs and twist the connector.
A lot of the other wiring is a matter of preference. Some guys like to use as much of the BMW wiring as possible. Others the opposite. I dont think theres one right way to do it.
Also, even if youre not keeping emissions, you need to keep the X6031 plug for the CEL/MIL light and youre probably going to want to pull the bulb for the transmission warning light and ASC light. The ABS light will be on if you remove the traction control solenoid. You have to put a resistor in its place to get it to turn off.
Sent from my iPhone using Tapatalk Pro
Member
Thanks folks! Without your golden kernels of info...we'd be sunk!
Bimerok: So I will round file the computer...less weight - ~like a pound. I recall reading about the auto to manual switch wiring issue - thanks!
Tipsy: not sure why the plug...or if the control valve had failed. Poor maintenance didn't help. I hope the heater core isn't plugged / leaking. Believe that is a job to replace.
BigL350: Good point on the ABS - I'm going to great lengths to extend wires/brake lines...it better be functional! Hadn't seen the missing reverse lights on the threads - very helpful. Dash will have to come out to pull the bulbs...I'm mostly concerned getting this car mobile and basic operation. Thank you for the brake switch - I'd never figure that out - I hate electricity. ;-)
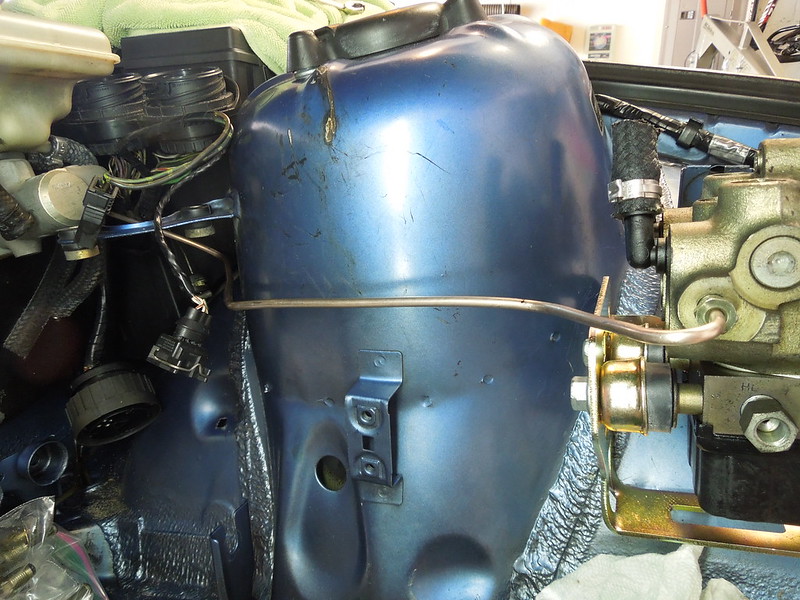
Sunday brought some work on cleaning tunnel:
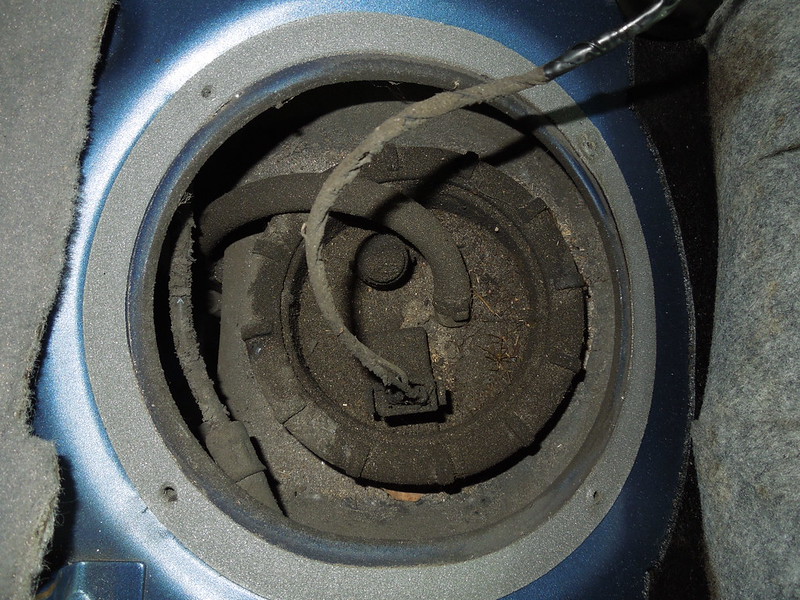
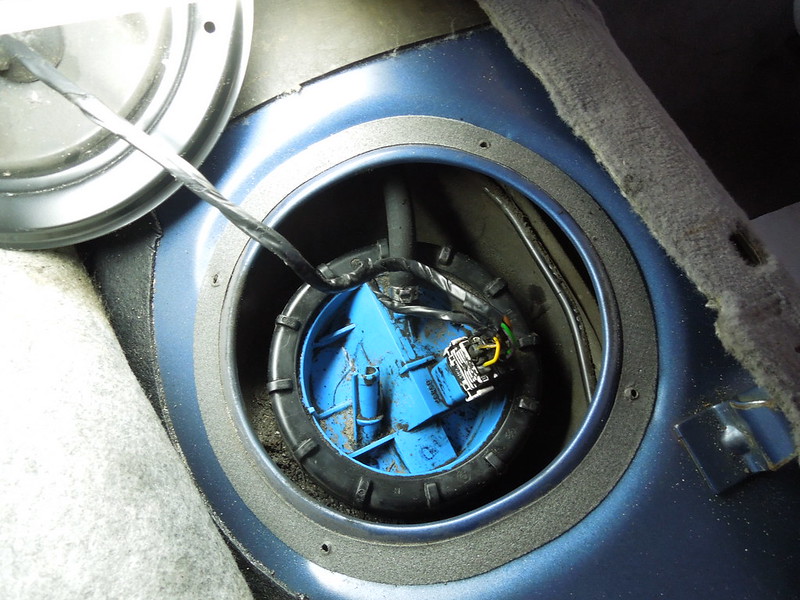
and to what I thought was the fuel pump...wrong side - it is clean now!:
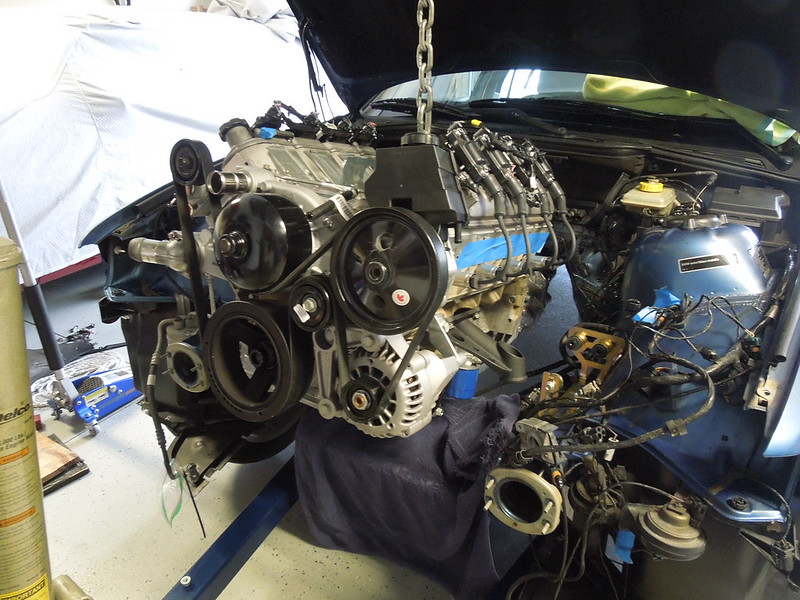
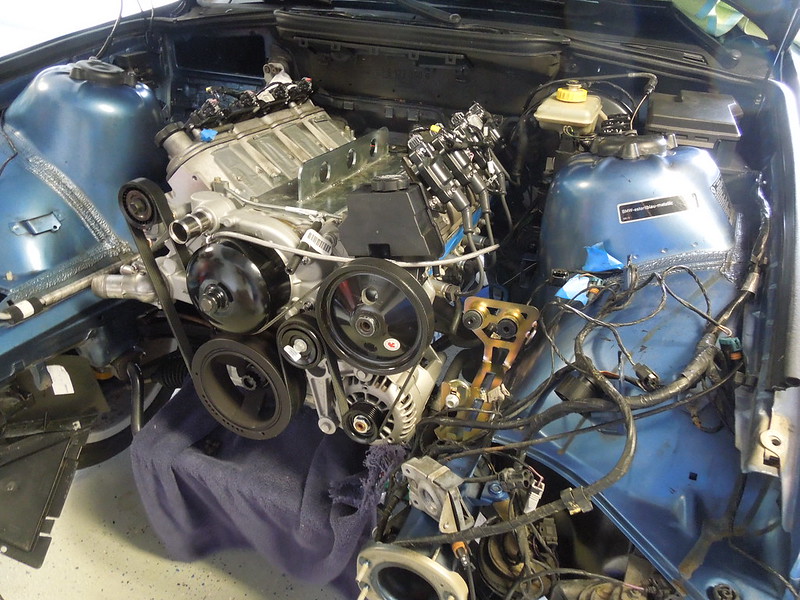
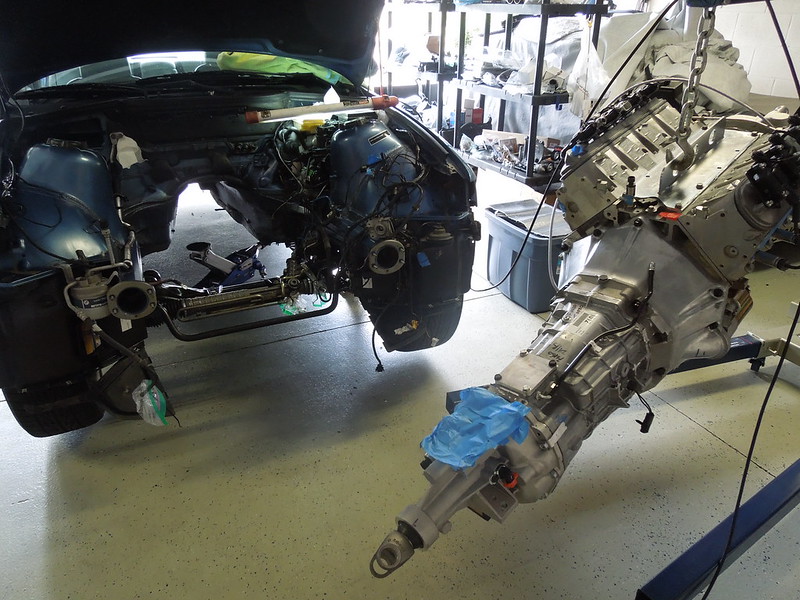
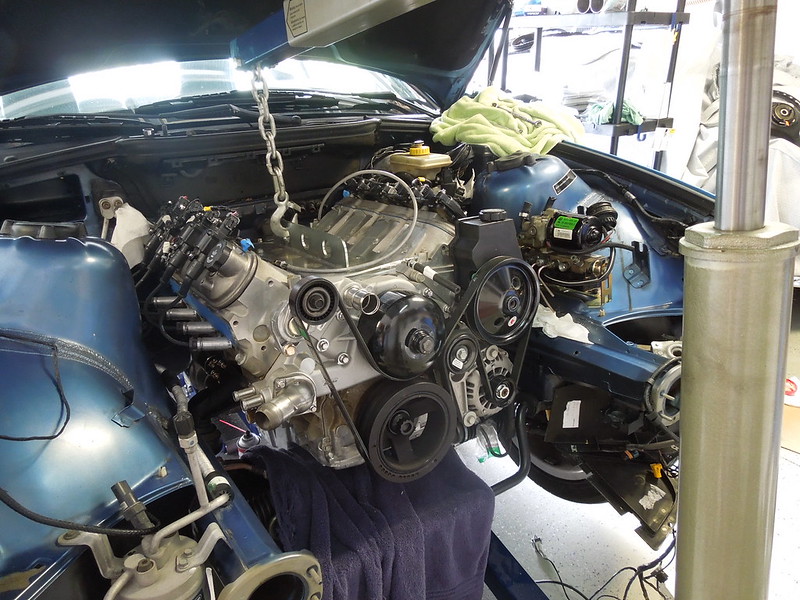
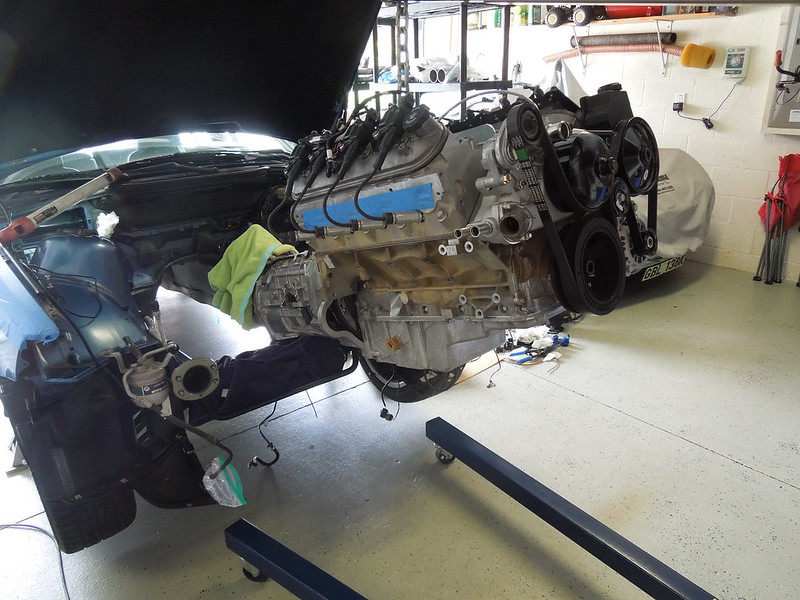
Today I couldn't resist and attempted the first engine install:
It fit! Like a glove!:
Passengerside:
Rear space...nil:
Booster space...nil:
Note: the trans crossmember was not bolted to the trans so believe it was off center a bit and possibly readjusting the engine will bring more space to the driverside. Currently I slide a rag thru and nothing more.
Also pulled the fuel pump for a Aeromotive piece:
And finally pulled the steering wheel to get reskinned - the missing leather at the top due to sun damage is not pleasing to the touch/eyes:
My assistant returned from swim lessons and declared we should try to start it! Slow down there cowboy...this is the easy stuff.
Thanks for all the assistance...we are going to need it! Master mechanics we are not...
Last edited by Tim Mc; 05-22-2018 at 08:34 PM.
Member
Yes, the dashboard and everything behind it has come out to remove/replace the heater core. I swapped my stock tan dash for a black dash, but I didn't remove the HVAC box. I also had the windshield out of the car when I removed the dash, which definitely helped access the dash bolts that are very near where the windscreen meets the dash.Originally Posted by Tim Mc

Point being, I would back flush the heater core the next time you remove the engine to make sure it isn't clogged. You don't want to find out after you've put everything back together.
Also, if you think you'll be removing the steering column at any point (necessary to remove the dash), I'd go ahead and remove the fracture bolts now. Once they are removed, you will simply resecure the steering column with regular (non-fracture) bolts, making future steering column removal considerably easier.
And if you're going to attempt to remove the steering column fracture bolts, remove the drivers seat. It'll be tons easier to lie on your back under the column with the drivers seat removed.
Member
I was able to replace my heater core without removing the dash. Theres a sticky somewhere on BF that gives step by step instructions. It wasnt easy but it beats pulling the dash. There is a water manifold that bolts up to the heater core that seals with o-rings and I believe these are what leak and cause that faint antifreeze smell in older (all) E36s. Definitely worth changing at this point.
Sent from my iPhone using Tapatalk Pro
Member
Tipsy: hate to say it...at this point on the time crunch, I'm going to loop the heater connections from the waterpump. I will backflush as you suggest - I live in FL so heat is not a requirement...AC is! :-) Good point on the fracture bolts as my column has play and makes wonderful noises as I turn the wheel. Seems like an easy fix...except those bolts - I read your thread.
BigL350: so the o-rings are directly behind the water 'diverter' port that sticks thru the firewall? Is that an easy part to remove? I will give it a look this weekend when the powertrain comes back out.
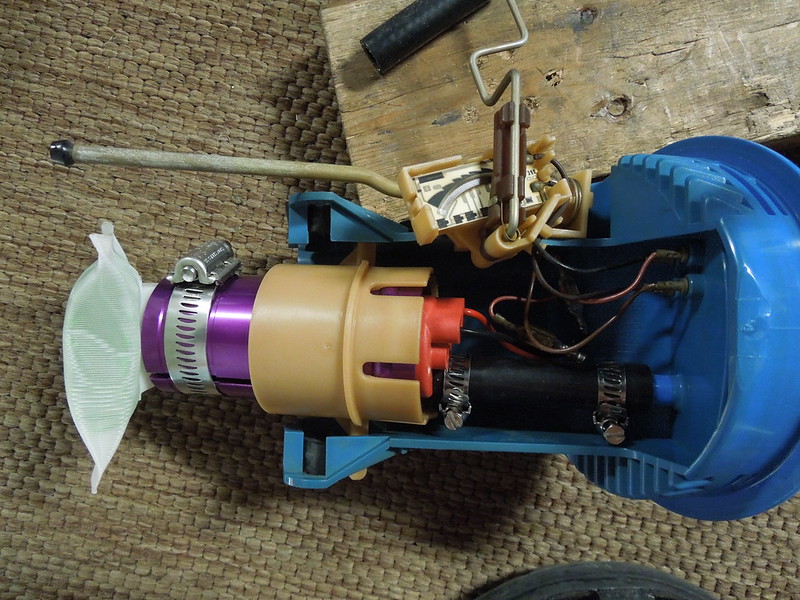
Finished up the fuel pump assembly. We elected to go with a Aeromotive 340 pump...with a sleeve from Rally Road. The wiring wasn't a plug and play so had to work that a bit. It is not ideal as we used the factory wiring thru the pump assembly to factory plug. Issue is it is a bit small compared to the Aeromotive wires. We are trying to keep it easy and clean...we'll revisit if the pump doesn't keep the pressure.
Our plan is to use the factory plug and cut the wires before it goes into the factory wiring bundle...route this to the Holley HP to command. Will the car still start if it doesn't see a fuel pump?
This weekend we will hook it up direct and pump the tank dry...flushing the system a bit and preparing for E85.
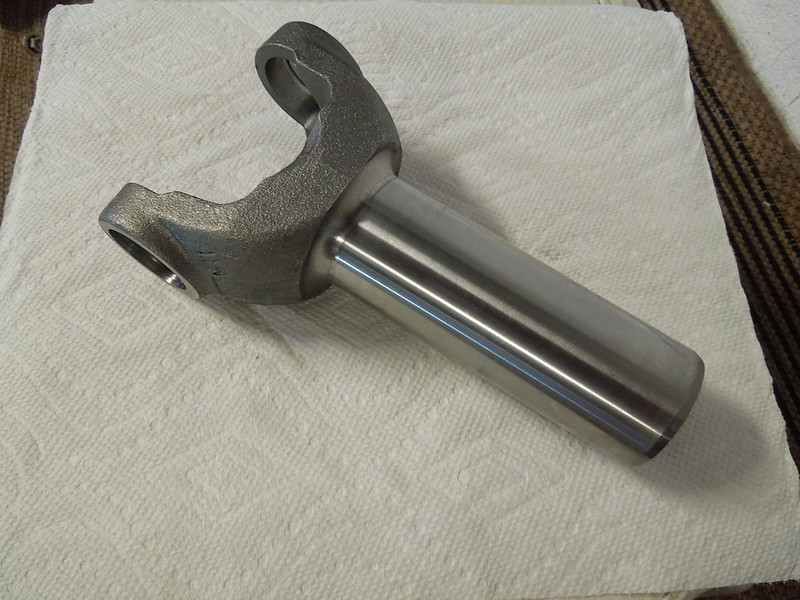
Spicer trans yoke came in...fit like a glove:
I bolted everything up and measured for a driveshaft - from flange to trans tail housing is 45.5 inches. With the yoke installed and bottomed on the external seal (likely would expect to pull the yoke out .5 inch) spans 42.75 inches. I will check with Chuck to see if that is what he sees. We'll plan to get a steel shaft made local - 2.75 inch diameter. Would really like an aluminum, but we are hearing aluminum is not offered in that size diameter.
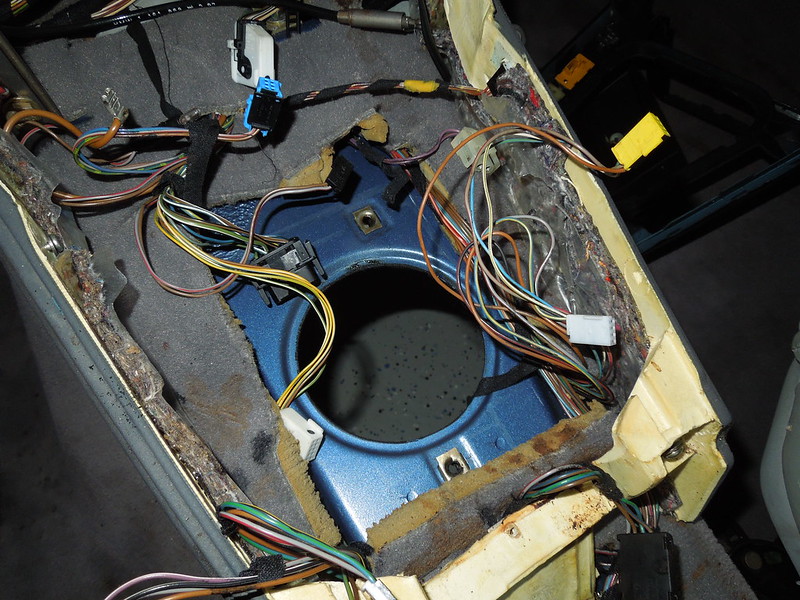
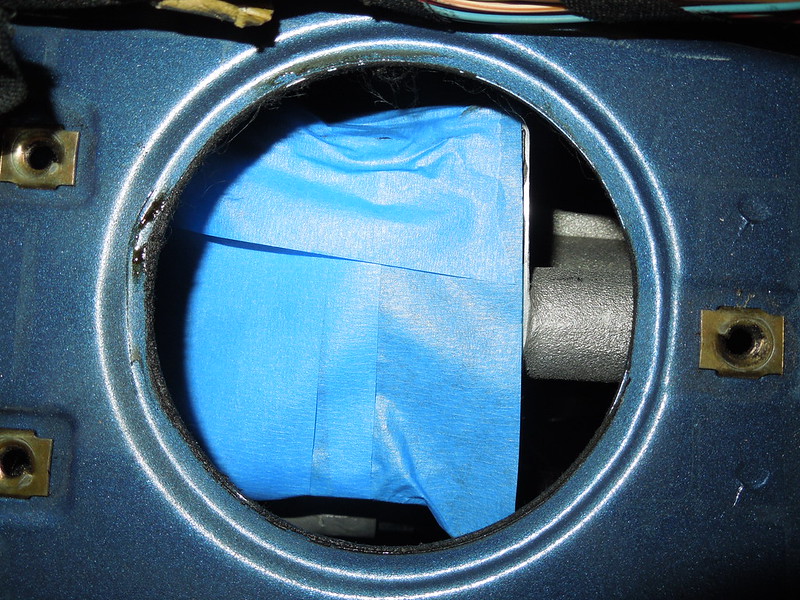
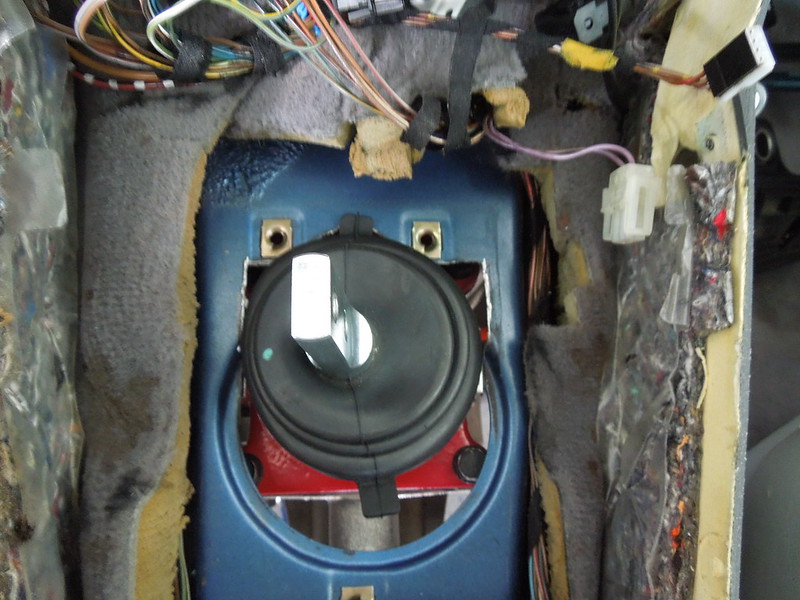
Lastly, with the trans bolted up and centered and using a Camaro bellhousing...my shifter hole is closer to 'ideal':
To the left is the front of the car. We will likely have to trim the hole larger diameter and a bit off the front. Surprised to see the differences from what others have posted. (GTO parts likely?)
Thanks all for the assistance!
БМВ Фанат!
Strange that you have to trim the hole to the front of the car. I had to trim to the back. The only thing I can think of is that your engine sits that much forward. Not sure which GTO parts you are refering to though.
- 96 328is 6.0L. (LS1 to LS2 build thread: http://forums.bimmerforums.com/forum...ad.php?2098938)
- 96 328is 5.7L. (LS1 build thread: http://forums.bimmerforums.com/forum....php?t=1289987)
- 95 ///M3 6.0L. (LS2 build thread: http://forums.bimmerforums.com/forum....php?t=1619249)
- 97 ///M3. (e46 Fender Flares/track car build thread: http://forums.bimmerforums.com/forum....php?t=1727098)
- 96 328is (Dual Fuel Pump to Surge Tank thread: http://www.bimmerforums.com/forum/sh...ad.php?1964025)
БМВ Фанат!
Just looked back and I see you are using T56 Magnum. That must be where difference comes from. Also I don't think you can move engine much forward if you are using F-Body oil pan. Hmmm
- 96 328is 6.0L. (LS1 to LS2 build thread: http://forums.bimmerforums.com/forum...ad.php?2098938)
- 96 328is 5.7L. (LS1 build thread: http://forums.bimmerforums.com/forum....php?t=1289987)
- 95 ///M3 6.0L. (LS2 build thread: http://forums.bimmerforums.com/forum....php?t=1619249)
- 97 ///M3. (e46 Fender Flares/track car build thread: http://forums.bimmerforums.com/forum....php?t=1727098)
- 96 328is (Dual Fuel Pump to Surge Tank thread: http://www.bimmerforums.com/forum/sh...ad.php?1964025)
Member
Yes, but there are also o-rings at the heater core.
Great progress, BTW.
Sent from my iPhone using Tapatalk Pro
Member
great progress man! I also have a magnum going in and was wondering how it lined up as all the other ones i saw were using the regular t56 and they had to cut towards the rear
Member
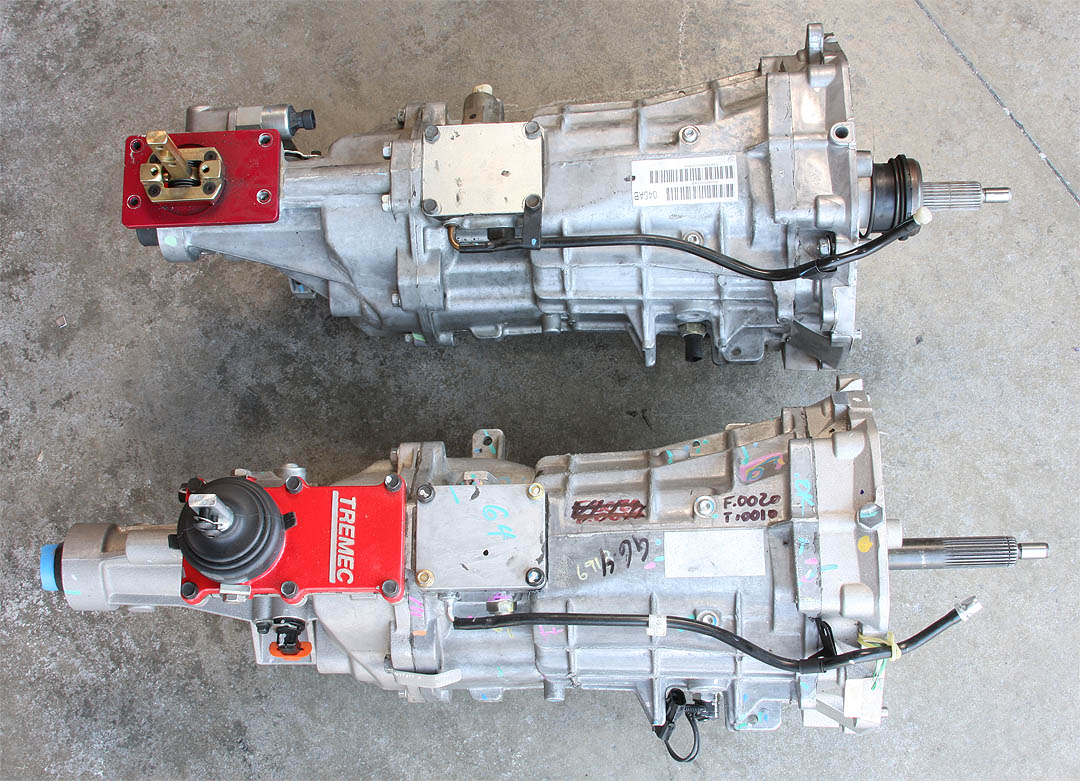
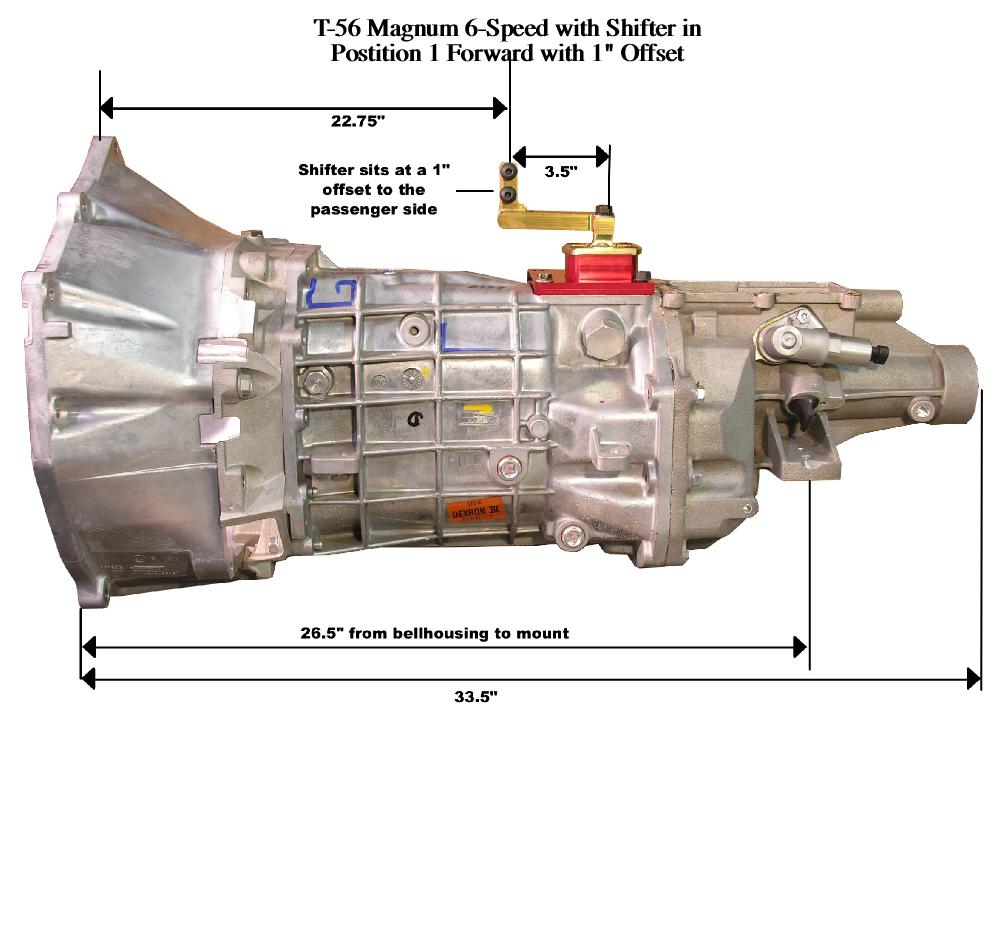
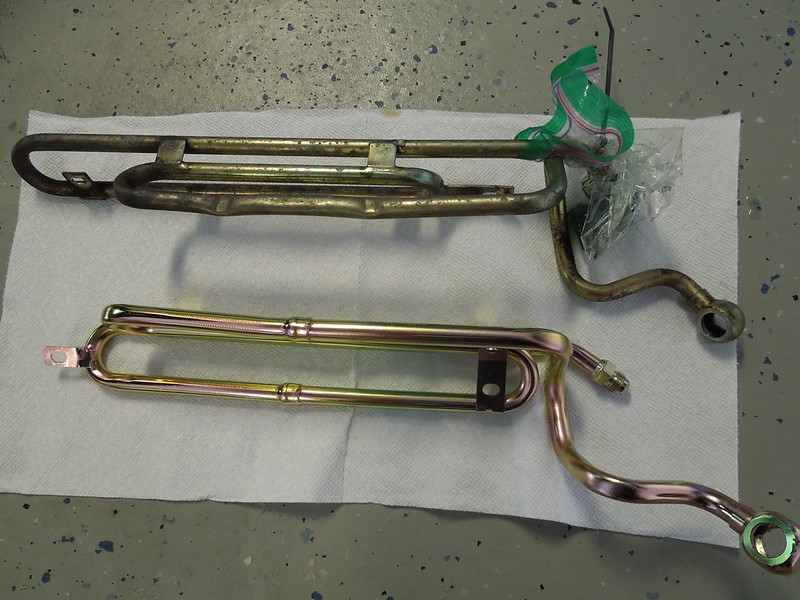
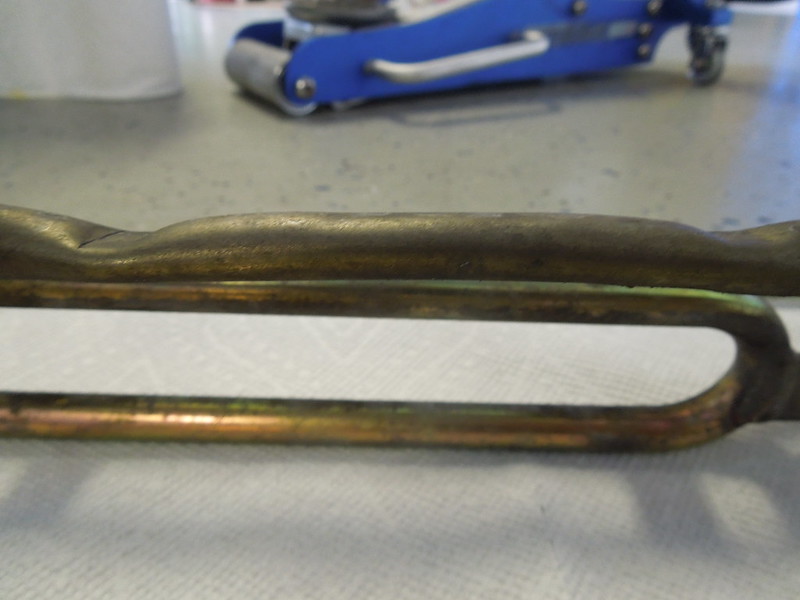
The top is supposedly a GTO T56 and the bottom is a Magnum. The additional pics give some dimensions:
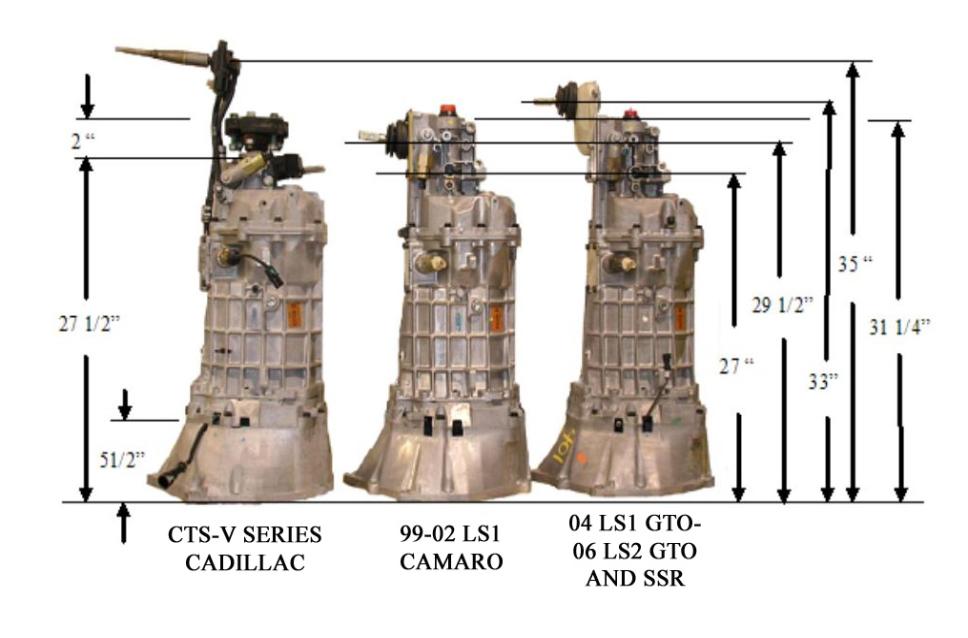
Last edited by TipsyMcStagger; 05-24-2018 at 02:21 PM.
Member
By the way, I don't know if the GTO shifter is compatible with the Magnum but if so, I still have my stock GTO shifter. It will move the shifter position further back. But maybe too far?
If you want to do some research, you're welcome to give it it shot. If it works, I'll let you have it it for a good price.
Member
I originally thought the Camaro bellhousing was shorter than the GTO (my pilot bearing challenge), but you guys pointed out that the trans housings are actually different-I was not tracking that!
- - - Updated - - -
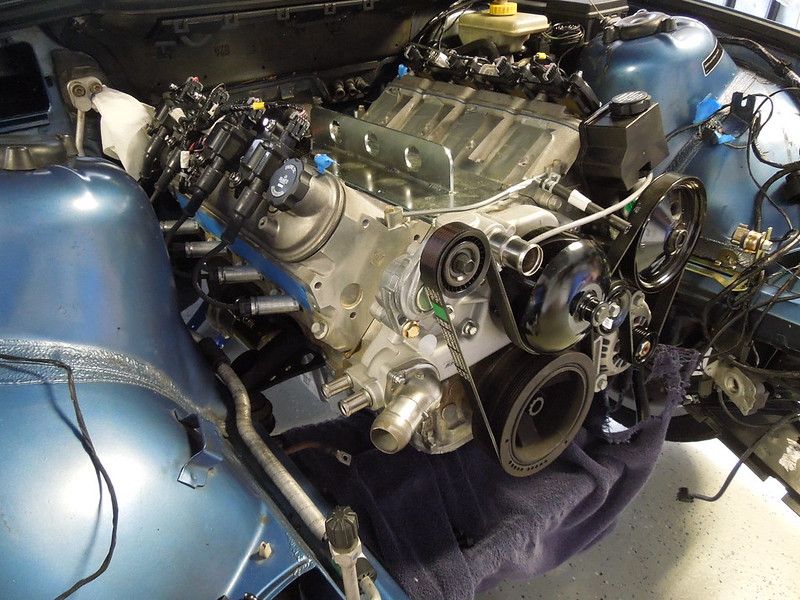
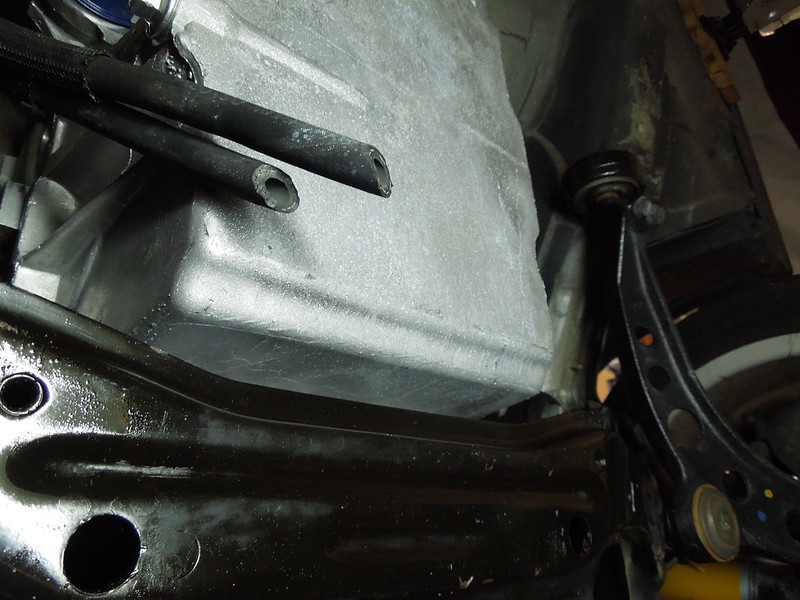
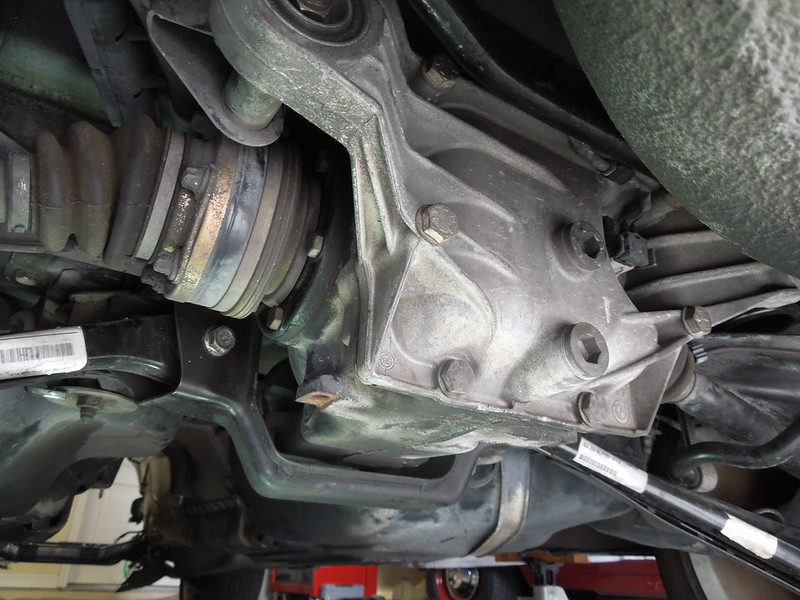
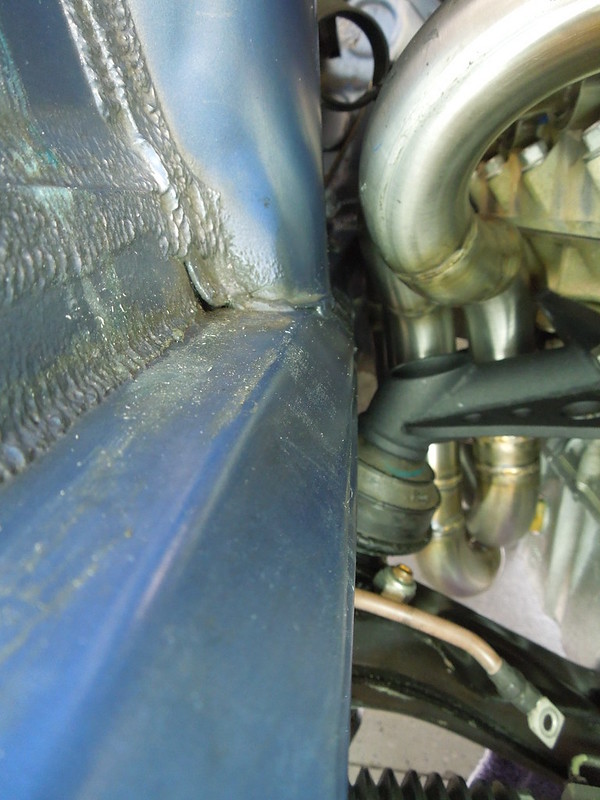
Took some images of the oil pan clearance:
I can run my fingers between all points.
Crossmember clearance:
A better image of the rear engine clearance:
Chuck did a great job positioning the driveline. Even the trans mounted to all 6 bolt holes...one bolt is gacked a bit so need to run a chaser thru it.
Last edited by Tim Mc; 05-24-2018 at 09:50 PM.
Member
Many thanks for the offer...I will give the OEM Tremec shifter a shot initially. It be great to trim minimally and use the factory automatic shift boot (modified with a shift level hole). Not that big of a deal though.
The specification shots are interesting. Had no idea all the versions were of different sizes. I'd think the higher capacity boxes would be longer...
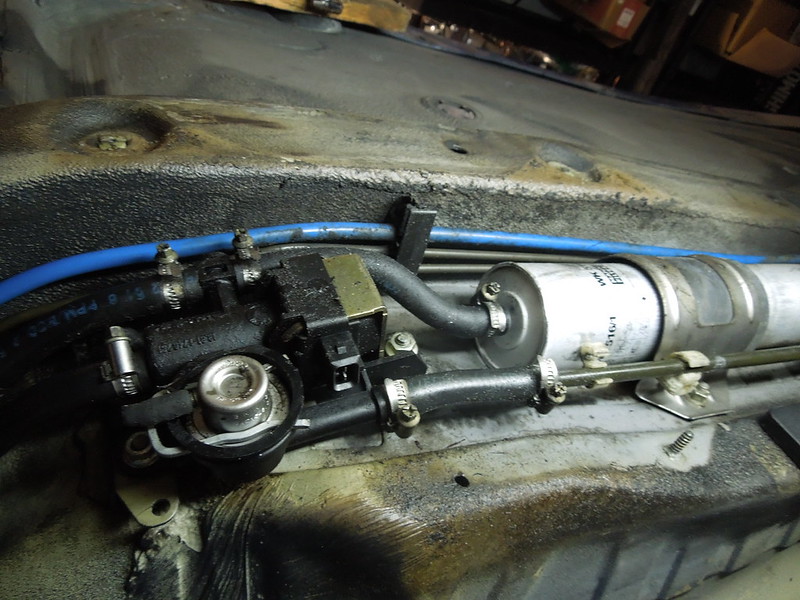
We emptied the fuel tank, drained the brake master cylinder and excised the OEM fuel filter apparatus. Quite a monstrosity!
Member
Full day today...
Out comes the engine for cleaning, further clearance, and the ABS reposition fun:
More clearance pieces removed...too bad the aluminum doesn't amount to much weight...:
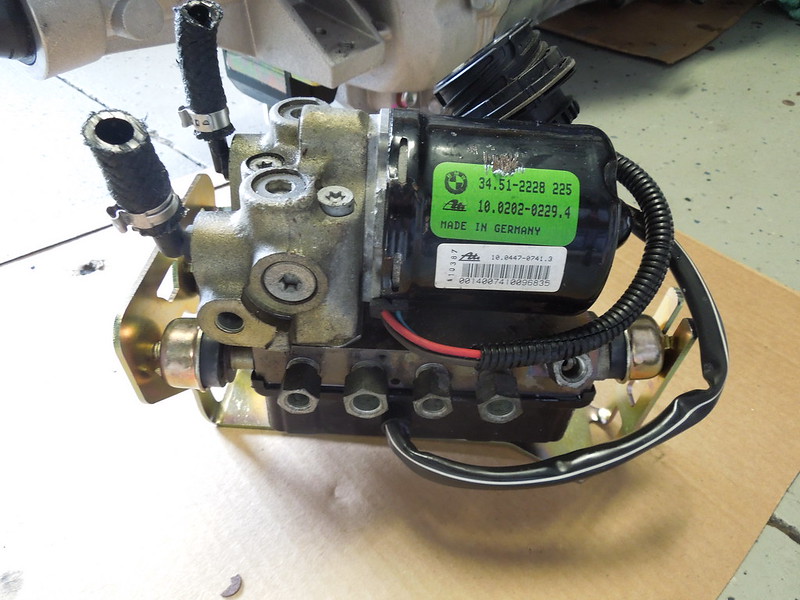
OEM ABS assembly installed:
ABS assembly removed - what a brake fluid mess...minimal damage the paint (not like one can see it):
ABS assembly in the Vorshlag mount:
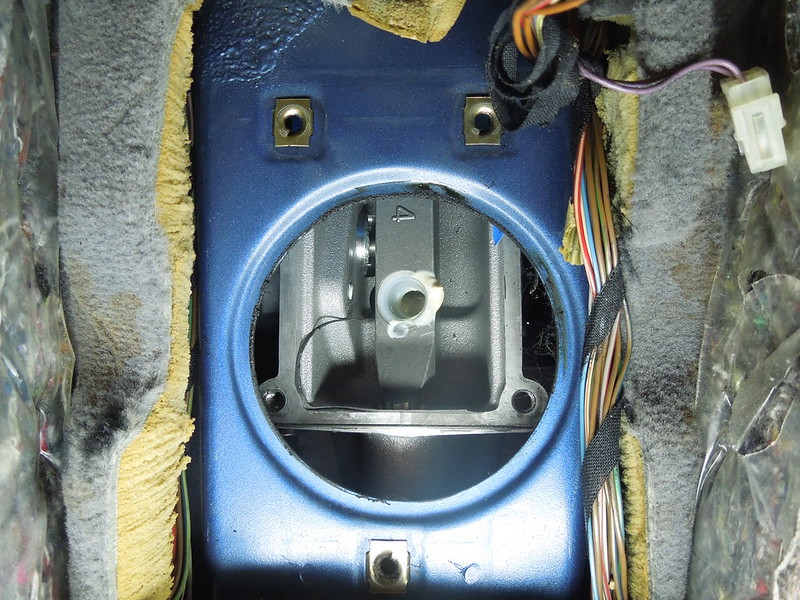
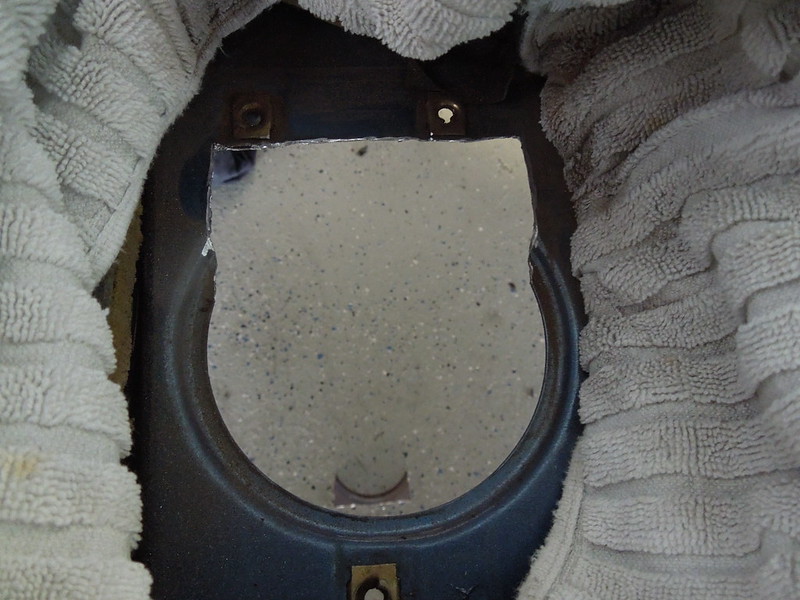
OEM shift hole alignment with the T56 Magnum trans...straight shot down:
Initial trim:
Final cut...didn't take nearly as long as the block/bellhousing/trans trims!:
It will likely need another 5 mm on the front side...will test fit the engine again...along with the headers this time.
Local shop will charge $350 for a 2.75 steel driveshaft - I'm supplying both the BMW diff adapter and the Spicer trans yoke - is this reasonable? I'd prefer an aluminum shaft, but no one seems to offer a 2.75 size - minimum is 3 inch.
Thanks!
Last edited by Tim Mc; 05-26-2018 at 01:23 PM.
Member
Bit more work in the PM...
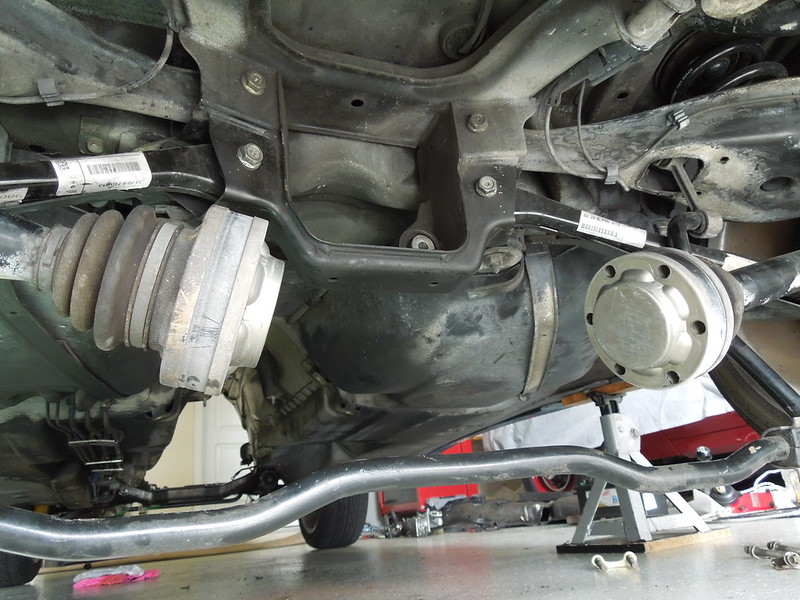
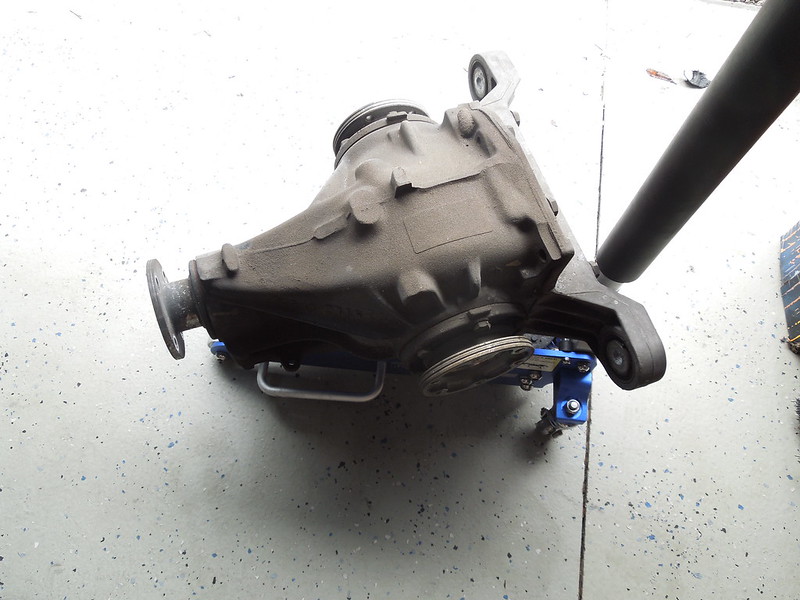
Have a set of 3.91 gears to install to 'offset' the .5 overdrive 6th gear. Found the E36 diff incredibly easy to remove. Likely never been out:
Removed:
Heavy:
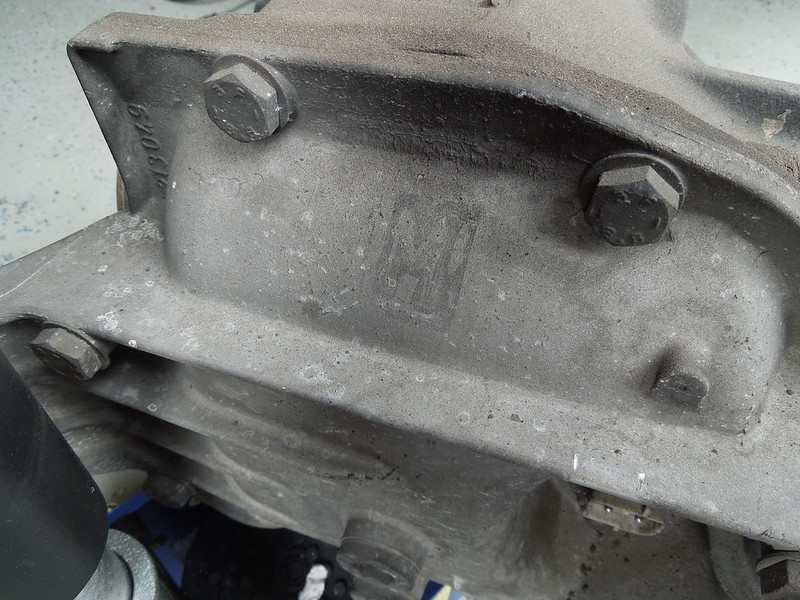
"M" with 3.36 ratio/limited slip:
Local tech will do the gear change for $200...I provide the parts. Planning on new bearings and seals along with the used 3.91 gear set. The limited slip appears to be tight and non-abused.
Disassembling a car is easy...reassembly and the details associated is the hat trick. Hope we succeed!
Last edited by Tim Mc; 05-27-2018 at 07:29 AM. Reason: Spelling!
БМВ Фанат!
$350 for a quality steel shaft is a decent price. I paid about that much 8 years ago only supplying the BMW diff adapter though.
- 96 328is 6.0L. (LS1 to LS2 build thread: http://forums.bimmerforums.com/forum...ad.php?2098938)
- 96 328is 5.7L. (LS1 build thread: http://forums.bimmerforums.com/forum....php?t=1289987)
- 95 ///M3 6.0L. (LS2 build thread: http://forums.bimmerforums.com/forum....php?t=1619249)
- 97 ///M3. (e46 Fender Flares/track car build thread: http://forums.bimmerforums.com/forum....php?t=1727098)
- 96 328is (Dual Fuel Pump to Surge Tank thread: http://www.bimmerforums.com/forum/sh...ad.php?1964025)
Member
A spendy option, but QA1 makes custom 2 1/4" carbon fiber driveshafts, supposedly good for up to 750 hp, that will all but eliminate any strength and clearance issues.
$820, according to their site.
Member
With inflation - similar. It is on the way from work so convenience is a benefit.
Tipsy: that is spendy...for this car. I can't say I spent a bit more for the Subaru's carbon fiber shaft. Will settle with the 2.75 steel shaft until we put some miles on it and get some use out of it. Appreciate the link!
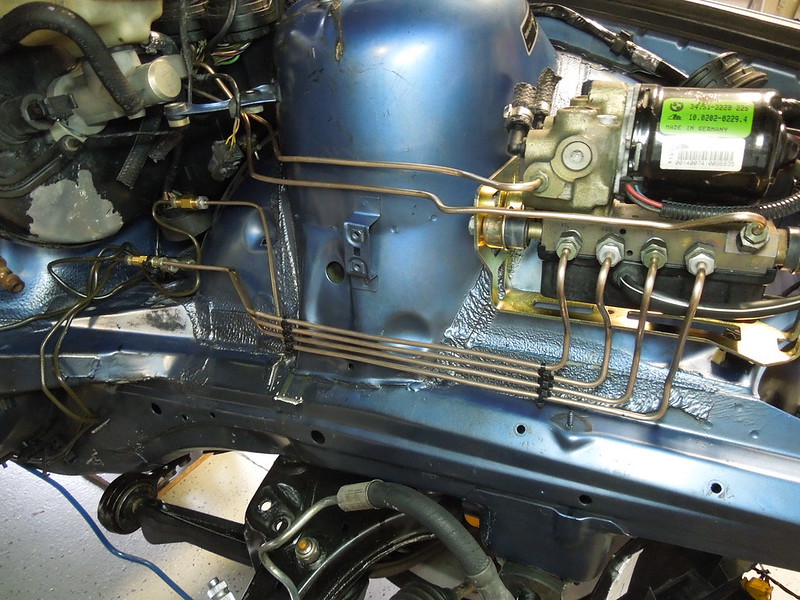
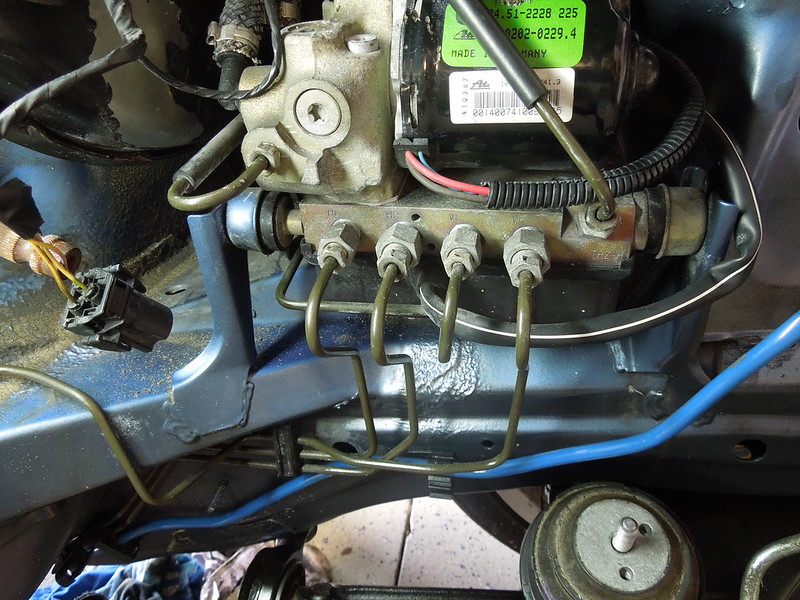
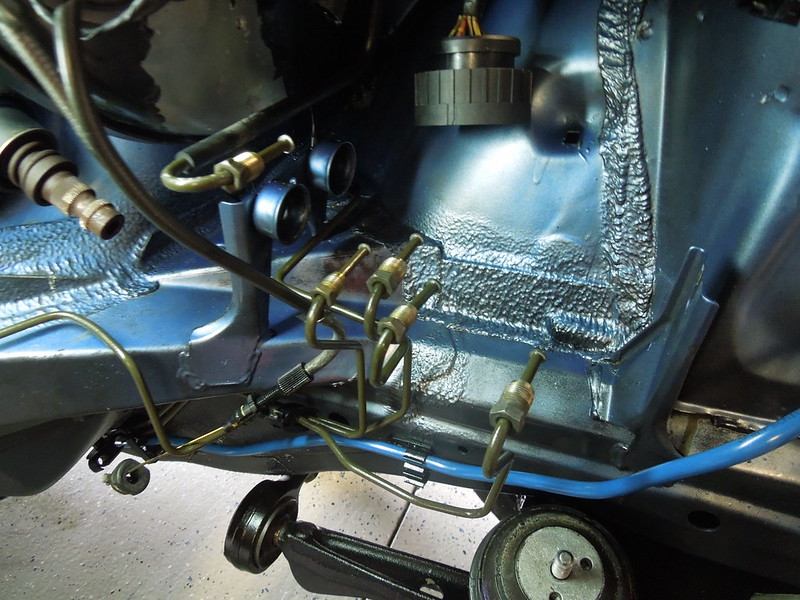
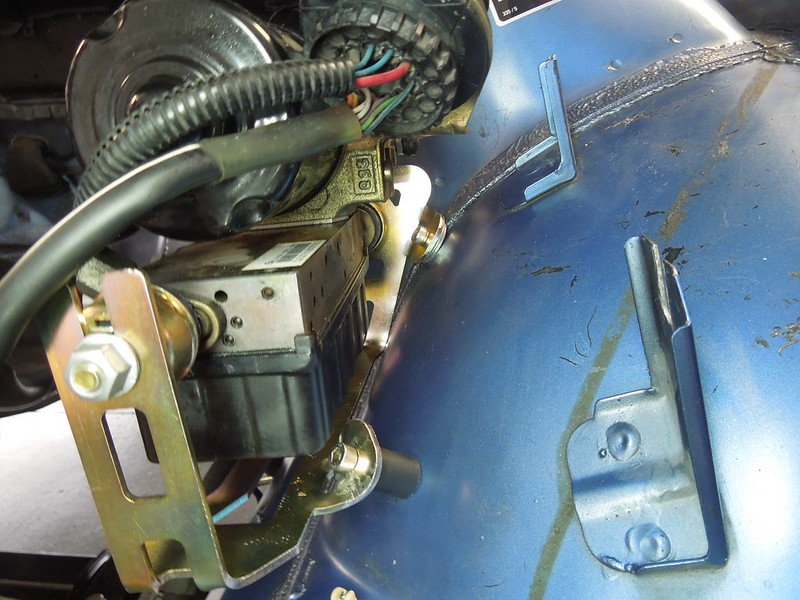
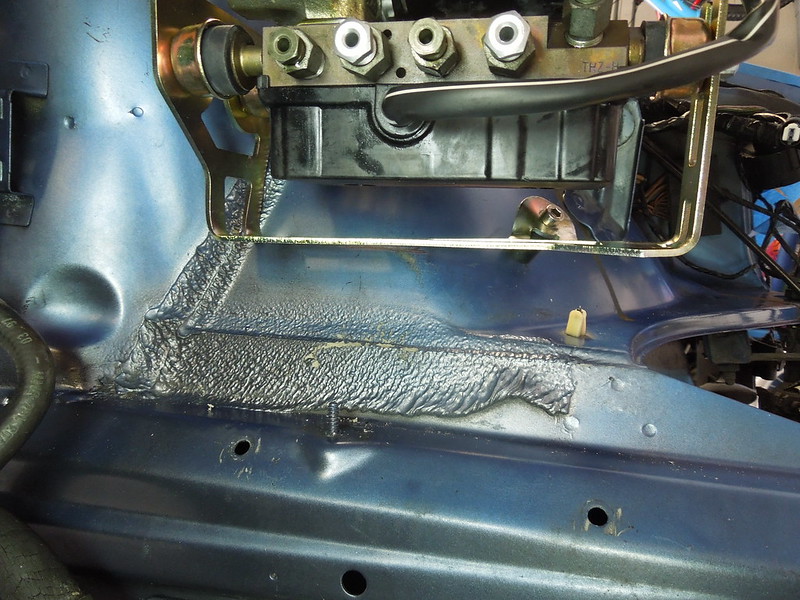
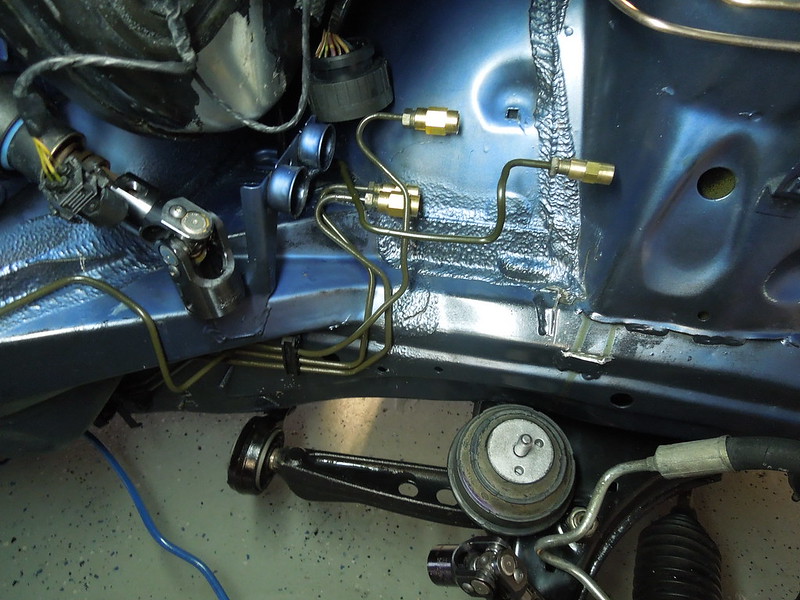
Today is the day for brake line bending. I spent too much time thinking about where to put the Vorshlag 4 channel ABS bracket. Vorshlag recommended putting it far forward and at an angle. The brake lines look a bit messy and they ran all new lines for the front end. No thanks.
I patterned my install as Chris on another site - very clean install.
My attempt:
Underside:
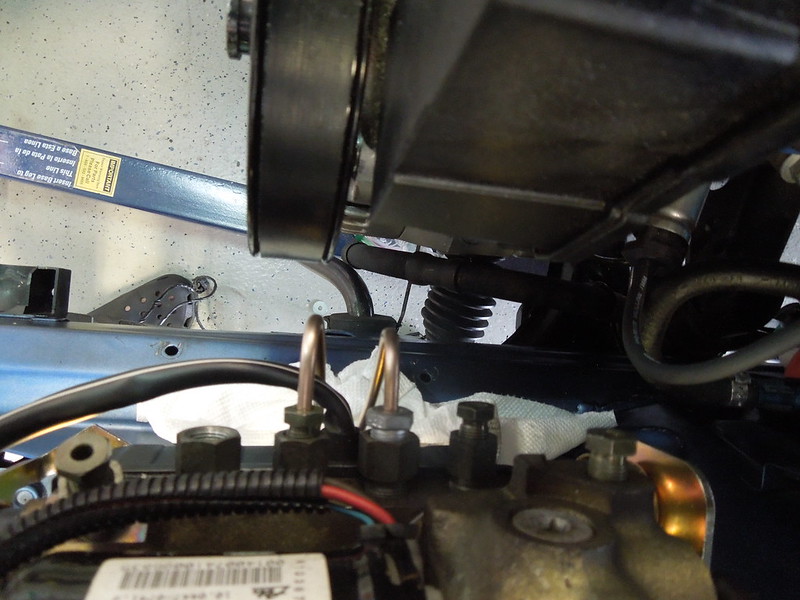
Clearance to the PS pulley...a bit close, but I think acceptable. Unsure if a lost serpentine belt can take out hardline:
First line bent!:
Engine install #3 to check fit:
Big kudos to Tipsy to lend us some high quality tubing tools - the mechanics were without issue - the 3 dimensional puzzle is a head scratcher. Luckily my assistant's mind is sharper than mine...
Hopefully finish up the remainder...already bent the OEM lines...will likely test fit the engine once more (literally takes 15 minutes solo!)
I also gave is a good rinse to rid any brake fluid and another attempt to clean 230,000 miles of grime. I did flow the heater core tubes...it wasn't pretty what came out. Good call Tipsy!
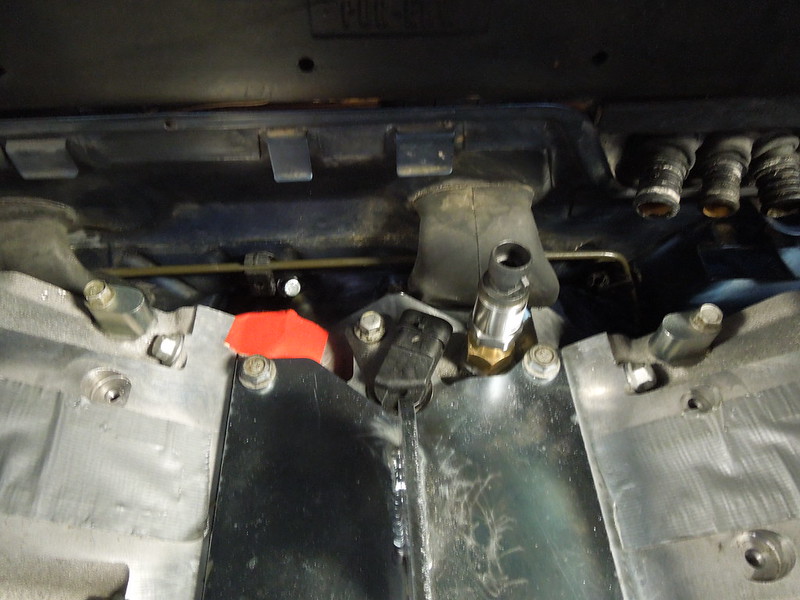
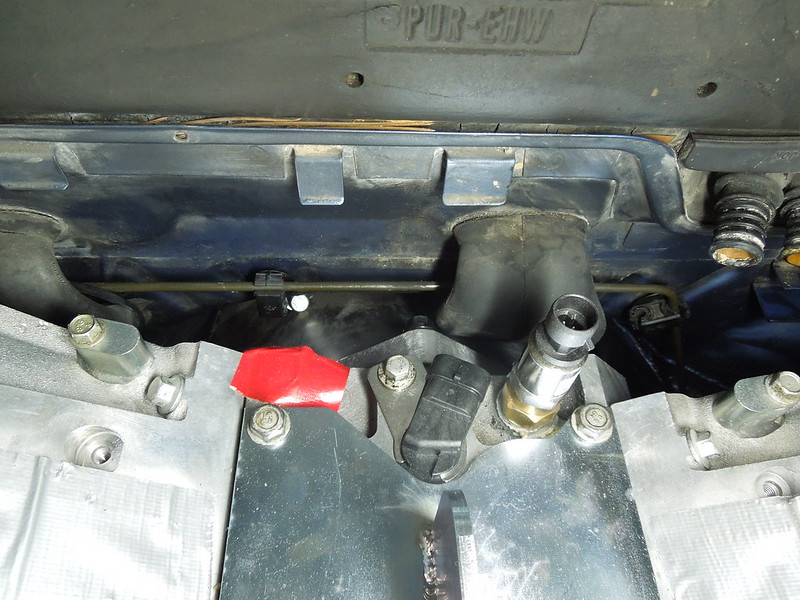
What is this?

Last edited by Tim Mc; 05-27-2018 at 09:51 PM.
Member
ASC+T Throttle actuator. No longer needed. Wire a resistor into the plug to prevent the ABS light from illuminating.
Member
Tipsy: Excellent! Yup...round filed. Thanks.
Member
Another long day with seemingly little accomplished.
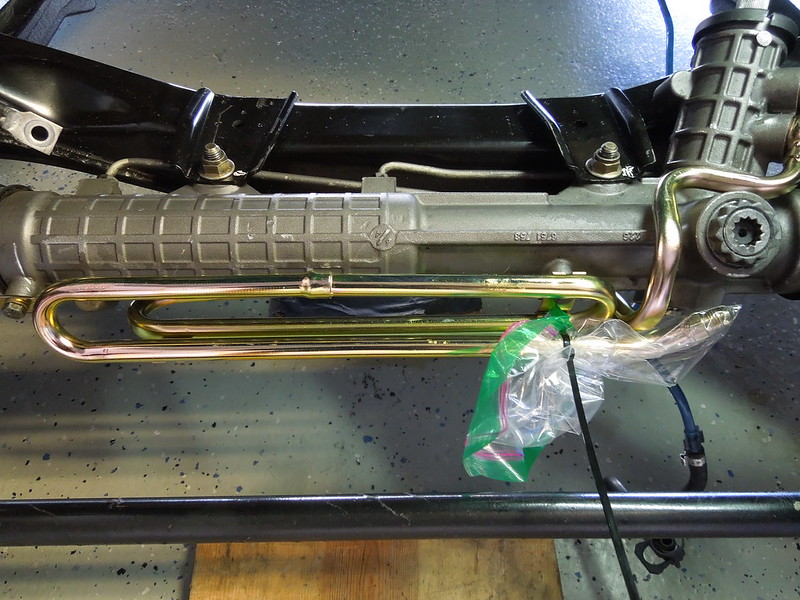
Power steering loop cooler by Vorshlag:
Comparison:
OEM restriction?:
Installed:
Another engine install (#4?) to confirm fit for the Tim bent OEM brake lines...
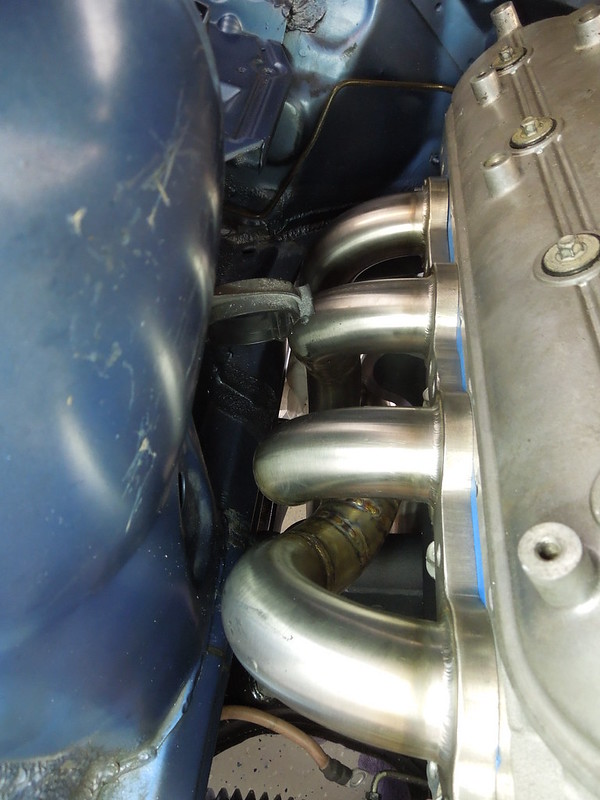
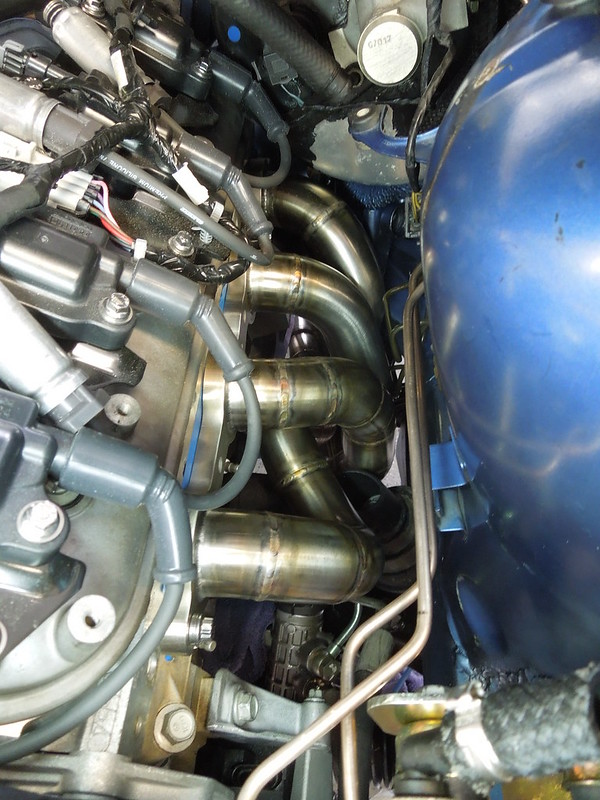
Finally added headers...driver side from the bottom and passenger side from the top! Not sure of the starter. Especially for such a large diameter (1 7/8), very impressive work getting these routed by Chuck...too bad you can't see them more after install. Don't even want to coat them.
Passenger side:
Driver side:
Shifter hole with shifter installed...need a bit more cutting:
Our work...turned out pretty good if you don't look at the OEM bent lines...I will likely wrap as a group.
Last edited by Tim Mc; 05-28-2018 at 08:14 PM.
Member
Very neat. Glad the tools are helping.
 Posting Permissions


 Reply With Quote


Bookmarks