
 ///Mkah Motorsports
Hey guys, my name is Andrew and I figured I'd start a build thread now that I'm doing this for the second time. I started with what I believed to be an older TRM turbo kit (spa manifold, spa 5000, etc) that was pulled from a running car. Started building the car early last year with a good friend of mine who has a turbo e36, put a cutring gasket/copper spacer combo in, arp head studs, oil pump nut safety wired, basically every gasket refreshed. In the process, I had a head stud pull the threads out of the block, and fixed it using a timesert. Ended up torquing the head studs fine on the stand so we threw it in. Got it done in the middle of June 2016, and drove it for a week (about 150 miles).
I went to retorque the headstuds after heat cycling the gasket for that week, and the threads pulled out of the block on the one I fixed previously, so as a result I let the car sit for about 9 months without even touching it.
Fast forward to this year, started getting motivation back to drive it again. Bought an m50b25 off a shop that posted on Facebook, came with superb leak down numbers so I was willing to pay basically anything for it. Got it home and had a small amount of coolant come out of the exhaust port on a cylinder when I was putting it on the stand, which made me leak down test it. My results varied greatly from what I was given, cylinder 1 had 80% leak down. 2 others were over 70%. The remaining 3 cylinders were all under 25%. Ended up taking the motor back to the shop and got money back on it, and am currently waiting on another motor to be delivered to a shop I work with locally so if I need to get it warranted, I don't have to drive an hour each way again.
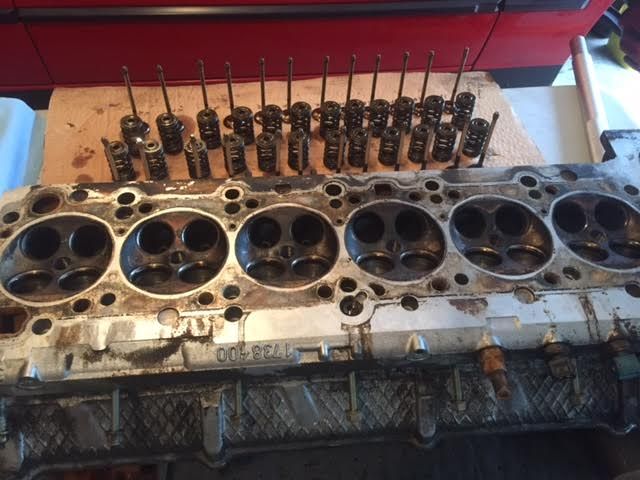
But in any case, got some motivation the past few days and this happened
Have to wait to get the new motor and get it next to it on a stand, but my goal is to be done by the middle of June. Power goals are going to be the same, looking for about 300 whp for daily driving fun, and whatever I can get as a high boost setting is cool with me. It's going to be a stock bottom end m50, I'm going to consider reusing the cutring gasket and copper spacer (upon inspection, this could very easily change), getting new head studs, whatever it takes to drive it this year yet!
The original build last year ended up being about $4k or so. Thankfully I don't have to buy all that stuff again, but I'm hoping to do this new motor on as tight of a budget as possible, however in doing this the first time, I think I'm going to change a few smaller pieces while I can.
Last edited by hellrotred325i; 04-25-2017 at 10:43 AM.
///Mkah Motorsports
An update for the past week. While I was waiting for the new motor to come in, I decided to contact SPA because I thought I had wastegate issues. Ended up pulling apart and confirming the diaphragm was still good, and they told me that I had the 11-17psi spring installed, so I ordered the 6-12psi so I could utilize my boost controller. That spring should be here in the next few days from Brazil, talk about quick shipping.
Picked up the new motor Tuesday last week. The last motor I picked up had excessive leak down (75%+ on 3 cylinders) and it got returned for a refund as a result. This new motor that I picked up most recently was sold through an auto recycler that sells to commercial businesses (aka shops). Had a note attached to it in the system that it ran amazingly when it was removed, and based on the tags it looks like it sat for about a year and was from a 95 325is from Arizona, with a 6 month warranty. Block looked clean, head is SUPER clean internally.
Before getting it on the stand, I did a leak down test on this new motor. Here's where the sad stuff starts. Ended up getting excessive numbers again, but on 5 cylinders (cylinder 6 came back at 15%, the rest were 80-85% leak down). Talking with the owner of the shop I purchased it through and because this was the second motor that I got that had high leak down numbers, he told me to go ahead and pull the head and take a look, and if need be, we'd get it warrantied. He also told me to do a leak down test without the cams/trays/lifters in to eliminate any error on my part.
At some point, I decided that I'm most likely going to be doing a valve lap job on this head, so I spent about 2 hours making a valve spring compressor. I bought a Harbor Freight welder about 2 years ago and never used it. Broke it out and made this little tool by mocking up on a spare head I had pulled out to do a trial run on pulling the cams since I didn't want to break them. It's somewhat inspired by sloppy mechanics and the welds suck, but it held together and I used what I had laying around. I had made a DSSR when I made my body mount shifter to try to get rid of some slop, so that's where the metal came from. Used an m10x1.5 nut in the event I needed to use an old head bolt. Sockets are used as spacers since the bolt I had laying around wasn't long enough , and the washer on the bottom piece is there to keep the bolt from slipping off under pressure.
Tested on two valves on the spare head, and it works!
Pulled the cams last night on the new motor, but by the time I got them out it was too late to run the air compressor to do a leak down test.
Today I did the leak down test before pulling the head, and was worried that the crank would spin on me when I applied air pressure to the cylinders. So I found some ingenuity to keep the timing chain from falling down into the timing cover, and found another use for zip ties
From cylinder 1 to 6, I got 60%, 80%, 40%, 55%, 79%, 30% leak down with the cams/trays/lifters removed. I'm not sure why the good cylinder (6) actually became worse with no cams, but regardless some did improve which is a step in the right direction. I can hear and feel the air coming out of the exhaust valves. Head should be getting pulled tonight, and we'll see how the bottom side of the valves look, mostly looking at carbon build up or anything obvious keeping the valves from sealing. Hopefully it just needs a lap job and I can get a few dollars back from the supplier that we got the motor through.
Last edited by hellrotred325i; 05-02-2017 at 04:47 PM.
Member
The set backs will just make the drive that much more enjoyable!
-sold...replaced by turbo e36
Member
Hopefully I'm not too late with this. I had a similar problem with an engine that had been storing for a while, lots of leak down on all cylinders. I fixed it by tapping the valves (cams and trays out) while I had the cylinders full of pressurized air. It must have slightly opened the valves and the air blew out something holding the valves open. I could hear air leaking past the valves during the leakdown test, where do you hear the leakdown going? This was an engine that I test drove before pulling from the car and it ran great, and has been in my car for the last 50 thousand miles.
Sent from my SM-G920W8 using Tapatalk
///Mkah Motorsports
I know Jon! In the end it'll be worth it. It was just such a tease that I actually got to drive the car last year after we built it the first time.Originally Posted by beeasy

I actually pulled the head a few days ago, and pulled the valves today before checking this thread, and the valves are pretty beat up, looks like pitting to me, so I'm sure if it were a carbon issue, tapping the valves could very easily get them to seat. I never seem to have "easy" problems though
Picture updates:
Got the head off with the help of my dad on Tuesday, and coated the block surface with ATF for a few hours, definitely cleaned the carbon bits off. Before ATF:
After ATF:
I received my wastegate spring that I had ordered from SPA, shipped from Brazil! There's a huge difference between the 6-12psi spring (left) and what I was told was the 11-17psi spring (right).
I pulled the engine harness of the new motor as well, since I noticed that the company that removed it from the car cut a few wires on it, making it near useless. Looked like two starter wires, and one of the wires that goes to the fuse box were the ones sacrificed to get the motor out
With the head off today, I did what I'd consider a poor mans leak down test. Put the spark plugs back in and filled the domes of the cylinder head with rubbing alcohol, and let it sit for 30 minutes or so. Cylinders 1, 2, and 5 leaked noticeably in seconds; 3, 4, and 6 remained bone dry throughout the time it sat. This confirms the bad numbers I got on those cylinders during the leak down tests.
Here's a close up of one of the valves that allowed rubbing alcohol to leak past, and as a result was from cylinder 2 which had the second highest leak down percentage during the leak down tests.
And finally, I spent about an hour and a half pulling all the valves out of the head. I have Supertech valve seals ordered already, so I still have to remove the original valve seals from the head, but that shouldn't be too much of a time commitment. Hoping by the end of the weekend I'll have all of the valves lapped and waiting for those seals to show up. Need to find time to pull the head off my old motor to grab the cutring/copper spacer and ARP head studs.
///Mkah Motorsports
Been a while since I updated, but progress has been kind of slow the past few days.
I finished lapping the valves, replaced valve seals with Supertech seals, and reassembled the head last weekend. I also put the head back on the block, and leak down tested it without cams in again to note any improvement. If you remember, I had previously leak down tested the motor before removing the head but with cams removed, and got the following: 60%, 80%, 40%, 55%, 79%, 30%. After testing the leak down again with the newly lapped valves, I got: 10%, 15%, 14%, 11%, 13%, and somewhere around 2%, from cylinders 1 to 6 again. Cylinder 6 barely made the gauge move that's how good it was. So I am super happy that the lapping paid off and no valves are leaking now.
I pulled the s52 pan that is drilled for the turbo drain off my old m50, and pulled the safety wired oil pump nut off to be reused on this new motor. Installed with red loctite, torqued to spec, and safety wired again.
I decided to do a leak down test on my old motor just to see how healthy it was before it's demise. Cams were removed, and I came up with 20%, 11%, 23%, 30%, 15%, 33%. Cylinder 6 was the highest and had a very small leak out of an intake valve. I'm happy to know that the new motor will be in a better position than the old one was.
I also pulled the head off my old motor to pull the head gasket out. Unfortunately, when I removed it, a small piece of gasket pulled off, although I never found the missing piece of gasket, rendering it basically useless as I don't have the desire to see if it would work or not being reused. The copper spacer looked ok to me, and I'll probably try to sell it, however when the timesert pulled up, it did pull on the spacer a bit, but shouldn't actually cause any issues in use. You can also see just how deep/shallow the cutring actually cuts into the head surface in this picture.
And a picture of the headstud from the block threads that failed with the timesert. I'm not sure which actually let go, as I could easily remove pieces of the timesert, but there's definitely embedded material in the threads that I can't get out. So at this point I decided on new headstuds and a new cutring set up.
Then I got some motivation to paint the block. So I spent a good amount of time scraping off gunk, painted the entire surface with kerosene to clean what was left over, wiped off with shop rags until nothing came off, and then sprayed it down with brake clean to degrease everything. Put down 3 coats of primer before 4 coats of paint. Went with the color "cast iron" as, after all, the block is cast iron.. I personally think that it came out really well. I did sacrifice the m50 oil pan and got overspray on it, as I didn't see a good way of taping the bottom off. But I'm not using this pan anyways so I didn't care.
When I was untaping the motor after painting it, I discovered that the new motor has a broken timing chain guide. So I have to remove the timing cover. I've tried to remove it using 3/8" air line with the enlarged 1/4" NPT air line fittings to try to squeeze a little more juice out of my air compressor, I've cranked up the regulator, and I've tried multiple air impact guns (one of which was from the guy who facilitated the motor purchase and said that it would have no problem getting the crank bolt off, it's a Matco branded gun that supposedly is good for 900 ft/lbs) and I just can't get the 22mm crank bolt off. I've even tried standing on the block, basically doing a leg press with it and a breaker bar with an allen wrench keeping the flywheel/crank from spinning. So as of today, I broke down and ordered the crankshaft holder tool (SIR part number 3034-2) that bolts to the 6 m8 bolts that surround the 22mm crank bolt and do it the right way. I also figured this would allow proper torque when reattaching everything. Since I purchased this and will most likely use it once, if anyone ever happens to come across this and read it, I'd be more than happy to rent it out.
I also ordered a new cutring gasket, spacer, and headstud combo the other day, but have not received notification that it shipped. I'll need to order a timing cover gasket, front main seal, and chain guides. I'm thinking while the timing cover is off, I'll paint it and my oil filter housing wrinkle black, to attempt to match my powder coated valve cover and have good contrast with the block color, but unfortunately that won't be until next weekend as I need to wait on parts and tools at this point.
LICENSE SUSPENDED
Most impact guns are rated for 1/2 air lines and XXX pressure.
As for the crank bolt, you could install a few bolts in the rear use a pry bar in between the bolts and wedge against the stand, then remove crank bolt with breaker bar and pipe.
1996 332IS
Built 3.2
CES/Steed TS Precision 6466, spraying a "$π!℅" load of meth.
Technique Tuning 80# tune.
1/4 mile 10.84 @ 136.72
Your 1 and only stop for all your BMW performance needs
WWW.CESMOTORSPORT.COM
///Mkah Motorsports
Very true on line sizing for rated torque numbers, I've never run into an issue before and always forget this. I figured that just using the 3/8" line with the bigger air fittings would have done enough to get the bolt off, but I guess I was wrong, and as we all know, there's no replacement for displacement.
As far as wedging bolts against a pry bar and the stand, I did try that on my old motor since I'm trying to pull the timing cover off that one to clean it before painting to swap onto the new motor, but it's on a 3 legged engine stand, so I couldn't put a lot of force into the crank bolt without risking it falling over.
///Mkah Motorsports
I wanted to get rid of the rust-brown color of the spa manifold since the rest of the motor is going to be painted in some shape or form, so I sanded it down, primed it with VHT Flameproof primer, and then sprayed it black with VHT Flameproof paint. I'm not too worried if it doesn't end up holding up, but it sure does look better now than it did before.
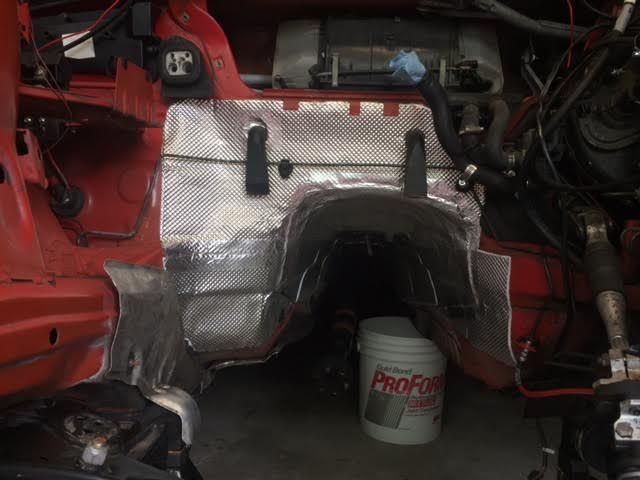
Got the idea from my buddy Jon (Beeasy) to redo the stock heat shield/insulation on the firewall and trans tunnel. I really liked how his car came out, so I ordered the same stuff. DEI Floor and Tunnel Shield. Seems like really good quality stuff, and should do a really good job insulating the inside of the car. But in order to apply it, I had to rip out the old crumbling insulation and clean up the engine bay. Used a diluted solution of Purple Power in a spray bottle, light agitation with paper towels, and then rinsed with water in another spray bottle. Here's a little before/after before I finished. Obviously I won't be coating the entire engine bay in the stuff, but I figured it was worth cleaning up since I was doing it.
Dirty:
Clean:
And here's the DEI product I'm using. I wanted something that was adhesive backed, and would also hold the shape it was put into, and this fit the bill.
Spent a little time in the garage today working on getting the crank bolt out. Ended up using a 25" breaker bar, with a jack handle on it to make it right around 36" or so, and had my dad hold the crank holding tool I had bought a little while ago. A little bit of force and the crank bolt came right off.
I've had all the timing chain guide stuff sitting in a cart for the past few days since I discovered the one was broken, but I wanted to confirm part numbers just to be safe. For anyone reading this, somewhere around 9/94, BMW switched to an all plastic guide for the "right" side of the engine. My old motor had the metal backed guide, the new motor is the plastic one.
Confirmed the part numbers I had waiting in a cart were correct, and placed the order, so that stuff will be here in the middle of next week.
I also ordered a -10AN bung and a push on 45 degree -10AN fitting to redo my oil drain going into the pan. The brass NPT fitting I had worked, however I had to smear it with Ultrablack RTV in order to get it to not leak oil. This time around, I wanted a cleaner install with less to worry about, so I'll be having a buddy weld the bung on, provided everything works as I think it will.
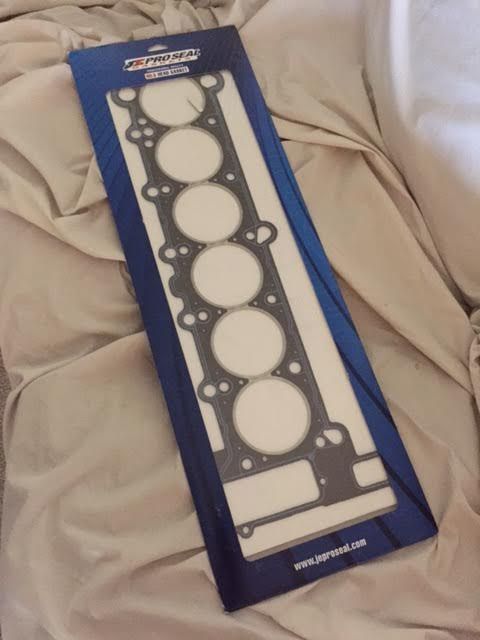
Had my order for the head gasket stuff canceled, because of a "pricing" problem on the website of what I would consider a well known shop. I don't want to discredit the shop, as I can understand there was a problem, however I don't feel the situation was treated correctly (the issue that they said was happening didn't add up monetarily, my order was canceled before I got to speak with them, forcing me to wait on a return, and that it took them 3 BUSINESS days in order to catch the mistake, which just wasted my time all together). I asked if they would price match to the prices I could get the individual components for, as the issue was not any fault of my own, and was told that they wouldn't. So as a result, I had to reorder stuff. Waited several days for the refund to come back into my bank account since I refused to transfer more money into an account that would be seeing a refund, and then purchased a cutring gasket from an eBay seller for what I considered a steal (new obviously, don't need another used one). The gasket showed up today. Placed an order on ARP head studs as well today, so those should be here in the middle of next week. That just leaves the spacer to get ordered at this point.
///Mkah Motorsports
Spent a little time applying the DEI floor and tunnel stuff. You can see on the driveshaft where the old sound deadening was rubbing. Ended up being a little harder to work with than I had anticipated, it really doesn't conform to bends at all. I tried to apply it in as big of sections as possible, using relief cuts where needed to wrap around bends, as I figured a continuous section was more effective than pieced together sections. The problem was, that the fiberglass material doesn't cut very easily at all, which made the whole thing more difficult. However I'm happy with how it turned out minus the one HVAC drain, I tried to use a hole saw to cut through the material, which was a mistake. On the other side, I just made a hole and opened it up using a large socket, and that worked substantially better and looks super clean.
I also applied some 3M Metal Repair Tape to the seams that my dad had laying around. Only did it on the firewall/forward facing sections, but I've decided that I'm going to cover all the seams with the stuff to try to keep water out. The roll says that it'll withstand 300 degrees, where the DEI stuff suggested for the same purpose will withstand 400, so I'm hoping it won't heat up and the adhesive will let go, but I'll find that out soon enough.
///Mkah Motorsports
Haven't had a whole lot of time to work on the car or update here, but I've slowly been making progress. As that middle of June goal approaches faster and faster, I think I may still make it.
Updates for the past week:
Cleaned the block surface using 3m roloc bristle disks. Started with the green coarse one, and followed up with a white fine one. Unfortunately it does look like there's very light pitting, but there's nothing in the sealing surface for the combustion chambers so I'm running with it.
Had a buddy weld an 10AN bung on the oil pan. Ended up being a bit more work that I had anticipated, he had to use a flap disk to sand down the vertical support on the side of the pan, and enlarge the hole that was previously there, as well as sand the bung on an angle (I am a very difficult customer to please haha). I asked him to put it as high as he could and still be able to weld the top, but unfortunately it ended up being just a slight bit too high and he couldn't weld the top 3/16" of it on the outside, so he welded the top half on the inside, and I threw a little JB weld on the outside and don't anticipate any problems. He did all this for free since I got an argon tank refilled for him so that was cool.
With the bung on the pan, I mounted it on the block. I'm using an Aeroquip 45 degree 10AN push lock fitting on 5/8" line, and with the position of the turbo on the spa manifold, and the spa oil drain on the turbo itself (the curved drain that's like 3" long), I'm almost certain that I'll be cutting at least one of the barbs off the fitting to have enough play in the line if the two pieces don't line up perfectly. But to me it's worth modifying the fitting to get it to work, this welded bung is far superior to an NPT fitting that barely had any thread engagement and pounds of rtv keeping it from leaking.
Didn't take any pictures, but I put both timing chain guides on before mounting the timing cover. I sprayed the timing cover gaskets with the high temp copper spray at the suggestion of the owner of the shop that I got the motor through, and that made it super easy to line up since they stuck where I put them.
I applied red loctite and torqued the new crank bolt to 150 ft lbs (the highest any of my torque wrenches go), and then had my dad come out and hold the crank holder tool for me while I used about 40" of leverage on the crank bolt and tightened it as far as we could. Hopefully it doesn't back off, however I'll keep an eye on it. Ended up deciding not to bother painting the timing cover or oil filter housing, figured it wasn't worth the work to most likely have it flake off anyways since I hate prep work when painting.
The copper spacer arrived on Saturday, so at this point I had everything to put the motor together.
Just got around to throwing it on today however, I had to wait for help as it's not a one person job. Threw the oil filter housing on just to start reassembling, and put the n54 exhaust manifold studs in the head. Coated the spacer in high temp copper gasket spray, threw it on the block with the gasket, and had my dad pass the timing chain through the head while I lowered it down onto the block and took a break. Sent a picture to Beeasy, and he asked if I put rtv on the timing cover. Which of course I did not, thankfully I hadn't started tightening nuts on the headstuds and now I owe him a beer. So I went back out and pulled the head off with my dads help again, pulled the gaskets off, put some ultra gray on the timing cover surfaces that needed it, resprayed the copper spacer with copper spray, and threw the head gasket stuff back on.
Then we put the head back on the block for good
ARP includes new instructions compared to the ones I followed with the set I bought last year, so I followed the new ones since they were new studs. The assembly lube that they give didn't change from what I had from last year (same part number on the packets), so I'm not sure why the torque spec is less than the old instructions. I sprayed the washers down with brake clean to clean the oil off, put the studs in finger tight, put the washers down, applied ARP's assembly lube to the top threads and bottom of the nuts, and did the first torque sequence at 25 ft lbs today. I wanted to check this torque after a little time, so I ended up putting the thermostat/housing back on, as well as the water pump.
I've never been good at waiting, so I only let the motor sit for an hour while I was doing the other stuff, and rechecked the 25 ft lbs torque on the head studs. Only the first 2 moved a fraction of an inch. I'm going to try to do the second torque (50 ft lbs) tomorrow morning, and recheck it mid afternoon if I get a chance, and try to knock out the final torque tomorrow night. I'm just super happy that the heads on now and I'm in the home stretch
///Mkah Motorsports
So I haven't been too concerned with updating this thread the past week, as I've been out working on the car basically any chance I got, so here's a nice big update.
Motor all assembled waiting for the engine harness
Dropped the motor from the stand to put the pilot bearing in, and mount the clutch. The clutch was brand new last year, so I am reusing it without any hesitation. If anyone wondered what a clutch disk with 150 miles looked like, here you go. Doesn't even look like it's halfway worn in. After seeing this, it reaffirms a break in period is needed.
Motor and trans were assembled on Friday night.
Had my dad give me a hand dropping the motor and trans in as an assembly. Definitely much more manageable having a second person keeping an eye on things and help push the engine hoist. I would have killed myself getting up and down if I would have done it by myself. Motor was installed on Saturday.
Intake manifold thrown on after the chain I used to lift the motor in was removed. Starts looking like a motor again at this point!
"
At this point, I had put the throttle body on, exhaust downpipe, and put the cold side intercooler piping on because the maf is in it, and went to start it up. Primed the motor for oil by pulling the fuel pump relay and fuse (double up just to be safe) and cranking a few times for 5-10 seconds at a time. Once the low oil pressure dash light went out, I made a little jumper wire to jump the fuel pump relay to prime the system with fuel. I stopped after I had heard fuel in the rail. And then the fun part of starting the car for the first time! First start was on Sunday. I thought it was kind of funny that it took me almost 2 weeks to get the motor in and running last year, and this year I did it in two days
After I knew it was going to run, it was game on. Spent nearly 8 hours out on Sunday working until dark. Got the entire front end back together, only thing I needed was the radiator to be put in. Only problem was, the belt that was on was only 6 months old when the car got parked, and I guess from sitting in one spot for so long, actually developed cracks in the ribs in a 4" section. So I opted to get a new one under warranty through my work before putting the rad in to make my life easy. So Sunday night, the car was left like this
Went to work Monday (yesterday) and got coolant, new oil/oil filter, and a new belt while I was there. Got home around 5:45 and spent the rest of the night in the garage. Put the new belt on, put the rad hoses on the thermostat housing, put the rad in and attached the lower hose, and started filling the upper hose with coolant. Before long, I had a coolant leak. The Felpro gasket (brand new may I add) that I put in the thermostat housing was too small and didn't seal. So I dug out my old housing gasket (with 150 miles on it and sitting around for a year), threw it in the housing, and haven't seen a drip other than what I've spilled.
Pulled the car out, and stuck my dad in the drivers seat to keep an eye on the temp gauge and to let me know when hot air was coming out of the vents while bleeding. Around 10:30 or so, the car looked like this and was outside for the first time in nearly a year.
Despite it being somewhat late and not wanting to piss neighbors off, I took the car out for a spin to road test it. Drove it around the neighborhood a few times, and backed into the garage again. When I got out, I noticed coolant on the ground. Stupid me forgot to put the bleeder back in the expansion tank. So I let the car sit overnight, and checked all fluids this morning just to be safe. I had overfilled the coolant a bit last night figuring it would push excess out, so I actually didn't need to add any today, which was good because I despise working with antifreeze, it always seems to get everywhere.
Pulled the car out of the garage and let it idle for a few minutes, and then drove to get it inspected. The owner of the shop laughed when he saw I drove the car under 300 miles since it was inspected in March of last year. Got back, and here she is!
If I would have known that I was going to be doing all this on my own this time last year, I probably would have lit the car on fire. I joked about doing that actually. But the experience has taught me so much, and it's hard to put a value on that. So much so, that I'm actually trying to convince my dad to get an e36 to turbo to replace his e46 that got totaled a few months back. Even though I did about 95% of the work by myself, I wouldn't have been able to do it without my dad giving me a hand. And it was also nice, that since I'm a commercial driver for shop deliveries in an autoparts store, I have access to a ton of resources of knowledge when it comes to cars, because I've built relationships with so many mechanics and techs everywhere I deliver to, but the owner of the shop that got me the motor was by far the biggest help, as he had worked previously in a performance shop that built turbo mustangs, so this kind of project was right up his alley.
I still have a few minor things to button up, like plumbing in the AEM Truboost solenoid, as I currently have the wastegate going off of manifold pressure so it's just going off the spring right now. But I'm excited to finally get a chance to drive the car again! Definitely needs a good wash though, who knew a car could get so dirty from not being used.. (fender had a fender cover on almost the entire time it was in the garage, that's quite a bit of build up on the hood though!)

Member
Awesome work dude! I have to get the motivation to get with mine, I spun a bearing so time to switch to e85!
///Mkah Motorsports
Thanks man. I was torn with just doing a rebuilt 2.5 or going bigger. My dad had an e46 330i that got totaled about two weeks before I bought the first motor, and I toyed with doing the 3.0l stroker build, but ended up opting for the easy route or a rebuilt 2.5. But you have an opportunity to go bigger, and you might as well at least redo the fuel system while you have the down time.
Also for anyone reading this, I'm having a small problem. The car keeps throwing a 1221 code for the O2 sensor. At first I figured it was because of bad gas, since it was a year old, so I tried using a rejuvenator product, which maybe raised idle afr's about half a point if that. So I ran the tank down to 1/4, and filled up with 93 octane (so about 11 gallons of fresh gas). Drove the car, and the O2 code did go away for about 15 minutes, at which point I got into boost a little here and there, only going to a little over half throttle. But when I got stuck behind a slow truck on a back road at one point, the code came back, so I'm thinking it has to do something with exhaust velocity and maybe a sluggish sensor (at least according to a mechanic I talked to about it).
This all being said, when the code is on, idle afr's are super rich, around 12ish even with the new gas in the tank. When the code wasn't on for those few minutes, idle afr's were between 14.5-15.1, which is spot on obviously. The fact it's running rich at idle means no vacuum leak to me since I'm using a maf sensor, and I'm assuming the O2 is bad to some extent, and the car is going into a fail safe mode and running super rich. Does anyone have any suggestions on this? I had ordered an O2 sensor through my work, but when I went this morning to get it, the harness was 57" long, so I reordered another bosch sensor that will be the correct one and I'll end up throwing that on tomorrow night. The O2 that I'm using currently is original to the best of my knowledge, and probably has somewhere around 168k miles on it so it's time for it to be replaced anyways.
Edit: I should probably add, that I've had this code pop up maybe 4 times in the past 3 years (1 of which the car wasn't driven), but it's always cleared itself. So I have zero issue spending the money on the sensor because I've had issues with it in the past, but I truthfully do believe that's my issue. But I'm more so looking to make sure that my thought process based on afr's is correct
Last edited by hellrotred325i; 06-11-2017 at 02:50 PM.
///Mkah Motorsports
So figured I'd update the issue. Replaced the o2 sensor and within 2 miles the cel went out on its own, and was idling right around 14.8 (give or take a few points either direction). However after that, I started getting an idle misfire that started out as a very intermittent misfire, but has become much more prevalent. Figured it could be spark plug related, since I had ngk 4554's gapped at .019", so I opened them up in steps up to .025", and it didn't change anything. So I swapped in a fresh set of ngk 4091's, gapped at the gap they come at, based on the suggestion of the mechanic that ordered the motor for me, which was .031". No spark blowout under boost up to 6500rpm, but I still had an idle misfire, which shouldn't be the case with a gap that big based on everything I read. I took the car down to his shop and he checked the coil packs with some sort of tool while the car was running, and ended up saying cylinder 6 coil was bad. So I ordered 6 Bosch coils and replaced them all, hoping that would fix it. Still misfires after the new coils, and seems to be cylinder 6 thats missing based on how it sounds when the coil pack harness is removed.
Which brings us to the present. I'm now thinking that it could be fuel related due to the old gas I had run through. So I had an Aeromotive Stealth 340lph pump that I had gotten when I bought all the turbo stuff last year, so I threw that in. Have it wired to a relay, only thing I need to do is put an inline fuse from the battery to the relay. Unfortunately it's way too much pump for what I expect out of the car, I'm just using it since I have it, and I'm expecting that it'll overpower the stock fuel pressure regulator, so is there a way to add an adjustable fuel pressure regulator in addition to the stock one on the rail (obd1), or do I need a block off plate for the rail regulator?
I also dumped a container of Chevron Techron fuel system cleaner in for good measure, because one of the guys I delivered parts to said it sounded like it could be a clogged injector, which I could totally understand based on the fact I ran a good amount of year old gas through the motor.
LICENSE SUSPENDED
Do a compression test. To 100% rule it out. That way your not throwing more money at it.
Having a cylinder low on compression could have a slight miss at idle then smooth out with load. You could have injector/wiring/sensor issues but, check the compression first.
1996 332IS
Built 3.2
CES/Steed TS Precision 6466, spraying a "$π!℅" load of meth.
Technique Tuning 80# tune.
1/4 mile 10.84 @ 136.72
Your 1 and only stop for all your BMW performance needs
WWW.CESMOTORSPORT.COM
Fixes the wheel
Not sure I'd want to mix oem and aftermarket fpr's but I will say that adding an adjustable fpr to my obd1 car certainly made it run and especially idle much, much smoother. It was super rich and things were pretty random before with my smaller 255 pump and even with the factory pump. Also have an afpr routing diagram I'd share if you like that has worked for me going on 2 years with zero issues
Also, if you have a good junkyard there you might be able to score a 1995-only(?) obd1 square fuel rail that won't need a blockoff plate because the stock fpr will be down in front of the fuel filter like the obd2 cars and easily bypassed.
Things are looking nice and good luck, you are so close!
1995 325i | OBD1 S52 | S50 cams | AA Turbo TD06 20g / 42lb / Porsche maf | .140 MLS | F1 s3 clutch | Ultimate SSK | AKG 75D subframe/diff bushings | 3.23 LSD | Powerflex LCAB/RTAB | e46 fca | Raceland coils | BMP rear arms | DEPO HID | AEM Failsafe | Aeromotive FPR | Walbo 255 | 3" Magnaflow muffler/cat/res | 17x8.5/9.5" 225/45 & 255/40
///Mkah Motorsports
I will do a compression test on the motor if I get a chance, however it is an intermittent misfire, and to me if it was loss of compression when the motor got hot, it would be consistent loss of compression.
On a side note, I finished up the aeromotive 340lph pump install, and the misfire is much more intermittent, and the wideband will only swing up to low 16's when it is missing, as opposed to before the pump install that I'd see high 17's (again this is ONLY when the car was misfiring, I'd see it swing back to about 13ish as the misfire cleared itself).
I was being hopeful that I didn't have to buy the block off, as the only one I can find available is achilles motorsport's at $50, seems a bit steep for a piece of metal I could probably turn myself on the wood lathe in my dads wood shop. My buddy has one though that I'm going to snag from him, so I'll use that and get rid of the factory regulator when I end up going to an adjustable regulator. So far, idle afr's have been right where they should be, even with the new pump, which I'm surprised by as I assumed the pump would far exceed what the regulator could handle. Cruising is also good, hovering within a few tenths around 14.8 like before, it may swing an extra .1 either way but that's negligible to me. I will end up getting an adjustable regulator just so I can be safe, and put a fuel pressure gauge in the system.
Couldn't find any diagrams on realoem as far as a fuel rail that doesn't have a regulator on it, but a google search confirms that there's some 95's without the regulator, so I appreciate the heads up! I'll have to check the intake manifold from the motor I bought for the rebuild, it was a 9/94 build date, so maybe it's close enough to 95 and I may luck out. Truthfully I never looked if it even had injectors since I wasn't using that harness/manifold/injectors.
 Posting Permissions


 Reply With Quote


Bookmarks