
 Member
I decided to create a new thread for the 2.0 conversion and move the pics and info from the original "hotter cam worth it?" thread. Should make it easier to manage and be more readily searched in the future.
My car is an '82 320i w/110k. I bought the car from the original owner after it sat for ~11 years due to lack of interest and a blown clutch slave. Once I got it back on the road, it started leaking oil fairly heavily from the timing cover gaskets and oil pan gasket. Late last fall I decided it was time to re-seal the engine and then scope creep set in...now I am building a mild 2.0 that will keep the factory K-jet.
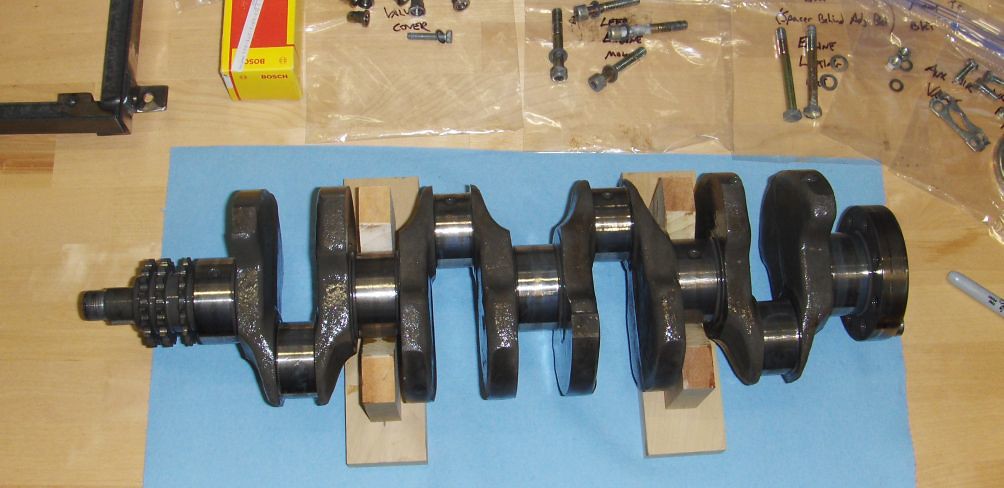
At this point the motor is apart and parts are ordered from TEP; 9.6:1 pistons, 284 re-grind and shorty header. I sourced a good used 2.0 crank and then started to figure out all of the other bits and pieces needed to put it all together.
This build will probably move slowly since there are several other non-engine related items that will be addressed at the same time - suspension, cooling system, and a rusty battery tray, etc.
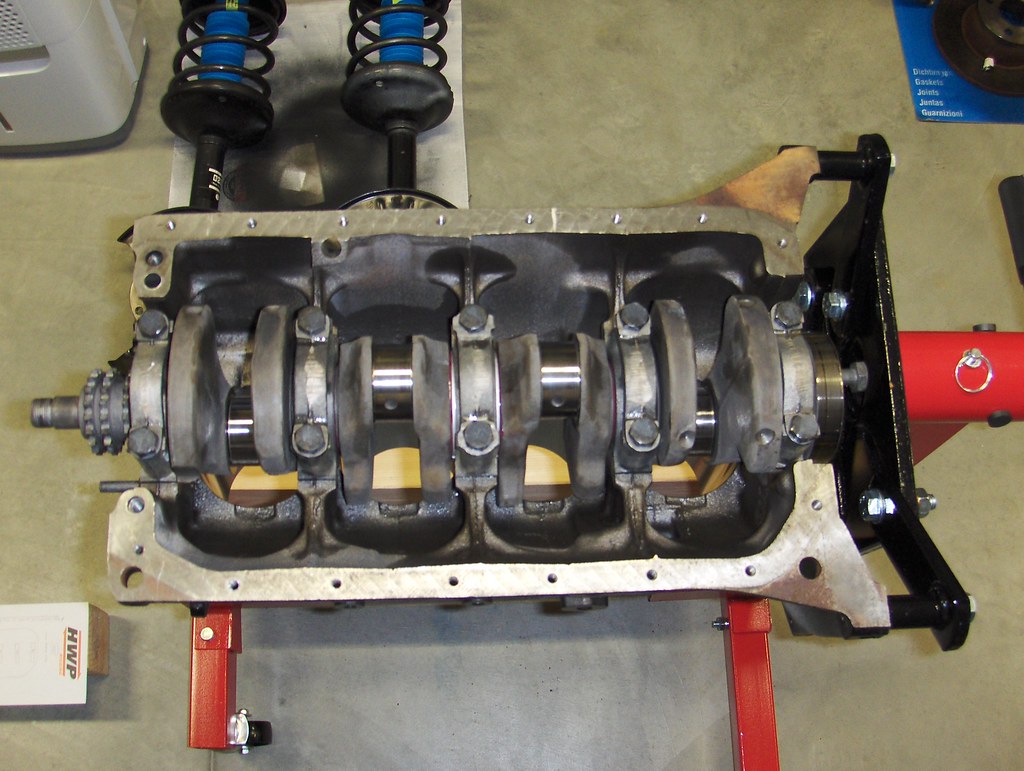
A few pics from the engine disassembly...
Cylinder wall condition looked good all around:
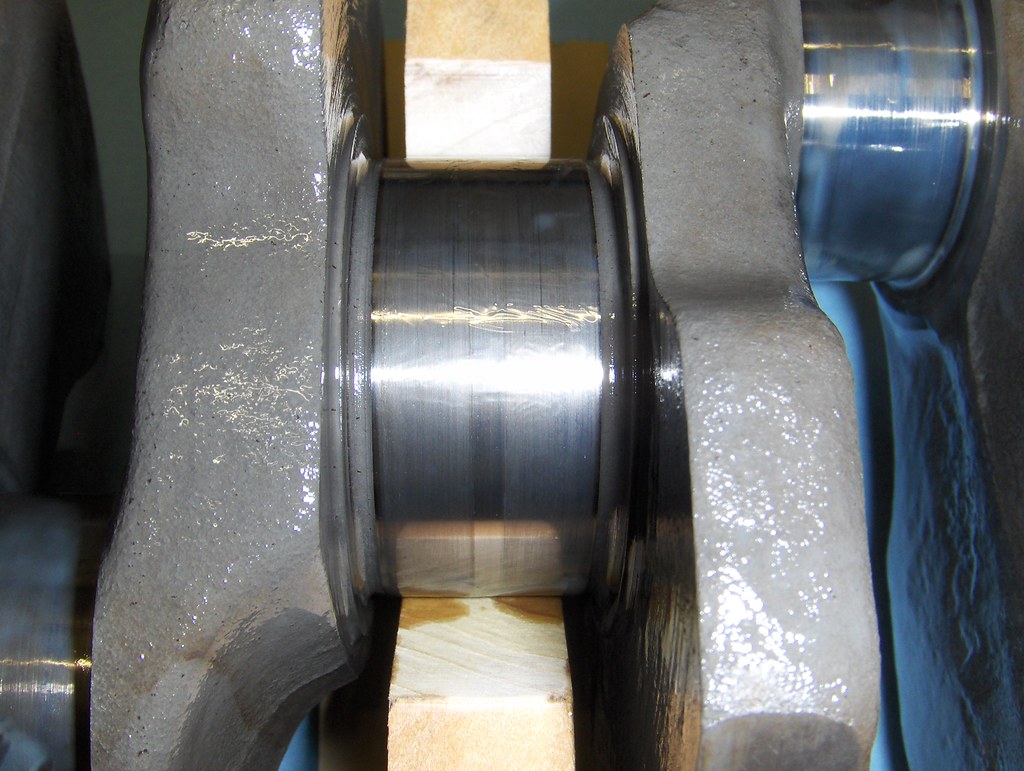
The rod and main bearings looked good, Cylinder #3 rod bearing had the most wear and #1 Main looked the worst of the lot:
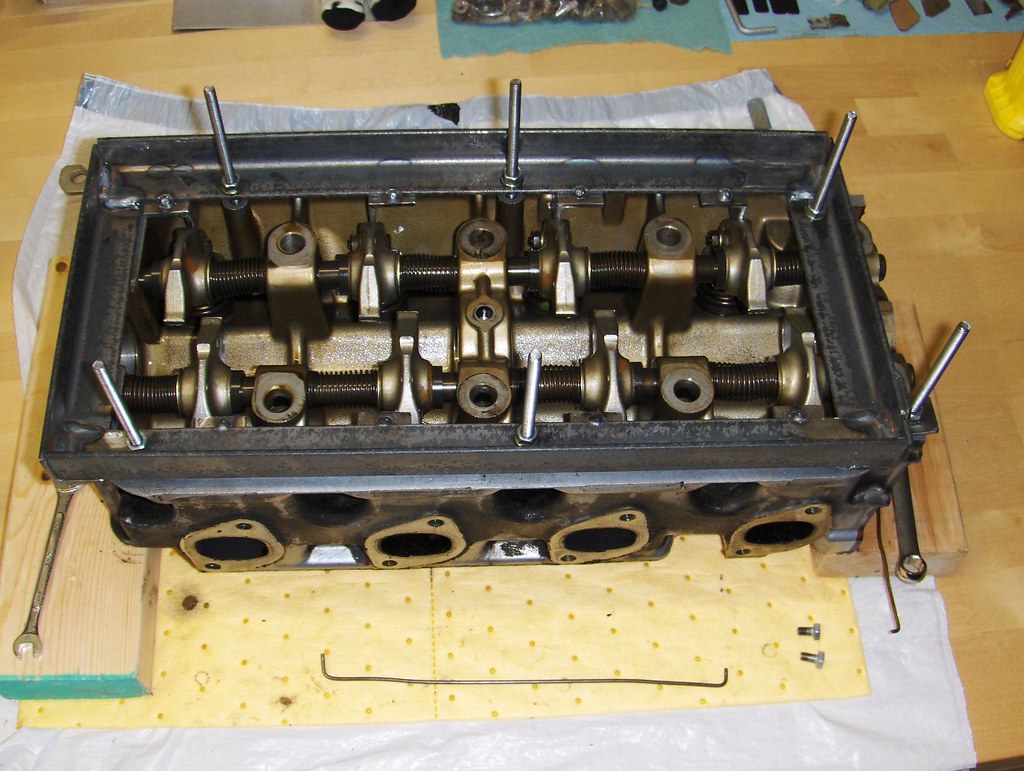
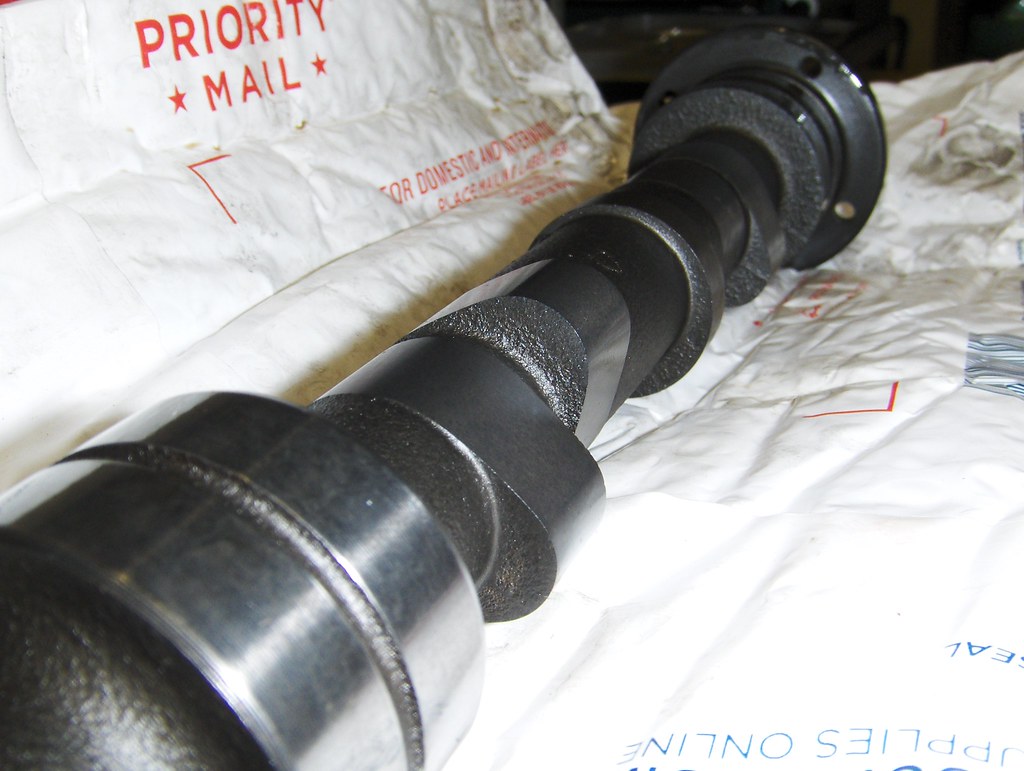
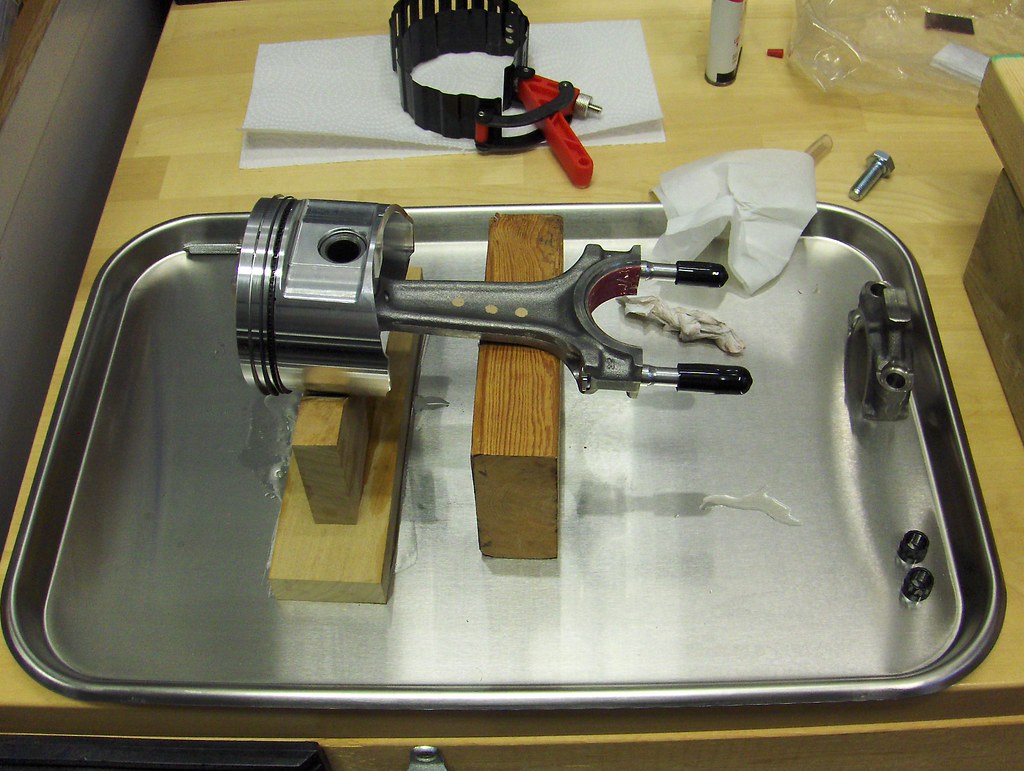
Made a camshaft removal tool that made easy work of that task:
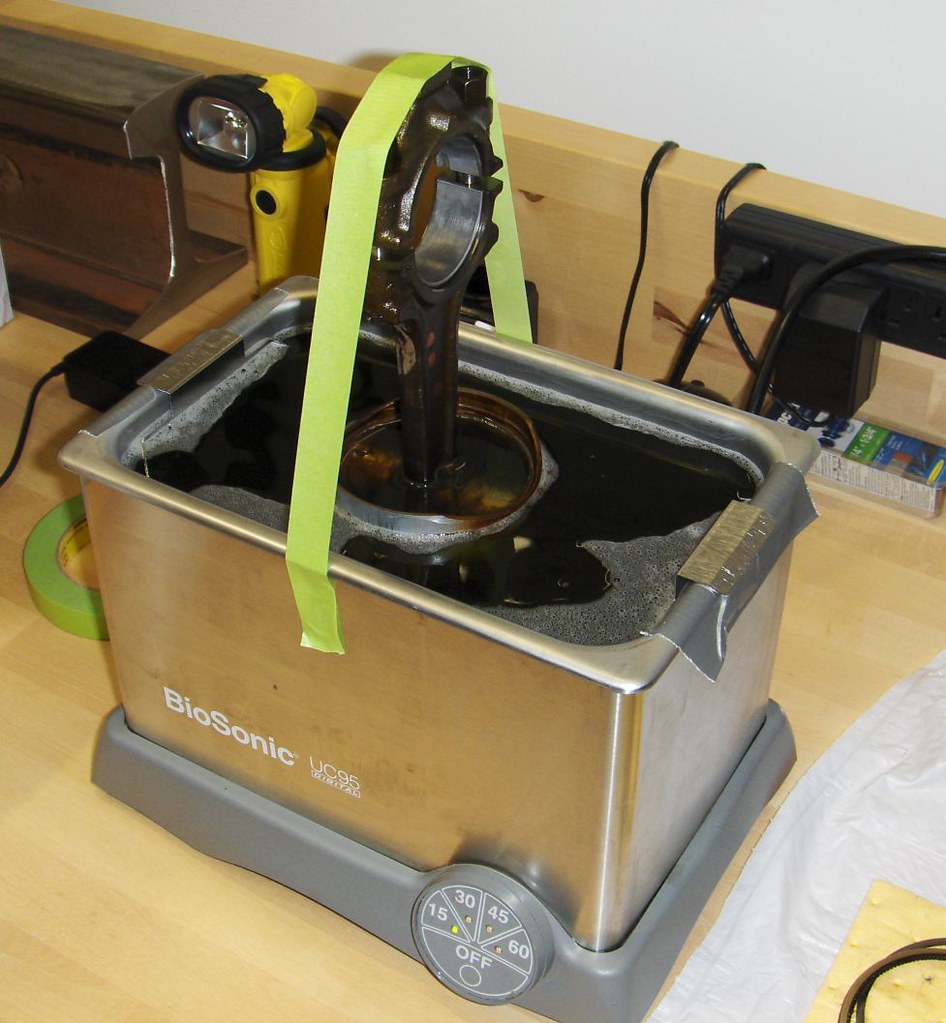
I also found a trick to making the wrist pin removal a bit easier. The wrist pins did not want to slide out freely due to varnish, etc. So since I have a small ultrasonic cleaner, I ran a 30 min cycle on each piston assy to clean them up. Once clean, each wrist pin slid out with little effort.
MJ
Member
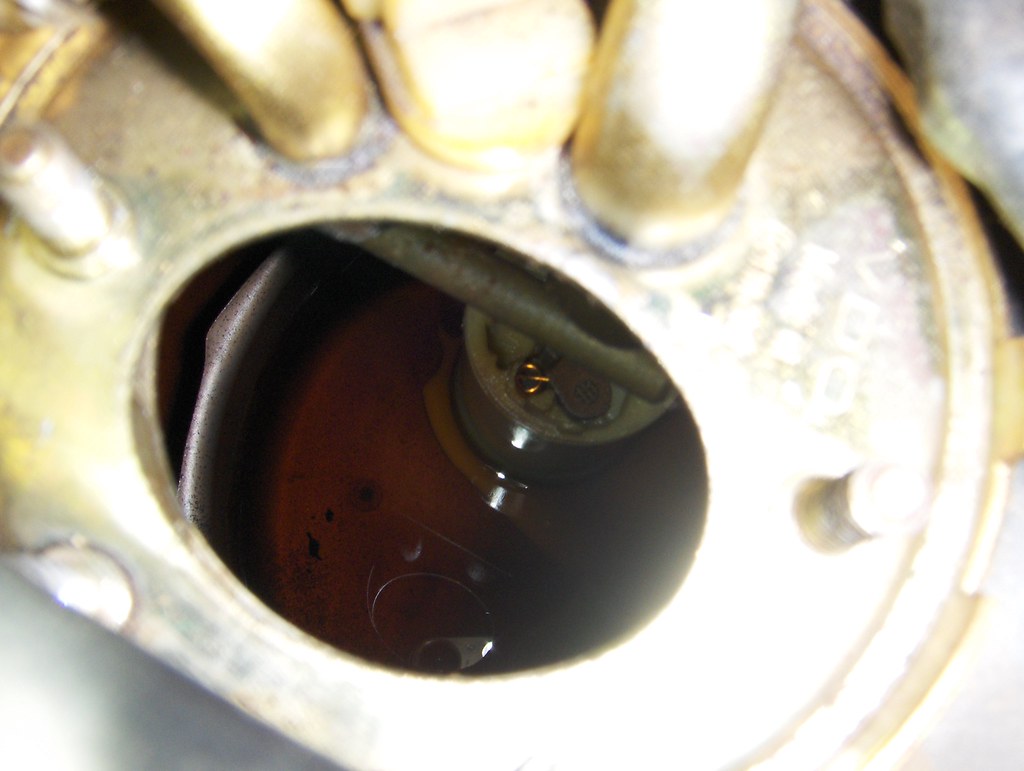
Pulled the fuel level sender today to have a look at the condition of the tanks. I'm glad I did this because the sender gasket was rock hard, which explains the whiff of gas I would get occasionally.
A bit of varnish but not too bad - hard to get pics but these will give you an idea:
Frankly I expected worse. The walls of the tanks do have a bit more varnish than the photo's show but nothing I would consider abnormal.
Also took a couple pics of the 2.0 crank. Unknown mileage but it is in very good shape.
MJ
Member
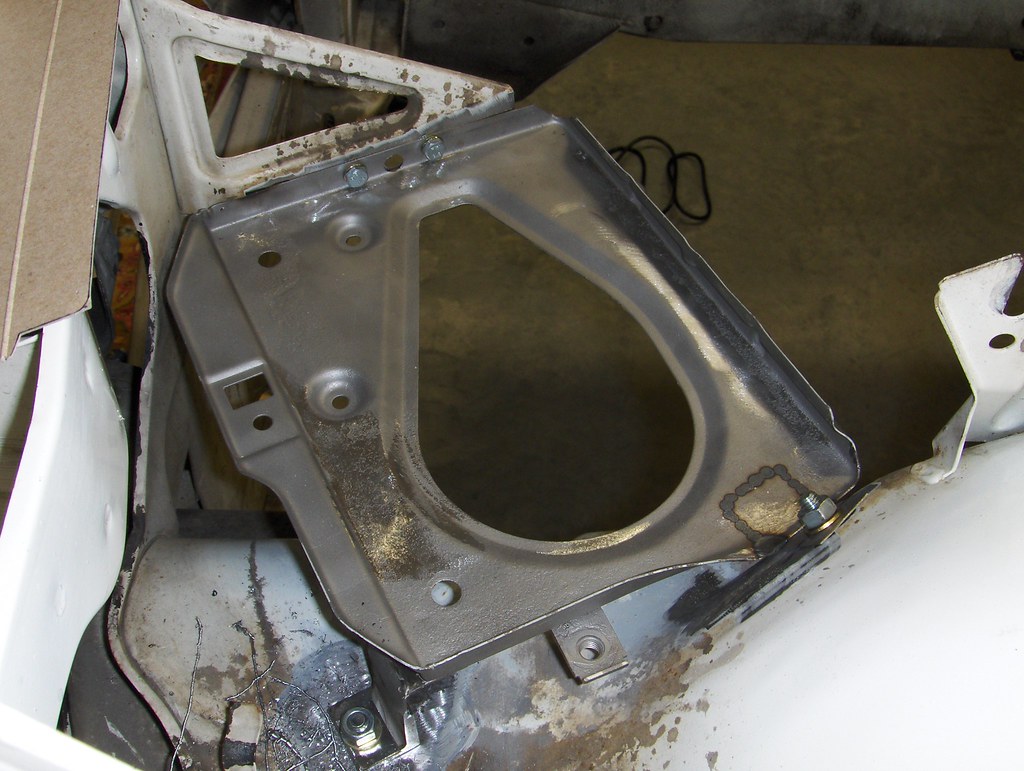
At some point the PO had a major battery issue which made a mess of the paint on the tray and the sheet metal underneath. I don't see a need to move the battery tray for my car but I need to refinish the paint...so I decided to remove the tray and make it a bolt in vs. weld in piece. The pic below was taken when roughing everything in, the hardware is not exactly what I'll end up using and I plan to add one more bolt to the radiator support arm area.
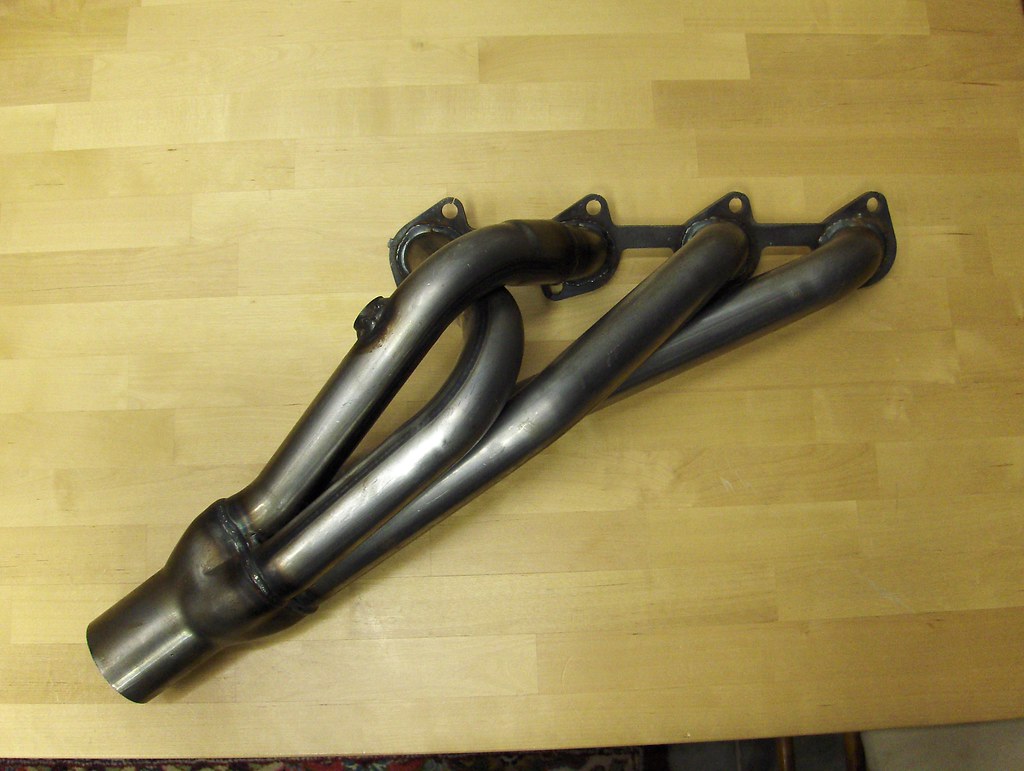
All of my parts arrived from TEP.
Overall I am really pleased with the parts so far. My only gripe is that TEP welded the O2 bung into the #3 cylinder rather than in the collector...why...who knows. Easy enough to fix with a little welding.
My cylinder head shop called and said the head is done and now that I have pistons I can take the block and rods to the machine shop. Will keep posting pics if anyone is interested
MJ
Member
Nice progress so far. Subscribed because I want to do something similar one day.
RE that TEP header. When I picked mine up end of last year the guy in the office (whose name escapes me now) told me that it didn't really matter if the O2 bung was at the collector or on an individual cylinder because the reading you get from an individual cylinder should be the same for all the others. Something like that. The reason I didn't have TEP weld the bung for me was because it was the week between Christmas and New Years and their welder was out.
When I had an exhaust shop install mine they put it on the collector:
IMG_20161231_120017.jpg
'81 E21 320i / '90 E30 325i / '̶9̶2̶ ̶E̶3̶4̶ ̶5̶2̶5̶i̶t (sold) / '15 Toyota XW30 / '̶̶8̶0̶ ̶E̶2̶1̶ ̶3̶2̶0̶i̶A̶ (sold)
Member
Usually I'd always want the sensor at a collection point or X merge of all banks. Especially for accurate reading if using a wideband. For a stock sensor probably doesn't matter. The only reason to put one closer would be keeping the right amount of heat in the sensor. Some like to be closer than others but too close depending on motor output will cause errors. Stock motor, stock sensor could probably be put anywhere in the exhaust for convenience of top change. On a later fuel injected motor for instance it would be at a merge or Y collector so it see's all cylinders.
So it's in a cylinder port one cause on the older M10 the sensor doesn't matter really, number two it's just lazy and less complicated for install
88 M3
91 318is
91 318i
83 320is
08 X3 3.0si
"If it flys, floats, or f*cks, rent it!"
Member
You jogged my memory. That was the other thing I was told verbatim.Originally Posted by autox320

'81 E21 320i / '90 E30 325i / '̶9̶2̶ ̶E̶3̶4̶ ̶5̶2̶5̶i̶t (sold) / '15 Toyota XW30 / '̶̶8̶0̶ ̶E̶2̶1̶ ̶3̶2̶0̶i̶A̶ (sold)
Member
amarino - thanks for posting up a picture of the shorty installed on your car. I was wondering how the sensor would fit if installed in the collector - and it looks like there is plenty of room.
A single wire sensor does need adequate heat to work properly but I think it will be fine in the collector of a shorty. A long tube would be a different story - I had an '87 GMC Sierra with long tube headers and the 1 wire sensor was installed right at the right bank collector (basically out in the air stream under the truck) and in the cold winter months I would get a code for malfunctioning O2. I simply replaced it with a 3 wire sensor to gain the heating element and it worked perfectly. You could do this easily in the E21 as well - all it takes is a relay and some power to get the heater circuit working.
MJ
Member
Long overdue update...
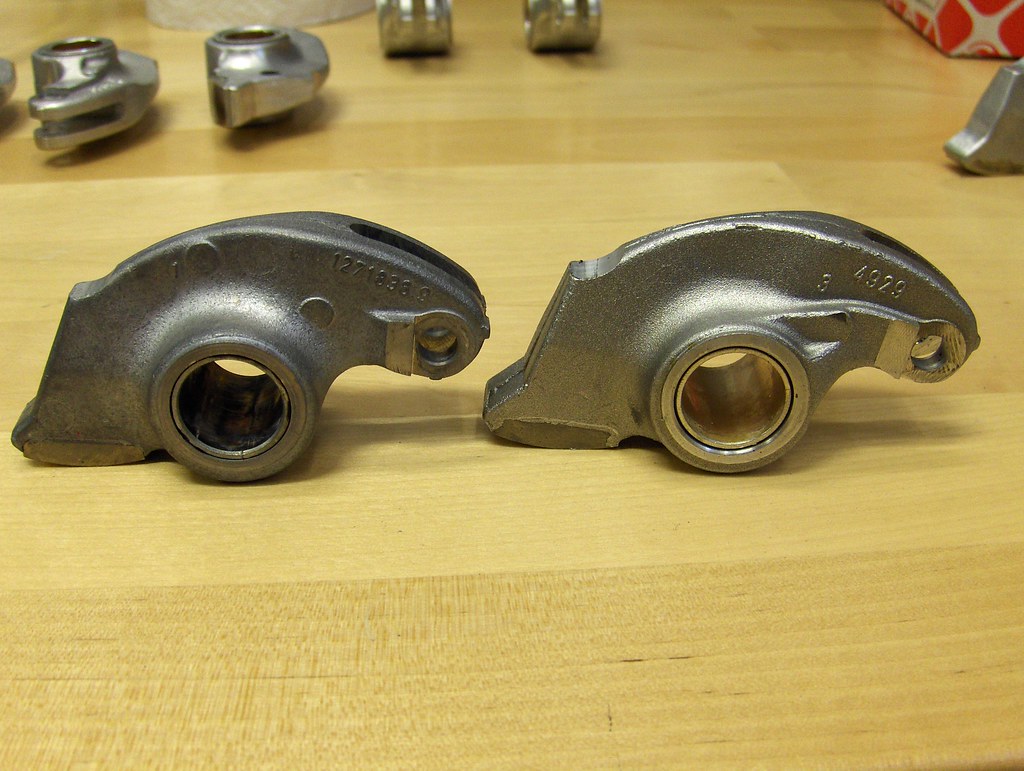
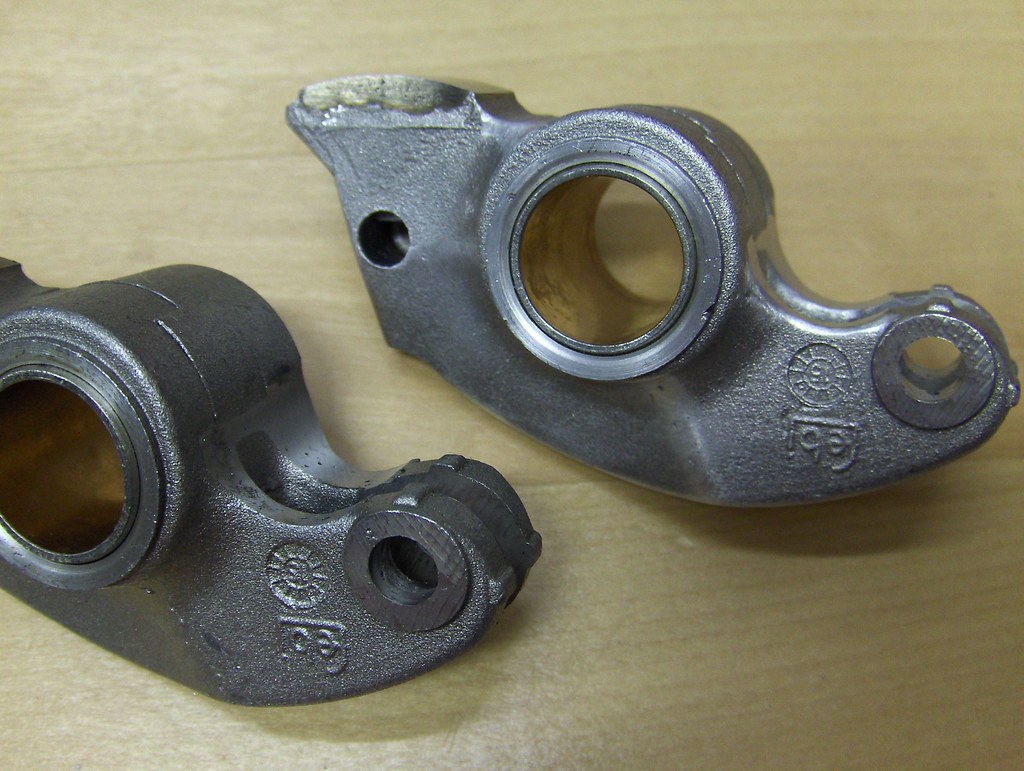
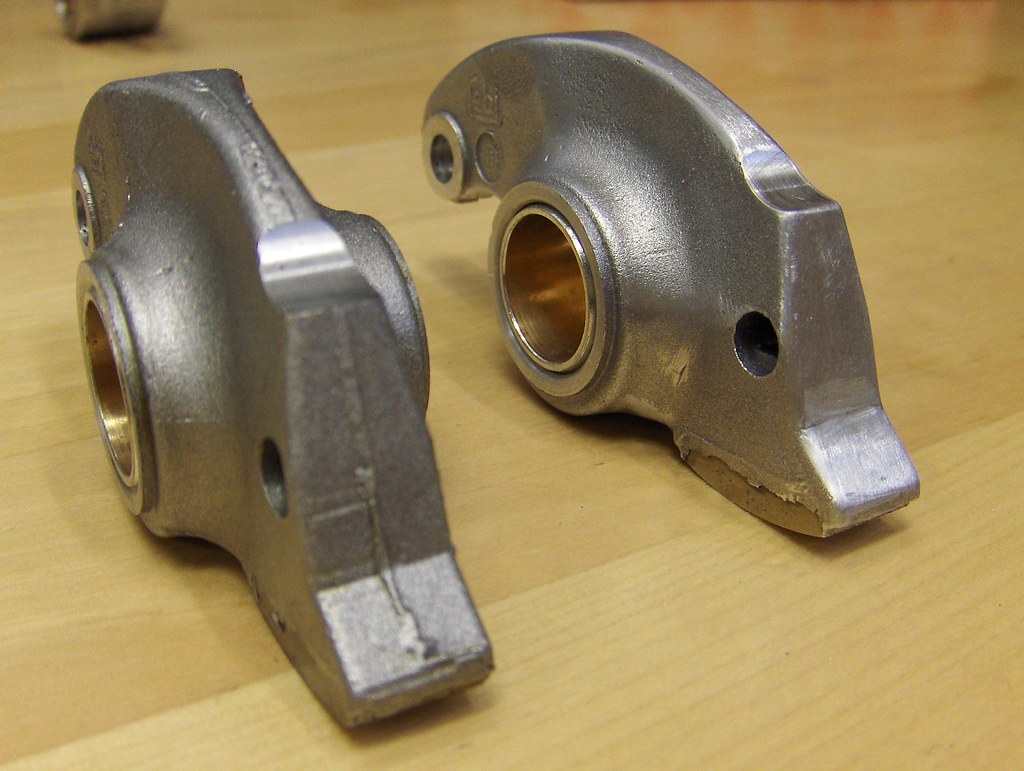
Original rocker arm on the left and new Febi on the right. Note the Febi is the later style design with the extra material on the eccentric end.
The Febi rockers all had a fair amount of casting flash so I did a little smoothing in hopes to eliminate stress risers. The critical area is the eccentric end - don't remove too much material, just ease the edges.
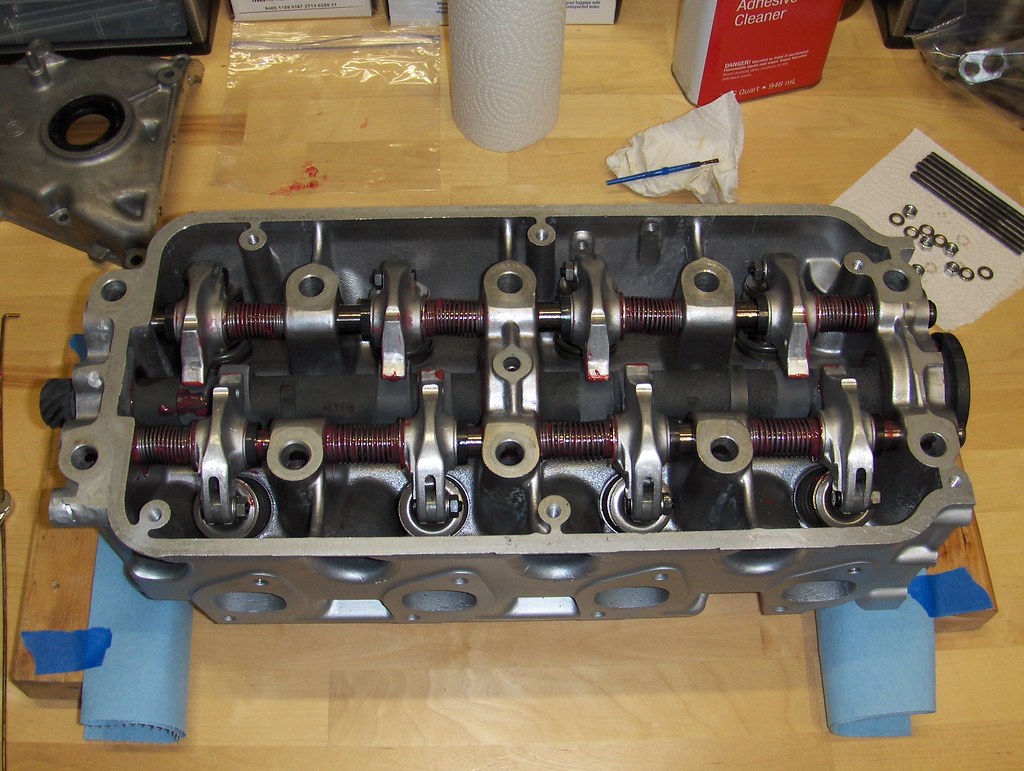
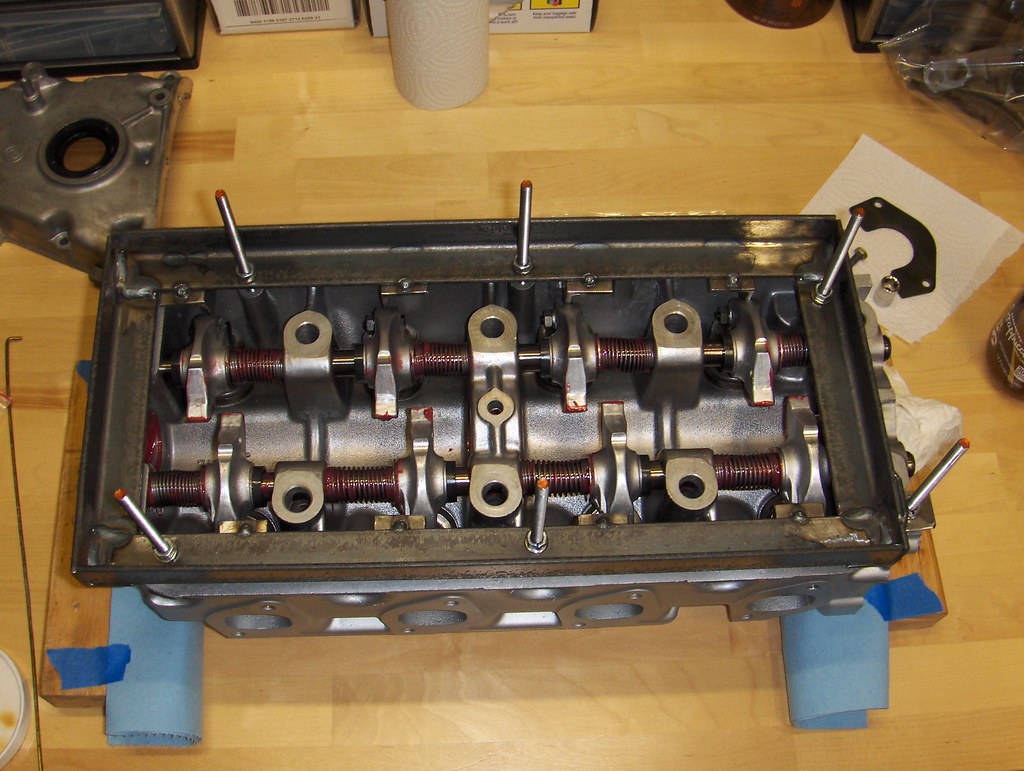
Rockers/hardware/shafts installed and preparing to install camshaft.
Camshaft installed.
Member
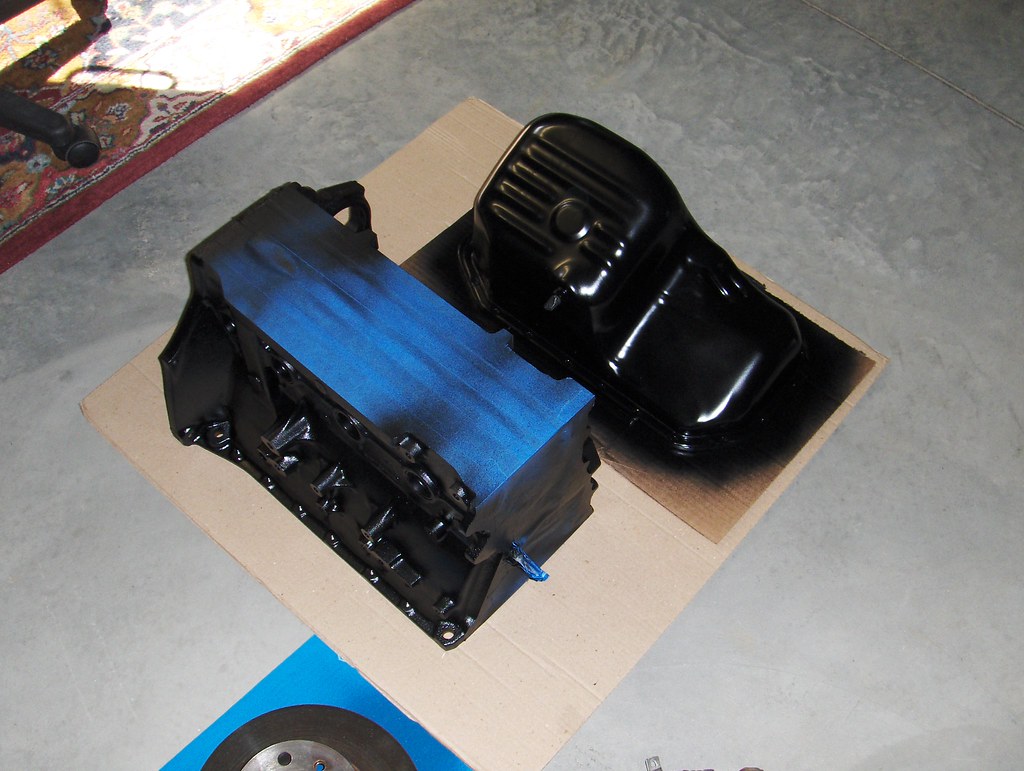
Next on to short block assembly.
Painted block and oil pan.
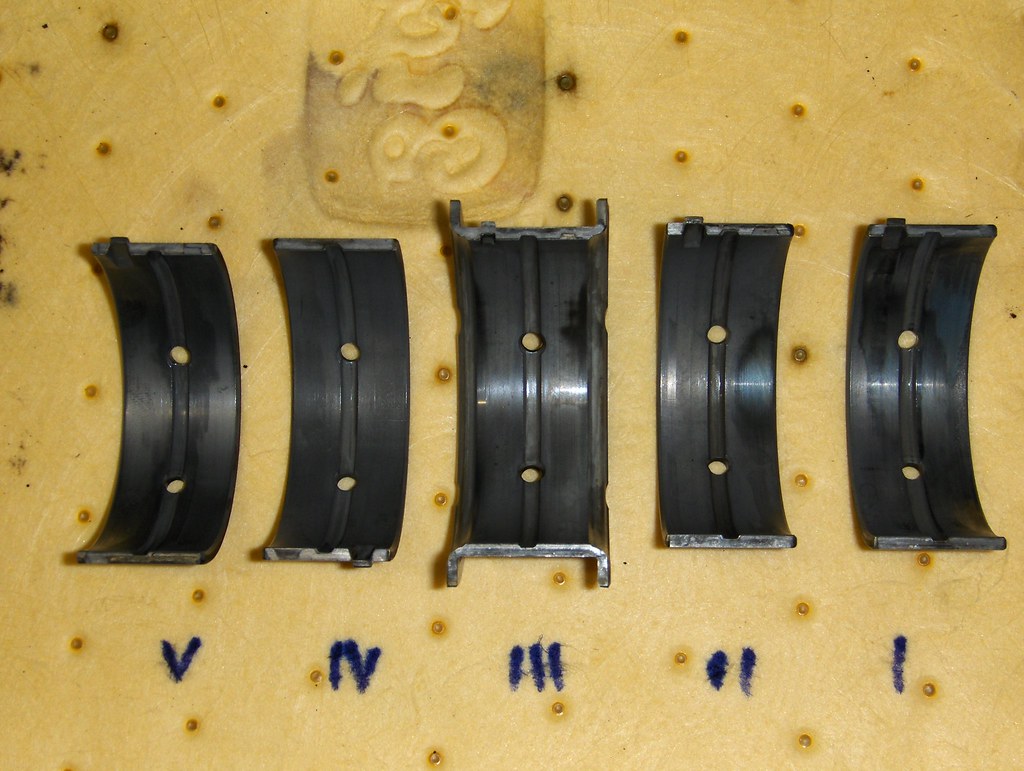
2.0 crank installed with new standard sized Kolbenschmidt bearings. Plastigage crush width was right around .002" save for one in between the .002-.003" on the scale (factory spec .0012" and .0027").
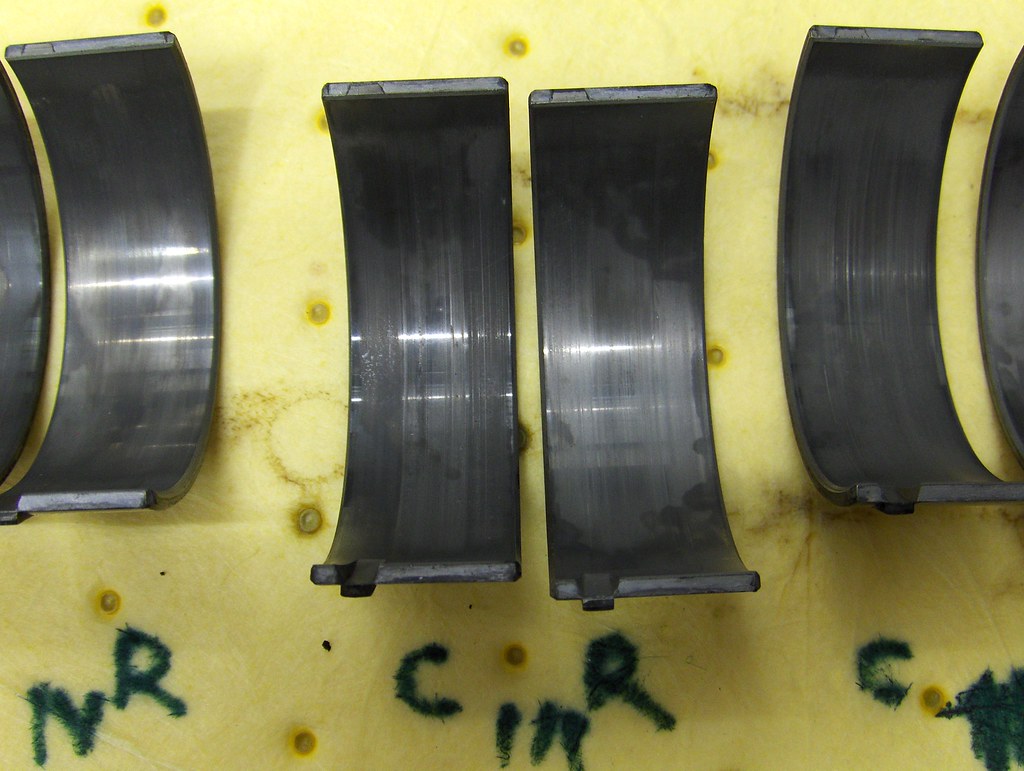
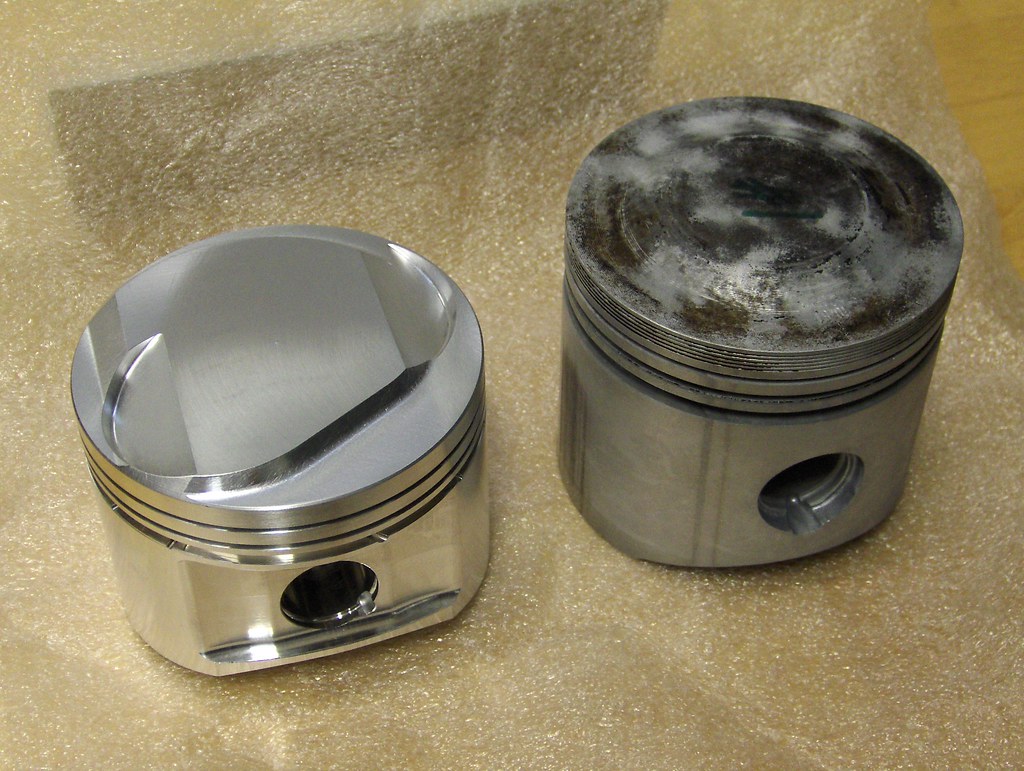
Machine shop installed ARP rod bolts, measured/machined big end of rods and honed small ends. They preferred to install pistons and wrist pins themselves as well as size and fit the ring-pack.
Installing standard sized Kolbenschmidt rod bearings and double checking assembly:
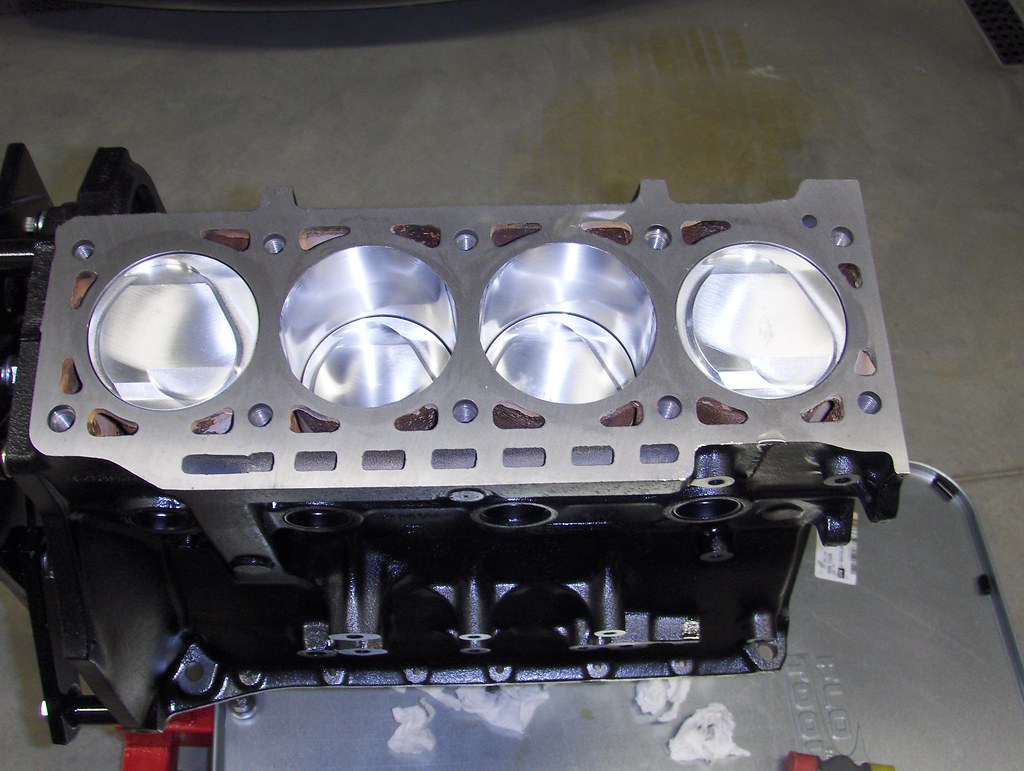
Block was bored to 3.543" per JE specs and honed. Machine shop stated that the head deck was very flat as-found and only did a light cut to create a clean gasket surface.
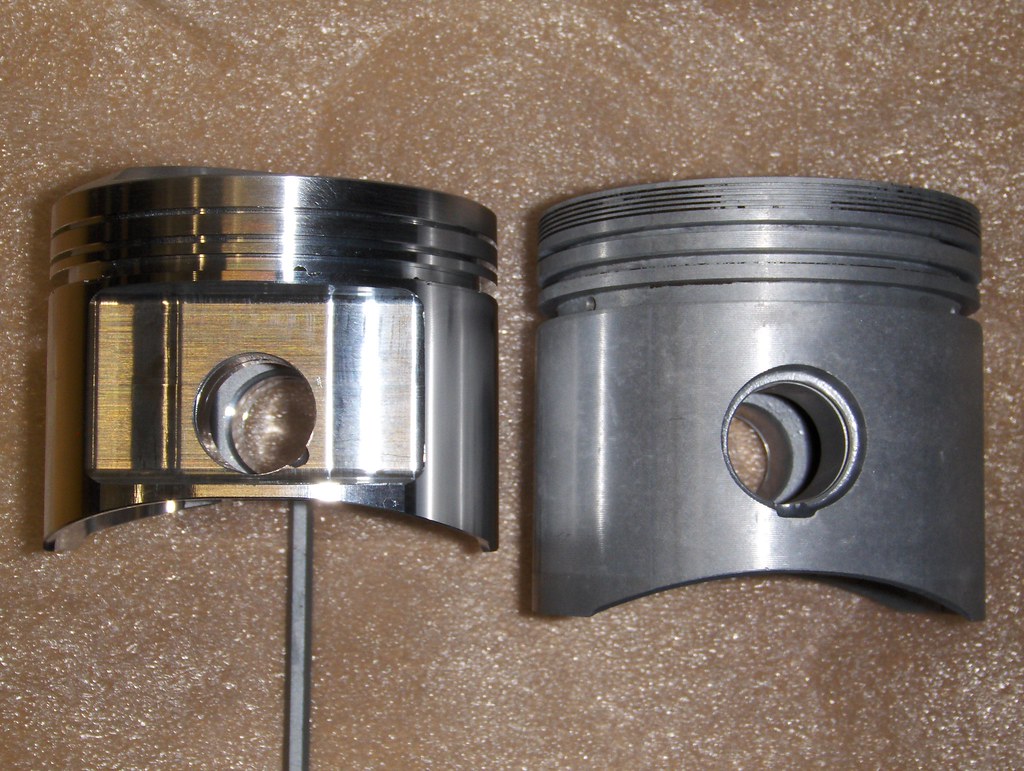
Pistons installed:
Bottom end done:
[/url]
Last edited by mjweimer; 06-17-2017 at 11:16 AM. Reason: Spelling
Member
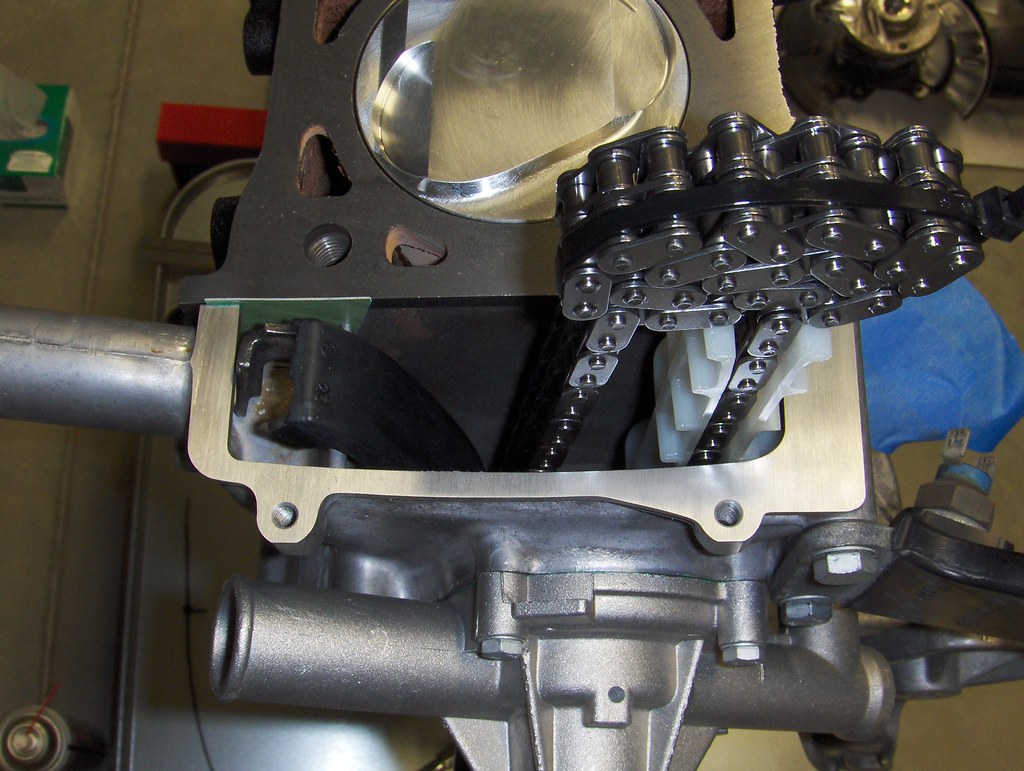
Once the bottom end was done it was time to install the head and timing components.
Decided to convert to dual row timing chain arrangement since I had a spare cam gear and the 2.0 crank already had the correct sprocket.
Head, timing covers, water pump and associated pieces in place, I also installed the oil pan and distributor housing at this point.
[/url]
Member
Now on to all the bits and pieces...
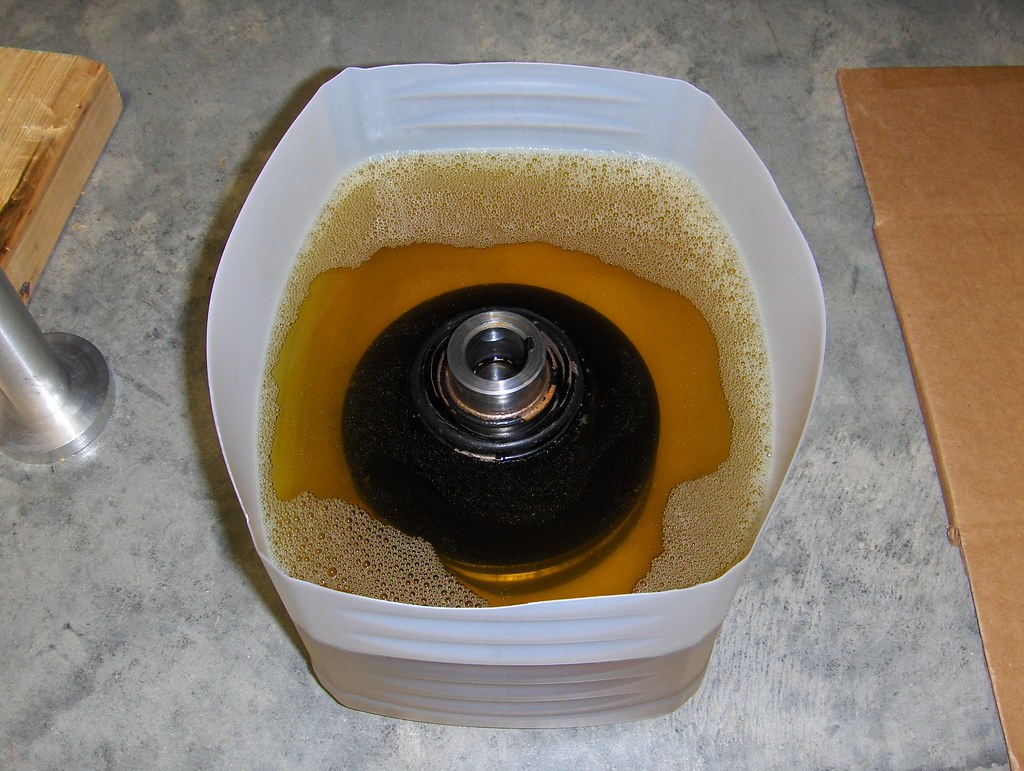
Crank pulley was really rusty on the inner surfaces thanks to the build up of funk over the years. I did not want to blast the pulley in fear of damaging the radial sealing surface and decided to try Evapo-Rust.
I let the pulley sit in the solution overnight and was pleasantly surprised how it simply melted off all of the rust. Sorry there is not a pic but the surface was ready for paint once it was rinsed and dried.
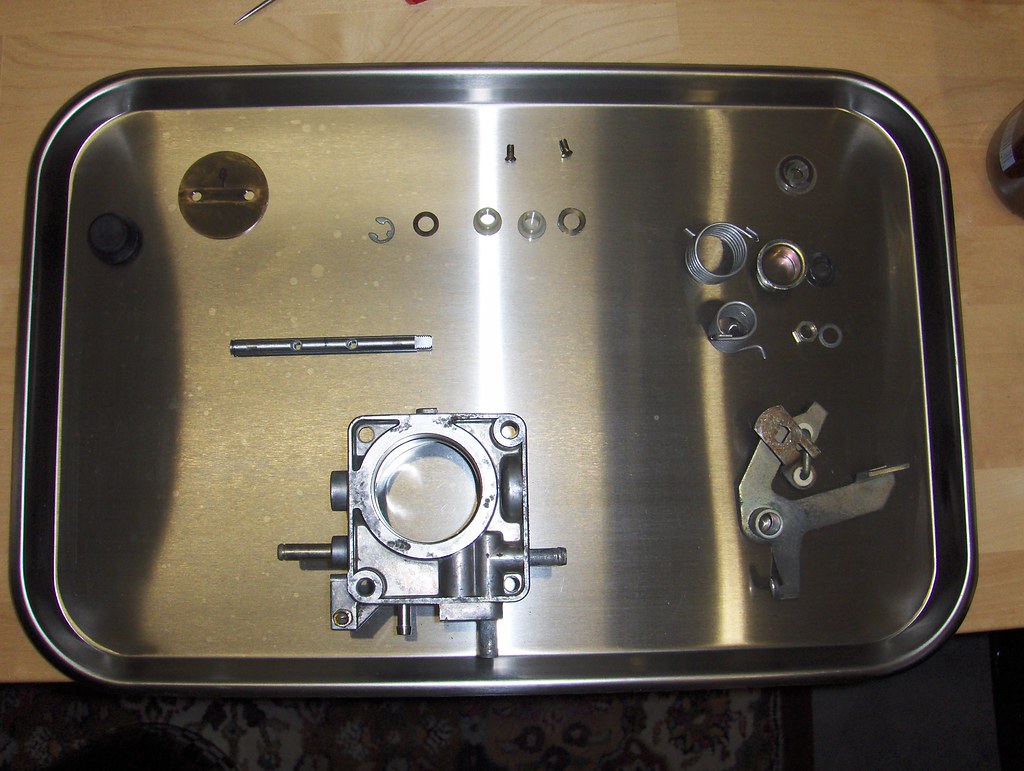
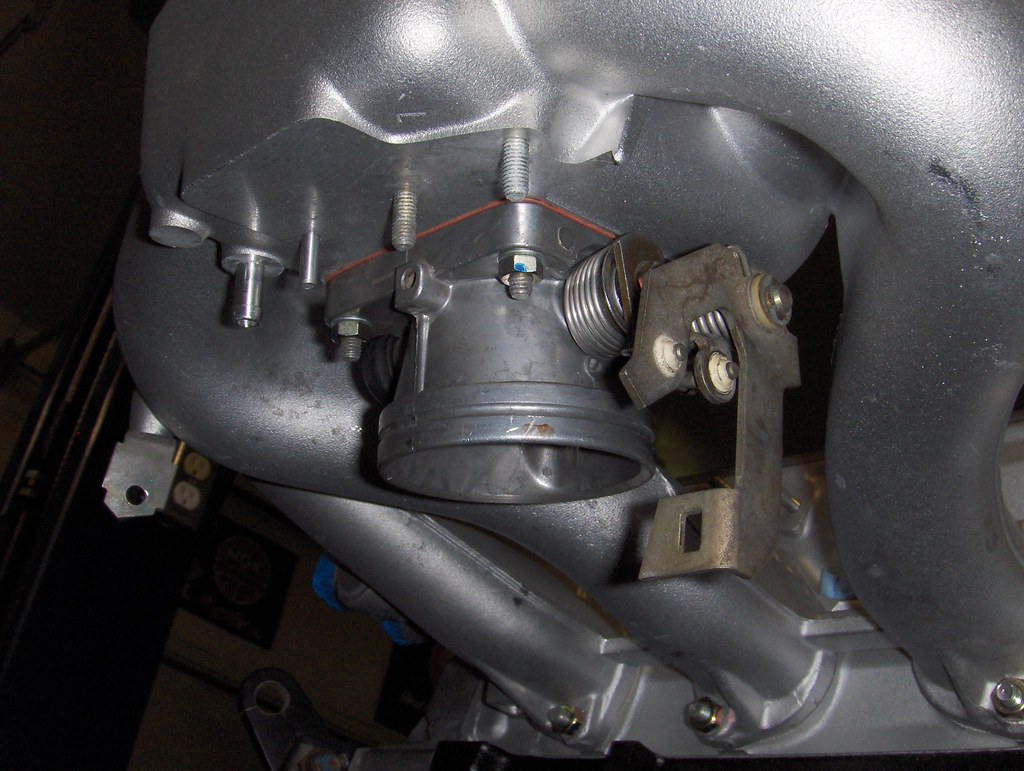
Next was cleaning up the throttle body. I sprayed it clean with brake cleaner, which removed the oil/grease, however afterwards there was a gritty feeling when opening/closing. At that point I decided to disassemble and do a full on clean-up.
Many small parts here and there are thin shims that are installed on each side of the throttle plate shaft that need to go back in the right location. Try to keep everything in order!
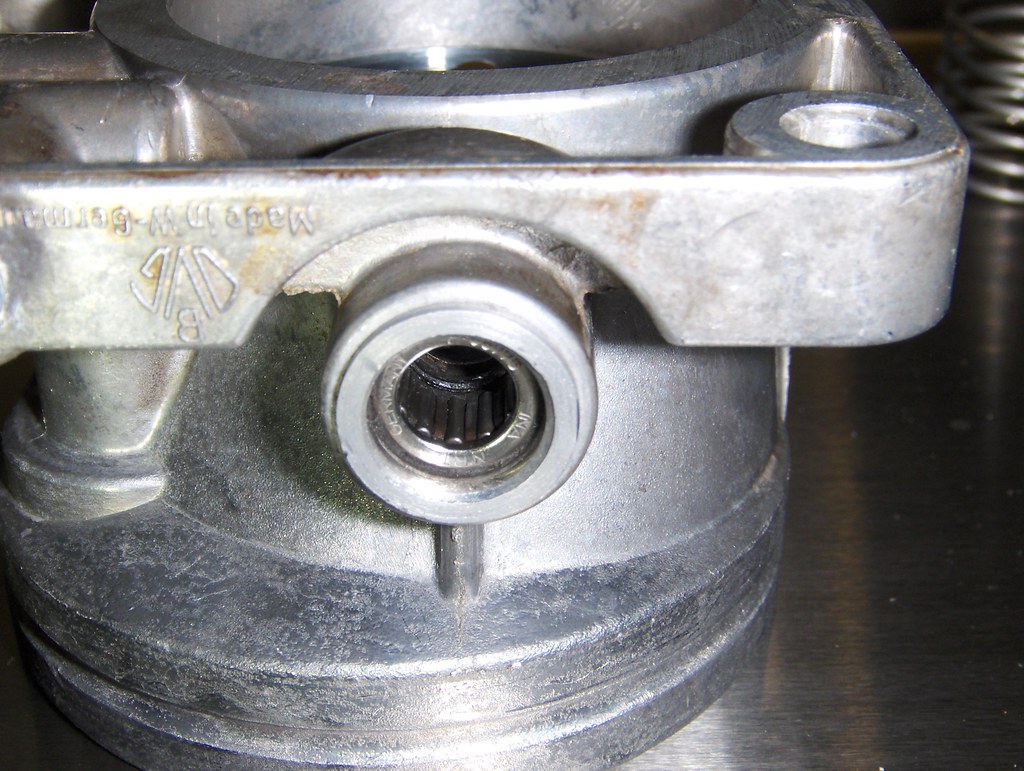
Was somewhat surprised to find that the throttle shaft rides on two bearings pressed into the throttle housing and not on bushings. I believe that my initial cleaning drove dirt into these bearings so keep that in mind if you plan to do this in the future.
I cleaned all of the old grease out of the bearings, repacked with a marine grade grease and put it all back together. I also used some silicone lubricant (Dow 111) on the plastic bushings for the throttle lever.
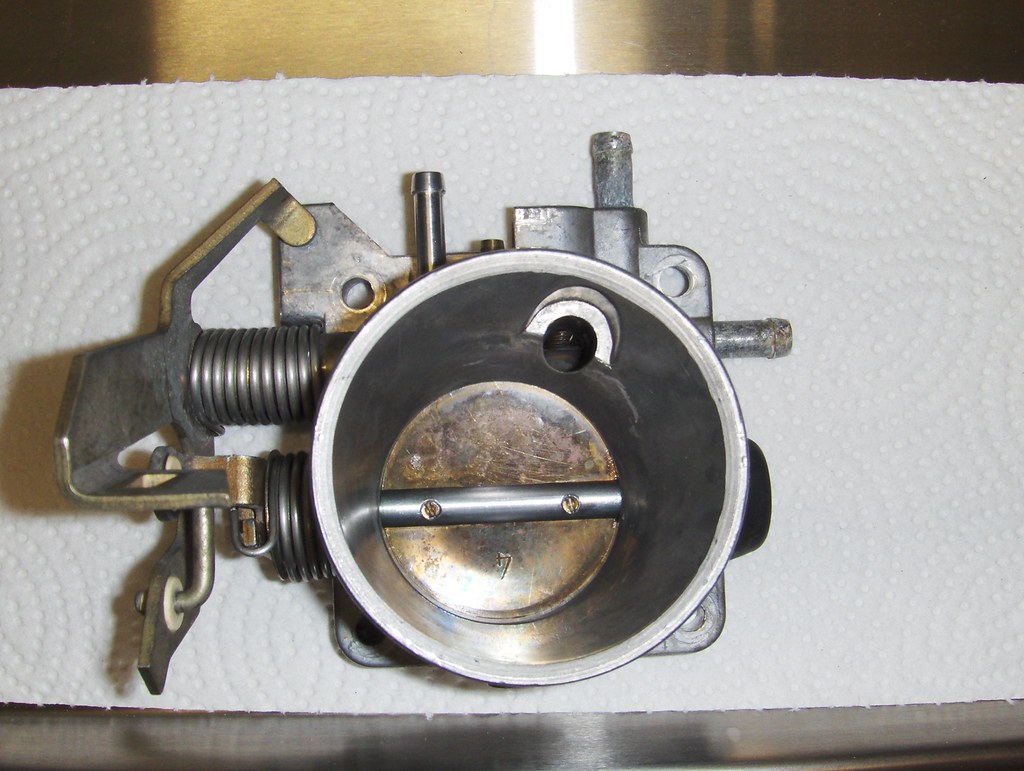
Installed with new gasket:
One more item to mention if you decide to disassemble the throttle body; use an awl or similar sharp object to mark the location of the throttle butterfly on the shaft before pulling it all apart. This will pay off huge during reassembly and allow you to keep the proper clearance around the perimeter (and prevent dragging). I also used a small amount of blue loctite on the small brass screws that hold the butterfly in position. They are slightly swaged from the factory and removing them straightens out the threads - I did not want to use a punch on the threads here in fear of collateral damage...
Member
Other misc.
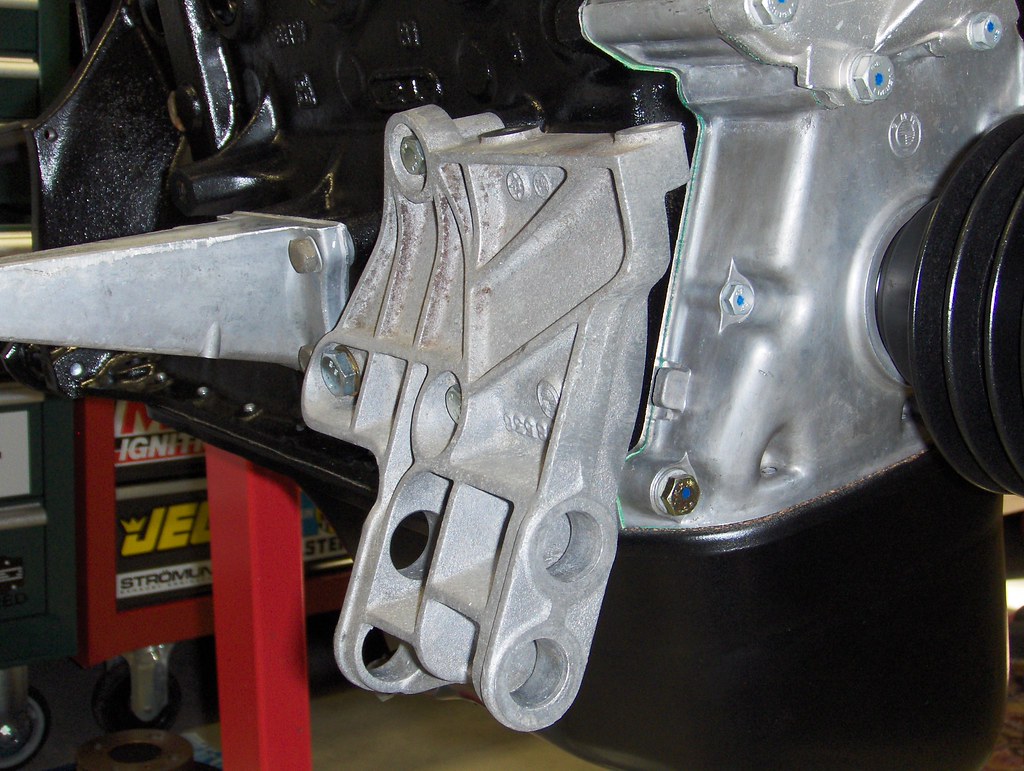
E30 318i AC compressor bracket installed. Simple bolt on affair to existing holes on the later blocks. This allows the use of a Bosch rotary compressor from the same E30.
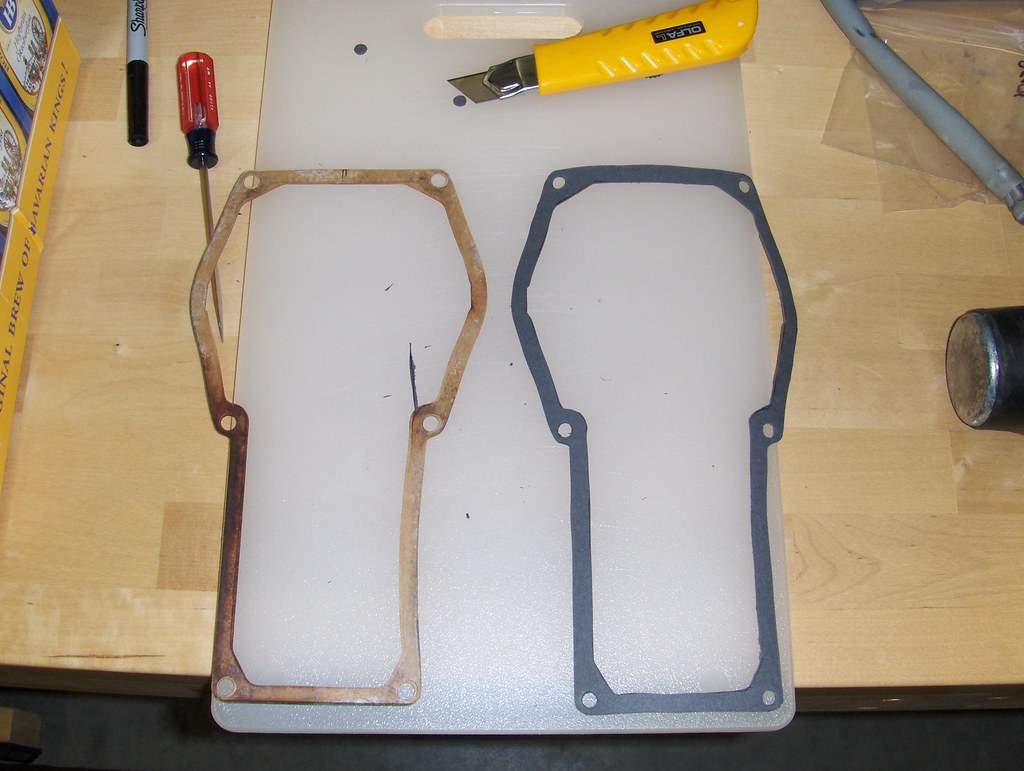
The airflow meter was coated internally in a thick crust of oil. There are several good threads on how to take it all apart but I could not find a pre-cut gasket. Ended up using the old as a template and making a new one out of readily available Fel-Pro gasket material. I purchased a leather punch kit on Amazon many years ago that makes trivial work out of punching the correct sized holes.
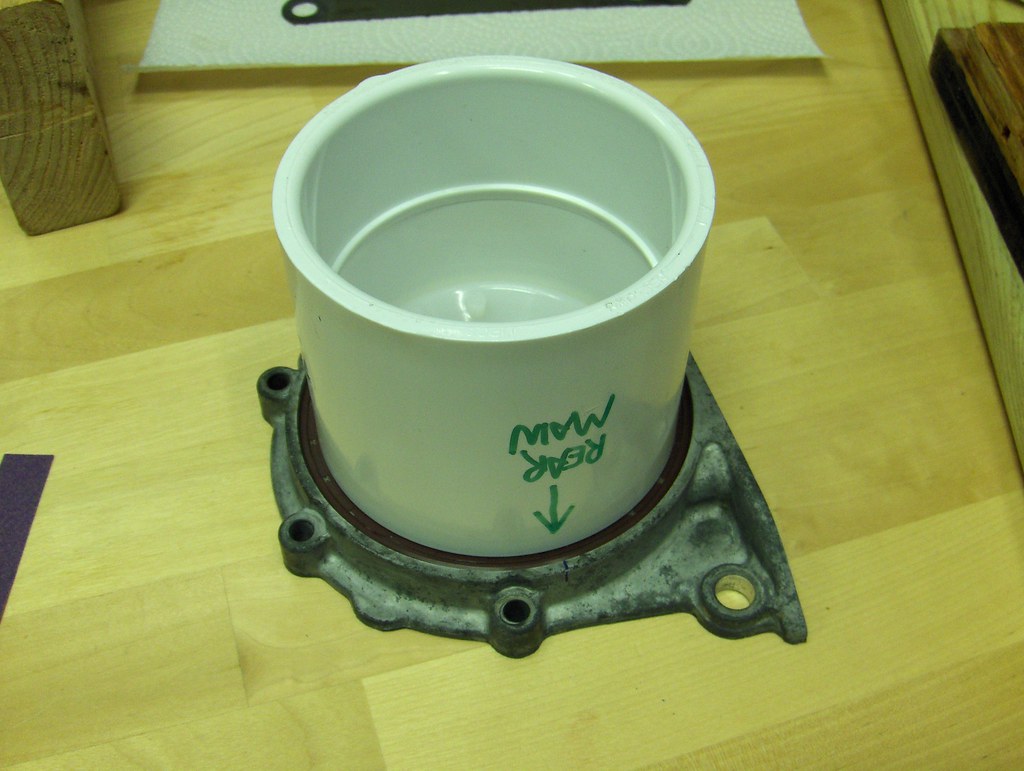
A 3" PVC pipe coupling works well to install a new rear main radial seal into the housing. I smoothed the flashing and lettering off of one end of the coupling to avoid damaging the seal.
Member
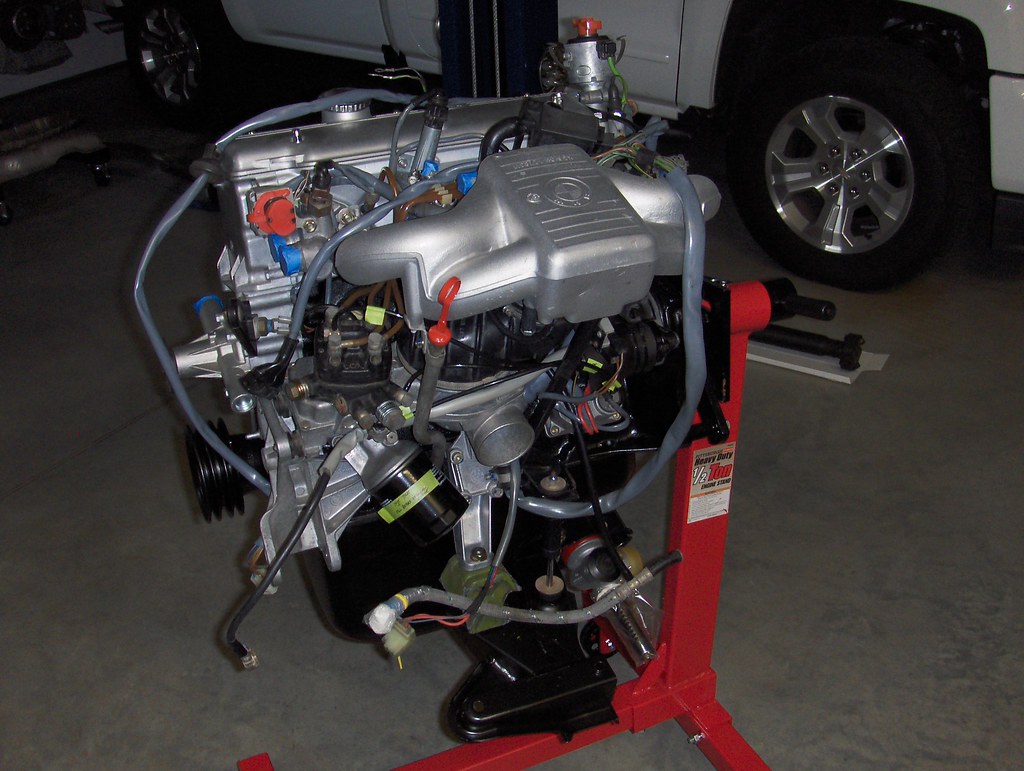
Spent some time cleaning up the wiring harness and all the other bolt-on bits like the idle air valve, distributor, starter, etc. Installed all of that and here is how the engine sits today:
I pulled the engine from the bottom of the car (still attached to the subframe) and it will be going in the same way. I had removed the steering rack prior to engine removal but decided it would be easier to assemble it to the subframe for install. Probably a good move because those Eurometric rack bushings would be a bear to install otherwise (nice product BTW).
As of today the engine is still on the stand awaiting install. I have decided to re-paint the engine bay due to the prior paint damage from the leaky battery and all the oil from the weeping engine.
This cleaning and prep work is proving to be quite time consuming but hopefully worth it in the end. Will update thread with pics as time allows.
MJ
Member
This is some NSFW material. Very nice job.
'81 E21 320i / '90 E30 325i / '̶9̶2̶ ̶E̶3̶4̶ ̶5̶2̶5̶i̶t (sold) / '15 Toyota XW30 / '̶̶8̶0̶ ̶E̶2̶1̶ ̶3̶2̶0̶i̶A̶ (sold)
Member
all shiny and new.....nice. but personally i would have tracked down an earlier style intake manifold.
Tom D
77 e21 - m42
88 e30m3
04 330 dinan3
84 r1000rt
02 r1150rs
all of them gray
14 f800gsa - red headed stepchild!
Member
Nice work,,this is the cleanest it will ever be, enjoy your new build,, once installed and running share the differences in power , heat and so forth.
Randy
Member
Really nice work all around!
Should have some nice pep to the car with the 2.0L.
Yeah i ran into the same problem on the air flow meter gasket.
Only way i found to get one is by buying the whole victor reinz gasket kit.
I just need to find me a E30 318i AC compressor bracket like yours and start on the AC in my car.
Are your upgrading the condenser as well?
Last edited by osburn383; 06-18-2017 at 07:20 PM.
Member
Thanks for the overview of your build. I want to do the same thing to my 1982 1.8L. I've come to enjoy the K-jet after I got it working properly...but I want a bit more power.
I know...that's what we all say.
Looking forward to hearing what you think of the new power gains.
- - - Updated - - -
Tom D., why use an earlier style intake manifold because it was used on a 2.0L and will have better flow? If I use an earlier intake, will I need all the earlier bit also?
Member
mostly because in my eye the ram horns look more appealing then the later 'tuned' intakes. but also because the earlier intakes were tuned for the 2.0 liter engines and the latter was introduced with the 1.8L
Tom D
77 e21 - m42
88 e30m3
04 330 dinan3
84 r1000rt
02 r1150rs
all of them gray
14 f800gsa - red headed stepchild!
Member
Maybe I missed it or not did you use a MLS head gasket ?
Randy
Member
Thanks for all the kind words on the build so far.
I am not planning on updating the condenser when using the E30 compressor. I had the original condenser pressure tested and it checked out fine and will be keeping it all R12 in hopes of eeking out the most of what is a fairly marginal system to begin with. I know others have had luck with R134 but I have some R12 available so real reason to change.
The head gasket is a stock Eliring part. Since I only bored to just under 90mm and am not planning on running boost there was no reason to go with an MLS.
I agree that K-jet is not too bad once you understand how it all works. Can't say I'm an expert by any means (especially compared to some in this group) but I can sort most common issues. To that end, I installed a NOS WUR as part of the rebuild and plan to install new injectors. The car had some cold start issues that pointed towards the WUR but I took it all apart before I did full-on troubleshooting.
Really hope to have the car running sooner than later but there is a lot of work to do prior to the engine going into the chassis. I also plan on sending the header out for coating once it is test fit in the engine bay and the proper flange welding in place. Will make sure to let everyone know how it feels in terms of seat of the pants gains.
MJ
Member
If looking for a functional coating check out Swaintech. Not pretty but an actual ceramic coat that works.
88 M3
91 318is
91 318i
83 320is
08 X3 3.0si
"If it flys, floats, or f*cks, rent it!"
Member
Thanks for the tip, will check them out.
Member
So behind in updating this thread and much to cover - so here goes:
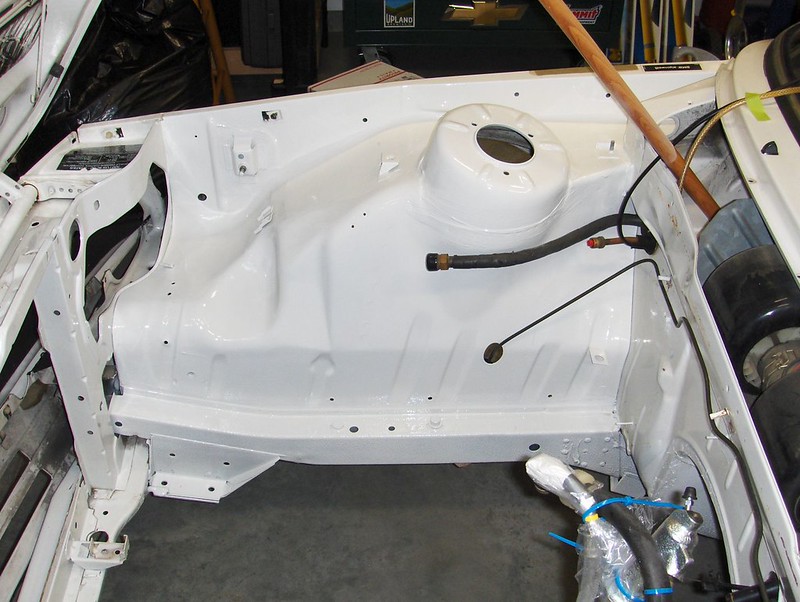
Decided to paint the engine bay since there was no better time but it did delay things a bit.
Before - note the remaining mess from a leaky battery:
I actually rattle-canned the paint in the engine bay and achieved excellent results. I did cheat a bit and tried out the SprayMax line of spray paints. Had their 1K (single stage) mixed to match the Alpine white and prepped like crazy. I could not have been happier with the result. The 1K paints have a cylinder of hardener within which you activate just before spraying...you are essentially spraying paint mixed as you would with a proper gun. The spray tip also has a wide fan to mimic a touch-up gun and lays the paint out nicely. It takes about 3 cans to get it done but I bet it could be done with 2 if you had some experience.
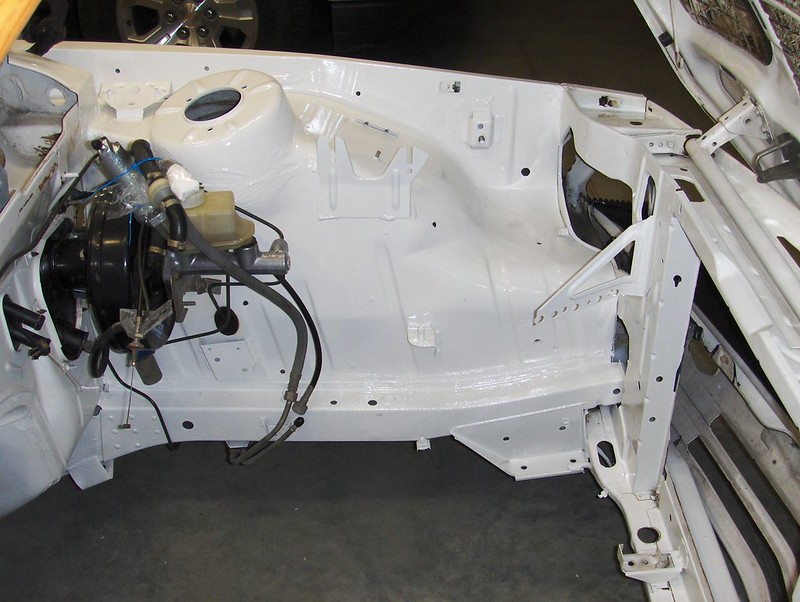
Here it is afterwards:
The heavy rubber on the firewall was falling apart so I decided to try DEI floor and tunnel shield II in its place:
It has a self adhesive backing which I am a little leery of, hopefully this holds up as well as it looks. The hard part of this was making the patterns and transferring that to the sheet. It cuts best with sheet metal snips.
Last edited by mjweimer; 09-18-2017 at 03:25 PM. Reason: clarity
Member
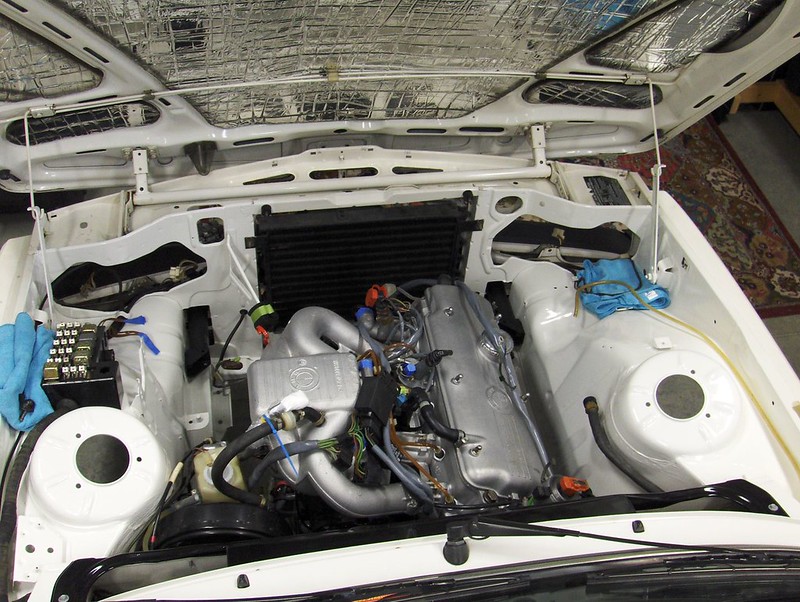
Engine finally in...from the bottom with subframe attached to the engine mounts.
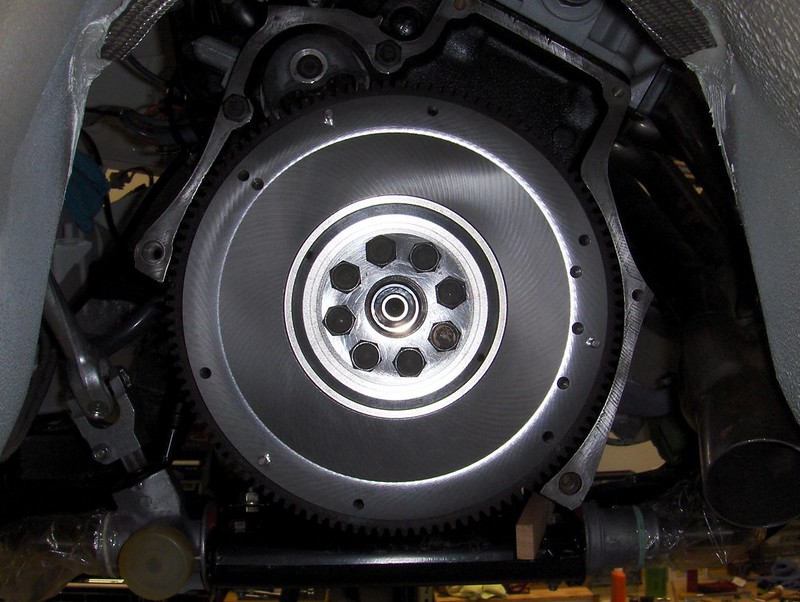
Local machine shop did a beautiful job on the flywheel. It was severely grooved so it is now at the minimum machined thickness,
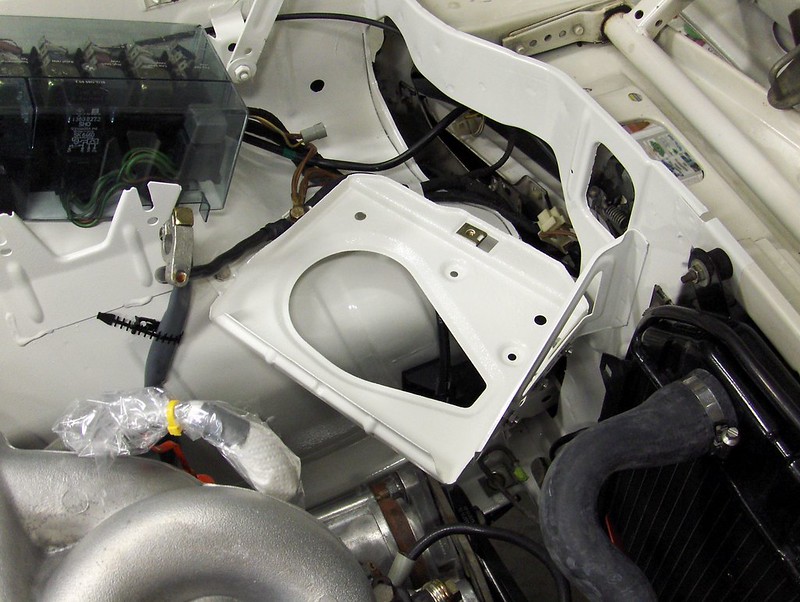
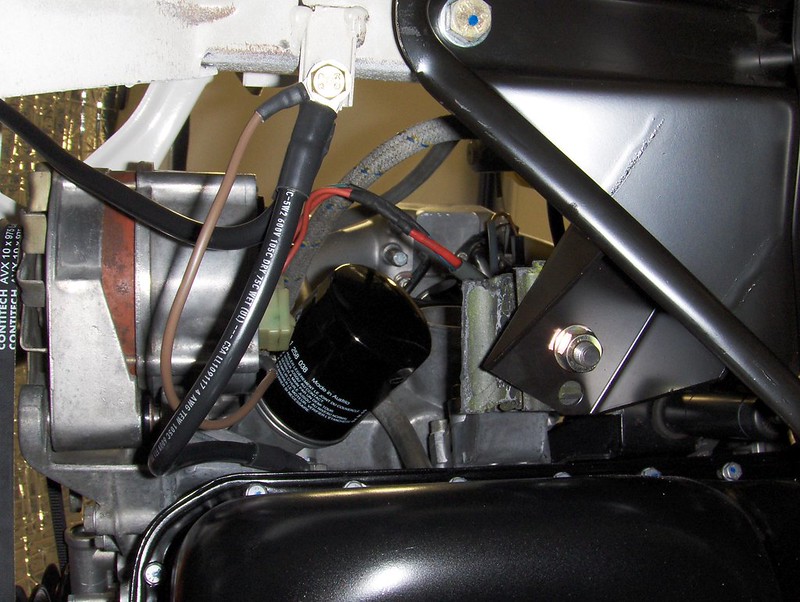
Bolt in battery tray in place.
Since the battery tray is now bolted rather than welded (all holes in the bodywork painted) I had to run a ground cable from the main ground on the frame-rail up to the battery tray grounding point. I also took the time to lengthen the engine ground cable and route in a way that allowed for clear access to the oil filter. I found all of my cables on Amazon from a marine supply house, they came with crimped and tinned ends.
During this time I also had the fuel tanks out at a local radiator shop to get cleaned out. The internals were pretty clean but since they were out to get better access to all of the rubber fuel lines I figured it was the right time. There were only a few spots of surface rust on the top of the tanks which were painted before install.
The bad news is that I found my fuel accumulator was leaking internally and while replacing that I trashed the hard metal line that connects it to the fuel pump...not wanting to tempt fate I replaced everything including the pump. This turned out to be a blessing in disguise because the new pump is silent, while the old one was very loud and possibly on its last legs.

 Posting Permissions


 Reply With Quote
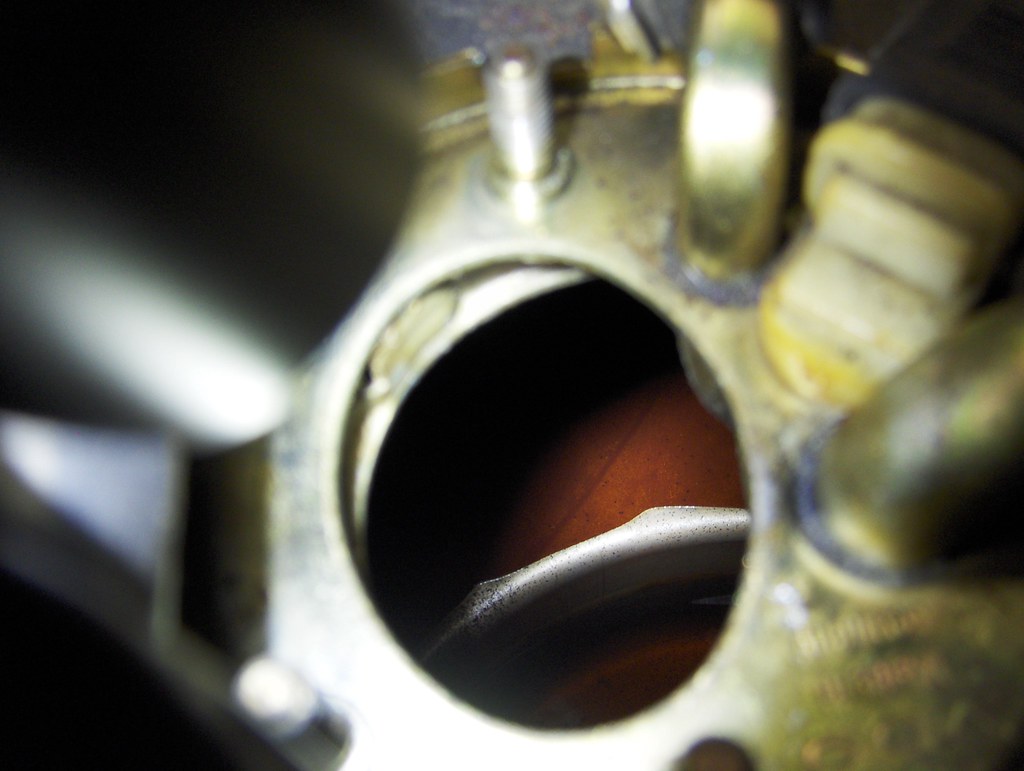


Bookmarks