
 Member
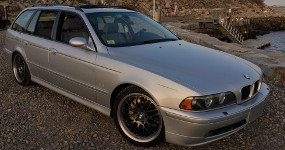
Pick up my third 5 series. A stealthy E39 TSI M tech super clean and straight wagon a few months ago, spent two weeks detailing it slowly and washing out that Calif sand from the surf mom beach runs. I am real anal in the clean department so I pulled the Seats out to get the carpet into standard that is acceptable. Fixed the seat track issues by removing the coins jammed in the gears. Cleaned and then treated the leather 5 times to get all the panels to have the same shine. It really is interesting to see the results that a few hrs of effort will provide an "almost new" look to a E39 interior. Exterior clayed and waxed. Tooth brush to all the seams. Pulled up lots of Calif again. Scrubbed under the hood, new hood pad and all parts cleaned, polished, waxed and Armor All all plastic parts then buffed with a microfiber cloth. Pulled the wheels, cleaned the wells, detailed my 17" "wagon wheels" with IronX. Great stuff!
Finished all the normal maintenance services, Service 1&2, fluid changes, valve cover gasket, oil filter housing, cooling system refreshed with drive belts tensioner and idlers, etc. Now into repairs. Spent this rainy weekend in the garage replacing the front suspension arms, tie rods and sway bar links. Front chin spoiler (really needs a new front bumper skin as the PO Parked on every curb with the front resting on the bumper extenders) Needless to say I have replaced both bumper extenders (pork chops). Just pieces were left under there. New fog lamps cleaned up the front look along with new angel eye bulbs.
In between rest stops, I got the right side clayed, buffed out and waxed. All touch up completed, and tar spots off since the front was in the air. Clayed the door jams and added a coat of wax. Getting to my normal standards one day at a time.
Next up all rear suspension arms and ball joints get replaced. Nothing worn out just at 100k it time to refresh these high wear items. Sub frame bushing still are quiet, so they will stay in for a few more miles.
On the list of needs:
Oil pan gasket - leaks like the Valdez.
530/540 brake upgrade
PDR scheduled after alignment
any suggestions? This one will be a daily driver/ parked in garages
Last edited by StephenVA; 04-12-2018 at 01:05 PM.
Current Garage Highlights
2003 525iT TiSilver
2002 M5 TiSilver
1998 528i KASCHMIRBEIGE METALLIC (301) (Goldie)
Former Garage Highlights
2005 X5 4.8is
2004 325iTs (2x)
1973 Pantera L
1971 Dodge Dart Swinger "Lite Package"
1970 Dodge Challenger T/A 340 Six Pack Alpine White
1970 Dodge Challenger T/A 340 Six Pack GoManGo Green
1969 Road Runner 383
1968 Barracuda Formula S 340 Sea Foam Green
Member
Pics or it didn't happen
Member
I will have a few in the next update. Didn't think another TiSi wagon shot would be of any interest. I used all the tips and tricks from all who posted in the past. Made the job easy peasy. I think the easiest is replacing the outer tie rods. Three whacks with a hammer on the short stem pickle fork and they pop out. As everyone discovers at some point in their DIY life, having the right tools makes every job easier.
Last edited by StephenVA; 01-26-2017 at 09:25 PM.
Current Garage Highlights
2003 525iT TiSilver
2002 M5 TiSilver
1998 528i KASCHMIRBEIGE METALLIC (301) (Goldie)
Former Garage Highlights
2005 X5 4.8is
2004 325iTs (2x)
1973 Pantera L
1971 Dodge Dart Swinger "Lite Package"
1970 Dodge Challenger T/A 340 Six Pack Alpine White
1970 Dodge Challenger T/A 340 Six Pack GoManGo Green
1969 Road Runner 383
1968 Barracuda Formula S 340 Sea Foam Green
Having No Trouble Here
BMW CCA Member
Nice. Agree w my friend JP5
2003 M3CicM6 TiAg
2002 540iT Sport Vortech S/C 6MT LSD TiAg
2008 Audi A3 2.0T DSG (the daily beater)
2014 BMW X1 xDrive28i (wifemobile)
Former:
1985 MB Euro graymarket 300SL
1995.5 Audi S6 Avant (utility/winter billetturbobattlewagen)
Member
Had my Helper/Inspector inspect the progress so far. He gave it two paws up.
Current Garage Highlights
2003 525iT TiSilver
2002 M5 TiSilver
1998 528i KASCHMIRBEIGE METALLIC (301) (Goldie)
Former Garage Highlights
2005 X5 4.8is
2004 325iTs (2x)
1973 Pantera L
1971 Dodge Dart Swinger "Lite Package"
1970 Dodge Challenger T/A 340 Six Pack Alpine White
1970 Dodge Challenger T/A 340 Six Pack GoManGo Green
1969 Road Runner 383
1968 Barracuda Formula S 340 Sea Foam Green
Having No Trouble Here
BMW CCA Member
LOL. Nice.
2003 M3CicM6 TiAg
2002 540iT Sport Vortech S/C 6MT LSD TiAg
2008 Audi A3 2.0T DSG (the daily beater)
2014 BMW X1 xDrive28i (wifemobile)
Former:
1985 MB Euro graymarket 300SL
1995.5 Audi S6 Avant (utility/winter billetturbobattlewagen)
Member
lmao!! Can't question a woofer's judgement
That picture speaks volumes....but is that's the only pic we get ??
maybe helper/inspector can give us tour ???
Member
I will be free this weekend to rebuild the rear suspension and I will take lots of images and share them. Been claying, polishing, detailing a panel at a time. Worked on the roof last night for a few hrs and the results look great. This was a Washington State car before becoming a CA vehicle for a short time so there is lots of clear coat left after a respray to buff and shine so far. Clayed the door jams and cleaned the rubber bits so it look like new once again. My goal is concours clean which will match the rest of the fleet.
Keeping a car super clean is like religion, it must be practiced with frequency and devotion. First steps are the hardest as you must undo the Previous owner's lack of efforts. This one had two "professional detailings" prior to my ownership so I get to undo/redo their sad excuse of workmanship. Looks clean from 5 feet is real different than a 1 foot impression. First world challenges.....
Last edited by StephenVA; 09-22-2017 at 07:03 PM.
Current Garage Highlights
2003 525iT TiSilver
2002 M5 TiSilver
1998 528i KASCHMIRBEIGE METALLIC (301) (Goldie)
Former Garage Highlights
2005 X5 4.8is
2004 325iTs (2x)
1973 Pantera L
1971 Dodge Dart Swinger "Lite Package"
1970 Dodge Challenger T/A 340 Six Pack Alpine White
1970 Dodge Challenger T/A 340 Six Pack GoManGo Green
1969 Road Runner 383
1968 Barracuda Formula S 340 Sea Foam Green
Member
Solid post and effort! Like others said nice to have before & after pics.
In my case the PO (only 1) was not an enthusiast and it was just a transportation car. I have some god tools but really lack time and special tools for some of this type of work so I rely on a friend who has a shop. The rest I try to do myself.
Sent from my iPhone using Tapatalk
Member
I have lots of images to share latter this week. RR is complete and now moving to the left rear. A few lessons learned so far:
* Pull the electrical connector and the red/blue hoses loose at the dist block before taking a part the lower suspension bolts. Makes it easier to pull the long ball joint swing arm bolt out much more easier to realign and reassemble!
* Having a nice warm and dry garage with some tunes makes this task even easier.
Trying not to have too much scope creep:
- Third brake light
- Brake upgrade
- Oil leak at pan
- Coding enhancements
- Detailing underbody panels (Hey I see dirt. ummmm clean, Armor All, reinstall. Now the wheel well liners even look new.)Lots of plastic panels on these E39s
etc etc etc
Last edited by StephenVA; 01-30-2017 at 04:11 PM.
Current Garage Highlights
2003 525iT TiSilver
2002 M5 TiSilver
1998 528i KASCHMIRBEIGE METALLIC (301) (Goldie)
Former Garage Highlights
2005 X5 4.8is
2004 325iTs (2x)
1973 Pantera L
1971 Dodge Dart Swinger "Lite Package"
1970 Dodge Challenger T/A 340 Six Pack Alpine White
1970 Dodge Challenger T/A 340 Six Pack GoManGo Green
1969 Road Runner 383
1968 Barracuda Formula S 340 Sea Foam Green
Old BMW's FTW
One thing I learned is that having the official BMW tool for the lower ball joint is the difference between a smooth, easy job and a nightmarish hellscape of torture. I tried so many other tools and ended up wrecking a new ball joint before I said "screw it" and paid the $110 for the proper tool. It's worth every penny.Originally Posted by StephenVA

1995 525i 5-speed - Thread
Member
Could not agree more. I picked up the CTA 8692 ball joint tool that works like and looks like the BMW tool. Made the ball joint process easy in and out. Great investment as I have one more E39 to do next.
Source: Tooltopia.com
Current Garage Highlights
2003 525iT TiSilver
2002 M5 TiSilver
1998 528i KASCHMIRBEIGE METALLIC (301) (Goldie)
Former Garage Highlights
2005 X5 4.8is
2004 325iTs (2x)
1973 Pantera L
1971 Dodge Dart Swinger "Lite Package"
1970 Dodge Challenger T/A 340 Six Pack Alpine White
1970 Dodge Challenger T/A 340 Six Pack GoManGo Green
1969 Road Runner 383
1968 Barracuda Formula S 340 Sea Foam Green
Old BMW's FTW
I got the one from Koch Tools, because they're based here in Mesa, AZ so their tools ship to my house within a day. I've ordered a bunch of their tools before, they all work great. Just like the BMW tools but cheaper.
1995 525i 5-speed - Thread
Member
All the suspension rebuilding is now completed. Wrapped up over the weekend with a fellow BMW owner coming in at the last minute to help torque down all the parts, as my arms are not long enough to hold a wrench and turn the torque wrench on the upper rear thrust arms frame bolts with a vehicle sitting on jack stands.
Background:
Vehicle: 2003 525iT all the Sport package - Suspension, interior, etc (except the M Aero for some reason), Mileage: 90K No noise clunk or chatter. Front suspension felt loose under irregular road surface braking and twitching under med to hard braking. Clunk only front RF on speed bumps on initial suspension compression. Worn suspension parts warning of steering shake at 40-45 mph, nothing under normal light braking, only under hard stops, especially on the second pounding.
Jacked up the front and removed all suspension parts with the exception of the struts as they appear to be serviceable (no leaks, etc).
Tools: Lots, nothing special that has not been found out before. Buy the Ball Joint tool for the trust arms Ball Joint Separator http://www.kochtools.com/index.php?p=product&id=183 and the rear ball joint tool CTA8692.
What I found front suspension: Front Torsion/trust arms large bushing cracked and fluid long gone. Ball joint dry and boots cracked. Sway bar links dry and cracking. Lots of movement after removal.
Easy R&R following this article from the forum: 1998 BMW 528i Complete FRONT Suspension Overhaul and Rear Suspension Great resource along with the Bently and BMW Shop guides. The later I used only to confirm torque specs with article.
Using the ball joint tool to pop off each ball joint was easy. Just crank and “POW” they pop loose with the sound of a .22 caliber pistol in your ear. First one I did I thought the tool cracked! Used a short pickle fork to pop off the outer tie rod end ball joint. Three hits with a BAH and they fall free. Easy.
Just follow the article and presto change O a few hour later you are ready to lower the car down to preload the suspension and torque everything up. I cheated by using 3” of wood to rest the front tires on as I needed the room to shove my ass under the bumper to get to the thrust arm large ends. (Note to self: Next time leave off the brake and alt air ducts until everything is torqued down FIRST)
Being total anal, I removed, cleaned (Dawn Dish detergent) and applied Armor All to anything that was plastic. Wheel well liners, ducts, covers, etc. You now can eat off those parts…..
Parts Source FCPEuro https://www.fcpeuro.com/
BMW 8-Piece Control Arm Kit (E39 525i 528i 530i) - 525E398PIECEL
Qty Part SKU Price 1 Suspension Control Arm and Ball Joint Assembly LEM-1308602 $98.99 1 Suspension Control Arm and Ball Joint Assembly LEM-1308702 $101.00 1 Suspension Control Arm and Ball Joint Assembly LEM-1308401 $100.99 1 Suspension Control Arm and Ball Joint Assembly LEM-1308501 $100.99 1 Suspension Stabilizer Bar Link LEM-1328302 $28.99 1 Suspension Stabilizer Bar Link LEM-1328402 $28.99 1 Steering Tie Rod Assembly LEM-1313701 $54.30 1 Steering Tie Rod Assembly LEM-1313801 $51.99
Switched ends and moved to the rear.
What I found Rear suspension: Rear Torsion/trust arms bushing cracked and fluid long gone, vertical movement. Ball joint dry and boots cracked. Lower ball joint (the big one) no movement with or without air bag inflated. Once removed, the lower ball joint had considerable play ¼ movement. Totally gone, but no tire cupping etc.
Just a bunch of bolts and everything falls on the ground. The arms (front toe alignment) and rear thrust arm, had lot of play when unloaded. There is a video showing the ball joint procedure https://www.youtube.com/watch?v=MG8jkWMsQw4 . We wagon owners with air suspension bags have an advantage. Pull the electrical connector in the trunk for the compressor. Open the red and blue hoses with a 10 mm line wrench and the bags go limp and everything is unloaded. No mess no fuss. Reconnect when done and turn the key to pressurize. (Note to self: Do This FIRST before pulling all the bolts out. Makes it a lot easier to get that ball joint long bolt out)
The ball joint removal is totally simple after removing the link, LONG ball joint bolt that holds everything to the lower control arm. Spray with WD-40, insert CTA BMW ball joint tool CTA8692) Source Tooltopia (Lowest price found Jan 2017) http://www.tooltopia.com/cta-tools-8692.aspx
I did not have any issues that some have reported removing the joints. Easier than all rubber bushings. Maybe 10 mins a side? Reinstall was just as simple. Once again the right tool makes everything easier. Note: you do not have to remove the rubber boots on the old Ball Joint if you use the CTA tool. The tool just fits over top. Simple.
Torque with suspension loaded: I used the method outlined in the DIY article. Makes it simple. I needed an extra set of arms to hold the bolts when torquing the nuts. Arms not long enough anymore….
Once again, I removed, cleaned (Dawn Dish detergent) and applied Armor All to anything that was plastic. Wheel well liners, ducts, covers, etc. Cleaned the air bags and applied Armor All. I did discover how to tell if you Sport or nonSport air bags. The Sport ones have a bottom mount that is lite colored and the nonSport have black mounting bottoms. The bags are all black. I know, nothing new here so move on….
Parts Source FCPEuro https://www.fcpeuro.com/
BMW 10-Piece Control Arm Kit (E39) - E39KITLLAT
This Kit Includes
Qty Part SKU Price 2 Suspension Integral Link LEM-3690201 $16.99 1 Suspension Control Arm and Ball Joint Assembly LEM-1320202 $101.99 1 Suspension Control Arm and Ball Joint Assembly LEM-1320302 $96.99 2 Suspension Stabilizer Bar Link LEM-1331103 $22.99 2 Suspension Guide Rod LEM-2585502 $99.99 2 Suspension Ball Joint LEM-1330701 $32.99
I wrapped up this project Saturday afternoon, so I spend Sunday with a buffer. Clayed for the second time in 60 days, polished using Griot’s products, buffed off and applied Best In Show wax with the buffer let it set up for 4 hours while cleaning out all the previous poor detailing work over the last 10 years from every piece of trim, rubber, joint and painted part. Now the trim looks nice and cleaner. Worth those three tooth brushes, 3M Adhesive cleaner, Fine Hand Polish, and Speed shine hrs. Replace the missing front OE spoiler (51117026383) to the chipped & curbed front bumper. Replaced the pitted fog lamps. Really cleaned up nicely if I say so myself.
Just came back from the alignment shop and a run up and down the Hwy, drove deep into the exit ramps, and felt the rewards. Transformed. Brakes tight, no wondering or tramming, suspension sets and tires just bite. No noise. No vibrations. Ready for HWY and back road carving.
Thanks to everyone’s tips and tricks that are posted here on the forum it made the job easy and allowed no surprises.
Now off the fix the third brake light wiring issue, Oil Pan gasket, with Head lamp adjusters R&R.
Last edited by StephenVA; 10-05-2023 at 09:47 AM.
Current Garage Highlights
2003 525iT TiSilver
2002 M5 TiSilver
1998 528i KASCHMIRBEIGE METALLIC (301) (Goldie)
Former Garage Highlights
2005 X5 4.8is
2004 325iTs (2x)
1973 Pantera L
1971 Dodge Dart Swinger "Lite Package"
1970 Dodge Challenger T/A 340 Six Pack Alpine White
1970 Dodge Challenger T/A 340 Six Pack GoManGo Green
1969 Road Runner 383
1968 Barracuda Formula S 340 Sea Foam Green
Member
More images so now there are photos to go with the story......
Last edited by StephenVA; 02-06-2017 at 11:39 PM.
Current Garage Highlights
2003 525iT TiSilver
2002 M5 TiSilver
1998 528i KASCHMIRBEIGE METALLIC (301) (Goldie)
Former Garage Highlights
2005 X5 4.8is
2004 325iTs (2x)
1973 Pantera L
1971 Dodge Dart Swinger "Lite Package"
1970 Dodge Challenger T/A 340 Six Pack Alpine White
1970 Dodge Challenger T/A 340 Six Pack GoManGo Green
1969 Road Runner 383
1968 Barracuda Formula S 340 Sea Foam Green
Member
More images. I wanted to including my trusted(? - ha ha) "helper" who was very patient with all the work. He sat in the shop doorway most of the time sleeping until the banging and cursing drove him away to seek a quieter spot. The cursing was trying to get the Clips on the rear thrust arms holding the ABS sensor lines to cip and lock. PITA.
Last edited by StephenVA; 02-07-2017 at 02:46 PM.
Current Garage Highlights
2003 525iT TiSilver
2002 M5 TiSilver
1998 528i KASCHMIRBEIGE METALLIC (301) (Goldie)
Former Garage Highlights
2005 X5 4.8is
2004 325iTs (2x)
1973 Pantera L
1971 Dodge Dart Swinger "Lite Package"
1970 Dodge Challenger T/A 340 Six Pack Alpine White
1970 Dodge Challenger T/A 340 Six Pack GoManGo Green
1969 Road Runner 383
1968 Barracuda Formula S 340 Sea Foam Green
Member
dude!! you don't mess around !! lol....
makes me want to toss a chunk of my retirement fund at mine to make it perfect....
"two wrongs don't make a right...only three lefts do...."
'79 Euro 635csi - gone and regretting it...
'89 gsxr-750 - former traffic knife
'97 528i sedan - holding on strong...(just sold after 16 years of ownership - sad day)
'03 Euro 525it - something about a famous dolphin.....
'06 Mercury Grand Marquis (don't ask....it gets the job done....)
'84 Specialized Allez - full Campagnolo Super Record
'99-ish Cannondale CAAD4
"Stinky" - Kona Stinky Five
'86 528e
2008 E70 X5 3.0
Member
It really was not that bad of a job. Time consuming yes, but it is really is nothing more than a bunch of bolts. The lesson learned is that I can now do this remove and replace in 1/2 the time, as you learn as you go. I did the LR in 1/2 the time it took me to do the RR for example.
My Dad used to say "Do it first for your enemy, the second time for your friend , and the third time for yourself", as you will make lots of mistakes/redos etc on the first pass, by the time you do it three times you will be perfect at it.
My approach is always do it right one time for a lifetime of pleasure.
Last edited by StephenVA; 02-07-2017 at 02:54 PM.
Current Garage Highlights
2003 525iT TiSilver
2002 M5 TiSilver
1998 528i KASCHMIRBEIGE METALLIC (301) (Goldie)
Former Garage Highlights
2005 X5 4.8is
2004 325iTs (2x)
1973 Pantera L
1971 Dodge Dart Swinger "Lite Package"
1970 Dodge Challenger T/A 340 Six Pack Alpine White
1970 Dodge Challenger T/A 340 Six Pack GoManGo Green
1969 Road Runner 383
1968 Barracuda Formula S 340 Sea Foam Green
Member
ha... I like that methodology your dad posed. I couldn't agree more on the "nothing more than a bunch of bolts...." bit too. That's my approach to everything. Someone made it so it must come apart...and if I can take it apart, shouldn't be any reason I can't put it back together...lol... (that wasn't always the case when I was a kid but that's how we all learned..!) My father taught me a good bit about everything and got me started on a life of self reliance. There isn't one thing around me that I do not repair myself. I started working on cars alone when I was 10...changing oil, plugs, points, condenser, cap and rotor type $#!t, belts, filters, waterpumps, etc...I'd do the work, he'd check me when I was done. I love these tasks...and the only way to do them is to do them yourself
great thread...great read...nice car...nice job !
"two wrongs don't make a right...only three lefts do...."
'79 Euro 635csi - gone and regretting it...
'89 gsxr-750 - former traffic knife
'97 528i sedan - holding on strong...(just sold after 16 years of ownership - sad day)
'03 Euro 525it - something about a famous dolphin.....
'06 Mercury Grand Marquis (don't ask....it gets the job done....)
'84 Specialized Allez - full Campagnolo Super Record
'99-ish Cannondale CAAD4
"Stinky" - Kona Stinky Five
'86 528e
2008 E70 X5 3.0
Member
Well done
Member
Wow. Read every word of that. Nice work ,and work ethic !! I was going to ask you how you spruced up the shadowline trim, but I see that you have chrome.
Anyone on that ? I've tried "Back to Black", but the trim and roof rails look only a little better. Too cold these days to tackle it now.
But springtime, I will do some of the stuff Stephen did. Fender liners DO look better when they're super clean !!
I love being obsessed by this car.
Member
The dark trim on the B pillars and the roof rack were hand polished using Griot's Fine Hand Polish as I too tried the back to black from Mother's
Terrible results and look. After drying it looked like someone left oil on those parts.
Current Garage Highlights
2003 525iT TiSilver
2002 M5 TiSilver
1998 528i KASCHMIRBEIGE METALLIC (301) (Goldie)
Former Garage Highlights
2005 X5 4.8is
2004 325iTs (2x)
1973 Pantera L
1971 Dodge Dart Swinger "Lite Package"
1970 Dodge Challenger T/A 340 Six Pack Alpine White
1970 Dodge Challenger T/A 340 Six Pack GoManGo Green
1969 Road Runner 383
1968 Barracuda Formula S 340 Sea Foam Green
Old BMW's FTW
I've had pretty good results with Mother's Back To Black. I find that the key is to buff it off after a few minutes so it doesn't leave a weird residue.
IMG_2062.jpg
1995 525i 5-speed - Thread
Having No Trouble Here
BMW CCA Member
I used to use that but this stuff kicks the booty of B2B. Amazing. You only use the tiniest bit. Lasts MUCH longer.
http://www.autogeek.net/black-wow-trim-restorer.html
BTW, about the light pole in that picture...
2003 M3CicM6 TiAg
2002 540iT Sport Vortech S/C 6MT LSD TiAg
2008 Audi A3 2.0T DSG (the daily beater)
2014 BMW X1 xDrive28i (wifemobile)
Former:
1985 MB Euro graymarket 300SL
1995.5 Audi S6 Avant (utility/winter billetturbobattlewagen)
Member
Nice updates...Where in VA are you? I have a similar wagon in winchester VA
 Posting Permissions


 Reply With Quote


Bookmarks