
 BFC Fire Marshal
I dont think Im following you on how to do it without the cams/lifters installed.Originally Posted by chikinhed

The 276/270 cams have the a similar lift as the 264/256
276 duration
11.2 lift
270 duration
10.8 lift
___________
264 duration
11.2 lift
256 duration
10.6 lift
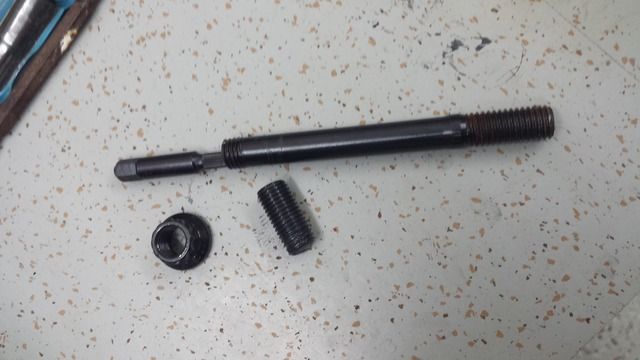
Valves are +1mm oversize valves. Ill be using the same head for checking clearance. I thought about using the spare head until I remembered the valves are oversized.
Spent last night assembling the block. I used Total Seals quick seat to lubricate the bores. Worked pretty well.
Last edited by NY98M3; 04-13-2017 at 09:01 AM.
98 Fern Green M3/2 - Precision 6870/AR Designs Twin Scroll/RK/E85
2017 Toyota Tundra Crewmaxx - Family Whip
2011 Pierce 75' Quint - Fire Apparatus West Islip FD
Cantry Member
You will need a dial indicator and a degree wheel.
With the head and head gasket on the block, turn the crank to each 5° increments, starting at 30° BTDC to TDC and to 30° ATDC, and depress the valve at each position until it contacts the piston. A dial indicator can be used on the tip of the valve (no lifter installed) to measure the travel from closed to when it contacts the piston. You will then have a table of exactly how much piston to valve clearance you have through the critical range.
When you install your valve springs, lifters and cams you can degree them to get the lift at the various degrees of crank rotation for the timing you have chosen. These measurements are taken at the top of the lifter which follows what the cam is doing. Compare the lift of the cam to the measured piston to valve clearance at the degreed of crankshaft position to know what your clearance is. Don't forget to take your measurements for the intake cam at full retard and full advance.
This method eliminates the chance of measuring inaccuracies due to lifters bleeding down.
'97 M3, Estoril blue, 2 dr, euro 6-spd, EFR 9180 divided T4 .92 IWG, RK tuning, CP 8.5:1 pistons, Eagle rods, Schrick cams, L19 11 mm ARP studs, O-ringed block, Supertech stainless/inconel valves, Supertech springs & Ti retainers, ported head, S54 oil pump/pan, 80 lb. injectors, OBD1 intake manifold, Steedspeed twin scroll T4, 3.5" SS exhaust, eBoost2 EBC, HFS-4 W/M injection, AEM Failsafe, Zeitronix data logger, Racelogic TC, OpenOBC w. ethanol %, Ireland Eng. engine mounts, UUC black tranny mounts w. enforcers, UUC twin disc feramic, ARC-8's, MCS 2-ways, Z3 rack, Rallyroad strut bar, X brace, Eibach sway bars, Ground Control LCAB bushings, Bimmerworld RTAB's, Powerflex subframe bushings, 210 4-clutch LSD, Stoptech BBK, titainium shims, steel braided lines, brake cooling ducts.
u owe my mule an apology
The way chikinhed described it is the best possible way to do it because then if you make cam timing changes in the future you can look at your data to see if there is any possible interference. Some might be a bit overwhelmed trying to make sense of the data though and you do need a degree wheel and dial indicator.
Another way to do it would be to put the head on the block with head gasket and check springs in and lifters that have been glued so they cant move. The locked lifters will hang the valves open about .050" Install the chains and cams and set the timing. Now advance the intake cam by applying air pressure to the vanos solenoid. Rotate the motor over by one tooth on tone wheel at a time (6 degrees per tooth) and reach in with a tool and make sure the lifter can still be pushed down off the cam. As long as the lifter can be pushed down by about .050" or so at each point of rotation your golden.
86 325es, 2.8L m50, S476sxe, ProEFI 128 ecu, e85, solid rear axle, TH400 trans, 28x10.5w slicks, zip ties, popsicle sticks, tape
best time 9.06 @ 151.8 mph, best 60 foot 1.30
Facebook.com/LUXFAB
Just started reading this thread. What did you end up doing about the cutout situation? I make turn downs on a 3 bolt flange fyi!
BFC Fire Marshal
Slow progress, Life is getting in the way...
Picked up a new E36 M3 Turbo tow/support vehicle, now I need to start getting motivated to finish this up.

98 Fern Green M3/2 - Precision 6870/AR Designs Twin Scroll/RK/E85
2017 Toyota Tundra Crewmaxx - Family Whip
2011 Pierce 75' Quint - Fire Apparatus West Islip FD
Member
Love those trucks, been thinking of getting one to tow the M3 as well. Just really hate having car payments. lol
PTE6262 .63 A/R, Stock S52, Cutring/Copper Spacer/Arp Studs Combo, Water Methanol Injected
10.9@131mph. #AngerMotorsports
BFC Fire Marshal
After 50 miles, I put a Corsa exhaust on it and a solid bed cover. Next up is front door window tint. I can see how guys love pick ups, Ive had over 35 cars since I started driving. Never a pick up.
Buttoned up the Rally Road Porsche brake upgrade, 4 piston calipers with E46 M3 lightweight rotors. Did some front sub frame work, replaced the control arms, and wheel well liners.

Last edited by NY98M3; 06-11-2017 at 08:50 AM.
98 Fern Green M3/2 - Precision 6870/AR Designs Twin Scroll/RK/E85
2017 Toyota Tundra Crewmaxx - Family Whip
2011 Pierce 75' Quint - Fire Apparatus West Islip FD
Troll level: Master
I never had one either before mine how will we manage without trucks from now on lol
Member
I would consider getting Decked bed storage system. I have one in my sierra and use the shit out of it. I can keep all of my tools in the back which allows me to continue to use the rear seats to take clients around.
BFC Fire Marshal
things were going good, cut ring all set
then this WTF! 30/60/and then to 80 ft/lbs. This was with ARP ultra torque lube. This shouldn't of happened at only 80 ft/lbs. These are brand new. I was going to 85 as spec'd by ARP but I usually wait til everything is cinched down.
Last edited by NY98M3; 06-28-2017 at 08:04 AM.
98 Fern Green M3/2 - Precision 6870/AR Designs Twin Scroll/RK/E85
2017 Toyota Tundra Crewmaxx - Family Whip
2011 Pierce 75' Quint - Fire Apparatus West Islip FD
Member
Thats some BS
328i Sedan Twin s366's, 6.0LS, TH400, MS3 Ultimate
9.20 at 150 on 22psi
Luchador
Thats no good!
BFC Fire Marshal
I couldn't believe it when it happened, Ive done this dozens of times with no issues lol
98 Fern Green M3/2 - Precision 6870/AR Designs Twin Scroll/RK/E85
2017 Toyota Tundra Crewmaxx - Family Whip
2011 Pierce 75' Quint - Fire Apparatus West Islip FD
BFC Fire Marshal
Just got off the phone with ARP. The directions that came in the box say 85 ft/lbs. The tech just told me they lowered the tq spec on these to 75 ft/lbs.
They are sending out a new set. Very good customer service, just inconvenient that it had to happen.
98 Fern Green M3/2 - Precision 6870/AR Designs Twin Scroll/RK/E85
2017 Toyota Tundra Crewmaxx - Family Whip
2011 Pierce 75' Quint - Fire Apparatus West Islip FD
LICENSE SUSPENDED
Are you going to recut the head ?
1996 332IS
Built 3.2
CES/Steed TS Precision 6466, spraying a "$π!℅" load of meth.
Technique Tuning 80# tune.
1/4 mile 10.84 @ 136.72
Your 1 and only stop for all your BMW performance needs
WWW.CESMOTORSPORT.COM
Member
That doesn't sound like a very good explanation to me.
So the spec is now 75 ft/lb yet they just snap @ 80? I find that hard to believe... I suppose there is zero tolerance in ARP's mind?
BFC Fire Marshal
No, not taking it back off. Frank has a spare "older style" head stud hes got he'll let me use. Ill save the new ones for the next build.
Seems the way to use the lube is different, before they wanted you to use lube on everything, now they want you not to use ANY ultra-torque lube on the washer at all.
New directions are here: http://arpinstructions.com/instructions/201-4302.pdf
98 Fern Green M3/2 - Precision 6870/AR Designs Twin Scroll/RK/E85
2017 Toyota Tundra Crewmaxx - Family Whip
2011 Pierce 75' Quint - Fire Apparatus West Islip FD
Member
So no lube on the bottom of the studs either, is that how you read the new instructions?
Only on the top of the stud and nut.
Member
Ive had two stretch and one snap on me. Luckily you're able to keep the head on.
BFC Fire Marshal
As per ARP, the revision started after Sept 2016. I dont think there was anything different about the studs, just how they get installed.
- - - Updated - - -
Were they new?
98 Fern Green M3/2 - Precision 6870/AR Designs Twin Scroll/RK/E85
2017 Toyota Tundra Crewmaxx - Family Whip
2011 Pierce 75' Quint - Fire Apparatus West Islip FD
Member
Same thing happened to me i got 2 new studs in and no one told me that the method had changed so i put them in and it all went well
Member
You never put lube on the bottom of the studs... ever.
Member
Thanks for the reply Notorious, switching to cutring/spacer and Molnar's (from MLS/stock rods) I couldn't remember what I had done last time.
Member
Clean the threads in the block, brake clean and compressed air (computer duster cans are a good substitute if you don't have compressed air where you are working BTW) to clean out all the junk... all studs should go in and out nicely with your fingers.
Then just follow the instructions ARP provides.
Member
Done and done! Having a compressor sure makes things easier sometimes.
Thanks again for the knowledge, NY98M3 love reading your thread, sorry for the thread jack, carry on!
 Posting Permissions


 Reply With Quote


Bookmarks