
 Member
I ran Billy Sports on H&R race springs on my wife's Ford Focus. I took them off a 99' VW GTI, sent them to my welder with my Ford struts to have the Ford's alignment tabs welded on. I then purchased new VW strut bearings and bump stops (they called these jounce bumpers) from PelicanParts.com, then modified {hacked away and hammered} the Ford strut mounts to accommodate them. I too had to trim the jounce bumpers and recall thinking "WhyTF did they make these things too long from the factory?"Originally Posted by autox320

I liked the setup so much that, after the timing chain gave out on the car and we sold the whole car to the junkyard, I actually went back to the yard a couple weeks later to pull and purchase my own front end setup.
It all comes full circle and I'm glad I did, because my wife's 2015 Jetta needs a front end refresher course after 75k miles: guess what I'm installing
Met with my welder Monday and next week we're gonna cut the VW's strut alignment tabs off and weld em' to my beloved Billy's!
- - - Updated - - -
For those of us less than mechanically inclined, care to show where you cut the coils on the tensioner spring? I looked at Jeff Ireland's mechanical tensioner, and you're right: his requires constant readjustment.
I've been a few weeks overdue on visiting his shop for some old business, but now I'm gonna relish the opportunity to show him this (with due credit, of course.)
Josh, if you're reading this, place this in the DIY thread, no?
Member
Anybody using the term 'rattlecan' has been hanging around automotive painters. Be careful around those folk--the fumes seem to seep into their brains and could seep into yours too if you're not careful haha! jk
Member
Just 4 coils cut off. If look close you'll notice the very bottom winding is not counted cause when side by side the winding is considered "dead" or inactive. Have to trim 4 active coils along with the dead one. No issues on showing. I actually posted about a year ago on starting jets suggestions on the faq forum and Jeff was the first reply for a ballpark start point using a 2.3L.
side by side pic from the post
If the ratio of brake force is near stock then shouldn't need a proportioning valve. This is piston area to piston area and nothing to do with pad material surface area. Brake master larger mm can have downsides. Firmer feel larger piston also means less modulation cause displacing more fluid per travel.
The idea of the booster volume is old school hot rod. With a cam and power booster you only have so much area for vacuum to store. A cam won't allow as much vacuum to be drawn at a given time especially how it's timed. Basically can have a couple brake events with boosted assist and then might not where the pedal will feel firm. This is cause not a chance for vacuum to build back up especially if WOT all the time. So just add more area to store vacuum is one way to get a few extra brake pushes with boosted assist. This is a cheapo way to solve issues with a hot motor setup using power brakes. Really if have funds should just by a tilton or wilwood setup with a balance bar. Would always have the right pedal travel and feel no matter what conditions. But I want to see how effective this is, and I don't believe my cam to be so aggressive it may work.
I saw your post on moving to 02 and brake line making. Look over my post on the brake lines. Paying upfront for nicopp lines and a good tool makes it easy. I was unsure doing them myself till found what to use. Bend by hand no tools cause tools can kink faster than using fingers. The small dia brake line is very nice to just shape however you need.
88 M3
91 318is
91 318i
83 320is
08 X3 3.0si
"If it flys, floats, or f*cks, rent it!"
Member
Sidetracked with other vehicles a bit this week.
alignments I use strings and custom made bars (diy smart strings)
-gave X3 4wheel alignment
-X3 belt kit with new tensioner and idler
-318is 4wheel alignment after redoing all the suspension
Saturday had some time to start back on the 320. It warmed up finally a bit so took the fuel tank outside for the second treatment of metal prep. I'll let it dry out a few days next to the woodstove. If get another warm few days may put the final stage of POR15 tank sealer in it. Ordered a few radiator hoses and had a few in my storage box. Mocked up a few and ordered a few more. All Gates cause they are some of the best. About as good as all silicone hoses like Samco. The long top hose I'll resort to the same way I had it before the tear down. A cut top hose with some 1.25" sink drain tubing inline. Hey it worked for 10 years before so I'm not questioning it. Bought a new tube and cut a new gates top hose.
Lower rad hose has to be longer due to the lean. Bought a Gates flex hose with the wire inside that fits nice. All hoses ordered from Rockauto cause they keep Gates in stock. I'll hopefully finalize hose selection next weekend. I'm using a a piece of samco silicone hose left over from the M3 for the thermostat to waterpump.
Wired up 99% of the engine bay. Made custom grounds. From alternator, starter, to the frame. Additional like stock from behind the distributor to our ground block for the ignition to have an easy path.
Almost forgot a overflow catch can for the radiator, so made one of those up. Cleaned up a bit of wiring on the passenger side. All that's left I can tell is the coolant temp wire which somehow is forgotten I'll have to trace and make sure. Then just adding the NGK WB02.
Painted the rad brace and added some aluminum angle to reinforce the radiator edge when bolted up. Think brake forces and acceleration with a full heavy radiator.

88 M3
91 318is
91 318i
83 320is
08 X3 3.0si
"If it flys, floats, or f*cks, rent it!"
Member
Are you cleaning and sealing that fuel cell or the stock tanks?
Have you skipped the muriatic acid and water rinsing steps or rinsing it with water? I've read about flash rust haunting nearly everybody who's DIY'd this project.
Member
Stock single passenger side tank (pickup). Cut off the crossover tube, welded a patch over it. The factory location has the best weight center distribution and protection in front of the subframe.
Bought the "kit" components of POR15 fuel sealer kit. Slowly following the steps, then flushing with hot water per instructions. This tank sits inside next to the wood stove. It's been kicked around and avoided during the project since so time consuming. So just working it in when possible. The only rust i've seen since starting is if left any water inside like a couple spots and lines. When washing bare metal it rusts fast. Same as if leave a car unattended after a car wash the brake rotors surface rust. From what I've seen the secret to this stuff really is keeping moisture out of the seams and to fully dry before each step. I plan to blow out any of the excess white dust from the metal prep, then stick a heat gun in there several hours(seems to be the best method).
88 M3
91 318is
91 318i
83 320is
08 X3 3.0si
"If it flys, floats, or f*cks, rent it!"
Member
Looking Great!
Looking forward to seeing a video - movement - motion - rolling tires - sound track - exhaust gasses - get the idea? LOL

Always FUN TO DRIVE - Build Thread & Tech info - 79 320/6 track car build thread -- Videos of track car -Adam in car Auto-x video - Start-up video - 4/2011 Adam's TOP BMW time San Diego BMWCCA - 4-5-15 Dyno break-in run new M20B25 - Exhaust Thread - Link
Member
Your not the only one
88 M3
91 318is
91 318i
83 320is
08 X3 3.0si
"If it flys, floats, or f*cks, rent it!"
Member
I bet your Dad would like to see it run too!
Always FUN TO DRIVE - Build Thread & Tech info - 79 320/6 track car build thread -- Videos of track car -Adam in car Auto-x video - Start-up video - 4/2011 Adam's TOP BMW time San Diego BMWCCA - 4-5-15 Dyno break-in run new M20B25 - Exhaust Thread - Link
Member
Doh. That's your radiator. From one angle it looks exactly like the fuel cells in Porsches.
Member
No Pcar here man
88 M3
91 318is
91 318i
83 320is
08 X3 3.0si
"If it flys, floats, or f*cks, rent it!"
Member
I thought i saw you walk on a yellow 996 (after a few mustangs and a 350z.) Was that the one ?
- - - Updated - - -
I went back to Eastwood's site to find that their "gas tank sealant kit" was the one requiring a muriatic acid rinse along the way, whereas the POR15 kit does not. I contacted them to ask them why and await their response.
Member
True a lot get eaten by the S14 beast, but HPDE isn't fair to judge machine capability. I had an instructor drive me around in his before he sold it. Pretty sure was a 996, stripped, 4pt cage, all heim suspension. I exited with a smile while gents in the paddock asked if I felt sick cause most riders puke lol. I was in amazement of his skills and he obviously knew the car well. We circled slowest laptime around VIR full course in 2.06 on worn out perelli slicks (practice set). That car ride sticks with me to this day, and I feel still learning from it.
Every video or post on the POR15 seal kit seems to work and have great results. Mostly used on nasty old motorcycle tanks which is a great test bed of followers proving it does the job. My tank is in great shape besides the dent in it I can't remove. The coating will just give a bit more comfort for future pin holes around where I welded.
88 M3
91 318is
91 318i
83 320is
08 X3 3.0si
"If it flys, floats, or f*cks, rent it!"
Member
sidetracked again; put a new master cylinder on another car
Waiting on some small items, but cracked a few brews tonight to run some additional wiring. Added the main ground on a piece of 1/8 steel. Made a tab that stacks under the seat belt bolt. Was actually harder than I thought to clean off the enamel paint on the rail and coat with dielectric contact grease. All ground points between areas A to B on the car measure less than 0.1 ohms so good there. Completely cleaned out the carb again, filed the main fuel port, checked things and put back on the manifold. It needed it; was full of filings from drilling out the fitting. Last of the radiator hoses came in along with additional wix filters, so have what I want and need a few extra clamps. Rockauto ftw. It's still too cool outside to use the fuel tank sealer. It's recommended 72F and dry for 3 continuous days outside after coating. Words of wisdom from the girl is just make it the last thing I do. Need to install the line and get on the fuel part of the project. Finally had a min to test out the fuel sender after soaking it in Seafoam. Bought a new vdo gauge which is smoother operation, but backwards for E and F due to our sender. No biggie

88 M3
91 318is
91 318i
83 320is
08 X3 3.0si
"If it flys, floats, or f*cks, rent it!"
Member
Went into the M again to "borrow" the wideband setup. Always thought was neat to see the back cover of the casting of the 265 transmission used on the S14. Looks similar to the 240 (83 320i, 84-85 318) and 245 (80-82 320). Note the gear speedo well is still there same casting. It has a fixed plug inside. Also the single trans mount ear is there even though it's not used and dual ears are present for more secure mounting on the back section.
Just random shots of engine bay with subtle additions. I want to shorten the wideband harness cause the sensor leg is about a mile long. In the M I had it routed from console out the driver side well; across the engine bay and down by the trans tunnel. It still had enough to bundle under the driver area of slack. Just a bit ridiculous but guess fits anything that way. I'll either shorten it or re-pin the connector.
Finished up the radiator hoses. Going to use a thermostat for now, but we've talked about a delete in the future. Also talked about adding a oil cooler during the entire build. Right now just short DE stints we want to see what temps we get and determine to need one. I'm betting a yes, but we'll see. Definitely add it if doing any kind of enduro events more than 20-30mins. Waiting on the drain plug sender from egauges for the vdo oil temp gauge.
Car is in the air to final mock up the fuel system I hope. Also will put in the drive axles.

88 M3
91 318is
91 318i
83 320is
08 X3 3.0si
"If it flys, floats, or f*cks, rent it!"
Member
Great thread OG- The detailed descriptions and pics are generous!
Member
Thanks man c-ya about the Vintage time frame.
88 M3
91 318is
91 318i
83 320is
08 X3 3.0si
"If it flys, floats, or f*cks, rent it!"
Member
small bites; daily drivers sorted for the moment, but the upstairs entertainment system needed rack maintenance and a bit of revamp with cable management
made it downstairs in between for a few
Shortened the WB02 harness and installed it. Drilled right through the firewall behind the cross tube. Starting on a "test tube" muffler. This will be a temporary dynomax bullet I had laying around just to have something on the open header and mount the WB02 sensor on. Eventually after some running and tuning the plan is to have the real muffler mounted and have our exhaust shop bend a connection tube.
Trying something different. . . nord lock washers. This has been a problem of mine with running a carb is keeping the thing on the manifold. I've tried wave washers, split lock washers, and nylock nuts. When did the carb swap the thing would always find it's way loose and cause running issues and huge vacuum leaks. My fix for this was double nut and it never moved since. I'm willing to try a new lock washer called nord locks. If never heard of them check' um out. Suppose to have good success if ever have vibration situations where nuts always come loose. These are 5/16 or 8mm. They come with a dab of hot glue between them just for ease of install, but if careful of orientation easily reusable.
My buddy gave this koozie to keep me motivated through the winter months. Her cheeks move on springs. Entertaining, and it's working. Man I can't believe I passed up Road Atlanta this weekend. Shout out best of luck to Poor Boys Racing. Give'em hell.

88 M3
91 318is
91 318i
83 320is
08 X3 3.0si
"If it flys, floats, or f*cks, rent it!"
Member
5/16 nicopp line down the inside edge of the tunnel. Since not using AN lines, I like using the best fuel line can get which is hands down Gates green barricade. I plan to shield the hard line even though a large air gap to the exhaust. Put some 3/8 line around corners just to give it some cushion. Was easier just to keep the small factory poly expansion tank (holy crap a factory part remains I know right). Wanted to retain an expansion so made it suit us. The breather off the top of the tank routes to the fueling cap area and breathes through a small engine fuel filter. The filler hose connections are some marine grade USA stuff Dad found for us.
Still messing with the tank area, but about to call it a day and finish up. Some cables came in for another project upstairs, so back to my other favorite spot behind a equipment rack

88 M3
91 318is
91 318i
83 320is
08 X3 3.0si
"If it flys, floats, or f*cks, rent it!"
Member
Last edited by OLD MAN; 02-06-2018 at 08:58 PM.
Always FUN TO DRIVE - Build Thread & Tech info - 79 320/6 track car build thread -- Videos of track car -Adam in car Auto-x video - Start-up video - 4/2011 Adam's TOP BMW time San Diego BMWCCA - 4-5-15 Dyno break-in run new M20B25 - Exhaust Thread - Link
Member
disgraceful, all that gray paint on your brake master tubes and rubber bits!
better let me take over from here.
Member
thanks guys
So the fuel tank is full of POR15 sealer. Rolled it around about 20-30min every side, then emptied the remainder back to the can. Set in my outside well pump house since it stays about 70F in there all winter. After 3 or so days I'll pull it out.
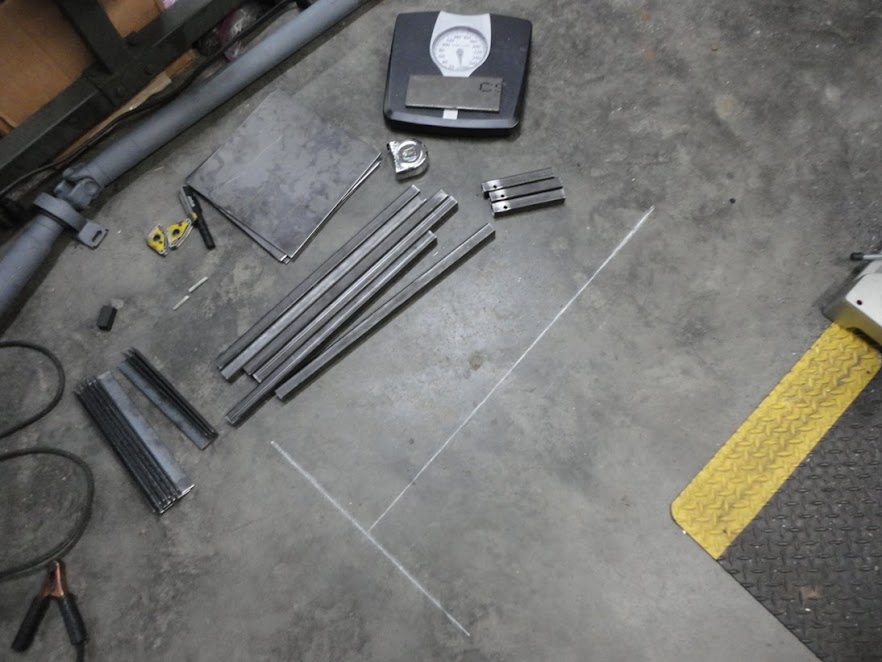
While that's going on, was looking at scales to corner weigh. Bout a $1000 on average, but browsed around the interwebs. Decided to try some Ruggles scales. Aircraft Spruce used to sell them, and Pegasus racing still does (still expensive). Looked at some pics online and built my own. Some caster wheels from harborfreight, and some roller skate bearings. Along with 4 bathroom scales this is about a $150 setup.
I've never used them or made them before, so here's my first set. I tacked one together just to see if my measurements worked. I figure the cars I use with these will be light (sub 2400 lbs), so chose to make a 3 to 1 ratio. I'm 185 lbs on the scale, and on the Ruggles exactly 62 lbs (3:1 ratio). So proceeded to make the other three and weld them out. Sometimes things are just built right on the shop floor
cut steel pads for the scales out of some old 3/16" ah has a old memory on it
me on the Ruggles (185/3)

88 M3
91 318is
91 318i
83 320is
08 X3 3.0si
"If it flys, floats, or f*cks, rent it!"
Member
Added wheel stops on the rear pads wide enough for a wide 17" tire in case upgrade the M3 tires. Slapped a coat of Rustoleum black and labeled. Made a basic excel sheet to put the ruggles numbers in. It gives actual weights, all percentages, cross weights, and a prediction of what to change to give equal cross weights. This should keep thinking to a minimum and allow some beer drinking during setup.

88 M3
91 318is
91 318i
83 320is
08 X3 3.0si
"If it flys, floats, or f*cks, rent it!"
Member
I'm heavily considering doing a similar scale build myself now. Looks like it will all pack away easily and won't take up too much room.
91 318is
83 320is
Member
Finally, a scale I can weigh myself on!
-John
 Posting Permissions


 Reply With Quote


Bookmarks