
 Member
New hurdles. Learn how to eat turd sandwiches with a smile. After attempts to local driveshaft shops nobody will touch and forget about shorten our shaft for us. They said due to OSHA (the clipboard warriors that don't know their ass from a hole well you know what I'm saying) turns out you can't legally shorten a BMW driveshaft. Really? Do whatI've never heard this BS before then again I've never cut out 4+" out of a shaft like this.
Anyways clipboarders be damned and look the F away. Measured and marked, lopped out a segment of the large diameter of the front tube we needed. Made a reference line to marry it back up. Beveled the edge and zipped it back together. BTW a shaft is 14ga tube. Took out 4" plus the blade width of both cuts equaled 4.25" removed. Clamped in pieces of angle iron and tacked together, then zipped up. Seems smooth enough checking the end with a dial gauge and turning. Balance? well since nobody will touch a home job shaft I'll use what an old timer suggested. Put a couple hose clamps on just tight enough to let them move when spinning. When the shaft is run low rpm the clamps will rest with the heavy ends where they need to be and clamp them down effectively giving your weight. Need more use in pairs. Can index them a bit to alter the weight if needed. Guess that's what we'll do.
Mocked up, fits great and we'll try it out.
once again fitting brews for the job; this is my favorite IPA btw; been hitting wicked since they opened

88 M3
91 318is
91 318i
83 320is
08 X3 3.0si
"If it flys, floats, or f*cks, rent it!"
Member
I just skipped the driveshaft place all together and took mine to a weld shop. They wound up heli arc welding it. I haven't had it balanced but I haven't noticed any vibrations. I am also running solid mounts and a window weld filled csb, so it cant move much.
(you cant really tell where the seam is in the pic, but its up near the top)
Member
Sweet. I chose the spot I did to be able to take out a large amount and still fit in some angle iron to mock up straight. Used the forward shaft so if need new u-joints it's just a rear shaft swap. I know Dad was about as frustrated as I was why they wouldn't do it. We initially planned to do it ourselves but thought nah let's just let the pro's have it. With that mind set we spent wasted time taking it places. Dad kept telling me the responses and I was baffled at the excuses. You can probably guess how it went from there. Few brews and new saw later. The new saw definitely let me cut with confidence straight clean cuts. I still say we can move the diff further up another 1/4" or so with some bang clearancing of the shaft just at the rear seat area. Now that the ebrake tubes and box are gone can get it up in the tunnel more. This gives the diff greater and more favorable axle angle even under compression on lowered suspension. Right now it's on 1" spacers. I'll cut and make some longer spacers for the diff requiring even longer front mount bolts which I guess will have to be ordered. Meh upwards and onwards.
88 M3
91 318is
91 318i
83 320is
08 X3 3.0si
"If it flys, floats, or f*cks, rent it!"
Member
Yeah. In hindsight I would had done the front shaft too.Originally Posted by autox320

Member
Made progress with the sways. At first made a bracket set for the front bar from 1" tubing but found it was just too much spacing than I liked. So gave it a hair cut. Had to cut off the tubing from the frame, clean up and put it back on. Drilled some holes to recess the nuts. Bar is much more inline now and when it sits on the ground at height can be level. These bars came off my e30m3. It's what I have so going to use them. The front one tucks nicely. The rear is a bit special cause had to bend it into more 320i friendly shape. Took out some major angle with the ends and straightened a few smaller bends. Then cut off the curly ends and welded on 3/16" plate for adjustment holes. Also gives spacing for using heims. Had to make a small order for heims from speedway to make up the endlinks. Rears will be 3/8 and fronts 7/16.
Pics of last night my buddy was under his modded E36 putting on a 3" exhaust system. My girl was out in the car port redoing her rear door barrier seals (dealer replaced the regulators and it's leaked water ever since). Turns out a lot of people have x3's that leak water. We found out it's the barrier seals broken or torn for the doors. She fixed them up and redid the panels and put them on last night. It's been leak free, no more wet floor boards.
Rocket girl; interesting but nothing special. Not enough boost rocket girl

88 M3
91 318is
91 318i
83 320is
08 X3 3.0si
"If it flys, floats, or f*cks, rent it!"
Member
Morning Gents. My OCD kicked in again this morning. Last night I worked on putting together another e30 diff for a spare on my other car. It's been laying around awhile, but has polished gears and %40 lockup with new clutches. Just ditching the Chinese bearings. Decided to put a full set of Timkens in it (shout to RockAuto as a great supplier for these). Anyways just couldn't get started this morning so decided to do clearing and cleaning. Once a year or so I redo the work bench slapping a coat of paint on it. Yeah I know it's just a bench and will be beaten up again, but
So after the bench dried thought it was a good time to snap some engine part pics. These will provide the bang to shovel our rig down course. Pistons are high compression from JE to use in the M3 S14 block with 2.3 crank and 144mm rods. The cam is a 294 from TEP. I tried to show the unique profile of this cam which was very apparent when I first looked at it. Very steep ramps on the leading sides with a slight curved ramp on the back sides. Should get the valves off the seats quick and hold both open for a wide band of overlap. Quite a bit more material taken off the backside base to get more lift. Noticeably more than the 288 I have. Very cool camshaft.

Last edited by autox320; 04-30-2017 at 12:14 PM.
88 M3
91 318is
91 318i
83 320is
08 X3 3.0si
"If it flys, floats, or f*cks, rent it!"
Member
Awesome progress !
I have been driving my e21 here and there tweaking the suspension. Sadly I have discovered my m20 is leaking oil from the corner of the head gasket. So time for arp hardware and a much better gasket.
I am currently not running a rear sway bar, debating if I should or not. Of course would need to make one. Though since I am not using the stock e30 shock mount location I think I can mount the end links there.
Member
Was finishing up another e30 lsd cause ocd from the first one didn't wear off yet. Then went into 320i mode. Got tired of finding 12mm long bolts for the diff. Passed a quick zip of 1/2" step bit through the mount holes wallah 1/2" standard from now on.
Next, wanted to tackle a final position of the driveshaft. Spaced the diff upward 1.325" making custom spacer sleeves from more moly 3/4 tubing and a washer as a base. Had to hammer some clearance just in front of the diff. Used a large solid brass cylinder and a chunk of aluminum as a drift. Finally had clearance and put back in the diff again. The center support warranted custom mounting since tucked everything else so close in the tunnel. So went back under to grind and cut off the body tabs. The shaft easily found where it's wants to be once the ends are bolted up. Went with a keep it simple using more sleeves passing into the car. It's overkill but had it laying around along with 1/2" bolts. Shaft seems happy now. You know what they say first time tight, second time just right. Time for some brews.
E21 diff ream and mounting with some grade 8 1/2" bolts
compliance station

88 M3
91 318is
91 318i
83 320is
08 X3 3.0si
"If it flys, floats, or f*cks, rent it!"
Member
Looking good ! I should of extended the frame rails like you did.
Member
Thanks man. I think they just make sense since keeping the original body of the car. Really stiffened up the tubs before tying into the cage. Makes it less of a tin can
88 M3
91 318is
91 318i
83 320is
08 X3 3.0si
"If it flys, floats, or f*cks, rent it!"
Member
damn, going all out!! probably steal a few ideas for mine i think!!
how do you find the engine stands as rotisserie? considered doing the same because i dont have the cash for a proper rotisserie
Member
No problem that's why I like to post. PM me anytime to brainstorm.
The engine stand rotisserie actually turned out much better than I first expected. For cars this light can get away with it. In my case it really works best cause I have a beam hoist to control and keep tension if want a awkward position. The engine stand pins only line up to the holes in a few places. The hoist allows any position. Another inexpensive way is using ratchet straps either side of the car to the legs of the stands. We do that on occasion as well but hoist works best. With a bare shell it rolls over fairly easy by hand. Once add some weight can tell if there's a tipping point. For instance car feels perfectly center balanced on the stands, then take one wheel off and it will want to roll over.
I first remember the engine stand rotisserie idea from my old E21 partner. He incorporated a hand geared crank to rotate it. Works flawless and was a very good design with low cost.
88 M3
91 318is
91 318i
83 320is
08 X3 3.0si
"If it flys, floats, or f*cks, rent it!"
Member
Freed up the bench space by finishing the diffs. Finally received the correct Timken bearing for the pinion of a 168mm. Apparently RockAuto and just about anywhere online has incorrect part numbersI had a parts buddy in the business verify the ID and OD from Timken and National. Punched in the number on Rockauto and it showed up but isn't listed under any 168mm BMW model. Hmmm oh well found it, installed it using the ole heat bearing to about 190F and freeze the pinion for 10min. General rule is per inch OD per 100F it grows one thou. So a bearing ID of approx 1" at 200F grows 2 thou which is plenty to get it on a shaft without pressing. Freezer of the opposite part helps maybe half a thou and liquid nitro probably a few thou. Keyboard cleaner(duster) can get about a good thou+. Combine the two heat and freeze can make room for just about anything without a press. Dropped right on and buttoned it up.
Was chillin having some Lt Dank. I laugh and call it Dan from my Forest Gump Reference. Heard a delivery truck and a box showed I've been waiting on from Speedway. So Dan/Dank helped install the sway links. The rears are a male+female 3/8 heim. Fronts are the 7/16 with studs. After measuring from a ride height of the chassis, whipped out some links. Adjusted the rears to have mid way and welded on mount tabs. The fronts measured and cut some 3/4 moly tubing to weld double nuts into for links. I hate aluminum links they always seem to gall and destroy threads. Guess the tabs I welded onto my struts way back beginning of the build worked out. I just eyeballed them then, but my future self is patting me on the back. Good guesswork.
Tried my best to set at a ride height we'll use measuring over and over. Then made the bars level when sitting at height to measure front links and weld on rear tabs. Adjustable links can take out any preload from the bars at height. I tried to intentionally keep as many threads possible engaged but give enough adjustment if change ride height slightly. Under droop you can see how hard it would be to guess the angle they want to rest at. Hope to get some other things finished but the holiday will cut short being dirty in the garage. I'm sure Mom would appreciate a hug without grease.

Last edited by autox320; 05-13-2017 at 07:00 PM.
88 M3
91 318is
91 318i
83 320is
08 X3 3.0si
"If it flys, floats, or f*cks, rent it!"
Member
All of it....I can only get so erect.
Also Federal RSR-R represent, they work realllly nice on the E21, they've got a nice 'flexibility' to them.
"The most important thing is balance." - KT
Member
Jesus, that's amazing.
My only concern is the weld on the end of the sway bar affecting the heat treatment of the steel in a bad way, might be too soft. I doubt it though.
Have you been keeping measurements and the like?
-John
Member
Hellz yes man these tires will have to prove themselves but I had a few guys tell me they are legit when at VIR last year
Which measurements in particular? I've been lining things up and centering as I make it. Sometimes mocked up several times before welding any new tabs etc on. So sometimes it just looks like yea a new bracket or tab is welded, when it actually took lot's of round circle mock ups
Just other thoughts
Things should be getting faster but feels slower going. Been a lot happening around the life circle lately so things are spurts then slower paced. Summer is around the bend and I won't say a deadline cause timing we see how that never works out. Hope to be painted and final assembly sometime in August we hope. Then probably lot's of jetting and tuning to find the most meat out of the powerplant. Last is fine tweak suspension dialing for autox, then a track only setup.
I might initially mock something up with fasteners I have then go by Fastenal and get what I really want for it. Beyond bolts most everything else has come from Speedway and QA1 through Speedway.
Last edited by autox320; 05-17-2017 at 04:55 PM.
88 M3
91 318is
91 318i
83 320is
08 X3 3.0si
"If it flys, floats, or f*cks, rent it!"
Member
Are those Federals 205 50 15? Any idea how they are when it gets wet?
91 318is
83 320is
Member
Yes 205/50/15. No idea in the wet but least they have some grooves. Anything has to be better than Azenis or Nitto NT01s in wet
88 M3
91 318is
91 318i
83 320is
08 X3 3.0si
"If it flys, floats, or f*cks, rent it!"
Member
After yard work, nose finally back on the grindstone. Gussets for the rear control arms for the spring perches. Used a cut piece of additional moly 3/4 tube. Seamed it to one of the existing tubes. Started on mocking up some electrical end points so Dad can start planning with me on the wiring harness. Trying to keep as basic as possible. Time to order another batch of switches and omron relays. For now just mock ups. No widgets here mang. Top switch panel is the main, and bottom is "DOT" items. Yep it should still be street legal when done believe it or not.

Last edited by autox320; 05-25-2017 at 09:09 PM.
88 M3
91 318is
91 318i
83 320is
08 X3 3.0si
"If it flys, floats, or f*cks, rent it!"
Member
Dang, those trailing arms are gorgeous.
Member
Thanks. It took some time, planned, mocked, but they actually aren't as nice as the real thing. Close enough for the girls I'll go out with. If want to see the utmost examples of the real dtm arms, then Conrad's win hands down. On another level. I feel super lucky to have actually seen these in person on a car. Even let me crawl around it while on stands.
Warning; engineering excellence ; I can't help with counseling your lady for extended page visits, so view at own risk
http://www.m3motorsport.co.nz/#!/pro...ar-suspension/
88 M3
91 318is
91 318i
83 320is
08 X3 3.0si
"If it flys, floats, or f*cks, rent it!"
Disco Librarian
Well, going outside this weekend is canceled....
Member
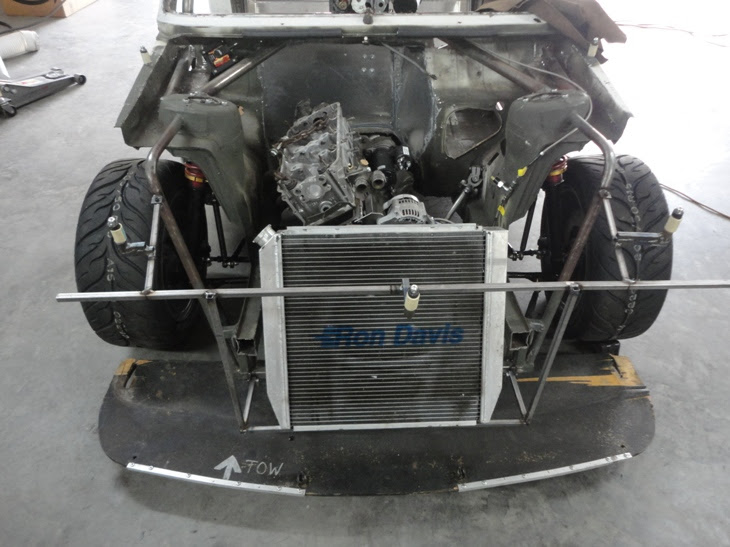
Used the Sully technique again, and made some brackets for the motor. Just hand fab'd. Cut by grinder using a cutoff wheel, then hand ground on the bench grinder. I learned from the S14 M3 don't cheap out on these cause once lose the water pump the game is over. I went through a few versions on the M till found one that wouldn't break. Luckily I mounted mine early off a block bolt though the power steering. Some haven't been so lucky and it puts a huge hole in the timing cover. So yeah I don't play around just mounting wherever because it will make huge headaches later. Used some 3/16 steel for the face brackets. Always ensure they are on bolts that reach into the block. Also joined on the backside plane for each using more block reaching bolts. I ran out of angle iron so took a high speed 1" square tube and sliced it making two angles. Also went ahead and made a gusset for the driver side motor mount since the holes were available. As usual need more heims for the alternator link. Never fails needing a few more small parts
Staying with lightweight theme to make it run. I'm using the all common denso mini alternator 3wire version for having a feedback field. Output at 1600rpm is only 11A, but ramps up quick from there until 57A at 6000rpm. Battery is a common pc680 odyssey. The M3 starter cause it's smaller and lighter than the M10/20/30 starters with more torque for starting a high comp motor.
Laughed my ass off on unboxing the M3 starter having the sticker on the solenoid. Man I used to have to always hit mine to start back in the day especially with summer heat. Didn't everybody
Tried dicking around with the wiper mounting. We just tossed it in to see which way to mount and come up with a single wiper. It will force more work than I want but eventually will happen. Probably just get rid of all the pot metal and mount the motor ourselves then make a custom arm.
The main gauge panel will only have two lights. One next to the fan switch to show it's still on or not. The other is a super bright red surface mount led next to the oil pressure gauge tied to a inline 20psi switch on the oil supply. Lights if drops below 20psi. I've this rig on the M3 with a 30psi switch and it works. Just maybe saving excess motor damage with a idiot light that can't be ignored.
Crank pulley is just sitting in there, no crank in the mock up motor
found a female 3/8 heim to just mock up before ordering a few males we'll need.

Last edited by autox320; 05-29-2017 at 03:39 PM.
88 M3
91 318is
91 318i
83 320is
08 X3 3.0si
"If it flys, floats, or f*cks, rent it!"
Member
Nananananananana race caaaaar!
Good call on the oil pressure switch. Never hurts to have a little extra protection. The new fuel filter placement is a good spot too
-John
Member
Slapped the wheels back on; needed ground level awhile (some tires mounted backwards
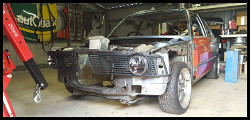
Dad started in on wiring a bit. We're using #6 for the main power and a couple short pieces of 6 to ground the alternator and battery. Dad wants to have a few ground blocks front, mid, and rear for some #10 to ensure we don't have grounding issues. I worked on the front end. Grabbed inspiration from some Grp5 pics on the interwebs. Used 1/2" 16ga square tubing cause I've used it before making the M3 radiator support. It's very light for steel and easily weldable so bonus for me. Hood position I wanted to use the holes already in it so adjusted fire to make it happen. Fiberglass hood has been around since early 2000. Bought from an 02 racer and believe it's an IE hood. Used my M3 plywood adjustable splitter as a mock up but actually it's not far off from what we'll make. It will attach under the steering rack area by 2 bolts and then 4 across the adjustable front bar. So far the front tubing fully removes with just 4 1/4-20 bolts just like we used to run but more thought out this time. Front skeleton frame and splitter support weighs in at 8 lbs so far. Probably add a pound or so to mount the light buckets and grill work etc. Radiator will be the heaviest thing in the front. Bought a wink 4 panel mirror. Man I have to say it's nice and can see 160deg behind us. All the LED's came in from SuperBrightLED. Headlights they sent us the wrong kit for H11 instead of H4 I ordered. Emailed and made a RMA hope to sort that out. Some long ding dong switches for the panels came in. These are easier to reach and use when belted in. Meh brews and some more thought process. My words to Dad are "push to paint" lol.

88 M3
91 318is
91 318i
83 320is
08 X3 3.0si
"If it flys, floats, or f*cks, rent it!"
 Posting Permissions


 Reply With Quote


Bookmarks