
 Member
Finally the weekend again. These guys are still hot in the pics. Waiting for them to cool decided to down some IPA and take a few pics. Bit more progress, but not much. Sheet metal tests my patience. Like a painter I need beer to weld sheet metal. Managed to cut out the tops last night and weld them on today. Same knock out punch technique for the dimple holes. 16ga sheet. Of course Dad took off this past week on another vacation to leave me with completing this rear suspension project solo
Least he's enjoying being retired and can take off where ever when ever. Must be nice.
I may leave the bottom of these control arms open awhile till can mount and figure out the swaybar attachment. No idea what it's going to be yet, but put a cross bar of 3/4 tubing to weld to underneath about where the swaybar ends line up.

88 M3
91 318is
91 318i
83 320is
08 X3 3.0si
"If it flys, floats, or f*cks, rent it!"
Member
Oh forgot to add I have a drill press! My Uncle donated a nice vintage Buffalo stand up press he wasn't using. I haven't cleaned it up yet but just plugged it in and still works like a champ. Rear hubs are at the machine shop being turned to fit the VW rear MK1 rotors. I told them no timeline in hopes they'll cut me a break on price. They said maybe a couple weeks out.
88 M3
91 318is
91 318i
83 320is
08 X3 3.0si
"If it flys, floats, or f*cks, rent it!"
Member
Knocking out a couple more gussets on the arms this morning. Really liking this newer Makita brushless drill model XPH12Z(bare drill on amazon for $72). Sidebar a sec; I bought a non-brushless during drilling the bolts and using the tube notcher. Well about 20 days of how I used it the thing went up in smoke. Want to say it was a XPH09 kit and shouldn't have the makita name on it. Most new drills now days are plastic so need to be brushless and have protection or will never last IMO. The era of lego drills. For me it came down to two models after the model 09 melted. Only choices were the brushless XPH12 or XPH07. The 7 is the big dawg and while great to have over 1000 in lbs of torque is a bit heavy and eats battery needing the larger 4.0 or 5.0 version to last. I may get it later anyways just cause it never hurts to have that much portable power on tap. The smaller 12 model is identical as powerful as my older BHP454 bought over 10yrs ago. The 12 is about the size of today's smaller drills with guts of a larger one. Probably drill the car body for the subframe outer mounts here in a bit.

88 M3
91 318is
91 318i
83 320is
08 X3 3.0si
"If it flys, floats, or f*cks, rent it!"
Member
Grab a beer, cause I tried to type in a bunch of things I wanted to remember to point out but probably forgot a few. This is a bit long winded.
I called and chat with OLD MAN for awhile. Was nice to have another member to ramble to and bounce ideas with. We discussed some rear angles and axle angles in practical application based off what gives traction
After thinking about our chat, I wanted to post more notes I have to share. May help someone else cause this is what has helped me. I'm no expert, but once again like to learn this stuff in more detail and actually apply it to what I'm driving. Basically I look at the ability to change RC is just another tuning tool for maximum grip. That's it. The fact that it's an instant change is important since it's the pivot of a car before the springs and shocks come into play. I never see too many setups that can change it, so wanted to incorporate it in the build really just for fun.
When start lowering the body too far on the suspension the arm angles and axle angles are not in favor of traction. Also some may have noticed it bottoms out the rear shock also adding another factor. Sure some make special tall mounts to give the shock room for travel, but that's just a band-aid. On the E21 front end some have noticed the frame is limited to lowering by resting on the control arms.
Semi-trail arm rear is a bit nuts at times to think about, so here's notes I'm using. Even with all this tech notes basic thought process says if you change something and don't like it change it back. Maybe even go the other direction. That's why there's spacers to use until it feels best in real world application. Here's what I observe with the DTM E30. The subframe is spaced down to accommodate the outer RC adjustment of the control arms box. This causes the diff to be spaced up to remain in stock location or higher keeping axle angles in check. This also allows the diff tie in to the cage work. The knuckle adjuster allows changes without effecting the overall sweep angle. If changes were made at the inside leg pivot the sweep, camber and toe can all be effected. The spherical bearing on the inside pivot allows the attachments centerline to move keeping the arm from binding which happens with eccentric bushings or weld in adjusters. Which is why most eccentrics seem to move over time unless weld in place or using a positive locking (IE toothed version seem promising)
Reference material I've collected
- Stock E30 rear RC height is 112mm / 4.4in
- Lowering (shorter springs) lowers the RC height
- Raising the rear subframe raises the RC height
- Raising the outer pickup point lowers the RC height
- Reducing the rear camber, raises the RC height (rough guess about 20mm/1°)
- Decreasing arm sweep angle moves the IC(instant center) further outwards and lowers RC height
The amount that a chassis rolls in a corner depends on the position of the roll axis relative to the car’s center-of-gravity (CG). The closer the roll axis is to the center of gravity, the less the chassis will roll in a corner. Chassis rolling at one end of the car or the other gives more grip to that end of the car.
Some semi-trail arm pictures to reference
My DTM replica arms adjustments
My tie ins for subframe and about to tie in the outer trail arm mount point
1992 DTM E30 M3 control arm
Early grpA E30 M3 arm replica; note the changes present
If made it this far probably need another beer.
Reference page I like.
http://thecartech.com/subjects/auto_...oll_Center.htm
--------------------------------------------------------------------------
Here's the page content posted directly without going to the link.
Roll Center Understood
A long time ago I wrote an article titled “Caster Understood” which explained in simple terms how caster affects a car’s handling. The great response from the RC community made me realize the need for clear, simple explanations on car handling, which at some times can be quite daunting and confusing.
Since that article, I have written several “how to” articles that help you to fine-tune your RC cars, or at least help you to “de-mystify” concepts that are part of our sport. I hope that this article on roll center will help to clear up a lot of the confusion surrounding this topic.
What is a Roll Center?
A “roll center” (RC) is a theoretical point around which the chassis rolls, and is determined by the design of the suspension. Front and rear suspensions have different roll centers.
A “roll axis” is an imaginary line between the front and rear roll centers.
The amount that a chassis rolls in a corner depends on the position of the roll axis relative to the car’s center-of-gravity (CG). The closer the roll axis is to the center of gravity, the less the chassis will roll in a corner. Chassis rolling at one end of the car or the other gives more grip to that end of the car.
Roll center is one of the most under-utilized adjustments on a car, but one of the most powerful. This is because roll center has an immediate effect on a car’s handling, whereas anti roll bars, shocks and springs require the car to roll before they produce an effect.
For the purpose of this article, I have borrowed explanations from a variety of sources, and I will try to paint a clear picture of how roll center works.
Roll Center Basics
Here are some basic facts about roll center (RC) and center-of-gravity (CG).
* Roll center (RC) is the point around which the car rolls
* Each end of the car (front and rear) has its own roll center
* Center-of-gravity (CG) is where all cornering force is directed
* RC and CG are (ideally) in the middle (left-right middle) of the car
* RC is vertically below the CG in cars
* Rolling produces more grip
Where is the Roll Center?
Roll center is determined by the cars suspension geometry. Each end of the car has its own roll center, determined by the suspension geometry at that end of the car.
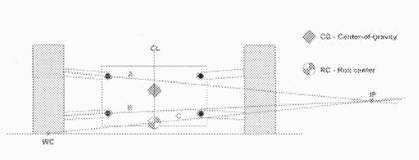
The following diagram shows how you can find a car’s roll center at one end of the car or the other.
This looks a little bit complicated, but here is a breakdown:
* Line ‘A’ is parallel to the upper arm.
* Line ‘B’ is parallel to the lower arm.
* Line ‘A’ and line ‘B’ intersect at point ‘IP’
* Line ‘C’ goes from the wheel contact point (WC — bottom center of the wheel) to point IP
* The point at which line ‘C’ crosses the car’s centerline (CL) is the roil center
Adjusting Roll Center
You can adjust roll center by changing the angle of the suspension arms.
IMPORTANT:
Always ensure that left and right sides of the car have the same settings!
Adjusting roll center can be done in a variety of ways, depending on the car. You can change either end of a suspension arm to change roll center. Sometimes it is easier to change the inner pivot point of the suspension arms (nearest the chassis), while other times it is easier to change the outer pivot point of the suspension arms (nearest the wheels).
Car manufacturers have come up with some innovative ways to do this on their car. Most modern, intermediate-to-pro-level cars have SOME way to adjust roll center.
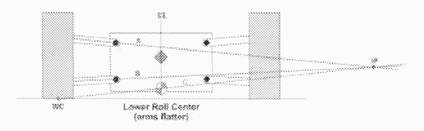
When adjusting roll center, changes to the upper arms result in small RC changes, while changes to the lower arms result in larger RC changes.
(Since the lower arms are closer to the roll-center itself, making changes in the lower arm angle will have a very large effect on roll center position.)
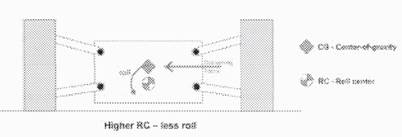
* To give a lower roll center, make the suspension arms flatter (more horizontal).
* To give a higher roll center, make the suspension arms more angled. Upper arms would have more of an upward angle where they meet the wheels; lower arms would have more a downward angle where they meet the wheels.
How Does Roll Center Work?
When cornering, centrifugal force is applied to the car’s CG, which tends to push the car to the outside of a corner. This causes the CG to rotate around the RC. Since the RC is below the CG, cornering force causes the car to rotate AWAY from the force. Hence, the car rolls to the OUTSIDE of the corner.
* When the RC is far away from CG (lower RC), when the car corners the CG has more leverage on the RC, so the car will roll more.
* When the RC is closer to CG (higher RC), when the car corners the CG has less leverage on the RC, so the car will roll less.
* If the RC was right on top of the CG, when the car corners the CG has no leverage on the RC, so the car would not roll at all.
Depending on what the car is doing, you will want one end or the other to roll more or less. You change the height of the RC accordingly to make it closer or further from the CG (which for all intents is a fixed point).
Effects of Front Roll Center Adjustment
Front roll center has most effect on on-throttle steering during mid-corner and corner exit.
LOWER front roll center
* More on-throttle steering
* Car is less responsive
* Better on smooth, high grip tracks with long fast corners
HIGHER front roll center
* Less on-throttle steering
* Car is more responsive
* Use in high grip conditions to avoid traction rolling
* Use on tracks with quick direction changes (chicanes)
Effects of Rear Roll Center Adjustment
Rear roll center affects on- and off-throttle situations in all cornering stages (entry, mid, exit)
LOWER rear roll center
* More on-throttle grip
* Less grip under braking
* Use to avoid traction rolling at corner entry (increases rear grip)
* Use under low traction conditions
* Increases traction, reduces rear tire wear
HIGHER rear roll center
* Less on-throttle steering
* Car is more responsive
* Use in high grip conditions to avoid traction rolling
* Use on tracks with quick direction changes (chicanes)
Last edited by autox320; 02-07-2017 at 10:00 PM.
88 M3
91 318is
91 318i
83 320is
08 X3 3.0si
"If it flys, floats, or f*cks, rent it!"
Member
Thank you for all the info !
Quick question.
Is it best to mount the rear shock vertical ? I have a e30 rear sub frame in my e21 and of course one of the challenges was trying to mount the shock in the same location as e21 stock. Right now I am using a set of qa1 coil over shocks mounted to a bracket that comes off of the e30 spring pad and mounts to another bracket that is welded to the lower portion of the e21 shock tower. It has a slight angle to it, about 2 degrees. The test drive went well, but I won't know until I get it to the track and see how the car behaves.
Member
We did discuss this exact thing actuallyOriginally Posted by m60b30530i

Far as vertical yes it should be close to 90 to the trail arm within the range of travel your in to be most effective. From my talk with Daryl it's noted at about passing 87 degrees the shock spring combo becomes less effective. That's only a 3 degree window, but yup was going to check mine when mount cause probably going to try a custom mount approach. Truth be told I want to run inverted to save more unsprung weight. The M3 Jstock bilsteins do this in the rear.
88 M3
91 318is
91 318i
83 320is
08 X3 3.0si
"If it flys, floats, or f*cks, rent it!"
Member
Awesome. Good thing I have room on my upper mount to move the mount location.
Member
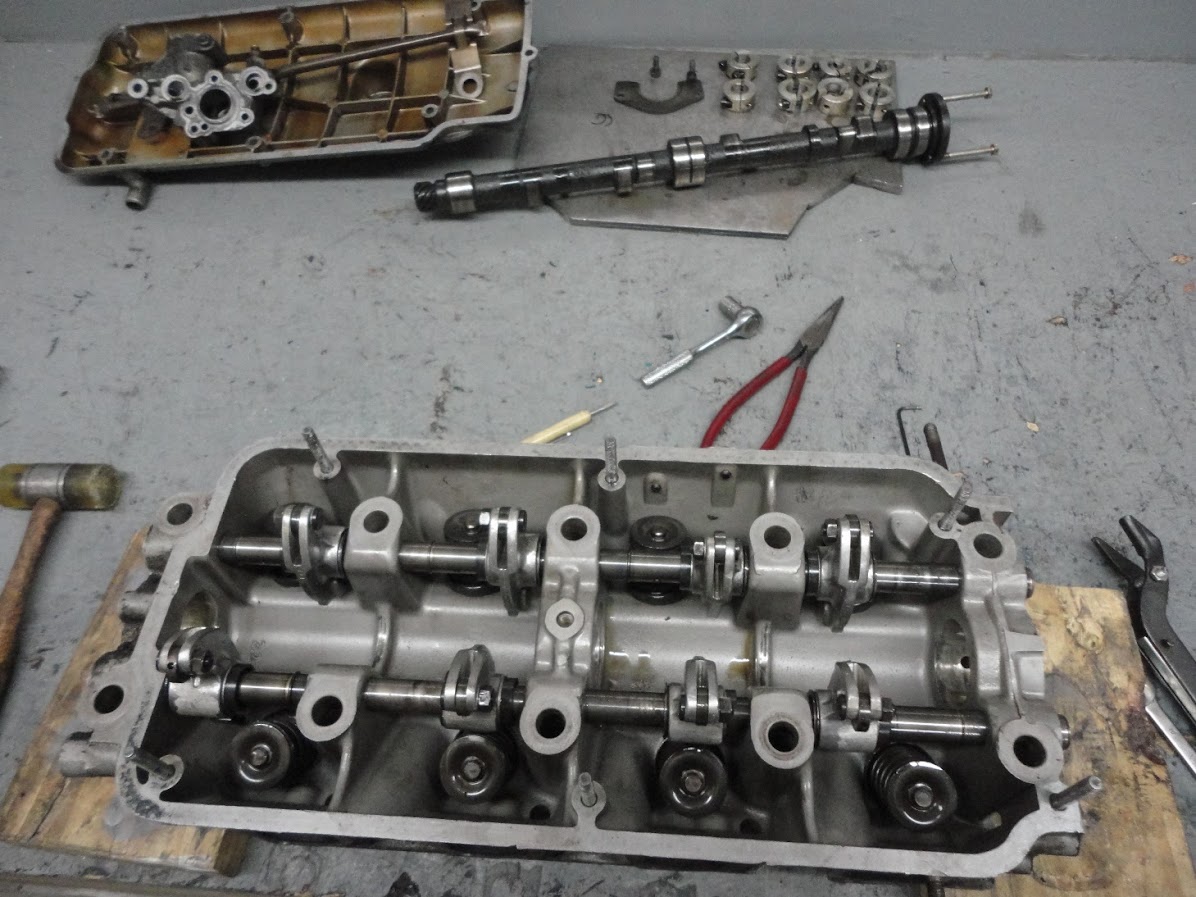
Can't find any tools for the cam removal. We did move quite a bit since 2004 so some things may still be missing in the garage. I need to measure some things with the head. Cleaned the bench and degreased it for surgery.
A quick search found exactly what I was looking for and put my own spin on it. Quick removal guide with minimal tools. For this I used a beer, a pack of used "shop socks", small flat screwdriver, and 10mm wrench. While downing beer rotate the cam with a couple bolts in the face and your 10mm wrench as a lever. Do a valve adjustment but put the eccentrics all the way with no lash. As each valve full opens during adjustments, stuff an old sock packing it around the valve on the bottom side. Once done roll the cam till least resistance and loosen all eccentrics. Unbolt the cam lock and tap it out. Slides right out. So quick you should even have beer left over
Neat shade tree tip off the 02faq forum.
88 M3
91 318is
91 318i
83 320is
08 X3 3.0si
"If it flys, floats, or f*cks, rent it!"
Member
My doorstop head has been around a long time. It's a stock head milled .025" off it. Max limit most shave is usually just under .020". Much closer and you'll hit the valves or hit the exhaust studs
Wanted to take a sec on the rockers etc on these cars cause It's been a long old talk and fail point in the past. These are older 77 early 2.0L style aka "chunky" rockers. The early versions were meaty compared to the later 80's 1.8L. It's nothing new and guys used to swap them for earlier ones being slightly stronger. These are deburred and peened. Of course rocker side locks and these are custom made from aluminum bar stock probably before anyone sold the idea of rebranding the 5/8" mcmaster carr split collars. It was just tedious to make the aluminum ones when the mcmasters were so cheap and avail we pointed people to them. Later well you know what happened. Anyways another and probably most important is not just using cleaned and peened rockers. It's the rocker hardware itself. Everyone use to miss this IMO. The reason the rockers break is movement true so rocker locks help save the pad side, but the eccentric side breaks too. We found it was the cheap soft stock hardware cause you to want to over tighten the pinch which caused the area under stress to snap. Also they had washers which in a clamp situation can slip or spin; even with split or wave washers. We used uprated bolt hardware and hardened nuts without washers. They never slip and don't require to wrench them so hard to clamp down ie much less stress on the ends. Knock on wood haven't broken an arm since 04.
Machine shop cut the hubs and they fit the rotors perfect now. Looks like 1/2" gap to make a caliper mate up. I'll get to it eventually to conjure up a mount.
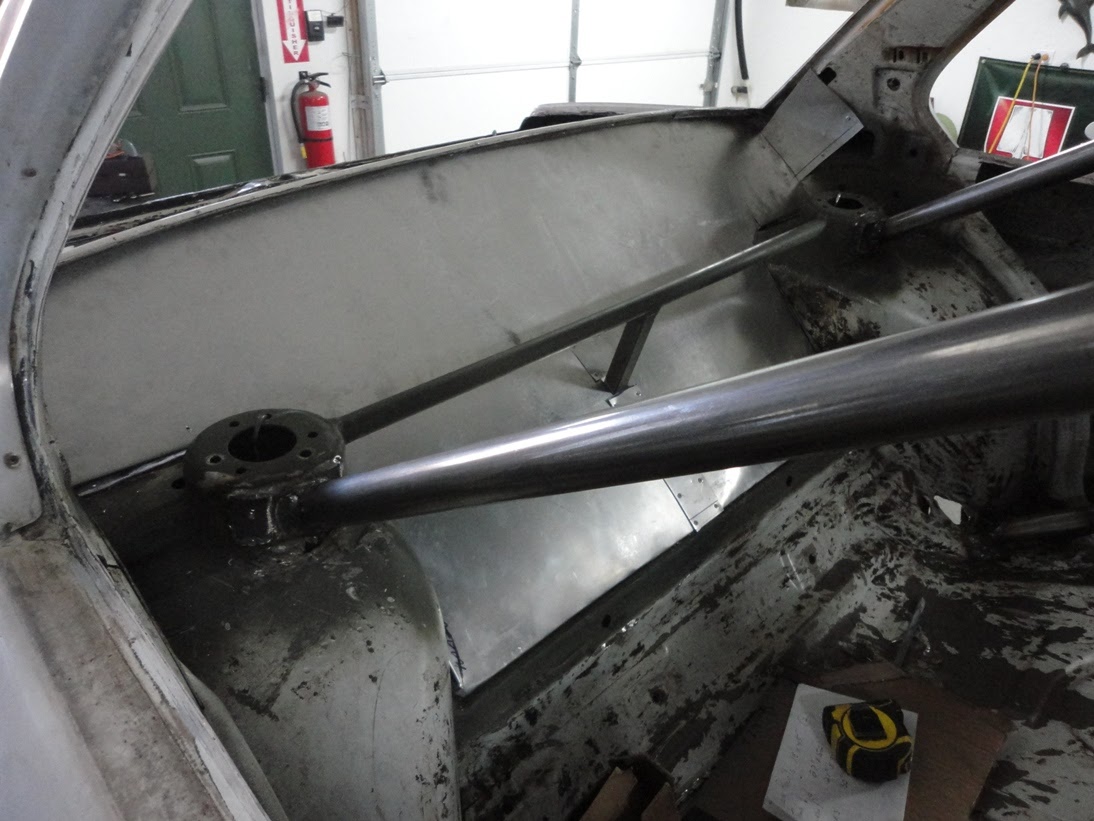
After cleaned up what I wanted to see on the head I put it back together with the test springs left in cyl 1 for future assembly. As with the socks stuffed in for taking out the cam used them to slide things back together effortless. Cleared the bench for more metal work. Tied in the subframe outer points for the trail arms to the cage. Last just finished cutting up into the body work for the arms to swing. Went ahead and made them fully clear even though they'll never reach this compression level unless the shock disappears. So if ever wondered whats back there it's 3 layers to reach the inside due to the factory gussets that area above. I welded the top layer of floor and cage to tie it all in. Could put a few beads on the other exposed layers but may be overkill. It's very stout now tying the subframe to the body via 4 points into the cage and the diff is solid mounted also tying into the cage.

88 M3
91 318is
91 318i
83 320is
08 X3 3.0si
"If it flys, floats, or f*cks, rent it!"
Member
The MK1 rotors fit if your using bolts. If using studs the holes need to be drilled out to about .580" . No issue really cause just cast iron so a quick open and they fit like a glove with stud kits. I checked a quick fit of a caliper and wheel to see if cleared and think good to go. Just need time to make it up.
Well dropped some coin. I ordered everything for the motor except pistons and clutch kit. Pistons should be sorted very soon as well and placed on order to put in cue. Think we'll get the tires now also since it's pre season and they are in stock. Once season gets under way it's hard to get the Federal RSR's. Ordering a set of the new compound 595RS-RR. The Federals run very wide like 20mm wider than advertised. So a 205 should be close to a 225. I know there's always something I'll forget, but far as major budget purchases that should wrap it up closing to completion. Still have some wiring and plenty to do after finish up suspension and brakes. How do you eat an elephant? one bite at a time man
Golden IPA

Last edited by autox320; 02-14-2017 at 08:48 PM.
88 M3
91 318is
91 318i
83 320is
08 X3 3.0si
"If it flys, floats, or f*cks, rent it!"
Member
The GC sleeves on our rear struts were frozen on after 13yrs. Dropped by a machine shop so they could press them off. Natures weld ie rusty in there along with the large build up of debris from years of road driving and grime. Took a 55ton press to get them off the snap ring and over the shock body
While I was there today I put some valve springs in the tester just to get some reference. Numbers were at my install height for my head I measured which is different for every head cause mine has had a few valve jobs. The springs were compressed 0.500" which on the intake side in my head was the max travel before keepers hit the stem seal. Exhaust side was 0.530". Most all camshafts even the Schrick 336 are within 0.500" pushing the valve off the seat. I used this as a ballpark idea to see what kinda pressures they could deliver at max compression and all seem to go just over 1/2" before binding so that's a good thing. I had some stock M3 springs from my motor build since used uprated evo springs in it. They were only .060" shorter than stock M10 springs so tested them on the same basis just to see if any stiffer if were in a M10 head.
125 lbs/in at 0.500" = Stock used m10 valve spring from 1.8i head; I bet a new spring is slightly better, but needs to be checked after a few heat cycles
145 lbs/in at 0.500" = used TEP dual spring setup (these are .200" taller than single springs)
145 lbs/in at 0.500" = used Single HD springs
165 lbs/in at 0.500" = Stock used M3 S14 2.3L dual springs (these are .060" shorter than single springs)
Something to chew on. Ballpark it is, but have some general data the duals and HD's aren't much more pressure than I thought.
88 M3
91 318is
91 318i
83 320is
08 X3 3.0si
"If it flys, floats, or f*cks, rent it!"
Member
Random pic through the fuel hatch.
hmm need some bolts, but should work; hit the ebrake to compress the pads on the rotor; need a bracket .470" bridging the gap

88 M3
91 318is
91 318i
83 320is
08 X3 3.0si
"If it flys, floats, or f*cks, rent it!"
Member
Nice tie in to the cage. I wanted to do that on my e21 but it was a challenge enough to get the e30 rear sub frame in and aligned on the ground in a old barn. lol
What I do plan to do is build a x brace that will tie the sub frame to the uni body. My gas tanks are gone so I have that empty space to fill.
Off topic question,
Who do you use for image hosting ?
Member
Thanks man, it's a fun build.
Yeah few extra holes with the hole saw. Minimal I figured at least bolt it through the floor to give the tall mount box support. Barn whaat
Just thinking but if tie into with a brace, maybe an idea to make a harness style bar inside behind the front seats across the tunnel. Then tie into that.
I switched to google photos a short ways back. After the forum couldn't tell me why my pics wouldn't upload anymore to the BF server. I was told it wasn't a storage issue yet no reason why it stopped working or fix. Only way I find the google photos work is using copy location and post to BF via URL but uncheck the retrieval box or BF says the link is bad. Google is free and unlimited hosting. How else could you take over the world.
88 M3
91 318is
91 318i
83 320is
08 X3 3.0si
"If it flys, floats, or f*cks, rent it!"
Member
Used some left over 10mm id sleeves and cut them down for mounting the calipers. Even after using shims under the rotor and faces of the caliper I die grinded the inside of the caliper to blue print it to the fitment. Made sure to have clearance when or if the rotor grows from heat. Finally found some 10.9 metric M10x1.25 bolts to do this. Almost had to internet order some, but a local mom and pop place had what I wanted.
Calipers clear the rotors, and everything mounts up and clears the wheels. Just need the larger wider Federal RR tires to see how close they get. Built in a bit extra clearance into the control arms and hope it's enough
Just look at those 2004 dry rotten azenis

88 M3
91 318is
91 318i
83 320is
08 X3 3.0si
"If it flys, floats, or f*cks, rent it!"
Member
Thats my plan weld a bar low and across. Tie the brace into that bar. Then its time to stiffen up the front end.
Member
Few things came in, and a bunch of items are in cue. Further reducing the swing weight of the rear trail arm using mk4 aluminum calipers. Tons of engine items came in, but just put on the shelf for now until it's all ready. Tires arrived and need to mount them up to check clearances. They are wider than Azenis but not as bad as predicted. I like how the Chinese are treating the new RR tire pretending and branding it a 200 wear to enter and sell for series classes
Pistons are finally on order. Going with JE. Called RaceTep and actually had a blast talking to Steve a bit. Just bs'ing in-between items I wanted to order was motivation once again for the project.
Stack comparison. Azenis are on wheels and new tires are not. Width will be a bit more I think once mounted.

Last edited by autox320; 03-05-2017 at 07:16 AM.
88 M3
91 318is
91 318i
83 320is
08 X3 3.0si
"If it flys, floats, or f*cks, rent it!"
Member
Seriously side tracked this weekend. My bro was in town and other family medical matters. Also had to tear off the trans from one of the 318's for a leaky rear main seal. So the garage is a bit full at the moment. Still we managed to knock back some German IPA and mock up mounts for the 320. I honestly didn't give the mounts much thought until now so brews in hand I looked around the garage for something to use. I wanted round on one end and sleeved bushing or preferably conveyor mat, hockey pucks or delrin. Wasn't long I was digging the trail arms back out of the scrap pile from outside to contribute to the cause. I shimmed the passenger frame rail with some angle iron for the headers to have clearance when done. The oil pan to subframe with piece of scrap 2x6, and scrap aluminum 1/2" tube. Driver side extended sump just clears the suspension inner heim. After a few mock up attempts can't get it any closer in any dimension. The engine actually sits lower than stock with this oil pan, but pushed the trans up in the tunnel to get exhaust header clearance. I used a 318is next to me in the shop to stick a level on the valve covers for reference. The only restriction we see with this setup will be the long tube headers which may work or will be cut down. I see TEP has shorty's but we'll try this first. If I do shorty's I'd try for cutting the long tubes into a tri-Y setup to keep the effective collection point the same. I like the long tubes powerband
Engine mounts came out pretty good I think. Dad cut the scrap left over roll tubing pieces and tweaked the ends just shaped needed to mate up. Was welding the trans mount into the car and ran out of weld gas right in the middle of it. Got it in place at least, but needs some love to look presentable. The tunnel is paper thin there so may put some plate on the inside of the car at the mount points. So far no luck it just eats the sheet around it. I need to fill the tank and hit it with some grinder surgery to clean it back up. After a several beers it's still just too damn ugly so needs to be fixed
Shaft will need to be shortened quite a bit, my guess is the motor is moved back about 6 inches. I'll know for sure when measure flange to flange how much to cut.

88 M3
91 318is
91 318i
83 320is
08 X3 3.0si
"If it flys, floats, or f*cks, rent it!"
Member
Finished up the 318 rear main seal job tonight so should get back to the 320 hopefully tomorrow. The trans tunnel is just too thin. I think it's due to age of the sheet metal and the area I want to make my brace is thin due to the form stamp of the tunnel when made. It's thinner in the wall area when they stamp stretched the metal. I want to attach but it's in the middle area where it was paper thin. The factory rail tabs will come off and i'm above that corner area where it's thicker. Sure the motor mounts are stout and would hold up but I just don't like the trans tunnel. I want to attempt to improve where I need to be before getting carried away.
Motor is moved back 5.75" from stock. Yea for the handling department.
Measured the shaft we need. Diff is mounted as far back as it can be on the subframe(axles still forward of trail arm OLDMAN). The 4hole flange front shaft is shorter than the 3hole. By 1.5" shorter. So using the 4hole shaft and 8 hole guibo. The guibo itself is 1.5". Even so we still need to cut the shaft by -4.25" to fit. Planning to cut the front shaft only so the rear one with u-joints can be replaced easier if needed later.
Anyways can't wait to get back at it.
Last edited by autox320; 03-10-2017 at 08:40 PM.
88 M3
91 318is
91 318i
83 320is
08 X3 3.0si
"If it flys, floats, or f*cks, rent it!"
Member
Jealous of that motor fitment. I moved my m20 back about an inch from factory, but I was stopped from going any further because I did not want to shorten the drive shaft. I used a shaft from the e24, the length can be adjusted.
Member
I come here to drink...and to view the impressive work!
Member
Well I had to slip into work for 12+hrs over the weekend, but found time to get back on this mounting issue. Finally have something stable for a trans mount. Took extra work, but I know it's not going anywhere when raping the gears. Cut away the thin section of the tunnel and sheet over it best I could. Then made a tri walled trans mounting tabs. Finished them off with more dimple style gussets on the tunnel. Dad started in on the trunk floor mock up using sign aluminum. Just a mock up cause will use lot's of rivets on the perimeter thinking it will see some air flow underneath. Will probably trim the back to have a rear diffuser effect.

Last edited by autox320; 03-12-2017 at 07:08 PM.
88 M3
91 318is
91 318i
83 320is
08 X3 3.0si
"If it flys, floats, or f*cks, rent it!"
Member
Thanks, and cheers. As much consumption of the brand in this garage, the build should be sponsored by Sierra Nevada.
88 M3
91 318is
91 318i
83 320is
08 X3 3.0si
"If it flys, floats, or f*cks, rent it!"
Member
bit more progress
Cut over 2.5" out of the shift linkage and decided to use my existing short shifter. It's welded longer bottom section used to have a few thou clearance to the driveshaft requiring solid mounts to not make contact with the shaft. It's just a simple solution to having a nice solid short shifter so decided we'll reuse it and live a 2nd life. Mocked up and drilled the bottom seat bolts. Still need to make the rear bolts with tabs from the cage and harness mounts later. Dad continued sheeting the rear firewall and sunroof. Mil 3003 aluminum .040" sheeting. We'll be using it for most of the remainder cover jobs and probably some simple front fenders.

88 M3
91 318is
91 318i
83 320is
08 X3 3.0si
"If it flys, floats, or f*cks, rent it!"
who cares
BMW CCA Member
I was about to say that nobody is as O.G. as me, until I saw you survived the purge of Sept. 2001 lol
Very nice progress on this
Stancing is for drivers trapped in an abusive relationship of their own lives.
 Posting Permissions


 Reply With Quote


Bookmarks