
 Member
BBK on a Budget. Project notes.
Normally I complete my projects first, then announce.
This saves the trouble of suffering the naysayers the seekers of the obvious.
But this idea is ...
- already revealed,
- already talked about in another context,
- fairly simple, trivial even,
- and so far it looks like it could go to a successful completion,
...so I had best start this dedicated thread before I get run over by every me-too keyboard jockey out there.
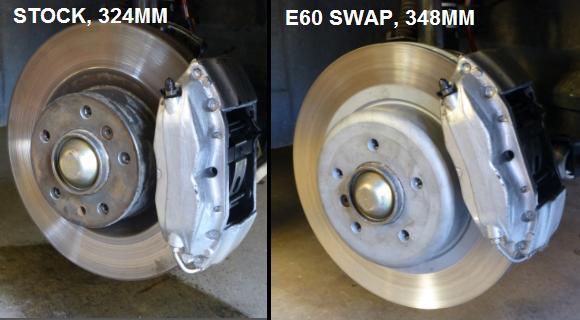
The rotor we investigate here is (PN 34116763824) from the E60/E61 models 545i & 550i, MY 2003-2010, and additionally the 530i/d and 540i in europe.
The rotor can also be found on 6-series E63/E64 from the same circa.
Certain lower engine trims (525i and 530i in US) had a smaller (320mm) rotor.
This spec rotor can be readily acquired for as little as $120/pr.
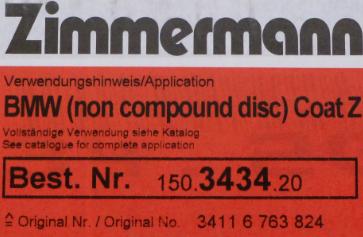
Here we use a Zimmerman brand PN 15343420.
Several choices, I'm not pushing any one.
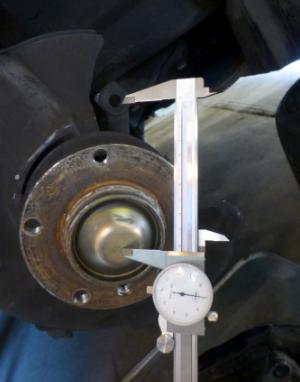
It has been determined that every critical dimension and feature matches my existing (probably aftermarket) E31 disk except the outside diameter, 348 vs 324mm.
Of particular interest, the seat-to-disc offset is the unchanged and hence the shield clearance is unchanged.
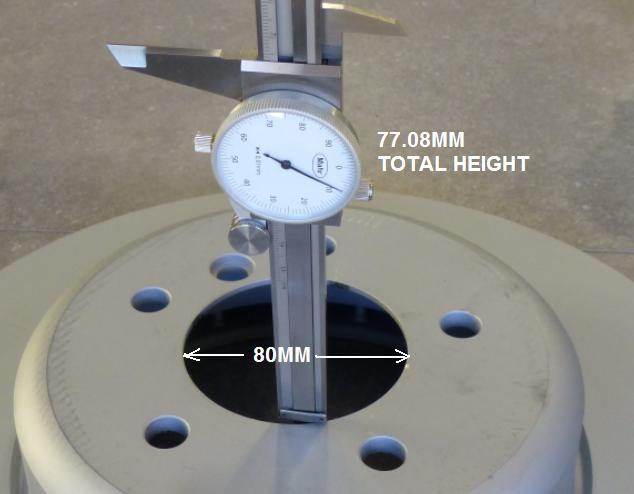
Total height (including seat thickness) = 77.08mm
Seat thick = 7.14mm
Disc width = 30.00mm
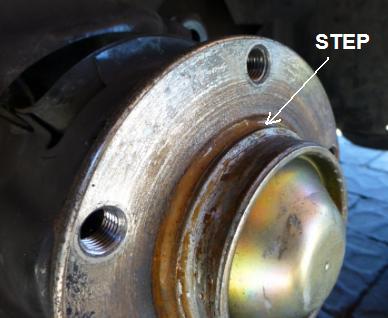
Inside diameter is just over 80mm.
Why not say 72.6? The hub has a step.
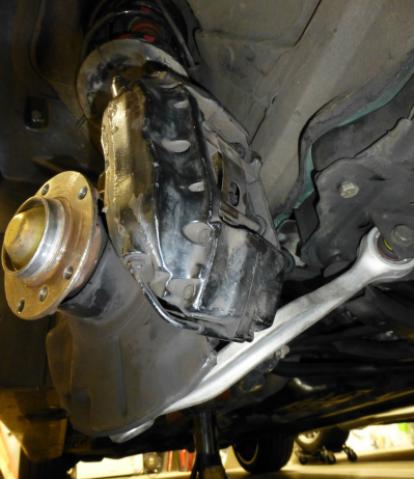
Confirmed, the E60 rotor mounts properly on the (late) E31 hub
Shield clearance? Couldn't believe my luck. It's the same vs E31 rotor.
The existing Brembo caliper needs to move radially outward from the hub by say 348-324 = 24mm.
Personally I have the option of breaking out my TIG welder and mod'ing the knuckle/strut, and this I have done over on my Ford van, and would be my preference.
However, since others might be interested in adopting this rotor application, it can't be such a one-up job, rather we need to design and fabricate a bolt-on bracket taking a formal CAD -> CNC route.
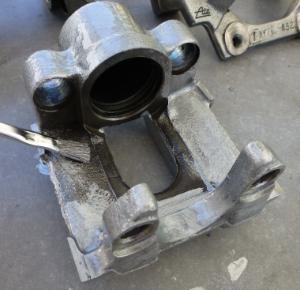
The step before CNC is 3D CAD, and the (optional) step before 3D CAD is to hack a prototype.
This is done (currently) in my shop on equipment that any caveman would think highly of.
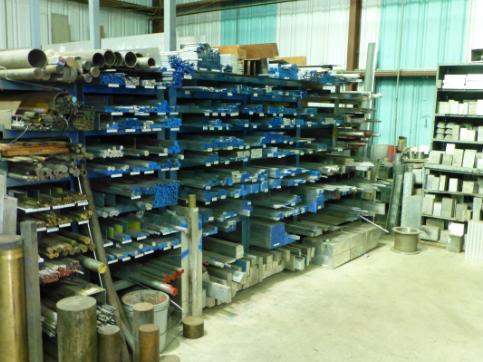
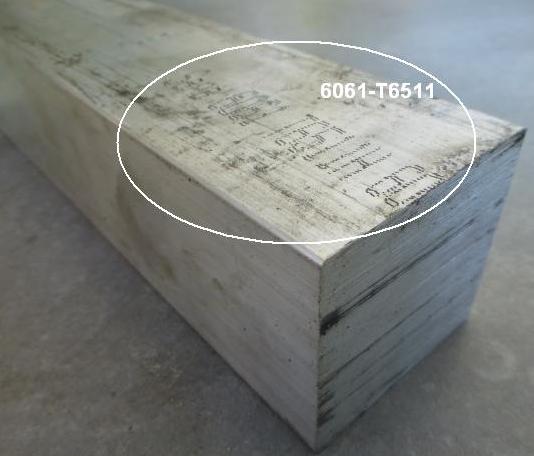
At the metal supply house, to select 2" square stock...
Strength is not critical so its 6061 aluminum over pricey 7075.
{ed: Later for production, I did switch to 7075 for the much heavier ATE 1-pots with Brembos still in 6061.}
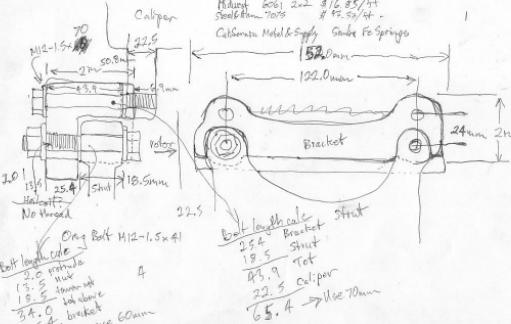
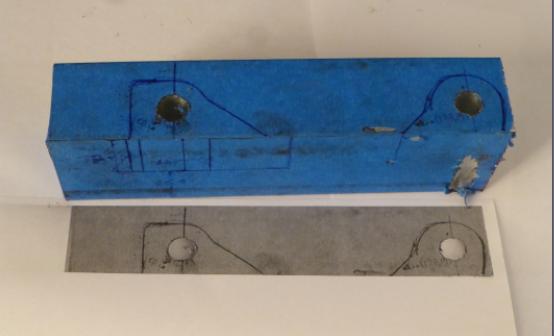
The obligatory back-of-the-envelope sketch.
This gets migrated to 3D CAD (Solidworks, TurboCAD, whatever), then sent over to a CAM package via DXF where we extract the tool path into a text file that is fed into the CNC machine.
Class 10, coated hardware was quite pricey as it was procured on short notice from Belmetric.
BF12X1.5X70GEM, BF12X1.5X60GEM, NTLH12X1.5DAC
The coating is variously called Geomet or Dacromet, good for 572F degrees and 720hrs in saltwater.
Although the Brembo caliper is moving further away from the chassis anchor point for the other end of the hose, the original line length looks still adequate.
To be updated in say a week.
Last edited by Hyper; 07-13-2017 at 11:27 AM. Reason: Pic link repair, re PB affair
Member
Very interesting, keep us posted!Originally Posted by Hyper

Mad Scientist
Umm... shouldn't that 24mm be halved? The extra 24mm in diameter of the disk is only 12mm extra on any particular edge...
Member
Yes, and I'm a seeker of the obvious.
Suffering while prototyping.
Member
Trust me, this battle would be over quite decisively in a matter of a few hours if I could only employ my grinder and TIG.
However, we are indulging a bracket.
**********
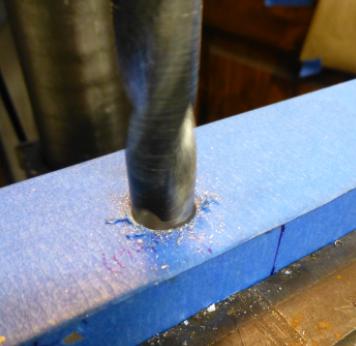
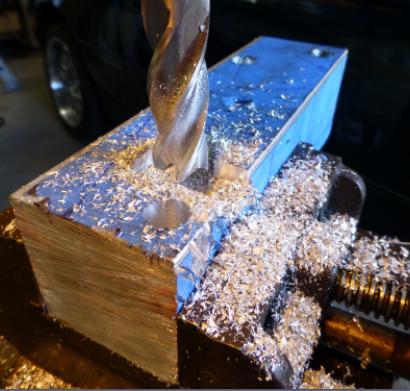
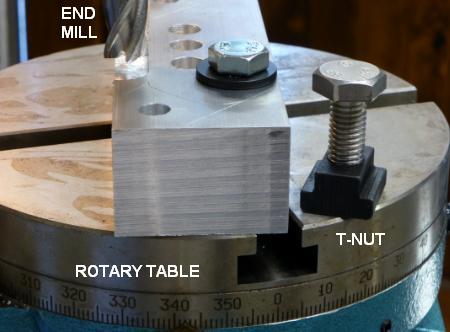
Tooling...
12.1 mm drill bit plus and end mill, suited to my poor-man's machinery.
The original E31 caliper mounting points at an approx radius of 104mm from the hub center.
Therefore the "E60" mounting points would have a radius of 104mm + (348-324) DIVIDED by TWO = 116mm.
I seemed to make the most progressive by drilling the mounting points (122mm CC) into the aluminum stock, then scribing, then photocopying so as to do "a little geometry" on paper.
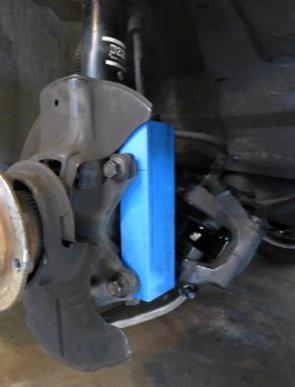
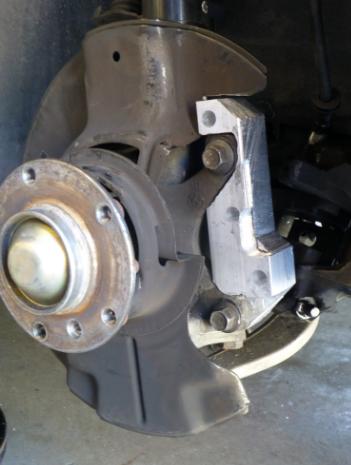
With the new mounting radius at +12mm, one can not simply force the caliper outward.
Rather the caliper is forced to clock north or south to avoid the knuckle-bracket mount.
I first tried north, got uncomfortable for some reason, then tried a southern clocking.
However, with any further southern clocking, the Brembo's would then collide with the (upper?) control arm with full steering.
Therefore back to investigating a northern clocking.
Last edited by Hyper; 07-13-2017 at 11:30 AM. Reason: Pic link repair, re PB affair
Member
What was bothering me was the need to notch a triangle out of the shield, which is true, but it turned out less than I first imagined, and otherwise it seems there is potential up north.
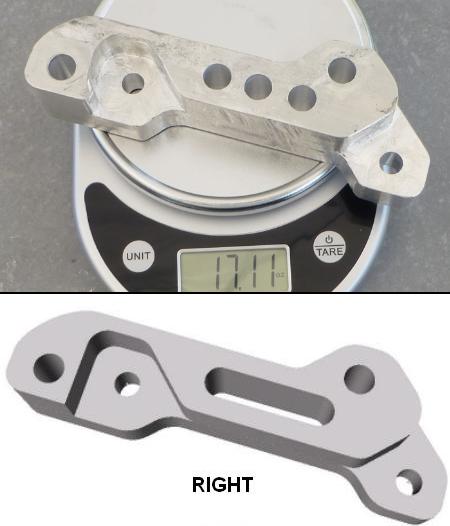
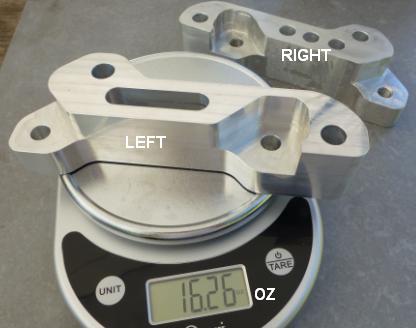
Now iterating, reducing weight (down to about 24oz. {ed: nope, heading towards sub 16}) and eliminating the expensive hardware.
Should have the caliper properly mounted within a day.
Fyi, E60 rotor weight = 11.3kg measured, whereas my used E31 rotor is 9.5.
Therefore the weight gain, disc plus bracket, is likely around 2.2kg over stock. {ed: now 2.0kg over}
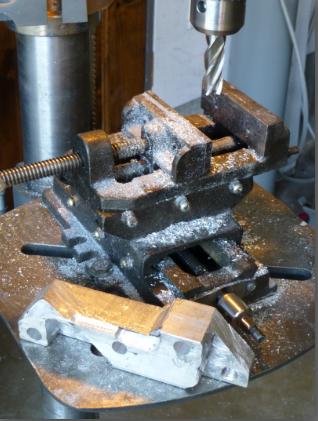
End mill chucked into a lowly drill press, work clamped into an X-Y vise.
Last edited by Hyper; 07-13-2017 at 11:31 AM. Reason: Pic link repair, re PB affair
Member
I am thoroughly enjoying following this project. Thanks for the updates and photos.
Someone want to do the math on increased braking benefits versus greater unsprung weight? If I'm reading this correctly, we're talking about twenty extra pounds of unsprung weight -- definitely not nothing! I'm punting on the analysis, having gotten only about three hours of sleep last night...
EDIT: Right...nine or ten pounds, front wheels only, multiply by two rather than four... Doh! Congrats, I now own the biggest bonehead comment on the thread, having well exceeded the radius/diameter oversight above. I really must get some sleep this weekend!! Thanks for responding. In theory, a 9% torque increase is significant. In reality, if you have brakes strong enough to engage the ABS system (i.e., traction-limited by the tires), I've never understood how bigger brakes are going to make any difference at all. Racing and heat dissipation is another matter, and improved cosmetics are different altogether, but I would expect actual stopping distances on a typical vehicle to be more or less the same. But I've hijacked the thread enough as it is, and will just bury this as an edit in my original post while continuing to enjoy your updates. Keep up the good work!
Cheers, John
Last edited by dukegrad98; 07-29-2016 at 03:52 PM.
Member
About 2.0kg x 2 = 9lbs total for the two corners and I make out an increase in torque on the order of 9%.
My quick math:
(New rotor radius - half a pad) / (Orig rotor radius - half a pad)
Last edited by Hyper; 07-30-2016 at 09:40 AM.
Member
We have all suffered the seeking of the obvious, now onto the naysaying.
In my case the brakes can not easily engage the ABS system unless I engage in some serious leg press and even then I might get a floor tap instead.
This illustrates the more important criteria, which is not the limits of braking potential, but rather the pedal effort required to achieve a planned deceleration.
Currently I can't hand the vehicle over to the alternate driver, a petite asian woman who might expect the brakes to have the same effort (per deceleration) as on her Lexus. It's not even close.
The result would be failure to apply the brakes with sufficient force, sufficiently quick.
This budget BBK approach is identified as Plan B while in parallel, investigating pads, braided lines & fluid.
Plan C is investigating hydraulic pressure.
Plan D would be bigger, better calipers as would be supplied in a $2K+ BBK.
Plan E is to sell the car.
- - - Updated - - -
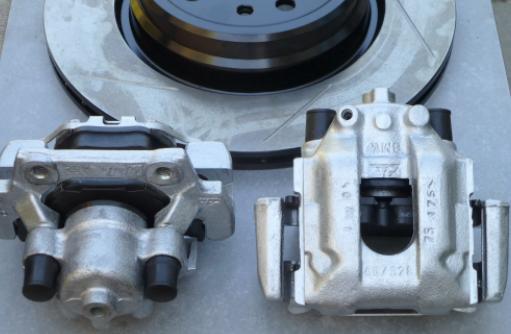
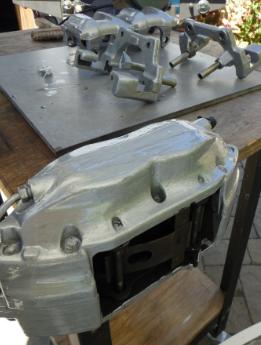
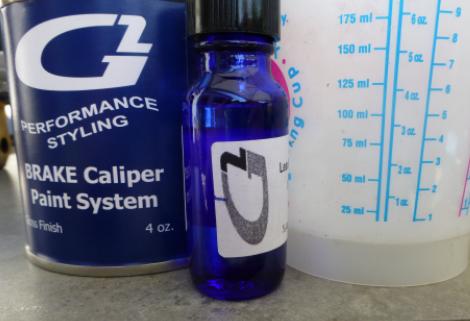
While we're in there...
G2 silver paint to match the E38 rebuild going on in the back forty.
E38/750 rear calipers, vented disc (StopTech shown).
While overhauling the e38's, it was determined that the piston size is the same as the orig e31's, and the rest of the caliper is just a wider version of the original 'cept the port style. Therefore no change in cold braking.
I was ready to drop this project at this point, because I would prefer to stay with the paid-for, lighter, solid disc.
However...
- It would be nice if the heat capacity were increased to match what was going on up front. It would be funny/strange if someone tracked the car and the rears went away while the fronts hung in there.
- On Plan A, I am swapping in new pads, but suppliers were supplying me pads too thick to load into the narrow E31 calipers. I could either turn down all 4 or 5 samples of pads OR swap in the wider calipers.
- My E31 discs were found to be cracked around the inner (parking) radius, therefore I had to spend money anyway, either on the solid spec or the vented spec.
Last edited by Hyper; 07-13-2017 at 11:32 AM. Reason: Pic link repair, re PB affair
Member
Not at all. I can appreciate a project for its own sake, but thanks for explaining your circumstances. Braking forces / pedal dynamics are WAY down the list of why the alternate driver in my house doesn't have keys to most of the cars!
Cheers, John
Member
The E31's master cylinder piston diameter, caliper piston area and rotors sizes are the same as other BMW's with similar weight and more than adequate brake torque.
Yep, the hydraulic Brake booster system is unique to only a few BMWs, (E23, E24, E28, E31 & E32) however I have yet to find it inadequate as a brake booster system on the 2 cars I have owned.
My 97, 850 has always had good brakes that do not require excessive pedal force.
I upgraded my brakes to the Euro CSi, 345x32 mm front and 328x20 mm rear rotors shortly after I purchased it.
That I recall the pedal feel did not change that much and it stopped very good with the OE brakes. and yes I have ABS the brakes several times on dry pavement
I attributed any significant increase in brake torque due to the Textar 4056-FF & 4057-FF pads over the E31 OE Jurad pads.
On my E34, M5 installing the same BBK was a dramatic upgrade, but the M5 OE rotors were only 315x30 mm front and 300x20 mm rear.
I also had a BBK on my E24, M6, now that was a huge upgrade.
For me the BBK on the 850 is more about the increase in heat dissipation than brake torque as I drive a lot of mountain roads and I like having the reserve capacity for the long down hill speed runs.
Just a thought...Have you tested the Brake Accumulator Lately?
Is the pedal hard when you attempt to panic stop the car but the brakes perform normally with a more casual brake application?
Is the brake pedal hard as soon as you turn the engine off?
These are all symptoms of a failed brake booster accumulator.
A good brake booster hydraulic accumulator will stay functional for 20 brake pedal applications after the engine is shut off.
With the engine off the hydraulic fluid level in the reservoir should rise to within 10mm of the top after 20 pedal applications.
Unfortunately, I have yet to measure the hydraulic booster pressure however the system has 2 pressure sensors/switches (common to all systems) that should indicate a low system pressure on the dash brake light. However the pressure sensor may only provide a quick blink on the dash brake light during panic stops with a bad brake booster accumulator.
Automotive photographer
Is this the (!) symbol on the dash cluster?
Member
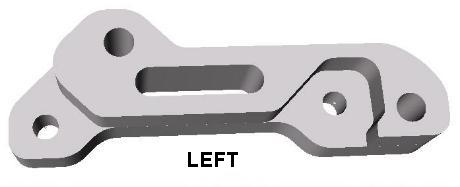
Prototype has been converted to CAD.
And I now know how much it cost to produce, in singles and in volume, and the lead time.
Off to CNC proto where I will spend approx $200 per bracket.
{ed: I later got a bench top mill and was able to manually knock out proto's and pre-production units.}
Slightly updated since Rightie above.
Last edited by Hyper; 07-13-2017 at 12:03 PM. Reason: Pic link repair, re PB affair
Member
Looks great, so are we looking at $400 for 2 brackets, left and right?
Member
We?
I spent $190 for a single leftie.
That...
- Qualifies the shop for production quantity.
- Qualifies both the design (for the left side) and the CAD output files.
- Gets me a match for the existing rightie that I previously cut myself. Then I can go for a little drive.
Production requires that I spend on the order of $2K -> $4K, so this was a prudent check on several things.
Member
Great R&D and Engineering as usual.
If in need of metal let me know.
Breaks are very often overlooked.
Member
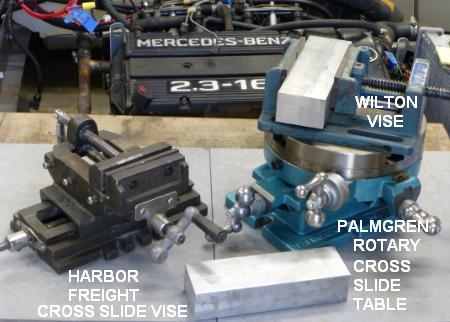
While waiting for leftie to return from CNC, my proto operations were upgraded out of the Harbor Freight category.
Cavemen now come to gawk.
A rotary table allows me to bolt down a vise of my choice...
...and/or bolt the work directly to the table.
This allows the end mill to travel past the edges without colliding with a vise. {ed: correction, the table moves therefore the edges travel beyond the end mill.}
Rotation allows the work to be aligned along an X-Y cross slide.
The CAD predicted the weight as 16.4oz, but this 2nd article had the interior drilled rather than slotted.
Last edited by Hyper; 07-13-2017 at 11:35 AM. Reason: Pic link repair, re PB affair
Member
BMW CCA Member
Been following this for a while. Great work on the bracket Hyper,
You said the E60 rotor fits on the later style hubs, are they any different from the earlier hubs?
I see on Real OEM there are different part numbers listed, 31221139345 are listed for all models and which are the symmetric hub, 31211129386 for up to 1992 and 31221139348 from 1992 and up for the asymmetric hubs. I'm not sure what the difference is between them other than the screw hole that hold the rotor in place.
So is the plan for the rears to use the E38 rear calipers with a vented disc, and will that just bolt on without modifications?
Member
*** Compatibility ***
The bracket seen here so far is good for models that uses the Brembo-lotus.
Same conservative statement regarding the rotor.
I'm not making presumptions about any other setup than the one I have personally tried out, but have no technical reason for how I've "bracketed" the application to the later MYs.
I'm not one who can or should comment on the other apps, but I'm sure others know that stuff thoroughly.
I do plan on trying out the 850-single in place of the Brembo (with the E60 rotor a late MY) and doing a version if needed, however, I would have to borrow an early 850 (vehicle) to check out the reverse, Brembo and/or rotor on a '91.
There might be differences in the strut, hub, clearance to control arms, etc.
*** Rears ****
--> E38 vented rear rotor project link
There is a larger rear rotor associated with the E60 (345mm iirc) as well as other rotors, but there is no reason to assume before testing that any of them fit the hub, work with the E31 parking shoes and clear the shield.
And that would also be another bracket.
Last edited by Hyper; 08-19-2016 at 04:10 AM.
Member
CNC version, slotted, versus 16.4oz predicted.
Current R&D considers a couple of known flies in the Brembo soup.
The 850 single is another dish with other, unknown flies.
Basically...
- A design criteria is to reposition the caliper using an DIY adapter bracket rather than modifying the strut via welding/machining.
- The small difference in mounting radius (before & after) means that the caliper must be clocked so that the new bolt is displaced sufficiently from the original bolt.
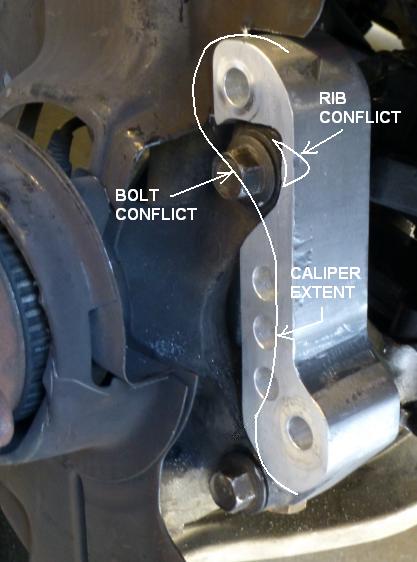
- The Brembo caliper has a substantial web in between its two mounting points.
- When clocked, the web overlays the original bolt hole.
- Imo, it would be impolite to hack a large chunk out of the web, right next to the mounting point.
The elected solution is to abandon the plan to send the (existing original M12x41mm) bolt thru from the outside.
Instead we place the (new M14) bolt on the inside and receive it into freshly reamed & threaded hole on the knuckle arm.
This slightly complicates the DIY objective and increases kit cost by a bolt and associated threading tools.
Another, similar collision occurs with a rib on the caliper that wants to occupy the same space as the knuckle mounting point.
The {tentative} solution is to grind a small notch out of the caliper rib, far less scarey than hacking the web, above.
{ed: it's a possibility that the rib, actually a bulge, is more than a buttress but conceals a fluid channel to the inside upper piston, in which case we will see about nibbling out of the few millimeters from the knuckle mount instead. This could be a show-stopping issue since we have just said that the same area needs modification for a larger bolt. Btw, the caliper would have to be clock significantly more for the bulge to clear the knuckle mount, the result then being that the brake hose is jammed too far towards the strut tube.}
Ironically, it would be less complicated to build an adapter for a ~370mm disc and 18" wheels.
This would create more displacement between the offending caliper features and the original mounting points, allowing as-is reuse of the original bolt, etc.
Last edited by Hyper; 07-13-2017 at 11:36 AM. Reason: Pic link repair, re PB affair
meeknet.co.uk
Great work, this is a very useful thread.....
Timm..2007 E64 650i Individual Sport..1999 E31 840ci Individual Sport..ex owner of 2000 E38 740..1999 E38 740i V8 M62..1998 E38 735i V8..1993 E32 730i V8..1988 E28 518i
My BMW Repair YouTube Channel
My Current 840ci Sport Individual
My Current 650ci Sport Individual
My E31 Repair and Information Website
My E38 Repair and Information Website
My E63/E64 Repair and Information Website
Chase - Heroes to a generation
Member
Very interesting and great work.
Member
Then why didnt you make the 18" wheel adapter with 370 floating rotors and some porsche calipers?
Member
I think Hypers objective was to make big brake set on budget.
I will make a separate thread with similar set up that you are referring to but it wont be on budget
Member
It's never on a budget with those cars
 Posting Permissions


 Reply With Quote


Bookmarks