
 Member
I think M cars are where it's pictured, and non M are perpendicular to that in front of the ecu cover.Originally Posted by lloydjoe

Sent from my SM-N930T using Tapatalk
Ls2 e36 sedan
Member
I didn't have one in the car originally, but put this one I got from the JY back in the same spot that I found it in the junk car, which was on the passenger fender.
Member
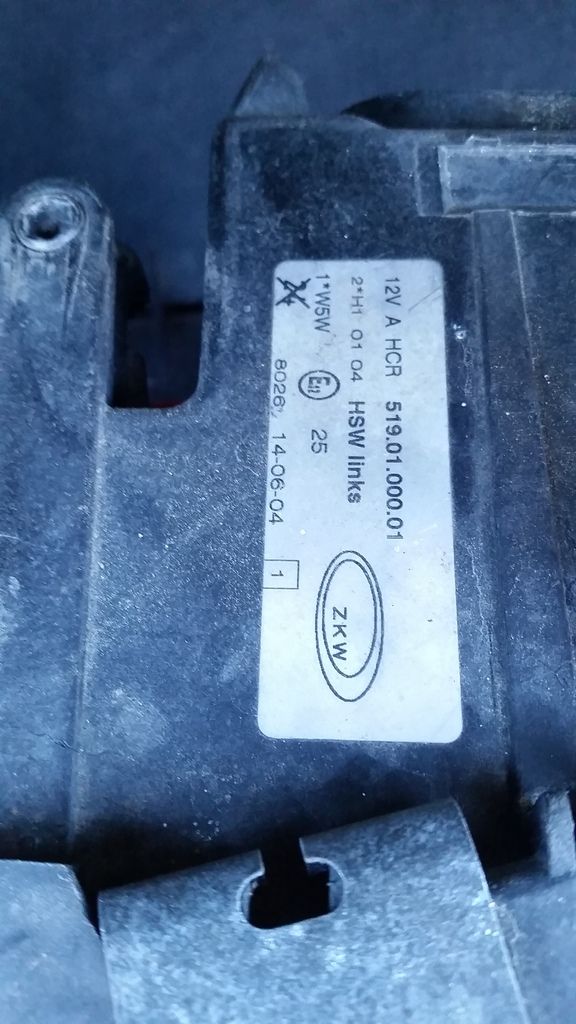
My '98 non-M car has it positioned as pictured.
Tipsy
Last edited by TipsyMcStagger; 10-13-2016 at 02:38 PM.
БМВ Фанат!
In this post you can see few shots of the bay and where it is located on 95 M3. It is infront of the ECU Compartment.
http://www.bimmerforums.com/forum/sh...3#post21762723
- 96 328is 6.0L. (LS1 to LS2 build thread: http://forums.bimmerforums.com/forum...ad.php?2098938)
- 96 328is 5.7L. (LS1 build thread: http://forums.bimmerforums.com/forum....php?t=1289987)
- 95 ///M3 6.0L. (LS2 build thread: http://forums.bimmerforums.com/forum....php?t=1619249)
- 97 ///M3. (e46 Fender Flares/track car build thread: http://forums.bimmerforums.com/forum....php?t=1727098)
- 96 328is (Dual Fuel Pump to Surge Tank thread: http://www.bimmerforums.com/forum/sh...ad.php?1964025)
Member
Do the 95's have the secondary air pump?
EDIT: I probably should just go look at the other 1997 M3 that I am daily driving. That would be an easy answer haha. From what I remember, the distribution block is on the passenger fender well and the SAP takes up the spot that your distribution block is in on your 1995.
Last edited by squashman702; 10-12-2016 at 08:48 PM.
Member
My 95 M had no SAP and the distro block was parallel the firewall.
always trying to make it lighter and faster
^^former build: http://www.bimmerforums.com/forum/sh...-neglected-M3/
current build: http://forums.pelicanparts.com/porsc...car-build.html
instant grams: doktor_b
Member
Adapter fitting from Russell added to the slave cylinder for the clutch line in place of the factory Camaro piece. Clutch line is from TechnaFit, -3AN braided line with a straight fitting on the trans side, and a 90* on the hard line side. This will then go to a -3AN to M10x1.0 fitting to adapt to the hard line. Bleeder line is a 48" setup from Speedway.
Shaved a couple spots on the trans, Tipsy has the spots marked out well in his thread.
Pilot bearing pulled. Used a blind hole bearing puller borrowed from Advance Auto Parts. Worked best once the roller bearings were removed from the pilot bearing, as the tool did not have enough to grab on to with the bearing intact.
- - - Updated - - -
These pictures all looked good on my phone, sorry about the blurriness.
Member
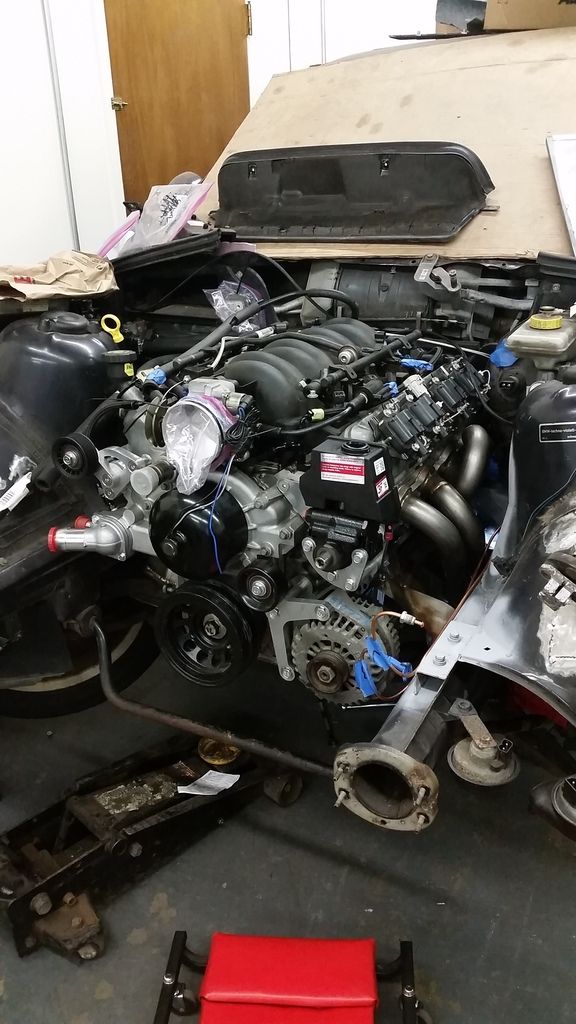
Got some work done on the car today.
Start of the day.
New pilot bearing installed.
LS7 clutch installed. Getting the trans back on was no fun. Luckily I had everything lined up well enough with the clutch tool, but wrestling the T56 into place is no fun. Made the mistake of waiting to put in the two bottom bolts thinking I could do them once it was in the car, so now I have to loosen everything and wiggle the trans around while it's in the car. This may be interesting, as the holes from the pan to trans looked like they were off by a good bit.
So- you get what you pay for with the CX stuff. The holes for the bolts from the block mounts were cut with a plasma, not drilled, and therefore not round. Welded some G8 washers on the outside of each hole to help correct the problem.
This is the inside, kind of shows what the holes looked like before- not enough space to add a washer on the inside, bushings are pretty tight inside the mounts.
Throttle cable setup, needs a little tweaking, cable is too long.
Bracket.
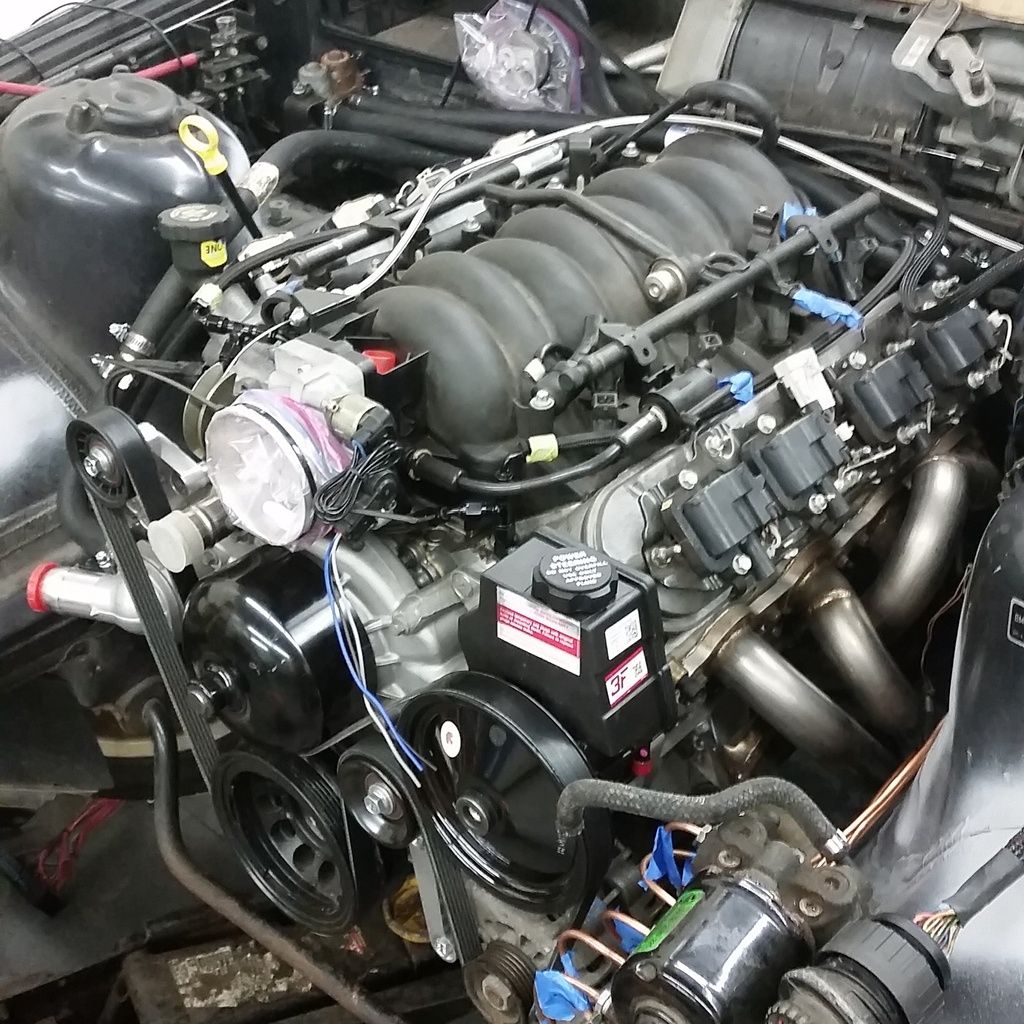
Got a lot of the engine put back together, headers in with new gaskets, new plugs, heat boots over the wires, etc.
Member
I had a tough time getting the trans to fully engage the crank, too. Had a buddy come over and the two of us were wresting with it for quite a while. I have no idea what we manipulated to ultimately send it home but when it moved that last quarter inch, I was relieved.
I left the top bolt out of the bell housing because I'd read doing so will make it easier to remove the bell hosung from the block with the trans in the car. But the more I mess with this thing - and the fact that I don't have a lift - I don't know if I'd ever try to remove the bell housing without first pulling the engine.
Tipsy
Member
Here's the issue I'm facing with the Camaro pan. Set up is GTO T56/bellhousing, LS1 from a Corvette, and an F Body pan.
Driver's side:
Passenger side:
Clutch line. Should've ordered the line with an M10 1.0 90 degree on it, instead of the -3AN fitting. The line is a little long as well. I'll probably reorder one for replacement for when I pull the motor to paint the bay after it's all running to eliminate some of the extra fittings.
More stuff added on the front. Ordered a Corvette pulley instead of a Camaro for the power steering pump, so that's another thing to add to the list.
БМВ Фанат!
Wow that misalignment is huge... Curious what caused it.
- 96 328is 6.0L. (LS1 to LS2 build thread: http://forums.bimmerforums.com/forum...ad.php?2098938)
- 96 328is 5.7L. (LS1 build thread: http://forums.bimmerforums.com/forum....php?t=1289987)
- 95 ///M3 6.0L. (LS2 build thread: http://forums.bimmerforums.com/forum....php?t=1619249)
- 97 ///M3. (e46 Fender Flares/track car build thread: http://forums.bimmerforums.com/forum....php?t=1727098)
- 96 328is (Dual Fuel Pump to Surge Tank thread: http://www.bimmerforums.com/forum/sh...ad.php?1964025)
Member
Yeah, I don't really understand it. It doesn't appear to be off the same amount/direction in each of the holes as well. Trans is flush to the pan. I spent a good deal of time getting the pan aligned on the block as well, and I'd doubt that I have enough room in the bolt holes on the pan to move it on the block that much. Everything I've read indicates that the GTO bell is the same, minus the starter.
БМВ Фанат!
Yeah, GTO Bellhousing connects to F-body pan. I have GTO dropout in my car with FBody pan and no issues at all. Yours look like you're at least missing a pan gasket or something.
You do have Pan gasket installed, correct?
- 96 328is 6.0L. (LS1 to LS2 build thread: http://forums.bimmerforums.com/forum...ad.php?2098938)
- 96 328is 5.7L. (LS1 build thread: http://forums.bimmerforums.com/forum....php?t=1289987)
- 95 ///M3 6.0L. (LS2 build thread: http://forums.bimmerforums.com/forum....php?t=1619249)
- 97 ///M3. (e46 Fender Flares/track car build thread: http://forums.bimmerforums.com/forum....php?t=1727098)
- 96 328is (Dual Fuel Pump to Surge Tank thread: http://www.bimmerforums.com/forum/sh...ad.php?1964025)
Member
Yes, there's a pan gasket in there.
Member
Same here.
Tipsy
Member
Polishing a turd, I know. New moldings installed on driver's side vent window. Outer trim piece is staying the same. Decided to fix my turn signal on the other M3 in the process of running to the parts store for the required adhesive remover, which snowballed into clipping a plug from the Technoviolet's harness and wiring it back in on the DD.
Member
Scored this at the junkyard today, along with the connector I cut out of this car yesterday to fix the DD and a DLC plug. Passenger side was broken, or I would've grabbed that as well.
Member
I was in SC and GA for a few days, didn't get to work on the car for a week. Got the correct power steering pump pulley pressed on today, and the belt routed. Started to put the interior back together after replacing the trim on the driver's side, but ran out of clips to hold the door panel back on.
Member
did you ever sort the bellhousing bolt alignment issue?
i offered up my bell to the block this week and mine looked the exact same. loosened all the bolts and was able to get them all started and torqued. but thought it was odd that it didn't look right.
always trying to make it lighter and faster
^^former build: http://www.bimmerforums.com/forum/sh...-neglected-M3/
current build: http://forums.pelicanparts.com/porsc...car-build.html
instant grams: doktor_b
Member
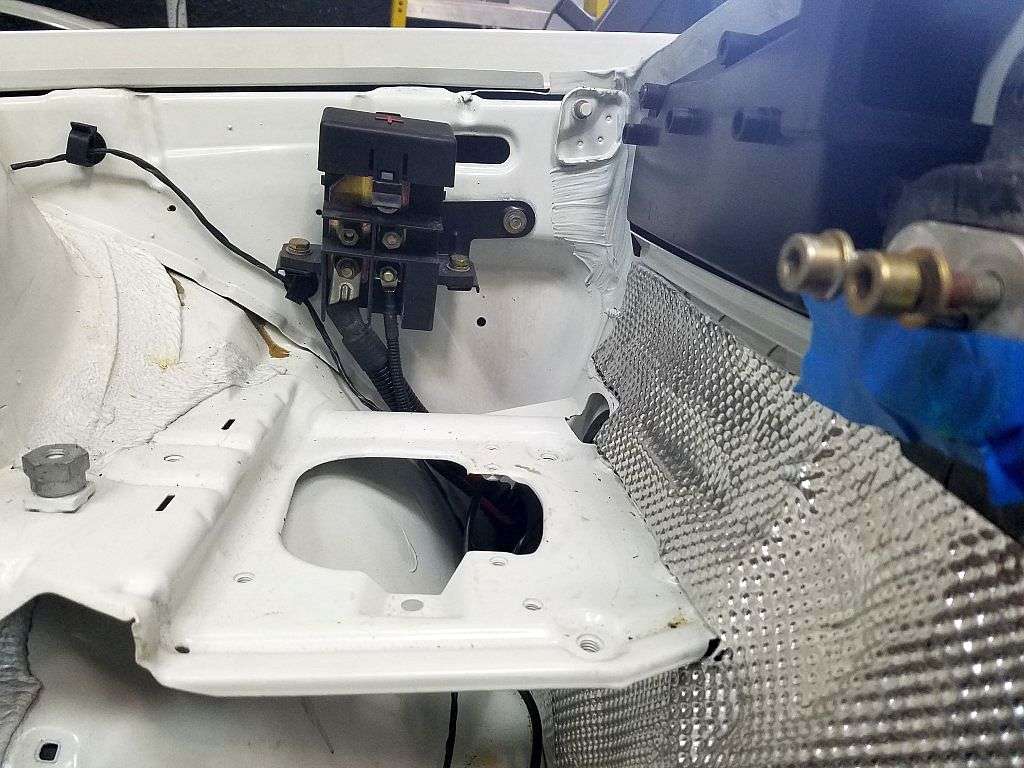
Haven't messed with it again really yet. Went to the shop to work on it today and the battery light came on in the M3/4/5, so I had to get that sorted. $173 later, the light is out . . .
EDIT: Did you have the alignment dowels in the back of the block? I'm thinking mine are fighting me from rotating the trans much.
Last edited by squashman702; 10-28-2016 at 08:51 AM.
Member
somehow i only have 1 dowel pin in my block. (passenger side) i wondered if that was related, but similarly haven't been back out to the garage to fiddle with it. i'll be back in there today and tomorrow before the Game. (GO CUBS)
always trying to make it lighter and faster
^^former build: http://www.bimmerforums.com/forum/sh...-neglected-M3/
current build: http://forums.pelicanparts.com/porsc...car-build.html
instant grams: doktor_b
Member
I'm sure you would have noticed but it's possible the other alignment dowel is stuck in the bellhousing.
Tipsy
Member
brand new bellhousing. my engine came from a truck. def only one when i got it.
i put it all together this weekend. ended up only putting in 7 total bell housing to block bolts. one in the pan just refused to play ball. so it's officially my spare now.
always trying to make it lighter and faster
^^former build: http://www.bimmerforums.com/forum/sh...-neglected-M3/
current build: http://forums.pelicanparts.com/porsc...car-build.html
instant grams: doktor_b
Member
Seems like I haven't worked on this in forever.
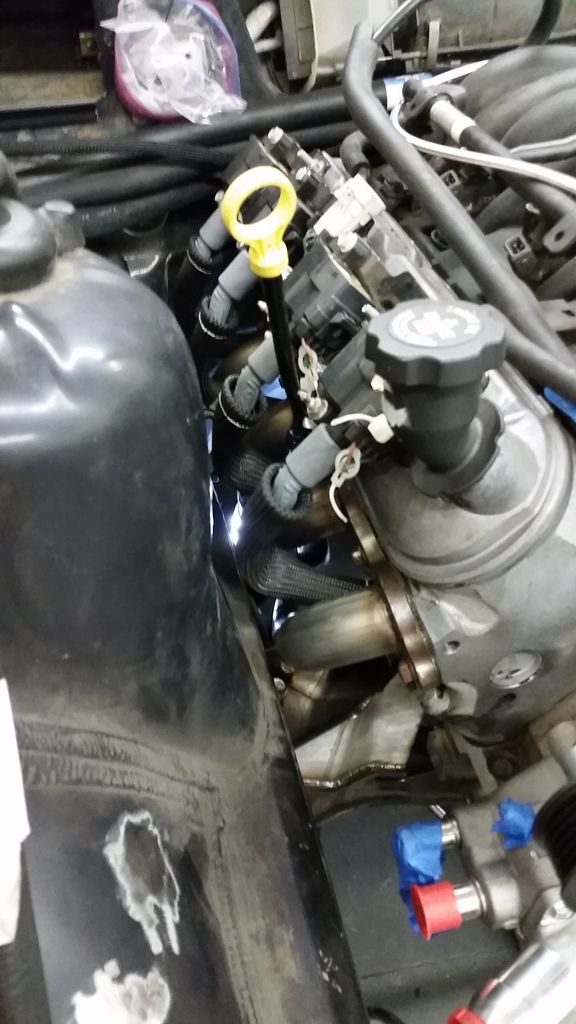
Heater hoses routed. Thought I was going to use a 5/8" molded elbow on the smaller hose but ended up flipping it so the 90* was on the water pump side, and it worked out better. I did end up using a hose barb and a molded 90* on the 3/4" hose. Going to have to drill holes for the coated hose clamps once I have the suspension out on the driver's side.
Here's the brake lines in their final spots. Probably going to try to find some sort of spark plug wire loom to organize these a little better.
Where I left off. Hope my belt routing is right, this was a guess.
Member
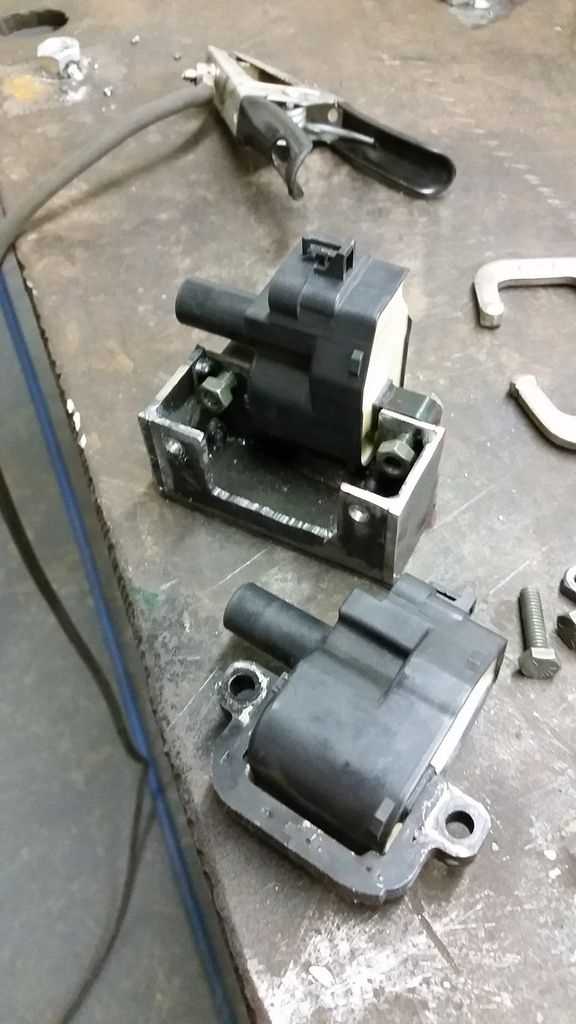
First take on a bracket for coil relocation. Played with the plasma, I've only used it a couple of times so I'm still pretty rough when cutting freehand. Didn't quite figure out a good method for attaching a straight edge.
Sides:
Magnets, skipped ahead a few steps here.
Tacked. Ignore that big booger of a tack in the top left. Tried to fit 10 pounds of shit in a 5 pound bag in between all the magnets, the MIG gun, and the ground clamp.
Mocked up with the coils.
Ran 1/4" bolts through the coils to the outside of the bracket. I should be able to add to this to make it mount up in a number of different ways in the car if I need to.
 Posting Permissions


 Reply With Quote
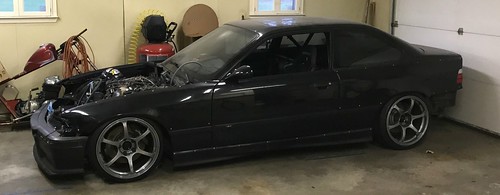


Bookmarks