
 Member
No, going to run with 6 of 8 at this point I think, unless I pull the motor back out and can give it another shot. Considering I have both dowels in the bellhousing, the tranny shouldn't be able to move much as it is.Originally Posted by bimerok

Instergrams: @davemakepictar
Member
Got a few things done today.
New wheel bearing on the driver's side. Dust shield was blasted and painted a while ago.
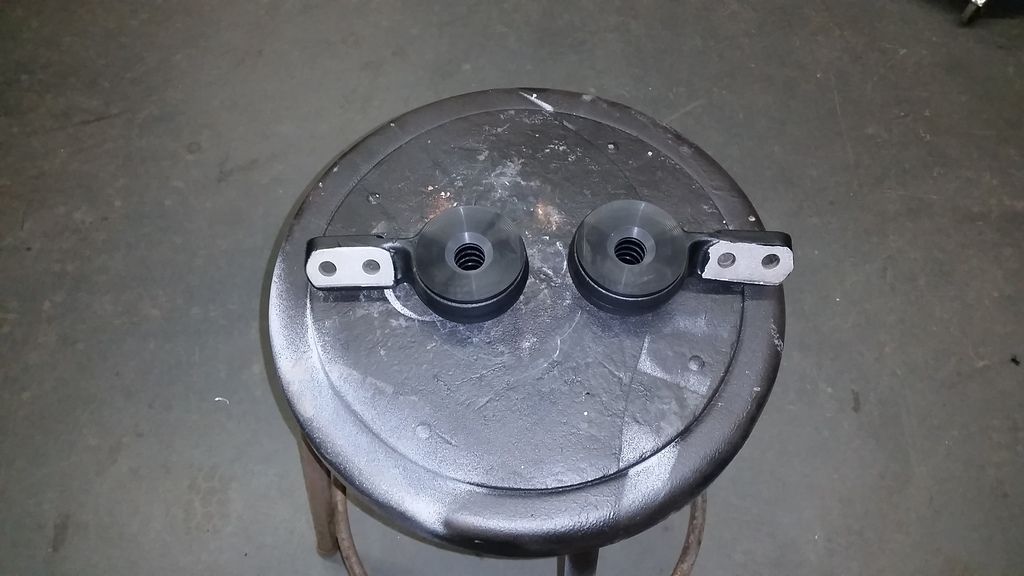
Studs installed.
AKG poly bushings pressed in, brackets painted instead of bedlined on the spots where they mount.
Instergrams: @davemakepictar
Member
Great thread with lots of good info.. Getting ready to start this endeavor myself with a 95 318IS that I'm picking up for $400.
Member
Thanks, learning a ton. Good luck with your project!
Instergrams: @davemakepictar
Member
While your AKG lollipops are out, you can zerk fit em if the poly bearing needs it.
I used some poly bushings on my lollipops: I drill through the rings then the outer bushing matl. I fitted a alum tube to hold the hole alignment. That way I could lube up the inner bushing as the heat from the headers breaks down the grease.
Last edited by OKsweetrides; 11-30-2016 at 04:08 PM.
1998 M3 Sedan - LS3 M12T56 - A bad addiction.
Member
So you put a hole right in the bushing itself? I was thinking I might make small heat shields like there is on the passenger side from the factory to protect them.
It was shitty out today, so that inspired me to build stuff for some reason when I got to the shop today. Been putting this off a bit, but finally got around to it.
Template and first attempt.
Bent up.
Added a tab for the rear part to screw into the floor. Welding on 220v with .035 on 22 gauge steel is not ideal. Probably should've switched the welder to 110v, but it actually came out decent except for one spot where I burned through. Definitely not laying any beads on this stuff with that setup.
Tacked and let them cool a bit in between.
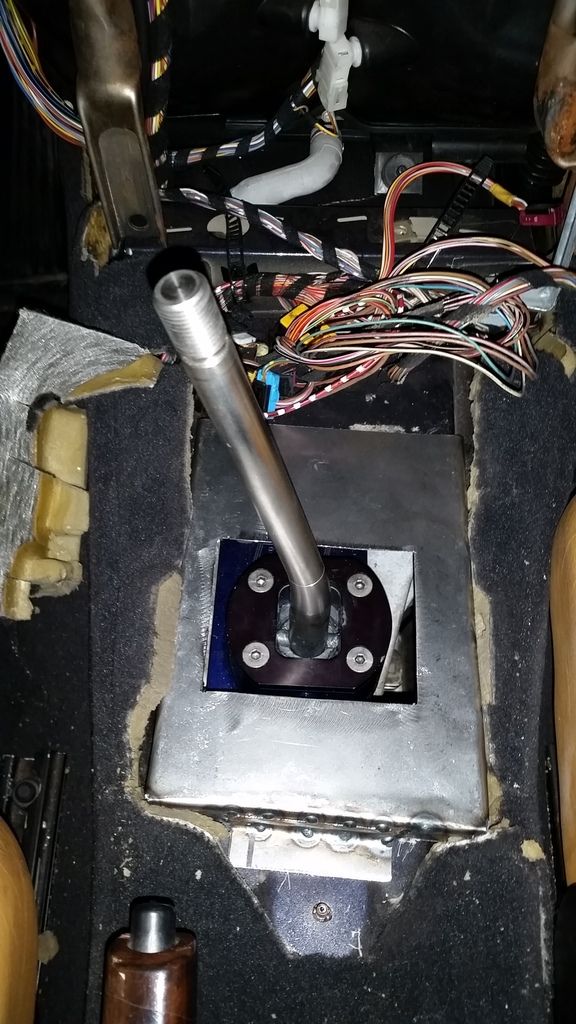
Mocked up in the car, hopefully the console still fits in around this.
Instergrams: @davemakepictar
Member
Was thinking about this on my drive in to work this morning, going to need to double check that my console fits around the plate, and that the shifter location is good once the console is in place. May try to adapt the BMW rubber boot to this setup as well, but that has a circle base. If everything else checks out, I may also go aftermarket with that and get a square base.
Instergrams: @davemakepictar
Member
Cover worked with the console, going to order a rubber shift boot. May need to modify the console slightly to get it to sit where it needs to be.
Did some work on the DD, rear driver's door was showing a lot of surface rust.
Some of the suspension bits back in. Other side is back in as well.
Anyone else with the CX stuff seeing these issues? This is the clearance between the passenger header and the control arm. Maybe 1/4" of clearance here. I'm guessing it'll improve slightly as the control arm rotates, but that's not much space.
Here's the pan to the crossmember, almost no clearance again on the passenger side of the crossmember where the tabs are for the rack, and on the rear of the crossmember to the pan. Probably less than 1/8" of an inch.

Instergrams: @davemakepictar
Member
console looks good! guess that means there's hope for me after i removed a big-ass chunk of my tunnel.
i'll check my header to control arm clearance tonight or tomorrow. but i don't recall it being super tight.
my engine to crossmember is definitely snug. not sure on an empirical measurement. but def not a lot of room for the engine to be floppin around before sadness.
always trying to make it lighter and faster
^^former build: http://www.bimmerforums.com/forum/sh...-neglected-M3/
current build: http://forums.pelicanparts.com/porsc...car-build.html
instant grams: doktor_b
Member
Thanks, happy with how it turned out so far.
Yeah if you don't mind looking at those clearances, that would be a big help. Just trying to make sure I didn't miss something and have the motor in the wrong place somehow.
Instergrams: @davemakepictar
Member
i'll check it out and report back. i'm at job2 or i could get you an answer faster.
but i'm finding that it's pretty hard to mis-align the CXR mounts. i thought i had my whole junk in there crooked by looking at the shifter/shifter hole alignment. but the trans mount was aligned perfectly. they made the kit pretty idiot-proof as far as i can tell.
always trying to make it lighter and faster
^^former build: http://www.bimmerforums.com/forum/sh...-neglected-M3/
current build: http://forums.pelicanparts.com/porsc...car-build.html
instant grams: doktor_b
Member
I have my crossmember holes punched out to a half inch from when I had the NAHR mounts, so that could be some of the offset. Dunno.
Instergrams: @davemakepictar
Member
I'm using the JTR kit but I placed an order for the CXRacing transmission crossmember. I don't know if it'll work with the JTR positon but we'll find out soon enough. The crossmember should be here today.
The JTR crossmember is super heavy duty and high quality, like the rest of the JTR components. But I'm not a big fan of the way the flanking pieces extend up into the trans tunnel. This requires drilling holes in the side of the trans tunnel and securing inside the cabin by the sides of the seat. I suppose if this was my third or fourth time installing an LSx using the JTR kit I'd feel confident drilling the holes. But I'm reluctant to do so because I fear I'll have it mounted and later discover I need to shift things around. The CXRacing crossmember seems much simpler, though I doubt it's as stout.
Tipsy
JTR Trans Crossmember

Member
It certainly looks WAY overkill! I don't see the need for a crossmember that will survive a nuclear strike, as long as the engine is securely mounted.
Member
The JTR pieces on the trans tunnel seem totally unnecessary, especially if there isn't a backing plate for the interior of the car. The floor pan is 16 gauge or so sheetmetal, so bolting through it without a plate behind it to spread the load is a little silly. The CX racing bolts to the stock holes and has some measure of adjustability, so I bet you'd be able to make it work. There's only so many places for the engine to sit in this chassis.
Instergrams: @davemakepictar
Member
New radiator came in, it's a Northern Radiator 209657. A little shorter than the Mishimoto aluminum radiator that I was using as mockup, but about an inch thicker. Measures out to be around 26"x16"x3.25". Lot of pictures on this because I haven't seen anyone use a Chevy style radiator in an E36 yet. Not claiming to be the first, so if someone knows of another build to compare to, I'd definitely be interested. Anyways . . .
Removed the clips for the top mounts and knocked out the plastic mounts on the side of the framerails.
Started making a crossmember for it. This is 3/4" 16ga tube, with 1/8" flat welded to the top. The isolators are pieces of hose sliced open then slid over the flat stock.
Fitted in to the bottom of the radiator.
Flats welded in, not my best work, used to more wire speed when welding thicker stuff, so it took me a bit to get it down. This isn't going to see any real load so it's not a huge deal.
Side pieces are 1.5"x 1/8" flat stock. Had to move the horizontal tabs down after test fitting.
Clamped into place.
Roughly where it sits, may have to drop it down a bit so that the cap clears.
Clearances in this location.
Moved the horizontal pieces down by 1.5" and over, as the frame rails narrow in slightly right where the nose mounts.
Another shot.
Hoping I can get away with LS1 Camaro hoses, considering they're $9 and $14, compared to what it costs to run the modified E36 stuff.
Instergrams: @davemakepictar
БМВ Фанат!
There you go if you need some ideas
http://www.bimmerforums.com/forum/sh...8#post27745028
- 96 328is 6.0L. (LS1 to LS2 build thread: http://forums.bimmerforums.com/forum...ad.php?2098938)
- 96 328is 5.7L. (LS1 build thread: http://forums.bimmerforums.com/forum....php?t=1289987)
- 95 ///M3 6.0L. (LS2 build thread: http://forums.bimmerforums.com/forum....php?t=1619249)
- 97 ///M3. (e46 Fender Flares/track car build thread: http://forums.bimmerforums.com/forum....php?t=1727098)
- 96 328is (Dual Fuel Pump to Surge Tank thread: http://www.bimmerforums.com/forum/sh...ad.php?1964025)
Member
I was considering doing the same style brackets for the bottom, but then came up with the idea I went with once I got the radiator in my hands. What'd you do for a lower hose? There's not a ton of space in my setup.
I'm also going to convert to open loop.
Instergrams: @davemakepictar
БМВ Фанат!
I went to advanced or pepboys back room and found the correct generic S bend that worked. Unfortunately no part number.
Why open loop though?
Last edited by bimerok; 12-03-2016 at 08:12 AM.
- 96 328is 6.0L. (LS1 to LS2 build thread: http://forums.bimmerforums.com/forum...ad.php?2098938)
- 96 328is 5.7L. (LS1 build thread: http://forums.bimmerforums.com/forum....php?t=1289987)
- 95 ///M3 6.0L. (LS2 build thread: http://forums.bimmerforums.com/forum....php?t=1619249)
- 97 ///M3. (e46 Fender Flares/track car build thread: http://forums.bimmerforums.com/forum....php?t=1727098)
- 96 328is (Dual Fuel Pump to Surge Tank thread: http://www.bimmerforums.com/forum/sh...ad.php?1964025)
Member
Good to know.
No shitty plastic expansion tank, or an expensive aftermarket option, I can place the overflow anywhere, etc. Seems to be a simpler system overall.
Instergrams: @davemakepictar
Member
"There's only so many places for the engine to sit in this chassis."
Words of wisdom. I made my own engine mounts and had planned to use the CXRacing transmission crossmember for guideance front to back. The amount of adjustability of the CXR crossmember makes that impossible but you're not working with much of a margin either between oil pan hitting the front subframe and the engine hitting the firewall. I put it in a position where there was decent clearance on both ends and the shifter wound up in the ~1" rearward location that everyone reported previously. The quality if the CXRacing piece is pretty poor but it's what I expected and I think it will hold up OK.
As for the shifter boot/enclosure, I'm running an aftermarket shifter too and had to do some head scratching about how to configure the shifter boots. I had initially planned on using a Spectre boot with the stock T56 shifter but decided on a Hurst Billet Plus after mounting the stock shifter and finding out it was beat. That required making the shifter hole a little larger to fit the new shifter but there was no way the Hurst boot was fitting. I cut the Spectre boot and used that to cover the Hurst Shifter body but looking back, the T56 rubber boot on the Hurst shifter probably would have worked too. To seal the opening in the transmission tunnel, I used a Mr. Gasket 1652 which fit perfectly over everything and under the OEM leather shifter boot. Just please make sure that you seal the interior of the car off with a proper boot so exhaust fumes can't enter the car, not to mention noise.
Last edited by BigL350; 12-03-2016 at 09:26 AM.
Member
Sadly the CX racing mounts overall are not great. If I did not have my past experience with automotive work, the CX stuff would be of little guidance to me. Luckily, I'm able to look at some of this a little more objectively and see that stuff does not end up like it should, and work from there.
Here's some more progress I made today. Decided to basically make my own nutserts.
Knocked out the factory mounts.
Frame rail ground down and holes added for some M8 nuts.
Crossmember and nutsert plate.
Sorry for the shitty pictures, should make more sense once it's all together.
Instergrams: @davemakepictar
Member
Yes, it was in essence just a ~5mm hole for the zerk. I'da preferred a heat shield, but I didn't have anything on hand lying around ot make something fancy and then gold reflect it with.
1998 M3 Sedan - LS3 M12T56 - A bad addiction.
Member
Radiator support is almost done.
These will be welded and seam sealed, just tacked in for now.
Thinking this will work pretty well, I'll make two clamps for the top and attach them to the radiator support.
Instergrams: @davemakepictar
Member
looks so good!
always trying to make it lighter and faster
^^former build: http://www.bimmerforums.com/forum/sh...-neglected-M3/
current build: http://forums.pelicanparts.com/porsc...car-build.html
instant grams: doktor_b
 Posting Permissions


 Reply With Quote


Bookmarks