
 Member
AKG bushings in, drilled out and tapped the diff to fit the M14 bolt as well.
Member
ICT Billet tensioner is in.
Anyone know an alternative to the Rallyroad fuel pump sleeve/install kit? Getting security errors when I try to order from their website, and can't seem to get them on the phone.
- - - Updated - - -
Nevermind, Rallyroad got back to me. Their install kit/sleeve and Aeromotive 340 ordered.
Member
Good work, I run the Rally Road kit also.
Member
Did you upgrade your hard lines as well?Originally Posted by Inflame

What'd you do with your evap system?
Member
Ordered some small stuff yesterday.
-GM bolts for pressure plate
-GM bolts for bellhousing to engine
-GM oil filler neck (mine was broken in transit)
-GM pilot bearing
-Clutch alignment tool
Need to get a slave cylinder and a bleeder line, and I think I'll have everything needed to mount the T56 to the motor.
Member
No, stock lines. I have the HPF 340L/hp pump.
Evap is 100% deleted, no emissions or inspection here in Michigan.
I bought the slave off rockauto for $60 I believe, has been working flawlessly. Also, I HIGHLY recommend the remote slave bleeder, it will be nearly impossible to bleed unless you drill a hole in your trans tunnel then plug it.
Member
Turns out the parcel shelf was black originally, not grey. Fixed that, a full can of duplicolor vinyl/carpet dye later . . .
Member
I swapped my tan dash to black and have been wanting to dye the tan package tray as well. How does the surface feel after drying? I guess you can't speak to how it will hold up long term but would you use the same dye again in hindsight?
Tipsy
Member
Feels crunchy.
I'd probably use it again based on the fact that I'm not sure I've ever used a parcel shelf in any of the three cars I've owned that have had them, so I'm not overly concerned about texture. The duplicolor stuff seemed to cover fairly well considering how faded it was.
Member
More progress . . .
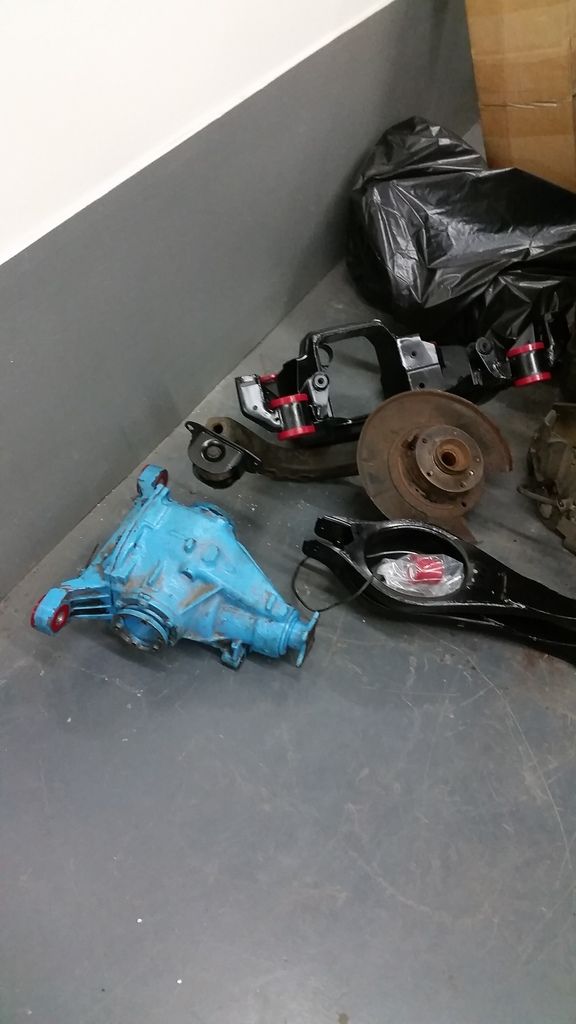
Pressed in the front diff bushing for the M14 bolt. Filled the diff with M1 synthetic, and bolted it to the subframe, and put the whole shebang in the car, only to find out that the control arms have to be hung in the subframe with the diff out of the way. Dropped the diff back out, and left the subframe.
Found that I could not figure out where the casting mark is on the trailing arm to measure from to set RTAB preload, so my buddy and I did it the hard way, and determined height from the center of the wheel well to the top of the flange should be 11.33", which is the measurement spec'd by my Bentley manual (21.26" unloaded for a stock M3), less half of the wheel height (8.5"), less half of the flange height (somewhere around 1.41", because it was easier to measure there than find the center of the flange and keep it level). We put a jack under the rear trailing arm, and lifted until we got to 11.33" of gap, then marked the trailing arm with a soap stone on two sides of the RTAB, then torqued to spec. Didn't get a chance to hang the assembly up tonight, probably will get to that tomorrow or Wednesday.
Ignore the diff color, guy I bought it from decided on it. Looks like a crayola box puked under the car currently, but I didn't care enough to go back and paint. At least the SPC arms look good.
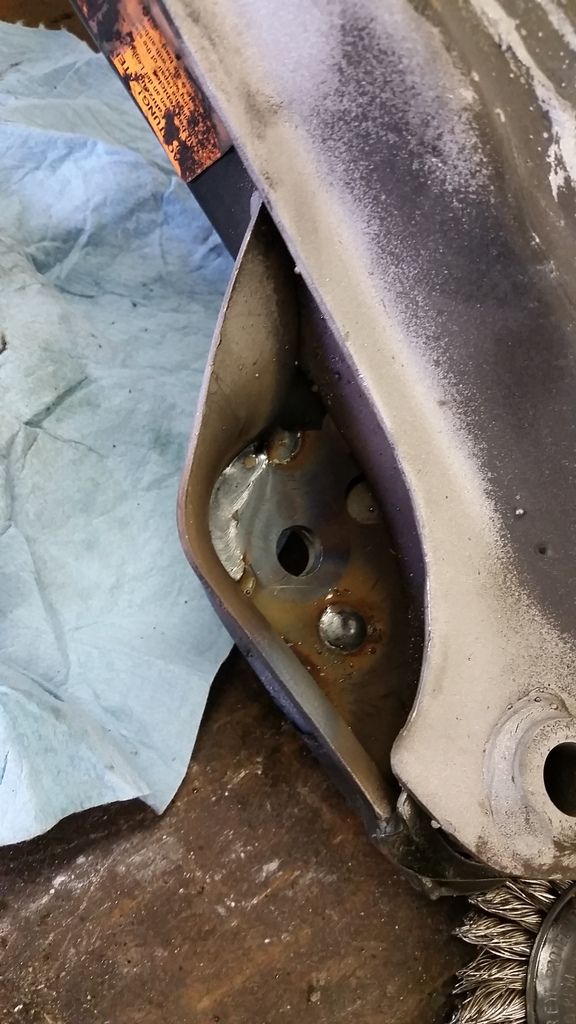
First attempt, good shot of the AKG rear sway reinforcements:
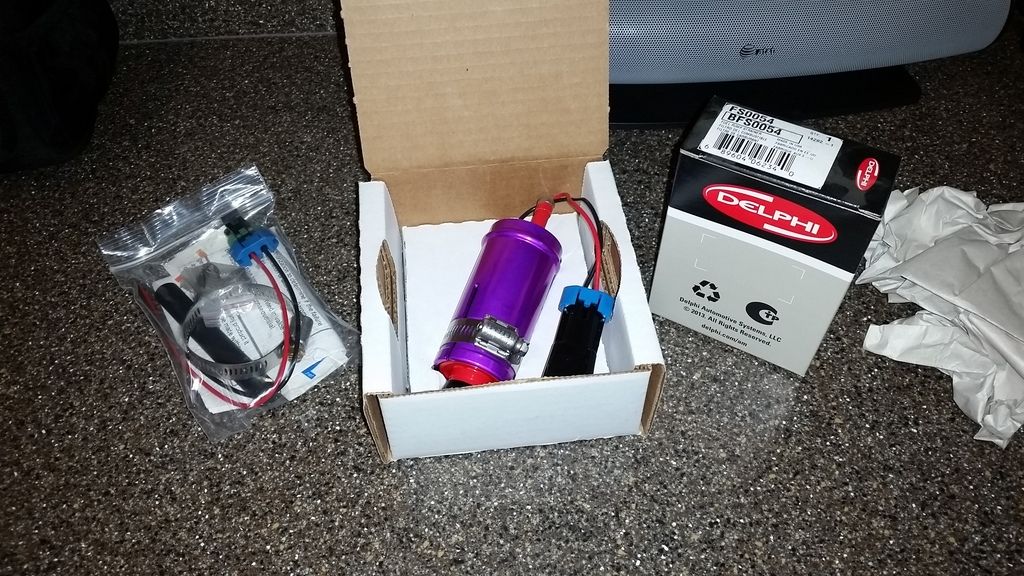
Aeromotive 340 and the rest of the Rally Road kit arrived while I was at the shop.
Member
Got a bit of work done the past couple days.
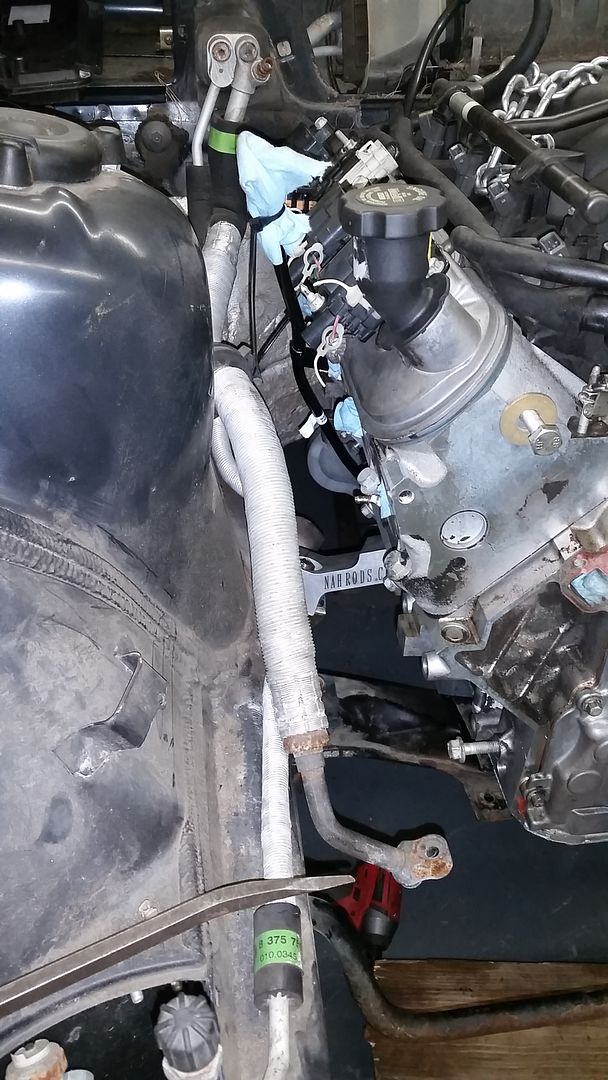
-Hung the Aeromotive 340 in the tank in the factory sending unit, no complaints about the Rally Road kit. Seemed to work as it should. I did have to redo the plug on the pump as the wires would not go through without either cutting the pins off (which were crimped on) or drilling much bigger holes in the top of the mount. The wires fit pretty snug without bigger holes, so I redid the plug instead, then sealed the little gap around them with RTV on the exterior of the tank.
-Added a SPAL FRH harness as the relay setup for the bigger pump. Used the stock fuel pump wiring as the trigger and ground for the relay. Grounded the pump to an existing ground near the airbag module under the back seat. Used expandable nylon loom so everything looks half decent and followed factory wiring where I could.
-Remounted and reconnected everything with the tank after blowing out the fuel lines. I'll figure out what I can delete later once I get the C5 fuel filter in place and the rest of the fuel system sorted.
-Hung the RTA on both sides under the car, waiting on new bolts for the LCA's from BMW, since I don't want to reuse the camber bolts now that I've got SPC arms. Would've used standard M12 bolts, but the BMW bolts have a little shoulder on them that makes them fit a lot tighter in the arm, so I ordered some replacements for the upper control arm at the ball joint side.
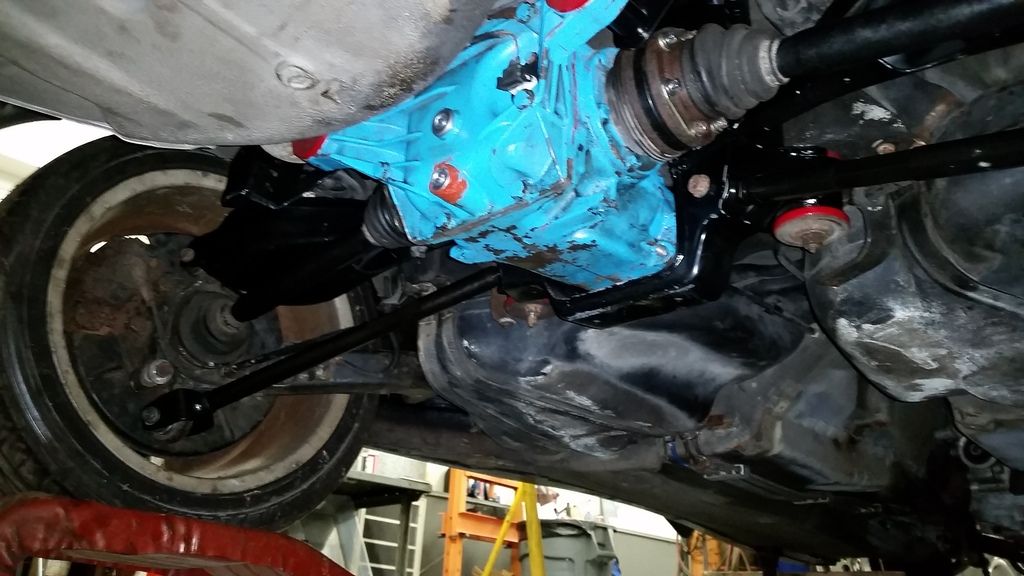
-Cleaned the rust out of the splines on the drive flange, discovered that I need M3 output flanges for the diff for the M3 half shafts. Ordered a used set off ebay. Also discovered that the bolt reinforcement plates are smaller on an E46, and that they won't work with M3 shafts either. Ordered those as well from BMW. I did pull hardware from the JY the other day for one side, as the guy I bought shafts from only had 6 of the 12 E12 bolts needed to mount, and apparently mixed up E46 reinforcement plates.
-Rebuilt the ebrake on the D/S, got the rotor/caliper and the wheel mounted. Thinking I'll have a local guy turn the rotors so I can at least test drive the car. They're ugly.
-RTV'd the diff drain plug again after swapping with new ones with the plastic seal that were torqued to spec. Still have a mild leak. Apparently I need to drain it, clean everything, then try to RTV again and refill.
Member
Pictures of stuff from the last couple of days:
Together enough to be back on the tires. Put the front up on stands to pull the crossmember so I can weld in reinforcements.
Member
Pulled the front crossmember to weld in the AKG reinforcements. Sandblasted the spots I needed to weld in, barely fit in the HF sandblaster. It would be a serious pain in the ass to strip the paint otherwise. Ran out of welding wire after getting the bottom pieces welded in. Looks like I'm going to have to drill out the holes slightly anyway as the NAHR mounts have a bigger than stock bolt that goes through the crossmember.
Member
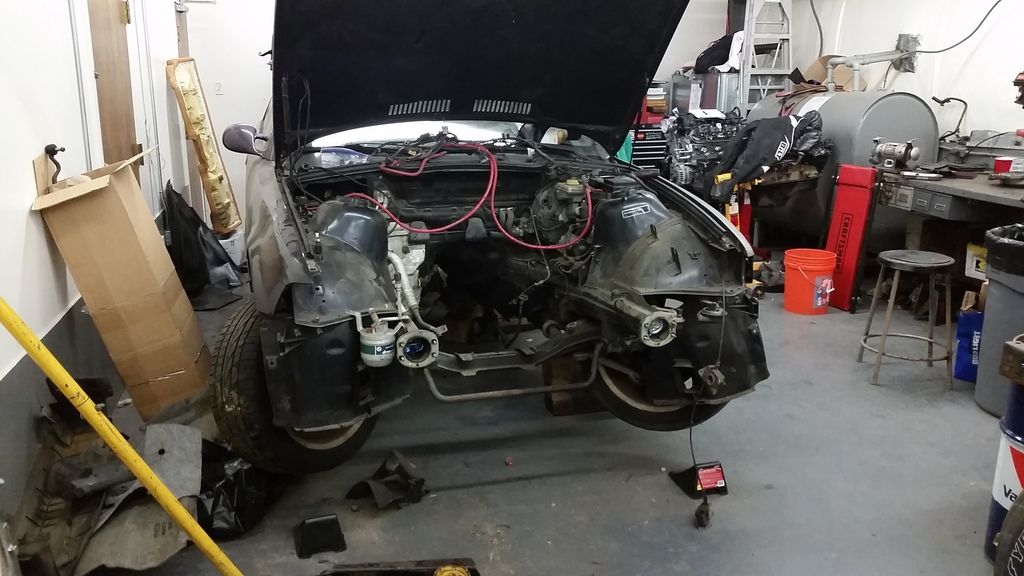
Friday, I ended up replacing the struts and shocks on the ZHP with Bilstein B4 stuff, new mounts, heavy duty shock mounts in the rear, etc. Saturday, I finished up the welding on the crossmember and got it installed in the car. Put the bellhousing back on the T56 today, then bolted it to the motor, and stuck the whole thing in the car.
Member
Why did he paint the diff...blue again?
Tons of work/progress. More than meets the eye on the E36 swaps...the good ones.
Member
No idea why the PO painted the diff blue. Probably because that makes it a drift build.
It's definitely been a lot of work so far. Some of the stuff snowballs pretty bad though- like the rear end of the car. The "while I'm in there" logic is why it ended up being completely torn down for new bushings everywhere.
Member
Boring update, but got the axle shafts installed and torqued on both sides after swapping the diff flanges with M3 stuff. Swapped out the LCA bolts for new hardware I bought from BMW and torqued the upper and lower control arms on both ends. Still need to drain the diff and reseal, then I can install the rear sway with new mounts and end links. Getting to the point where I'm running out of new parts for the rear end.
Member
Untorqued the CA's at both ends when I realized how far off from ride height I was, I'll have to readdress that later. Bentley shows ride height at 21.66" from the bottom of the lip of the wheel to bottom of fender- these cars are tucking the rear tire stock? Also took some time to try to line up the NAHR trans crossmember, which seems to sit way too far forward. Going to have to mess with that more to try to get it to work.
Also ordered a power steering pump, remote bleeder line, and C5 fuel filter/regulator. One of my buddies just bought an E46 M3, so we also spent some time going through that and doing some of the Inspection II on Thursday night.
Member
Not too much to report lately, been messing with the ZHP and an E46 M3 a buddy just bought, trying to help him get that sorted out.
I did end up making a little progress today, pulled an x20 and x69 connector from an OBDII 328i from the junkyard today. Went through and labeled everything on the x20. It looks like the x69 has a lot of extra wiring from the 328i that's missing on my M3. The wiring thread on here shows that it can all be deleted, so I will likely do that, and pull what I need out of the smaller connector and move that to the x20 so the system is down to one plug. I also went through the Corvette harness and labeled everything based off the wiring diagram that I have. Found out that I'm missing the three relays on the side of the fuse box for DME, O2 sensors, and the fuel pump. I'm thinking I'll just need to add the one for the DME, as what I've read indicates that the GM PCM will power the O2's, and I've already added a relay for the fuel pump when I added the Aeromotive unit. The wiring seems a little less intimidating now that I've started getting organized.
I was able to identify all but two of the connectors on the Corvette harness (which I didn't realize is DBW, and will have to be converted) and am wondering if anyone can tell me what these two are?
Guessing this is the throttle position sensor, but it did not match the diagram exactly.
Not sure what this is, driver's side of the motor, coming off the front of where the injector harness is. Anyone?
Here's the mess I've made so far, Corvette harness is mostly stripped of the loom and partially stripped of the tape:
I fitted the NAHR crossmember as well. Not sure what exactly is going on with this. Trans is lifted up to the point where the tail housing where the shifter mounts is even with the floor of the car, which leaves maybe 1/2" to 3/4" of clearance between the crossmember and trans. The crossmember also doesn't sit flat on the floor on the driver's side. I spoke to someone at NAHR on Tuesday, and they told me that I shouldn't need an adapter to run the T56, which the crossmember did come with, but I'm not seeing any other way to mount the T56 besides the two holes on the bottom of the tail housing. Also looks like I'll have to run single 3" around the trans, as there's no space above the crossmember on the passenger side, which I'm not too pleased about. May have to take out the Miller and get to work.
Clearance, that's an M8 bolt.
Adapter/mount:

Member
The five wire plug might be for the maf if you've got a dbw harness. I believe they integrated the iat sensor into the maf so instead of two plugs, you get one five wire plug.
Sent from my LG-H901 using Tapatalk
Ls2 e36 sedan
Member
This has a two wire plug for the IAT.
Member
I beleive the first one is the tps plug, if it was maf last two wires would be tan and black for iat. Second one looks like alternator
Sent from my SM-G900T using Tapatalk
Member
First plug is TPS
TPS sensor conn..gif
2nd is Alternator.
- - - Updated - - -
As far as the trans cross member goes, I think you need to move the cross member back to the next set of mounting holes towards the rear. The trans mount attaches to the two vertical bolt holes in the tail shaft housing:
bolt_trans_mount.jpg
Here's a pictures of it on someone else's car:
nahrmount.jpg
IMG_3513.jpg
I don't have personal experience with the NAHR mounts, but in the end I would presume the shifter will not be flush with the trans tunnel, and actually be slightly lower. You want a little space in there so things aren't vibrating around.
Hope some of this stuff helps.
Last edited by sdobart; 07-22-2016 at 01:00 AM.
96 M3 | Forged LSx | Twin S366 | Injector Dynamics | E85 | AEM Infinity
90 Schwarz 325i
IG : sdobart
Member
Big help, thank you.
I think that my trans crossmember has an additional piece of flat stock TIG'd to the driver's side, which is throwing me off. Looks like the crossmember you pictured is essentially flat across the bottom. I was having a hard time finding any other pictures of NAHR stuff, I'm guessing there's not many sets of their mounts out there.
Member
Sdobart was right, talked to NAHR as well, and the piece of aluminum on the passenger side of the crossmember was an add on. Did some surgery with the grinder and removed that piece, and mounted up the trans and shifter. Shifter is a B&M Ripper.
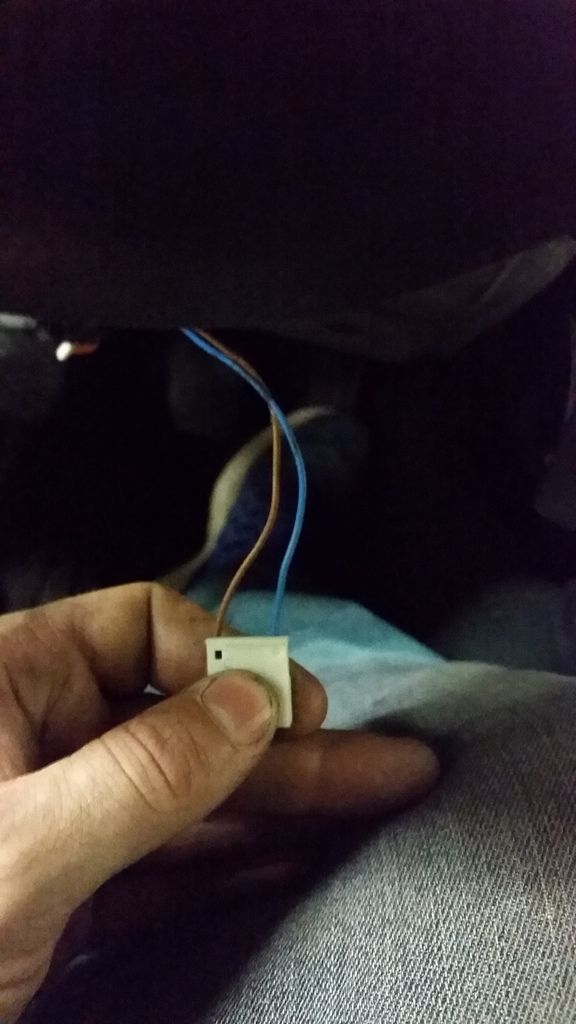
Also started my 99 wheel swap. I have the matching clock spring, but can't figure out where the wires below plug into or get spliced into. Any thoughts?
 Posting Permissions


 Reply With Quote


Bookmarks