
 БМВ Фанат!
lol Brighton, MA must be the toughest place to find coolant hoses out of all places where LS swaps are doneOriginally Posted by squashman702

Just as another idea to make it look nicer - you can try using 2 90* bends (one on each of the ports) and connect them with a small, straight/slightly bent piece of tube.
- 96 328is 6.0L. (LS1 to LS2 build thread: http://forums.bimmerforums.com/forum...ad.php?2098938)
- 96 328is 5.7L. (LS1 build thread: http://forums.bimmerforums.com/forum....php?t=1289987)
- 95 ///M3 6.0L. (LS2 build thread: http://forums.bimmerforums.com/forum....php?t=1619249)
- 97 ///M3. (e46 Fender Flares/track car build thread: http://forums.bimmerforums.com/forum....php?t=1727098)
- 96 328is (Dual Fuel Pump to Surge Tank thread: http://www.bimmerforums.com/forum/sh...ad.php?1964025)
Member
My shop isn't in Brighton, must be why I can't find anything haha.
It looks like a simple problem to solve- don't get me wrong. But, there's only 5-5.5" between the center line of the two outlets. We played around with it a lot yesterday trying to come up with a better solution. I also have a 135* hose I got in today that may be able to work in that spot. Lots of funky angles.
Last edited by squashman702; 02-08-2017 at 05:34 PM.
Instergrams: @davemakepictar
Member
I didn't work on this thing for a week. Shame on me.
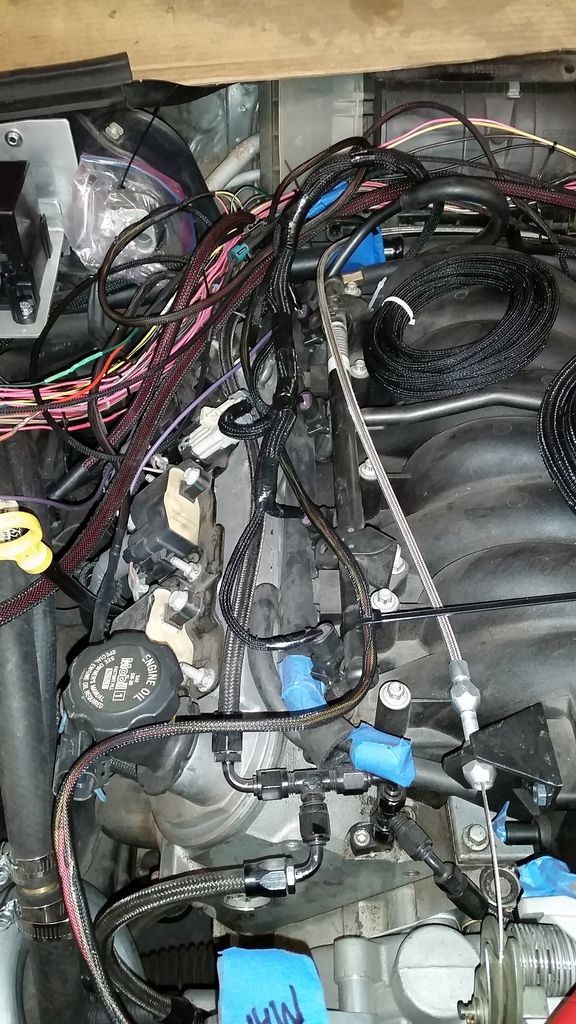
Moved the coolant temp sensor for the PCM to the rear of the passenger side head.
Starter wire on the right, alternator to distribution block on the left. 4ga welding cable. This basically completes the "big 3" upgrade for this car.
Loomed the bank 2 injector wiring.
Instergrams: @davemakepictar
Member
Didn't get a thing done tonight, had an intermittent CEL in the daily that came back again today. Looks like it's probably the upper O2 sensor in bank one. Bought one from Advance, tried to loosen the old one, and it didn't budge. Hit it with some PB, and I'll try to address it a different day. Noticed the jack point is trashed as well, got to love New England. Lifting block is level with the floor. Can't wait for the LS to be done so I can sell or part this thing.

Instergrams: @davemakepictar
Member
If you can reach it, hit the O2 with a MAP torch.
That should help loosen it up.
always trying to make it lighter and faster
^^former build: http://www.bimmerforums.com/forum/sh...-neglected-M3/
current build: http://forums.pelicanparts.com/porsc...car-build.html
instant grams: doktor_b
Member
Probably going to do that or something similar. We have an oxy acetylene torch too, so that's another option. Going skiing for the next couple days and we're taking the Honda, so I'm not worried about it at the moment.
Instergrams: @davemakepictar
Member
I used a Dayco 71189 hose plus one other (OEM BMW hose) for the upper setup. The 71189 has a 90* bend, then it is offset (drops down) about an inch, then its a long straight section. Worked great for me.
DSC05988.jpg
How much lower is the lower connection on your rad compared to the OEM location? Mine is a few inches further down, currently I have two hoses spliced together but I found one that might fit better. Its a Dayco 71982. Switching the thermostat connection to an angled swivel connection opened up my options.
Last edited by lloydjoe; 02-20-2017 at 01:36 PM.
Member
Here is a pic of the lower connection on the new rad with the new hose I plan on using.
Sent from my SM-G935W8 using Tapatalk
Member
Dave, I drove my car to work yesterday.
get to it!
always trying to make it lighter and faster
^^former build: http://www.bimmerforums.com/forum/sh...-neglected-M3/
current build: http://forums.pelicanparts.com/porsc...car-build.html
instant grams: doktor_b
Member
[QUOTE=squashman702;29574492]
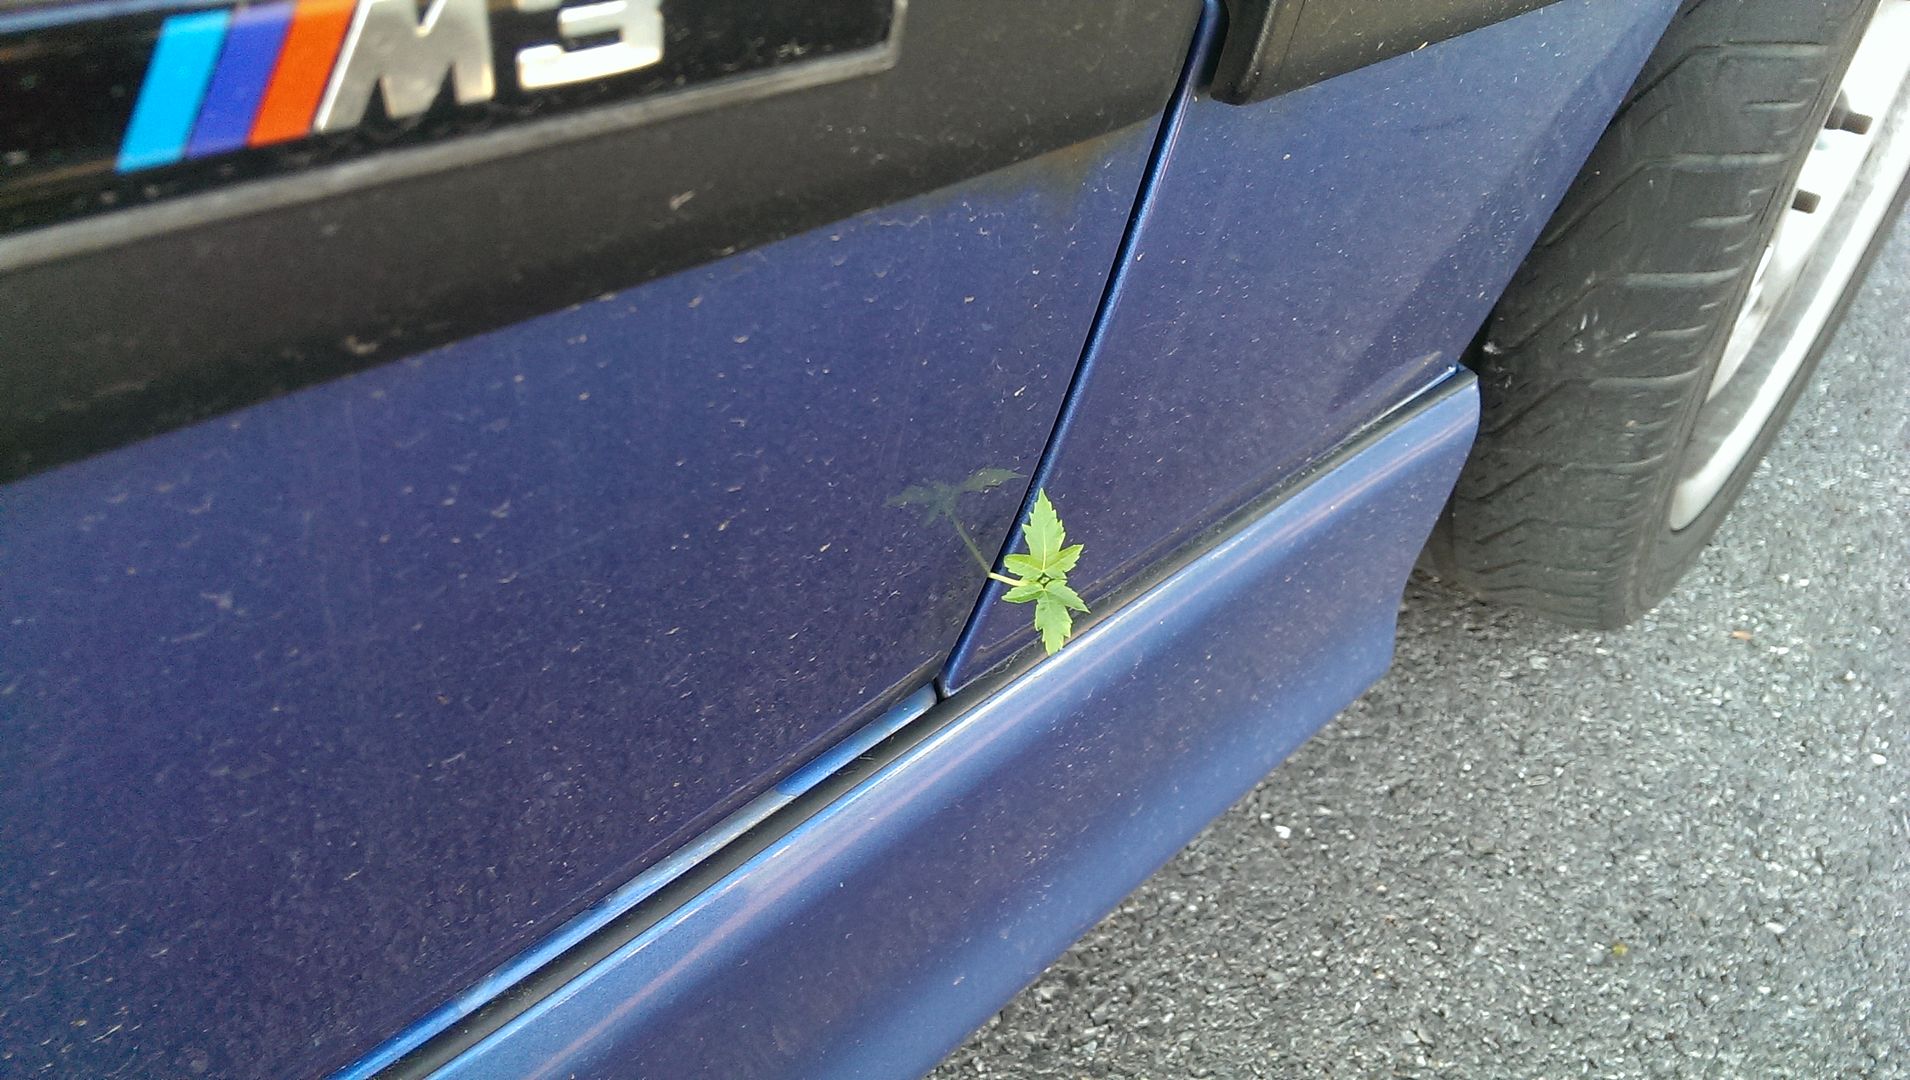
Pulled the passenger inner fender while the bumper was off, found about 10 pounds of dirt sitting on the bottom of the fender. Also found out that someone probably used the fender as a jack point at some point before I owned the car.
[QUOTE]
It's a fertile pasture in there, I had a maple tree sprout from mine.
1988 911 - Carb'd - Twin Plug - 3.6
1999 SL 500
2016 4Runner TEP - Gone
1995 M3 - LS2 - Gone
1998 M3 - Gone
1991 M5 - Gone
1993 RS America - Gone
1995 M3 - Gone
Member
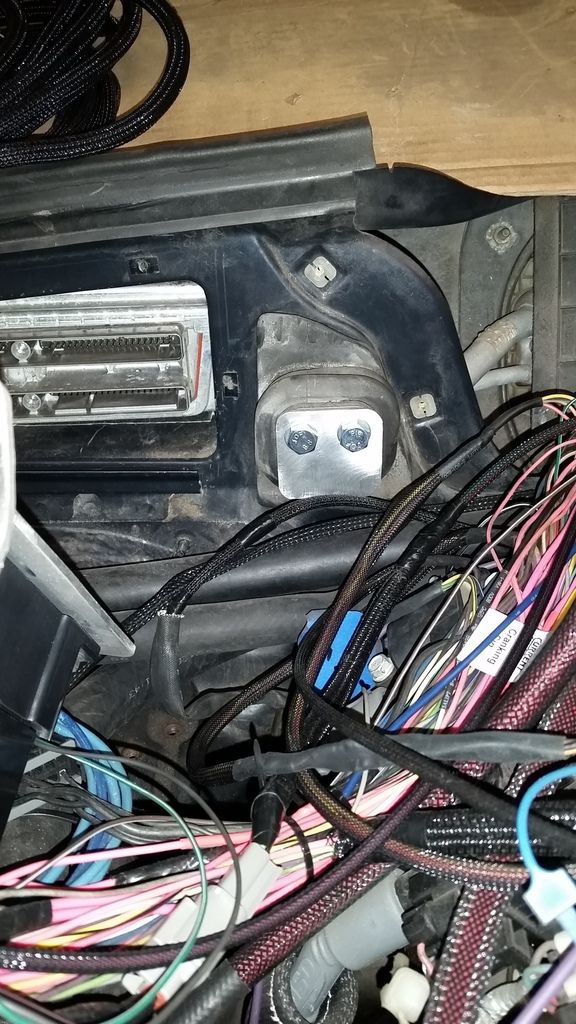
Loomed some more of the driver's side harness today. Alternator plug was left in place in case I decide to go to a four pin regulator at some point with the DR44G.
Figured out the length and started looming the VSS and reverse lockout solenoid. Had to go back and repin 44 on the red connector, as that was pulled previously, and then extended the wires. The Current Performance box has a provision for power for the solenoid and the reverse lights, which is not pictured, but was used. Ordered a Cobra T56 reverse light switch, as the GTO T56 switch doesn't allow enough space for the plug. Since it was a C5 harness, none of this wiring existed, so I had to go back and extend all this.
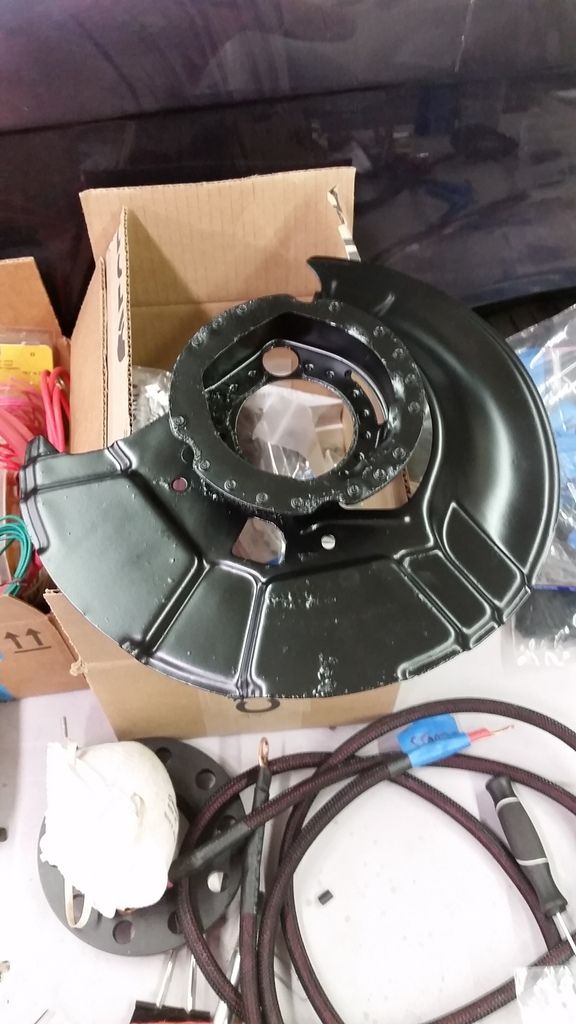
Also cleaned up the dust shield for the passenger side, going to throw this and the bearing on, probably tomorrow. I have tomorrow and Friday off work, so hopefully I can knock some stuff out.
Instergrams: @davemakepictar
Member
Crossed a few more things off my list today.
Trans harness almost wrapped up. Reverse light wiring not loomed due to me waiting on the Cobra T56 plug. Didn't mess too much more with wiring for today- I'll follow up with all that at the end of the post.
Got around to this, did the other side a long while ago. Glad I addressed it, everything was very dry rotted. Lots of coats of adhesive removal spray to get this junk off.
And done. Cleaned the windows and cleaned up all the adhesive remover from the side of the car, then hit it with some quick detailer for some reason.
Backing plate on, new inner dust seal installed, and fresh Moog bearing. Wheel studs, 10mm spacer, and wheel went on later.
This was I think one of the only panels I didn't have to glue when I swapped to the Modena interior. It came apart today when I did the window trim, since it all has to come out, so I Goop'd it.
Put the passenger side skirt back on. New clips on the side and on the bottom, cleaned up the rocker and inside of the skirt first.
New clips on the driver's door panel. Again, these were parts I had, but didn't install. Got it done.
Now for the wiring questions/story.
The car has started and run multiple times at this point. I think I'm getting close to the point where I want to loom the remainder of the harness, and may be close to being done changing stuff around. Left on my to-do list is:
-Clutch safety switch- need to look into how this needs to be wired.
-Fan- wiring is set up already off the Current Performance box, just need to find a fan and shroud.
-O2 sensors- Plugs are in the harness, just need to install, loom, and secure wiring under the car.
-Reverse lights- This will be completed once I get the Cobra plug.
-BMW underhood diagnostic connector (the giant round one)- Do I need this? My understanding is that it's used to diagnose issues on the body side and clear airbag lights, etc.
-Starter signal wire needs to be shortened and loomed
-Remainder of harness needs to be pulled, loomed, and reinstalled.
As of right now, the only wiring I have coming out of the X20 plug is as follows:
-Pin 8 for the CEL
-Pin 10 for the reverse lights- going straight to the switch on the trans, key on power will come from the Current Performance box
-Pin 13 for the fuel pump trigger wire
-Pin 18 for the starter wire
-Pin 20 for the tach signal
-Pin 21 for 12v power for the Current Performance box
Noticeably absent from the list are the following:
-Temp gauge- I have an aftermarket gauge since the stock BMW is more of a warning light than anything else. PCM temp sender takes up the other port on the head. Is there a spot for a third sender to easily run the gauge in the cluster?
-Oil pressure warning light- Running an aftermarket gauge for oil pressure as well, seems overkill to have the warning light too
Stuff I still need to address:
-Three wires need to be run to the rear of the car for the pressure sensor for the evap. I don't want to leave the evap venting to atmosphere, so I have the line from the tank hooked up. Will it function with just the two wires to the purge are hooked up? I know it will not pass an emissions check if plugged in without being tuned out, but cars older than 15 years do not get plugged in for inspection in MA. I bought what I thought was the sensor a while ago, but it's completely different than what the wiring diagrams I found for an F body show. Thinking I'm going to reorder the sender so I can finish that out.
-Alternator dummy light- Not sure it's needed, and I have a two pin regulator on my DR44G that I'm thinking about switching over to four pin. Probably should take care of this first.
Anything I'm missing here?
Instergrams: @davemakepictar
Member
Had a bunch of weatherpack (I think?) connectors from work, so I added in a connector for the OBD2 wiring, and for the evap, so that the harness can be removed from the car without cutting anything. These were all two wire, so I had to scavenge wires from a couple of the others to make them work for the three wires in the evap harness.
And the finished product. Drilled a hole next to where the battery wiring goes into the cabin, but I was having a hard time with the grommet, so that's where I gave up last night. Apparently my boot made a cameo as well.
Also shortened the radiator neck slightly to relieve some of the stress on the silicone 90 for the upper hose. Used the crimpers to remake the bead around the tube. Reglued the foam pads on the radiator as well when the radiator was out, the adhesive seemed like it wasn't going to hold up.
Heat shrink hose clamps came in too. I dig these things. This one is over the barb I had to use in the larger heater hose.
Upper hose got some of the clamps too. Need to order a smaller one to go over the 1.25" end of the water pump. Didn't do the final install either since I still need to work out my fan setup. Might go with a pusher setup to keep the bay a little cleaner.
Ordered a Spectre swivel neck from Advance. Just as an FYI, a SB/BB Chevy neck doesn't work on a LS motor. The bolt spacing is wrong for the water pump. Couldn't really find much online about it, so I ordered one to try it as they make a 90 degree swivel. Hose angle isn't really ideal- this is with a 45* 1.5" to 1.75" adapter. Going to look and see if I can get one with longer "legs" so I have more engagement on the water neck side. The heat shrink clamps should still work in this application according to Gates.
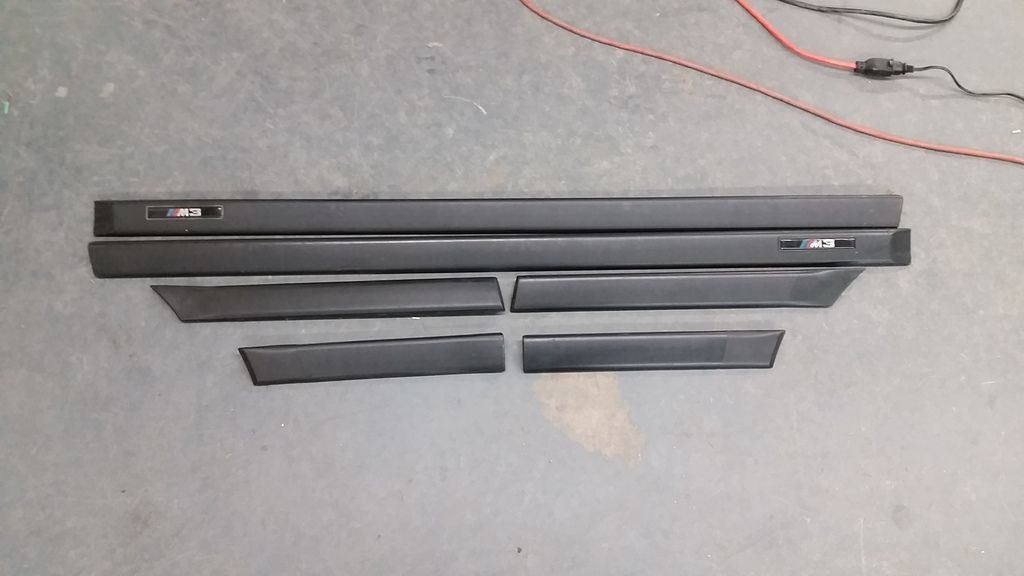
Finally, a shameless for sale post. I have a full set of moldings for sale, for some reason I have spares. Fits coupe/vert. $150 plus shipping.
Instergrams: @davemakepictar
Member
Finished up installing the GM pressure sensor into the expansion tank(?) in the passenger rear wheel well. Wiring is also ran, and new plug added for the GM sensor. Not much progress lately due to problems with my DD- had the rear U joint go bad, and I spent the week chasing down a replacement, and wasn't able to get to my shop due to sharing a car with my girlfriend. Yesterday, I swapped the front lip on the DD, replaced one of the upper O2 sensors, and addressed some other smaller issues to prep it for sale.
Here it is, for anyone that may be interested:
https://boston.craigslist.org/gbs/cto/6027606308.html
Instergrams: @davemakepictar
Member
Started to play with the exhaust today, but then realized the 3" V bands I ordered won't work with the CX headers. Called them up and got those on the way. Did a couple other small things in the meantime, added some heatshrink hose clamps to the heater hoses at the water pump.
Also made the blockoff plate for the A/C lines. Pulled the pins out of the firewall block, then made an aluminum plate to bolt on in place of the lines.
Instergrams: @davemakepictar
Member
do work, Dave!
how far are you from driving it?
always trying to make it lighter and faster
^^former build: http://www.bimmerforums.com/forum/sh...-neglected-M3/
current build: http://forums.pelicanparts.com/porsc...car-build.html
instant grams: doktor_b
Member
Feels pretty far away still. Just haven't had time to knock stuff out lately.
Instergrams: @davemakepictar
Member
Got a few things done the last couple days. Ran the heavy gauge wiring for the alternator, starter, and fuse box around the bay. Loomed the starter trigger wire and rerouted that away from the header primaries. Went to start it last night, and got nothing. Figured out today that I had the starter wire hooked to the wrong side of the distribution block. Corrected that, and then worked on the OBD2 port. I was missing a fuse in the Current Performance relay box, added that, and got the following codes:
MIL light circuit not complete:
And, one for the MAF, which was sitting on top of the motor since I don't have all of my intake parts yet.
Pretty happy I didn't mess up too bad.
Instergrams: @davemakepictar
Member
Grounded pin 1 on the X6031 connector so I have a working check engine light, and pulled the harness to loom it.
Still waiting for the Ford backup light switch and fan to come in, so those are the only things not added to the harness yet, which is why some of the wires aren't loomed. Also need to figure out if I'm going to add in the round BMW connector or not.
Instergrams: @davemakepictar
Member
Cleaned the shop some.
Started to reinstall the harness.
Instergrams: @davemakepictar
Member
keep it up! you'll be on the road in no time!
always trying to make it lighter and faster
^^former build: http://www.bimmerforums.com/forum/sh...-neglected-M3/
current build: http://forums.pelicanparts.com/porsc...car-build.html
instant grams: doktor_b
Member
Plugging away at it . . . I have a small oil leak at one of the bolts in the middle of the passenger side of the pan, then had some fluid leaking from the slave cylinder from the install that seemed pretty persistent. I was worried I was going to have to drop the T56 to figure that one out, but I added fluid to the reservoir on Saturday and pumped the pedal a bunch, and have no fluid out of the bottom of the bell housing. We'll see. At this point, the only things I can really add to make pulling it tougher are trans wiring and exhaust, both of which should be easily removed in the event I do end up pulling the trans to address the leaks.
Instergrams: @davemakepictar
Member
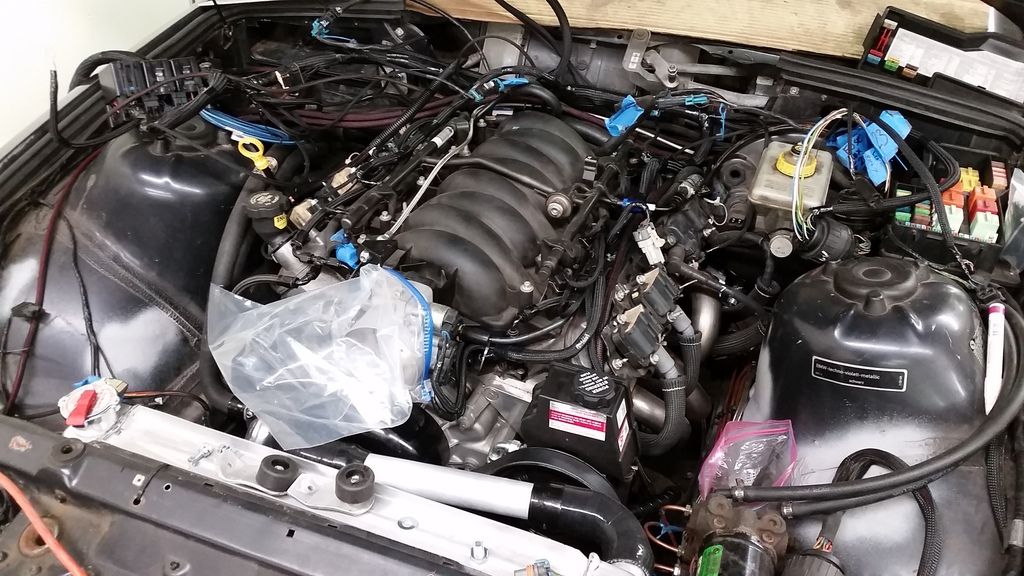
Spent a lot of time this week trying to figure out what I still have to order for intake parts, body trim, etc. Got most of that sorted. Played around more with the harness. Instead of having the 4 gauge wires for the starter, engine ground, fuse box, and alternator running on top of the motor, I'm going to tuck as much of it underneath the motor as I can to make things a little less chaotic up on top. The fuse box wire was too short, and one of my grounds was too long, so I ordered some more wire, and installed what I could.
New ground stud welded to body, and made a stud for the block where the A/C compressor used to sit.
Fan came in, $50 ebay special. Wired in and mounted. Not really enough room for a shroud with this fan and radiator setup, so I'll see how this cools and reevaluate if needed. Still waiting on the lower hose for the radiator so I can complete the cooling system.
Ordered these. I do have a Corvette motor after all.
Quick mockup on the motor.
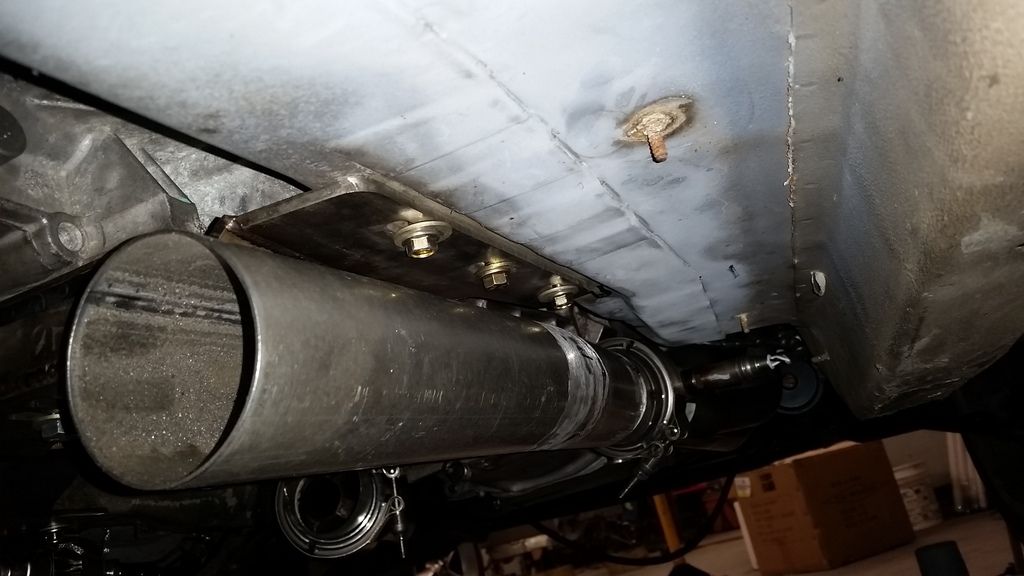
Haven't bought any tools in a while, and this thing should be handy for the exhaust. 12" disc sander from Horrible Freight.
Inspired to start playing with exhaust some. Ordered the other half of the V bands from CX, which came in earlier this week.
This is 3", which will continue to at least past the end of the transmission. Sander was a big help, even with the wood discs on it.
Instergrams: @davemakepictar
Member
Never even occurred to me to buy tools to make the exhaust fab easier. Did it all with an angle grinder. Feel kinda silly now. Lolz.
keep it up!
always trying to make it lighter and faster
^^former build: http://www.bimmerforums.com/forum/sh...-neglected-M3/
current build: http://forums.pelicanparts.com/porsc...car-build.html
instant grams: doktor_b
Member
I have a 14" chop saw as well that I was using, was considering picking up a Milwaukee Portaband and a SWAG Offroad table to go with it, but that may be an investment for later on, considering that's another $450 investment.
Instergrams: @davemakepictar
 Posting Permissions


 Reply With Quote


Bookmarks