
 Member
I recently took the plunge and purchased a Mason pedal, and let me tell you… whoever mentioned that it is a short shifter for the clutch could not have said it any better. As many of you already know, the clutch pedal in our cars and many newer models is made of PLASTIC, yes you read that right… composite plastic. It begs the question, was this a cost saving measure implemented in the early 90’s by BMW? Most probably. In any case, way to skimp out in building the ultimate driving machine! It goes without mention that the plastic clutch pedal is complete and utter crap. It feels spongy and oftentimes clutch engagement is far from smooth. I found it unacceptable and decided to remedy the problem. Here’s a quick unbiased review with a run down of the pedal installation and some overall thoughts. I should point out that this isn’t meant to be total step-by-step instructions. The info I provide should be used as a supplement to the official guide on the Mason Engineering website.
Background
Originally nicknamed GSP - short for Gustav Stroes pedal. The pedal was named after Gustav who had his stock, metal constructed E30 M3 clutch pedal cut and modified to a new position. His goal was to have the pedal rest about an inch further from the brake pedal in order to reduce pedal travel and place less strain on his knee as a result of an increased extension of his leg. Mason’s latest iteration is based on Stroes’ design. For those unfamiliar, John Mason is a long time fabricator who has designed and manufactured suspension and chassis parts in the racing world. Nowadays he designs and fabricates parts for BMW and Minis with one of his top sellers being the clutch pedals (E36, Z3/4, E46). What’s so special and why does it cost as much as it does, you ask? Well, it’s hand fabricated using high quality material and it clearly shows. It not only looks/ feels great but improves upon a major design flaw.
Knowing that Mason Engineering was located within a 20 minute drive in Simi Valley, I reached out and expressed interest in the clutch pedal. Surprisingly enough, Mr. John Mason himself answered my call. When I told him I drove an M Coupe he was quick to remark, “Oh, that will never work,” in reference to the E30/E36 suspension. True story, hahah. He expressed that his workshop is set up from home and that I’d be more than welcome to pay him a visit, so I figured why not considering I could a save a few bucks. Without me even inquiring about pricing, he was quick to establish that if I brought $220, I could have a pedal in hand ready to be installed. He was nice enough to give me a tour of his expansive workshop which mind you covers two levels, and showed me some of the projects he worked on in his heyday. Pretty impressive stuff to say the least. It’s obvious he takes a lot of pride in the work he does and is adamant about the material and workmanship that goes into the products that he offers. As the old adage goes, you get what you pay for.
Here's the Mason pedal in all its glory,
Some comparisons between stock and new. I tried to be as accurate as possible by rigging both on the main pivot.
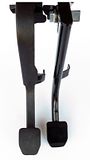
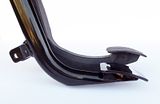
And the end result. The clutch pedal now sits at approximately the same height as the brake pedal.
Removal/ Installation
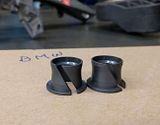
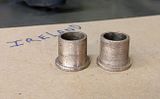
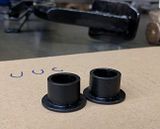
Removal of the stock pedal is straightforward after analyzing the assembly and seeing how it operates. There are a few circlips/ pins, a barrel or helper spring, and a metal bracket with switches secured by two 10mm bolts that will need to be removed before the pedal can be slid off the main pivot. Aside from the 10mm bolts holding the metal bracket, only one circlip will be reused on the new pedal to secure the pedal onto the pivot. With the stock pedal out of the car, you’ll want to transfer over the rubber pad and aftermarket bushings, if this applies. And if it doesn’t, now would be a good opportunity to install *delrin or oilite (Ireland Engineering) type bushings that many on here prefer.
*The Mason pedal was designed to be used with the stock, plastic bushings p/n 35 21 1 158 290. I discovered this after ordering a set of I.E. oilite bushings which are obviously meant to be used with the stock pedal. The outside diameter of the I.E. bushings is slightly larger in size. I had John sand some material off to allow the bushings to be installed on my pedal. Interestingly enough the delrin bushings supplied by UUC that I had installed on my stock pedal were a very snug fit. This is due to the fabrication process and welding of the steel in and around the main pivot hole. Before they're ready to be shipped, he reams the hole to ensure the plastic bushings fit nicely.
**I came across a set of Garagistic brake/ clutch pedal delrin bushings (blue) I had set aside for my E30 and they fit perfectly, even better than the UUC's. This might be the best option but will require a PTFE/ Teflon based lubricant for prolonged squeak free operation. I should note that it appears garagistic has changed the color of these bushings to yellow.
[BMW bushings] [BMW bushings w/ part number] [I.E. sanded bushings] [UUC bushings] [Garagistic bushings]

The Mason pedal comes with the necessary hardware (bolt, locking nut, washers) to mount to the clutch actuator. OEM type bushings are also supplied if you choose to install these instead of supplying your own. Once the new pedal is in place it will need to be secured to the actuator and the metal bracket reinstalled. One of the last steps involves installing a new spring with grommets. More on this in the following section.
Note
Some additional parts are required for the conversion. The clutch pedals in Z3M’s come with a barrel type spring, often referred to as a helper spring. This spring is eliminated altogether and replaced with a return type spring found on non M’s and some, if not all E36’s? The new spring, p/n 35 21 1 158 489, mounts in a different location towards the top of the pedal. Two rubber grommets, p/n 35 31 1 113 725 will also need to be sourced and installed. This will all become clear once you start disassembling the stock clutch pedal and compare it to the new setup. A very informative thread that goes into more details can be found, HERE
Level of Difficulty
On a scale of 1-5: 2.5 Bumped a half point up due to the cramped work space. I imagine having the seat out may help, however it isn’t necessary. Being thin and flexible certainly works to your advantage. The install takes anywhere between 1-2 hours depending on how familiar you are with clutch pedal assembly. If you’ve replaced the pedal bushings, the conversion should go smoothly.
Pro's
- Improved ergonomics with lower pedal position
- Shorter pedal travel
- Solid/ linear feel with no squeaks or creaks
- Lateral play eliminated
- Increased control and shift speed
- Enhanced driving experience
Con's
- Requires slightly more force to engage clutch. Easy to push initially, but more difficult near the floor. This might be a nuisance for some, however I find it to me more of a pro since you get a better feel/ positive feedback. This is something that you could easily get used to.
- $$$
Conclusion
All in all, the pedal has completely transformed the car. I’ve completed the shift pin service, removed the CDV, installed a new clutch line, bled the system, replaced trans fluid with Amsoil, installed a weighted ship knob among other things–all in the hopes of improving the driving experience. However, none of this work has made as great of an impact in improving the driveability of the car as the clutch pedal conversion. It’s a must have and I can’t recommend it enough. Simply put, I guarantee you won’t be disappointed even at the steep price point.
For anyone in the SoCal area who wants to experience the pedal first hand, shoot me a PM. You really need to see and feel it to appreciate. And for any of you interested in one of these and on the fence due to the cost as I was, please chime in as I may be able to arrange a group buy at $220 (what I paid for mine) plus shipping and PP associated fees. Figure approximately $14 more for shipping via USPS Prioirty medium flat rate. This is my way of expressing appreciation for being a part of such a great and knowledgeable group. Quite frankly, everyone on here deserves to experience this awesomeness and will benefit from this small, yet extremely effective mod – what I personally consider my favorite to date. Lastly, I should note that I'm not getting paid to promote this product and certainly not interested in making a profit if the group buy materializes. Thanks for reading.
Last edited by Eurospec; 04-04-2016 at 11:46 PM.
Member
Where are you located? I'm in the San Fernando Valley and would like to checkout your clutch pedal.
ImaginaryFriendWBennefits
I’d be down to try out the clutch - I’m actually stuck out in Simi Valley already. Car is coming up on 50k pretty soon and I’m planning on doing a pretty expansive overhaul of most wear and tears - this fits in with that refresh since I got a squeaker already.
Member
This is so helpful! Was considering modifying my original pedal (fill and drill) to move the master cylinder attachment point, but at ~$220 I might just buy this!
DO IT YOURSELF.
This is one of the best ways you can spend ~$200 on your Z. Couple it with a clutch line, a refresh of the shifter wear points, a Whalen shift knob, and you're going to be amazed at what you put up with for so long beforehand.
Member
I love mine, put it in 10 years ago and have enjoyed every second of it.
NorCal Coupe Grupper
EPIC review!!!! I'm glad you listened and pulled the trigger. It's not just a pedal hahaha THIS IS A MUST HAVE!!!!!!
Member
I'm in the valley too. Shoot me a PM with your number.Originally Posted by K1CKBAC

Send me a PM with your info and if I ever make it out there again or you pass through my neck of the woods, we'll hook up.
Glad you found the review informative. No point in tinkering with the stock pedal... it's junk!
Member
Great review. I've been curious about this pedal for a long time... Might just have to buy one now, as I'm always looking for something to tinker with on the Zed!
96 320i Touring
98 Z3 2.8 Roadster
01 PY M Coupe
96 Z3 1.9 - DASC
95 318ti Clubsport
94 Miata M-Edition
13 smart fortwo
Member
Updated my original post with some findings in regards to the pedal bushings. My advice would be to stick with the stock bushings supplied on the Mason pedal.
Do it, you won't be disappointed.
Member
Looking back at my log, this was the first mod I did. I hated the stock clutch pedal feel soooo much. The second mod was the Ireland subframe bushings.
Member
excellent write up. hoping to do this soon.
1of1 SG/DBO Twinscrew
So what was the issue you ran into with using the IE oilite bushings? Seems like the oilite with Mason pedal would be the perfect indestructible setup.
- 1of1 rebuild (build thread) -
- Wanted Car items - FS: PnP aftermarket alarm details -
- Coupe Custom Subwoofer box - FS: Z3 Coupe LED 3rd brake lights -My Website for DIY content and parts: Double Bee Garage
Member
BMW CCA Member
I'd be interested in buying for $220 if that's still an option. Also wanting that Mason race bar, any potential discounts on that?
Also curious if there was any sort of discount for buying the race strut bar in person as well?
___________________________________
Always looking for my next ///M Coupé...
Member
I'd also be interested @ $220.
Member
BMW CCA Member
I'm a yes at $220 plus shipping.
Member
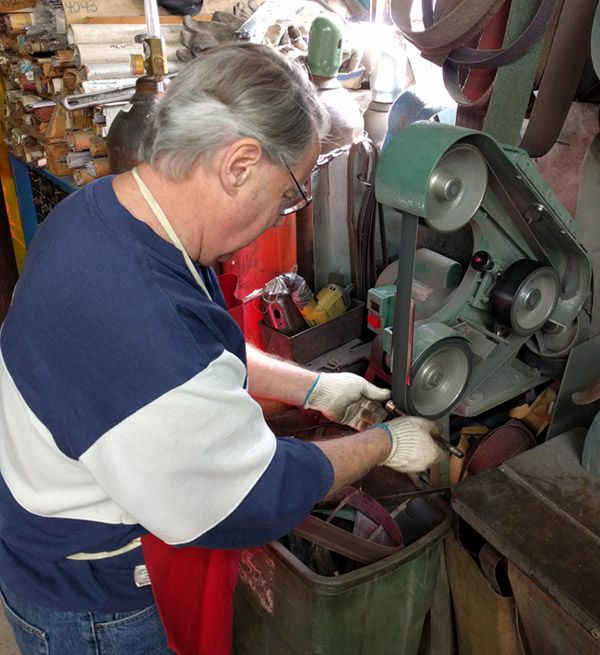
Exactly my thought until I had the oilite bushings in my hand and tried to install them. The outside diameter is just a tad too large and required some sanding. Here's John making the proper adjustment on his belt sander...
Yes, the $220 price point will probably be a go gauging by the interest. As far as the race brace goes, those will be discounted too at I believe $400 for the steel version. I'll need to iron out the details with him prior to setting up the GB.
Member
Is there any difference for the 1.9L clutch. I believe the Clutch Master Cylinder is somehow longer on the 1.9
Would I also have to replace the master cylinder?
Member
I don't think there's a difference based on the p/n. Its a common part across the Z3 chassis. Perhaps someone can confirm.
Member
How does one get in on the $220 deal? Ok for us canadian types?
A BMW
1of1 SG/DBO Twinscrew
So the only reason that you are recommending the OE bushing is for "direct" fit, versus the light modification the Oilites need?
Nothing to do with operation?
- 1of1 rebuild (build thread) -
- Wanted Car items - FS: PnP aftermarket alarm details -
- Coupe Custom Subwoofer box - FS: Z3 Coupe LED 3rd brake lights -My Website for DIY content and parts: Double Bee Garage
Member
I am in for the $220 + deal if possible.
Dave
Member
Count me in on the GB too.
He who is enslaved to the compass is free to sail the seas...
Member
Such a glowing review, who am I to say no to a group buy? Though having a base model Z3 2.3 (model year 2000), will I really see the same effect? The OP writes from the POV of a Z3M and describes the stock clutch engagement as "spongy and oftentimes far from smooth... unacceptable", yet I have not noticed anything lacking in the stock clutch pedal. Then again this is my first car with a manual transmission.
Member
i'm in for $220 also... standing by
I know it was discussed by the OP... but i'm simple.
but so i'm clear: additional parts needed are as follows:
I.E. oilite bushings (modified) or delrin bushings supplied by UUC or stock, plastic bushings p/n 35 21 1 158 290
new spring, p/n 35 21 1 158 489
Two rubber grommets, p/n 35 31 1 113 725
also, any idea how much material needs to come off the IE bushings? i'd like to go that route..
 Posting Permissions


 Reply With Quote


Bookmarks