
 Member
So I bit the bullet and am going to be taking on an M60 V8 swap. Whilst there is allot of info out there, none of it is all in one place. Hence i am going to try and make this thread as informative as possible.
SO. In my mind I've broken this swap up into a few different parts:
1 - Engine rebuild
2 - Electronics (loom integration with chassis)
3 - Gearbox and flywheel selection
4 - Gearbox and engine mounts
5 - Oil pump and sump problem
6 - Accessory adaption.
7 - Exhaust
As I make posts i'll name them one of the above sections, and i'll try and and post as many pictures as i can.
Here goes:
This is the car that the engine will be going in. It was a 1JZ swapped 318 sedan. I bought it sans engine but it came with M3 trailing arms, brakes, axles and an LSD.
IMG_4424.jpgIMG_4427.jpg
1 - ENGINE REBUILD.
The M60 I got was a unit out of a 5 series with 328000Km's. i know this is allot, but it came with a full service history, all oil changes had been on time. I Had always planned on rebuilding the engine anyway.
I haven't taken any photos of me pulling the engine apart, thats pretty easy. Some advice though. Ziplock bags are a LIFESAVER. Label the bags, and put all your nuts and bolts in the bags. I'm talking Alternator bolts in one bag, passenger side rocker cover another etc. This is what works for me, admittedly its a little time consuming, but will save time in the long run.
IMG_5879.jpg
These are the two cylinder heads that came off the engine, as you can see - pretty clean for an old engine. I dropped them off to be skimmed the other day. Turns out all the valve guides are in excellent condition (hoorah for on time oil changes!) So I'm just having the valve stem seals replaced, and light valve enshrouding done. These heads are actually very well built, the ports are pretty well cut from factory, and there is a multi angle valve job. These heads really do flow very well, and are capable of supporting much more HP than the engine does in stock form.
Got an exciting email the other day, all new gaskets/seals and whatnot have been shipped from europe, and should be here within the week! BRING ON THE REBUILD!!!
well thats all for now.
Last edited by Kurtisja; 02-13-2016 at 01:36 AM. Reason: pictures didn't appear properly
Member
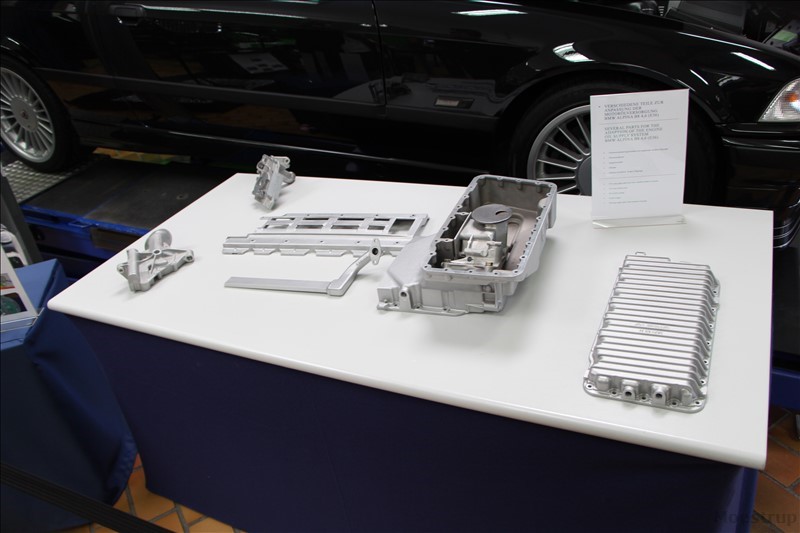
The big issue will always be the oilsump,,,
Here is a picture from the sump that ALPINA did on their conversion,, i took the picture in June 2015
Sveinbjörn Hrafnsson
E30 CABRIO V12 M70B50 ///
ALPINA B10 BITURBO 346 @ 507
ULTIMA Evolution
Contacts
http://alpina.123.is/pictures/
Member
Ive got a few ideas to deal with the oil sump/pump issue. I don't want to post anything until I've tested. Theres too much bad information on the internet and i don't want to contribute to it.
Ive heard of people modifying E53 X5 pumps and moving them back as in the picture below:
25062010117.jpg
Another option is flipping the pump around to the actual pump sits in front of the chain.
Finally i could always use an external oil pump, either a single stage external pump and a wet sump, a multistage pump with part wet sump, part reservoir system, or go full dry sump.
Like i said, i don't want to post my solution just yet, but at the moment it consists of using entirely BMW parts, with little to no modification. Will lee you updated.
One of those JZ swappers
BMW CCA Member
Peterson fluid systems..they were very helpful to me when I was going to use one of their pumps in a custom application. Their wet vac pump is what I was looking at.
1995 M3 - Forged 9.8:1 2JZ, S366, MS3x, E85, LQ9s, 420g/PMC Motorsport kit, 4 clutch 3.15 LSD Large Case 757whp/710wtq
2011 X5 Xdrive35d- Blk on Cinnamon, Towing Pkg, Heat Pkg., etc..the tow rig/DD!
Member
my OIL PUMP AND SUMP SOLUTION:Peterson fluid systems..they were very helpful to me when I was going to use one of their pumps in a custom application. Their wet vac pump is what I was looking at.
I was looking at one of their pumps actually, there was a nice single stage on on ebay but I wasn't quick enough :/
Anywho, I think I have the oil pump issue solved. Someone suggested playing with an N62 oil pump. Given the way BMW build there engines, most parts seem to be compatible across families. So I figured i might as well experiment. Admittedly it was a fairly expensive experiment but I feel i have good news.
So the N62 pump FITS! almost. Actually not really at all.
IMG_5910.jpgIMG_5909.jpg
Sorry, again the pictures aren't very good, but you can see a few things.
Mainly, the main cap bolts line up with the oil pump bolt holes. This is the main thing I was concerned about. However, due to the design, the N62 pump sits allot closer to the main caps. (i'll post some more photos of this next time
Screen Shot 2016-02-19 at 10.12.58 am.png
Im hoping with a little bit of working on the Lathe parts 5 and 6 can be altered so that I can mount the oil pump accordingly. I'm not sure if i am going to alter the stock BMW parts or make new parts from scratch.
The other issue is the sprocket form the pump sits about 25mm away from the sprocket on the crank. My plan is to just machine down the existing sprocket drive shaft. so that it fits. I think i may also reverse thread the sprocket nut, and drill a hole for a safety wire. The front bracket will also need a little altering. Again, not sure whether I will keep the existing bracket, or fabricate a new one. (i have a mate with a mill and a lathe which is always helpful)
It does look like the feed pipe lines up with the existing feed pipe. So my plan is to build a distribution block outside the engine for sensors, then take the oil back into the block (on the N62 pump the oil filter is incorporated into the pump, unlike the external filter on the M60)
Still waiting on the sump to arrive, not sure if it is a direct bolt up, or if i will need to weld the sump pan to the M60 sump mounting flange. Also I'm not sure
A few pros and cons of this solution:
pros:
- you get a solution using entirely BMW parts that are readily available.
- The solution involves no critical welding (welding cast aluminium is notoriously difficult, even with a proper TIG setup. I would not feel good about having a part like this in such a critical part of the engine, especially given the environment and the vibrations)
- with the filter housing is incorporated, meaning one less thing in the engine bay
- easy to build in an oil cooler, and distribution block for sensors.
cons:
- still not a direct bolt on solution
- requires machine work ( if you have allot of patience and a steady hand most could be done with common workshop tools, but the drive shaft DOES need proper machining)
- sump may require machining
- requires custom spacers
- not the cheapest oil pump around
Member
OK, so the build continues!
I picked the cylinder heads up the other day, previous owner had clearly been good with his oil services so they only needed new valve stem seals and a skim.
These heads flow really well, and have incredibly large valves (I'm pretty sure the same size as the S62). There wasn't much porting and polishing work to be done, I got the valves deshrouded a little though. 90% of the gain for 10% of the work.
IMG_5947.jpg
You can see just around the outside of the valves where a little material has been taken off. We didn't want to go too far to keep costs at a reasonable level.
IMG_5950.jpg
Cylinder heads back on the engine!
OIL PUMP/ENGINE MOUNTS:
So back to the juicy stuff, I've been playing around with the N62 pump and sump and there is definitely a way to make that combination work. Unfortunately the bolt holes etc of both are off by a matter of millimetres. On top of this even with the N62 rear mounted oil pan, I still cant get my subframe where i want it. I'm aiming to get the back of the engine in the same place as the 6's sit, so when i bolt on a gearbox, theoretically i can use an e36 tail shaft and not have to get one made.
I measured the distance from the rear of an M50 to the engine mount bolt, then transferred this same measurement onto the M60.
IMG_5938.jpg
The little mark on the bottom (top in the picture) of the steel plate is where I need the engine mount bolt to be. As you can see with the N62 oil pan, it is just a little bit too far back (i know i could correct this with engine mounts, but I'm trying to keep them as square as possible, for ease of manufacture)
Hence the new solution is I'm going to cut off the oil filter housing from the rear of the N62 pump and move it as far back as possible. I will mill a little plate that will be welded onto the rear cover of the oil pump that will direct oil back the way it needs to go. I will then completely custom make a sump out of aluminium that will fit around the subframe.
I hope by the next post i will have some form of engine mount made up, even just a test piece.
Member
Very cool stuff. Keeping my eyes on this.
Member
any updates?
Member
Sorry i have been so slack with this build guys! It is still continuing, i haven't given up! At the moment i am just in the boring process of rebuilding the engine after a complete tear down. And of course, i'm always missing that one gasket, seal or bolt... grrrrr.
I have began playing around with the N62 oil pump. Ive decided that this is probably just as much effort as modifying an X5 oil pump, but I'm already $500 down the N62 path, so I'm going to stick with it. One way or another, it gives another option those attempting this swap, and who want a rear mounted sump.
anyway, ill have some more pictures, and a proper progress report soon!
Member
Finally I'm back! (for those who are following) anywho, i spent some time today messing around with the N62 oil pump, and i think I've hit pay dirt.
So here is a pic of the oil pump sitting as it will be mounted. Basically what i did is ordered myself a few more of those screw things with the internal threads that the stock oil pump bolts to (pt#111736059) bolted them in and drilled some holes in some steel flat bar. that runs from the first bearing journal, all the way to the back. This allows me to position the pump wherever i want, and means i don't have to alter the sprocket shaft. Also, this is probably a good time to mention i cut the oil filter housing off the back of the pump and welded the hole up.
anywho, a few more pics of how the pump sits: unfortunately the chain isn't quite long enough to go all the way over the sprocket, so i am probably gonna have to mill down the mounting points on the pump somewhat. the other option is to recess whatever i use (steel or aluminium). either way, the intent is to move the pump closer to the crank.
IMG_6636.jpg
IMG_6634.jpg
IMG_6633.jpg
Plan is basically cut the M60 and N62 sumps and weld them together. Will post more in time.
Member
I'm following!
Member
i'm lurking

Popular engine swap weights & stock engine weights
M42 + trans - 427lbs
302 + t5 trans - 475lbs
m20b27 + g260 - 497lbs
m52b25 vanos + g250 - 544lbs
351w + t5 trans - 572.5lbs
LS, aluminum block + t56 - 609lbs
LS, iron block + t56 - 719lbs, EST.
http://www.bimmerforums.com/forum/sh...60-m42-1jz-2jz
Member
been talking to a mate with a mill, plan of attack is to mill down the oil pump mounts till i can get the drive gear on. thankfully there is HEAPS of room between the pump and the crank counterweights/bottom of the rods.
Although, i am using the M60 oil pump gear as oppose to the N62 pump gear, which is bigger. meaning the pump will be spinning slower. Ill need to do some some fancy engineer type maths to see how this affect oil volume (should be easy to calculate as they're both just gerotor pumps). oil pressure shouldn't change dramatically as this is set by the pumps relief valve, and i cant imagine the N62 pump flowing LESS oil than an older unit.
All things to think about. Don't suppose anyone knows where i can find info on the pressure relief valve presets? otherwise ill need to calculate them based off of the spring constants (again which ill need to test, although this is relatively easy with a known mass and a ruler)
is this all strictly necessary? probably not. But i am gonna do it anyway because its all useful info to have out there, and its cheaper to spend an hour doing maths than it is to spin a bearing shell.
- - - Updated - - -
Also, i know this isn't strictly a physics/engineering forum. But anyway, let me outline my thinking, and see if anyone see's anything wrong with it.
Also, im gonna be working in metric units, (sorry for those used to imperial)
Pressure is measured in MPa, or Newtons/mm^2
Spring force is measured in N/mm.
Ie, if a spring constant is K=5N/mm for every 5N of force the spring will compress or extend by 1mm.
therefore, if max permissible oil pressure is for example 120MPa, or 120N/mm^2. i could calculate the required spring constant by diving 120 by the area of the relief valve IE 120/valve area (mm). This would mean, with the given K, at 120MPa the valve opens 1mm starts to bleed pressure, at a rate equivalent to the opening size and viscosity of the fluid. (these are present based on the pump dimensions, and oil i choose to use). and then as the pressure rises further, the valve opens more.
Therefore, to match the two, id need to figure out the spring constant of the original M60 pump, measure the area of the relief, and figure out the relationship between how much the relief opens, and area for the oil to flow out of (if its a circular opening I'm fairly sure the relationship is quadratic?). Based off this, by altering the spring constant in the N62 pump, i can alter it to reflect the pressure relief characteristics of the M60 pump.
Or i could just install the pumps, have a beer and hope for the best.
unfortunately(or fortunately?) ill probably take the first option. Feel free to chime in with any corrections to my maths. I know its all probably on google somewhere, but i cbf to look it up now, and i like mind exercises. ill double check this at a later date when I'm not hungry and yearning for beer.
Member
you're overthinking this. if you HAD to solve this problem on paper, you're on the right track, but there's a herp-de-derp way to go about this. go some place with compressed air with an air nozzle and a fine tune air regulator. rig the air nozzle up somehow so that you're putting pressure on the pressure relief valve and... viola, you've got the pressure relief valves' opening PSI rating
Popular engine swap weights & stock engine weights
M42 + trans - 427lbs
302 + t5 trans - 475lbs
m20b27 + g260 - 497lbs
m52b25 vanos + g250 - 544lbs
351w + t5 trans - 572.5lbs
LS, aluminum block + t56 - 609lbs
LS, iron block + t56 - 719lbs, EST.
http://www.bimmerforums.com/forum/sh...60-m42-1jz-2jz
Member
you're absolutely right, i didn't even think about this! like you said, definitely over thinking it. this would be very easy to rig up in my workshop.you're overthinking this. if you HAD to solve this problem on paper, you're on the right track, but there's a herp-de-derp way to go about this. go some place with compressed air with an air nozzle and a fine tune air regulator. rig the air nozzle up somehow so that you're putting pressure on the pressure relief valve and... viola, you've got the pressure relief valves' opening PSI rating
Member
Bump because some interesting shit...
Member
Thanks! hopefully i'll get back to this project very soon. right now I'm just bulletproofing my track car, so i don't need to drag it back into the shop whilst I'm working on this swap.Bump because some interesting shit...
Member
Diving into the same swap this month. Brought a pan and pump conversion out of Europe. We'll see how it goes.
Member
http://www.parts33.com/product/bmw-m...-e36-e46-z3-z4
many great parts here
Sveinbjörn Hrafnsson
E30 CABRIO V12 M70B50 ///
ALPINA B10 BITURBO 346 @ 507
ULTIMA Evolution
Contacts
http://alpina.123.is/pictures/
Member
Finally I'm back team! (for those still following anyway) Im currently off work, so have a fair bit of time to work on this.
Been tackling the wiring over the last few days, whilst i cleaned out my workshop to make room (you wouldn't believe how many junk M5x's i have lying around).
Anywho, the guy i bought the car off had been running a 1JZ, and had done a fair bit of custom wiring himself. Anyway, all i can say is it was rough as guts. Im pretty sure I've pulled out all the dodgy wiring he had done so I have a clean slate to start with. He also did me the massive favour of cutting off all the plugs from the front loom he didn't need. Yay for having to find headlight, AC and windscreen washer plugs at a wreckers. Actually this wasn't an issue, I wanted to pick up an M43 loom so I could easily trace all the necessary wires in the X20 plug.
IMG_8245.jpg
Anyway, My process was as follows:
got the loom, and BOTH sides of the X20 plug from a wrecked car (of the same year). Then used the bentley manual and a multimeter to trace each pin from the ECU, and wherever else they go to the X20. The layout that I found is as below.
Screen Shot 2017-01-10 at 3.18.51 PM.png
I included the termination points, so I can double check everything matches up on the car side (i.e. car side X20 to termination). It is so much easier to get it right the first time, than trying to find gremlins when the engine is in and not starting. Im waiting for an E38 bentley manual before i dive into the M60 side. Ideally I'm going to wire it all into an X20 plug, so the V8 plugs in exactly the same as a standard engine. I think I'm also going to wire in all my aftermarket gauges, monitoring systems and general aftermarket wiring through a second X20 plug (like an auto car) just for that stock look.
Also ordered myself an ICEngine works header mockup kit. It was expensive, but hopefully I can make my money back doing other jobs. I got the 1 5/8 kit. there isn't really any maths behind that, based more off available tube, what is easy to work with, large enough for the engine, but not so large that it doesn't fit.
Ive also been looking into steering shafts, as I'm a little concerned the stock steering shaft may prove problematic. (also cuz I'm working on an LS swap with someone else, and thats an issue he is looking at as well) Flaming River seem to be the only non oem option that i can find (if i want a collapsable shaft). Im going to try to stick the the current one. It is possible to reverse these so the guibo is up closer to the firewall rather than down near the exhaust. Not sure if this will clear the valve cover though.
Looking at possibly making an ITB setup for the engine, because why not. Cant quite decide if i want to go through the headache of tuning it, just for a daily though.
Stay tuned, more to come soon!
Member
do like
there's a guy who posted a thread recently where he's planning on doing some wild front sump setup on his e36
it'll be interesting to see if it fits though
Popular engine swap weights & stock engine weights
M42 + trans - 427lbs
302 + t5 trans - 475lbs
m20b27 + g260 - 497lbs
m52b25 vanos + g250 - 544lbs
351w + t5 trans - 572.5lbs
LS, aluminum block + t56 - 609lbs
LS, iron block + t56 - 719lbs, EST.
http://www.bimmerforums.com/forum/sh...60-m42-1jz-2jz
Member
Managed to do some more work on the swap today. Finally got around to actually putting the engine in the car. Admittedly just hanging by the cherry picker, but its nice to just see it in there. to get some sort of confirmation that it fits. And honestly, it isn't as tight as I thought it would be, but there are a few issues that I've noticed.
IMG_8292.jpg
ABS: As I expected I'm going to have to relocate the ABS, although I really don't mind this. I wasn't too happy about it sitting right down next to the exhaust anyway, both because of the heat from the exhaust, and the difficulty that replacing it would be should there ever be an issue. The picture below shows how far over the engine needs to be to clear the ABS, whilst being low enough to mount the gearbox and it not foul on the transmission tunnel.
IMG_8289.jpg
IMG_8290.jpg
For the sake of being able to put it wherever i want, im going to remake the brake lines. Im thinking of relocating it either right next to the fuse box (where the US brake booster would be) or down the front where the M5x air filter would go. This will be confirmed when i have the engine placement confirmed.
SUMP and OIL PUMP: as everyone knows the biggest drama with this swap is the sump and oil pump. Thus far i have neglected doing anything oiling related other than a little bit of playing with the N62 stuff when it arrived. Once I've determined engine placement i can figure out exactly where and how ill make the sump, and attach the oil pump. Im thinking ill just weld on some new mounting points to the N62 pump. Ill upload pictures of the sump when i get a better idea of how I'm going to do it. But i have some ideas.
ENGINE PLACEMENT: Obviously ill be making my own engine mounts, which means I can place the engine wherever I want. It also means there are quite a few axis which I need to align the engine along. Im planning on using a standard E46M3 6 speed getrag box with an adaptor plate (more on this later) and so my thinking is using the gearbox to align the engine. That way I can hopefully get it in in such a way that i can use the E36 euro M3 propshaft, which will save me having to have a custom one made. I can use measurements taken from my E36 with ZF 5 speed to get angles right (i.e. how far back the engine is tilted) by measuring the distance from the centreline of the gearbox to level, and from the output shaft to varying points on the chassis. When all this is done, I can tack up some mounts. For the mounts I'm just going to use steel. In the future it might be cool to mill some out of solid aluminium, but for now i know steel will work.
GEARBOX: So like i said I'm using the 6 speed from an E46 M3, rather than the 6 speed that came on the V8's. This is mainly due to availability in Australia. It was cheaper to buy the gearbox, adaptor plate and matching flywheel than it was to import a V8 gearbox, and flywheel. Im reticent to say where the adaptor plate cam from incase it doesn't work for me. Which is a concern as it was designed for a LHD car. So ill have some milling and possibly welding to do. More on that later.
Furthermore, I'm aiming to get this engine as far back in the car as possible. I have a feeling with the MASSIVE bell housing on the V8 gearboxes this may prove an issue. The M3 6 speed was designed to fit in an E36 transmission tunnel, so for now I'm going to go with that. That being said there is every possibility the V8 bell housing would have fit. And if anyone has a line on a cheap one, id be interested in buying it.
The next thing i need to do is fabricate something that will allow me to lift the engine along the crane axis. As you can see from the photo, the lifting points are diagonally across from each other, making it difficult to level it. Im thinking a steel plate that bolts onto where the intake manifold does. Similar to a carby lift plate shown below.
Lift.jpg
Member
More work done today. Got the gearbox attached to the engine, which was a massive PITA (holy crap those 6 speeds are heavy compared to the ZF5S), and put the engine into the car for the 2nd time. Yes I'm keeping a tally, i reckon 6 times the engine goes into the car.
IMG_8296.jpg
Here it is. Didn't end up making the lift plate. A trolley jack under the rear end of the gearbox meant i could adjust the angle that way, and just keep the cherry picker centred, thus the engine square.
With the adaptor plate I'm using I can use the standard 6 speed mount, and the stock mounting points, which means stock tail shaft (yay!) Without the adaptor plate (which is about 30mm thick (just over an inch for those on the imperial system)) I feel like the engine may be a bit too close to the firewall. I am however going to have to bend a few of the brake fluid/vacuum lines to ensure the engine doesn't rub on anything as it moves. Thinking possible of putting the ABS unit down where the washer fluid tank goes, as this keeps the lines from the brake fluid reservoir nice and short (and easy to replace if need be). This will mean extending the wiring for the plug though.
Another issue is the proximity of the number 4 cylinder exhaust port to the steering shaft. I have yet to purchase any exhaust bends, so I don't know if it clashes, but I'm guessing it will.
IMG_8303.jpg
Id like to keep the original steering shaft, if not its either move the engine (which I'm reticent to do) or come up with another solution to the steering shaft issue. I know earlier model E36 shafts were thinner (although I've had some bad experiences with them), then theres the flaming river setup (which is costly) or some frankenstein combination of cut up E46 shafts.
IMG_8301.jpg
This is a photo of the clearance around the transmission. Like I've said previously, i think i would have had issues with the V8 bell housing. Im sure there is a way to make it fit, (or maybe it fits fine by itself) but I'm happy I've gone this route.
Member
ENGINE MOUNTS/ARMS ARE DONE! smashed out a massive day today getting these suckers built. Although half of that was spent running around getting some bits and pieces to get my welder to work. For the mounts my goals were, in no particular order, as follows:
1) utilises stock rubber mounts
2) can be removed easily
3) engine sits in an appropriate position
4) Strong enough to support the engine
These are as simple as they can be. They're both just mild steel, 5mm plate, 50x5mm flat bar, and 25x5mm flat bar cut and tag welded appropriately.
IMG_8346.jpgIMG_8347.jpg
Will provide some more photos of these tomorrow, at the moment they are supporting the engine (i want to make sure they don't buckle under its weight over night. Although I know these are over designed. In the future I might look into milling something similar out of a block of aluminium. Although, these are honestly not that much heavier than the stock cast mounts.
Depending on time restraints, and how long I have waiting for more parts, I might draw these up in CAD and do some FEA, see if there is anywhere material can be removed. Although I'm not too concerned, weight isn't a huge issue for this car.
Also spent some time milling down the old engine mount so i can utilise the oil passageways.
IMG_8332.jpg
Unfortunately, when I started this project i didn't have my mill, so I hacked this up with an meat axe (carbide tipped grinder blade). So it is more cleanup work than anything. Im trying to reduce the size of this as much as possible, whilst retaining strength, as it is part of the alternator mounting. I may end up milling out most of it, and welding in some extra supports.
Member
Keep up the good work mate!
 Posting Permissions


 Reply With Quote
Bookmarks