
 Member
I think a new HG, freshly flatted head, and having it pressure tested as well as magnafluxed will get you sorted.
if you're really worried, you could put in a stock thickness cut-ring HG and it'll be much more resistant to blowing in the future.
always trying to make it lighter and faster
^^former build: http://www.bimmerforums.com/forum/sh...-neglected-M3/
current build: http://forums.pelicanparts.com/porsc...car-build.html
instant grams: doktor_b
Member
What if the shop doesn't do magnafluxing? Is pressure testing going to tell the whole story?Originally Posted by doktor b

I don't think I follow you with the cut-ring HG, can you elaborate?
Member
I can't tell you if your local machine shop does magnafluxing. But if you're worried about cracks, that's the only way I know to check definitively.
cut-ring gaskets are HGs with a ring that goes on top to 'cut' into the head and make a super durable seal. It's generally a boost-only application. But durability under boosted applications will be massive overkill for
NA.
always trying to make it lighter and faster
^^former build: http://www.bimmerforums.com/forum/sh...-neglected-M3/
current build: http://forums.pelicanparts.com/porsc...car-build.html
instant grams: doktor_b
Member
Besides the GM coils that keep failing, the engine has run perfectly since day 1.
Member
I've done some research today on reman heads, and after speaking with the guys at VAC, I think my best option right now is to just do a compression and leak down test, and likely just get the head decked locally and slap it together with a new HG. The shop does not offer magnafluxing, just pressure testing, but it's $150, including decking. Yeah, my rings are probably worn, but as long as I'm not going through a quart every 100 miles I think I'll live.
Member
I finally was able to work on the car and do some testing, and I could use some help deciphering the results. I installed a new OEM radiator cap before any of this.
I bought a CO2 testing kit to see if any CO2 was in the cooling system. Unfortunately, no matter how much coolant I sucked out of the system, the tester would suck up coolant instead of air with the car running, so the results of this were inconclusive.
I then warmed up the car do get it ready for a compression test. I watched my OBD2 scan tool to monitor the coolant temperature, as I wanted to make sure my electric fan was working. As temps crept past 205* and the fan didn't turn on, I turned the car off. On a hunch, I touched both radiator hoses and they were both cool to the touch. Same with the radiator. It didn't feel like any hot coolant had made its way to the radiator, which would of course explain why the fan didn't kick on. I hard wired the fan and it kicked right on, so I know it's good. To refresh your memory, when I built the car a year ago I installed a new OEM thermostat and Stewart water pump, along with all new hoses and OEM coolant. I'm leaning towards a stuck thermostat as the culprit, but this doesn't really explain why the system remains pressurized a day after it's turned off. Even though I know the system is now low on coolant, after having spit so much out, the overflow tank always reads above the full mark.
I then did a compression test. It turns out that a previous owner had heli-coiled cylinder #1 (the front one), and when I removed the spark plug, it took the heli coil with it! Thus, I was unable to get a reading on #1, but it looks like #4 is low:
1- Unknown
2- 230
3- 220
4- 190. Went up to 200 with oil added.
5- 225
6- 225
I would just like to go on a mini-rant about the instructions I've come across on doing a compression test. Everyone says to pull the fuse for the fuel pump and the relay for the DME. Pulling the fuse, #18, for the fuel pump is easy enough. But where in the world is the relay for the DME? All I could find was a fuse, #26. Are all of the instructions confusing a relay for a fuse, or am I daft? In the end, I just unplugged the DME before doing the test...
These are not in order unfortunately....
But this one is from #1 and has the heli coil still on it:
Does anyone have any suggestions on how I should deal with the heli-coiled cylinder #1? Or how I should interpret my cooling system problems?
Member
Your compression numbers are quite good for an old engine so it is less likely that the rings are causing all of that oil consumption. Maybe a stupid question but have you inspected the rear main seal? Old main seals can leak quite a bit.
Deck the head and install a new HG with OEM bolts.
Is that a nutsert or a heli-coil on the #1 spark plug. The picture makes it looks like a greasy Nutsert.
If Nutsert, I would clean off all the grease off the threads and use small brush to do the same on the head threads (maybe soak the brush in a SMALL amount of degreaser). Apply liberal amount of red Loctite on the nutsert threads, install, and leave alone for 24hrs. Next day you should be all set.
Member
I'm pretty sure the RMS is leaking a bit, but when I race the car people have commented that they see burnt oil coming from the exhaust. Although, that may now be resolved since I installed an OEM CCV.
I've never used a helicoil or nutsert, and frankly wasn't aware of the differences. In doing some looking around, it looks like it might be a nutsert. That's good advice about re-installation, I'll do that!
What do you make of my radiator hoses not getting hot? The only thing that comes to mind is a thermostat that's stuck shut, but I'm surprised that an OEM one could go bad in less than a year.
Member
Nutserts are great. You’re lucky that the PO chose the right solution (minus the Loctite). Make sure that no loctite gets on the spark plug-nutsert threads because that would be quite bad.
I have no experience with the OEM CCV as I swamped mine for a catch can soon after car purchase.
The hoses not getting hot can be a function of a sticky thermostat or air in the system. I replace my thermostat every 2 years as a precaution. I also drill a 1/8 hole in the top portion of the thermostat so it allows water/air to pass even when not open. This helps the system bleed air, but does in theory slow down the warm-up period. Long-term, the euro-e36 or e30 coolant reservoir is the right solution that you should look into.
I have also seen a clogged radiator in the past, but I doubt that is the case here.
Member
I'm also a proponent of drilling a small hole in the top of the tstat flange to ease bleeding.
always trying to make it lighter and faster
^^former build: http://www.bimmerforums.com/forum/sh...-neglected-M3/
current build: http://forums.pelicanparts.com/porsc...car-build.html
instant grams: doktor_b
Member
I didn't realize I hadn't done any updates, so here's a wall of text!
We left off with my radiator and rad hoses not getting hot. I figured there were two possibilities- a stuck thermostat or air in the system. I decided to start with the simpler diagnosis and burped the car while up on ramps to help any trapped air escape. After about 20 minutes of burping, adding more coolant, and more burping, everything was nice and hot and the fans were kicking on at 205*. I figured I had solved the problem, it was just air in the system! Just to be sure, I repeated the whole burping on ramps again a few days later to be SUPER sure all the air was out. Car on ramps, heater on max, rad cap and bleeder screw off. Over the next few weeks I drove the car on ever longer trips and never had a problem. The car even idled better than it had in a long time! When I would open the rad cap I would hear a little air escape, but no fluid ever came out. In anticipation of back to back rally-x events this weekend, I took the car to an auto-x last Sunday and it was pretty hot out (about 90*). I monitor coolant temps with the Torque app on my phone, and they never went above 205 the whole day. Aside from the crappy all season tires, the car felt great!
Today's rally-x got postponed due to rain, but we were still scheduled to have another one tomorrow, so I figured I would give the car a once over. It's been sitting in the garage for almost a week without being driven. I added about 1/2 quart of oil (because of course I did) but when I opened the rad cap I was greeted by a geyser of coolant again!! I'm now back to my original thesis of a blown head gasket, and the only thing I can think to do is a leak down test. Can anyone offer any other suggestions of things I should be looking for? I REALLY don't want to do a head gasket on this car but I can't imagine what else the problem could be.
Member
The day after my last post Turbojosh was nice enough to come over and help out with the leak down test. The results were uninspiring. As you may recall, cylinder one can't be tested due to the heli-coiled spark plug threads in the head, which came out with the plug. Either way, this sucks:
#1 cold: XXX hot: XXX
#2 cold: 98% hot: 97%
#3 cold: 96 hot: 94
#4 cold: 70 hot: 71 (air coming through crankcase, so rings are bad)
#5 cold: 82 hot: 85 (if leak down improves from cold to hot, I believe this means the rings are going out, but correct me if I'm wrong)
#6 cold: 74 hot: 96 (again, large improvement from cold to hot)
This corresponds with the compression test results:
1- XXX
2- 230
3- 220
4- 190. Went up to 200 with oil added.
5- 225
6- 225
Even with further testing, my CO2 tester was not indicating any CO2 in the coolant system. But the system is still staying pressurized a week after driving it, so I can't imagine any other possibility.
So this motor:
-has a head gasket that is on the way out
-a worthless head that would need to be replaced due to cylinder #1
-bad rings on #4, with #5 and 6 appearing to be on the way out
-no idea what's going on in #1
And with that, it was time to find a new motor to swap in. Thankfully, I think I got lucky and found a good one, and it should arrive on Friday. More info and questions coming soon....
Last edited by 95maxrider; 05-18-2017 at 09:49 AM.
Member
With a motor replacement on the horizon, I'm trying to plan the best way to get the engine in and out of the car. I've read plenty of threads about doing that for these cars, and found some similarities between all the threads:
-Remove the engine and transmission as one piece, do not separate
-Removing the radiator support makes things much easier
I read a few people talking about how dropping the engine from the bottom is easy, but my lift only goes up 2' and I think that's going to be a tight squeeze getting the motor out underneath the car. Not to mention I don't really want to deal with taking the whole front end/suspension apart.
That leaves two possibilities- remove the engine from the top, or take the whole front end apart and take it out through the front. I'm not opposed to doing this; apparently removing the radiator support isn't difficult. The thing that concerns me the most is the AC system. I still have AC in my car, and I want to keep it that way. Most people say to keep the AC compressor in the car and not disconnect any lines, but I'm not clear on how this relates to the radiator support and condenser. Can I just remove the radiator and support while leaving the condenser and lines in place? I really don't want to deal with AC evacuation and recharging. Does removing the bumper and headlights make things easier, or is that required to remove the radiator support?
Also, most people mention having to remove the intake manifold to get to the rear lift point, but some people say it's not necessary. Can anyone provide any confirmation one way or the other?
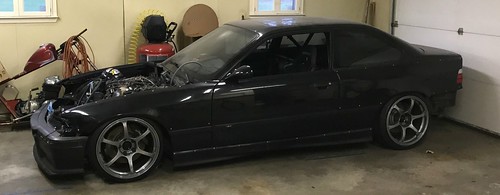
There's one more thing to consider, and that's the layout of my garage. There's a decent amount of room in front of the car if you pull in normally, but that area is a cluster of fake wood flooring, broken tiles, concrete, and the hydraulic line for the lift. The area at the back of the is generally flat concrete, but it's much smaller. I'm having trouble deciding if I should pull the car in normally and hope that I can maneuver the engine hoist around the obstacles, or back the car in and deal with a tighter, but flat, work area. Here are some pics to give you a better idea of what I'm working with.
An overview:
If I remove the shop press and plastic cart, there is 60" between the car and the wall. Note the condition of the floor and the transitions between materials. Not smooth at all.
There's about 32" between the rear bumper and the garage door. If the door is open, there's another 10" of flat concrete, then the driveway starts sloping down pretty quickly. The engine hoist would have to stay on the garage concrete; if it gets out in the driveway it's gonna roll down into the street.
This shows how much room I could pull the car in before the wheels start going up on the lift. I need to take into consideration the engine hoist legs and how they can be positioned and moved around the front of the car.
So, if you were in my shoes, how would you proceed?
Member
A buddy asked a question of the GRM forum and I figured I would post it up here:
<blockquote><cite>¯\_(ツ)_/¯ wrote: </cite>
What does the middle of the lift look like? If you can't pivot the back of the trans down far enough, no way is it coming out the top. My vote would be to back the car in, moving a loaded engine hoist on a rough surface is no fun.
</blockquote>
Good question! The piston for the lift is pretty much directly under the transmission if I pull the car in normally. When I replaced the trans brace, I had to back to car in to get access.
Here are some pics of the lift. It's 30+ years old and super heavy. It's not going to be moving any time soon.

Member
I recently finished an engine swap on my 99 M3 and was trying to figure out the best way to go about it, since it was my first time doing so. I personally found it much easier to remove every single accessory and wiring from the engine and also radiator. This leaves you with A LOT of room. I decided to remove the transmission first, takes me about 2 hours start to finish. Then, I went about the engine. It took me literally 5 minutes from hooking up the hoist to having no engine in the car. Remove the AC compressor and it's bracket from the engine, and simply set the AC compressor aside in the engine bay
I also removed the intake manifold.
I also didn't loosen anything steering column related. I was able to work the pan around all that.
In the end, the prep work payed off a lot for me. Getting the engine out was super easy. Putting it back in... now that was a whole nother story. Passenger side motor mount was a PITA because of the angle
some pictures for reference
Been following this build for a while and admire what you've done with the car. Hope to see it back on the gravel soon!!
Sent from my iPhone using Tapatalk
Member
Aww yes, this is the type of response I was hoping for, thank you!
If you don't mind, I'm going to run down some things for you to confirm.
You removed:
-All accessories (alternator, PS pump, AC compressor, belts, pullies, water pump and fans)
-radiator and hoses
-transmission
So you pulled the AC compressor from the engine, obviously, I take it you left the condenser in place?
Did you remove any of the exhaust or the driveshaft? If you were to do it again, would you do anything differently?
Also, is there a reason you removed your front bumper?
Thanks for all the help!!!
Member
Yep! That is essentially what I did
I did in rough order:
-Radiator and hose removal
-Intake manifold and related stuff
-remove and label each and every piece of wiring
- I removed all the brackets under the intake manifold and transferred every single nut and bolt to the new engine
-I removed all accessories
-finally, removed engine with only headers connected and as I mentioned I had no interference issues with the steering column, however it helps to have a second person to work the hoist while to work the engine
As for AC, I simply un bolted the the compressor and set aside in the engine bay still connected to all the lines. Condenser and anything else AC related was not touched. My AC works just as it did before the swap!
I've removed my transmission multiple times so I've learned a few things from that. I have a rear diffuser, so for me it is much easier to only remove the mid pipe. I leave the cat back in place. That leaves you enough room to remove heat shield and driveshaft. As for the driveshaft, I only removed the front section, left the diff side attached. You do have to unbolt the CSB to allow enough flex to remove the front part, but you do not have to remove the whole thing.
I removed my bumper for ease, I have a motion Motorsport under panel and splitter. It is much easier for me to remove the bumper as a single unit, than to remove splitter and under panel. Plus it gives you more room to get under the car, which is important as some of the accessory bolts will need to be removed from the bottom
Hope that answers your questions, let me know if there's more!!
Edit: forgot to answer one question!! If I were to do it again, I really don't think I would do it any differently. I'm sure I could get away with not removing as many stuff as I did. But I think it really helps making the process as headache free as possible.
Sent from my iPhone using Tapatalk
Last edited by th3turk; 05-18-2017 at 12:57 PM.
Member
I pulled the motor and trans together using a hoist with a leveler and the car on the lift at work.
the intake manifold definitely has to come off to reach the rear lift point.
i did have to pull the steering shaft off the rack to clear the oil pan.
i worked alone, and pulled the entire front off before I started.
I had the AC already removed, but it is common here at work for us to just unbolt a compressor or condenser and lay it to the side.
from driving in, to complete removal, maybe 6 hours. I didn't do any prep work before.
i agree. Back into the garage as far as you can get. The hoist will take up more space than you think.
always trying to make it lighter and faster
^^former build: http://www.bimmerforums.com/forum/sh...-neglected-M3/
current build: http://forums.pelicanparts.com/porsc...car-build.html
instant grams: doktor_b
Member
Thanks again for all the details!
I've heard some people grumble about it being difficult to remove the transmission due to some difficult to access bolts. Is there anything to that complaint or is it worth the effort to remove it while still in the car?
Did you have the front of the car on jack stands?
Member
No problem!
As for transmission bolts. These were a pita my first ever time removing the trans but I've picked up a few things after doing it a few times and now I have no issues with them. My advice would be to loosen every transmission bolt that you can easily access, not fully remove but just break them loose. Then, loosen the transmission brace, then you can pull the transmission down a little bit for more room. But if you flash a light down there you will see exactly where the bolts are. 2 starter and 1 transmission to block bolt. You will need super long attachments for this. I usually combine all the attachments to make something that is ridiculously long. Make sure the socket is fully seated on the bolts and then remove! Done. It's not as bad as it seems, once you get the hang of it. However it does kinda such being under the car when it's on jack stands trying to see where the bolts are.
For me, it was easier to remove the transmission before the engine was out. With the transmission out, you simply just have to pick the engine out of then engine bay vs with a transmission attached you have have to pull and leverage it out. Idk if that makes sense?
I had all four corners on jack stands for every thing except for when I was taking the engine out. I thought if I had the front of the car as low as possible it would be much easier for me to lift the engine out of there. You have a sedan, so I highly recommend putting the hood in the service position. I guess if I ever were to do this again, I would remove my hood completely since coupes don't have the service position option.
Sent from my iPhone using Tapatalk
Member
Wow, more good tips. You rock! I wasn't even aware of the service position for the hood, awesome!
- - - Updated - - -
Thanks for chiming in, more good info!!
While I have some knowledgeable people in here, I want to ask an unrelated question: What do you guys think about replacing the rubber steering column guibo with the metal u-joint version from the E34? Seems like a good way to get rid of slop and it should be more durable than the rubber, but I wonder if it will transmit TOO much while I'm rally-xing. My steering guibo is worn out and needs to be replaced, and now seems like the perfect time to do the job. Any thoughts?
Member
Glad I could be of assistance! Good luck with the swap!!
Sent from my iPhone using Tapatalk
Have you checked RealOEM?
BMW CCA Member
Just wanted to jump in here- I'm not sure how the sedan service position works, but on my coupe I was able to get the hood standing straight up. Gave me way more room when doing my HG. There are two small torx screws in the good hinges. Remove these, and have another person stand on the other side of the hood. With the hood mostly down, lift up the back- you'll see the hinge open up. This gives you the clearance to lift the hood up into a fully vertical position. I had to tie a rope around it to keep it open, but it was definitely worth it. I also had to disconnect the hood struts- I don't think they're long enough to support the hood straight up.
Also, I've never had to remove an engine (yet), but why not pull the whole front bumper/bar/rad support? From what I've seen you have to drill out a few spot welds but it seems like it'd make things much easier.
Last edited by mslevin; 05-18-2017 at 02:04 PM.
1993 E36 325is
2003 E46 325iT
SpeedHunters feature: http://www.speedhunters.com/2018/04/...t-dtm-tribute/
APEX feature: https://www.apexraceparts.com/blog/m...-arc-8-wheels/
Member
He's worried about keeping the AC charged and no one has been able to say how hard it is to push the condenser aside when pulling the engine. Pulling the headlights and fascia is less labor intensive than pulling all of the accessories and intake manifold.
Last edited by Laminar; 05-18-2017 at 02:28 PM.
Have you checked RealOEM?
BMW CCA Member
Ah got it, that makes sense.
1993 E36 325is
2003 E46 325iT
SpeedHunters feature: http://www.speedhunters.com/2018/04/...t-dtm-tribute/
APEX feature: https://www.apexraceparts.com/blog/m...-arc-8-wheels/
 Posting Permissions


 Reply With Quote


Bookmarks