
 Member
Copying some sappy bullshit I just posted to Instagram...
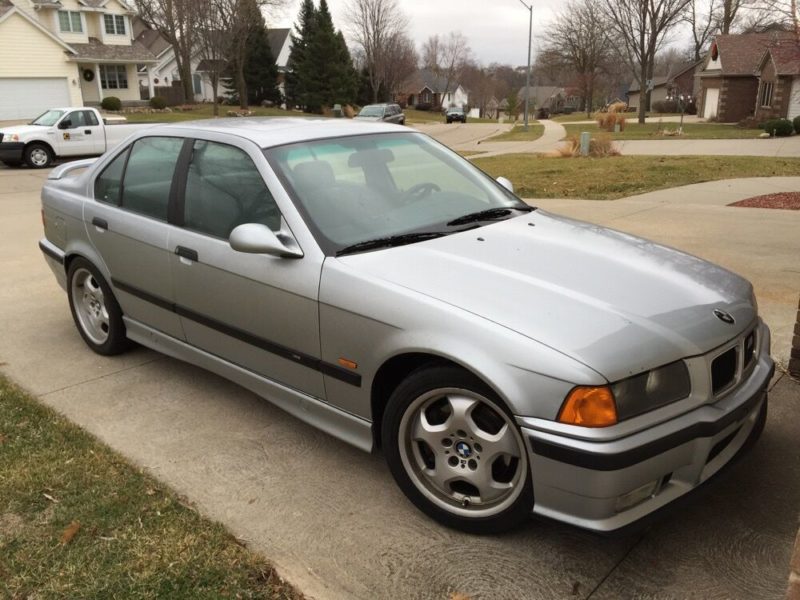
Five years ago yesterday a friend and I went to some podunk little town in the middle of nowhere Iowa and bought this car for $2450. Then, 9 miles into the 60 mile drive home, the exhaust cam sheared in half from lack of oil flow. The car (fittingly) coasted to a stop next to a cemetery. No matter, there was another engine already sitting in my garage waiting to be shoehorned into place. In the last five years I have done a lot of things to and with this car - autocross, RallyCross, track days, drag racing, commuting, hypermiling, kid- and dog-hauling, and more. Since that first day, I’ve only had to tow it home two more times, and both times were due to BMW parts failing (PS cooler and diff mount bolt). The Explorer engine, Mustang transmission, GM ignition coils, Miata clutch parts, Audi coolant tank, Jeep hood scoop, MegaSquirt I soldered together in my kitchen, Z3 suspension, and whatever else I’ve cobbled together has otherwise always been able to get me home. Sometimes limping, but always smiling. It’s been a fun 5 years, which BTW is the longest I’ve ever owned a single car. Guess I just haven’t gotten bored of it...yet.
Member
Lots of blood, sweat, and tears there...quite the journey!
Member
The poor car didn't get much love over the winter. As is tradition, now that we're almost at the first race of the season, it's time for me to tear everything apart. Of course, there are no actual races happening so it's not as much of a time crunch. Also, you'd think working from home would afford me more opportunities to sneak out into the garage, but between trying to manage two kids and at least make it look like I'm getting some work done, it's still hard to make the time.
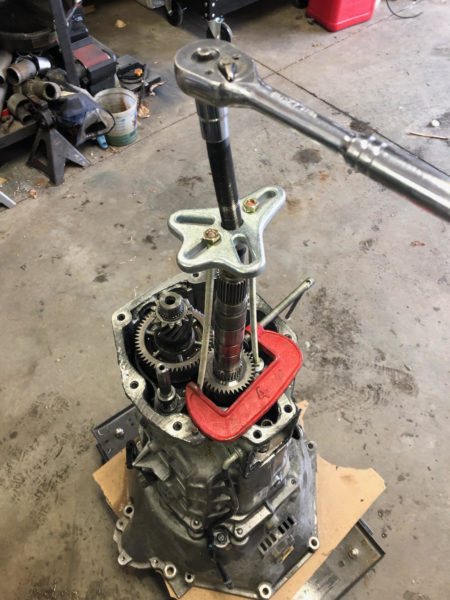
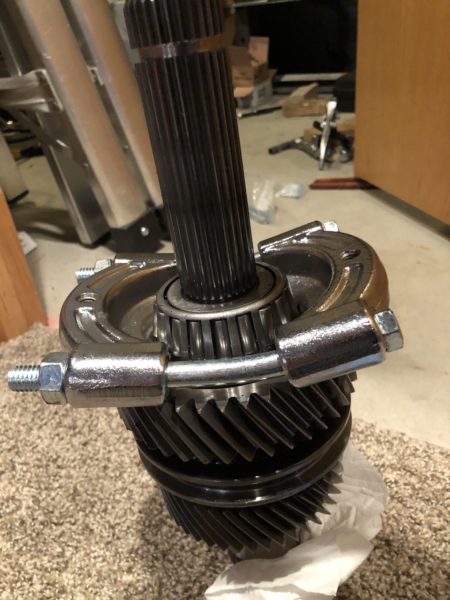
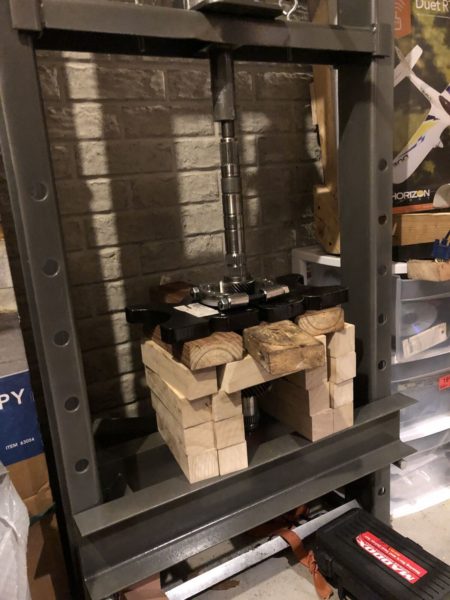
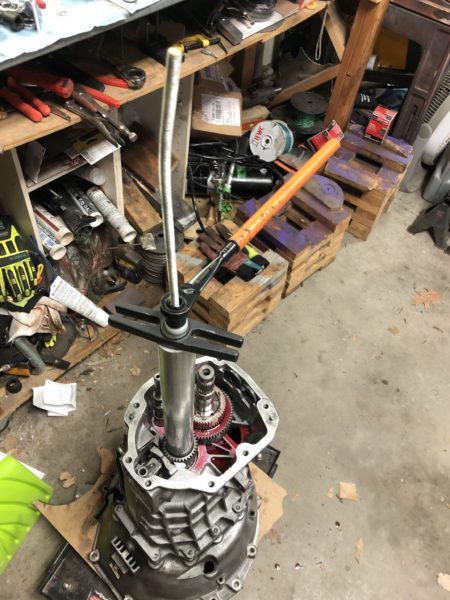
I started back in January tearing apart the TR-6060 I got for my Cougar. That ended up needing synchros and bearings. I'd never rebuilt a manual trans before. Super frustrating at times but I got it done.
I had to get creative with my tools to get everything pulled and/or installed.
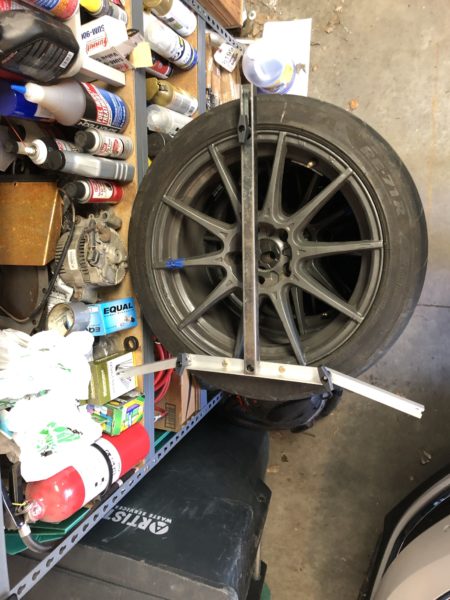
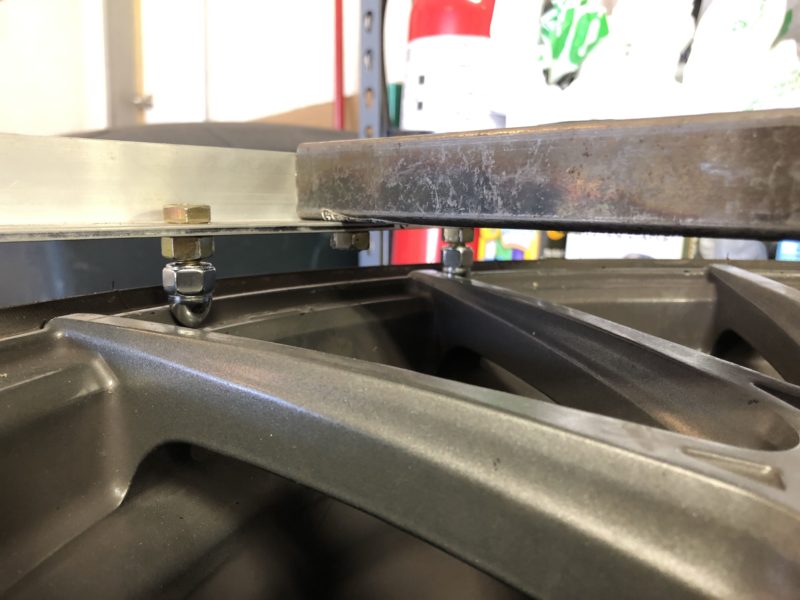
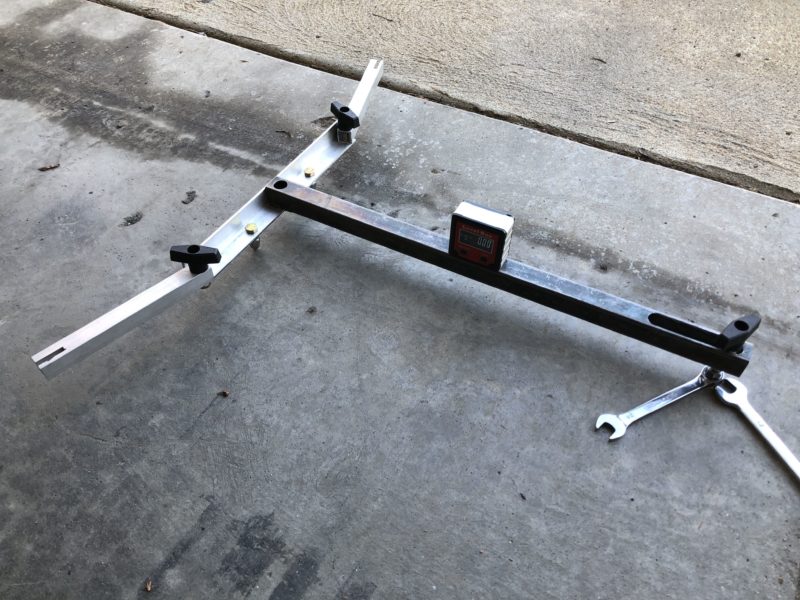
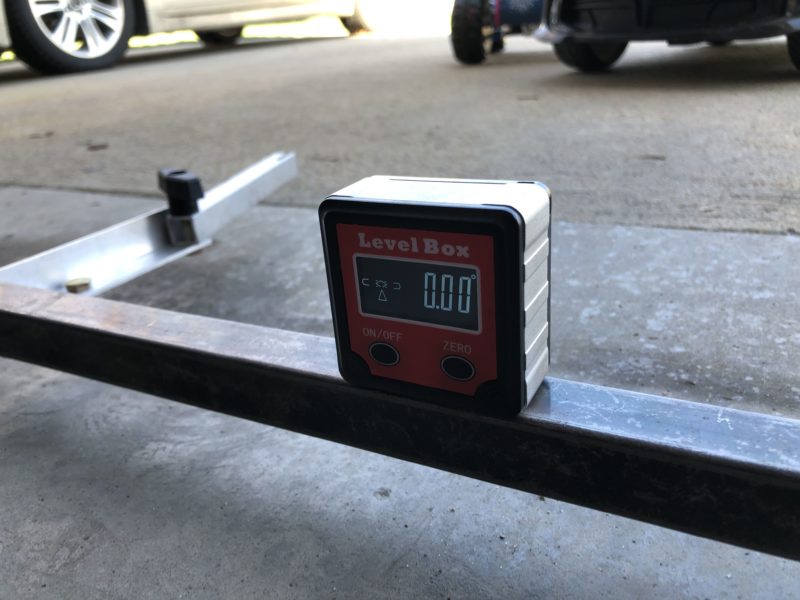
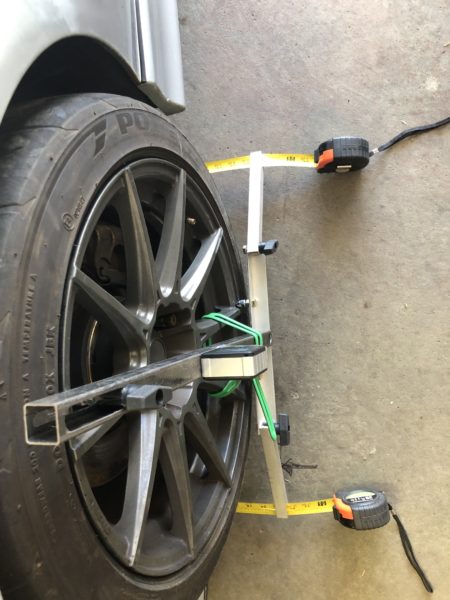
I finally got that sealed up at the end of March and moved on to the next project - a DIY alignment setup. Most generic alignment places around here won't touch my car (too low?). The local Euro shop will do it but charges $170+ (and got it wrong last time, giving me major rear toe out). I had a guy at a local dealership that would give me any specs I wanted for $100 but he changed shops so I'm on my own again. I grabbed some steel and aluminum, ordered a couple of level gauges, and got to work.
Everything's adjustable so I can dial in perfect level.
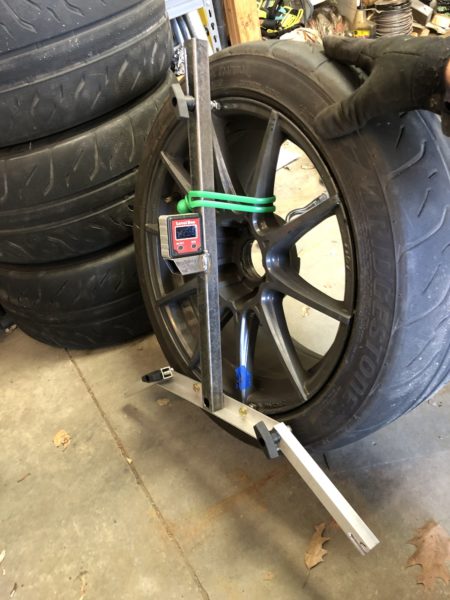
Then I can slap them on the wheels on the car and check camber and toe. I could calculate caster, too, but I've never really bothered.
The square arms are slotted to hold a tape measure tightly in place. Of course, by the time I finished these, the car was up on the lift and the tires were pulled so I can't try them out until everything's back together.
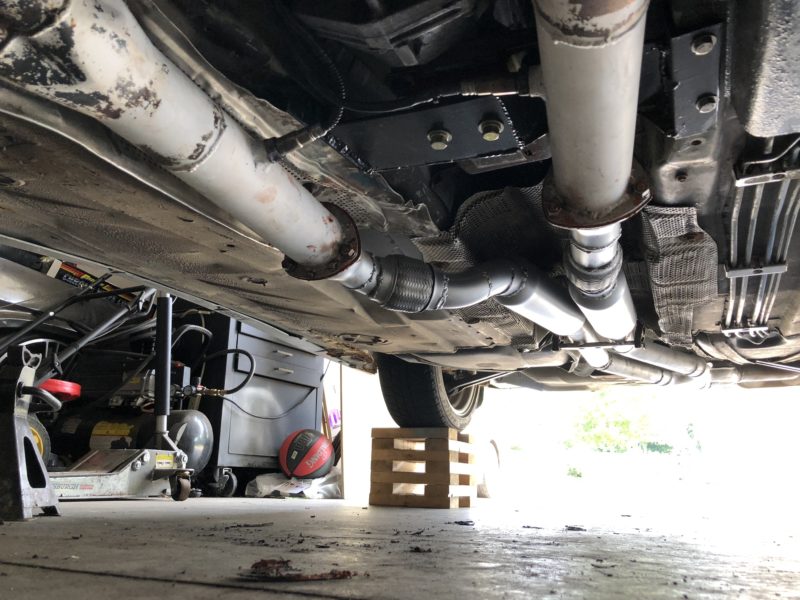
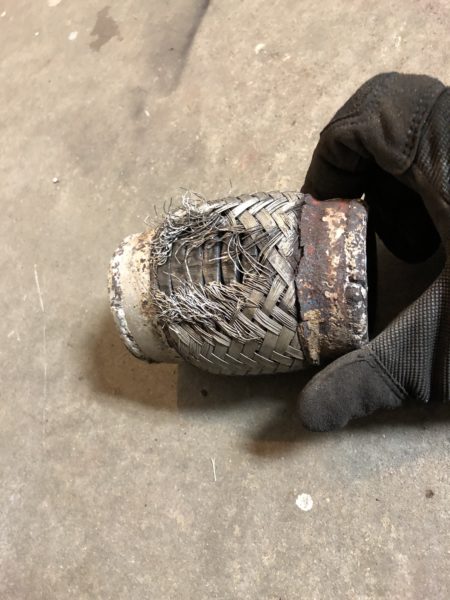
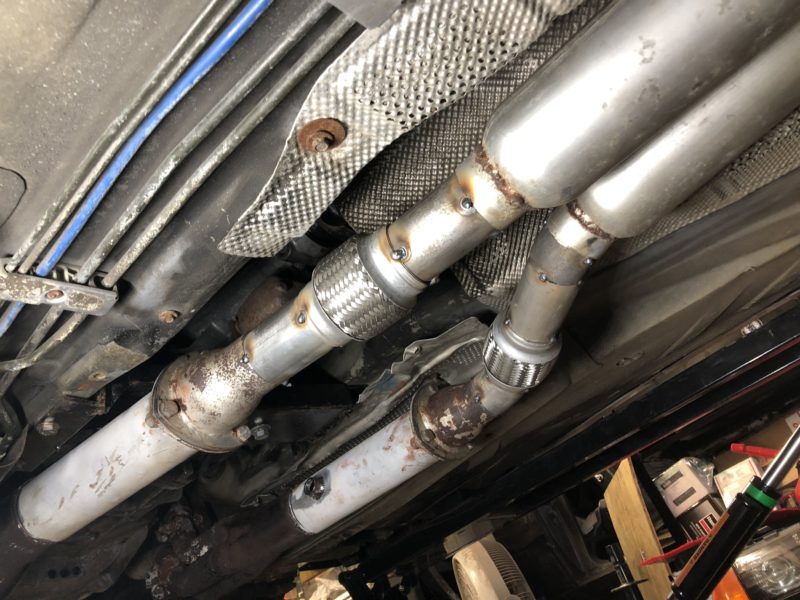
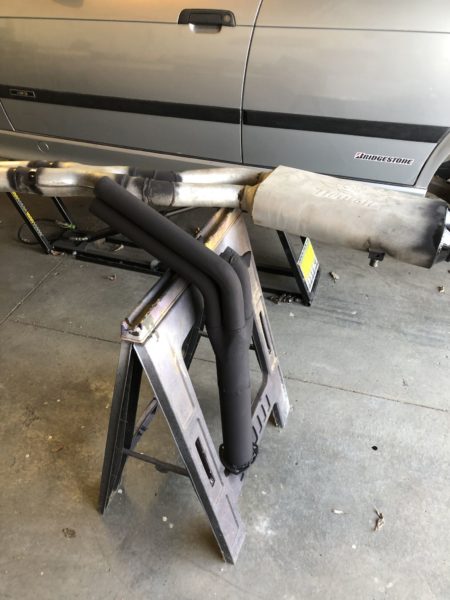
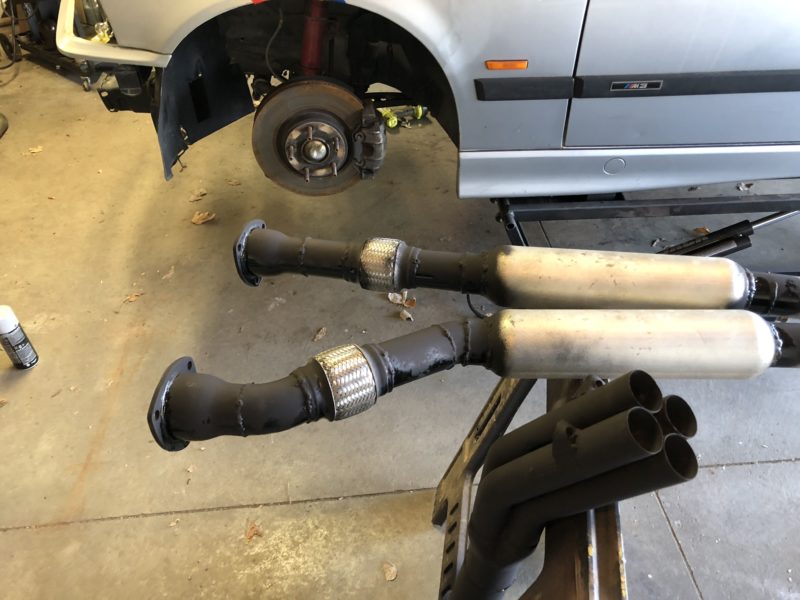
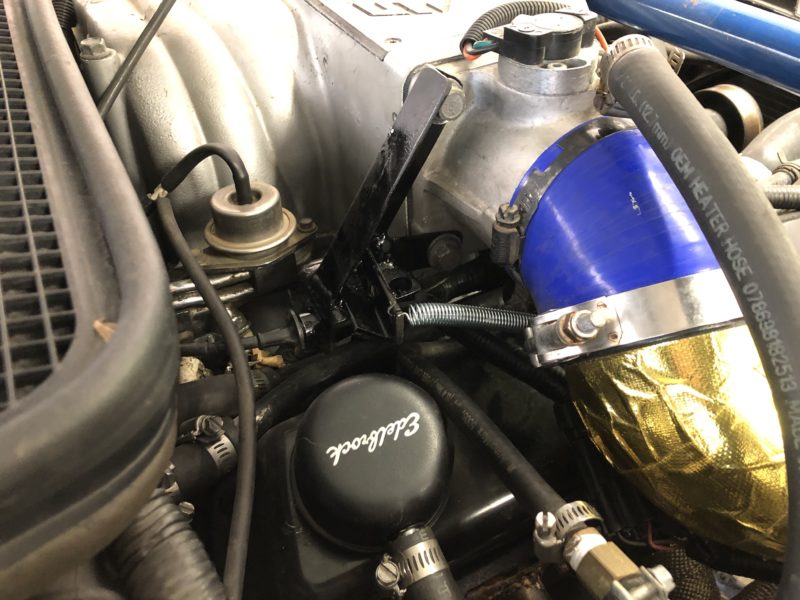
And now on to the real work - I have a couple issues to fix and some improvements to make. I'm sick of the exhaust scraping over the tiniest of bumps and every single driveway and business entrance. I also suspect I have some leaks, as the exhaust stinks inside of the car and I end up with a headache after driving for a while. I tightened all of the header flange bolts, they were all snug and there's no signs of leakage around there. I pulled off the lower half of each header and found several spots where the slip-fit connections are leaking. I've always installed them dry before, relying on the mechanical connection to seal. I'll be using some copper RTV this time to get it good and sealed. With the lower header halfs off, I'm going to cut off the collectors and reattach them so they're tighter to the body. Previously, the header flange and flex pipe were the lowest parts of the car, so the flex pipe is all sorts of torn up.
I ordered two new flex pipes and a 2.25" j-bend to redo that whole section up tight to the car. Got my flex pipes in the mail yesterday, so it's time to start chopping and zapping. I also tossed in a new clutch slave, as it sits right next to the header and gets cooked pretty good. I need to either make up a heat shield or wrap the header at that point to stop it from cooking the rubber bits.
Last edited by Laminar; 04-07-2020 at 11:57 AM.
Member
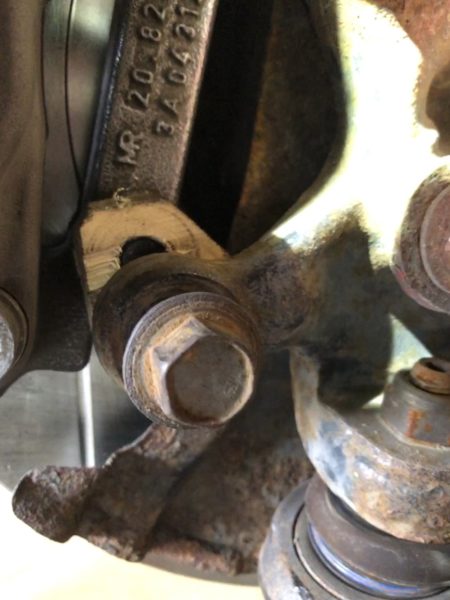
Next up is the steering rack. I fought with a vague on-center wobble all last year. I found at least one loose inner tie rod but even with fresh inners and outers, there was still a tiny bit of play that bugged me on the highway. And by the end of the year, steering was getting very heavy. I remember this being the case when I originally bought the car and its rack was worn out - steering was super heavy. I've been running a used non-M Z3 rack of unknown mileage for the past few years. I've found that's there's a lot of garbage misinformation out there on steering racks and ratios. One common bit of BS is that people claim the Z3 rack is really fast because it's only 2.7 turns lock-to-lock, where the stock M3 rack must be slow because it's 3.2 (or 3.4) turns LtL. The problem is that the lock-to-lock turns are limited by the steering stops, and are in no way dictated by the ratio.
When I installed the Z3 rack, I measures its stroke vs. input shaft turns and compared that to the M3 rack. I verified that it is a faster ratio, but also that it has a limited stroke compared to the M3, meaning that I get a larger turning radius and less steering angle at full lock (somehow I find myself in situations where full lock is helpful...).
Enter the 330i ZHP rack, denoted by its yellow tag and "712" in the part number. Again, lots of confusion in E46 world about which racks are good and which are shit, as some purple tag racks are the same as the yellow tag racks, and some non-ZHP models came with a purple tag rack and some with a yellow tag 712 rack, and some of them have the same ratio as the yellow tag rack but they're still not as good, etc. The best info I could find was reposted from The Rack Doctor here.
So I found a 712 rack on eBay and ordered it up. Bonus, it was less than the Z3 racks out there, as everyone thinks they're the best racks so they're impossible to find now.
I measured it by hand the same way yesterday and confirmed it's the exact same ratio as the Z3 rack - 50mm of rack movement per turn of the input shaft. 3 total turns LtL, which means 150mm of rack travel. Because the Z3 rack only goes 2.7 turns LtL and has the same ratio, it's limited to 146mm of total travel for less overall angle. For comparison, the stock E36 rack I measured (could have been M3, but who knows with this car) did about 45mm of rack travel per turn and topped out around 152mm of total travel.
So the ZHP rack gets me the Z3 ratio but more steering lock. It's also a direct bolt-in - the E36 steering cooler bolted right up, it had both bosses there and tapped (a real Z3 rack is missing one of the steering cooler bosses).
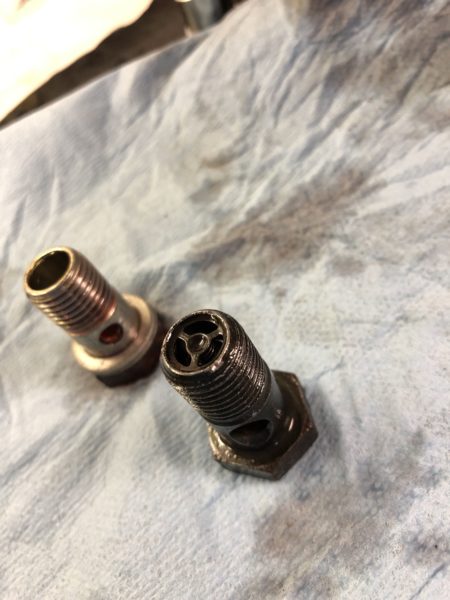
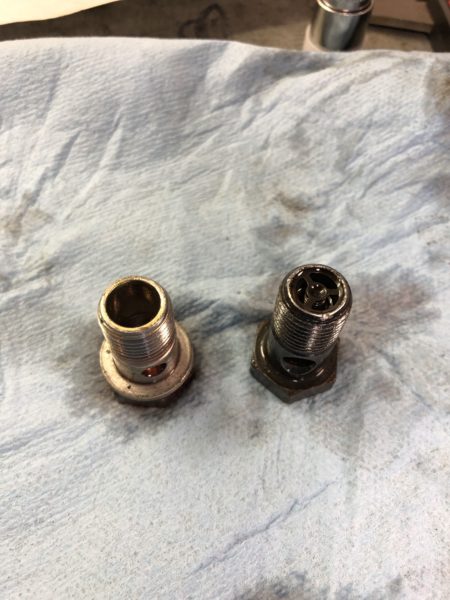
One thing I wasn't sure of - the lower (to cooler) rack bolt from the ZHP rack appeared to have some kind of filter or flow restrictor in it. I used that when I installed everything but I saved the E36 bolt just in case.
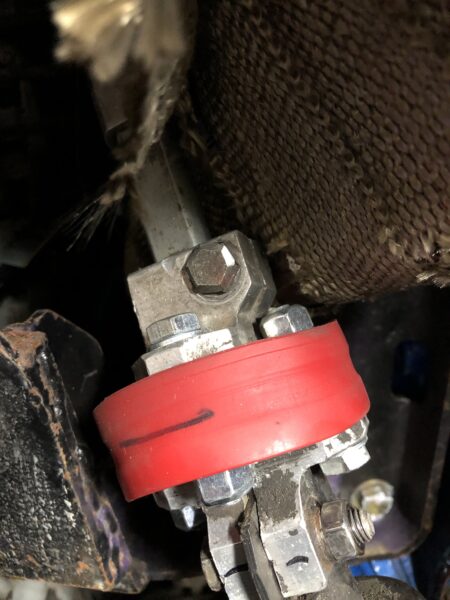
I have new inners and outers to install when I get a chance, and I have a poly steering guibo to stiffen that connection up.
Here's the list as it stands:
Member
I'm very interested to hear your thoughts on how the ZHP rack feels compared to the Z3 rack! I've got a dead spot on center with my Z3 rack that I would love to get rid of. I can't help but feel part of it is from the metal U joint on the column, but I didn't see a way to remove it without either taking the engine out of the car or removing the column from the car. Does your U joint have much play in it? I had bought a new one hoping to install it when I put in the Z3 rack, and it had noticeably less play than the one installed in my car.
Member
I haven't checked that u-joint. I'm running an E46 steering shaft for the added driver side header clearance. I haven't pulled that out since I installed it 5 years ago. It's probably worth looking at now, thanks for the tip!
Member
Ah, that might explain why you were able to install the ZHP rack without changing anything. I could have sworn that when I was reading about installing it on an E36 that there was some part that needed to be changed.Originally Posted by Laminar

Member
The u-joint looks like it's in good shape. I was able to get the pinch bolt out, but I wasn't able to pull the shaft out, I couldn't get anything behind it to pry on it. But I was able to move it around and feel that it's in good shape. What I did find was that the column itself has some play in it, so maybe I need to look into addressing that.
Guibo's in place.
Tie rods are installed and torqued up. I'll have to wait until I can drop it on the ground to finish the alignment.
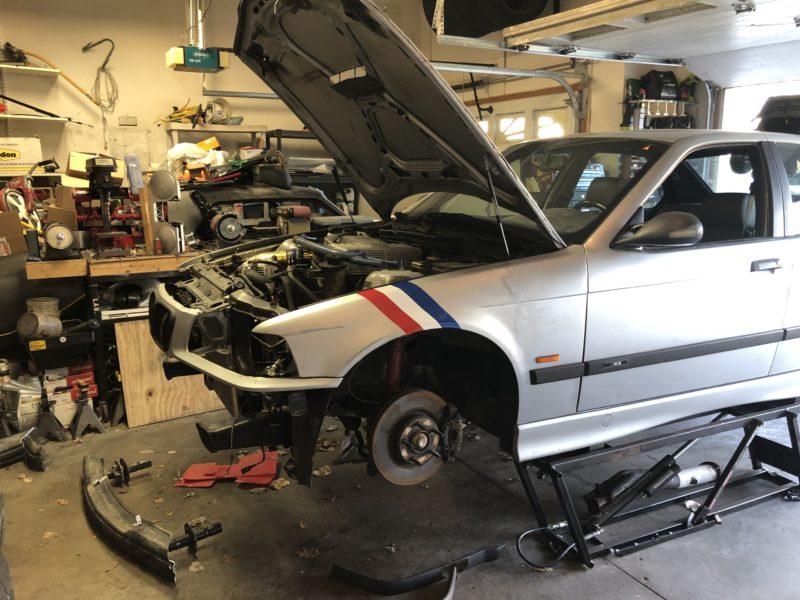
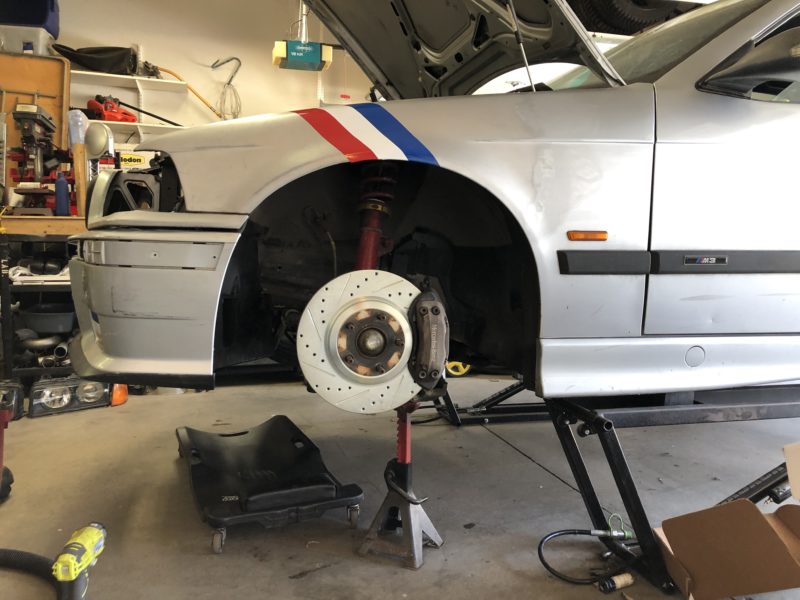
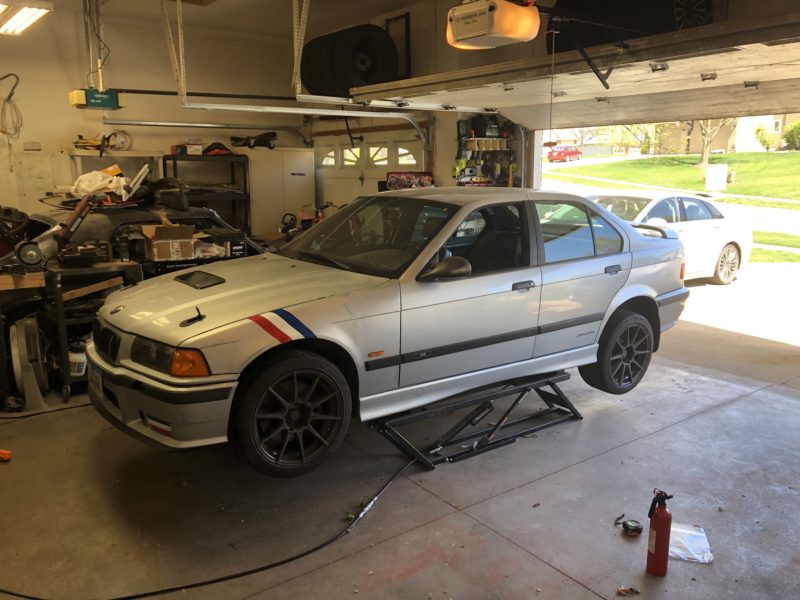
Wouldn't be race prep if I didn't pull the bumper off for something.
Last edited by Laminar; 04-08-2020 at 09:32 AM.
Member
What a great post. Thanks for sharing all of that. Too bad we have no "like" buttons (I think!).
Diving in at the shallow end!
Member
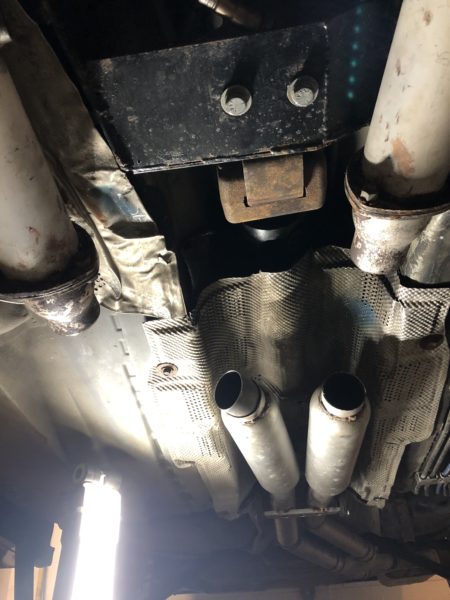
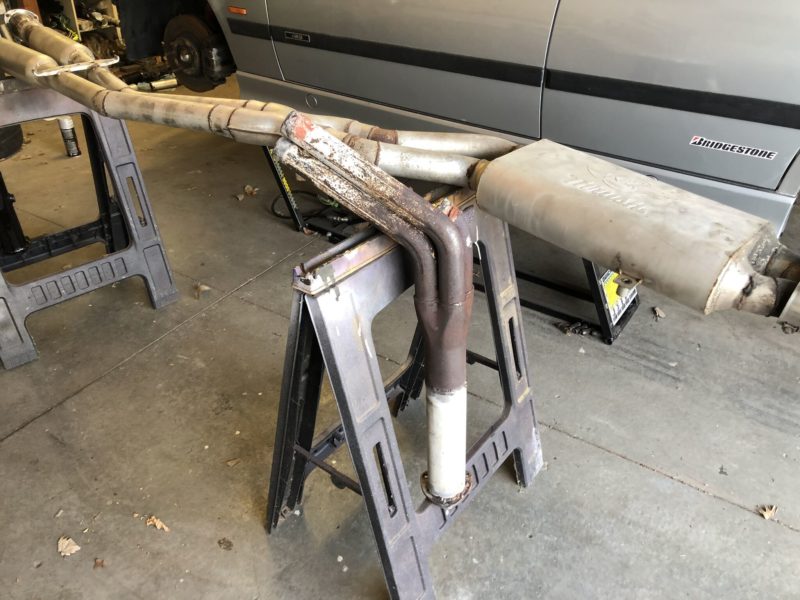
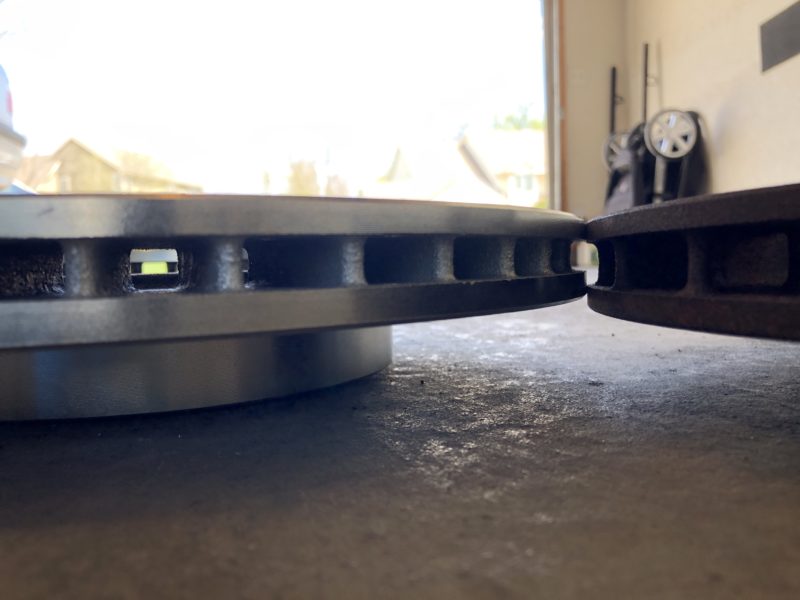
Some more progress. In this picture, you can actually see the header flange and passenger flex pipe and how low they get over bumps:
This is what I end up with:
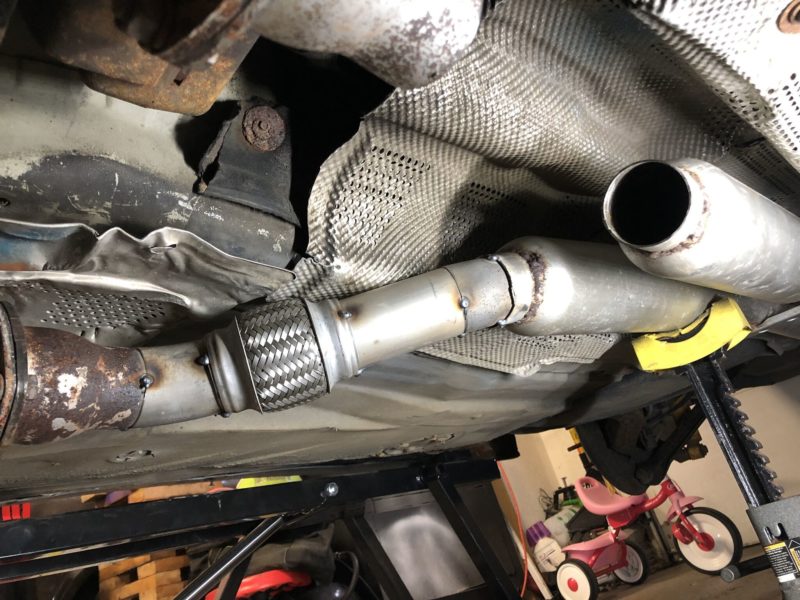
Here was the previous iteration. Somewhere between tacking up the header collector and final-installing it, it ended up pointing much further down than I intended:
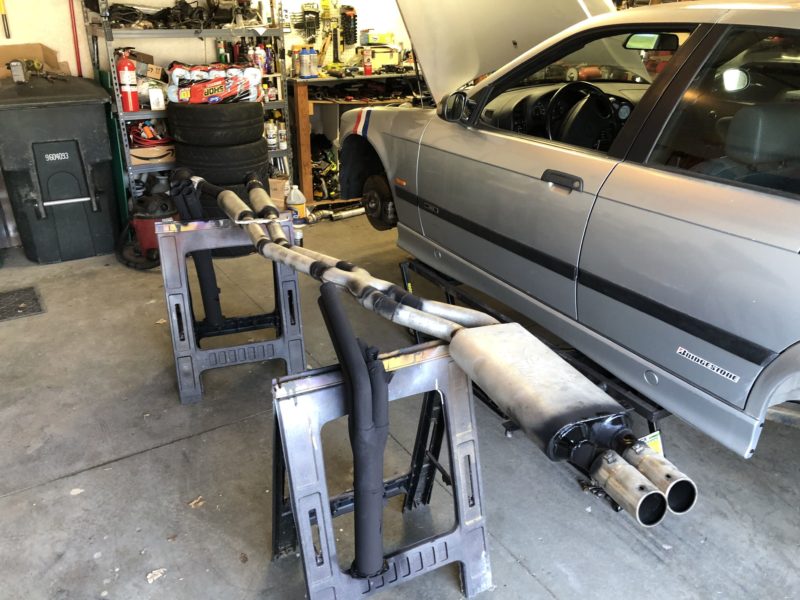
With the collectors pulled off, I took a small pie cut out of the top of each collector pipe so that I could aim it further upward, netting me a small gain in ground clearance at the flange. I put the collectors back on the car dry, pushed the ends up, and tacked them in place. Then I took the remaining section (the "catback," if I still had cats) and cut off everything between the header flanges and the resonators. That section holds the flex pipes and is primarily what scrapes on the ground. Now the collectors were up tighter to the car and I could reconnect everything.
I bought two new flex pipes and a 2.25" mandrel j-bend so I'd have enough tubing to complete all of the new turns I needed.
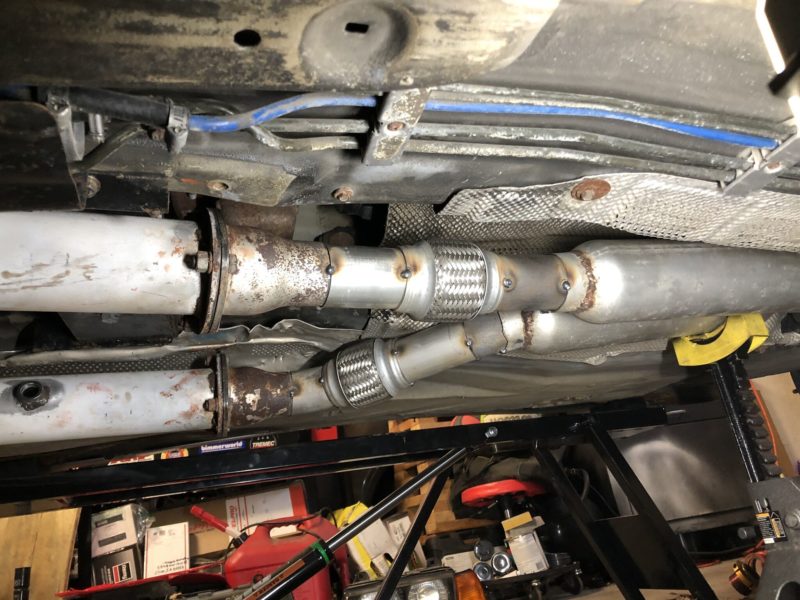
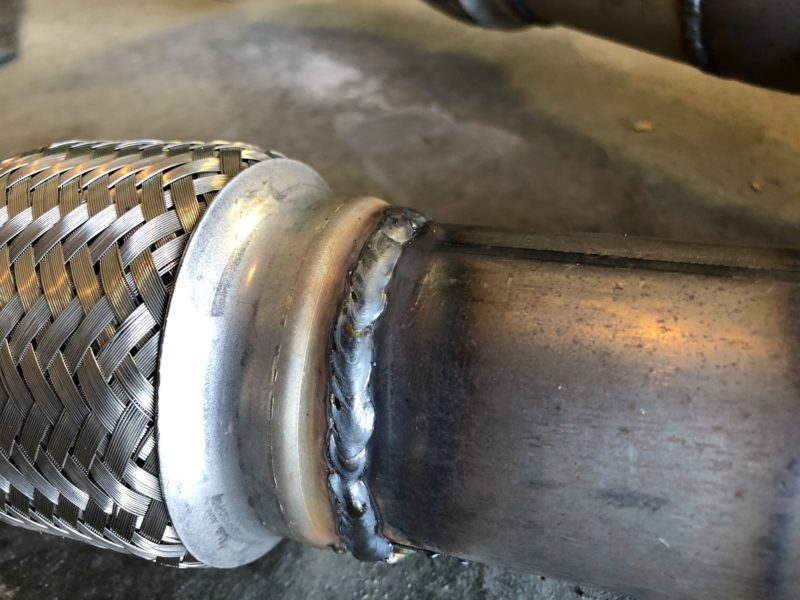
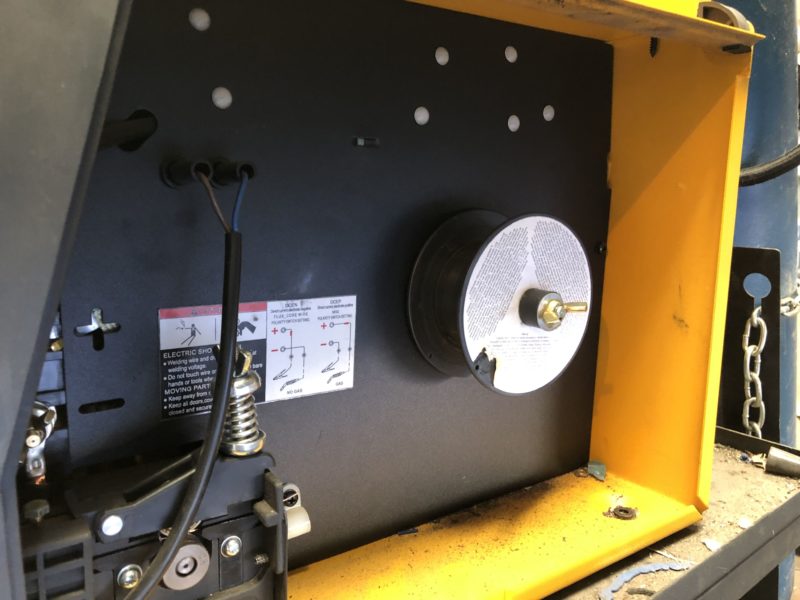
That's much better, and I only needed two bends, which I was able to get out of a piece of scrap I had, I didn't even have to break into the new j-bend. The last few tacks I made started looking a little bubbly. I checked my tank and...you guessed it...out of welding gas. Of course I run out...
The next day I donned my mask and gloves and went to Northern to exchange my tank. The next day, with the new tank in hand, I pulled the catback and collectors back out and started welding everything up. I was able to get the welder dialed in nicely and was actually pretty proud of how the welds were looking.
Compared to some of my other work on this exhaust, that's pretty clean. And then suddenly the wire stopped coming out.
Cause why wouldn't I check to see if I needed wire before venturing out to the welding supply store...
I was totally out of the 0.023 wire I had just dialed in so nicely. I did have a spool of 0.030 lying around that I had bought to do thicker plate steel. I guess that's what I'm using. Nothing after that was as clean, it was not fun trying to do the thin wall exhaust tubing with that thick wire, but I got the job done.
I took a wire wheel to the headers, as the part that's out in the open was pretty rusty from road grime/debris/salt.
I gave them a coat of header paint.
And hit the welds and bare spots on the catback to keep it clean, for at least a little while.
The last thing I did was to wrap the section of the collector that passes by the clutch slave. I noticed the rubber boot on the old slave was dry, brittle, and cracked, probably from being so close to all of that heat. I put the collectors back in place with a healthy dose of copper RTV at each connection. These things will be hell to pull next time, but hopefully they seal well enough and there won't have to be a "next time."
I intended to reinstall the catback to finish that up, but then the mailman came. I don't want to get too ahead of myself, but this actually looks promising:

Last edited by Laminar; 04-21-2020 at 08:44 AM.
Member
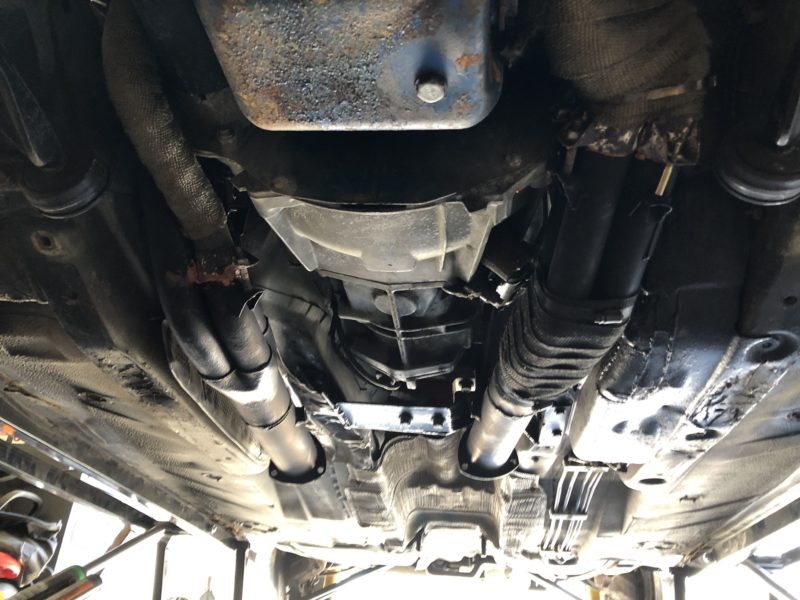
Got the u-joints and swaybar endlinks greased and reinstalled the catback yesterday. Fitup is nice, nothing moved while welding. I did clearance a couple spots at the back that were rubbing on the suspension and subframe, plenty of clearance there now.
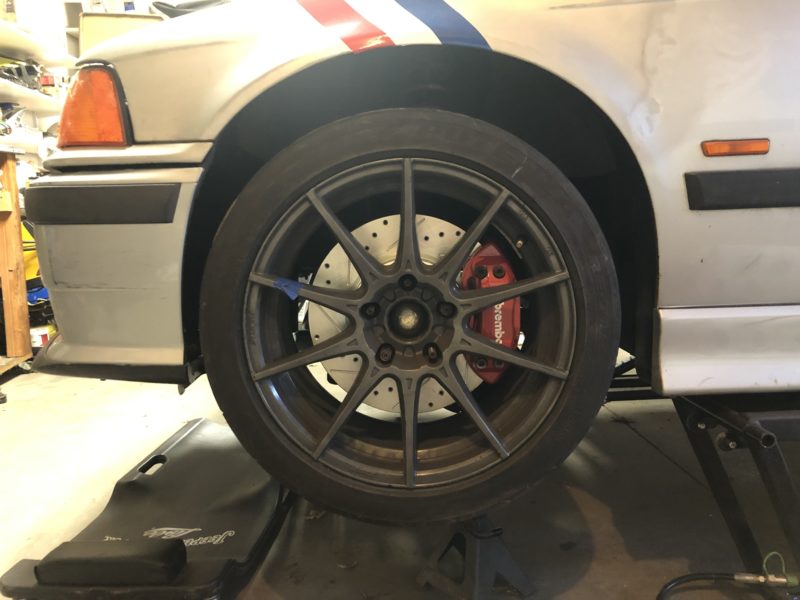
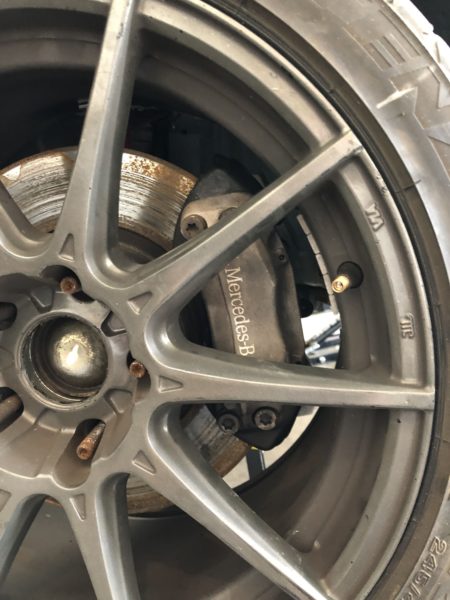
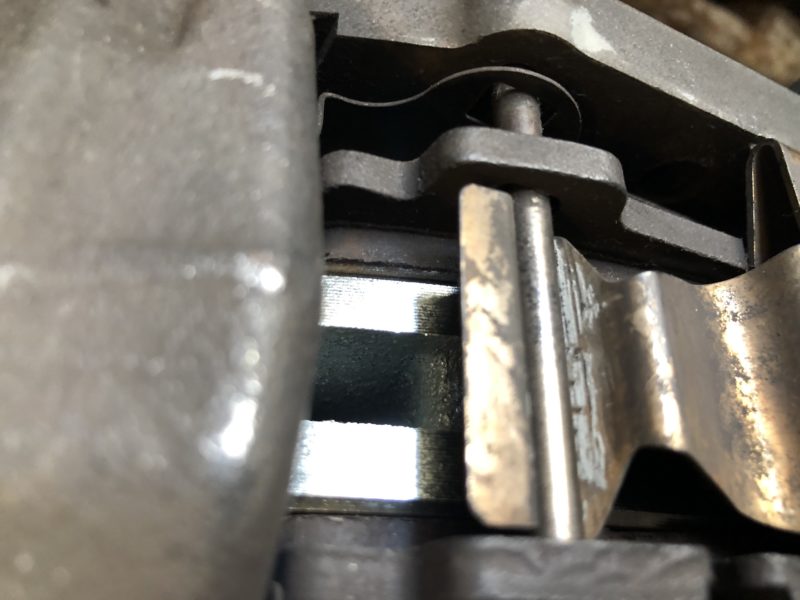
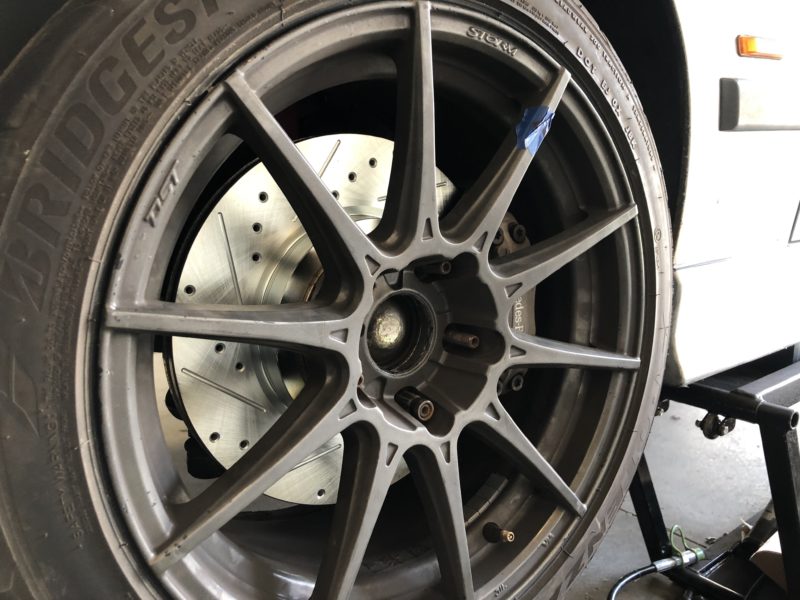
Not sure if these brakes will work, there's not enough room to make an adapter so it can fit the factory rotor.
But I do have one more trick to try.
Member
I wish I could weld - seems like a very useful skill.
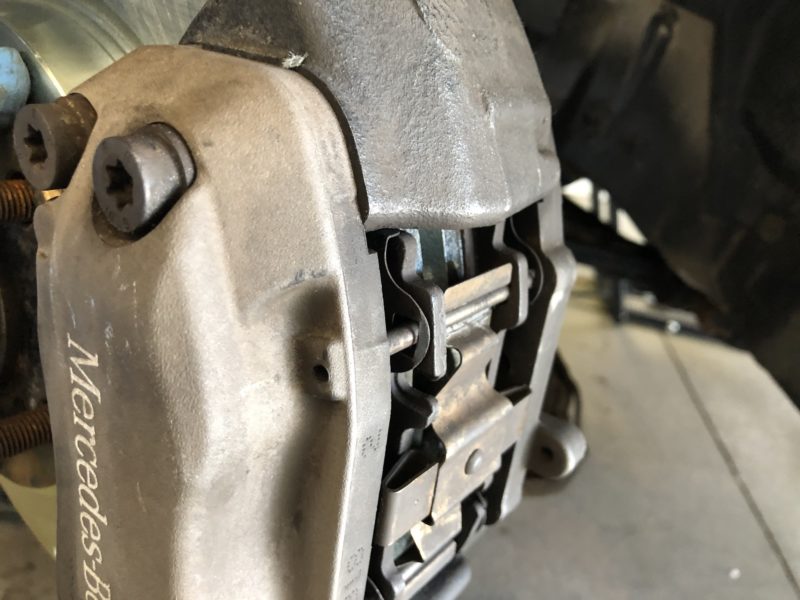
I may have missed it, but is the Merc caliper for the rear?
Member
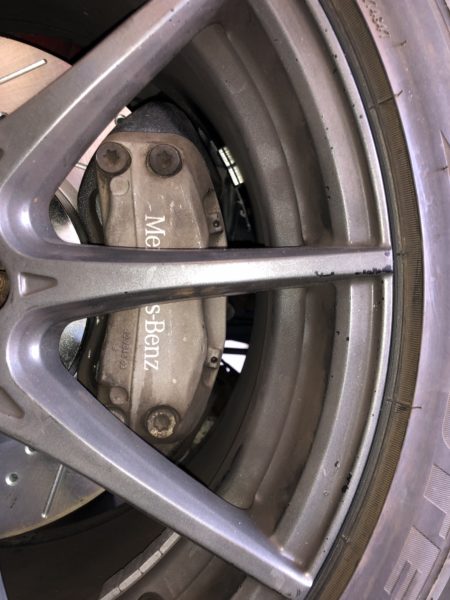
It's for up front. Four piston caliper designed for a 312mm disc, so it's very close to the stock M3 315mm disc. Miles of clearance even with 17" wheels. Based on the piston sizes, brake force is extremely comparable to the stock brakes, so it shouldn't mess with bias too much. And the caliper is about a pound lighter than the stock units. The problem is that the bolt spacing won't let me install it over a stock caliper. I ordered some 325mm 330i rotors that just might work, we'll see when they get here.
Member
Likely you've considered the 996 Brembo caliper uprade?
https://rallyroad.net/collections/e3...dapterbrackets
Member
Hmmm. I already have the 330i rotors and calipers up front. Very interested to see if you can get the the Benz calipers to work, but suppose I need to get mine running before considering swapping the calipers out again.
Member
Yes, I looked all over for brake options. The hitch is that the performance of the stock brakes is more than adequate for what I do. I don't need increased heat capacity - I noticed when I had someone co-driving my car that the brakes were much more effective when they didn't get a chance to cool down in between runs. In fact, I blocked off my brake vents for my last event so that my brakes would actually get up to temp and work. If I went with a larger rotor, it'd make that problem worse.
I have two issues:
1. Standard E36 spongy brakes. I have good rotors, new pads, good fluid, stainless lines, etc. and my brake pedal is still spongy for an inch or two before it grabs.
2. Weight. The stock cast iron caliper is hella heavy.
Most brake upgrades mean installing larger (heavier) rotors, which I don't need. To get lighter rotors I could go with a two-piece design with an aluminum hat, but I don't see anything out there like this for under $1000.
Even the "cheap" option like the 996 upgrade is stupid expensive:
- $225 for the brackets
- $500 for the pair of calipers
- $100 for them to machine the calipers down to fit my 17" wheels
- $100 for cheap E46 M3 rotors, or $450 for good ones
So I'm at $925 and I have heavier rotors. The aluminum caliper might offset the weight and save me a little, who knows.
These calipers cost me $90 for the pair. They have a cast iron main bracket and aluminum piston housings, they're about a pound lighter than the stock units. If I can adapt them to fit for cheap without having to modify the calipers or spindles, that's awesome. If I still have a spongy pedal, I can shell out the $180+ for a new master cylinder.
Member
Verified that the E46 bolt was the wrong bolt to use. When I first started the car up, every time I turned the wheel the pump howled and the steering seemed to chatter a bit. Swapped the bolts and all is right with the world. It must have been too much of a restriction. I know the E36 has a restrictor in the return line after the cooler, maybe the E46 doesn't and uses the bolt for that purpose instead.
As far as I can tell, the exhaust sealed up nicely, it's way less stinky in the car now. I need to get the front end put back on, dial in the alignment, and see how it all feels.
One outstanding item is the steering shaft rebuild. I ordered a bunch of parts from FCP Euro to do a rebuild of the column but not everything has shown up yet.
Member
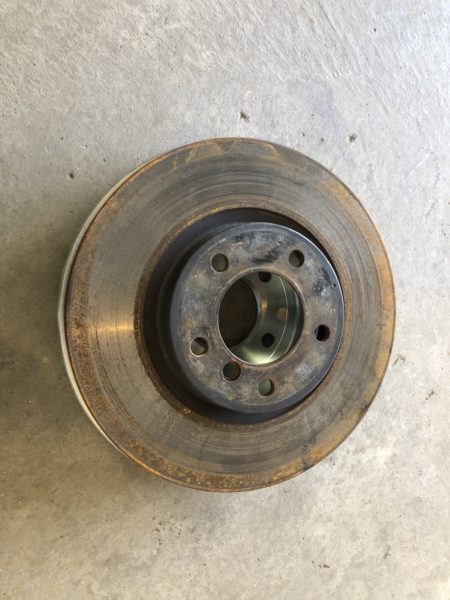
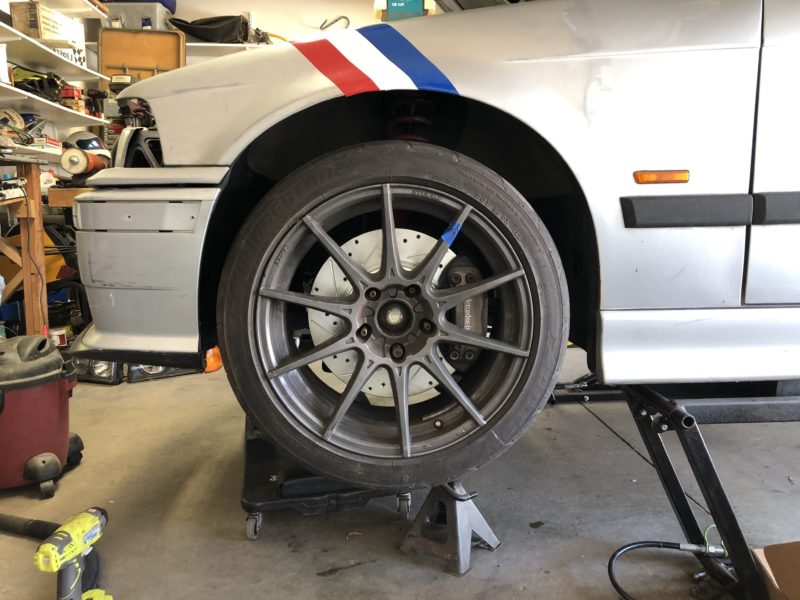
Update! UPS came by with the E46 330i rotors I ordered, I had to test fit them.
Went to pull the stock rotors off that I installed two years ago. You know what happened.
After that debacle I took some measurements.
325mm vs. stock E36 M3 @ 315mm.
My slightly used stockers measure 28.01mm thick, which is right at new spec. The 330i are supposed to be 25mm thick, these were 25.6mm thick.
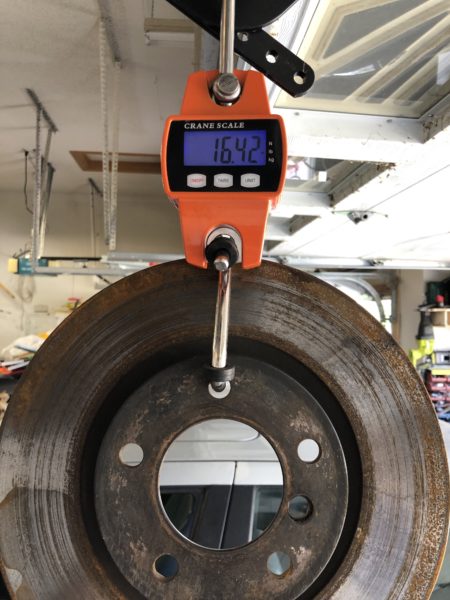
E36 rotors weigh 16.4lbs
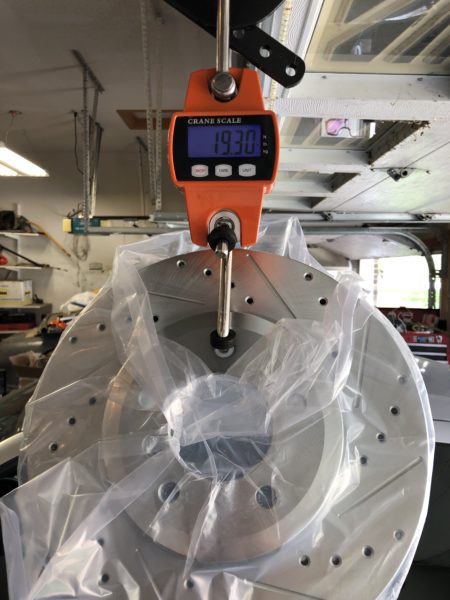
E46 are 19.3lbs (backed it up on the bathroom scale with a 19.2lb)
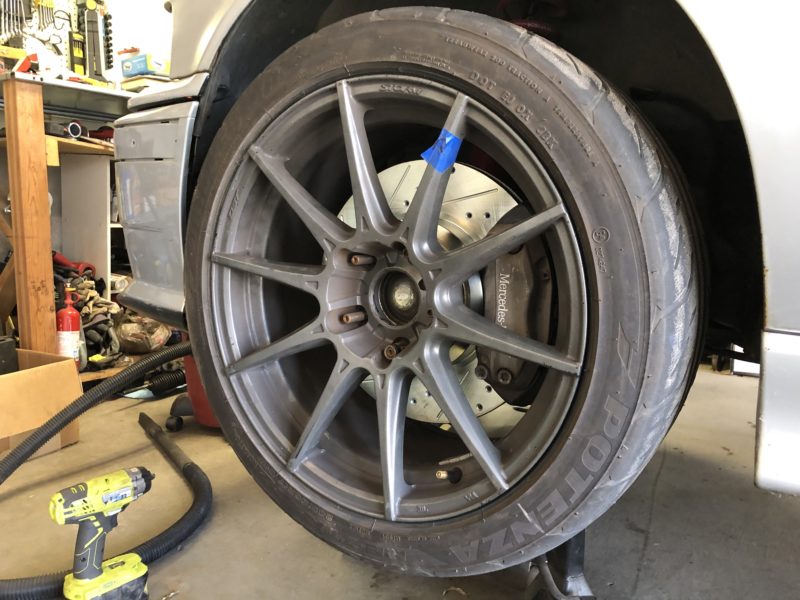
They slapped right into place (used my spacer to hold it on since I don't have the bolt...):
I bolted the top caliper bolt into the top stock caliper bolt hole.
Pad fit is *kisses fingertips* muah:
Miles of clearance around the 17" wheel:
Here's the lower caliper bolt holes. There's no overlap of the two holes, so in theory I should be able to make up a spacer that lets this bolt up perfectly.
The rotors came with some (worn) pads so I can at least road test before I invest the $$$ into some decent pads.
Member
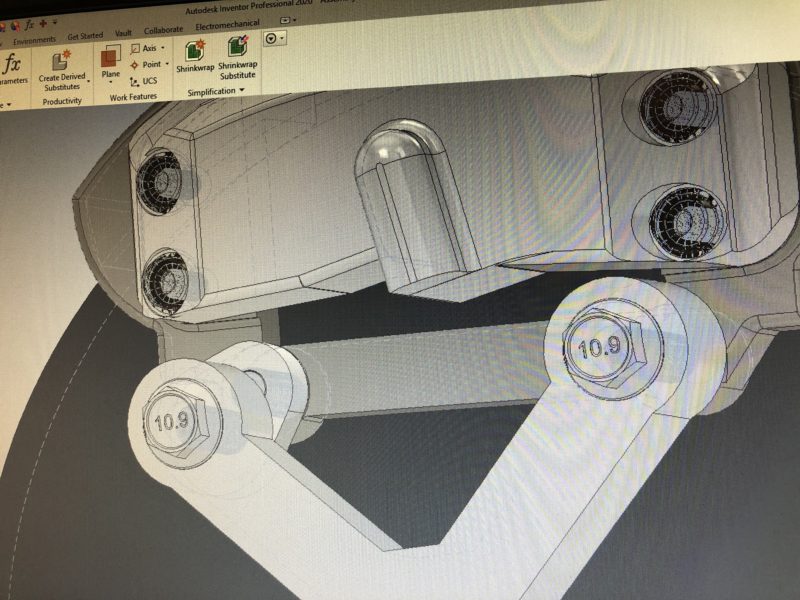
Getting the front end put back together. Installed new lower triangles - they keep exploding when I hit cones, and then my tires rub on the fender liners. I'm also tossing around some ideas for securing the front bracketry, headlights, and bumper to one another so that I can remove the whole thing as a unit by just taking out a couple bolts, instead of having to remove the headlights to get at the 8 bumper bolts. I think it's doable, maybe next time I pull everything apart.
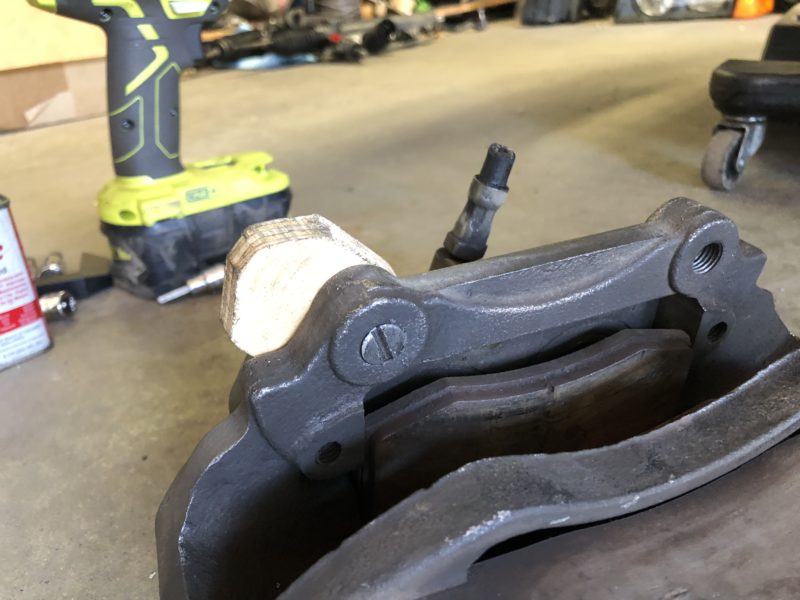
Mocked up a brake bracket out of 1/2" plywood to see if it was feasible. I think this will work.
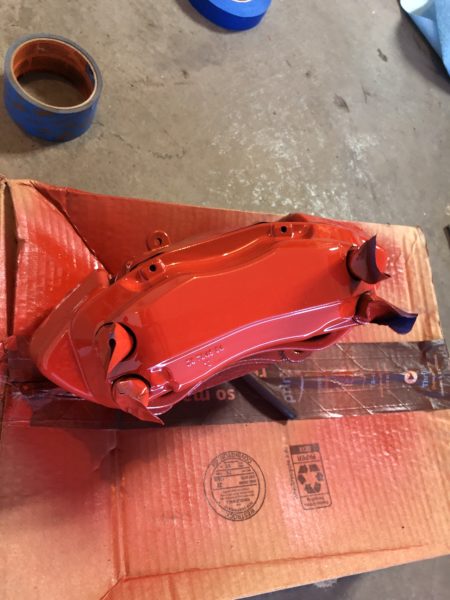
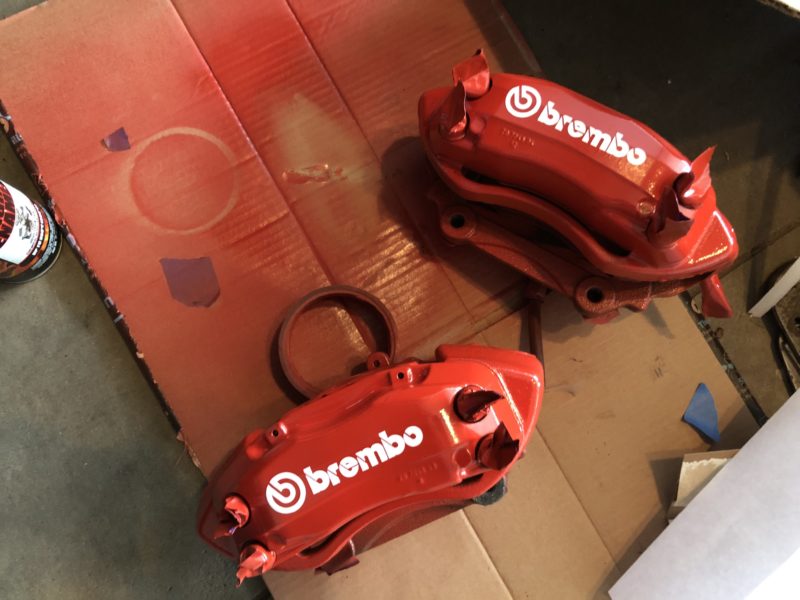
Since everything looked like it would work, I cleaned up the calipers and gave them a nice coat of paint.
Had to add the stickerzzz
M12x1.5 tap is on the way, I just need to find some 1/2" thick stock and I'll be in business.
Member
Pleased with how these turned out.
Member
Man you work fast!
Looks very sweet.
Diving in at the shallow end!
Member
Got the steel in on Friday to make the brackets for real. Went about marking, cutting, drilling and tapping. Went to fit it up only to find that they sent 5/8" thick plate instead of the 1/2" I ordered. So glad I went through the trouble without actually checking the thickness.
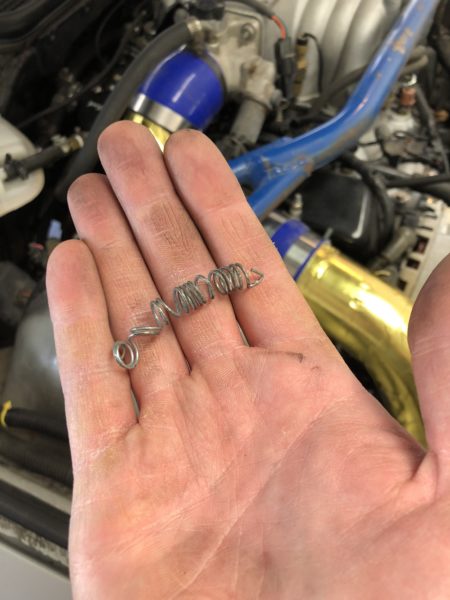
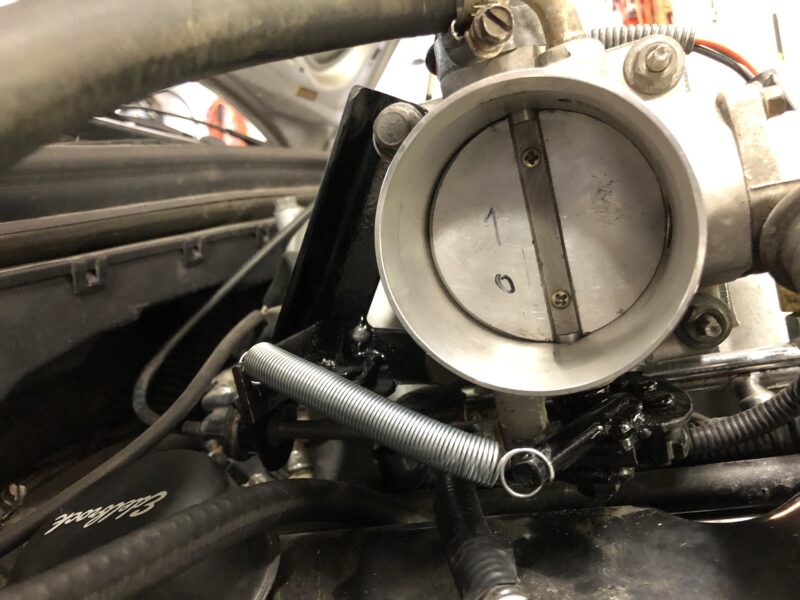
Got a couple little things done - swapped out the old throttle spring.
The old spring attachment was poorly thought out and I didn't like it. Added some bracketry and used a better spring:
It's a bit stiff, so I might look for a softer one.
Got the alignment done:
Upon first drive, the steering wheel was way off center, so I had to adjust that. It's better now. Steering feels generally good, although there seem to be spots where it feels like it's "catching." I wonder if the stiffer guibo isn't rotating smoothly. I'll double check for interference.
Also set the ride height. Front control arms are set level, rear height is set so the fender is 1/2" lower in the rear than the front. It's less slammed than it has been in the past. Hoping this helps with rubbing and generally unfavorable characteristics.
Exhaust seems to have sealed up nicely - it's not stinky in the cabin anymore. That should be a huge improvement over getting headaches after too long in the car.
Member
Nice work.
Member
Swapped out the spring for a lighter one, much much better. It's amazing how much something as simple as the throttle stiffness affects how the car feels and drives.
Also looked at the steering hangup, and I was right, it was catching on something. The very corner of the steering coupler bolt was rubbing on the headers at one point in the rotation. The new guibo is thicker than the old one, so the coupler sits higher, just high enough to catch on the header where before it had 1/4" clearance. I took off the corners of the bolt and all is well.
Almost drove it to work today, but it was rainy so I decided to be comfy instead.
I have everything I need to rebuild the steering column now. I also want to check the heater core to see if that's solid. I may do those things at the same time since the steering column needs to be dropped for the dash to come out. If things open up, our first event will be May 16-17 so I just want to make sure the car is in working condition then.
Member
The correct steel to make the brake brackets should show up today. Once those are installed I'll need to look at getting pads. I have PF Z-rated on front and who knows what random pads on the rear. I'm looking for something I can get for both calipers - SL500 front and E36 year. EBC Bluestuff look like they might be the ticket - aggressive street/decent track. I don't DD this car so dust, noise, and rotor wear don't scare me. I just need good hard initial bite.
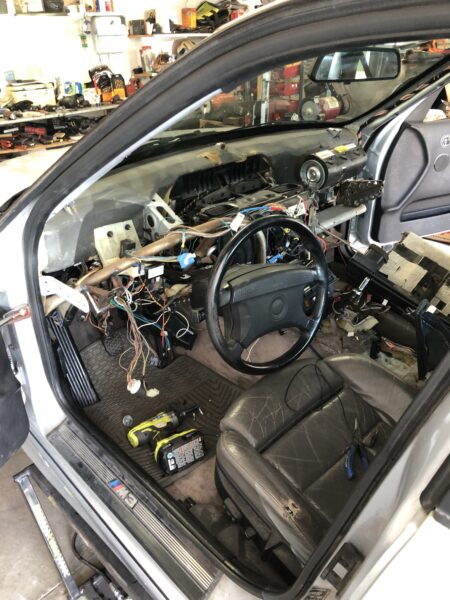
I also decided to go nuts yesterday and pulled the dash out.
The inside still smells and coolant is disappearing slowly so I'm concerned about the heater core. I also have all of the bearings and stuff to rebuild the steering column so now's the time to do that.
I pulled the cover off of the heater core and I can't see any trace of leakage. I may grab a coolant system pressure tester from the parts store and pump it up to see if anything seeps.
I'll also take the opportunity to pull the AC evaporator. It's not doing any good, so I might as well lose the couple pounds. Putting this thing back together is going to be a bit of a bear...
 Posting Permissions


 Reply With Quote
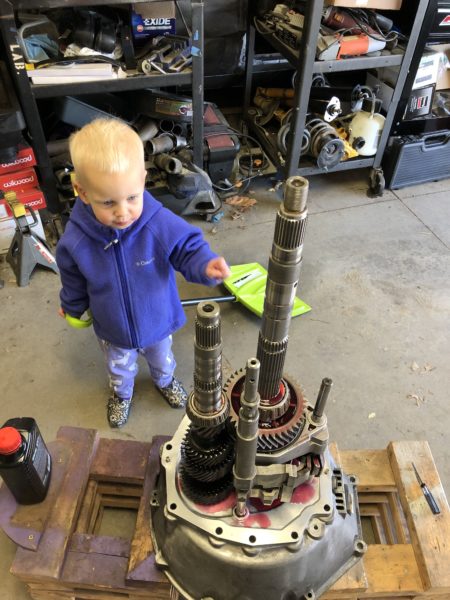


Bookmarks