
 shade tree mechanic
Moderator
shade tree mechanic
Moderator
If the open side of the seal is towards the pressure side, then correct. Just wanted to make sure that this is important. Checked with another MaxJax owner and his comment is:
Both you and Steve are correct. Steve installed the seal in the correct direction per the pictures he provided.
During installation you have to stretch the seal open to get it over the piston (I lubed the piston and seal during this step). Once it goes over the piston and sits in its grove I let it sit for a while to allow the seal to return to its original shape because I noticed it was easily spinning around the piston grove too freely. Once it returned to its shape it was now tight fitted around the grove and also not over sized making it more difficult to insert the piston back into the cylinder.
The second thing i did was lube the cylinder wall and threaded opening just before I inserted the piston. I also found it to be a bit difficult to get it in but the lube helped. rocking the piston shaft back and forth as I pushed down the piston into the cylinder by hand was all it took to get it in. I never had to use a hammer/mallet for this.
***My assumption is also your seals are the correct sizes!
Note:
**some seals have a wider lip than others in the same size. I dont know the specs on your seals.
**lube = hydraulic fluid
Last edited by shogun; 10-12-2020 at 12:21 AM.
Shogun tricks and tips for the E32 series are HERE!
Member
I think my main issue is the seal that comes in the SVI kit has an o-ring in the U groove (loaded U cup) and in turn requires a lot of extra force to compress the seal lip down to the 2.0" of the bore when inserting. The seals you and the other owner posted are a standard U seal without the o-ring and allows the seal lip to compress more easily. I think that is why you were able to insert into the cylinder without a crazy amount of effort. In my case I have two choices.
1. Precompress the seal before inserting. I bought a 2" to 2.25" exhaust adapter (https://www.autozone.com/emission-co...ter/402073_0_0). this will allow me to insert the piston into this adapter to precompress the seal before inserting into the piston. The ID of this adapter is 2.02 and the OD is 2.11. I will need to grind the OD a bit as the inside of the cylinder were the threads are is about 2.089.
2. Order the PU18-1.62-31 seal from herculesus. I did order 2 of these in case the original seals from SVI do not work.
Either way I think using the adapter I listed will be useful as it will prevent any damage to the seal when passing it through the cylinder area with the threads.
Thanks!
Steve
Last edited by skamp; 10-12-2020 at 07:45 AM.
shade tree mechanic
Moderator
The lip seals I installed were ordered last year directly from MaxJax. The original ones installed ex factory in 2011 as well as the new ordered ones had no o-ring in the U groove. See my pics in post #91 + 92. Let us know how you finally fixed it.
Shogun tricks and tips for the E32 series are HERE!
Member
Hey Shogun,
Wanted to let you know I was able to get the o-ring seal installed. I used a 2x2.25 exhaust adapter and ground down the OD of the 2" side to 2.080 so it would fit into the bore. Once I put the exhaust adapter with the rod/seal inserted I was able to tap into the bore without little effort. I documented the process with pictures on the garagejournal thread (https://www.garagejournal.com/forum/...77#post8779577). Thanks for all the help on this!
Steve
shade tree mechanic
Moderator
Unfortunately we cannot see the thread and pics in the The Garage Journal Board forums as guest, you can post the pics and copy the text here too.
Shogun tricks and tips for the E32 series are HERE!
Member
Here is what I posted to Garagejoural.
It seems like the Maxjax uses 2 different seals. One with an o-ring (loaded U cup) and one without. Mine originally had the one with the o-ring as well as the seal kit. The o-ring version I assume would leak less as it maintains the seal when the cylinder is not under pressure. The problem is the one with the o-ring is much harder to install as it needs to be compressed before inserting into the cylinder bore. This is what I did to get it installed.
I bought a 2" x 2 1/4" exhaust adapter from Autozone (https://www.autozone.com/emission-co...ter/402073_0_0). This has an OD of ~2.125 and in ID of ~2.02. I then ground down the OD to about 2.080. The threaded part of the bore is about ~2.089.
This allowed me to drop the rod into the top and with a quick tap of soft faced hammer the seal compressed into the exhaust adapter.
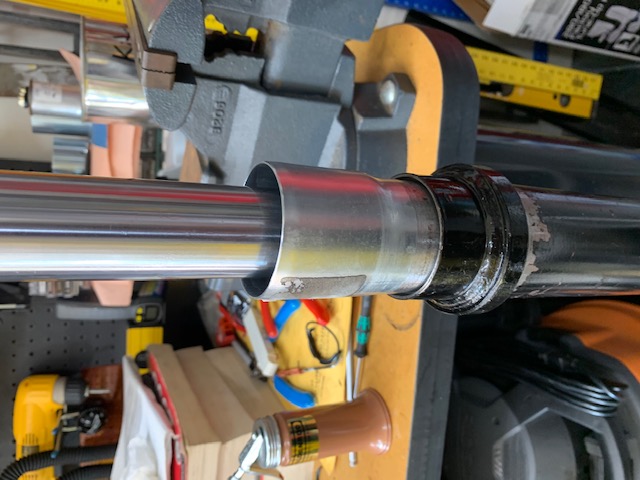
I then inserted the exhaust adapter with the rod into the threaded part of the cylinder bore.
A few hits with the hammer and it slid right into the bore. The exhaust adapter also protects the seal lip from any damage from the threaded part of the bore.
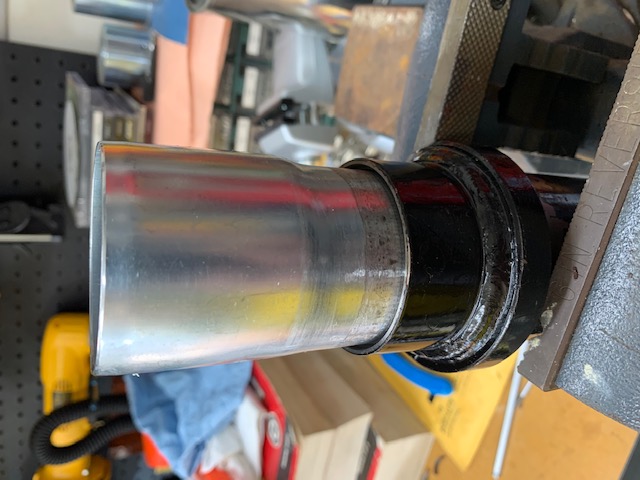
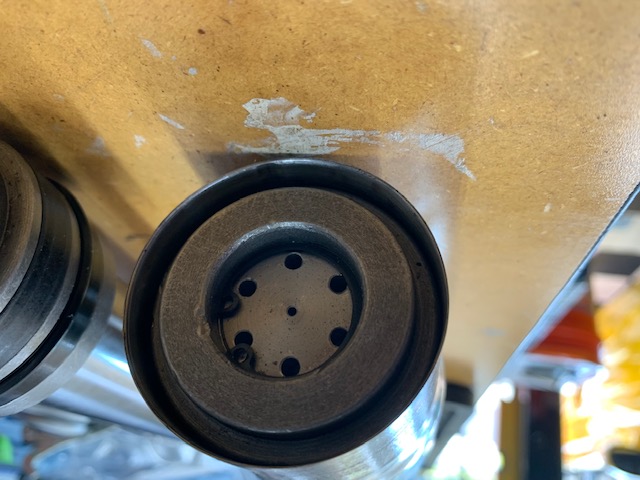
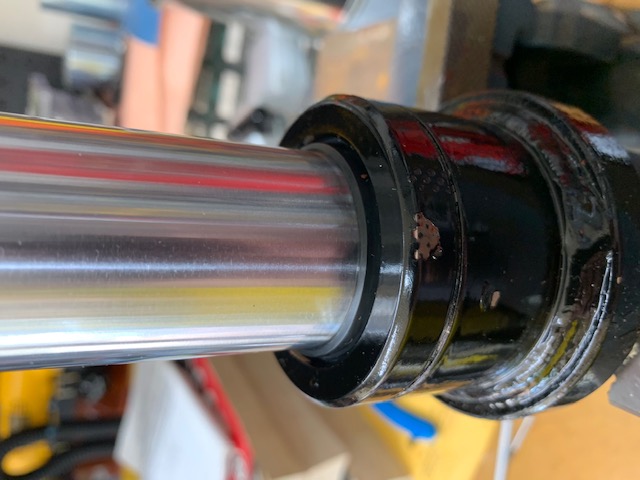
I then screwed the cap back on and gave it a few taps with a hammer and punch. Below is the cap threaded on and you can see the new wiper seal installed.
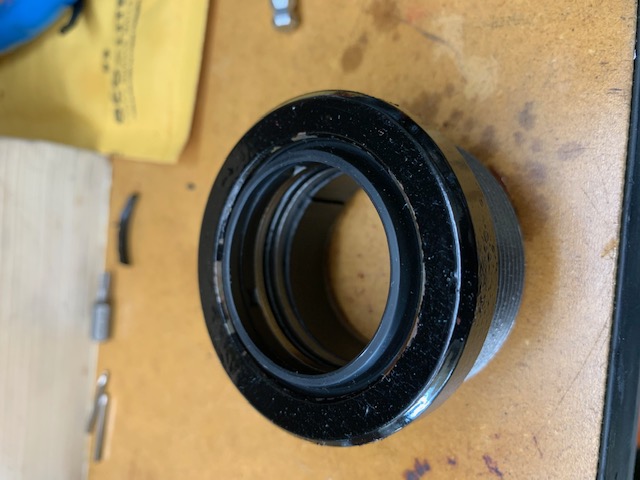
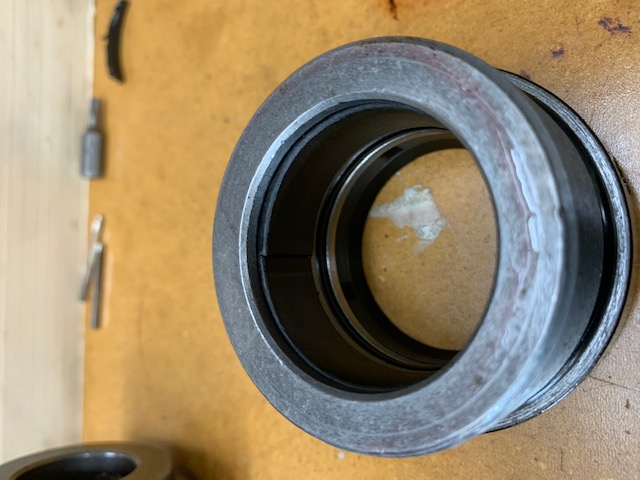
These pictures show the cap with the new wiper seal and wear ring.
I also wanted to mention that the small o-ring in the seal kit I got was for the bleed screw.
I was also able to find a diagram that shows all the seals and wear rings used.
.
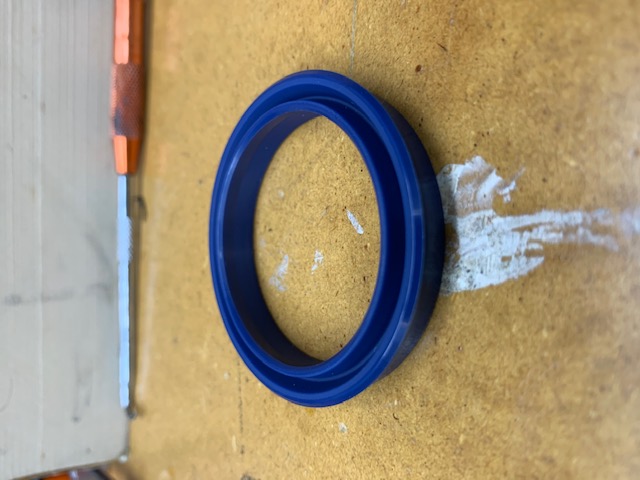
I also ordered a set of the non o-ring U cup seals (PU18-1.62-31) from herculesus (https://herculesus.com/product.php?p...t=15510&page=1) as plan B in case I could not get the seal with the o-ring installed. From comments on another forum the non o-ring seal goes in very easy without all the effort I had to go through. On the minus side it may leak/weep more than the seal with the o-ring. Picture below.
So I hope this helps anyone that needs to swap the seals. If I had this info in advance it would be a simple job.
Steve
shade tree mechanic
Moderator
For info, MaxJax has now started to make Tech Service Bulletins available online, as of this moment there are: HYDRAULIC CYLINDER FITTING ASSEMBLIES, HYDRAULIC HOSE REPLACEMENT, HYDRAULIC FITTING REPLACEMENT,HYDRAULIC FLOW DIVIDER PORT LOCATIONS, SAFETY WELDMENT REPLACEMENT, https://www.maxjax.com/maxjax-downloads/
hope they will add more soon. Parts list online for replacement parts is unfortunately very short, no details about seals, needs to be improved with more detailed info and detailed installation instructions.
user manual Rev G 07-12-2016, p/n 199923 for download with parts list from homedepot https://images.homedepot-static.com/...de1168131a.pdf
Public Announcement 04/2020, BendPak Holdings LLC, has acquired ..from Garage Equipment Supply, Inc..... The acquired assets include three renowned brands, Dannmar®, MaxJax®, and .... https://www.dannmar.com/company/announcement/
Shogun tricks and tips for the E32 series are HERE!
shade tree mechanic
Moderator
TECHNICAL SERVICE BULLETIN ,MODELS: MAXJAX M6 AND M6K ,SUBJECT: HYDRAULIC FLOW DIVIDER PORT LOCATIONS , MODELS: MAXJAX M6 AND M6K , SUBJECT: HYDRAULIC FLOW DIVIDER PORT LOCATIONS
The purpose of this Technical Service Bulletin is to describe the different Port locations on the Hydraulic Flow Divider used with your MaxJax. There is a Hydraulic Out Port on either side of the Hydraulic Flow Divider, with a Hydraulic IN Port on the lower Ports. Depending on the Hydraulic Flow Divider that came with your MaxJax, the Ports may be configured differently. To make connections to the Hydraulic Flow Divider, you will need: • Two Long Hydraulic Hoses (P/N 5570241) ,• One Short Hydraulic Hose (P/N 5570242) ,• One JIC x NPT Elbow Fitting (P/N 5550170). Connects to the Hydraulic Flow Divider. ,• One JIC x ORB Elbow Fitting (P/N 5550074). Connects to the Power Unit., • Liquid Thread Sealant (P/N 5580012)
CAUTION: Your MaxJax will not work correctly unless the Long Hydraulic Hoses and Short Hydraulic Hose are connected to the correct Ports on the Hydraulic Flow Divider.
The following graphics show the possible Port locations for your Hydraulic Flow Divider. Identify your layout and make the appropriate Hydraulic connections.
Hydraulic Flow Divider 1: Connect the two Long Hydraulic Hoses to the top Out Ports (either side of Hydraulic Flow Divider), and the Short Hydraulic Hose connects to the Bottom Left IN Port
Hydraulic Flow Divider 2: In this case, the Left side Ports are mislabeled. Do not connect the Short Hydraulic Hose to the Top Left Port. Same design as Hydraulic Flow Divider 1, the Short Hydraulic Hose must be connected to the Bottom Left Port, and the two Long Hydraulic Hoses connect to the Top Ports on either side of the Hydraulic Flow Divider.
Hydraulic Flow Divider 3: If your Hydraulic Flow Divider looks like the graphic below, rotate the Hydraulic Flow Divider 180º so that the side with an IN and OUT Port is on the right side, and then connect the Short Hydraulic Hose to the lower IN Port; the other end of the Hose connects to the Pressure Port on the right side of the Power Unit. In this case, you will need a longer Short Hydraulic Hose (~317 mm long)
For more details see tech service bulletins https://www.maxjax.com/maxjax-downloads/
Shogun tricks and tips for the E32 series are HERE!
Member
Originally Posted by shogun

I joined specifically because I found your post and my MaxJax which I've had since 2011 is identical to yours! The new kits show that the cylinder head is different from mine.
See attached pictures.
I'm super confused now on which seals I need not only for the top cylinder but also the lower part that unscrews from the cylinder.
Nothing that I have in the kit seems to match up with anything at all on my cylinders, so I can only assume that when I got the rebuild kit from maxjax that they set me the kit that they had after they revised the cylinders... :-(
-Nigel
shade tree mechanic
Moderator
send the pics to Maxjax and show them the serial number and what is installed and what you got now as spare. Best is you also show the differences in size, shape with exact measurements. I installed from the set I got years ago what fitted and the rest I received and was not needed at all I scrapped, see from post 92 the pics and comments, apparently there was a design change and some confusion and still is. Can only hope under new ownership after sales service will improve step by step.
Once you got a reply and have fixed it, post the result here for info.
Another options is to buy directly from Hercules, see post 97, there is a link and you can order exactly by size. https://www.herculesus.com/index.php
Last edited by shogun; 04-01-2024 at 01:56 AM.
Shogun tricks and tips for the E32 series are HERE!
Member
Appreciate all this information! So glad this was here honestly because without the help of you and Steve I don't know how I would have even figured out what to get....
So with the help of you and Steve I am getting the following for my MaxJax that doesn't have the internal o-ring in the cap, and also for the piston I really only have the one seal and the wear ring. Everything that MaxJax sent me before isn't really used. So
Qty 2 - Wiper seal - ST-150-SH (goes on cap and wipes the fluid from the rod)
Qty 2 - Wear ring - 612-200-037-SC (goes on piston)
Qty 2 - Wear ring - 612-175-050 (goes inside cap)
Qty 2 - U-Seal - PU18-1.62-31 (goes on piston)
-Optional upgrade to the cap seal: ST-150-XL
I am also going to pick up 2 of the ST-150-XL cap wiper seals only because from reading this thread it seems like those are actually slightly better and provide more protection against potential crap from getting inside. I will note that my fluid and internal cylinders looked good, and I didn't pull any debris out of it so I'd rather actually have a couple on hand so I can then figure out which is best to use. But I'm wondering if I should buy 3-4 sets of these and just have them. I really would hate to run into this situation again finding out the manufacture doesn't make a seal and then I'm screwed.
I was almost ready last night to purchase an entire cylinder from maxjax. I am so glad I waited and didn't act out in frustration.
I will update once my order comes in from Herculesus.
Thanks,
-Nigel
Member
So I got an email from BenPack since they are the ones that bought MaxJax. What silly nonsense from them. This was the reply I got back...ROFL.
maxjaxreply.JPG
So they don't sell a rebuild kit and want you to buy TWO new cylinders..at $441 each. How ridiculous. Thanks to the information here and on GarageJournal, I bought BOTH rebuild kits/seals/wear rings plus a spare set of wiper seals for a total of around $60....
I'm HALF tempted to send this back to them but, what I feel is going to happen is they will buy them in a large amount and then sell them at 10x the price point. IE: Lets sell the rebuild kit for $200 or something crazy. Regardless, what crappy customer service to not be able to support a product that they make.
I'll post the everything when I receive it later in the week.
Thanks,
-Nigel
Last edited by NewShockerGuy; 04-02-2024 at 10:00 AM.
 Posting Permissions


 Reply With Quote
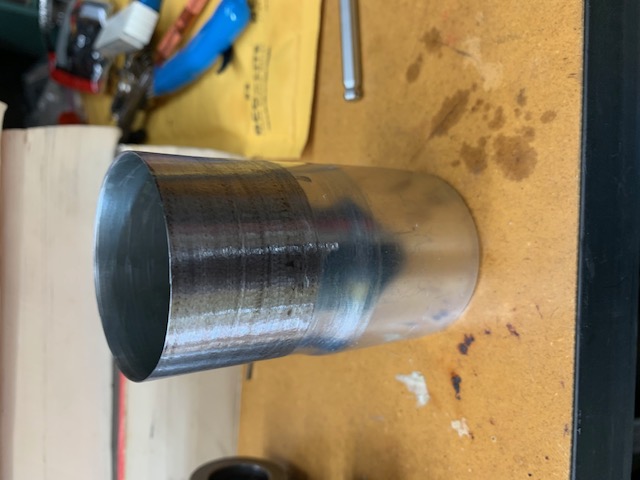


Bookmarks