
 Ralph
Ralph
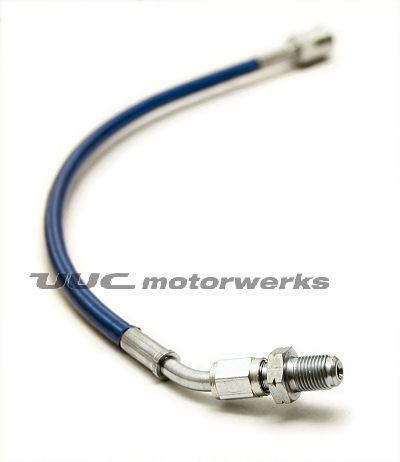
Ok, I replaced my 98' M Roadster clutch line with one for a 3.0 as per Randy Forbes advice, part No. 21 52 1 159 714
this one:
The advantage of using the 3.0 line is that it eliminates the little hard line and bracket at the slave cylinder, and it eliminates the orifice restriction that mimics a clutch delay valve (CDV). The job was more difficult than I anticipated, and I couldn't find a suitable write up (on my iPhone--so there may be one, just I couldn't find it). In any event, here are my notes on the job.
First remove the slave cylinder from the transmission by unbolting two 13mm nuts using a 13mm 3/8" drive swivel-socket and an extension. The slave is under pressure from the engagement rod, so remove each nut a little at a time so it pushes out evenly. Snake the slave cylinder out and away from the transmission and let it dangle.
Now comes the maddening part. You can see the 11mm line nut on top of a bracket and the hard line leading from the master cylinder to the bracket good enough. What you can't see is anything to get a wrench on on the rubber line--all you can see is a plastic shroud. The plastic shroud terminates at the bracket into a metal fitting that is covered by a rubber grommet in the bracket through which the line passes. This metal fitting does not have a six sided nut flange on it (the 3.0 replacement line does). Instead, it is round with no obvious perch for a line wrench, as you might expect. However, if you pull the line down through the grommet (there is just enough play in the metal line to do this), there are two flat spots on the round surface that you can get a 14mm wrench over. These two flat spots do not allow you to use a 14mm line wrench, but only an open end. So now you can get an 11mm line wrench on the line nut and a 14mm open end on the metal end of the flex hose.
Only there isn't room to actually turn either wrench. This presents quite the difficulty, and I pondered a solution for some time. In the end I came up with this: a 14mm Allen socket and a 9mm Allen socket. My 11mm line wrench is a combination wrench with the other end being 9mm, and, of course, the other end of my open end 14mm wrench is a 14mm box end. using a long extension and a 1/2" ratchet, I inserted the 14mm Allen into the box end of my 14mm combination wrench with the open end over the flat spots on the metal portion of the rubber line. Using a long extension and a 3/8" ratchet, I inserted the 9mm Allen into the 9mm end of the 11mm/9mm combination line wrench, with the 11mm end over the line nut. With the 3/8" ratchet set to "on" and the 1/2" ratchet set to "off," and an assistant, the line nut gave way nicely--the rest could be done just by twisting the line and slave cylinder counter clockwise.
As soon as the line came free I plugged the end on the car with a golf tee, but later I realized that this was unnecessary, and I could just have let it run out and caught the fluid in a container--the drain in the brake fluid reservoir for the clutch master cylinder is high enough up not to pose a problem for the brakes if it drains down to below that point.
Next I took the slave and line assembly over to the bench and lined up the new hose to it to match angles of the bent metal portion of the lines. This is important because you don't get an opportunity to do this once the slave is mounter to the transmission. Then I switched lines on the slave cylinder and tightened the line nut on the new line to the slave, making sure the mounting angle was just the same as on the old line with the bracket (no bracket on the new line).
I carried the assembly over to the car and screwed it onto the line nut on the car (through the grommet) by just twisting it clockwise. I tightened it the same way I loosened it, only this time the new line does have a nut flange (17mm) and I used a 11/16 line-crow's foot instead of the 14mm Allen, and the 3/8" ratchet, extension and 9mm Allen.
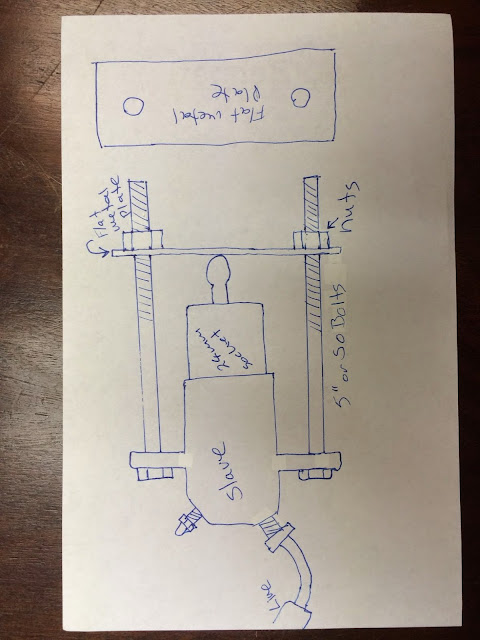
Next comes bleeding the slave (I loosened the bleeder with the slave off the car first in a vise). For this you need two 5" long threaded bolts and corresponding nuts, a metal plate with two holes drilled in it the same distance apart as the holes in the slave cylinder mounting flange, and a 24mm 1/2" socket. Insert the bolts through the holes in the mounting flanges from the back (bleeder side) forward (toward the end of the slave that mounts in the transmission). Place the 24mm 1/2" socket over the engaging rod, and the metal plate with the two holes over the ends of the 5" bolts and thread the corresponding nuts onto the bolts. Use the nuts to draw the metal plate down onto the end of the socket by compressing the engaging rod into the slave cylinder until the plate is secure against the socket, and the socket is wedged between the plate and the slave cylinder. This apparatus will hold everything together for the bleeding.
Top off the fluid level in the reservoir. With an assistant pushing on the clutch pedal by hand and keeping firm pressure on it, loosen the bleeder until the pedal reaches to the floor. Tighten the bleeder and then have your assistant let the pedal up. Top off the fluid level again and repeat this procedure 3 or 4 times. That's it, reinsert the slave into the transmission (you have to compress the rod to do this), and tighten the 13mm retaining nuts a little at a time, back and forth until it is mounted evenly and tightly. Don't forget the bleeder cap. Push the new line back into the grommet in the mounting bracket firmly.
I didn't take any pictures, so hopefully this description is clear enough to help someone. It's a b****h of a job for how easy it could have been with a little bit better engineering.
The clutch is vastly improved and the transmission now shifts like butter.
Member
Thanks for the write up as I just got my new clutch line in the mail a couple days ago
Member
That's one (1) way to do it, I try to position the two (2) wrenches, the 11mm line & 14mm open, so that I can squeeze them together in one (1) hand. to brake the joint loose. Once it's loose, I hold the nut on the steel tube, and unscrew the hose.
You're right though, It goes back together much easier!
You're also pretty crafty; I'd have never thought of using the Allen sockets__but then, I'm always trying to do any given job while holding onto fewer tools
Member
Uh oh. My stainless UUC line for my '98 2.8 roadster just arrived from BAVAUTO. Someone tell me it is way easier on a non-m please!! I was looking forward to a simple job after work one day this week, but am now a bit worried.
Member
PITAOriginally Posted by jdjkelowna

Member
Baaah!
Ralph
Of course I tried to do that (desperately and repeatedly), but my wrenches would only fit onto their "nuts" in one position each (due to the tight quarters), and that particular configuration would not allow me to get them both in one hand, and I couldn't do it with two. I tried flipping the wrenches over, coming at it from different angles, longer and shorter wrenches, crow's feet, 7/16ths and 9/16ths wenches, you name it, nothing worked. There was a lot of head scratching and coffee breaks over that one, and I arrived at the Allen solution more out of perseverance than craftiness. Thankfully I have a lift, I would not want to tackle that job lying on the floor.
Better give it a weekend day and have an assistant handy. I started at 10:00 a.m. or so and was done by 2:00 p.m. (including set up and clean up time--actually by 3:00 if you include car wash time, but I released my assistant at 2:00). And of course I had to deal with what happens if you try to bleed the slave without the bracket and bolts I describe above--I only arrived at that set up (with help) after dealing with the "aw s**t" first--but I left that step out of the write up (note: it takes three "atta-boy's" to make up for one "aw s**t").
Member
Great write up. I think that just confirmed how I will tackle mine....hello indie mechanic....
Former Fleet
1984 BMW 318i (long gone - started the addiction)
1989 Chevy S10 Blazer (4.3l V6, 4x4)
1993 Chevy Cavalier (3.4l V6, 5spd.)
1999 VW Golf GTI GLX
2003 Subaru Forester
Current Garage
2006 Honda Odyssey (keep the wife and kids happy)
2009 BMW 328i xDrive
1999 BMW M Roadster
Grumpy
BMW CCA Member
Assuming the connections are not all corroded up like someone's last year, changing the flex line is a sub one hour single person job. At least it is on my garage.
The one thing I will say here is do not let the system drain. Purposely letting air in can never be beneficial. In fact, if the job is done right, there is no on-car bleeding.
/.randy
Ralph
So how do you remove and replace the line without letting fluid out, and how do you bleed it off the car with the line disconnected?
Member
I had the same problem as Bingley. I used 2 open tube wrenches like Randy and did not have the strength to move them. I eventually found a way to get some 2x4 scraps wedged in there and was able to use a lever to turn one of the wrenches. True PITA.
Member
Isn't the preferred bleed method to push fluid from the bottom bleed valve up to the reservoir with an oil squirt can? Air likes to travel up...
Grumpy
BMW CCA Member
I didn't say you can do it without letting any fluid out; only that you shouldn't let all the fluid out. Your golf tee will work, though I prefer vacuum caps.
All hydraulic components, clutch or brake, should be bench bled before being installed. Yeah, I know, no one ever does that. Then they go shopping for the magic pressure bleeder to try and force the trapped air out. But if you bench-bleed the slave and line assembly fully, and have a full system that was capped, there will be no air. All you do is pull the cap off the hard line and offer up the assembled line and slave. Yes, a bit of fluid will run out, replaced by fluid from the reservoir. No air will get in as long as you don't empty the system. No further bleeding required. If you then want to flush the fluid, you can do so without risk of introducing air.
- - - Updated - - -
If there is a high spot in the system that can trap air, you WILL NOT flush that air out no matter the technique or force. There are many clutch hydraulic systems out there that simply can not be bled in the car. Our slave cylinders when mounted are one such example. The classic example was the 1990's Ford Ranger/Explorer. The master mounted pointing down about 45 degrees with both feed and pressure lines at the bottom. If you got air in the master, you were done. It had to come out to be be bench bled. Many shops wasted many man-days and gallons of fluid trying to pressure bleed these.
/.randy
Member
You're absolutely sure of this?
(By the way, I did bench bleed the master cylinder when I installed it in the spring. So that's at least one person...)
Grumpy
BMW CCA Member
Stock slave with air in it, bolted to the transmission, can not be fully bled. The bled passage drilling goes into the feed port, which enters the piston bore in the center. The air in the top half of the piston bore will not go down and out. This is why BMW has the special tool clamp to push and hold the piston fully back in it's bore.
/.randy
Ralph
Now that method didn't occur to me, and if it had I probably wouldn't have tried--I'm sure a vision of me standing there fumbling trying to get the line nut started with brake fluid running into my arm pits would have come to mind, and I hate that (a lot). As it turned out I could have done it that way as I got the line nut started just fine. Bench bleeding the slave didn't occur to me either, I do bench bleed new master cylinders, but it's been so long since I replaced a slave I forgot (at this point I've forgotten more than I remember). In any event, the method I describe worked quite well (leaving aside the business of trying it without a retaining bracket first). I agree with you about the power bleeder--I didn't even consider that for bleeding the slave, although I like it very much for brakes.
I'm sure that if I did the job again I could do it in a couple of hours, and after a third time probably in an hour. The difference between being a professional and an amateur (and I have been both when it comes to turning wrenches) is that we amateurs do every job as our first (and usually only) crack at it. We never get to learn the lessons of experience doing the same job over and again. We make up for our lack of experience on a particular job by taking our time, triple checking our work, and thinking everything through. I will say this--I do much better work as an amateur than I observed (and did) as a professional--not having the pressure of the clock and the book, and REALLY caring about the car, make a big difference--it's nothing for me to sew everything up only to realize (or even second guess) that I didn't apply the right neversieze or thread lock, and just take it all back apart again because I want it perfect--not so much in a front line shop. I remind myself that I'm doing it for fun, not for money, and that it's as fun to do it a second time as it was the first (sometimes more).
Member
BMW E36 M3 ExpertSomething you will really like about the UUC line is that it is designed to replace that little hard line also. It also has the convenient hex wrench fitting.
http://store.uucmotorwerks.com/stain...-s54-p318.aspx
----------
NOT with that company any more.
Member
Comment removed: Unnecessary for the DIY
Last edited by Tib; 09-11-2014 at 09:11 PM.
Ralph
So you can make one as I describe in the original post with two 5" or so long bolts that will fit through the mounting holes in the slave cylinder flange, nuts to go on them, a flat metal plate with holes big enough for the two bolts to pass through--drilled approximately the same distance apart as the slave flange holes--and a 24mm or so 1/2" drive socket. Like so:
You use the nuts to tighten the plate back and forth to compress the rod until the plate bottoms against the socket. The socket should hold the slave piston seal in without touching the slave housing (like when driving in a seal).
Last edited by Mr Bingley; 09-09-2014 at 12:02 PM.
Member
I like Ralph's solution above.... But you can get an actual tool for this application at BAVAUTO.com for 34.95. Plug CBT tool into their search engine after selecting your car's model and year.
Member
I am going to buy a replacement slave cylinder attach the new UUC line, and bench bleed the two. So its a fast and easy swap under the car.
Last edited by Tib; 09-11-2014 at 09:13 PM.
Ralph
I would have bought one for that kind of money too if I had know I needed one--I love special tools, but I went into the job blind--hence this thread.
Member
I've read lots of your posts (new and old) and have learned plenty over the last year by doing so - I wish you had dragged a camera under the car on this particular venture though. I've read this one over a couple times and not so sure I actually want to start something that will end with me towing my roadie to the dealer with a half disconnected line dripping brake fluid and me with a defeated look on my face. Hmmmm maybe Tibs will go first.... And I can get my resolve back thru his success. I kinda like his idea of changing the slave while I have it out already... Do they fail? Maybe my notchy 1-2 shifting would benefit from a two pronged attack... Line AND Slave.
Member
for my own plunger tool I clipped vise grips gently on to either side of the slave housing, so that the plunger tip sat right in the ridge of my vice grips, very securely. barely touched the cover on the tip, no damage, easy and worked great the few times I've bled the clutch on a Z3.
Ralph
Yeah, I wish I took pictures too, but I launched into the job and got to caught up in it too quickly to stop and get my phone--I hope my drawing makes some sense. I'm flattered you have read my posts and found them informative--I'm not sure that my OP in this thread is all that informative, but the entire discussion in the thread is very informative to me, and just the sort of thread I was looking for (and wish I found) when I started this job. Really I should have started this thread before I tackled the job, but I'm too proud to admit ignorance (and failure at searching) without trying first--a minor character flaw.
The only really hard part was breaking the 11mm hard line nut free from the rubber clutch line end. I think that if you had a 14mm crow's foot (non-line), and an 11mm line crow's foot, that part of the job would be much easier (and a 17mm line crow's foot for reassembly if you're using the 3.0 replacement line). A trip to Harbor Freight ahead of time is called for. I just didn't have that particular combination of crow's feet (crow's foots?), so I had to improvise (and Harbor Freight is only 10 minutes away, so I didn't save any time doing it my way)--live and learn. I really like Randy's method of bench bleeding the slave and reinstalling it with no on-car bleeding required (although I would bleed it anyway on the car just to be sure). And I don't see any reason not the replace the slave, except cost.
 Posting Permissions


 Reply With Quote


Bookmarks