
 Member
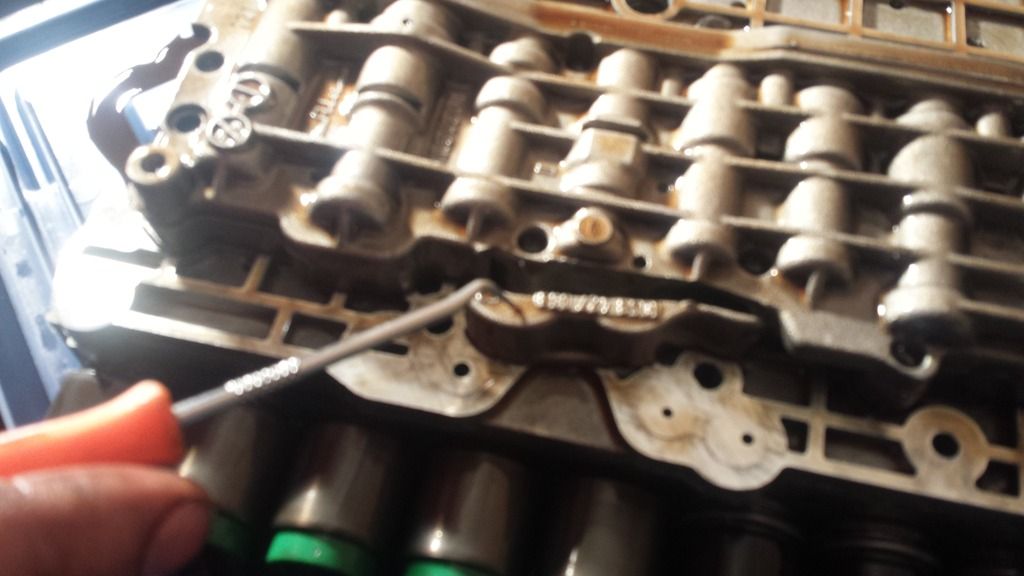
so that's what it looks like under those coolant pipes? what is the gasket for? pardon my dumb question, that looks like a passage for heat dispersion.
1966 Porsche 911
1966 FORD GT40 MK2
1967 Alfa Sprint GT
1968 Ford Mustang Coupe
1968 Chevy C10
1970 Alfa 1300 GT Junior
1972 Alfa 2000 GTV
1974 Alfa 2000 GTV
1978 Porsche 911 SC Targa
1980 Mazda 626 Rotary Turbo
1981 Mercedes 300GD
1986 Mercedes 190E 2.3 16
1987 Mercedes 190E 2.3 16
1988 BMW 735i 5 Speed
1989 BMW M3 BRG
1989 BMW 325IX
1991 BMW 850i
1991 Range Rover 2 Door VM Diesel.
1993 BMW M5
1995 Porsche 911 C2
1996 BMW M3
2001 BMW M5
2002 Porsche 911 Carrera 4S
2002 Ford F150 5 Speed 4x4 Reg Cab Shorty
2002 Honda Insight 5 speed
2005 BMW M3
2008 BMW M5
2012 BMW X5 Diesel
2017 Ford F150 Platinum Supercrew
Member
Do you mean checking for cracks in the cylinder heads? Yes, that was done by a machine shop. I think they charged me $120 for just that test.Originally Posted by BMWpower7

Yeah, poor wording on my part. The crack goes all the way to the stud threads I think, and also halfway down that part of the casting. My worry is that over time, the crack will continue to the bottom of that hole and create a leak or worse issues.
Do you mean a shop couldn't weld this material? Or it's just really hard to do for an untrained welder like myself? I think from what I am hearing from you guys and others, I am planning on temporarily reattaching the oil pans and paying someone to fix my problems. Not easy to move the block though.
- - - Updated - - -
Yeah, coolant is flowing through this passage (underneath the cover, which I have removed). It links the water pump with the rear coolant passageway. The gasket is simply sandwiched between the block and the aluminum cover plate to keep the coolant from leaking out of the valley area there. I left the gasket on here to try to protect the machined surface while I worked on extracting the bolts. I'll replace the gasket when I reassemble everything.
Last edited by atakordie; 03-25-2015 at 08:44 PM.
Member
are these hex bolts? have u tried extracting them?Yeah, coolant is flowing through this passage (underneath the cover, which I have removed). It links the water pump with the rear coolant passageway. The gasket is simply sandwiched between the block and the aluminum cover plate to keep the coolant from leaking out of the valley area there. I left the gasket on here to try to protect the machined surface while I worked on extracting the bolts. I'll replace the gasket when I reassemble everything.
how do you plan to take them out?
1966 Porsche 911
1966 FORD GT40 MK2
1967 Alfa Sprint GT
1968 Ford Mustang Coupe
1968 Chevy C10
1970 Alfa 1300 GT Junior
1972 Alfa 2000 GTV
1974 Alfa 2000 GTV
1978 Porsche 911 SC Targa
1980 Mazda 626 Rotary Turbo
1981 Mercedes 300GD
1986 Mercedes 190E 2.3 16
1987 Mercedes 190E 2.3 16
1988 BMW 735i 5 Speed
1989 BMW M3 BRG
1989 BMW 325IX
1991 BMW 850i
1991 Range Rover 2 Door VM Diesel.
1993 BMW M5
1995 Porsche 911 C2
1996 BMW M3
2001 BMW M5
2002 Porsche 911 Carrera 4S
2002 Ford F150 5 Speed 4x4 Reg Cab Shorty
2002 Honda Insight 5 speed
2005 BMW M3
2008 BMW M5
2012 BMW X5 Diesel
2017 Ford F150 Platinum Supercrew
I Void Warranties
I mean an amateur welder would completely botch the job, and a pro would only be willing to try because its not exactly structural right there. If it was a crack in a more important place in the block, you would have trouble finding anyone willing to do the work.
Member
Since the block is cracked, have you considered finding another block?
A weld may not hold up well and then you have the same problem again. More time and more $$$$.
The good thing is the crack is not near a cylinder, but it's still a crack.
02 e39 540i Sport (Son), 01 DINAN 7 (Me), 12 e70 X5 x35i (Mrs), 95 e34 525i (Daughter 2), 01 e46 325Ci vert (Daughter 1)
Member
did the old block have cracks?
1966 Porsche 911
1966 FORD GT40 MK2
1967 Alfa Sprint GT
1968 Ford Mustang Coupe
1968 Chevy C10
1970 Alfa 1300 GT Junior
1972 Alfa 2000 GTV
1974 Alfa 2000 GTV
1978 Porsche 911 SC Targa
1980 Mazda 626 Rotary Turbo
1981 Mercedes 300GD
1986 Mercedes 190E 2.3 16
1987 Mercedes 190E 2.3 16
1988 BMW 735i 5 Speed
1989 BMW M3 BRG
1989 BMW 325IX
1991 BMW 850i
1991 Range Rover 2 Door VM Diesel.
1993 BMW M5
1995 Porsche 911 C2
1996 BMW M3
2001 BMW M5
2002 Porsche 911 Carrera 4S
2002 Ford F150 5 Speed 4x4 Reg Cab Shorty
2002 Honda Insight 5 speed
2005 BMW M3
2008 BMW M5
2012 BMW X5 Diesel
2017 Ford F150 Platinum Supercrew
Member
To address both questions: If I looked for another block, it would be the third one I'd disassemble. I'd rather take my chances with this one crack, assuming the shop says it can be fixed. The original engine had been overheated at some point, the head gaskets had been changed as well, and the mechanic who did that job helicoiled two of the head bolt threads in the block for some reason. I don't want to deal with that engine, at least not yet. I don't think the original block had cracks, but I didn't pay too much attention once I saw its condition.
I agree. I hope the shop I take it to does it well. Depending on what the repair looks like, I may add some RTV sealant to the area. Not sure what to use on the two new stud threads for the valley pan, to prevent leakage from the bottom of the hole. Maybe some teflon tape?
Last edited by atakordie; 03-26-2015 at 12:15 PM.
Member
id say you put them side by side, idk much about such precision work, but in time if this crack causes trouble, you wont be happy, you've put alot of effort on this. taking both the blocks to the engine/machine shop wud be a good idea, so they can tell you which one is better?
1966 Porsche 911
1966 FORD GT40 MK2
1967 Alfa Sprint GT
1968 Ford Mustang Coupe
1968 Chevy C10
1970 Alfa 1300 GT Junior
1972 Alfa 2000 GTV
1974 Alfa 2000 GTV
1978 Porsche 911 SC Targa
1980 Mazda 626 Rotary Turbo
1981 Mercedes 300GD
1986 Mercedes 190E 2.3 16
1987 Mercedes 190E 2.3 16
1988 BMW 735i 5 Speed
1989 BMW M3 BRG
1989 BMW 325IX
1991 BMW 850i
1991 Range Rover 2 Door VM Diesel.
1993 BMW M5
1995 Porsche 911 C2
1996 BMW M3
2001 BMW M5
2002 Porsche 911 Carrera 4S
2002 Ford F150 5 Speed 4x4 Reg Cab Shorty
2002 Honda Insight 5 speed
2005 BMW M3
2008 BMW M5
2012 BMW X5 Diesel
2017 Ford F150 Platinum Supercrew
Member
No, i'm talking about transmission valve body. Upper piece can crack. In your foto i can see just center plate and both lower pieces, but no upper.
[[
Last edited by BMWpower7; 03-27-2015 at 11:38 AM.
Member
Wow, I didn't know that was a possibility. I didn't check for cracks while it was out, but I don't really see a problem from the picture I have of the area.
I have dropped off the engine block at a machine shop for bolt extraction and crack repair (welding). The first shop I took it to did not seem confident enough to do the job, but I was referred to a shop that had a larger milling machine to fit the block. They said they could true up the block to the machine only if I removed the upper oil pan and if they were able to shore up the bottom (since the crankshaft is still in place, which protrudes below the level of the upper pan gasket).
The block, ready to be unloaded for repair:

Member
Your looks fine, but sometimes its hard to see the crack, when it just starts to crack. If you ever will have transmission issues, like delayed gear engagement in position D, gear engage with hit, also can occur emergency running. First check this piece.
Last edited by BMWpower7; 03-29-2015 at 06:39 AM.
Member
OK, update time...
Got the block back from the machine shop, they were able to get all of the bolts out without damaging the threads. I am so happy about this, as it is kinda scary (at least to me) to leave an engine with someone you don't know. At some point, they did scratch the block at the upper pan gasket surface, but some Hylomar blue should keep that from leaking. They also welded over the crack at the rear of the valley.
Meanwhile, I spent a little time opening up and cleaning the oil pump.
And I ordered new door handles and had them painted, since the old ones were making a lot of noise scratching against themselves due to the return spring bending the pot metal of the opening lever/hinge area. Looks like over time, the door handles of the E38 self-destruct.
Assembled the cylinder heads...
Tested the valves for leakage by filling the combustion chamber with water and waiting a few hours to see if the intake or exhaust ports got wet. No leakage. (many of them leaked a lot before I lapped the valves)
Finished cleaning the carbon off of the piston crowns and installed the valley pan cover and new rear main seal. Also checked the deck flatness with a precision straight edge, everything checked out under 0.0015"
Installed oil pump.

Member
do you think you will be able to get this car back before summer? looks like you got the hard part taken care of.
1966 Porsche 911
1966 FORD GT40 MK2
1967 Alfa Sprint GT
1968 Ford Mustang Coupe
1968 Chevy C10
1970 Alfa 1300 GT Junior
1972 Alfa 2000 GTV
1974 Alfa 2000 GTV
1978 Porsche 911 SC Targa
1980 Mazda 626 Rotary Turbo
1981 Mercedes 300GD
1986 Mercedes 190E 2.3 16
1987 Mercedes 190E 2.3 16
1988 BMW 735i 5 Speed
1989 BMW M3 BRG
1989 BMW 325IX
1991 BMW 850i
1991 Range Rover 2 Door VM Diesel.
1993 BMW M5
1995 Porsche 911 C2
1996 BMW M3
2001 BMW M5
2002 Porsche 911 Carrera 4S
2002 Ford F150 5 Speed 4x4 Reg Cab Shorty
2002 Honda Insight 5 speed
2005 BMW M3
2008 BMW M5
2012 BMW X5 Diesel
2017 Ford F150 Platinum Supercrew
Member
Wow a lot of work
Member
Yeah, I'm shooting for May as the month to get it drivable (provided the engine and transmission works out fine). I've just sent my fuel injectors to be cleaned and flow tested, so I'll have to get it started soon so as not to risk a cleaned injector sticking.
Yeah, I never would have thought it would take this long though. I've enjoyed most of it. Lots to learn.
Additional video of the engine block with the heads removed:
Member
once you get it cleaned up, make sure you check the injector seals ( not the return lines ) it usually leaks from the top of the injector, i have been unfortunate enough to have 1, 3 and 4th injector leaking on the drivers side, really badly. so i decided to buy 12 new injectors for $916. when i first got the car, i thought i stole it for $2250 Lol. But i Drove it yesterday with 16" basket weaves, IT IS SO COMFORTABLE! it just floats Lol
One question, did you take out the front shocks? what goes wrong if the rubber shim at the bottom of the spring disintegrates?
1966 Porsche 911
1966 FORD GT40 MK2
1967 Alfa Sprint GT
1968 Ford Mustang Coupe
1968 Chevy C10
1970 Alfa 1300 GT Junior
1972 Alfa 2000 GTV
1974 Alfa 2000 GTV
1978 Porsche 911 SC Targa
1980 Mazda 626 Rotary Turbo
1981 Mercedes 300GD
1986 Mercedes 190E 2.3 16
1987 Mercedes 190E 2.3 16
1988 BMW 735i 5 Speed
1989 BMW M3 BRG
1989 BMW 325IX
1991 BMW 850i
1991 Range Rover 2 Door VM Diesel.
1993 BMW M5
1995 Porsche 911 C2
1996 BMW M3
2001 BMW M5
2002 Porsche 911 Carrera 4S
2002 Ford F150 5 Speed 4x4 Reg Cab Shorty
2002 Honda Insight 5 speed
2005 BMW M3
2008 BMW M5
2012 BMW X5 Diesel
2017 Ford F150 Platinum Supercrew
Member
Thanks for the heads up, I wouldn't want a leak there after all this! I thought about new injectors, but the shop I sent them to has a good reputation and will replace all the o-rings and stuff after they ultrasonically clean them. I hope that will keep any leaks at bay.
I did replace the front struts. If the rubber mount is bad, I think you might start to get a metal-on-metal sound when going over bumps. Your alignment will probably suffer a little as well. The suspension will still function, but not ideally. I will say, if you fix it yourself, you'll probably want to find a spring compressor that is the "fork" style, not the simple type that AutoZone rents out. This is because the spring profile is shaped like this: () not like this: || The straight threaded rod spring compressors can't reach around the wider center section of the spring.
Southpaw
Nice work!!!
Been there- done that!!! And I applaud you!!!
Here's a VERY good write up- if you haven't seen it http://bmwe32.masscom.net/sean750/en...0rebuild_1.htm
DSCN4590 by richardhayes454, on Flickr
My build-http://stingrayv12.com/home.html
Member
Nice work. Its takes some gusto to dive that far into a V12. Keep up the good work and the progress reports.
"**if you suck at driving, it certainly could put you into a curb. Don't suck."
Member
Well, when tightening the head bolts in sequence (30 N-m, 60˚, 60˚) I have run into a potential issue that I want to run by anyone listening here. I used a 3/8" Snap-on Techangle torque wrench to tackle this job, which is an electronic wrench for measuring either torque or angle. My procedure was to coat the head bolt washer top and bottom with ARP torquing compound, install finger tight, then do the torque + angle sequence (following TIS). I did not coat the threads of the bolts with the torquing compound. My issue is that on several of the bolts, when using the angle feature of the wrench, I encountered "slippage" of the fastener during the 60˚ turn...meaning the fastener seemed to break free for 5-10˚ or so (turning rapidly), then "catch" and continue turning at the previous rate. I don't really know how better to describe it, but if you know what I'm talking about, great. Anyway, I don't know if the torque wrench was able to "keep up" during these slipping events in order to accurately measure the angle. FYI, The instrument uses a piezo-electric gyroscope to measure angular movement of the wrench.
Unfortunately, I didn't mark the fastener to see if it actually turned 60˚, not thinking I'd run into any issues. In hindsight I guess I should have used a physical torque angle gauge instead. The torque wrench gives feedback after torquing to the specified angle (whether or not the angle was accurate, I don't know) and it was showing a range of final torque from as low as 63.7Nm up to 75.0Nm on Bank 1 and 65.7Nm - 74.2Nm on Bank 2 after the second 60˚ pass. I am aware that the goal is not to necessarily have all the final torque measurements be the same, but instead to have all the 2 angular turns be precise for torque-to-yield bolts... but I can't help think that the range of final torque values I have is too great or that the wrench didn't measure accurately enough if a fastener jerked during tightening. Anyone know if I'm okay here?
Member
I've experianced what your describing before. This is one of the reasons i hate head bolts with an angle torque spec. Does TIS have any reccomendations about coating the thread bolts with oil or a torquing compound? Did you run a tap town the bolts holes in the cylinder block and clean out the threads? I would think either one of two things happened: the head bolts stretched during the tightening process just like they are designed to do and that was the tight-loose-tight feeling you got when torquing, or the threads in the block gave way.
I did a HG job on a northstar V8 where half of the head bolts did this same thing, thats after i heli-coiled all the threads in the block. I was really nervous about that job, but i have to assume it was bolt stretch, since the caddy ran for years after with no issues.
"**if you suck at driving, it certainly could put you into a curb. Don't suck."
Member
Why didn't you lube the head bolts? No wonder you got binding.
Go ahead and bite. Plenty for everyone.
Member
I was kind of hinting at that...
"**if you suck at driving, it certainly could put you into a curb. Don't suck."
Member
Thanks for the input guys.
Yes, I cleaned out the head bolt bores in the block very well. Cleaned them with brake cleaner and a thread chaser as well as vacuuming out using a straw. TIS says not to wash off the "coating" from the cylinder bolts. I didn't want to add lube to the bolt threads because I didn't know if BMW meant for the coating to be made for creating the proper head bolt-block thread friction or not. So, I only lubed the top end of the bolt on both sides of the washer where it contacts the cylinder head and the fastener's head. The binding I experienced didn't seem to be threads giving way, but who can know unless I take it back apart. All the bolts kept getting tighter until I hit 60˚ (or thereabouts).
I am contemplating doing a bench test with the torque wrench by torquing quickly on a spare bolt somewhere while having an angle gauge attached as well to see how accurate the wrench is when I recreate the conditions I encountered. Otherwise, I think I only have 2 options: finish engine assembly and run it, or take the heads off and replace the gaskets and bolts, using torquing compound this time.
Last edited by atakordie; 05-06-2015 at 08:46 PM.
Member
You weren't stripping threads out of the block, you were experiencing binding because you didn't lube the bolt threads. You really should have done that.
Go ahead and bite. Plenty for everyone.
 Posting Permissions


 Reply With Quote


Bookmarks